MMDetection3D是一个基于PyTorch的目标检测开源工具箱, 下一代面向3D检测的平台.
✨本文提供了一套完整的基于Docker的目标检测研究环境搭建思路,对官方教程进行了一定的修改和补充。同时随文提供SSH和Jupyter server实践,均为可用状态,提供了可靠资料给小伙伴们探索。
注:官方docker适合运行框架内的模型,本文的修改的docker适合对模型进行修改和创新,对使用者的要求略高。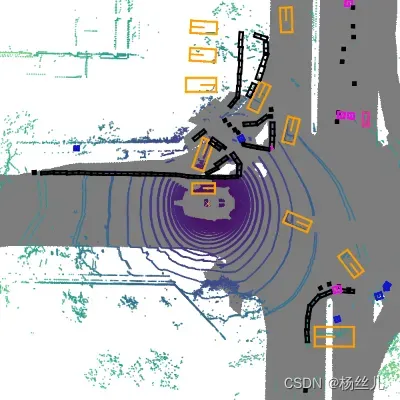
整个过程
1. 下载需要的资源
   1. 下载 Kitti 数据集
   2. 下载 MMDetection3D 代码
   3. 下载需要的模型参数
2. 制作开发环境
   1. 按说明将预训练模型参数和数据放到相应路径下
   2. 编辑 Dockerfile
   3. 制作 Docker 镜像
   4. 创建 Docker 容器
3. 开始使用
x. 框架解析
官方文档:MMDetection3D
1.下载所需资源
1. 下载 Kitti 数据集
官方网址:3D Object Detection Evaluation 2017。
参见博文:KITTI数据集下载及解析,内附百度云盘链接。
[外链图片转存失败,源站可能有防盗链机制,建议将图片保存下来直接上传(img-brppkgeE-1647775714669)(https://image.discover304.top/blog-img/s12212503202022-2022320122126.png)]
2. 下载 MMDetection3D 代码

官方代码仓库:https://github.com/open-mmlab/mmdetection3d
使用 git 下载:
git clone https://github.com/open-mmlab/mmdetection3d.git
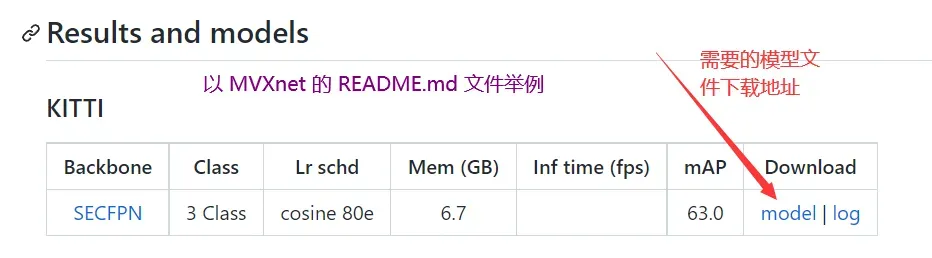
3. 下载需要的模型参数
在mmdetection3d/configs/文件夹中找到您需要的模型。模型文件夹README.md中有模型参数下载链接。
2.创建开发环境
1. 按说明将预训练模型参数和数据放到相应路径下
a. 模型预训练参数
将下载好的.pth文件放到mmdetection3d/checkpoints文件夹中。
b. 数据集
官方对数据集预处理的文档:3D 目标检测 KITTI 数据集,流程如下:
解压所有 Kitti 数据集,并将文件按如下方式组织:
mmdetection3d
├── data
|   ├── kitti
|   |   ├── ImageSets
|   |   ├── testing
|   │   │   ├── calib
|   │   │   ├── image_2
|   │   │   ├── velodyne
|   |   ├── training
|   │   │   ├── calib
|   │   │   ├── image_2
|   │   │   ├── velodyne
|   │   │   ├── label_2
2. 编辑 Dockerfile
官方提供的 Dockerfile 依然会有问题,因为我们进入 Dockerfile 进行一些修改。Dockerfile 的路径是mmdetection3d/docker/Dockerfile。
先放最终 Dockerfile 修改版本:
ARG PYTORCH="1.6.0"
ARG CUDA="10.1"
ARG CUDNN="7"

FROM pytorch/pytorch:${PYTORCH}-cuda${CUDA}-cudnn${CUDNN}-devel

ENV TORCH_CUDA_ARCH_LIST="6.0 6.1 7.0+PTX"
ENV TORCH_NVCC_FLAGS="-Xfatbin -compress-all"
ENV CMAKE_PREFIX_PATH="$(dirname $(which conda))/../"

#更换国内源文件
RUN apt-get update\
    && apt install ca-certificates
COPY ./sources.list /etc/apt/sources.list

RUN apt-get update && apt-get install -y ffmpeg libsm6 libxext6 git ninja-build libglib2.0-0 libsm6 libxrender-dev libxext6 \
    && apt-get clean \
    && rm -rf /var/lib/apt/lists/*

# Install MMCV, MMDetection and MMSegmentation
RUN pip install "mmcv-full>=1.3.17, <=1.5.0" -f https://download.openmmlab.com/mmcv/dist/cu101/torch1.6.0/index.html
RUN pip install "mmdet>=2.19.0, <=3.0.0"
RUN pip install "mmsegmentation>=0.20.0, <=1.0.0"

# # Install MMDetection3D
# RUN conda clean --all
# ENV FORCE_CUDA="1"
# RUN pip install "mmdet3d==v1.0.0rc0"

WORKDIR /mmdetection3d

#安装Open-SSH
RUN apt-get update \
    && echo "#!/bin/sh\nexit 0" > /usr/sbin/policy-rc.d \
    && DEBIAN_FRONTEND="noninteractive" apt-get install -y openssh-server

#设置用于ssh连接的root密码
RUN echo 'root:<root用户的密码>'|chpasswd
RUN mkdir -p /var/run/sshd

#允许root连接
RUN echo "PermitRootLogin yes" >> /etc/ssh/sshd_config

# 开放 22 端口
EXPOSE 22
CMD ["/usr/sbin/sshd", "-D"]
在mmdetection3d/docker/文件夹中新建一个文件sources.list,内容如下:
# 清华源
# 默认注释了源码镜像以提高 apt update 速度,如有需要可自行取消注释
deb https://mirrors.tuna.tsinghua.edu.cn/ubuntu/ focal main restricted universe multiverse
# deb-src https://mirrors.tuna.tsinghua.edu.cn/ubuntu/ focal main restricted universe multiverse
deb https://mirrors.tuna.tsinghua.edu.cn/ubuntu/ focal-updates main restricted universe multiverse
# deb-src https://mirrors.tuna.tsinghua.edu.cn/ubuntu/ focal-updates main restricted universe multiverse
deb https://mirrors.tuna.tsinghua.edu.cn/ubuntu/ focal-backports main restricted universe multiverse
# deb-src https://mirrors.tuna.tsinghua.edu.cn/ubuntu/ focal-backports main restricted universe multiverse
deb https://mirrors.tuna.tsinghua.edu.cn/ubuntu/ focal-security main restricted universe multiverse
# deb-src https://mirrors.tuna.tsinghua.edu.cn/ubuntu/ focal-security main restricted universe multiverse

# 预发布软件源,不建议启用
# deb https://mirrors.tuna.tsinghua.edu.cn/ubuntu/ focal-proposed main restricted universe multiverse
# deb-src https://mirrors.tuna.tsinghua.edu.cn/ubuntu/ focal-proposed main restricted universe multiverse
a. 硬件驱动版本
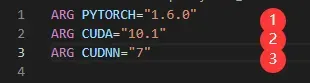
根据平台的硬件配置,到Nvidia 官网寻找合适的 cuda 和 cudnn 的版本,然后到Pytorch 的官网确定 Pytorch 的版本号。不需要下载到本地,按照修改下面的位置为对应的版本即可。
b. 软件依赖版本

原先在 Dockerfile 中提供的版本号稍微陈旧了些,按照原版制作出来的环境会有很多的报错,所以我们根据官方给出的版本号配置进行修改。
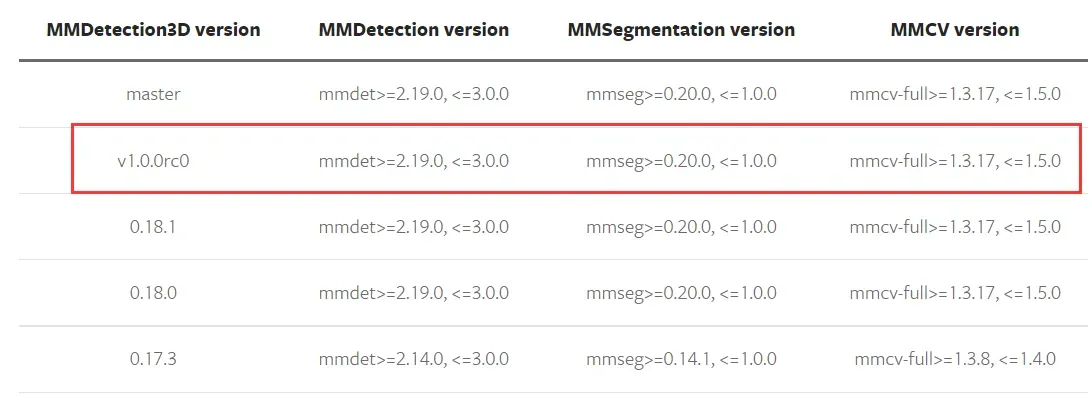
修改如下:
RUN pip install "mmcv-full>=1.3.17, <=1.5.0" -f https://download.openmmlab.com/mmcv/dist/cu101/torch1.6.0/index.html
RUN pip install "mmdet>=2.19.0, <=3.0.0"
RUN pip install "mmsegmentation>=0.20.0, <=1.0.0"
# RUN pip install "mmdet3d==v1.0.0rc0"
需要注意的是 mmcv-full 对不同的 cuda 和 pytorch 的版本有对应的支持,因此必须添加 -f 参数,参数链接的格式为:https://download.openmmlab.com/mmcv/dist/cu<版本号>/torch<版本号>/index.html,例如:https://download.openmmlab.com/mmcv/dist/cu101/torch1.6.0/index.html。
c. 修改国内镜像源
参考:用Dockerfile创建一个具有ssh服务的基础Ubuntu镜像
参考:ubuntu20.04换清华源后不能更新、https更新失败
d. 安装 ssh 并添加 ssh 配置命令
同参考:用Dockerfile创建一个具有ssh服务的基础Ubuntu镜像
3. 制作 Docker 镜像
在mmdetection3d/目录中执行:
docker build -t mmdetection3d docker/
因为 Docker 的默认镜像源在国外,速度堪忧,所以需要换源。有需要的小伙伴可以参考以下链接进行操作,这里就不展开说明了。
- Docker Desktop 修改国内镜像:Docker 国内镜像
- Docker 配置国内镜像源不起作用解决办法:修改dns(114.114.114.114) 。参考:docker 配置国内镜像源不起作用
4. 创建 Docker 容器
基于生成的镜像创建名为mm3ddocker 容器:
docker run --name mm3d --gpus all --shm-size=8g -p 2022:22 -v <到 mmdetection3d 的绝对路径>:/mmdetection3d -d mmdetection3d
这里,我们设置了端口映射和文件映射,宿主机端口2022映射 Docker 内部端口22,宿主机文件夹mmdetection3d映射Docker 内部文件夹mmdetection3d。接下来我们就可是使用端口2022与 Docker ssh 通信,并可以同步 Docker 和宿主机mmdetection3d文件夹内的变化。
需要注意的是,这里的文件夹的映射关系一旦确定,就不能再改变主机所在文件夹的路径。
3. 入门
启动我们的容器:docker start mm3d。
在容器中启动一个终端:docker exec -it mm3d bash。
在mmdetection3d目录下执行:pip install -v -e .安装 mmdet3d。
示例:使用预训练 MVXNET 模型进行多模态目标检测。
python
    demo/multi_modality_demo.py
        ${PCD_FILE}
        ${IMAGE_FILE}
        ${ANNOTATION_FILE}
        ${CONFIG_FILE}
        ${CHECKPOINT_FILE}
        [--device ${GPU_ID}]
        [--score-thr ${SCORE_THR}]
        [--out-dir ${OUT_DIR}]
        [--show]

python \
    demo/multi_modality_demo.py \
        demo/data/kitti/kitti_000008.bin \
        demo/data/kitti/kitti_000008.png \
        demo/data/kitti/kitti_000008_infos.pkl \
        configs/mvxnet/dv_mvx-fpn_second_secfpn_adamw_2x8_80e_kitti-3d-3class.py \
        checkpoints/dv_mvx-fpn_second_secfpn_adamw_2x8_80e_kitti-3d-3class_20200621_003904-10140f2d.pth\
        --out-dir assets/
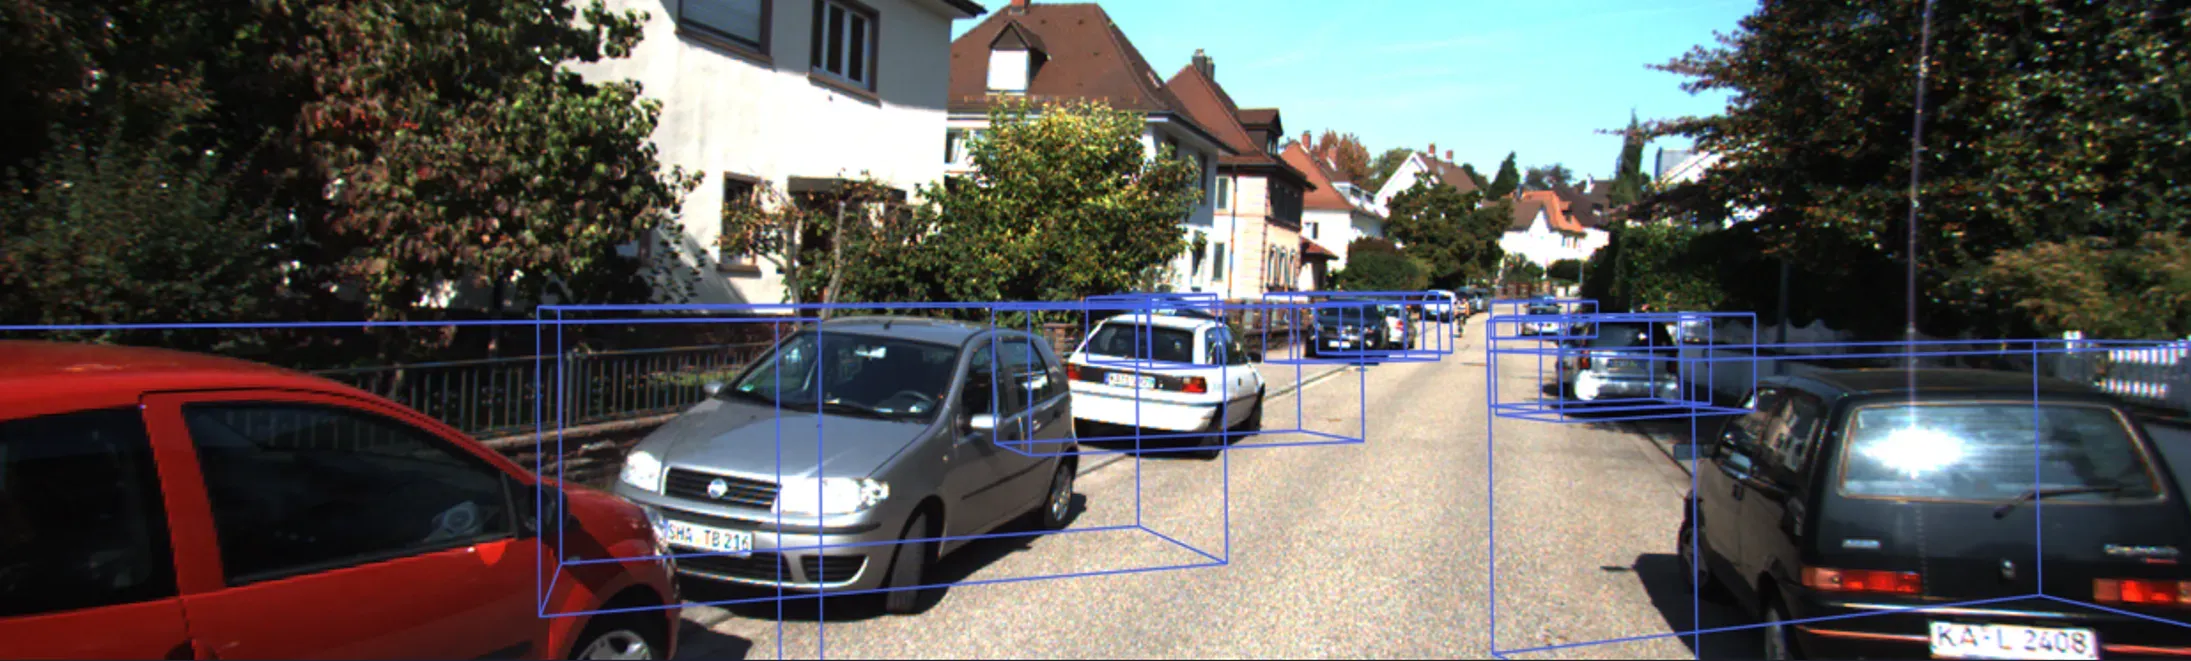
预测结果在mmdetection3d\assets\kitti_000008文件夹中,结果如图:
补充
下一步是准备数据集并使用以下代码处理数据集:
mkdir ./data/kitti/ && mkdir ./data/kitti/ImageSets

# Download data split
wget -c  https://raw.githubusercontent.com/traveller59/second.pytorch/master/second/data/ImageSets/test.txt --no-check-certificate --content-disposition -O ./data/kitti/ImageSets/test.txt
wget -c  https://raw.githubusercontent.com/traveller59/second.pytorch/master/second/data/ImageSets/train.txt --no-check-certificate --content-disposition -O ./data/kitti/ImageSets/train.txt
wget -c  https://raw.githubusercontent.com/traveller59/second.pytorch/master/second/data/ImageSets/val.txt --no-check-certificate --content-disposition -O ./data/kitti/ImageSets/val.txt
wget -c  https://raw.githubusercontent.com/traveller59/second.pytorch/master/second/data/ImageSets/trainval.txt --no-check-certificate --content-disposition -O ./data/kitti/ImageSets/trainval.txt

python tools/create_data.py kitti --root-path ./data/kitti --out-dir ./data/kitti --extra-tag kitti
参考:3D 目标检测 KITTI 数据集
接下来是可选内容,参考:Docker – jupyter notebook使用方法
# 更新软件列表
apt update
# 卸载jupyter
pip uninstall jupyter
# 安装 jupyter lab:
pip install jupyterlab
# 安装vim编辑器
apt install vim
# 生成 jupyter notebook 配置文件
jupyter notebook --generate-config
# 编辑配置文件
vim ~/.jupyter/jupyter_notebook_config.py
修改以下内容以删除注释格式。
c.NotebookApp.allow_root = True
c.NotebookApp.default_url = '/lab'
c.NotebookApp.ip = '*'
c.NotebookApp.open_browser = False
直接在容器中启动 jupyter lab:
docker exec -it jupyter lab
注:因为没有设置密码,所以需要从终端给出的带 token 的链接打开。
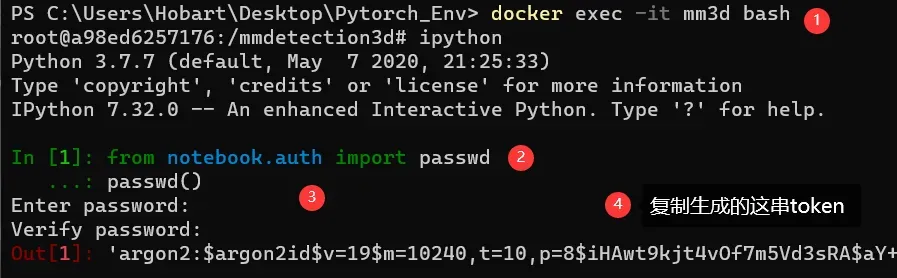
在添加jupyter密码时使用。在命令行里输入ipyton,再输入:
from notebook.auth import passwd
passwd()
输入后设置密码,生成秘钥。结果如下:
🍀破碎的想法🍀
Hello米娜桑,这里是英国留学中的杨丝儿。我的博客的关键词集中在编程、算法、机器人、人工智能、数学等等,点个关注吧,持续高质量输出中。
🌸唠嗑QQ群:兔叽的魔术工房(942848525)
⭐️B站账号:YangSierCode000(活跃于知识区生活区和动画区)
文章出处登录后可见!