提示:文章写完后,可以自动生成目录。生成方法请参考右侧帮助文档
前言
提示:这里可以添加本文要记录的大概内容:
在实际工程中,有时候我们使用python进行模型训练,但是训练好的模型需要写在芯片中,这个时候怎么弄呢?笔者在网上找了一下,没有发现可以将训练好的模型直接转化为我们需要的语言,比如C++。因此笔者自己动手写了相关代码,并且已经经过测试验证。这篇文章将做了一件事,将python训练好的决策树模型转化生成为C++代码,并且不需要手动写更多代码,需要自己配置好相关参数即可。
1.决策树模型
下面是对一个iris数据集进行相关实验:
代码显示如下
#-*- coding: utf-8 -*-
import matplotlib.pyplot as plt
from sklearn import datasets
from sklearn.tree import DecisionTreeClassifier
from sklearn.model_selection import train_test_split
from IPython.display import Image
from sklearn import tree
import pydotplus

# 仍然使用自带的iris数据
iris = datasets.load_iris()
X = iris.data
y = iris.target

# 总训练集:验证集 = 8:2
X_train, X_test = train_test_split(X, test_size=0.2, random_state=28)
y_train, y_test = train_test_split(y, test_size=0.2, random_state=28)

# 训练模型,限制树的最大深度4
clf = DecisionTreeClassifier(max_depth=4)

#拟合模型
clf = clf.fit(X_train, y_train)
score = clf.score(X_test,y_test)
print(score)   #测试结果

# 混淆矩阵
from sklearn.metrics import confusion_matrix
test_predict = clf.predict(X_test)
cm = confusion_matrix(y_test,test_predict)
print(cm)

# 决策树可视化
dot_data = tree.export_graphviz(clf, out_file=None,
                         feature_names=iris.feature_names,
                         class_names=iris.target_names,
                         filled=True, rounded=True,
                         special_characters=True)
graph = pydotplus.graph_from_dot_data(dot_data)
# 使用ipython的终端jupyter notebook显示。
Image(graph.create_png())
# 如果没有ipython的jupyter notebook,可以把此图写到pdf文件里,在pdf文件里查看。
# graph.write_pdf("tree.pdf")
打印结果:
0.9666666666666667
[[ 9 0 0]
[ 0 10 1]
[ 0 0 10]]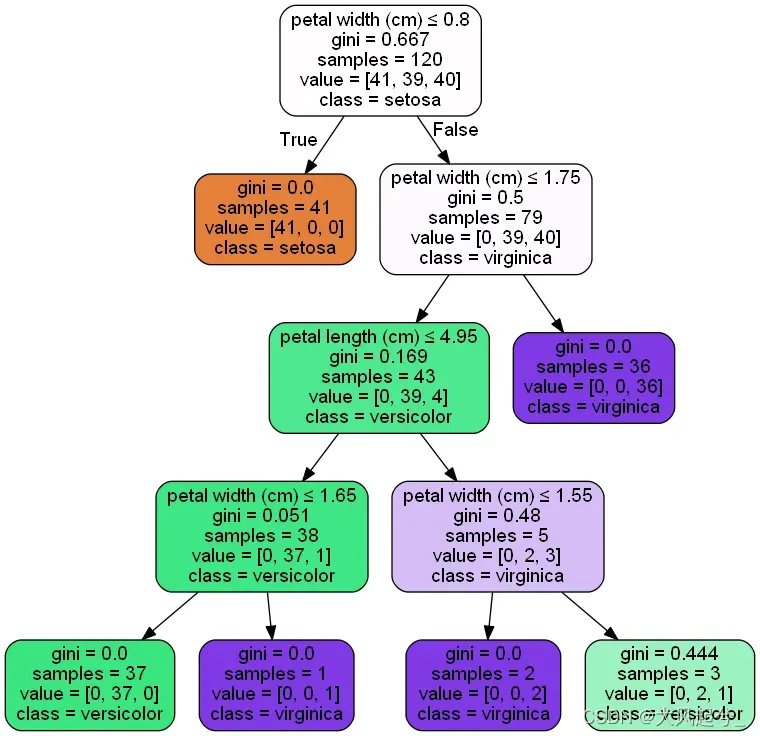
注意:这里有两个参数列表需要注意,生成我们的代码时需要修改这两个参数! !
print(iris.feature_names)
print(iris.target_names)
这是特征名称和标签名称
[‘sepal length (cm)’, ‘sepal width (cm)’, ‘petal length (cm)’, ‘petal width (cm)’]
[‘setosa’ ‘versicolor’ ‘virginica’]
2. 分析决策树模型
1. 模型分解
上面代码中的dot_data,我们可以直接打印一下看看里面是什么内容。
print(dot_data)
digraph Tree {
node [shape=box, style="filled, rounded", color="black", fontname=helvetica] ;
edge [fontname=helvetica] ;
0 [label=<petal width (cm) ≤ 0.8<br/>gini = 0.667<br/>samples = 120<br/>value = [41, 39, 40]<br/>class = setosa>, fillcolor="#fffdfd"] ;
1 [label=<gini = 0.0<br/>samples = 41<br/>value = [41, 0, 0]<br/>class = setosa>, fillcolor="#e58139"] ;
0 -> 1 [labeldistance=2.5, labelangle=45, headlabel="True"] ;
2 [label=<petal width (cm) ≤ 1.75<br/>gini = 0.5<br/>samples = 79<br/>value = [0, 39, 40]<br/>class = virginica>, fillcolor="#fcfafe"] ;
0 -> 2 [labeldistance=2.5, labelangle=-45, headlabel="False"] ;
3 [label=<petal length (cm) ≤ 4.95<br/>gini = 0.169<br/>samples = 43<br/>value = [0, 39, 4]<br/>class = versicolor>, fillcolor="#4de88e"] ;
2 -> 3 ;
4 [label=<petal width (cm) ≤ 1.65<br/>gini = 0.051<br/>samples = 38<br/>value = [0, 37, 1]<br/>class = versicolor>, fillcolor="#3ee684"] ;
3 -> 4 ;
5 [label=<gini = 0.0<br/>samples = 37<br/>value = [0, 37, 0]<br/>class = versicolor>, fillcolor="#39e581"] ;
4 -> 5 ;
6 [label=<gini = 0.0<br/>samples = 1<br/>value = [0, 0, 1]<br/>class = virginica>, fillcolor="#8139e5"] ;
4 -> 6 ;
7 [label=<petal width (cm) ≤ 1.55<br/>gini = 0.48<br/>samples = 5<br/>value = [0, 2, 3]<br/>class = virginica>, fillcolor="#d5bdf6"] ;
3 -> 7 ;
8 [label=<gini = 0.0<br/>samples = 2<br/>value = [0, 0, 2]<br/>class = virginica>, fillcolor="#8139e5"] ;
7 -> 8 ;
9 [label=<gini = 0.444<br/>samples = 3<br/>value = [0, 2, 1]<br/>class = versicolor>, fillcolor="#9cf2c0"] ;
7 -> 9 ;
10 [label=<gini = 0.0<br/>samples = 36<br/>value = [0, 0, 36]<br/>class = virginica>, fillcolor="#8139e5"] ;
2 -> 10 ;
}
这是一个dot文件,可以生成决策树的可视化图片,上面已经有了。仔细观察可以发现,这里先是0节点,1节点,然后是0->1的指向,以此类推,就是一个决策树了。这里是一个深度的遍历过程,并且每一个节点上有对应的判决规则,以及节点的类别。注意没有特征时,时叶子节点,也就是要分类的节点。因此,构建一个决策二叉树是一个关键,其中有几个重要信息要从上面的dot内容解析出来:节点名,节点的判决规则,节点类型,是否是叶子节点。
根据上面的分析过程,先解析dot文件出有用的信息:
def decompose_dt_model(dot_data1):
# print(dot_data1.find('{'),dot_data1.find('}'))
start = dot_data1.find('{')
end = dot_data1.find('}')
dot = dot_data1[start+1:end]
# print(dot)
dot_list = []
for val in dot.split(' ;'):
dot_list.append(val.strip())
dot_list = dot_list[2:]
# print(dot_list)
return dot_list
def dt_model_list(dot_list):
res = []
for val in dot_list:
# print(val)
if val.strip=='':
break
if val.find('->')!=-1:
node1,node2 = '',''
for c in val:
if c == ' ':
break
node1 += c
if val.find('[')!=-1:
for c in val[val.find('->')+2:]:
if c =='[':
break
node2 += c
else:
for c in val[val.find('->')+2:]:
node2 += c
node1,node2 = node1.strip(),node2.strip()
# print(node1,node2)
res.append([node1,node2])
elif val.find('[')!=-1:
node = ''
for c in val:
if c==' ':
break
node+=c
node = node.strip()
rule = ''
if val.find('=<gini')==-1:
feature_label = ''
for c in val[val.find('=<')+2:]:
if c==' ':
break
feature_label += c
the=''
for c in val[val.find('≤')+len('≤'):val.find('<br/>')]:
the+=c
rule = feature_label.strip()+'<='+the.strip()
tag = val[val.find('class = ')+len('class = ')]
res.append([node,rule,tag])
print(res)
return res
dot_list = decompose_dt_model(dot_data)
res = dt_model_list(dot_list)
下面是运行结果,列表中有3列的是节点(节点名,判决规则,标签),2列的是指向边(父节点名指向子节点名)。后面会根据这些结构化的数据进行树的构建以及代码生成。
[['0', 'petal<=0.8', 'setosa'], ['1', '', 'setosa'], ['0', '1'], ['2', 'petal<=1.75', 'virginica'], ['0', '2'], ['3', 'petal<=4.95', 'versicolor'], ['2', '3'], ['4', 'petal<=1.65', 'versicolor'], ['3', '4'], ['5', '', 'versicolor'], ['4', '5'], ['6', '', 'virginica'], ['4', '6'], ['7', 'petal<=1.55', 'virginica'], ['3', '7'], ['8', '', 'virginica'], ['7', '8'], ['9', '', 'versicolor'], ['7', '9'], ['10', '', 'virginica'], ['2', '10']]
2. 构建决策二叉树
根据提取上述列表信息,构建二叉树。为了便于构建,在树中定义了父节点。
class Tree_node:
    rule,tag = '',''
    def __init__(self,label=None,left=None,right=None,father=None):
        self.label = label
        self.left = left
        self.right = right
        self.father = father

root = Tree_node(res[0][0])
root.rule,root.tag = res[0][1],res[0][2]
def create_tree(root):
    node = root
    node_dict = {}
    for val in res:
        if len(val)==2:
            while node!=None and val[0]!=node.label:
                node = node.father
            new_node = Tree_node(val[1])
            new_node.rule,new_node.tag = node_dict[val[1]][0],node_dict[val[1]][1]
            if node.left==None:
                node.left = new_node
            else:
                node.right = new_node
            new_node.father = node
            node = new_node
        elif len(val)==3:
            node_dict[val[0]] = val[1:]
    return root

def print_tree(root):
    if root:
        isChild = False
        if root.left==None and root.right==None:
            isChild = True
        print(root.label,root.rule,root.tag,isChild)
        print_tree(root.left)
        print_tree(root.right)

root = create_tree(root)
print_tree(root)
运行结果,这个是前序打印,[节点名,规则(无空格),类型名,是否为叶子节点],如下图说明一棵二叉树已经构建成功,可以通过顺序打印。
前序遍历:
0 petal<=0.8 setosa False
1  setosa True
2 petal<=1.75 virginica False
3 petal<=4.95 versicolor False
4 petal<=1.65 versicolor False
5  versicolor True
6  virginica True
7 petal<=1.55 virginica False
8  virginica True
9  versicolor True
10  virginica True
中序遍历:
1  setosa True
0 petal<=0.8 setosa False
5  versicolor True
4 petal<=1.65 versicolor False
6  virginica True
3 petal<=4.95 versicolor False
8  virginica True
7 petal<=1.55 virginica False
9  versicolor True
2 petal<=1.75 virginica False
10  virginica True
3. 生成代码
3.1 生成python代码
生成代码时做了一个剪枝操作,将同一个父节点下都是相同类的,不再if-else操作,减少代码量。
def generate_dt_code(root,tab_val,code_file):
    if root.left==None and root.right==None:
#         print('{}res = {}'.format(' '*tab_val*4,root.tag))
        code_file.write('{}res = "{}"\n'.format(' '*tab_val*4,root.tag))
        return tab_val-1
    if prune_operation(root):
#         print('{}res = {}'.format(' '*tab_val*4,root.tag))
        code_file.write('{}res = "{}"\n'.format(' '*tab_val*4,root.tag))
        return tab_val-1
#     print('{}if {}:'.format(' '*tab_val*4,root.rule))
    code_file.write('{}if {}:\n'.format(' '*tab_val*4,root.rule))
    generate_dt_code(root.left,tab_val+1,code_file)
#     print('{}else:'.format(' '*tab_val*4))
    code_file.write('{}else:\n'.format(' '*tab_val*4))
    generate_dt_code(root.right,tab_val+1,code_file)

def prune_operation(root):    # 剪枝操作,去掉一些分支中的冗余代码
    if root==None:
        return True
    if root.left!=None and root.left.tag!=root.tag:
        return False
    if root.right!=None and root.right.tag!=root.tag:
        return False
    return prune_operation(root.left) and prune_operation(root.right)


def generate_dt_code_python(root,filepath):   # 生成python模型代码
    code_file = open(filepath,'w')
    code_file.write('def judge_model(val):\n    res = ""\n')
    generate_dt_code(root,1,code_file)
    code_file.write('    return res')
    code_file.close()

generate_dt_code_python(root,'geneCode.txt')
生成的结果在geneCode.txt文件中,也可以打开上面的print注释,直接打印输出。下面就是生成的代码:
def judge_model(val):
    res = ""
    if petal_width_cm<=0.8:
        res = "setosa"
    else:
        if petal_width_cm<=1.75:
            if petal_length_cm<=4.95:
                if petal_width_cm<=1.65:
                    res = "versicolor"
                else:
                    res = "virginica"
            else:
                if petal_width_cm<=1.55:
                    res = "virginica"
                else:
                    res = "versicolor"
        else:
            res = "virginica"
    return res
3.1 生成C++代码
def generate_code_cpp(root,tab_val,code_file):
    if root.left==None and root.right==None:
        code_file.write('{}res = "{}";\n'.format(' '*tab_val*4,root.tag))
        return tab_val-1
    if prune_operation(root):
        code_file.write('{}res = "{}";\n'.format(' '*tab_val*4,root.tag))
        return tab_val-1

    code_file.write('{}if({}){}\n'.format(' '*tab_val*4, root.rule, '{'))
    generate_code_cpp(root.left,tab_val+1,code_file)
    code_file.write('{}{}else{}\n'.format(' '*tab_val*4,'}','{'))
    generate_code_cpp(root.right,tab_val+1,code_file)
    code_file.write('{}{}\n'.format(' '*tab_val*4,'}'))

def prune_operation(root):    # 剪枝操作,去掉一些分支中的冗余代码
    if root==None:
        return True
    if root.left!=None and root.left.tag!=root.tag:
        return False
    if root.right!=None and root.right.tag!=root.tag:
        return False
    return prune_operation(root.left) and prune_operation(root.right)

def generate_dt_code_CPP(root,filepath):   # 生成C++模型代码
    code_file = open(filepath,'w')
    code_file.write('string TestDemo::judge(){\n    string res;\n')
    generate_code_cpp(root,1,code_file)
    code_file.write('    return res;\n')
    code_file.write('}')
    code_file.close()

generate_dt_code_CPP(root,'geneCode.txt')
生成代码结果:
string TestDemo::judge(){
    string res;
    if(petal_width_cm<=0.8){
        res = "setosa";
    }else{
        if(petal_width_cm<=1.75){
            if(petal_length_cm<=4.95){
                if(petal_width_cm<=1.65){
                    res = "versicolor";
                }else{
                    res = "virginica";
                }
            }else{
                if(petal_width_cm<=1.55){
                    res = "virginica";
                }else{
                    res = "versicolor";
                }
            }
        }else{
            res = "virginica";
        }
    }
    return res;
}
3. 扩展
3.1 验证
根据生成的代码,调整特征参数来测试模型:
def judge_model(val):
    petal_length_cm,petal_width_cm=val[2],val[3]  #这行代码需要根据特征顺序进行添加
    res = ""
    if petal_width_cm<=0.8:
        res = "setosa"
    else:
        if petal_width_cm<=1.75:
            if petal_length_cm<=4.95:
                if petal_width_cm<=1.65:
                    res = "versicolor"
                else:
                    res = "virginica"
            else:
                if petal_width_cm<=1.55:
                    res = "virginica"
                else:
                    res = "versicolor"
        else:
            res = "virginica"
    return res

def judge_class(data):
    res = []
    for val in data:
        label = judge_model(val)
        res.append(label)
    return res
混淆矩阵:按生成代码分类
test_predict_ = judge_class(X_test)
label_dict = {'setosa':0,'versicolor':1,'virginica':2}
test_predict = [label_dict[val] for val in test_predict_]
cm = confusion_matrix(y_test,test_predict)
print(cm)
结果:
[[ 9  0  0]
 [ 0 10  1]
 [ 0  0 10]]
混淆矩阵:根据模型的代码分类
from sklearn.metrics import confusion_matrix
test_predict = clf.predict(X_test)
cm = confusion_matrix(y_test,test_predict)
print(cm)
结果:
[[ 9  0  0]
 [ 0 10  1]
 [ 0  0 10]]
3.2 深层决策树
当决策树的深度比较大的时候,使用自动生成代码的方法会很爽。
下面是9层的决策树:
生成代码有700行: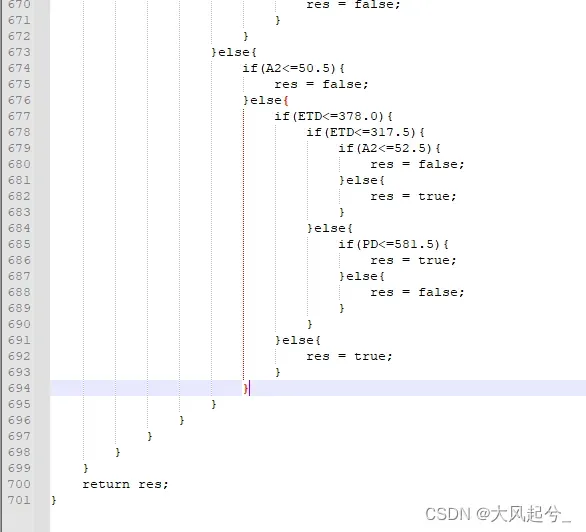
总结
至此已经完成决策树模型的C++迁移工作,代码中还有生成Python的算法,这个主要是便于验证。总体而言,上面的算法基本可以完成一些常用的工作内容,后面遇到更多问题时再更新。从开始将决策树模型迁移到C++代码上时,想通过可视化的决策树一步一步写if-then代码,将决策树的深度调为5是可以接受的。但是每次模型调整,又要重新写代码,并进行测试,写一遍就弃疗了T_T。分析了一下,觉得可以写成生成代码的算法,不用再去写模型的if-then代码了。>_<
文档中是以iris数据集进行实验,部分地方可能没有充分测试。自己的数据集和这个不太一样,所以可能会有所疏漏的地方。
引用
[1]决策树、随机森林结果可视化
文章出处登录后可见!