目录
1、数据处理模块搭建
这里需要根据自己的数据集进行选择合适的方法,这里就以图像分类作为一个例子来说明。
通常有两种方法:
(1)采用torchvision中的datasets.ImageFolder来读取图像,然后采用torch.utils.data.DataLoader加载;
Ps:这种情况一般是想要读取一自己在一个文件夹中的数据作为数据集
具体的形式如下:
dataset/
    cat/
        0.jpg
        1.jpg
    dog/
        0.jpg
        1.jpg

--------------------------
这种情况使用ImageFolder就比较方便(2)继承torch.utils.data.Dataset来实现用户自定义,然后采用torch.utils.data.DataLoader加载;
torch.utils.data.Dataset 是一个表示数据集的抽象类。任何自定义的数据集都需要继承这个类并覆写相关方法。

Pytorch提供两种数据集: Map式数据集 Iterable式数据集

对于Map式数据集处理方式:

重写getitem(self, index),len(self) 两个内建方法,用来表示从索引到样本的映射(Map).

当使用dataset[idx]命令时,可以在你的硬盘中读取你的数据集中第idx张图片以及其标签(如果有的话);len(dataset)则会返回这个数据集的容量。

上述参考:https://zhuanlan.zhihu.com/p/105507334
自定义模块可以参考:
class CustomDataset(torch.utils.data.Dataset):#需要继承torch.utils.data.Dataset
    def __init__(self):
        # TODO
        # 1. Initialize file path or list of file names.
        pass
    def __getitem__(self, index):
        # TODO
        # 1. Read one data from file (e.g. using numpy.fromfile, PIL.Image.open).
        # 2. Preprocess the data (e.g. torchvision.Transform).
        # 3. Return a data pair (e.g. image and label).
        # 这里需要注意的是,第一步:read one data,是一个data
        pass
    def __len__(self):
        # You should change 0 to the total size of your dataset.
        return 0
参考一个实例:
from torch.utils import data
import numpy as np
from PIL import Image

# 参考:https://zhuanlan.zhihu.com/p/105507334
class face_dataset(data.Dataset):
    def __init__(self):
        # 数据集的路径
        self.file_path = './data/faces/'
        # 对应的数据集和标签,这里是保存在txt文件中的,也有的是json文件,或者csv文件等
        # 根据自己的数据集情况而定
        f = open("final_train_tag_dict.txt","r")
        self.label_dict = eval(f.read())
        f.close()

    def __getitem__(self,index):
        """
            通过index返回对应的img和label
        """
        label = list(self.label_dict.values())[index-1]
        img_id = list(self.label_dict.keys())[index-1]
        img_path = self.file_path+str(img_id)+".jpg"
        img = np.array(Image.open(img_path))
        return img,label

    def __len__(self):
        # 返回整个数据集的数量
        return len(self.label_dict)
在这里我采用第一种形式,因为我采用的数据集是下面这种形式:

每个文件对应一个类别,如果你采用的数据集是给定了一个image_label.txt或者image_label.csv,则采用第二种数据处理方法比较方便;
第一种方法的实现代码如下:
from torch.utils.data import Dataset,DataLoader
from torchvision import transforms,datasets

# 1、Data augmentation
# https://pytorch.org/vision/stable/transforms.html
# 数据增强部分可根据自己的情况选择,可以参考官方代码
transforms_train = transforms.Compose([transforms.ToTensor(),
                                       transforms.ColorJitter(),
                                       transforms.Normalize((0.485, 0.456, 0.406),(0.229, 0.224, 0.225))])
# valid不需要数据增强
transforms_valid = transforms.Compose([transforms.ToTensor(),
                                       transforms.Normalize((0.485, 0.456, 0.406),(0.229, 0.224, 0.225))])


# 2、load dataset
ds_train = datasets.ImageFolder("../data/train/",transform=transforms_train,
                                target_transform=lambda t:torch.tensor([t]).float())
ds_valid = datasets.ImageFolder("../data/test/",transform=transforms_valid,
target_transform=lambda t:torch.tensor([t]).float())torchvision.datasets.ImageFolder(root: str, transform: Optional[Callable] = None, target_transform: Optional[Callable] = None, loader: Callable[[str], Any] = <function default_loader>, is_valid_file: Optional[Callable[[str], bool]] = None)
Parameters:

1、root (string) – Root directory path.->数据集地址

2、transform (callable, optional) – A function/transform that takes
in an PIL image and returns a transformed version. E.g, transforms.RandomCrop

3、target_transform (callable, optional) – A function/transform that
takes in the target and transforms it.主要是处理对应的图像标签

4、loader (callable, optional) – A function to load an image given
its path.

5、is_valid_file – A function that takes path of an Image file and
check if the file is a valid file (used to check of corrupt files)
检查数据集中图像是否损坏


Returns:通过:__getitem__(index: int) → 得到:Tuple[Any, Any]

1、(sample, target) where target is class_index of the target class.
经过ImageLoader之后的数据具体是什么格式?
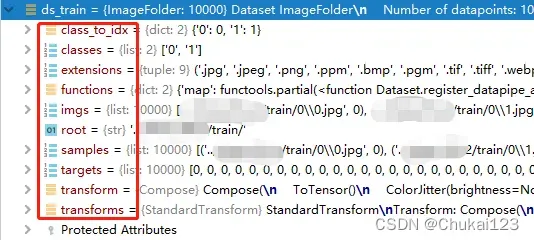
从上图可以看出返回的samples中是一个元组(图像的地址,图像的标签);
targets对应每张图像的标签,classes所有数据的类别,class_to_idx类别索引,extensions图像支持的扩张名等
# 查看数据集中的类别
print(ds_train)
print(ds_valid.classes)
# 每个类别对应的标签
print(ds_valid.class_to_idx)经过ImageLoader处理后,还需要经过DataLoader进一步处理:
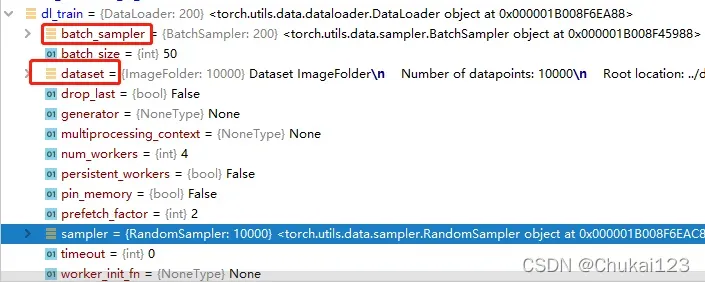
# 通过DataLoader加载ImageFolder
# 这里的num_workers为了避免出错,尽量设置为0
dl_train = DataLoader(ds_train,batch_size=50,shuffle=True,num_workers=0)
dl_valid = DataLoader(ds_valid,batch_size=50,shuffle=True,num_workers=0)
注意:这个num_workers如果设置为其他数字,刚开始可能没问题,但是后续会可能会出现问题,不妨设置为0;
官方文档:
介绍:
DataLoader.:Combines a dataset and a sampler, and provides an iterable over the given dataset.
包括一个数据集和一个采样器,并且提供一个给定数据集的可迭代对象;
The DataLoader supports both map-style and iterable-style datasets with single- or multi-process loading, customizing loading order and optional automatic batching (collation) and memory pinning.
DataLoader支持的格式比较多,本次采用的是map-style;
看一下经过DataLoader之后的数据形式:
查看一下数据集中的部分样本:
import matplotlib.pyplot as plt
plt.figure(figsize=(5,5))
for i in range(9):
    # ds_train[i]也可以
    img,label = ds_valid[i]
    # 图像是b*c*w*h->b*w*h*c
    img = img.permute(1,2,0)
    ax = plt.subplot(3,3,i+1)
    ax.imshow(img.numpy())
    ax.set_title("label = %d"%label.item(),fontsize=8)
    ax.set_xticks([])
    ax.set_yticks([])
plt.show()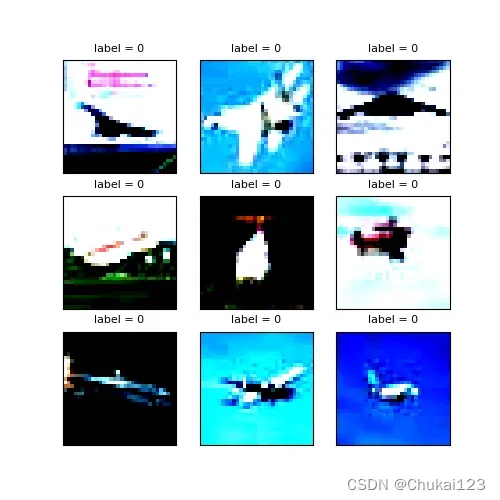
2、模型构建
(1)使用torch.nn.Sequential按层顺序构建模型;
(2)继承torch.nn.Module基类构建模型;
(3)继承torch.nn.Module基类构建并辅助应用模型容器(nn.Sequential,nn.ModuleList,nn.ModuleDict);
nn.Sequential案例
# Using Sequential to create a small model. When `model` is run,
# input will first be passed to `Conv2d(1,20,5)`. The output of
# `Conv2d(1,20,5)` will be used as the input to the first
# `ReLU`; the output of the first `ReLU` will become the input
# for `Conv2d(20,64,5)`. Finally, the output of
# `Conv2d(20,64,5)` will be used as input to the second `ReLU`
model = nn.Sequential(
          nn.Conv2d(1,20,5),
          nn.ReLU(),
          nn.Conv2d(20,64,5),
          nn.ReLU()
        )

# Using Sequential with OrderedDict. This is functionally the
# same as the above code
model = nn.Sequential(OrderedDict([
          ('conv1', nn.Conv2d(1,20,5)),
          ('relu1', nn.ReLU()),
          ('conv2', nn.Conv2d(20,64,5)),
          ('relu2', nn.ReLU())
        ]))
而对于nn.Module通过官方的一个example:
它是所有神经网络模块的基类,自己定义的模型应该继承这个类。
同时该模块还可以包含其他模块,允许将它们嵌套在树结构中。
import torch.nn as nn
import torch.nn.functional as F

class Model(nn.Module):
    def __init__(self):
        super(Model, self).__init__()
        self.conv1 = nn.Conv2d(1, 20, 5)
        self.conv2 = nn.Conv2d(20, 20, 5)

    def forward(self, x):
        x = F.relu(self.conv1(x))
        return F.relu(self.conv2(x))
本文采用继承nn.Module创建model
class Image_Net(nn.Module):
    def __init__(self):
        super(Image_Net,self).__init__()
        self.conv1 = nn.Conv2d(in_channels=3,out_channels=32,kernel_size=3)
        self.pool = nn.MaxPool2d(kernel_size=2,stride=2)
        self.conv2 = nn.Conv2d(in_channels=32,out_channels=64,kernel_size=5)
        self.dropout = nn.Dropout2d(p=0.2)
        self.adaptive_pool = nn.AdaptiveMaxPool2d((1,1))
        self.flatten = nn.Flatten()
        self.linear1 = nn.Linear(64,32)
        self.relu = nn.ReLU()
        self.linear2 = nn.Linear(32,1)
        self.sigmoid = nn.Sigmoid()

    def forward(self,x):
        x = self.conv1(x)
        x = self.pool(x)
        x = self.conv2(x)
        x = self.dropout(x)
        x = self.adaptive_pool(x)
        x = self.flatten(x)
        x = self.linear1(x)
        x = self.relu(x)
        x = self.linear2(x)
        y = self.sigmoid(x)
        return y

# 实例化
net = Image_Net()
print(net)
3、开始训练
首先设置一些训练参数
import pandas as pd
# 其他指标可以查看sklearn.metrics
from sklearn.metrics import roc_auc_score
model = Image_Net()
model.optimizer = torch.optim.SGD(model.parameters(),lr=0.01)
model.loss_func = torch.nn.BCELoss()
model.metric_func = lambda y_pred,y_true:roc_auc_score(y_true.data.numpy(),y_pred.data.numpy())
model.metric_name = "auc"
下面采用函数式训练循环
首先创建train模块
def train(model,features,labels):
    """
    :param model:
    :param features:
    :param labels:
    :return: loss & metric
    """
    # 训练模式,dropout层发生作用
    model.train()
    # 梯度清零
    model.optimizer.zero_grad()

    # 正向传播求损失
    predictions = model(features)
    # 计算损失
    loss = model.loss_func(predictions,labels)
    # metric计算,这里选择的是AUC
    metric = model.metric_func(predictions,labels)

    # 反向传播求梯度
    loss.backward()
    model.optimizer.step()
return loss.item(),metric.item()然后创建valid模块:
def valid(model,features,labels):
    """
    因为只是验证所以不对模型的参数进行更新,只需要输出对应的结果就行
    :param model:
    :param features:
    :param labels:
    :return: loss & metric
    """
    # 预测模式,dropout层不发生作用
    model.eval()
    predictions = model(features)
    loss = model.loss_func(predictions,labels)
    metric = model.metric_func(predictions,labels)
    return loss.item(),metric.item()
设置GPU
device = torch.device("cuda:0" if torch.cuda.is_available() else "cpu")
model.to(device) # 移动模型到cuda
完整的训练代码如下:
import datetime
def train_model(model, epochs, dl_train, dl_valid, log_step_freq):
    metric_name = model.metric_name
    # 用于记录训练过程中的loss和metric
    dfhistory = pd.DataFrame(columns=["epoch", "loss", metric_name, "val_loss", "val_" + metric_name])
    print("Start Training...")
    nowtime = datetime.datetime.now().strftime('%Y-%m-%d %H:%M:%S')
    print("==========" * 8 + "%s" % nowtime)

    for epoch in range(1, epochs + 1):

        # 1,训练循环-------------------------------------------------
        loss_sum = 0.0
        metric_sum = 0.0
        step = 1

        for step, (features, labels) in enumerate(dl_train, 1):
            # train模块,也可以直接放在这里

            loss, metric = train(model, features, labels)

            # 打印batch级别日志
            loss_sum += loss
            metric_sum += metric
            # 设置打印freq
            if step % log_step_freq == 0:
                print(("[step = %d] loss: %.3f, " + metric_name + ": %.3f") %
                      (step, loss_sum / step, metric_sum / step))

        # 2,验证循环-------------------------------------------------
        val_loss_sum = 0.0
        val_metric_sum = 0.0
        val_step = 1

        for val_step, (features, labels) in enumerate(dl_valid, 1):
            # valid模块
            val_loss, val_metric = valid(model, features, labels)

            val_loss_sum += val_loss
            val_metric_sum += val_metric

        # 3,记录日志-------------------------------------------------
        info = (epoch, loss_sum / step, metric_sum / step,
                val_loss_sum / val_step, val_metric_sum / val_step)
        dfhistory.loc[epoch - 1] = info

        # 打印epoch级别日志
        print(("\nEPOCH = %d, loss = %.3f," + metric_name + \
               "  = %.3f, val_loss = %.3f, " + "val_" + metric_name + " = %.3f")
              % info)
        nowtime = datetime.datetime.now().strftime('%Y-%m-%d %H:%M:%S')
        print("\n" + "==========" * 8 + "%s" % nowtime)

    print('Finished Training...')

    return dfhistory
训练实例:
epochs = 25
dfhistory = train_model(model,epochs,dl_train,dl_valid,50)
Start Training...
================================================================================2022-01-19 10:39:33
[step = 50] loss: 0.662, auc: 0.699
[step = 100] loss: 0.627, auc: 0.747
[step = 150] loss: 0.605, auc: 0.762
[step = 200] loss: 0.593, auc: 0.770
EPOCH = 1, loss = 0.593,auc = 0.770, val_loss = 0.514, val_auc = 0.839
================================================================================2022-01-19 10:39:43
[step = 50] loss: 0.541, auc: 0.805
[step = 100] loss: 0.539, auc: 0.806
[step = 150] loss: 0.531, auc: 0.813
[step = 200] loss: 0.524, auc: 0.819
......4、评估模型
直接print(dfhistory)即可;
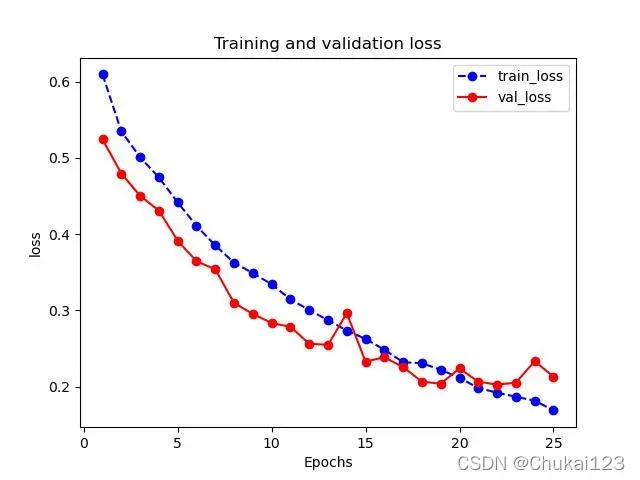
def plot_metric(dfhistory,metric,name):
    """
    :param dfhistory: 训练的info
    :param metric: 指定训练的哪个指标
    :return: 返回对应的训练曲线
    """
    train_metrics = dfhistory[metric]
    val_metrics = dfhistory['val_'+metric]
    epochs = range(1,len(train_metrics)+1)
    plt.plot(epochs,train_metrics,"bo--")
    plt.plot(epochs,val_metrics,"ro-")
    plt.title("Training and validation "+metric)
    plt.xlabel("Epochs")
    plt.ylabel(metric)
    plt.legend(["train_"+metric, 'val_'+metric])
    # save
    plt.savefig("figure/"+name+".jpg")
    plt.show()
这里将plot_metric放在utils.py中;
from utils import plot_metric
plot_metric(dfhistory,"loss",name="image_train_loss")
plot_metric(dfhistory,"auc",name="image_train_auc")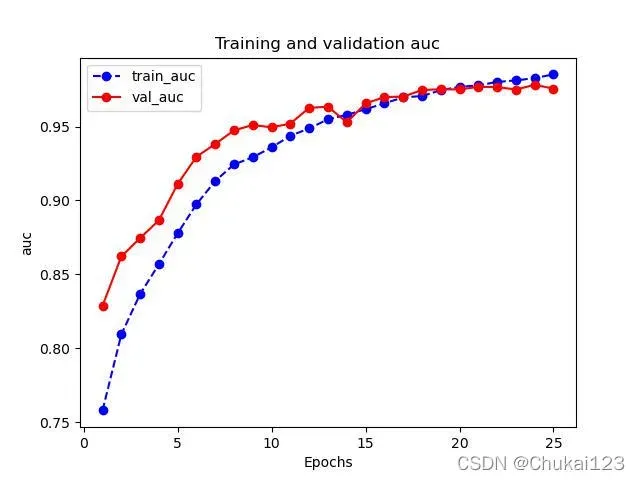
5、使用模型进行预测
def predict(model,dl):
    model.eval()
    result = torch.cat([model.forward(t[0]) for t in dl])
    return (result.data)
# 预测概率
y_pred_probs = predict(model,dl_valid)
print("y_pred_probs:",y_pred_probs)
# 预测类别
y_pred = torch.where(y_pred_probs>0.5,torch.ones_like(y_pred_probs),torch.zeros_like(y_pred_probs))
print(y_pred)
6、保存模型
浅谈pytorch 模型 .pt, .pth, .pkl的区别及模型保存方式![]() https://www.jb51.net/article/187269.htm采用torch.save保存模型参数:
https://www.jb51.net/article/187269.htm采用torch.save保存模型参数:
torch.save(model.state_dict(),"model/model_parameter_image.pkl")
net_clone = Image_Net()
net_clone.load_state_dict(torch.load("model/model_parameter_image.pkl"))
# test
predict(net_clone,dl_valid)
后续会增加onnx模型部署!
版权声明:本文为博主Chukai123原创文章,版权归属原作者,如果侵权,请联系我们删除!
原文链接:https://blog.csdn.net/weixin_43687366/article/details/122575969