目录
1.数据增强概述
- 海量数据是目标检测的基础,而针对于特定场景的数据往往需要自己获取和标注,往往需要耗费大量的人工成本和时间成本。而数据增强则能很好的解决这问题。
- 与简单的数据增强方法不同,目标检测的数据增强不仅要考虑图片的相应转变,还要实现图片内所标注坐标的转换,即目标检测的数据增强既要生成原图片的衍生图片,同时还需生成相应的xml文件(pascal voc数据集为例)。因此目标检测的数据增强与图像分类的数据增强有很大的不同。
- 往往目标检测的数据增强又分为在线数据增强和离线数据增强。大多的目标检测模型都默认带有在线数据增强,通过相关配置文件就能实现,优点是不占用本地内存方便实现,缺点是不够直观。而离线的数据增强则相反。而在刚起步学习阶段,可以通过离线数据增强的方式更直观的感受一下。
2.目标检测离线数据增强步骤(一定要先看,便于理解过程)
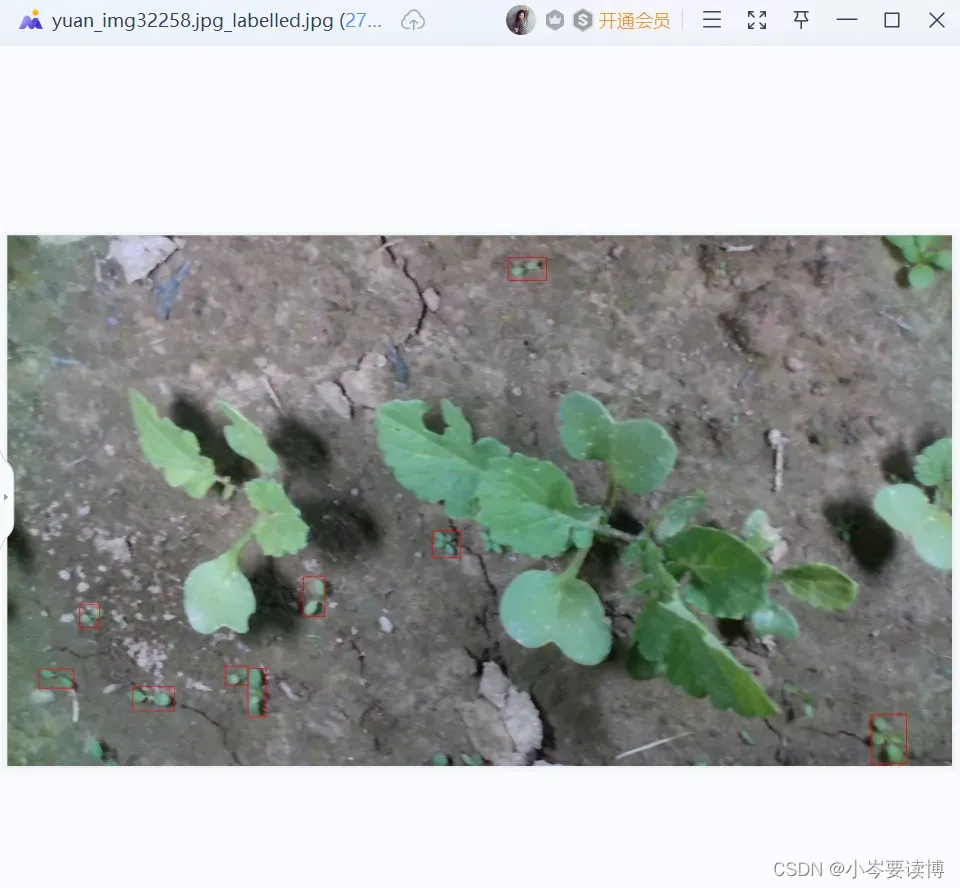
- 第一步针对标注好的数据(pascal voc数据集为例),通过相关python脚本将标注的矩形框画出来,检查标注时的准确性(随机挑选部分图片,可以不用全部照片)。
- 第二步使用几种数据增强方式对图片进行增强,这里主要使用了五种数据增强方法(图像旋转、高斯噪音、改变亮度、裁剪、平移),其中图像旋转有六种旋转角度(60, 90, 120, 150, 180, 270)。并且,在这几种方法中,添加高斯噪音和改变亮度xml文件与原图是相同的。
- 第三步在生成新的图片和xml文件后,与第一步相同验证新生成图像所生成xml文件的准确性。不正确就需要针对具体情况进行调整。
- 在扩充了数据集之后就开始对模型进行训练了。
3.数据增强代码
- 实现对标注好的数据集进行验证(验证标注情况的实际情况)
import os
import cv2 as cv
import xml.etree.ElementTree as ET


def xml_jpg2labelled(imgs_path, xmls_path, labelled_path):
    # k=0
    imgs_list = os.listdir(imgs_path)
    xmls_list = os.listdir(xmls_path)
    nums = len(imgs_list)
    for i in range(nums):
        # k+=1
        img_path = os.path.join(imgs_path, imgs_list[i])
        xml_path = os.path.join(xmls_path, xmls_list[i])
        img = cv.imread(img_path)
        labelled = img
        root = ET.parse(xml_path).getroot()
        objects = root.findall('object')
        for obj in objects:
            bbox = obj.find('bndbox')
            xmin = int(float(bbox.find('xmin').text.strip()))
            ymin = int(float(bbox.find('ymin').text.strip()))
            xmax = int(float(bbox.find('xmax').text.strip()))
            ymax = int(float(bbox.find('ymax').text.strip()))
            labelled = cv.rectangle(labelled, (xmin, ymin), (xmax, ymax), (0, 0, 255), 1)
        cv.imwrite('%s%s_labelled.jpg' % (labelled_path, imgs_list[i]), labelled)
        # if k>=100:
        #     break
        # cv.imshow('labelled', labelled)
        # cv.imshow('origin', origin)
        # cv.waitKey()


if __name__ == '__main__':

    ## 原图
    # imgs_path='D:\MyselfStudy\yolov5-6.0\data\\test\img'#图片所在路径
    # xmls_path ='D:\MyselfStudy\yolov5-6.0\data\\test\\xml'#xml所在路径
    # labelled_path='D:\MyselfStudy\yolov5-6.0\data\\test\\anchor_imgs\yuan_img\\'#生成带有矩形框图片所在路径
    # xml_jpg2labelled(imgs_path, xmls_path, labelled_path)
原图片生成anchors实验结果
2.图片增强(均在一个脚本内)
在实现图像增强时,将几种图片增强方法都放入了ImgAugemention这个类中,因此要调用相关方法时需先实例化ImgAugemention这个类。
#相关依赖包
import cv2
import math
import numpy as np
import os
import xml.etree.ElementTree as ET
import random
import xml.dom.minidom as DOC
from skimage import exposure

#ImgAugemention类
class ImgAugemention():
    def __init__(self, crop_rate=0.5, shift_rate=0.5, change_light_rate=0.5, add_noise_rate=0.5, angle=90):
        self.crop_rate = crop_rate
        self.shift_rate = shift_rate
        self.change_light_rate = change_light_rate
        self.add_noise_rate = add_noise_rate
        self.angle = angle  # rotate_img
2.1图像水平旋转
    def rotate_image(self, src, angle, scale=1.):
        w = src.shape[1]
        h = src.shape[0]
        # convet angle into rad
        rangle = np.deg2rad(angle)  # angle in radians
        # calculate new image width and height
        nw = (abs(np.sin(rangle)*h) + abs(np.cos(rangle)*w))*scale
        nh = (abs(np.cos(rangle)*h) + abs(np.sin(rangle)*w))*scale
        # ask OpenCV for the rotation matrix
        rot_mat = cv2.getRotationMatrix2D((nw*0.5, nh*0.5), angle, scale)
        # calculate the move from the old center to the new center combined
        # with the rotation
        rot_move = np.dot(rot_mat, np.array([(nw-w)*0.5, (nh-h)*0.5, 0]))
        # the move only affects the translation, so update the translation
        # part of the transform
        rot_mat[0, 2] += rot_move[0]
        rot_mat[1, 2] += rot_move[1]
        # map
        return cv2.warpAffine(
            src, rot_mat, (int(math.ceil(nw)), int(math.ceil(nh))),
            flags=cv2.INTER_LANCZOS4)

    def rotate_xml(self, src, xmin, ymin, xmax, ymax, angle, scale=1.):
        w = src.shape[1]
        h = src.shape[0]
        rangle = np.deg2rad(angle)  # angle in radians
        # now calculate new image width and height
        # get width and heigh of changed image
        nw = (abs(np.sin(rangle)*h) + abs(np.cos(rangle)*w))*scale
        nh = (abs(np.cos(rangle)*h) + abs(np.sin(rangle)*w))*scale
        # ask OpenCV for the rotation matrix
        rot_mat = cv2.getRotationMatrix2D((nw*0.5, nh*0.5), angle, scale)
        # calculate the move from the old center to the new center combined
        # with the rotation
        rot_move = np.dot(rot_mat, np.array([(nw-w)*0.5, (nh-h)*0.5, 0]))
        # the move only affects the translation, so update the translation
        # part of the transform
        rot_mat[0, 2] += rot_move[0]
        rot_mat[1, 2] += rot_move[1]
        # rot_mat: the final rot matrix
        # get the four center of edges in the initial martix,and convert the coord
        point1 = np.dot(rot_mat, np.array([(xmin+xmax)/2, ymin, 1]))
        point2 = np.dot(rot_mat, np.array([xmax, (ymin+ymax)/2, 1]))
        point3 = np.dot(rot_mat, np.array([(xmin+xmax)/2, ymax, 1]))
        point4 = np.dot(rot_mat, np.array([xmin, (ymin+ymax)/2, 1]))
        # concat np.array
        concat = np.vstack((point1, point2, point3, point4))
        # change type
        concat = concat.astype(np.int32)
        # print(concat)
        rx, ry, rw, rh = cv2.boundingRect(concat)
        return rx, ry, rw, rh

    def process_img(self, imgs_path, xmls_path, img_save_path, xml_save_path, angle_list):
        # assign the rot angles
        for angle in angle_list:
            for img_name in os.listdir(imgs_path):
                # split filename and suffix
                n, s = os.path.splitext(img_name)
                # for the sake of use yolo model, only process '.jpg'
                if s == ".jpg":
                    img_path = os.path.join(imgs_path, img_name)
                    img = cv2.imread(img_path)
                    rotated_img = self.rotate_image(img, angle)
                    save_name = n + "_" + str(angle) + ".jpg"
                    # 写入图像
                    cv2.imwrite(img_save_path + save_name, rotated_img)
                    # print("log: [%sd] %s is processed." % (angle, img))
                    xml_url = img_name.split('.')[0] + '.xml'
                    xml_path = os.path.join(xmls_path, xml_url)
                    tree = ET.parse(xml_path)
                    # file_name = tree.find('filename').text  # it is origin name
                    # path = tree.find('path').text  # it is origin path
                    # change name and path
                    tree.find('filename').text = save_name  # change file name to rot degree name
                    # tree.find('path').text = save_name  #  change file path to rot degree name
                    root = tree.getroot()
					# if angle in [90, 270], need to swap width and height
                    if angle in [90, 270]:
                        d = tree.find('size')
                        width = int(d.find('width').text)
                        height = int(d.find('height').text)
                        # swap width and height
                        d.find('width').text = str(height)
                        d.find('height').text = str(width)

                    for box in root.iter('bndbox'):
                        xmin = float(box.find('xmin').text)
                        ymin = float(box.find('ymin').text)
                        xmax = float(box.find('xmax').text)
                        ymax = float(box.find('ymax').text)
                        x, y, w, h = self.rotate_xml(img, xmin, ymin, xmax, ymax, angle)
                        # change the coord
                        box.find('xmin').text = str(x)
                        box.find('ymin').text = str(y)
                        box.find('xmax').text = str(x+w)
                        box.find('ymax').text = str(y+h)
                        box.set('updated', 'yes')
                    # write into new xml
                    tree.write(xml_save_path + n + "_" + str(angle) + ".xml")
2.2增加高斯噪音
     # 高斯模糊
    def addGaussi(self,img_path,xml_path,save_img,save_xml):
        xml_save_path=save_xml+'GaussianBlur\\'
        img_save_path=save_img+'GaussianBlur\\'
        for imgs in os.listdir(img_path):
            img = cv2.imread(img_path+imgs)
            size = random.choice((5, 9, 11))
            Gau_img=cv2.GaussianBlur(img, ksize=(size, size), sigmaX=0, sigmaY=0)
            # 写入图像
            cv2.imwrite(img_save_path + "Gau_img"+imgs, Gau_img)
            xml=xml_path+imgs[:-4]+ ".xml"
            tree = ET.parse(xml)
            tree.write(xml_save_path + "Gau_img"+imgs[:-4]+ ".xml")
2.4改变亮度
 # 调整亮度
    def changeLight(self, img_path,xml_path,save_img,save_xml):

        xml_save_path = save_xml +'changeLight'
        img_save_path = save_img +'changeLight'
        for imgs in os.listdir(img_path):
            flag = random.uniform(0.6, 1.3)  # flag>1为调暗,小于1为调亮
            img = cv2.imread(img_path+imgs)
            light_img=exposure.adjust_gamma(img, flag)
            cv2.imwrite(img_save_path +'\\'+ "light_img" + imgs, light_img)
            xml = xml_path + imgs[:-4] + ".xml"
            tree = ET.parse(xml)
            tree.write(xml_save_path + '\\'+"light_img" + imgs[:-4] + ".xml")
2.5平移和裁剪代码
以下时实现平移和裁剪所需的函数,不在ImgAugemention类中,不要将以下这段代码放到ImgAugemention类中。
# 从xml文件中提取bounding box信息, 格式为[[x_min, y_min, x_max, y_max, name]]
def parse_xml(xml_path):
    '''
    输入:
        xml_path: xml的文件路径
    输出:
        从xml文件中提取bounding box信息, 格式为[[x_min, y_min, x_max, y_max, name]]
    '''
    tree = ET.parse(xml_path)
    root = tree.getroot()
    objs = root.findall('object')
    coords = list()
    for ix, obj in enumerate(objs):
        name = obj.find('name').text
        box = obj.find('bndbox')
        x_min = int(box[0].text)
        y_min = int(box[1].text)
        x_max = int(box[2].text)
        y_max = int(box[3].text)
        coords.append([x_min, y_min, x_max, y_max, name])
    return coords


# 将bounding box信息写入xml文件中, bouding box格式为[[x_min, y_min, x_max, y_max, name]]
def generate_xml(img_name, coords, img_size, out_root_path):
    '''
    输入:
        img_name:图片名称,如a.jpg
        coords:坐标list,格式为[[x_min, y_min, x_max, y_max, name]],name为概况的标注
        img_size:图像的大小,格式为[h,w,c]
        out_root_path: xml文件输出的根路径
    '''
    doc = DOC.Document()  # 创建DOM文档对象

    annotation = doc.createElement('annotation')
    doc.appendChild(annotation)

    title = doc.createElement('folder')
    title_text = doc.createTextNode('VOC2007')
    title.appendChild(title_text)
    annotation.appendChild(title)

    title = doc.createElement('filename')
    title_text = doc.createTextNode(img_name)
    title.appendChild(title_text)
    annotation.appendChild(title)

    source = doc.createElement('source')
    annotation.appendChild(source)

    title = doc.createElement('database')
    title_text = doc.createTextNode('The VOC2007 Database')
    title.appendChild(title_text)
    source.appendChild(title)

    title = doc.createElement('annotation')
    title_text = doc.createTextNode('PASCAL VOC2007')
    title.appendChild(title_text)
    source.appendChild(title)

    size = doc.createElement('size')
    annotation.appendChild(size)

    title = doc.createElement('width')
    title_text = doc.createTextNode(str(img_size[1]))
    title.appendChild(title_text)
    size.appendChild(title)

    title = doc.createElement('height')
    title_text = doc.createTextNode(str(img_size[0]))
    title.appendChild(title_text)
    size.appendChild(title)

    title = doc.createElement('depth')
    title_text = doc.createTextNode(str(img_size[2]))
    title.appendChild(title_text)
    size.appendChild(title)

    for coord in coords:
        object = doc.createElement('object')
        annotation.appendChild(object)

        title = doc.createElement('name')
        title_text = doc.createTextNode(coord[4])
        title.appendChild(title_text)
        object.appendChild(title)

        pose = doc.createElement('pose')
        pose.appendChild(doc.createTextNode('Unspecified'))
        object.appendChild(pose)
        truncated = doc.createElement('truncated')
        truncated.appendChild(doc.createTextNode('1'))
        object.appendChild(truncated)
        difficult = doc.createElement('difficult')
        difficult.appendChild(doc.createTextNode('0'))
        object.appendChild(difficult)

        bndbox = doc.createElement('bndbox')
        object.appendChild(bndbox)
        title = doc.createElement('xmin')
        title_text = doc.createTextNode(str(int(float(coord[0]))))
        title.appendChild(title_text)
        bndbox.appendChild(title)
        title = doc.createElement('ymin')
        title_text = doc.createTextNode(str(int(float(coord[1]))))
        title.appendChild(title_text)
        bndbox.appendChild(title)
        title = doc.createElement('xmax')
        title_text = doc.createTextNode(str(int(float(coord[2]))))
        title.appendChild(title_text)
        bndbox.appendChild(title)
        title = doc.createElement('ymax')
        title_text = doc.createTextNode(str(int(float(coord[3]))))
        title.appendChild(title_text)
        bndbox.appendChild(title)

    # 将DOM对象doc写入文件
    f = open(os.path.join(out_root_path, "new_" +  "_" + img_name[:-4] + '.xml'), 'w')
    f.write(doc.toprettyxml(indent=''))
    f.close()
平移和裁剪代码
 # 平移
    def shift_pic_bboxes(self,xml_path,img_path,img_save_path,save_path_xml):
        img_save_path=img_save_path+'shift'
        save_path_xml=save_path_xml+'shift'
        for xmls in os.listdir(xml_path):
            x=xml_path+xmls
            coords = parse_xml(x)#读xml文件
            img = cv2.imread(img_path+xmls[:-4] + ".jpg")
            names = [coord[4] for coord in coords]
            bboxes = [coord[:4] for coord in coords]
            '''
            平移后的图片要包含所有的框
            输入:
                img:图像array
                bboxes:该图像包含的所有boundingboxs,一个list,每个元素为[x_min, y_min, x_max, y_max,label],要确保是数值
            输出:
                shift_img:平移后的图像array
                shift_bboxes:平移后的bounding box的坐标list
            '''
            # ---------------------- 平移图像 ----------------------
            w = img.shape[1]
            h = img.shape[0]
            x_min = w  # 裁剪后的包含所有目标框的最小的框
            x_max = 0
            y_min = h
            y_max = 0
            for bbox in bboxes:
                x_min = min(x_min, bbox[0])
                y_min = min(y_min, bbox[1])
                x_max = max(x_max, bbox[2])
                y_max = max(y_max, bbox[3])

            d_to_left = x_min  # 包含所有目标框的最大左移动距离
            d_to_right = w - x_max  # 包含所有目标框的最大右移动距离
            d_to_top = y_min  # 包含所有目标框的最大上移动距离
            d_to_bottom = h - y_max  # 包含所有目标框的最大下移动距离

            x = random.uniform(-(d_to_left - 1) / 3, (d_to_right - 1) / 3)
            y = random.uniform(-(d_to_top - 1) / 3, (d_to_bottom - 1) / 3)

            M = np.float32([[1, 0, x], [0, 1, y]])  # x为向左或右移动的像素值,正为向右负为向左; y为向上或者向下移动的像素值,正为向下负为向上
            shift_img = cv2.warpAffine(img, M, (img.shape[1], img.shape[0]))

            # ---------------------- 平移boundingbox ----------------------
            shift_bboxes = list()
            for bbox in bboxes:
                i=0
                shift_bboxes.append([bbox[0] + x, bbox[1] + y, bbox[2] + x, bbox[3] + y,names[i]])
                i+=1
            cv2.imwrite(img_save_path + '\\' + "shift_img" +xmls[:-4] + ".jpg", shift_img)
            file=xmls[:-4] + ".jpg"
            auged_img=shift_img
            auged_bboxes = shift_bboxes
            generate_xml(file, auged_bboxes, list(auged_img.shape), save_path_xml)


    # 裁剪
    def crop_img_bboxes(self,xml_path,img_path,img_save_path,save_path_xml):
        '''
        裁剪后的图片要包含所有的框
        输入:
            img:图像array
            bboxes:该图像包含的所有boundingboxs,一个list,每个元素为[x_min, y_min, x_max, y_max,label],要确保是数值
        输出:
            crop_img:裁剪后的图像array
            crop_bboxes:裁剪后的bounding box的坐标list
        '''
        # ---------------------- 裁剪图像 ----------------------
        img_save_path=img_save_path+'crop'
        save_path_xml=save_path_xml+'crop'
        for imgs in os.listdir(img_path):
            imgPath=img_path+imgs
            img=cv2.imread(img_path+imgs)
            w = img.shape[1]
            h = img.shape[0]
            x_min = w  # 裁剪后的包含所有目标框的最小的框
            x_max = 0
            y_min = h
            y_max = 0
            xmlPath=xml_path+imgs[:-4] + ".xml"
            coords = parse_xml(xmlPath)  # 读xml文件
            names = [coord[4] for coord in coords]
            bboxes = [coord[:4] for coord in coords]
            for bbox in bboxes:
                x_min = min(x_min, bbox[0])
                y_min = min(y_min, bbox[1])
                x_max = max(x_max, bbox[2])
                y_max = max(y_max, bbox[3])

            d_to_left = x_min  # 包含所有目标框的最小框到左边的距离
            d_to_right = w - x_max  # 包含所有目标框的最小框到右边的距离
            d_to_top = y_min  # 包含所有目标框的最小框到顶端的距离
            d_to_bottom = h - y_max  # 包含所有目标框的最小框到底部的距离

            # 随机扩展这个最小框
            crop_x_min = int(x_min - random.uniform(0, d_to_left))
            crop_y_min = int(y_min - random.uniform(0, d_to_top))
            crop_x_max = int(x_max + random.uniform(0, d_to_right))
            crop_y_max = int(y_max + random.uniform(0, d_to_bottom))

            # 确保不要越界
            crop_x_min = max(0, crop_x_min)
            crop_y_min = max(0, crop_y_min)
            crop_x_max = min(w, crop_x_max)
            crop_y_max = min(h, crop_y_max)

            crop_img = img[crop_y_min:crop_y_max, crop_x_min:crop_x_max]

            # ---------------------- 裁剪boundingbox ----------------------
            # 裁剪后的boundingbox坐标计算
            crop_bboxes = list()
            for bbox in bboxes:
                i=0
                crop_bboxes.append([bbox[0] - crop_x_min, bbox[1] - crop_y_min, bbox[2] - crop_x_min, bbox[3] - crop_y_min,names[i]])
                i+=1
            cv2.imwrite(img_save_path + '\\' + "crop_img" + imgs, crop_img)
            auged_img = crop_img
            auged_bboxes = crop_bboxes

            generate_xml(imgs, auged_bboxes, list(auged_img.shape), save_path_xml)
4.代码运行
if __name__ == '__main__':
    img_aug = ImgAugemention()

    #原图像路径
    imgs_path='D:\MyselfStudy\yolov5-6.0\data\\test\img\\'
    ##原xml文件路径
    xmls_path='D:\MyselfStudy\yolov5-6.0\data\\test\\xml\\'

    #新生成图像存储路径
    save_xml='D:\MyselfStudy\yolov5-6.0\data\\test\\new_xml\\'
    ##新生成xml文件存储路径
    save_img='D:\MyselfStudy\yolov5-6.0\data\\test\\new_img\\'

    #要实现相应图像增强方式,去掉注释即可

    #旋转
    # angle_list = [60, 90, 120, 150, 180, 270]
    # img_aug.process_img(imgs_path, xmls_path, save_img, save_xml, angle_list)

    #高斯噪音
    # img_aug.addGaussi(imgs_path, xmls_path, save_img, save_xml)
    #改变亮度
    # img_aug.changeLight(imgs_path, xmls_path, save_img, save_xml)
    #平移
    # img_aug.shift_pic_bboxes(xmls_path, imgs_path, save_img, save_xml)
    #裁剪
    img_aug.crop_img_bboxes(xmls_path, imgs_path, save_img, save_xml)
5.结果展示

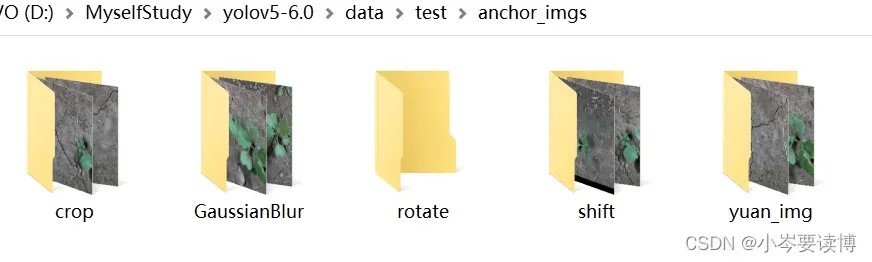
- anchor_imgs内记录了各种生成方法的anchors图片
以shift(平移)为例子(原图和平移后的带anchors图片)
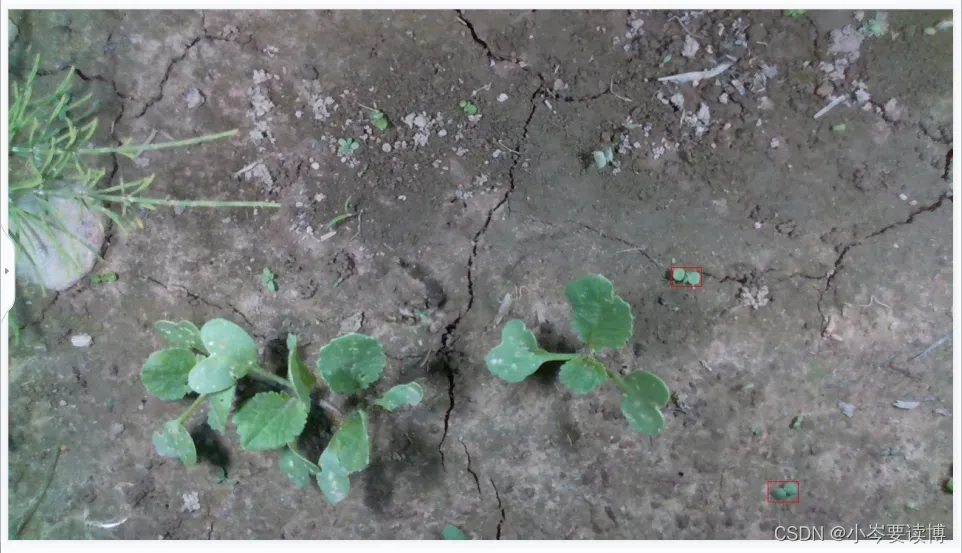
 很显然,图像增强后的anchor准确,经得起验证。
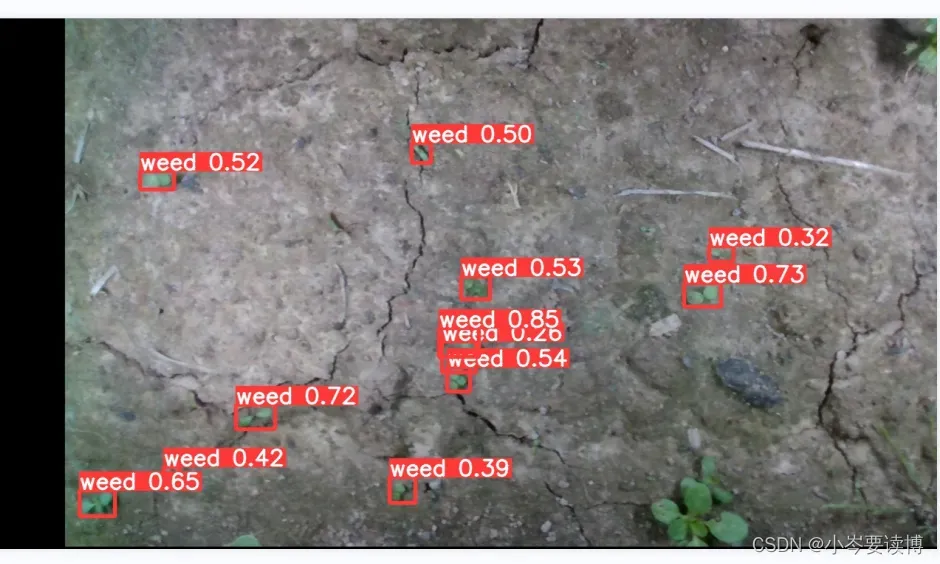
最后附上近期实现yolov5模型实现的杂草检测结果(小岑还要继续努力)。
文章出处登录后可见!
已经登录?立即刷新