实现目标
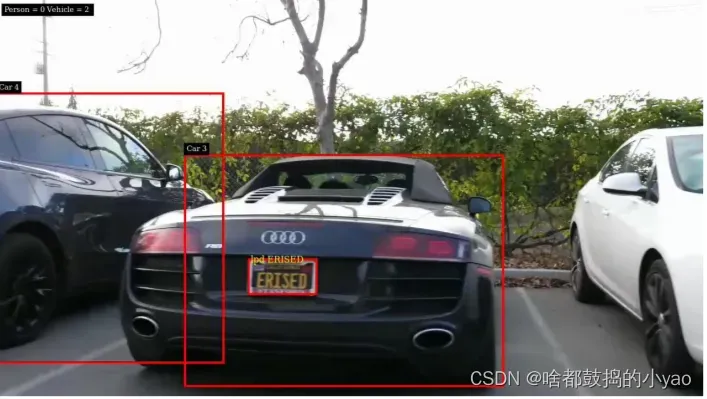
汽车检测以及车牌信息
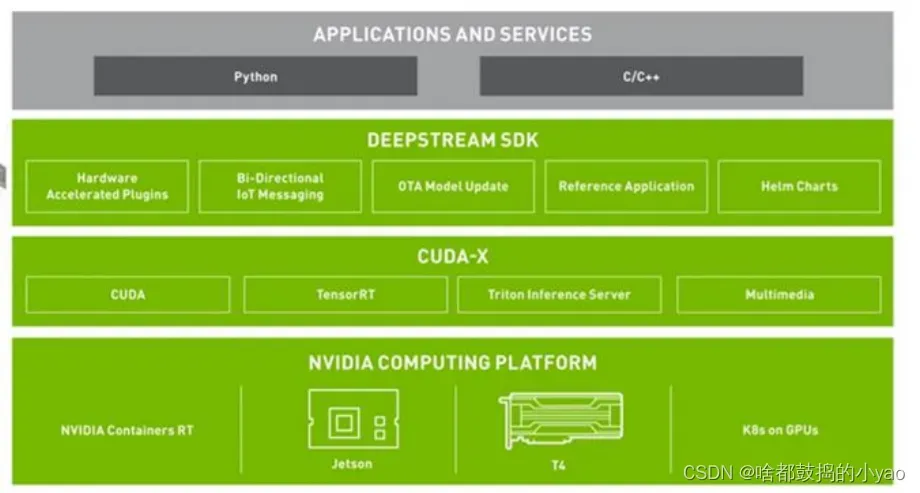
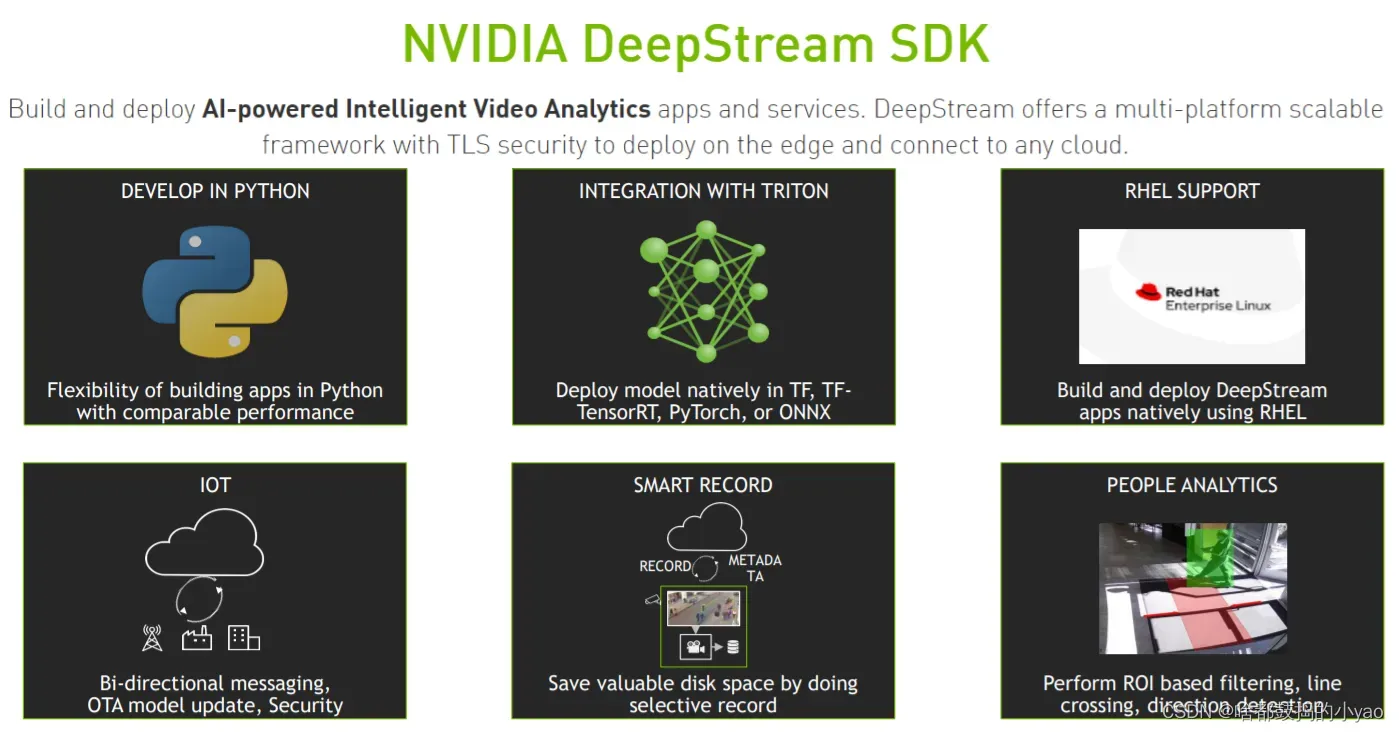
部署工具:NVIDIA DeepStream SDK
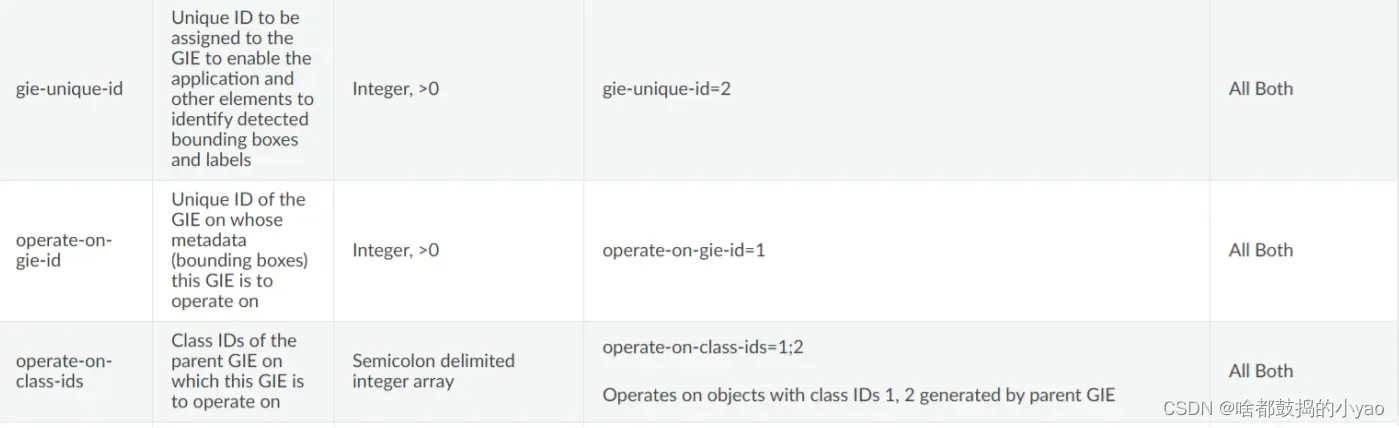
简单设置参数
工作流程

视频源—— 视频流处理(RTSP/RAW、DECODE)—— 预处理大小、分辨率等(IMAGE PROCESSING)—— 批次处理即几张图片组合到一起进行处理(BATCHING)—— 推理任务(DNN(s))—— 进行更多操作如追踪任务(TRACKING)—— 显示合成(VIZ)—— 输出(DISPLAY/STORAGE/CLOUD)
注意事项
- 流数据可以通过RTSP通过网络传输,也可以从本地文件系统或直接从摄像机传输。这些流是使用CPU捕获的。一旦帧在内存中,他们被发送为解码使用NVDEC加速器。decode的插件名为Gst nvvideo4linux2。
- 解码后,还有一个可选的图像预处理步骤,在此步骤中可以对输入图像进行预处理,然后进行推理。预处理可以是图像的色彩空间的变换等。Gst-nvdewarper插件可以从鱼眼或360度相机变形图像。Gst-nvvideoconvert插件可以在帧上执行颜色格式转换。这些插件使用GPU或VIC(视觉图像合成)。
- 下一步是批处理帧以获得最佳推理性能。批处理使用Gst-nvstreammux插件完成一旦帧被成批处理,它就被发送去进行推理。推理可以使用NVIDIA的推理加速器运行时TensorRT完成,也可以使用Triton推理服务器在本地框架(如TensorFlow或PyTorch)中完成。本机TensorRT推断使用Gst-nvinfer插件执行,Triton推断使用Gst-nvinferserver插件执行。推理可以使用GPU或DLA(深度学习加速器]的Jetson AGX Xavier和Xavier NX。
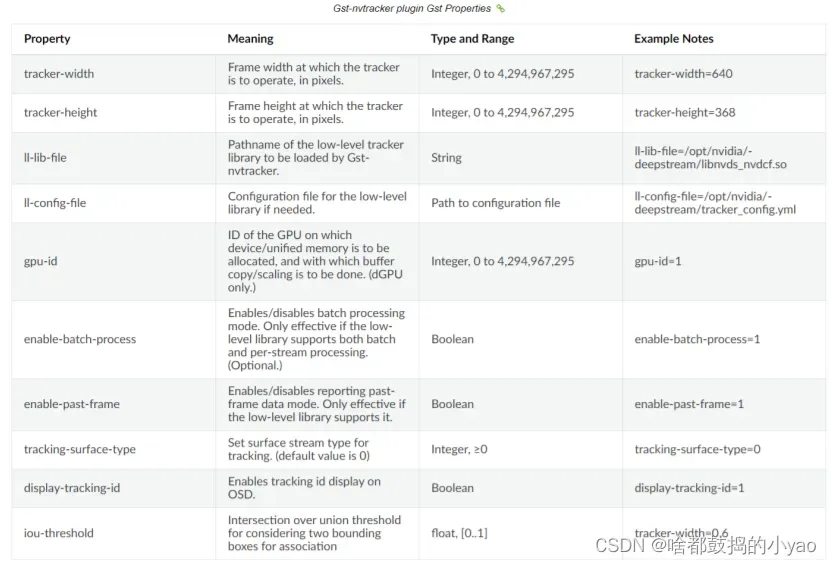
- 在推断之后,下一步可能涉及跟踪对象。在SDK中有几个内置的参考跟踪器,从高性能到高精度。使用Gst-nvtracker插件执行对象跟踪。
- 有一个可视化插件名为Gst-nvdsosd,用于创建诸如边框、分割掩码、标签等可视化工件
- 最后,为了输出结果,DeepStream提供了各种选项:用屏幕上的边框呈现输出,将输出保存到本地磁盘,通过RTSP流输出,或者直接将元数据发送到云。为了向云发送元数据,DeepStream使用Gst-nvmsgconv和Gst-nvmsgbroker插件。Gst-nvmsgconv将元数据转换为模式有效负载,Gst-
nvmsgbroker建立到云的连接并发送遥测数据。有几个内置的代理协议,如Kafka、MQTT、AMQP和Azure loT。可以创建自定义代理适配器。
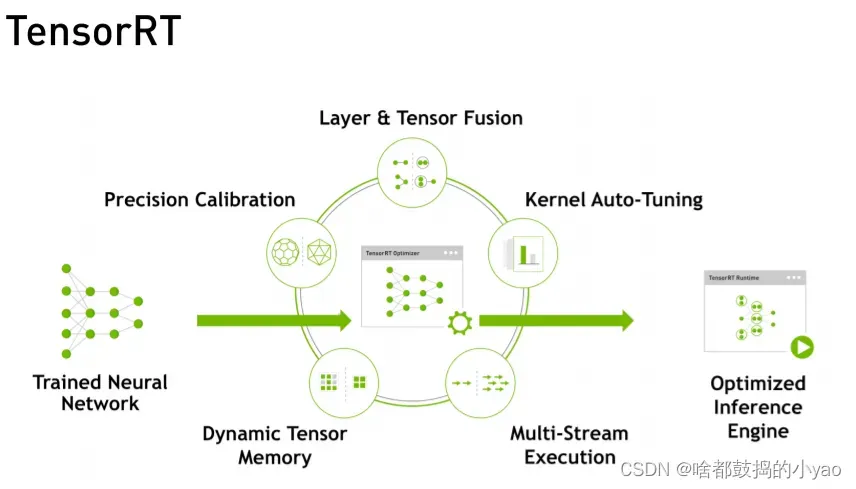
GPU深度学习推理:TensorRT
部署工具

Transfer Learning Toolkit是一个基于python的工具包,它使开发人员能够利用NVIDIA预先训练的模型,并为开发人员提供一系列的工具,使流行的网络架构适应他们自己的数据,并且能够训练、调整、修剪和导出模型以进行部署。它还拥有简单的接口和抽象APl,提高了深度学习训练工作流的效率。
- GPU优化的预训练模型,可用于计算机视觉任务
- 轻松修改配置文件以添加新类并使用自定义数据重新训练模型
- 在异构的多GPU环境中执行模型调整和重新训练。
- 使用修剪功能缩小模型尺寸
- 模型导出API,可在具有NVIDIA Tesla和Jetson产品NVIDIADeepStreamSDK上部署
实战代码
GST Python 安装
sudo apt-get install python-gi-dev
export GST_LIBS="-lgstreamer-1.0 -lgobject-2.0 -lglib-2.0"
export GST_CFLAGS="-pthread -I/usr/include/gstreamer-1.0 -I/usr/include/glib-2.0 -I/usr/lib/x86_64-linux-gnu/glib-2.0/include"
git clone https://github.com/GStreamer/gst-python.git
cd gst-python
git checkout 1a8f48a
./autogen.sh PYTHON=python3
./configure PYTHON=python3
make
sudo make install
下载 Deepstream Python 绑定文件
tar xf ds_pybind_0.5.tbz2 -C /home/nvidia/Downloads/deepstream/sources
包装内容
DeepStream Python包 包括:
1.DeepStream 元数据库的 Python 绑定 这些绑定作为已编译模块提供,可用于 x86_64 和 Jetson 平台。 在以下位置找到它们:
|- x86_64
|- pyds.so
|- jetson
|- pyds.so
2.Python 中的 DeepStream 测试应用程序有四个测试应用程序可用: deepstream-test1/deepstream_test_1.py deepstream-test2/deepstream_test_2.py deepstream-test3/deepstream_test_3.py deepstream-test3/deepstream_test_4.py
运行代码:
注意 – 确保 pyds.so 文件所在的文件夹路径位于 PATH 中。
导入必要的库
import sys
sys.path.append('../')
sys.path.append('/home/nvidia/Downloads/deepstream/sources/python/bindings/x86_64')
sys.path.append('/usr/lib/python3/dist-packages')
from common.is_aarch_64 import is_aarch64
import gi
gi.require_version('Gst', '1.0')
from gi.repository import GObject, Gst
from common.is_aarch_64 import is_aarch64
from common.bus_call import bus_call

import pyds
声明类标签 ID
PGIE_CLASS_ID_VEHICLE = 0
PGIE_CLASS_ID_BICYCLE = 1
PGIE_CLASS_ID_PERSON = 2
PGIE_CLASS_ID_ROADSIGN = 3

def osd_sink_pad_buffer_probe(pad,info,u_data):
    frame_number=0
    #Intiallizing object counter with 0.
    obj_counter = {
        PGIE_CLASS_ID_VEHICLE:0,
        PGIE_CLASS_ID_PERSON:0,
        PGIE_CLASS_ID_BICYCLE:0,
        PGIE_CLASS_ID_ROADSIGN:0
    }
    num_rects=0

    gst_buffer = info.get_buffer()
    if not gst_buffer:
        print("Unable to get GstBuffer ")
        return

    # Retrieve batch metadata from the gst_buffer
    # Note that pyds.gst_buffer_get_nvds_batch_meta() expects the
    # C address of gst_buffer as input, which is obtained with hash(gst_buffer)
    batch_meta = pyds.gst_buffer_get_nvds_batch_meta(hash(gst_buffer))
    l_frame = batch_meta.frame_meta_list
    while l_frame is not None:
        try:
            # Note that l_frame.data needs a cast to pyds.NvDsFrameMeta
            # The casting is done by pyds.glist_get_nvds_frame_meta()
            # The casting also keeps ownership of the underlying memory
            # in the C code, so the Python garbage collector will leave
            # it alone.
            frame_meta = pyds.glist_get_nvds_frame_meta(l_frame.data)
        except StopIteration:
            break

        frame_number=frame_meta.frame_num
        num_rects = frame_meta.num_obj_meta
        l_obj=frame_meta.obj_meta_list
        while l_obj is not None:
            try:
                # Casting l_obj.data to pyds.NvDsObjectMeta
                obj_meta=pyds.glist_get_nvds_object_meta(l_obj.data)
            except StopIteration:
                break
            obj_counter[obj_meta.class_id] += 1
            try:
                l_obj=l_obj.next
            except StopIteration:
                break

        # Acquiring a display meta object. The memory ownership remains in
        # the C code so downstream plugins can still access it. Otherwise
        # the garbage collector will claim it when this probe function exits.
        display_meta=pyds.nvds_acquire_display_meta_from_pool(batch_meta)
        display_meta.num_labels = 1
        py_nvosd_text_params = display_meta.text_params[0]
        # Setting display text to be shown on screen
        # Note that the pyds module allocates a buffer for the string, and the
        # memory will not be claimed by the garbage collector.
        # Reading the display_text field here will return the C address of the
        # allocated string. Use pyds.get_string() to get the string content.
        py_nvosd_text_params.display_text = "Frame Number={} Number of Objects={} Vehicle_count={} Person_count={}".format(frame_number, num_rects, obj_counter[PGIE_CLASS_ID_VEHICLE], obj_counter[PGIE_CLASS_ID_PERSON])

        # Now set the offsets where the string should appear
        py_nvosd_text_params.x_offset = 10
        py_nvosd_text_params.y_offset = 12

        # Font , font-color and font-size
        py_nvosd_text_params.font_params.font_name = "Serif"
        py_nvosd_text_params.font_params.font_size = 10
        # set(red, green, blue, alpha); set to White
        py_nvosd_text_params.font_params.font_color.set(1.0, 1.0, 1.0, 1.0)

        # Text background color
        py_nvosd_text_params.set_bg_clr = 1
        # set(red, green, blue, alpha); set to Black
        py_nvosd_text_params.text_bg_clr.set(0.0, 0.0, 0.0, 1.0)
        # Using pyds.get_string() to get display_text as string
        print(pyds.get_string(py_nvosd_text_params.display_text))
        pyds.nvds_add_display_meta_to_frame(frame_meta, display_meta)
        try:
            l_frame=l_frame.next
        except StopIteration:
            break

    return Gst.PadProbeReturn.OK
初始化 GStreamer
# Standard initialization procedure
GObject.threads_init()
Gst.init(None)

# Create gstreamer elements
# Create Pipeline element that will form a connection of other elements
print("Creating Pipeline \n ")
pipeline = Gst.Pipeline()

if not pipeline:
    sys.stderr.write(" Unable to create Pipeline \n")
创建流的不同元素
# 创建用于从文件中读取的源元素
print("Creating Source \n ")
source = Gst.ElementFactory.make("filesrc", "file-source")
if not source:
    sys.stderr.write(" Unable to create Source \n")
# 创建一个 h264 解析器作为输入文件是一个基本的 h264 流
print("Creating H264Parser \n")
h264parser = Gst.ElementFactory.make("h264parse", "h264-parser")
if not h264parser:
    sys.stderr.write(" Unable to create h264 parser \n")
# 在 GPU 上使用 nvdec_h264 进行加速解码
print("Creating Decoder \n")
decoder = Gst.ElementFactory.make("nvv4l2decoder", "nvv4l2-decoder")
if not decoder:
    sys.stderr.write(" Unable to create Nvv4l2 Decoder \n")
# 创建一个 nvstreammux 实例以形成一个或多个源的批处理
streammux = Gst.ElementFactory.make("nvstreammux", "Stream-muxer")
if not streammux:
    sys.stderr.write(" Unable to create NvStreamMux \n")
# 设置 nvinfer 以在解码器输出上运行推理(注意:推理的行为是通过配置文件设置的)
pgie = Gst.ElementFactory.make("nvinfer", "primary-inference")
if not pgie:
    sys.stderr.write(" Unable to create pgie \n")
# 根据 nvosd 的要求,使用转换器从 NV12 转换为 RGBA
nvvidconv = Gst.ElementFactory.make("nvvideoconvert", "convertor")
if not nvvidconv:
    sys.stderr.write(" Unable to create nvvidconv \n")
# 创建 OSD 以在转换后的 RGBA 缓冲区上绘图
nvosd = Gst.ElementFactory.make("nvdsosd", "onscreendisplay")
if not nvosd:
    sys.stderr.write(" Unable to create nvosd \n")
# Jetson 设备所需的检查
if is_aarch64():
    transform = Gst.ElementFactory.make("nvegltransform", "nvegl-transform")
最后渲染 osd 输出
print("Creating EGLSink \n")
sink = Gst.ElementFactory.make("nveglglessink", "nvvideo-renderer")
if not sink:
    sys.stderr.write(" Unable to create egl sink \n")
设置 PGIE 和 Streammux 属性
建议阅读:dstest1_pgie_config.txt
# Edit this cell to change the inputs and the stream config
print("Playing file /home/nvidia/Downloads/deepstream/sources/python/apps/deepstream-test1/sample_720p.h264 ")
source.set_property('location', \
                    "/home/nvidia/Downloads/deepstream/sources/python/apps/deepstream-test1/sample_720p.h264")
streammux.set_property('width', 1920)
streammux.set_property('height', 1080)
streammux.set_property('batch-size', 1)
streammux.set_property('batched-push-timeout', 4000000)
pgie.set_property('config-file-path', \
                  "/home/nvidia/Downloads/deepstream/sources/python/apps/deepstream-test1/dstest1_pgie_config.txt")
将所有上述定义的元素添加到管道并链接它们
print("Adding elements to Pipeline \n")
pipeline.add(source)
pipeline.add(h264parser)
pipeline.add(decoder)
pipeline.add(streammux)
pipeline.add(pgie)
pipeline.add(nvvidconv)
pipeline.add(nvosd)
pipeline.add(sink)
if is_aarch64():
    pipeline.add(transform)
# we link the elements together
# file-source -> h264-parser -> nvh264-decoder ->
# nvinfer -> nvvidconv -> nvosd -> video-renderer
print("Linking elements in the Pipeline \n")
source.link(h264parser)
h264parser.link(decoder)

sinkpad = streammux.get_request_pad("sink_0")
if not sinkpad:
    sys.stderr.write(" Unable to get the sink pad of streammux \n")
srcpad = decoder.get_static_pad("src")
if not srcpad:
    sys.stderr.write(" Unable to get source pad of decoder \n")
srcpad.link(sinkpad)
streammux.link(pgie)
pgie.link(nvvidconv)
nvvidconv.link(nvosd)
if is_aarch64():
    nvosd.link(transform)
    transform.link(sink)
else:
    nvosd.link(sink)
创建事件循环并向其提供总线消息
loop = GObject.MainLoop()
bus = pipeline.get_bus()
bus.add_signal_watch()
bus.connect ("message", bus_call, loop)
添加探针以获取生成的元数据
# we add probe to the sink pad of the osd element, since by that time,
# the buffer would have had got all the metadata.
osdsinkpad = nvosd.get_static_pad("sink")
if not osdsinkpad:
    sys.stderr.write(" Unable to get sink pad of nvosd \n")

osdsinkpad.add_probe(Gst.PadProbeType.BUFFER, osd_sink_pad_buffer_probe, 0)
启动管道
print("Starting pipeline \n")
pipeline.set_state(Gst.State.PLAYING)
try:
    loop.run()
except:
    pass
# cleaning up as the pipeline comes to an end
pipeline.set_state(Gst.State.NULL)
设置推理间隔
0:每帧推理
1:每隔一帧推断一次(例如,每隔一帧检测一次对象,使用跟踪器在中间进行定位)
2:每三帧推理一次
转到下面提到的配置文件
“/home/nvidia/Downloads/deepstream/sources/python/apps/deepstream-test1/dstest1_pgie_config.txt”
并根据需要更改间隔。
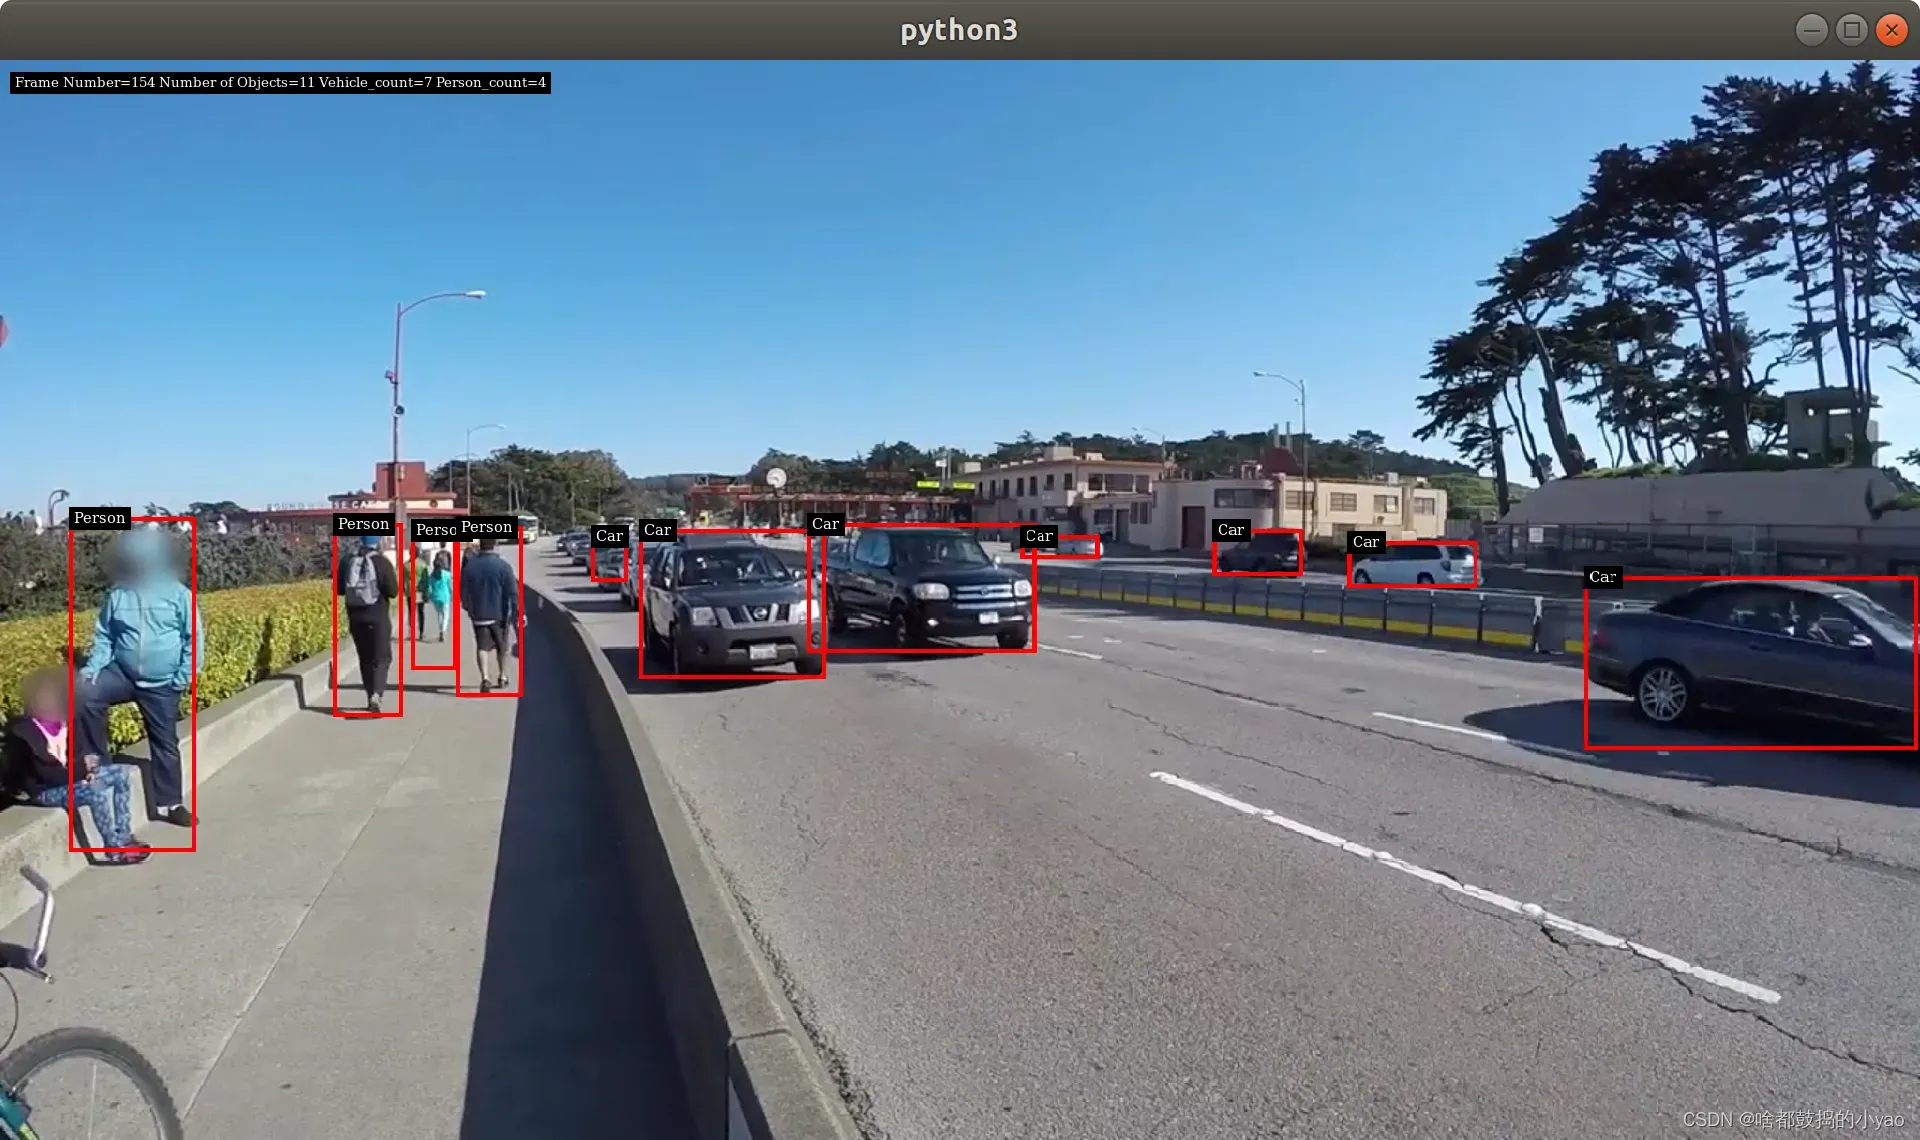
获取显示器的静态图像
from IPython.display import Image
Image(filename='ds_test1.png')
源代码:我是一个Github链接
欢迎各位投稿互相支持
“我的NVIDIA开发者之旅” | 征文活动进行中…
文章出处登录后可见!