原文名称:Attention Is All You Need
原文链接:https://arxiv.org/abs/1706.03762
如果不想看文章的可以看下我在b站上录的视频:https://b23.tv/gucpvt
最近Transformer在CV领域很火,Transformer是2017年Google在Computation and Language上发表的,当时主要是针对自然语言处理领域提出的(之前的RNN模型记忆长度有限且无法并行化,只有计算完时刻后的数据才能计算
时刻的数据,但Transformer都可以做到)。在这篇文章中作者提出了
Self-Attention的概念,然后在此基础上提出Multi-Head Attention,所以本文对Self-Attention以及Multi-Head Attention的理论进行详细的讲解。在阅读本文之前,建议大家先去看下李弘毅老师讲的Transformer的内容。本文的内容是基于李宏毅老师讲的内容加上自己阅读一些源码进行的总结。
文章目录
前言
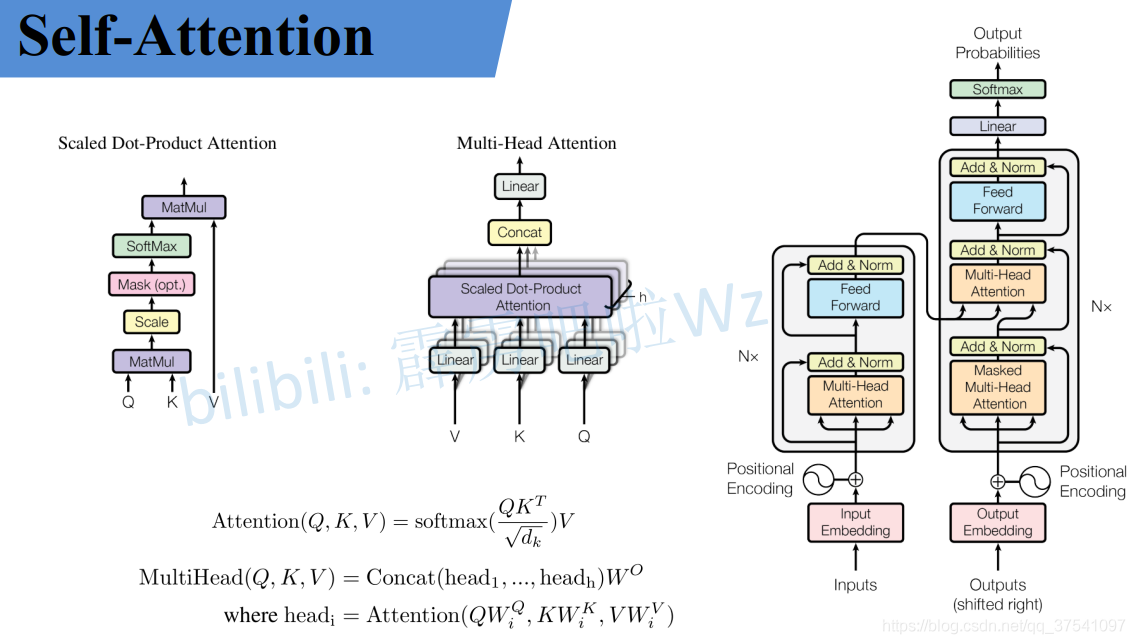
如果之前你有在网上找过self-attention或者transformer的相关资料,基本上都是贴的原论文中的几张图以及公式,如下图,讲的都挺抽象的,反正就是看不懂(可能我太菜的原因)。就像李弘毅老师课程里讲到的"不懂的人再怎么看也不会懂的"。那接下来本文就结合李弘毅老师课上的内容加上原论文的公式来一个个进行详解。
Self-Attention
下面这个图是我自己画的,为了方便大家理解,假设输入的序列长度为2,输入就两个节点,然后通过Input Embedding也就是图中的
将输入映射到
。紧接着分别将
分别通过三个变换矩阵
(这三个参数是可训练的,是共享的)得到对应的
(这里在源码中是直接使用全连接层实现的,这里为了方便理解,忽略偏执)。
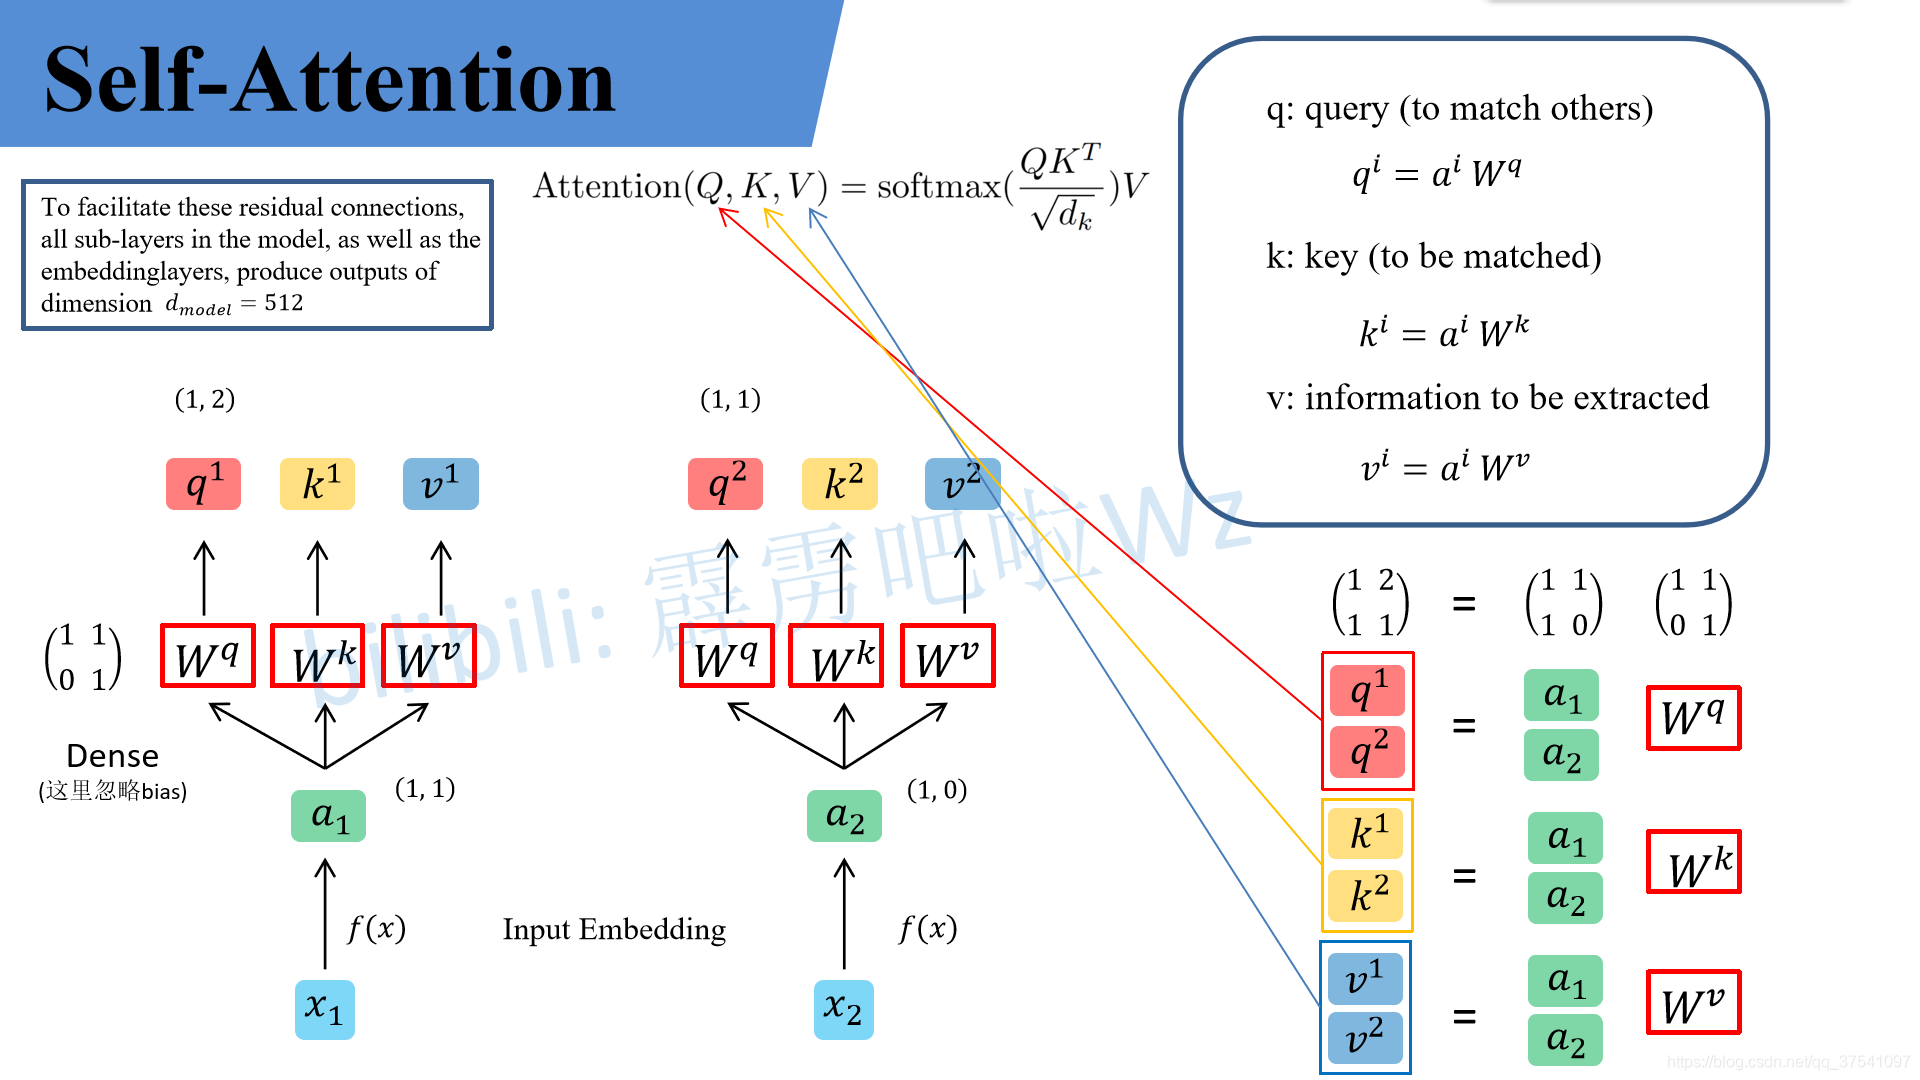
其中
代表query,后续会去和每一个
进行匹配
代表从
中提取得到的信息
- 后续
假设那么:
前面有说Transformer是可以并行化的,所以可以直接写成:
同理我们可以得到和
,那么求得的
就是原论文中的
,
就是
,
就是
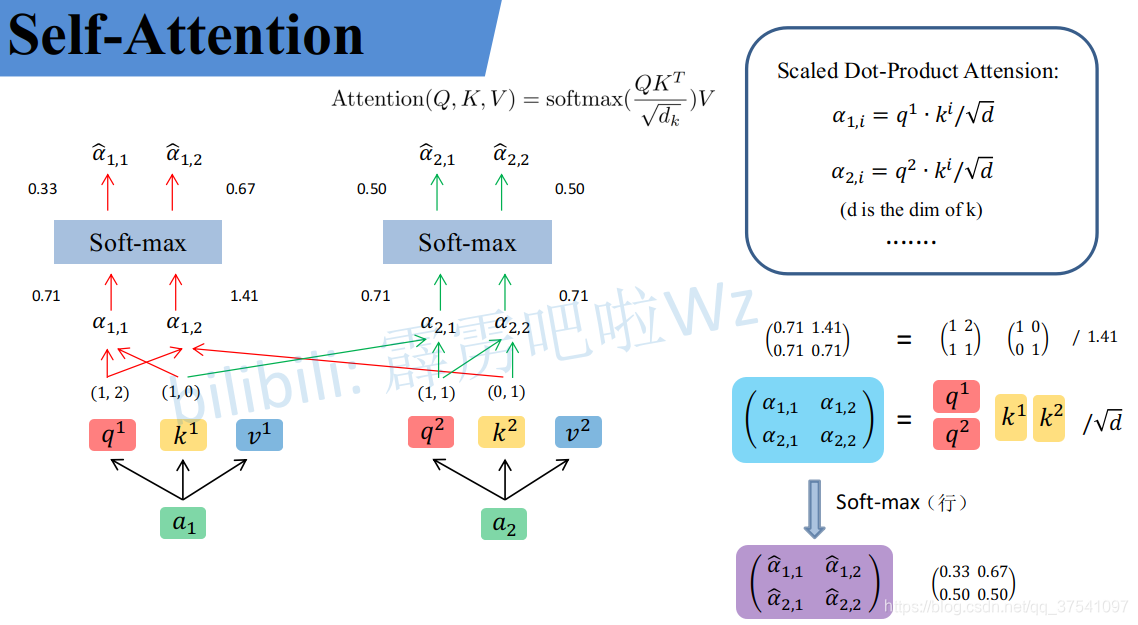
。接着先拿
和每个
进行match,点乘操作,接着除以
得到对应的
,其中
代表向量
的长度,在本示例中等于2,除以
的原因在论文中的解释是“进行点乘后的数值很大,导致通过softmax后梯度变的很小”,所以通过除以
来进行缩放。比如计算
:
同理拿去匹配所有的
能得到
,统一写成矩阵乘法形式:
接着对每一行即和
分别进行softmax处理得到
和
,这里的
相当于计算得到针对每个
的权重。到这我们就完成了
公式中
部分。
Multi-Head Attention
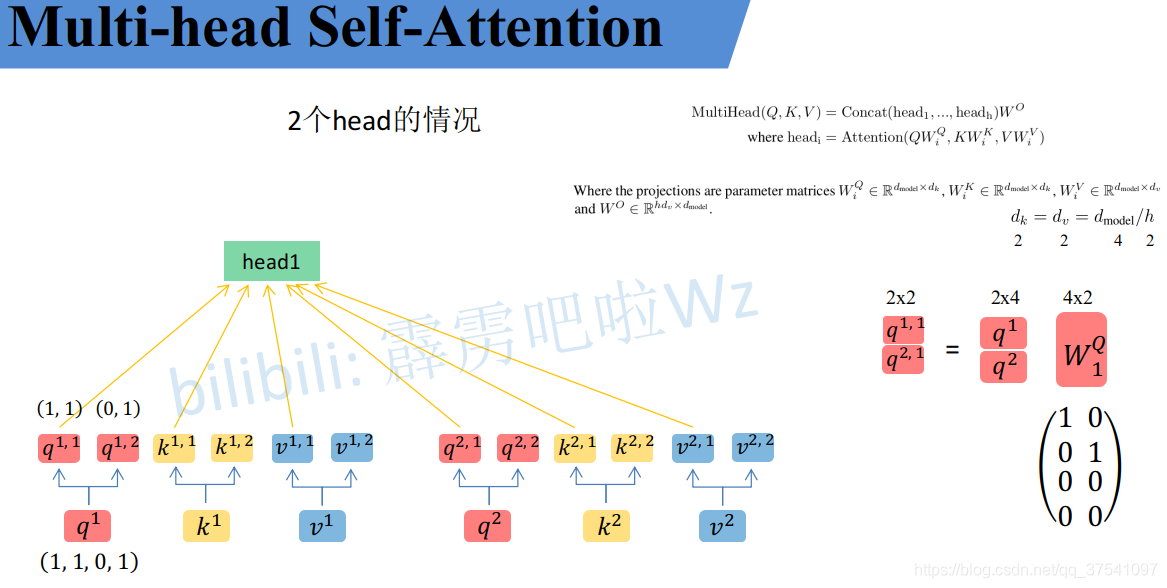
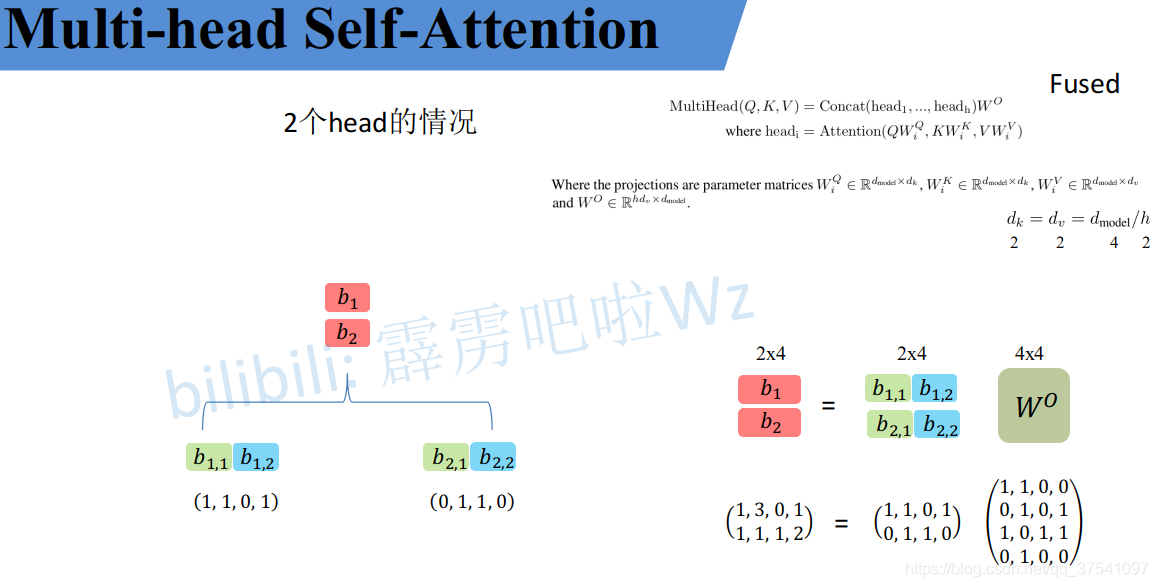
刚刚已经聊完了Self-Attention模块,接下来再来看看Multi-Head Attention模块,实际使用中基本使用的还是Multi-Head Attention模块。原论文中说使用多头注意力机制能够联合来自不同head部分学习到的信息。Multi-head attention allows the model to jointly attend to information from different representation subspaces at different positions.其实只要懂了Self-Attention模块Multi-Head Attention模块就非常简单了。
首先还是和Self-Attention模块一样将分别通过
得到对应的
,然后再根据使用的head的数目
进一步把得到的
均分成
份。比如下图中假设
然后
拆分成
和
,那么
就属于head1,
属于head2。


Self-Attention与Multi-Head Attention计算量对比
在原论文章节3.2.2中最后有说两者的计算量其实差不多。Due to the reduced dimension of each head, the total computational cost is similar to that of single-head attention with full dimensionality.下面做了个简单的实验,这个model文件大家先忽略哪来的。这个Attention就是实现Multi-head Attention的方法,其中包括上面讲的所有步骤。
- 首先创建了一个
Self-Attention模块(单头)a1,然后把proj变量置为Identity(Identity对应的是Multi-Head Attention中最后那个的映射,单头中是没有的,所以置为Identity即不做任何操作)。
- 再创建一个
Multi-Head Attention模块(多头)a2,然后设置8个head。 - 创建一个随机变量,注意shape
- 使用fvcore分别计算两个模块的FLOPs
import torch
from fvcore.nn import FlopCountAnalysis

from model import Attention


def main():
    # Self-Attention
    a1 = Attention(dim=512, num_heads=1)
    a1.proj = torch.nn.Identity()  # remove Wo

    # Multi-Head Attention
    a2 = Attention(dim=512, num_heads=8)

    # [batch_size, num_tokens, total_embed_dim]
    t = (torch.rand(32, 1024, 512),)

    flops1 = FlopCountAnalysis(a1, t)
    print("Self-Attention FLOPs:", flops1.total())

    flops2 = FlopCountAnalysis(a2, t)
    print("Multi-Head Attention FLOPs:", flops2.total())


if __name__ == '__main__':
    main()
终端输出如下, 可以发现确实两者的FLOPs差不多,Multi-Head Attention比Self-Attention略高一点:
Self-Attention FLOPs: 60129542144
Multi-Head Attention FLOPs: 68719476736
其实两者FLOPs的差异只是在最后的上,如果把
Multi-Head Attentio的也删除(即把
a2的proj也设置成Identity),可以看出两者FLOPs是一样的:
Self-Attention FLOPs: 60129542144
Multi-Head Attention FLOPs: 60129542144
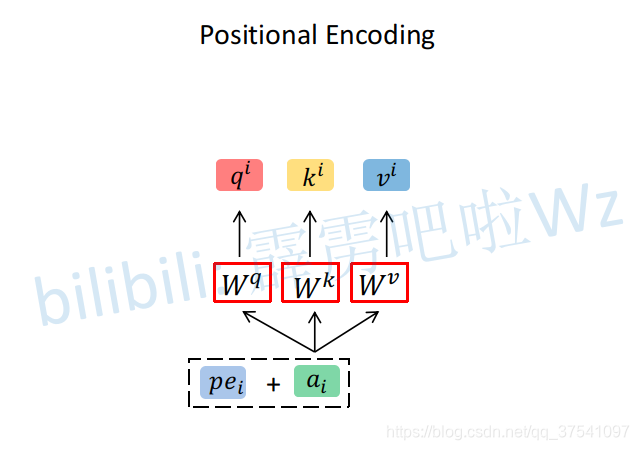
Positional Encoding
如果仔细观察刚刚讲的Self-Attention和Multi-Head Attention模块,在计算中是没有考虑到位置信息的。假设在Self-Attention模块中,输入得到
。对于
而言,
和
离它都是一样近的而且没有先后顺序。假设将输入的顺序改为
,对结果
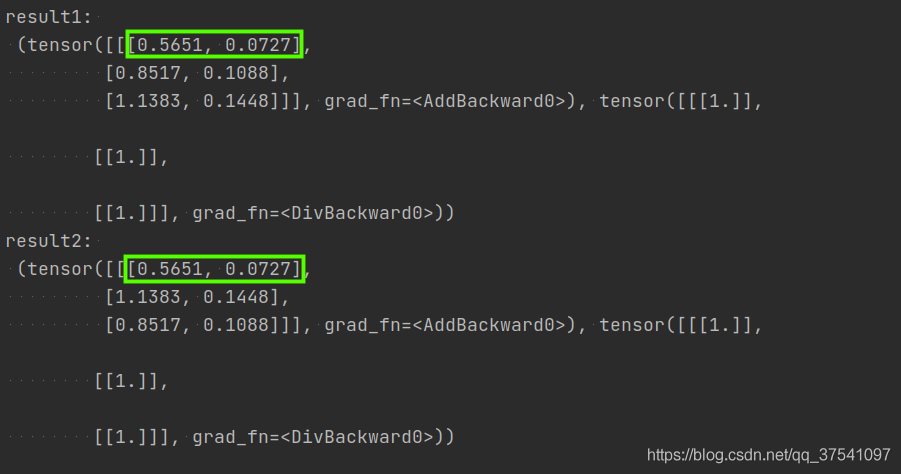
是没有任何影响的。下面是使用Pytorch做的一个实验,首先使用
nn.MultiheadAttention创建一个Self-Attention模块(num_heads=1),注意这里在正向传播过程中直接传入,接着创建两个顺序不同的
变量t1和t2(主要是将
和
的顺序换了下),分别将这两个变量输入Self-Attention模块进行正向传播。
import torch
import torch.nn as nn


m = nn.MultiheadAttention(embed_dim=2, num_heads=1)

t1 = [[[1., 2.],   # q1, k1, v1
       [2., 3.],   # q2, k2, v2
       [3., 4.]]]  # q3, k3, v3

t2 = [[[1., 2.],   # q1, k1, v1
       [3., 4.],   # q3, k3, v3
       [2., 3.]]]  # q2, k2, v2

q, k, v = torch.as_tensor(t1), torch.as_tensor(t1), torch.as_tensor(t1)
print("result1: \n", m(q, k, v))

q, k, v = torch.as_tensor(t2), torch.as_tensor(t2), torch.as_tensor(t2)
print("result2: \n", m(q, k, v))
对比结果可以发现,即使调换了和
的顺序,但对于
是没有影响的。
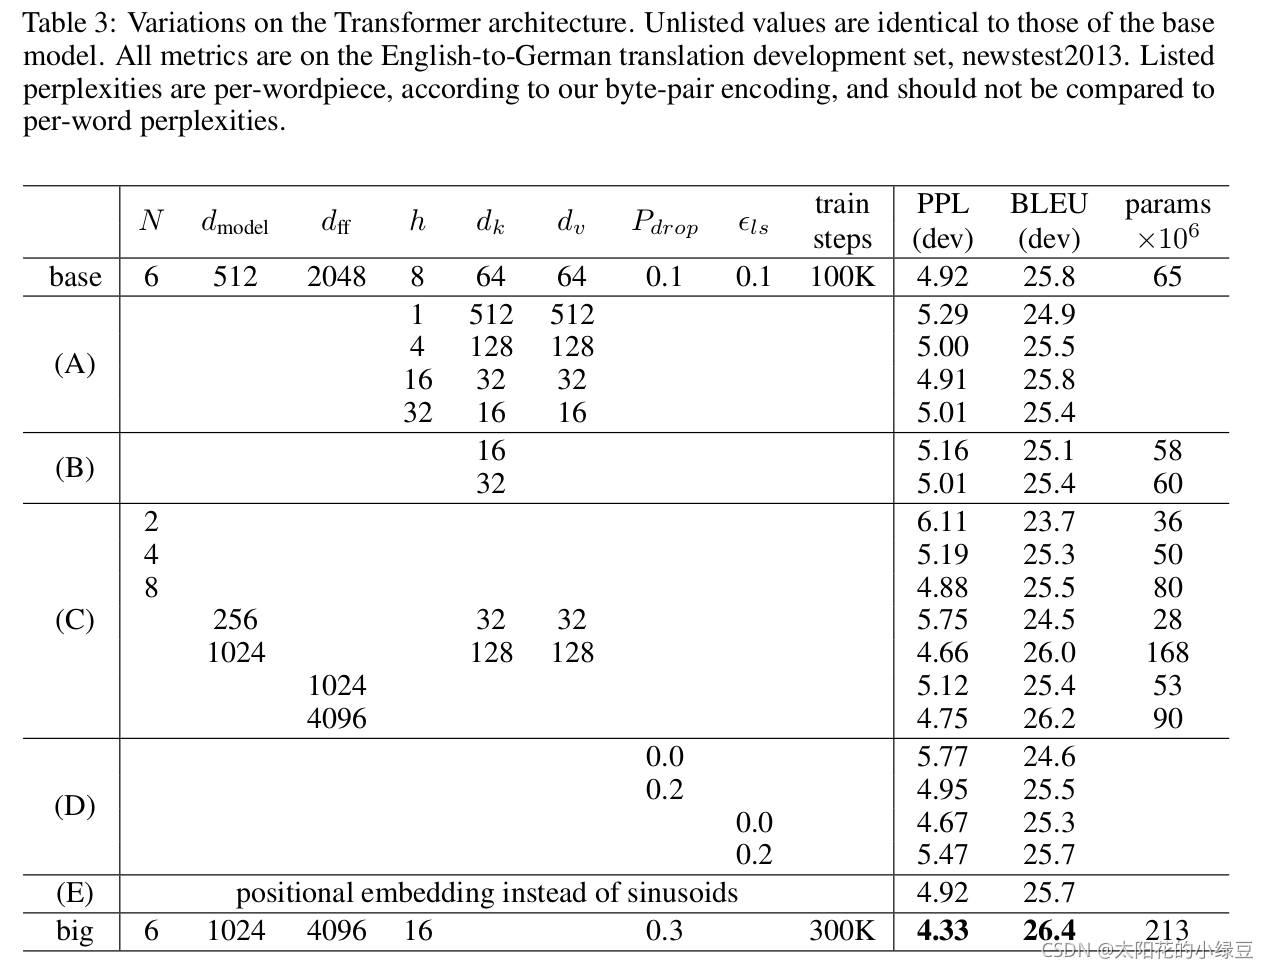
超参对比
关于Transformer中的一些超参数的实验对比可以参考原论文的表3,如下图所示。其中:
- N表示重复堆叠Transformer Block的次数
表示Multi-Head Self-Attention输入输出的token维度(向量长度)
表示在MLP(feed forward)中隐层的节点个数
- h表示Multi-Head Self-Attention中head的个数
表示Multi-Head Self-Attention中每个head的key(K)以及query(Q)的维度
表示dropout层的drop_rate
到这,关于Self-Attention、Multi-Head Attention以及位置编码的内容就全部讲完了,如果有讲的不对的地方希望大家指出。
文章出处登录后可见!