1. MS COCO数据集介绍
MS COCO的全称是Microsoft Common Objects in Context,起源于微软于2014年出资标注的Microsoft COCO数据集。
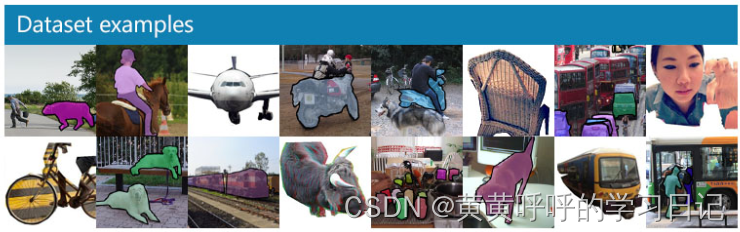
COCO是一个具有非常高的行业地位且规模非常庞大的数据集,用于目标检测、分割、图像描述等等场景。特点包括:
- Object segmentation:对象级分割
- Recognition in context:上下文识别
- Superpixel stuff segmentation:超像素分割
- 330K images (>200K labeled):330万张图像(超过20万张已标注图像)
- 1.5 million object instances:150万个对象实例
- 80 object categories:80个目标类别
- 91 stuff categories:91个物体类别
- 5 captions per image:每张图片有5段描述
- 250,000 people with keypoints:250万个人体关键点标注
关于上面80个目标类别和91个物体类别(不知道翻译的对不对,嘻嘻)的进一步解释。
官方论文中说明:
1.“stuff” categories include materials and objects with no clear boundaries (sky, street, grass).也就是说,stuff类别包含了一些没有明确边界的目标,例如天空、街道、草等等。
2.对于目标检测任务来说,80类是完全足够的。而包含91类的stuff category能够提供更多上下文信息。所以,80 object categories 是91 stuff categories的子集。
3. 2014年发布的数据集中只包含了80类。(后续我们从代码中也能看到,2014的数据集中,虽然类别id从1-91,但实际上有11类没有被使用。)
4. 相差的11 categories: hat, shoe, eyeglasses (too many instances), mirror, window, door, street sign (ambiguous and difficult to label), plate, desk (due to confusion with bowl and dining table, respectively) and blender, hair brush (too few instances).
论文链接:下载(在官网首页也能找到下载链接)

2. COCO数据集下载
官网首页,点击DataSet-Download可以进入下载界面。
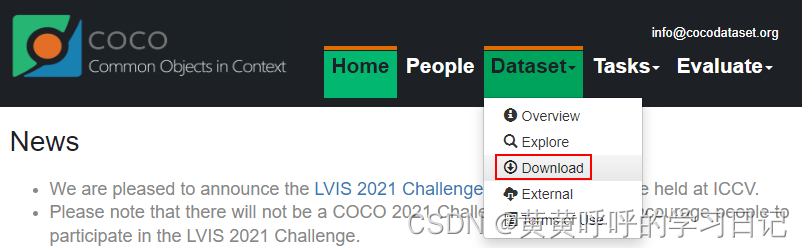
可以下载到对应的数据集。
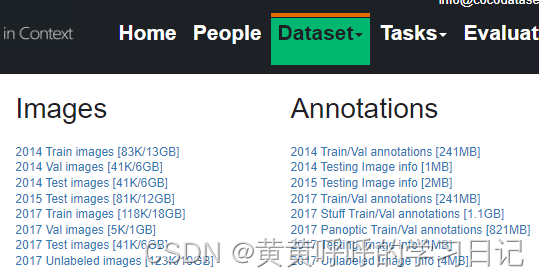
其中,
Train images:训练集,训练过程中使用到的图像
Val images:验证集,验证过程中使用到的图像
Test images:测试集,测试过程中使用到的图像(如果使用test数据集,那么可以把验证集合训练集一起用于训练),后续例子中没有下载使用
Train/Val annotations:训练集和验证集的标注文件,json格式
下载后,压缩到同一个文件夹中,以COCO2017为例,形成如下结构:
COCO_2017
├── val2017 # 验证集所在文件夹,包含5000张图像
├── train2017 # 训练集所在文件夹,包含118287张图像
├── annotations # 标注文件所在文件夹,包含如下文件
├── instances_train2017.json # 目标检测、分割任务的训练集标注文件
├── instances_val2017.json # 目标检测、分割任务的验证集标注文件文件
├── person_keypoints_train2017.json # 人体关键点检测的训练集标注文件
├── person_keypoints_val2017.json # 人体关键点检测的验证集标注文件
├── captions_train2017.json # 图像描述的训练集标注文件
├── captions_val2017.json # 图像描述的验证集标注文件
3. COCO数据格式
官方主页有对数据格式进行描述。
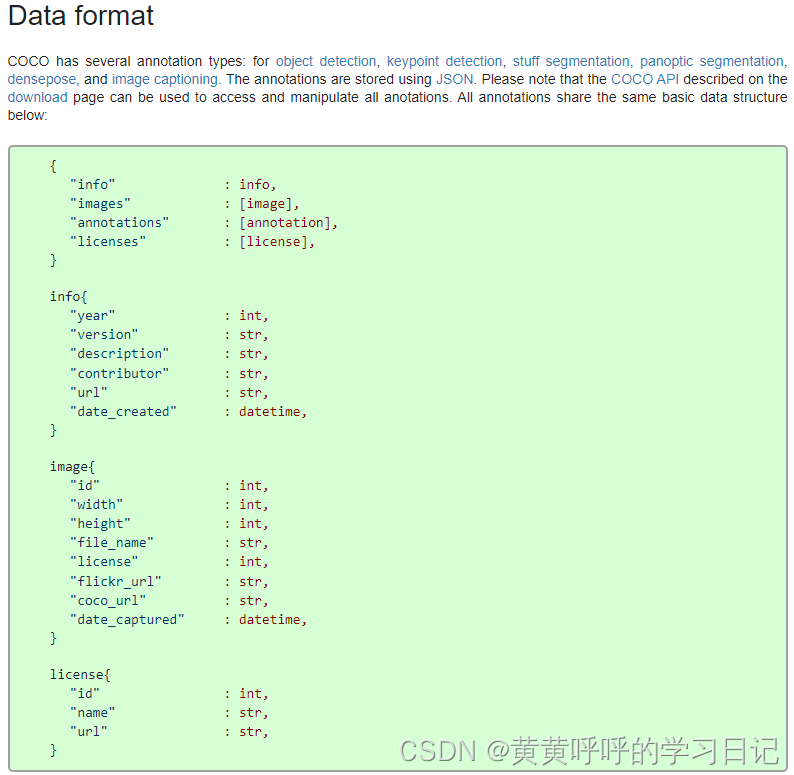
此处使用json包来对数据进行简单查看。
import json

json_path = "./data/annotations/instances_val2014.json"
json_labels = json.load(open(json_path,'r'))
json_labels.keys()
此时返回结果为:
dict_keys(['info', 'licenses', 'categories', 'images', 'annotations'])3.1 info字段
json_labels['info']此时返回结果为:
{'description': 'COCO 2014 Dataset',
 'url': 'http://cocodataset.org',
 'version': '1.0',
 'year': 2014,
 'contributor': 'COCO Consortium',
 'date_created': '2017/09/01'}
3.2 licenses字段
一个列表,包含了不同类型的licenses,并在images中按照id号被引用,基本不参与到数据解析过程中。
json_labels['licenses']此时返回结果为:
[{'url': 'http://creativecommons.org/licenses/by-nc-sa/2.0/',
  'id': 1,
  'name': 'Attribution-NonCommercial-ShareAlike License'},
 {'url': 'http://creativecommons.org/licenses/by-nc/2.0/',
  'id': 2,
  'name': 'Attribution-NonCommercial License'},
  ...,
  'name': 'No known copyright restrictions'},
 {'url': 'http://www.usa.gov/copyright.shtml',
  'id': 8,
  'name': 'United States Government Work'}]
3.3 categories字段
一个列表,元素个数等于类别数,列表中每个元素都是一个dict,对应每个类别的信息,包括所属父类supercategory、类别id、子类名称name。
COCO2014数据集共计有80类(按照子类统计)。
json_labels['categories']此时返回结果为:
[{'supercategory': 'person', 'id': 1, 'name': 'person'},
 {'supercategory': 'vehicle', 'id': 2, 'name': 'bicycle'},
 {'supercategory': 'vehicle', 'id': 3, 'name': 'car'},
......
 {'supercategory': 'indoor', 'id': 89, 'name': 'hair drier'},
 {'supercategory': 'indoor', 'id': 90, 'name': 'toothbrush'}]
注意,虽然id超过了80,但实际上中间有些数字是缺失的,也就是stuff中11类并没有被使用。
len(json_labels['categories']) # 此时返回80另外,可以发现id是从1开始的,实际上0会给到背景这一类别。
3.4 images字段
一个列表,元素个数等于图像数,列表中每个元素都是一个dict,对应一张图片的相关信息,包括图像名称、宽度、高度、id等信息,其中的id唯一地标识每一张图片。
json_labels['images']此时返回结果为:
[{'license': 1,
  'file_name': 'COCO_val2014_000000556101.jpg',
  'coco_url': 'http://images.cocodataset.org/val2014/COCO_val2014_000000556101.jpg',
  'height': 640,
  'width': 480,
  'date_captured': '2013-11-16 15:42:33',
  'flickr_url': 'http://farm8.staticflickr.com/7442/9281624471_f030c5331e_z.jpg',
  'id': 556101},
     ......,
 {'license': 1,
  'file_name': 'COCO_val2014_000000281028.jpg',
  'coco_url': 'http://images.cocodataset.org/val2014/COCO_val2014_000000281028.jpg',
  'height': 480,
  'width': 640,
  'date_captured': '2013-11-17 04:16:09',
  'flickr_url': 'http://farm4.staticflickr.com/3235/2888670184_48d33767a0_z.jpg',
  'id': 281028}]
3.5 annotations字段
一个列表,元素个数等于数据集中所有标注的目标个数(一张图像可能有多个标注目标),列表中每个元素都是一个dict,对应一个目标的标注信息。包括:
segmentation:目标的分割点集(polygon多边形)
- 使用polygon时,则记录的是多边形的坐标点,连续两个数值表示一个点的坐标位置,点的数量为偶数。具体的,"segmentation": [[499.71, 397.28,……342.71, 172.31]]
- 使用RLE(Run Length Encoding)格式时,大致原理为:例如将图像中目标区域的像素值设定为1,背景设定为0,则形成一个张二值图,例如:0011110011100000……但是这样比较占存储空间,于是可以采用统计有多少个0和1的形式进行局部压缩,因此上面的RLE编码形式为:2-0-4-1-2-0-3-1-5-0……(表示有2个0,4个1,2个0,3个1,5个0)。具体的,"segmentation": {"counts": [66916, 6, 587,….. 1, 114303], "size": [594, 640]}
- 官方说:使用RLE是实现了压缩存储和计算高效。
area:区域面积
image_id:该标注所在的图像id
iscrowd:0或1。一般情况下,0表示标注单个目标,此时segmentation使用polygon表示;1表示标注的是一组目标,此时segmentation使用RLE格式。
bbox:目标的矩形标注框,[x,y,width,height](左上角x,左上角y坐标,宽,高)
category_id:该标注的类别id
id:当前标注的id,每个id对应一个标注,一张图片上可能有多个目标标注
json_labels['annotations'][2]此时返回结果为:
{'segmentation': [[334.39,
   383.8,
   ......
   332.88,
   376.99]],
 'area': 1164.7766999999994,
 'iscrowd': 0,
 'image_id': 556101,
 'bbox': [294.28, 339.54, 40.11, 59.4],
 'category_id': 31,
 'id': 1433627}
4. 官方COCO API使用
因为完整的COCO数据集比较大,后续使用COCO2014的子集作为例子。
官方有给出MS COCO数据集读取和操作的使用demo,参考GitHub:链接。
4.1 安装
Linux系统安装pycocotools:
pip install pycocotoolsWindows系统安装pycocotools:
pip install pycocotools-windows本人Windows系统,配置清华镜像源,安装pycocotools上述命令亲测好使。
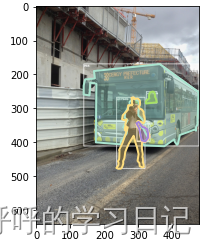
4.2 绘制annotation
from pycocotools.coco import COCO
from PIL import Image, ImageDraw
from matplotlib import pyplot as plt

anno_file = './data/annotations/instances_val2014.json'
# 加载coco标注文件
coco = COCO(anno_file)
# 获取所有图片的id
ids = list(coco.imgs.keys())  # 返回结果:[556101,509020,...]共497个元素
# print("number of images: {}".format(len(ids)))

# 获取目标类别,最终为一个字典:classs_dict={1: 'person',2: 'bicycle',...,90: 'toothbrush'}
classs_dict = {}
cat_ids = coco.loadCats(coco.getCatIds())
for cat in cat_ids:
    classs_dict[cat["id"]] = cat["name"]

# 获取第一章图片的标注id
ann_ids = coco.getAnnIds(ids[0])  # 返回结果:[163368, 192442, 1433627, 1687504, 2210763],当前图片中所有标注的id值

# 根据annotation id获取所有目标的标注信息
anns = coco.loadAnns(ann_ids)  # 返回结果:一个由5个字典组成的列表,每个字典是一个annotation

# 获取图片名称
path = coco.loadImgs(ids[0])[0]['file_name']  # 'COCO_val2014_000000556101.jpg'
# 获取图片
img = Image.open(os.path.join(img_path, path)).convert('RGB')

plt.imshow(img)
# 绘制annotation
coco.showAnns(anns)
#plt.show()

draw = ImageDraw.Draw(img)
# 绘制bbox
for ann in anns:
    x, y, w, h = ann["bbox"]
    x1, y1, x2, y2 = x, y, int(x + w), int(y + h)
    draw.rectangle((x1, y1, x2, y2),width=2)
    draw.text((x1, y1), classs_dict[ann["category_id"]])

# 展示图片
plt.imshow(img)
plt.show()
此时返回结果:
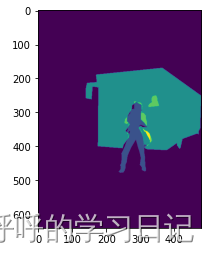
4.3 绘制mask
from pycocotools.coco import COCO
from PIL import Image, ImageDraw
from matplotlib import pyplot as plt

anno_file = './data/annotations/instances_val2014.json'
# 加载coco标注文件
coco = COCO(anno_file)
# 获取所有图片的id
ids = list(coco.imgs.keys())  # 返回结果:[556101,509020,...]共497个元素
# print("number of images: {}".format(len(ids)))

# 获取目标类别,最终为一个字典:classs_dict={1: 'person',2: 'bicycle',...,90: 'toothbrush'}
classs_dict = {}
cat_ids = coco.loadCats(coco.getCatIds())
for cat in cat_ids:
    classs_dict[cat["id"]] = cat["name"]

# 获取第一章图片的标注id
ann_ids = coco.getAnnIds(ids[0])  # 返回结果:[163368, 192442, 1433627, 1687504, 2210763],当前图片中所有标注的id值

# 根据annotation id获取所有目标的标注信息
anns = coco.loadAnns(ann_ids)  # 返回结果:一个由5个字典组成的列表,每个字典是一个annotation

# 获取图片名称
path = coco.loadImgs(ids[0])[0]['file_name']  # 'COCO_val2014_000000556101.jpg'
# 获取图片
img = Image.open(os.path.join(img_path, path)).convert('RGB')

mask = coco.annToMask(anns[0])
for i in range(len(anns)):
    mask += coco.annToMask(anns[i])

# 展示图片
plt.imshow(img)
plt.imshow(mask)

plt.show()
此时返回结果:
后续如有新增,会逐渐补充。
如果需要这个小小的COCO2014数据集,我想想办法嘿。
文章出处登录后可见!