前言:paddleocr可以说是最近ocr的主⼒军,⼤家对于paddleocr的认可度是相当的⾼,特别是最近推出的轻量级模型,可以识别近80种语⾔,并且效率是这三种ocr工具种最⾼的,相同的图⽚,paddleocr只需要2秒左右。对于多场景的⼩语种需求,需要再多多训练模型。paddleocr最⼤的好处是⽂档健全,⽀持自己训练模型,所以对于⽹上⼤多数的⽂章来说有很多使⽤者已经基于这个平台开始训练自己的模型,使⽤场景⾮常⼴泛。
目录
一、介绍
1、什么是OCR?
光学字符识别(Optical Character Recognition, OCR),ORC是指对包含文本资料的图像文件进行分析识别处理,获取文字及版面信息的技术,检测图像中的文本资料,并且识别出文本的内容。
那么有哪些应用场景呢?
其实我们日常生活中处处都有ocr的影子,比如在疫情期间身份证识别录入信息、车辆车牌号识别、自动驾驶等。我们的生活中,机器学习已经越来越多的扮演着重要角色,也不再是神秘的东西。
OCR的技术路线是什么呢?
ocr的运行方式:输入->图像预处理->文字检测->文本识别->输出
2、 PaddleOCR
PaddleOCR支持多种与OCR相关的前沿算法,并在此基础上开发了行业特色模型/解决方案PP-OCR和PP-Structure,打通了数据生产、模型训练、压缩、推理和部署的全流程。
PaddleOCR分为文本检测、文本识别和方向分类器三部分,其中文本检测有三个模型,分别是MobileNetV3、ResNet18_vd和ResNet50,其中最常使用的是MobileNetV3模型,整体比较小,适合应用于手机端。文本识别只有一个MobileNetV3预训练模型。方向分类器使用默认的模型。
2.1 PP-OCR简介和特点
PP-OCR是自主研发的一款实用的超轻量级OCR系统,在重新实现学术算法的基础上,兼顾精度和速度的平衡,进行了精简和优化。
PP-OCRv2系统输送管道如下:
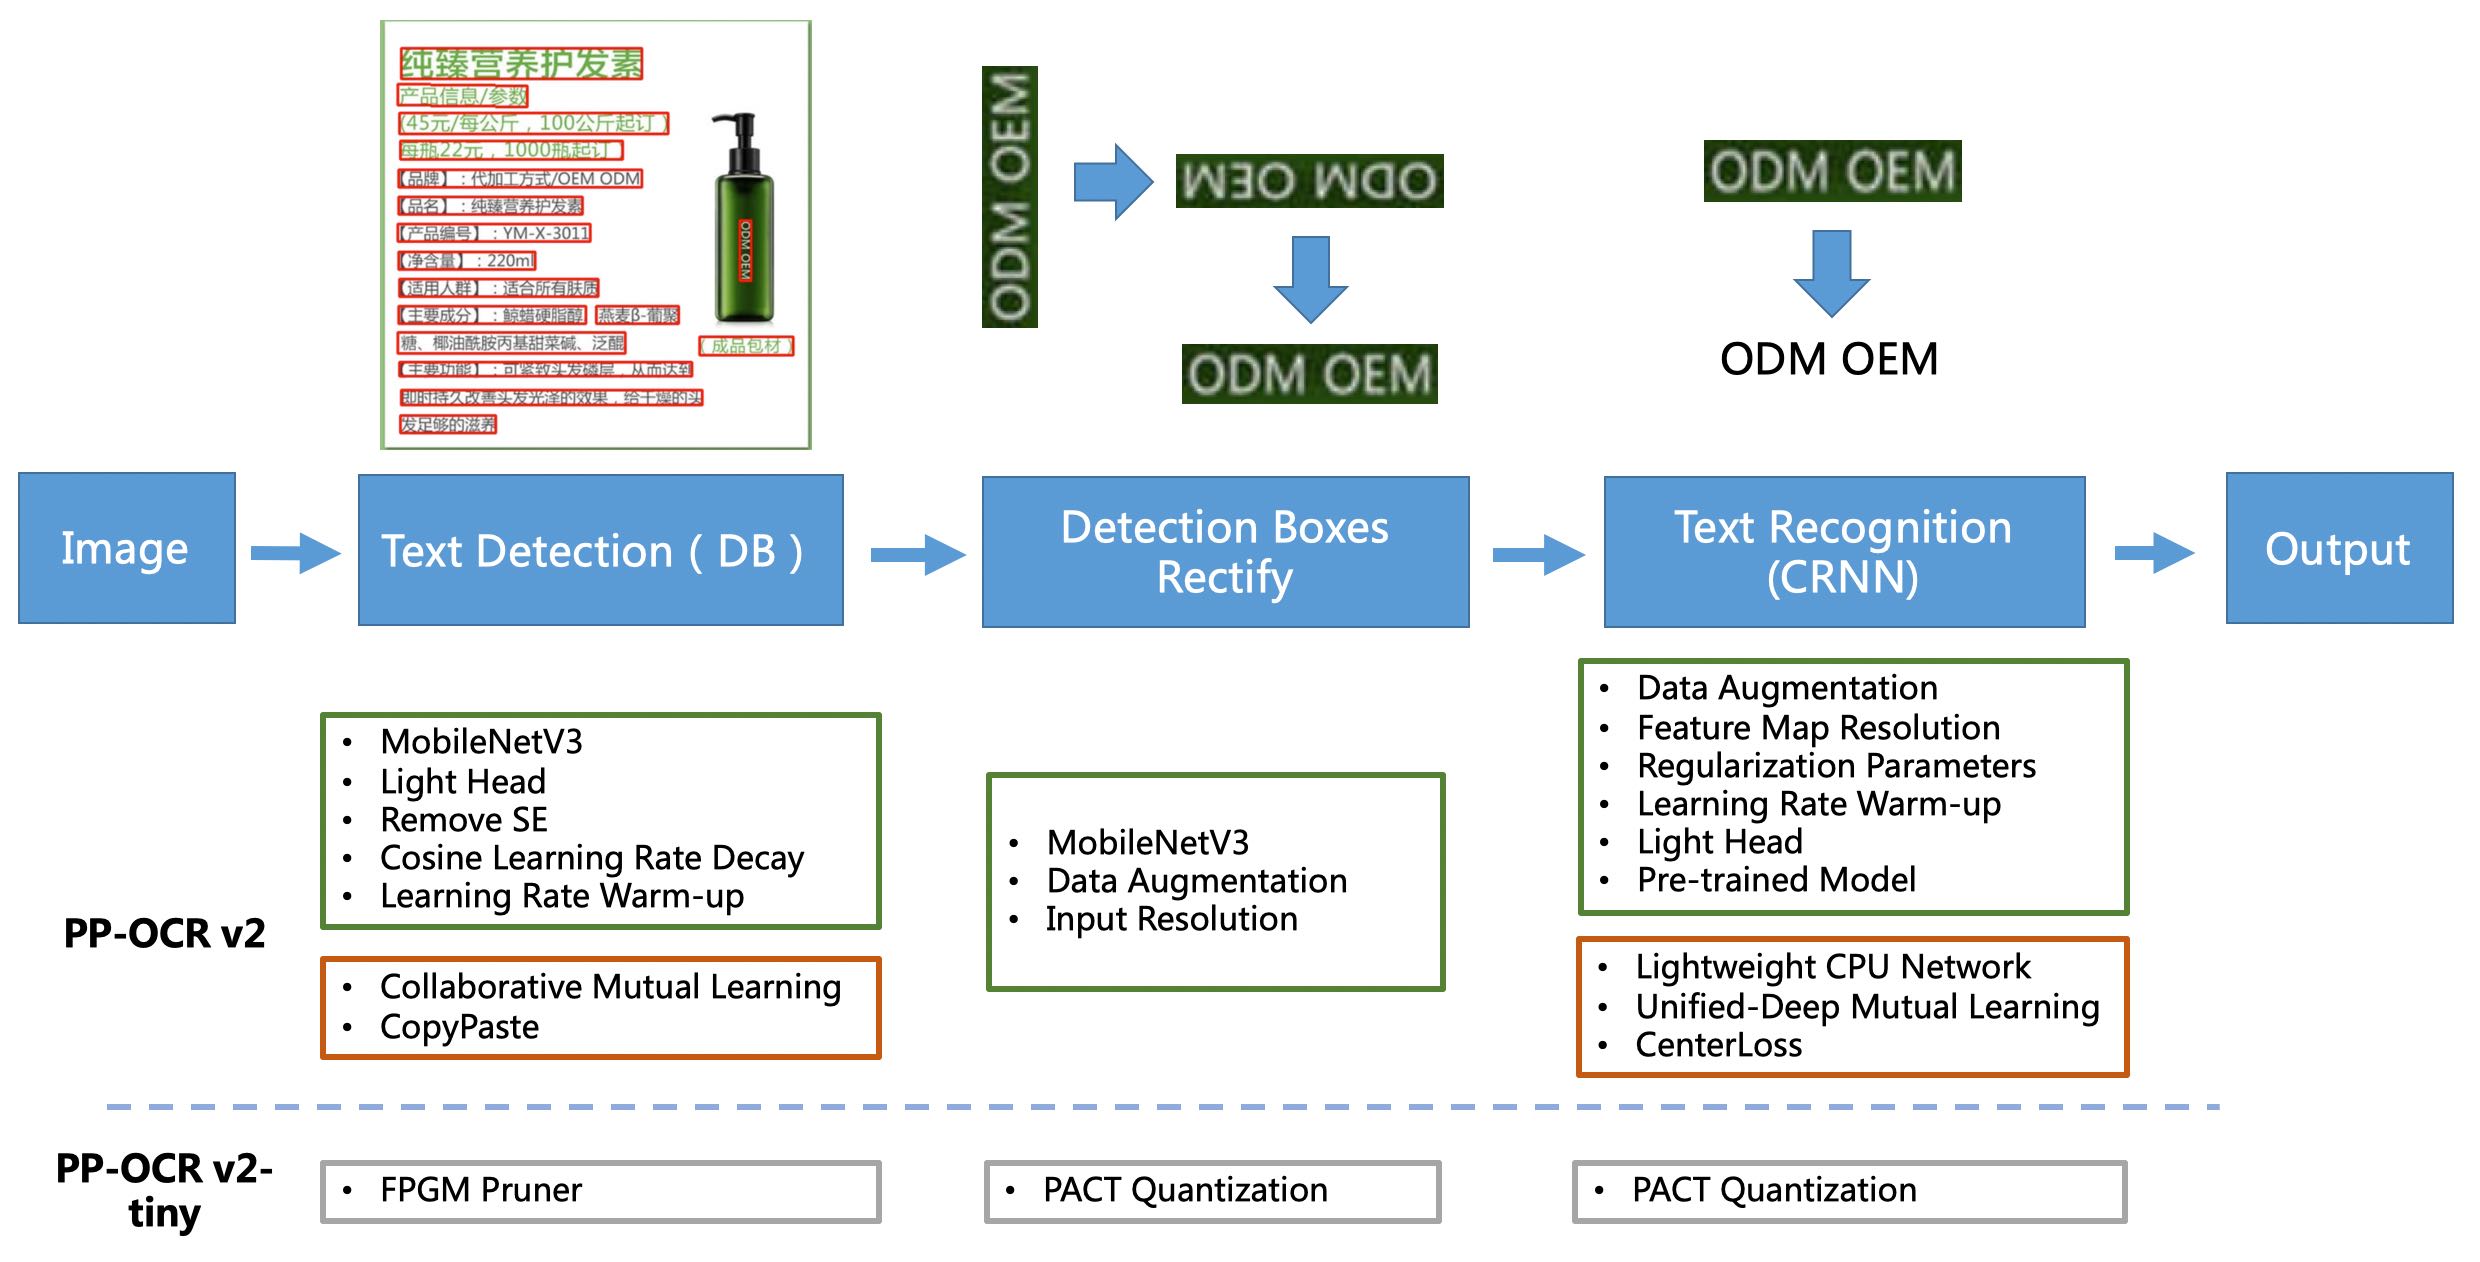
PP-OCR
PP-OCR是一个两阶段的OCR系统,其中文本检测算法为DB,文本识别算法为CRNN。此外,在检测和识别模块之间增加了一个文章方向分类器来处理不同方向的文本。
PP-OCR从骨干网络选择与调整、预测头设计、数据增强、学习率转换策略、正则化参数选择、预训练模型使用、模型自动剪裁与量化等8个方面采用19种有效策略进行优化瘦身每个模块的型号(如上图绿色框所示)。最终的结果是一个整体大小为3.5M的超轻量级中英文OCR模型和一个2.8M的英文数字OCR模型。
PP-OCRv2
在PP-OCR的基础上,PP-OCRv2在五个方面进一步优化。检测模型采用CML(Collaborative Mutual Learning)知识蒸馏策略和CopyPaste数据扩展策略。识别模型采用LCNet轻量级骨干网络、U-DML知识蒸馏策略和增强的CTC损失函数改进(如上图红框所示),进一步提升了推理速度和预测效果。
PP-OCRv3
PP-OCRv3在PP-OCRv2的基础上对检测模型和识别模型进行了9个方面的升级:
- PP-OCRv3检测器对PP-OCRv2中提出的CML(Collaborative Mutual Learning)文本检测策略进行了升级,进一步优化了教师模型和学生模型的效果。在教师模型的优化中,提出了一个大感受野的泛模块LK-PAN,并采用了DML蒸馏策略;在学生模型的优化中,提出了一种带有残差注意机制的FPN模块RSE-FPN。
- PP-OCRv3 识别器基于文本识别算法SVTR进行了优化。SVTR通过引入transformers结构不再采用RNN,可以更有效地挖掘文本行图像的上下文信息,从而提高文本识别能力。PP-OCRv3采用轻量级文本识别网络SVTR_LCNet,通过attention引导训练CTC,数据增强策略TextConAug,通过自监督TextRotNet、UDML(Unified Deep Mutual Learning)和UIM(Unlabeled Images Mining)进行更好的预训练模型来加速模型并提高效果。
2.2 特点
- 超轻量级PP-OCRv3系列机型:检测(3.6M)+方向分类器(1.4M)+识别12M)=17.0M
- 超轻量级PP-OCRv2系列机型:检测(3.1M)+方向分类器(1.4M)+识别8.5M)=13.0M
- 超轻量级PP-OCR移动系列机型:检测(3.0M)+方向分类器(1.4M)+识别(5.0M)=9.4M
- 一般PP-OCR服务器系列机型:检测(47.1M)+方向分类器(1.4M)+识别(94.9M)=143.4M
- 支持中文、英文、数字识别、竖排文本识别、长文本识别
- 支持多语言识别:韩语、日语、德语、法语等约80种语言
3、模型训练
3.1 文本检测
1)数据和权重准备
1.1)数据准备
要准备数据集,请参阅ocr_datasets。
1.2) 下载预训练模型
首先下载预训练模型。PaddleOCR 的检测模型目前支持 3 个主干,分别是 MobileNetV3、ResNet18_vd 和 ResNet50_vd。您可以根据需要使用PaddleClas中的模型来替换骨干。并且骨干预训练权重的响应下载链接可以在(https://github.com/PaddlePaddle/PaddleClas/blob/release%2F2.0/README_cn.md#resnet%E5%8F%8A%E5% 85%B6vd%E7%B3%BB%E5%88%97)。
cd PaddleOCR/
# Download the pre-trained model of MobileNetV3
wget -P ./pretrain_models/ https://paddleocr.bj.bcebos.com/pretrained/MobileNetV3_large_x0_5_pretrained.pdparams
# or, download the pre-trained model of ResNet18_vd
wget -P ./pretrain_models/ https://paddleocr.bj.bcebos.com/pretrained/ResNet18_vd_pretrained.pdparams
# or, download the pre-trained model of ResNet50_vd
wget -P ./pretrain_models/ https://paddleocr.bj.bcebos.com/pretrained/ResNet50_vd_ssld_pretrained.pdparams
2) 培训
2.1) 开始训练
如果安装了 CPU 版本,请在配置中将参数设置use_gpu为false。
python3 tools/train.py -c configs/det/det_mv3_db.yml  \
-o Global.pretrained_model=./pretrain_models/MobileNetV3_large_x0_5_pretrained在上面的说明中,使用-c选择训练使用configs/det/det_db_mv3.yml配置文件。配置文件的详细解释请参考config。
您也可以-o在不修改 yml 文件的情况下更改训练参数。例如,将训练学习率调整为 0.0001
# single GPU training
python3 tools/train.py -c configs/det/det_mv3_db.yml -o   \
         Global.pretrained_model=./pretrain_models/MobileNetV3_large_x0_5_pretrained  \
         Optimizer.base_lr=0.0001

# multi-GPU training
# Set the GPU ID used by the '--gpus' parameter.
python3 -m paddle.distributed.launch --gpus '0,1,2,3'  tools/train.py -c configs/det/det_mv3_db.yml -o Global.pretrained_model=./pretrain_models/MobileNetV3_large_x0_5_pretrained

# multi-Node, multi-GPU training
# Set the IPs of your nodes used by the '--ips' parameter. Set the GPU ID used by the '--gpus' parameter.
python3 -m paddle.distributed.launch --ips="xx.xx.xx.xx,xx.xx.xx.xx" --gpus '0,1,2,3' tools/train.py -c configs/det/det_mv3_db.yml \
-o Global.pretrained_model=./pretrain_models/MobileNetV3_large_x0_5_pretrained注意:多节点多GPU训练,需要将ips前面命令中的值替换为自己机器的地址,并且机器之间要能ping通。此外,当我们开始训练时,它需要在多台机器上分别激活命令。查看机器IP地址的命令是ifconfig。
如果想进一步加快训练速度,可以使用自动混合精度训练。对于单卡训练,命令如下:
python3 tools/train.py -c configs/det/det_mv3_db.yml \
     -o Global.pretrained_model=./pretrain_models/MobileNetV3_large_x0_5_pretrained \
     Global.use_amp=True Global.scale_loss=1024.0 Global.use_dynamic_loss_scaling=True
2.2) 加载训练好的模型并继续训练
如果您希望加载训练好的模型并再次继续训练,您可以将参数指定Global.checkpoints为要加载的模型路径。
例如:
python3 tools/train.py -c configs/det/det_mv3_db.yml -o Global.checkpoints=./your/trained/model注意: 的优先级Global.checkpoints高于Global.pretrained_model,即同时指定两个参数时,Global.checkpoints会先加载 指定的模型。如果指定的模型路径Global.checkpoints错误,Global.pretrained_model将加载指定的模型路径。
2.3) 新骨干训练
network部分完成了网络的搭建,PaddleOCR将网络分为四个部分,分别在ppocr/modeling下。进入网络的数据会依次经过这四个部分(transforms->backbones->ecks->heads)。
├── architectures # Code for building network
├── transforms    # Image Transformation Module
├── backbones     # Feature extraction module
├── necks         # Feature enhancement module
└── heads # Output module如果要替换的Backbone在PaddleOCR中有对应的实现,可以直接修改Backbone配置yml文件部分的参数。
但是,如果您想使用新的 Backbone,更换主干的示例如下:
- 在ppocr/modeling/backbones文件夹下新建一个文件,例如 my_backbone.py。
- 在my_backbone.py文件中添加代码,示例代码如下:
import paddle
import paddle.nn as nn
import paddle.nn.functional as F


class MyBackbone(nn.Layer):
    def __init__(self, *args, **kwargs):
        super(MyBackbone, self).__init__()
        # your init code
        self.conv = nn.xxxx

    def forward(self, inputs):
        # your network forward
        y = self.conv(inputs)
return y- 在ppocr/modeling/backbones/_ init_ .py文件中导入添加的模块。
添加网络的四部分模块后,只需要在配置文件中配置即可使用,如:
  Backbone:
    name: MyBackbone
args1: args1注意:有关替换 Backbone 和其他 mudule 的更多详细信息可以在doc中找到。
2.4) 混合精度训练
如果想进一步加快训练速度,可以使用Auto Mixed Precision Training,以单机单gpu为例,命令如下:
python3 tools/train.py -c configs/det/det_mv3_db.yml \
     -o Global.pretrained_model=./pretrain_models/MobileNetV3_large_x0_5_pretrained \
     Global.use_amp=True Global.scale_loss=1024.0 Global.use_dynamic_loss_scaling=True
2.5) 分布式训练
多机多gpu训练时,使用--ips参数设置使用的机器IP地址,使用--gpus参数设置使用的GPU ID:
python3 -m paddle.distributed.launch --ips="xx.xx.xx.xx,xx.xx.xx.xx" --gpus '0,1,2,3' tools/train.py -c configs/det/det_mv3_db.yml \
-o Global.pretrained_model=./pretrain_models/MobileNetV3_large_x0_5_pretrained注意:使用多机多gpu训练时,需要将上面命令中的ips值替换为自己机器的地址,机器需要能够互相ping通。此外,训练需要在多台机器上单独启动。查看机器ip地址的命令是ifconfig。
2.6) 知识蒸馏训练
PaddleOCR 支持知识蒸馏,用于文本检测训练过程。有关详细信息,请参阅文档。
2.7) 其他平台训练(Windows/macOS/Linux DCU)
-
Windows GPU/CPU Windows平台与Linux平台略有不同:Windows平台只支持
single gpu训练和推理,训练指定GPUset CUDA_VISIBLE_DEVICES=0在Windows平台上,DataLoader只支持单进程模式,所以需要设置num_workers为0; -
不支持macOS GPU模式,需要
use_gpu在配置文件中设置为False,其余训练评估预测命令与Linux GPU完全相同。 -
Linux DCU 在 DCU 设备上运行需要设置环境变量
export HIP_VISIBLE_DEVICES=0,1,2,3,其余训练和评估预测命令与 Linux GPU 完全相同。
3.) 评估与测试
3.10 评价
PaddleOCR 计算了三个指标来评估 OCR 检测任务的性能:Precision、Recall 和 Hmean(F-Score)。
运行以下代码计算评价指标。结果将保存在save_res_path配置文件中指定的测试结果文件中det_db_mv3.yml
评估时,设置后处理参数box_thresh=0.6, unclip_ratio=1.5. 如果您使用不同的数据集、不同的模型进行训练,则应调整这两个参数以获得更好的结果。
Global.save_model_dir训练时的模型参数默认保存在该目录下。评估指标时,需要设置Global.checkpoints指向保存的参数文件。
python3 tools/eval.py -c configs/det/det_mv3_db.yml -o Global.checkpoints="{path/to/weights}/best_accuracy" PostProcess.box_thresh=0.6 PostProcess.unclip_ratio=1.5- 注意:
box_thresh和unclip_ratio是DB后处理所需的参数,在评估EAST和SAST模型时不需要设置。
3.2 测试
在单张图片上测试检测结果:
python3 tools/infer_det.py -c configs/det/det_mv3_db.yml -o Global.infer_img="./doc/imgs_en/img_10.jpg" Global.pretrained_model="./output/det_db/best_accuracy"测试DB模型时,调整后处理阈值:
python3 tools/infer_det.py -c configs/det/det_mv3_db.yml -o Global.infer_img="./doc/imgs_en/img_10.jpg" Global.pretrained_model="./output/det_db/best_accuracy" PostProcess.box_thresh=0.6 PostProcess.unclip_ratio=2.0测试文件夹中所有图片的检测结果:
python3 tools/infer_det.py -c configs/det/det_mv3_db.yml -o Global.infer_img="./doc/imgs_en/" Global.pretrained_model="./output/det_db/best_accuracy"4.) 推理
推理模型(保存的模型paddle.jit.save)一般是模型训练完成后保存的固化模型,多用于部署中的预测。
训练过程中保存的模型是checkpoints模型,保存了模型的参数,多用于恢复训练。
与检查点模型相比,推理模型会额外保存模型的结构信息。因此,由于模型结构和模型参数已经固化在推理模型文件中,因此更易于部署,适合与实际系统集成。
首先,我们可以将 DB 训练模型转换为推理模型:
python3 tools/export_model.py -c configs/det/det_mv3_db.yml -o Global.pretrained_model="./output/det_db/best_accuracy" Global.save_inference_dir="./output/det_db_inference/"检测推理模型预测:
python3 tools/infer/predict_det.py --det_algorithm="DB" --det_model_dir="./output/det_db_inference/" --image_dir="./doc/imgs/" --use_gpu=True如果是其他检测算法,比如EAST,需要将det_algorithm参数修改为EAST,默认为DB算法:
python3 tools/infer/predict_det.py --det_algorithm="EAST" --det_model_dir="./output/det_db_inference/" --image_dir="./doc/imgs/" --use_gpu=True3.2 文本识别
1.) 数据准备
1.1) 数据集准备
要准备数据集,请参阅ocr_datasets。
PaddleOCR 提供了用于训练 icdar2015 数据集的标签文件,可以通过以下方式下载:
# Training set label
wget -P ./train_data/ic15_data  https://paddleocr.bj.bcebos.com/dataset/rec_gt_train.txt
# Test Set Label
wget -P ./train_data/ic15_data https://paddleocr.bj.bcebos.com/dataset/rec_gt_test.txtPaddleOCR还提供了数据格式转换脚本,可以将ICDAR官网标签转换为PaddleOCR支持的数据格式。数据转换工具在ppocr/utils/gen_label.py,这里以训练集为例:
# convert the official gt to rec_gt_label.txt
python gen_label.py --mode="rec" --input_path="{path/of/origin/label}" --output_label="rec_gt_label.txt"
数据格式如下,(a)为原始图片,(b)为每张图片对应的Ground Truth文本文件:
- 多语言数据集
多语言模型训练方法与中文模型相同。训练数据集是 100w 个合成数据。可以使用以下两种方法下载少量字体和测试数据。
1.2)字典
最后,需要提供一个字典({word_dict_name}.txt),以便在模型训练时,所有出现的字符都可以映射到字典索引。
因此,字典需要包含您希望正确识别的所有字符。{word_dict_name}.txt 需要按如下格式写入,并以utf-8编码格式保存:
l
d
a
d
r
n在word_dict.txt中,每行有一个单词,将字符和数字索引映射在一起,例如“and”将映射到 [2 5 1]
PaddleOCR 内置字典,可按需使用。
ppocr/utils/ppocr_keys_v1.txt是一本6623字的汉语词典。
ppocr/utils/ic15_dict.txt是一本有 63 个字符的英文字典
ppocr/utils/dict/french_dict.txt是一个有 118 个字符的法语词典
ppocr/utils/dict/japan_dict.txt是一个有 4399 个字符的日语字典
ppocr/utils/dict/korean_dict.txt是一个包含 3636 个字符的韩语词典
ppocr/utils/dict/german_dict.txt是一个有 131 个字符的德语词典
ppocr/utils/en_dict.txt是一本有 96 个字符的英文字典
目前多语言模型仍处于演示阶段,将继续优化模型并添加语言。非常欢迎您向我们提供其他语言的字典和字体,如果您愿意,可以将字典文件提交给dict,我们将在 Repo 中感谢您。
要自定义 dict 文件,请修改character_dict_path.configs/rec/rec_icdar15_train.yml
- 自定义词典
如果您需要自定义 dic 文件,请在 configs/rec/rec_icdar15_train.yml 中添加 character_dict_path 字段以指向您的字典路径。并将 character_type 设置为 ch。
1.4) 添加空间类别
如果要支持space分类识别,请将use_space_charyml文件中的字段设置为True.
1.5) 数据增强
PaddleOCR 提供了多种数据增强方法。默认情况下启用所有增强方法。
默认的扰动方法是:cvtColor、模糊、抖动、Gasuss 噪声、随机裁剪、透视、颜色反转、TIA 增强。
在训练过程中以 40% 的概率选择每种干扰方法。具体代码实现请参考:rec_img_aug.py
2.)培训
PaddleOCR 提供训练脚本、评估脚本和预测脚本。本节将以 CRNN 识别模型为例:
2.1) 开始训练
首先下载pretrain模型,可以下载训练好的模型在icdar2015数据上进行finetune:
cd PaddleOCR/
# Download the pre-trained model of en_PP-OCRv3
wget -P ./pretrain_models/ https://paddleocr.bj.bcebos.com/PP-OCRv3/english/en_PP-OCRv3_rec_train.tar
# Decompress model parameters
cd pretrain_models
tar -xf en_PP-OCRv3_rec_train.tar && rm -rf en_PP-OCRv3_rec_train.tar
开始训练:
# GPU training Support single card and multi-card training
# Training icdar15 English data and The training log will be automatically saved as train.log under "{save_model_dir}"

#specify the single card training(Long training time, not recommended)
python3 tools/train.py -c configs/rec/PP-OCRv3/en_PP-OCRv3_rec.yml -o Global.pretrained_model=en_PP-OCRv3_rec_train/best_accuracy

#specify the card number through --gpus
python3 -m paddle.distributed.launch --gpus '0,1,2,3'  tools/train.py -c configs/rec/PP-OCRv3/en_PP-OCRv3_rec.yml -o Global.pretrained_model=en_PP-OCRv3_rec_train/best_accuracy
PaddleOCR 支持交替训练和评估。您可以修改eval_batch_stepinconfigs/rec/rec_icdar15_train.yml以设置评估频率。默认情况下,每 500 次迭代评估一次,并output/rec_CRNN/best_accuracy在评估过程中保存最佳 acc 模型。
如果评估集很大,测试将很耗时。建议减少评价次数,或者训练后评价。
- 提示:您可以使用该
-c参数选择configs/rec/路径下的多个模型配置进行训练。rec_algorithm支持的识别算法:
训练中文数据,推荐使用 ch_PP-OCRv3_rec_distillation.yml。如果想在中文数据集上尝试其他算法的结果,请参考以下说明修改配置文件:
举ch_PP-OCRv3_rec_distillation.yml个例子:
Global:
  ...
  # Add a custom dictionary, such as modify the dictionary, please point the path to the new dictionary
  character_dict_path: ppocr/utils/ppocr_keys_v1.txt
  # Modify character type
  ...
  # Whether to recognize spaces
  use_space_char: True


Optimizer:
  ...
  # Add learning rate decay strategy
  lr:
    name: Cosine
    learning_rate: 0.001
  ...

...

Train:
  dataset:
    # Type of dataset,we support LMDBDataSet and SimpleDataSet
    name: SimpleDataSet
    # Path of dataset
    data_dir: ./train_data/
    # Path of train list
    label_file_list: ["./train_data/train_list.txt"]
    transforms:
      ...
      - RecResizeImg:
          # Modify image_shape to fit long text
          image_shape: [3, 48, 320]
      ...
  loader:
    ...
    # Train batch_size for Single card
    batch_size_per_card: 256
    ...

Eval:
  dataset:
    # Type of dataset,we support LMDBDataSet and SimpleDataSet
    name: SimpleDataSet
    # Path of dataset
    data_dir: ./train_data
    # Path of eval list
    label_file_list: ["./train_data/val_list.txt"]
    transforms:
      ...
      - RecResizeImg:
          # Modify image_shape to fit long text
          image_shape: [3, 48, 320]
      ...
  loader:
    # Eval batch_size for Single card
    batch_size_per_card: 256
    ...
请注意,预测/评估的配置文件必须与训练一致。
2.2) 加载训练好的模型并继续训练
如果您希望加载训练好的模型并再次继续训练,您可以将参数指定Global.checkpoints为要加载的模型路径。
例如:
python3 tools/train.py -c configs/rec/rec_icdar15_train.yml -o Global.checkpoints=./your/trained/model注意: 的优先级Global.checkpoints高于Global.pretrained_model,即同时指定两个参数时,Global.checkpoints会先加载 指定的模型。如果指定的模型路径Global.checkpoints错误,Global.pretrained_model将加载指定的模型路径。
2.3) 新骨干训练
network部分完成了网络的搭建,PaddleOCR将网络分为四个部分,分别在ppocr/modeling下。进入网络的数据会依次经过这四个部分(transforms->backbones->ecks->heads)。
如果要替换的Backbone在PaddleOCR中有对应的实现,可以直接修改Backbone配置yml文件部分的参数。
但是,如果您想使用新的 Backbone,更换主干的示例如下:
- 在ppocr/modeling/backbones文件夹下新建一个文件,例如 my_backbone.py。
- 在my_backbone.py文件中添加代码,示例代码如下:
import paddle
import paddle.nn as nn
import paddle.nn.functional as F


class MyBackbone(nn.Layer):
    def __init__(self, *args, **kwargs):
        super(MyBackbone, self).__init__()
        # your init code
        self.conv = nn.xxxx

    def forward(self, inputs):
        # your network forward
        y = self.conv(inputs)
return y- 在ppocr/modeling/backbones/_ init_ .py文件中导入添加的模块。
添加网络的四部分模块后,只需要在配置文件中配置即可使用,如:
  Backbone:
    name: MyBackbone
args1: args1注意:有关替换 Backbone 和其他 mudule 的更多详细信息可以在doc中找到。
2.4) 混合精度训练
如果想进一步加快训练速度,可以使用Auto Mixed Precision Training,以单机单gpu为例,命令如下:
python3 tools/train.py -c configs/rec/rec_icdar15_train.yml \
     -o Global.pretrained_model=./pretrain_models/rec_mv3_none_bilstm_ctc_v2.0_train \
     Global.use_amp=True Global.scale_loss=1024.0 Global.use_dynamic_loss_scaling=True
2.5) 分布式训练
多机多gpu训练时,使用--ips参数设置使用的机器IP地址,使用--gpus参数设置使用的GPU ID:
python3 -m paddle.distributed.launch --ips="xx.xx.xx.xx,xx.xx.xx.xx" --gpus '0,1,2,3' tools/train.py -c configs/rec/rec_icdar15_train.yml \
-o Global.pretrained_model=./pretrain_models/rec_mv3_none_bilstm_ctc_v2.0_train注意:使用多机多gpu训练时,需要将上面命令中的ips值替换为自己机器的地址,机器需要能够互相ping通。此外,训练需要在多台机器上单独启动。查看机器ip地址的命令是ifconfig。
2.6) 知识蒸馏训练
PaddleOCR 支持知识蒸馏,用于文本识别训练过程。有关详细信息,请参阅文档。
2.7) 多语言培训
目前PaddleOCR支持的多语言算法有:
| 配置文件 | 算法名称 | 骨干 | 反式 | 序列 | 预测 | 语 |
|---|---|---|---|---|---|---|
| rec_chinese_cht_lite_train.yml | 神经网络 | Mobilenet_v3 小 0.5 | 没有任何 | BiLSTM | 反恐委员会 | 中国传统的 |
| rec_en_lite_train.yml | 神经网络 | Mobilenet_v3 小 0.5 | 没有任何 | BiLSTM | 反恐委员会 | 英文(区分大小写) |
| rec_french_lite_train.yml | 神经网络 | Mobilenet_v3 小 0.5 | 没有任何 | BiLSTM | 反恐委员会 | 法语 |
| rec_ger_lite_train.yml | 神经网络 | Mobilenet_v3 小 0.5 | 没有任何 | BiLSTM | 反恐委员会 | 德语 |
| rec_japan_lite_train.yml | 神经网络 | Mobilenet_v3 小 0.5 | 没有任何 | BiLSTM | 反恐委员会 | 日本人 |
| rec_korean_lite_train.yml | 神经网络 | Mobilenet_v3 小 0.5 | 没有任何 | BiLSTM | 反恐委员会 | 韩国人 |
| rec_latin_lite_train.yml | 神经网络 | Mobilenet_v3 小 0.5 | 没有任何 | BiLSTM | 反恐委员会 | 拉丁 |
| rec_arabic_lite_train.yml | 神经网络 | Mobilenet_v3 小 0.5 | 没有任何 | BiLSTM | 反恐委员会 | 阿拉伯 |
| rec_cyrillic_lite_train.yml | 神经网络 | Mobilenet_v3 小 0.5 | 没有任何 | BiLSTM | 反恐委员会 | 西里尔 |
| rec_devanagari_lite_train.yml | 神经网络 | Mobilenet_v3 小 0.5 | 没有任何 | BiLSTM | 反恐委员会 | 梵文 |
更多支持的语言请参考:多语言模型
如果想在现有模型效果的基础上进行微调,请参考以下说明修改配置文件:
举rec_french_lite_train个例子:
Global:
  ...
  # Add a custom dictionary, such as modify the dictionary, please point the path to the new dictionary
  character_dict_path: ./ppocr/utils/dict/french_dict.txt
  ...
  # Whether to recognize spaces
  use_space_char: True

...

Train:
  dataset:
    # Type of dataset,we support LMDBDataSet and SimpleDataSet
    name: SimpleDataSet
    # Path of dataset
    data_dir: ./train_data/
    # Path of train list
    label_file_list: ["./train_data/french_train.txt"]
    ...

Eval:
  dataset:
    # Type of dataset,we support LMDBDataSet and SimpleDataSet
    name: SimpleDataSet
    # Path of dataset
    data_dir: ./train_data
    # Path of eval list
    label_file_list: ["./train_data/french_val.txt"]
    ...
2.8) 其他平台训练(Windows/macOS/Linux DCU)
-
Windows GPU/CPU Windows平台与Linux平台略有不同:Windows平台只支持
single gpu训练和推理,训练指定GPUset CUDA_VISIBLE_DEVICES=0在Windows平台上,DataLoader只支持单进程模式,所以需要设置num_workers为0; -
不支持macOS GPU模式,需要
use_gpu在配置文件中设置为False,其余训练评估预测命令与Linux GPU完全相同。 -
Linux DCU 在 DCU 设备上运行需要设置环境变量
export HIP_VISIBLE_DEVICES=0,1,2,3,其余训练和评估预测命令与 Linux GPU 完全相同。
3.) 评估与测试
3.1) 评价
Global.save_model_dir训练时的模型参数默认保存在该目录下。评估指标时,需要设置Global.checkpoints指向保存的参数文件。可以通过修改文件Eval.dataset.label_file_list中的字段来设置评估数据集configs/rec/PP-OCRv3/en_PP-OCRv3_rec.yml。
# GPU evaluation, Global.checkpoints is the weight to be tested
python3 -m paddle.distributed.launch --gpus '0' tools/eval.py -c configs/rec/PP-OCRv3/en_PP-OCRv3_rec.yml -o Global.checkpoints={path/to/weights}/best_accuracy
3.2) 测试
使用 paddleocr 训练的模型,可以通过以下脚本快速得到预测。
默认预测图片存储在 中infer_img,训练后的权重通过 指定-o Global.checkpoints:
根据配置文件中设置的save_model_dir和save_epoch_step字段,将保存以下参数:
output/rec/
├── best_accuracy.pdopt
├── best_accuracy.pdparams
├── best_accuracy.states
├── config.yml
├── iter_epoch_3.pdopt
├── iter_epoch_3.pdparams
├── iter_epoch_3.states
├── latest.pdopt
├── latest.pdparams
├── latest.states
└── train.log
其中,best_accuracy.*是评估集上最好的模型;iter_epoch_x.* 是以 为间隔保存的模型save_epoch_step;latest.* 是最后一个 epoch 的模型。
# Predict English results
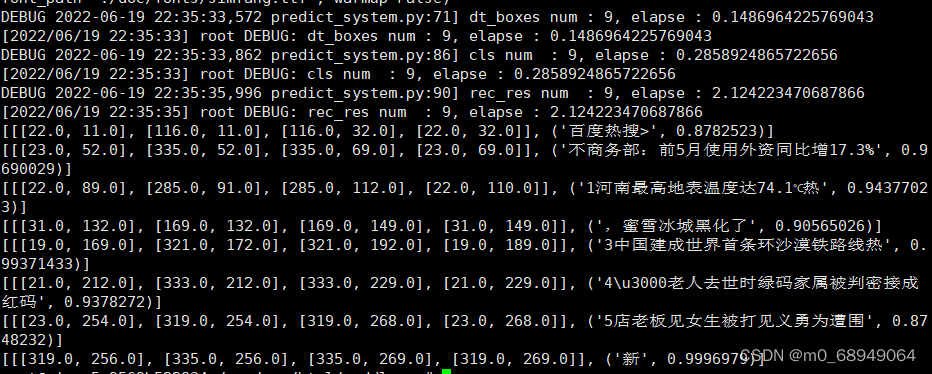
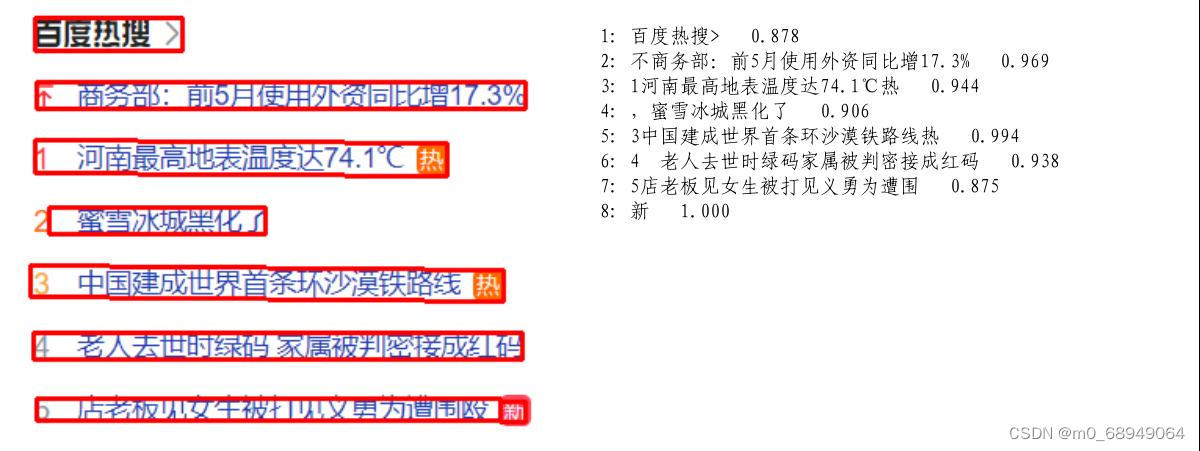
python3 tools/infer_rec.py -c configs/rec/PP-OCRv3/en_PP-OCRv3_rec.yml -o Global.pretrained_model={path/to/weights}/best_accuracy Global.infer_img=doc/imgs_words/en/word_1.png输入图像:
得到输入图像的预测结果:
infer_img: doc/imgs_words/en/word_1.png
        result: ('joint', 0.9998967)
用于预测的配置文件必须与训练一致。比如你用 完成了中文模型的训练python3 tools/train.py -c configs/rec/ch_ppocr_v2.0/rec_chinese_lite_train_v2.0.yml,可以使用下面的命令来预测中文模型:
# Predict Chinese results
python3 tools/infer_rec.py -c configs/rec/ch_ppocr_v2.0/rec_chinese_lite_train_v2.0.yml -o Global.pretrained_model={path/to/weights}/best_accuracy Global.infer_img=doc/imgs_words/ch/word_1.jpg
输入图像:

得到输入图像的预测结果:
infer_img: doc/imgs_words/ch/word_1.jpg
        result: ('韩国小馆', 0.997218)
4.) 推理
推理模型(保存的模型paddle.jit.save)一般是模型训练完成后保存的固化模型,多用于部署中的预测。
训练过程中保存的模型是checkpoints模型,保存了模型的参数,多用于恢复训练。
与检查点模型相比,推理模型会额外保存模型的结构信息。因此,由于模型结构和模型参数已经固化在推理模型文件中,因此更易于部署,适合与实际系统集成。
识别模型转化为推理模型的方式与检测相同,如下:
# -c Set the training algorithm yml configuration file
# -o Set optional parameters
# Global.pretrained_model parameter Set the training model address to be converted without adding the file suffix .pdmodel, .pdopt or .pdparams.
# Global.save_inference_dir Set the address where the converted model will be saved.

python3 tools/export_model.py -c configs/rec/PP-OCRv3/en_PP-OCRv3_rec.yml -o Global.pretrained_model=en_PP-OCRv3_rec_train/best_accuracy Global.save_inference_dir=./inference/en_PP-OCRv3_rec/如果您有使用不同字典文件在自己的数据集上训练的模型,请确保character_dict_path将配置文件中的修改为您的字典文件路径。
转换成功后模型保存目录下有三个文件:
inference/en_PP-OCRv3_rec/
    ├── inference.pdiparams         # The parameter file of recognition inference model
    ├── inference.pdiparams.info    # The parameter information of recognition inference model, which can be ignored
└── inference.pdmodel # The program file of recognition model-
使用自定义字符字典的文本识别模型推理
如果在训练过程中修改了文本字典,在使用推理模型进行预测时,需要指定使用的字典路径
--rec_char_dict_pathpython3 tools/infer/predict_rec.py --image_dir="./doc/imgs_words_en/word_336.png" --rec_model_dir="./your inference model" --rec_image_shape="3, 32, 100" --rec_char_dict_path="your text dict path"
3.1 文字方向分类
1.)方法介绍
角度分类用于图像不是0度的场景。在这个场景中,需要对图片中检测到的文本行进行校正操作。在PaddleOCR系统中,文本检测后得到的文本行图像经过仿射变换后送入识别模型。这时候只需要对文本进行0度和180度角分类,所以内置的PaddleOCR文本角度分类器只支持0度和180度分类。如果你想支持更多的角度,你可以自己修改算法来支持。
0度和180度数据样本示例:

2.) 数据准备
请按如下方式组织数据集:
训练数据的默认存储路径是PaddleOCR/train_data/cls,如果你的磁盘上已经有一个数据集,只需创建一个指向数据集目录的软链接:
ln -sf <path/to/dataset> <path/to/paddle_ocr>/train_data/cls/dataset
请参考以下内容来整理您的数据。
- 训练集
首先将训练图像放在同一个文件夹(train_images)中,并使用一个txt文件(cls_gt_train.txt)来存储图像路径和标签。
- 注意:默认情况下,图片路径和图片标签是用 分割的
\t,如果使用其他方法分割,会导致训练错误
0 和 180 分别表示图像的角度为 0 度和 180 度。
" Image file name           Image annotation "

train/word_001.jpg   0
train/word_002.jpg   180
最终的训练集应具有以下文件结构:
|-train_data
    |-cls
        |- cls_gt_train.txt
        |- train
            |- word_001.png
            |- word_002.jpg
            |- word_003.jpg
            | ...
- 测试集
与训练集类似,测试集也需要提供一个包含所有图像(测试)的文件夹和一个 cls_gt_test.txt。测试集的结构如下:
|-train_data
    |-cls
        |- cls_gt_test.txt
        |- test
            |- word_001.jpg
            |- word_002.jpg
            |- word_003.jpg
            | ...
3.) 培训
将准备好的txt文件和图片文件夹路径写入配置文件Train/Eval.dataset.label_file_list和Train/Eval.dataset.data_dir字段下,图片的绝对路径由Train/Eval.dataset.data_dir字段和txt文件中记录的图片名称组成。
PaddleOCR 提供训练脚本、评估脚本和预测脚本。
开始训练:
# Set PYTHONPATH path
export PYTHONPATH=$PYTHONPATH:.
# GPU training Support single card and multi-card training, specify the card number through --gpus.
# Start training, the following command has been written into the train.sh file, just modify the configuration file path in the file
python3 -m paddle.distributed.launch --gpus '0,1,2,3,4,5,6,7'  tools/train.py -c configs/cls/cls_mv3.yml
- 数据增强
PaddleOCR 提供了多种数据增强方法。如果您想在训练过程中添加干扰,请取消注释配置文件中的RecAug和RandAugment字段Train.dataset.transforms。
默认的扰动方法有:cvtColor、模糊、抖动、高斯噪声、随机裁剪、透视、颜色反转、RandAugment。
除 RandAugment 外,在训练过程中以 50% 的概率选择每种干扰方法。具体代码实现请参考: rec_img_aug.py randaugment.py
- 训练
PaddleOCR 支持交替训练和评估。您可以修改eval_batch_stepinconfigs/cls/cls_mv3.yml以设置评估频率。默认情况下,每 1000 次迭代对其进行评估。训练期间将保存以下内容:
├── best_accuracy.pdopt # Optimizer parameters for the best model
├── best_accuracy.pdparams # Parameters of the best model
├── best_accuracy.states # Metric info and epochs of the best model
├── config.yml # Configuration file for this experiment
├── latest.pdopt # Optimizer parameters for the latest model
├── latest.pdparams # Parameters of the latest model
├── latest.states # Metric info and epochs of the latest model
└── train.log # Training log
如果评估集很大,测试将很耗时。建议减少评价次数,或者训练后评价。
请注意,预测/评估的配置文件必须与训练一致。
4.) 评价
可以通过修改文件Eval.dataset.label_file_list中的字段来设置评估数据集configs/cls/cls_mv3.yml。
export CUDA_VISIBLE_DEVICES=0
# GPU evaluation, Global.checkpoints is the weight to be tested
python3 tools/eval.py -c configs/cls/cls_mv3.yml -o Global.checkpoints={path/to/weights}/best_accuracy
5.) 预测
- 训练引擎预测
使用 paddleocr 训练的模型,可以通过以下脚本快速得到预测。
用于Global.infer_img指定预测图片或文件夹的路径,Global.checkpoints用于指定权重:
# Predict English results
python3 tools/infer_cls.py -c configs/cls/cls_mv3.yml -o Global.pretrained_model={path/to/weights}/best_accuracy Global.load_static_weights=false Global.infer_img=doc/imgs_words_en/word_10.png
输入图像:
得到输入图像的预测结果:
infer_img: doc/imgs_words_en/word_10.png
     result: ('0', 0.9999995)
二、安装和使用
1、安装
我安装的环境是 ubuntu18.04、python 3.7 和 pip 22.1.2,python环境至少要是3以上,pip版本最好也高一些,不然安装过程中会有很多错误,提升pip版本的命令也在下面:
sudo apt install python3.7 python3.7-dev  //先安装python环境和依赖包

sudo apt install python3-pip //安装pip3

sudo pip3 install --upgrade pip  //提升pip版本

pip3 install -i https://mirror.baidu.com/pypi/simple cmake //此CMake是一个开源、跨平台的工具系列,旨在构建、测试和打包软件

pip3 install -i https://mirror.baidu.com/pypi/simple paddlepaddle //此处需要先安装此工具,如果系统有gpu硬件可安装paddlepaddle-gpu

pip3 install -i https://mirror.baidu.com/pypi/simple paddleocr==2.4 //此处我选的版本是2.4,官网上建议大于等于2.0.1即可
另外安装过程中可能会有很多下面的错误,就是因为当前环境的版本低的原因,只需要单独安装此python扩展即可,比如下面的软件是 scikit-learn,只需要稍微降低一下版本即可,执行
pip3 install -i https://mirror.baidu.com/pypi/simple scikit-learn==1.0 //“==” 后面是版本号,存在的版本号只需要输入10000(不存在的版本号)就会全部出来
paddleorc安装可能会出来很多其他问题,百度搜索大部分的问题都会有答案。
2、python 识别图片文字
识别图片:

代码:
#!/user/bin/env python
# coding=utf-8

from paddleocr import PaddleOCR,draw_ocr
# Paddleocr supports Chinese, English, French, German, Korean and Japanese.
# You can set the parameter `lang` as `ch`, `en`, `fr`, `german`, `korean`, `japan`
# to switch the language model in order.
ocr = PaddleOCR(use_angle_cls=True, lang='ch') # need to run only once to download and load model into memory
img_path = './file/aa.png'
result = ocr.ocr(img_path, cls=True)
for line in result:
    print(line)


# draw result
from PIL import Image
image = Image.open(img_path).convert('RGB')
boxes = [line[0] for line in result]
txts = [line[1][0] for line in result]
scores = [line[1][1] for line in result]
im_show = draw_ocr(image, boxes, txts, scores, font_path='./fonts/simfang.ttf')
im_show = Image.fromarray(im_show)
im_show.save('result.jpg')
识别结果和绘制结果图:
绘制结果图需要安装下面的相关库和有 ttf 中文文件包,我此处使用的仿宋体。
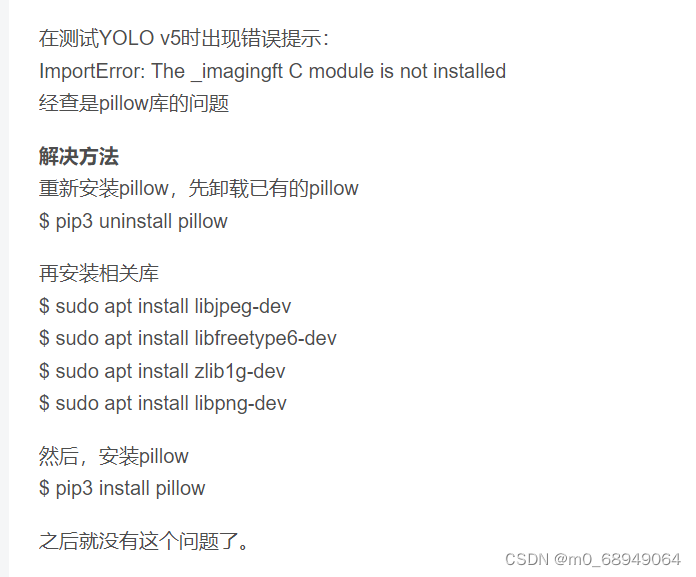
文章出处登录后可见!