目录
一、NovelAI
NovelAI是一个用来画二次元图片的开源算法,部署方式见 b站链接
二、UIautomation和pywin32
UIautomation和pywin32是python的库,主要用于窗口句柄的抓取和操作,本代码中用于接收、发送QQ群消息
三、代码
1、AI画图相关
通过使用NovelAI代码包里的txt2img.py文件,实现从文字到图片的转化:
def txt2img(prompt: str, negative_prompt: str, prompt_style: str, prompt_style2: str, steps: int, sampler_index: int, restore_faces: bool, tiling: bool, n_iter: int, batch_size: int, cfg_scale: float, seed: int, subseed: int, subseed_strength: float, seed_resize_from_h: int, seed_resize_from_w: int, seed_enable_extras: bool, height: int, width: int, enable_hr: bool, scale_latent: bool, denoising_strength: float, *args):
    p = StableDiffusionProcessingTxt2Img(
        sd_model=shared.sd_model,
        outpath_samples=opts.outdir_samples or opts.outdir_txt2img_samples,
        outpath_grids=opts.outdir_grids or opts.outdir_txt2img_grids,
        prompt=prompt,
        styles=[prompt_style, prompt_style2],
        negative_prompt=negative_prompt,
        seed=seed,
        subseed=subseed,
        subseed_strength=subseed_strength,
        seed_resize_from_h=seed_resize_from_h,
        seed_resize_from_w=seed_resize_from_w,
        seed_enable_extras=seed_enable_extras,
        sampler_index=sampler_index,
        batch_size=batch_size,
        n_iter=n_iter,
        steps=steps,
        cfg_scale=cfg_scale,
        width=width,
        height=height,
        restore_faces=restore_faces,
        tiling=tiling,
        enable_hr=enable_hr,
        scale_latent=scale_latent if enable_hr else None,
        denoising_strength=denoising_strength if enable_hr else None,
    )

    if cmd_opts.enable_console_prompts:
        print(f"\ntxt2img: {prompt}", file=shared.progress_print_out)

    processed = modules.scripts.scripts_txt2img.run(p, *args)

    if processed is None:
        processed = process_images(p)

    shared.total_tqdm.clear()

    generation_info_js = processed.js()
    if opts.samples_log_stdout:
        print(generation_info_js)

    if opts.do_not_show_images:
        processed.images = []

    return processed.images, generation_info_js, plaintext_to_html(processed.info)
输入对应的参数后,图像数据存储在以下位置
txt2img[0][0].save(fullfn)#fullfn是路径2、QQ群消息抓取相关
接收方面
_get_all_hwnd(hwnd, mouse)用于遍历QQ窗口下的所有控件,用于找到消息管理器窗口下的所有控件
def _get_all_hwnd(hwnd, mouse):
    if win32gui.IsWindow(hwnd) and win32gui.IsWindowEnabled(hwnd) and win32gui.IsWindowVisible(hwnd):
        hwnd_title.update({hwnd: win32gui.GetWindowText(hwnd)})
textrefresh(delay)用于点击消息管理器的刷新按钮,以更新群消息
def textrefresh(delay):
    win32gui.EnumWindows(_get_all_hwnd, 0)
    for wnd in hwnd_title.items():
        # print(wnd)
        if wnd[1] == '消息管理器':
            break
    long_position = win32api.MAKELONG(810, 130)
    win32api.SendMessage(int(wnd[0]), win32con.WM_LBUTTONDOWN, win32con.MK_LBUTTON, long_position)
    win32api.SendMessage(int(wnd[0]), win32con.WM_LBUTTONUP, win32con.MK_LBUTTON, long_position)
    sleep(delay)
之后在一个while循环里不断获取最新的一条群消息,并用正则表达式提取指令,以用于后续操作
chat_window = auto.WindowControl(searchDepth=1, ClassName='TXGuiFoundation', Name='消息管理器')
msg_list = chat_window.ListControl(Name='IEMsgView')  #找到 list
finalmsg = msg_list.GetLastChildControl()
msg = finalmsg.Name
# print(msg)
obj = re.compile(r'.*?\((?P<QQnum>.*?)\)\d{1,}:\d{2}:\d{2}(?P<QQmsg>.*)', re.S) #可拿出
result = obj.findall(msg)
需要注意的是“点击刷新按钮”和“获取群消息”是两个事件。
不同点是“点击刷新按钮”使用的是win32api,win32gui,win32con库,“获取群消息”使用的是uiautomation库。
相同点是这两个操作都是针对“消息管理器”窗口的。
uiautomation库和win32api,win32gui,win32con库有很多共有的功能,两者都是对控件进行操作的库,博主在使用时有所取舍。
对于“点击刷新按钮”需求:uiautomation的点击操作需要占用鼠标,很不方便,而win32库里有后台鼠标,因此用于实现“点击刷新按钮”的需求是合适的。
对于“获取群消息”需求:win32库需要遍历所有子控件,博主认为这会提高运行时间,并且定位最后一条群消息还需要额外的筛选操作,而uiautomation里可以直接调用GetLastChildControl()方法得到最后一个子控件,而这个最后的子控件刚好是群内最新的消息。
至此程序已经完成了提取群消息里的指令的需求
发送方面
fs(fsgs, fsnr)用于向群聊天窗口发送文字信息
def fs(fsgs, fsnr):
    c.OpenClipboard()
    c.EmptyClipboard()
    c.SetClipboardData(b.CF_UNICODETEXT, fsnr)
    c.CloseClipboard()
    handle = a.FindWindow(None, fsgs)
    if handle != 0:
        a.SendMessage(handle, 770, 0, 0)
        a.SendMessage(handle, b.WM_KEYDOWN, b.VK_RETURN, 0)
        print('消息发送成功!')
sendImage(name,imgpath)用于向群聊天窗口发送图片
def sendImage(name,imgpath):
    im = Image.open(imgpath)
    im.save('1.bmp')
    aString = windll.user32.LoadImageW(0, r"1.bmp", win32con.IMAGE_BITMAP, 0, 0, win32con.LR_LOADFROMFILE)
    #print(aString)
    if aString != 0:  ## 由于图片编码问题  图片载入失败的话  aString 就等于0
        w.OpenClipboard()
        w.EmptyClipboard()
        w.SetClipboardData(win32con.CF_BITMAP, aString)
        # 关闭剪贴板
        w.CloseClipboard()
        # 获取qq窗口句柄
        handle = win32gui.FindWindow(None, name)
        if handle == 0:
            print('未找到窗口!')
        # 显示窗口
        win32gui.ShowWindow(handle, win32con.SW_SHOW)
        # time.sleep(0.2)
        # 把剪切板内容粘贴到qq窗口
        win32gui.SendMessage(handle, win32con.WM_PASTE, 0, 0)
        # time.sleep(0.2)
        # 按下后松开回车键,发送消息
        win32gui.SendMessage(handle, win32con.WM_KEYDOWN, win32con.VK_RETURN, 0)
        win32gui.SendMessage(handle, win32con.WM_KEYUP, win32con.VK_RETURN, 0)
至此程序已经完成了向群里发送文字和图片的需求
以上是主要的代码,后面还需要设置条件判断群友是不是@了机器人,以及@机器人后的指令该怎么使用 ,等等的细节这里省略(不难)
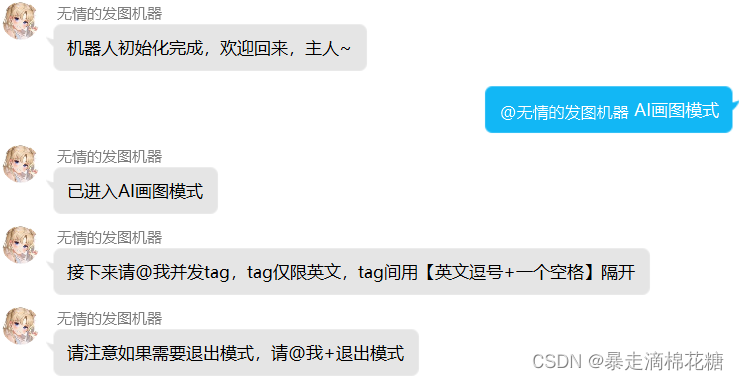
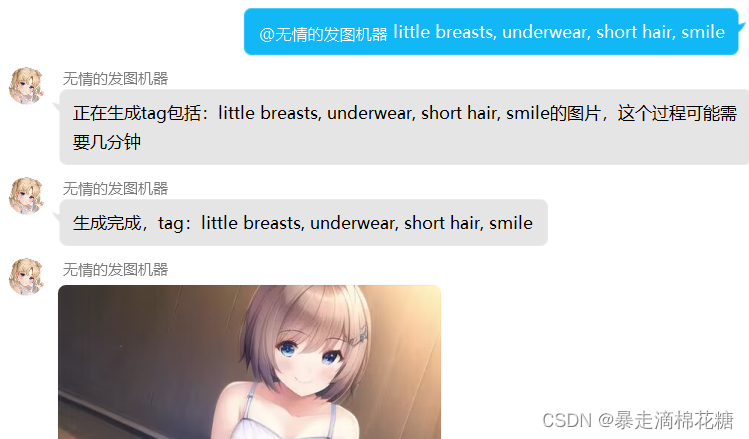
四、代码效果
五、后记
反正也没人看,权当是个人学习记录吧
仅供娱乐,如有侵权请联系我删除
文章出处登录后可见!