一、前言
图像拼接(Image Stitching)是一种利用实景图像组成全景空间的技术,它将多幅图像拼接成一幅大尺度图像或360°全景图,可视作场景重建的一种特殊情况,其中图像仅通过平面单应性进行关联。图像拼接在运动检测和跟踪,增强现实,分辨率增强,视频压缩和图像稳定等机器视觉领域有很大的应用。
图像拼接的输出是两个输入图像的并集。
1、特征点提取(Feature Extraction):检测输入图像中的特征点。
2、图像配准(Image Registration):建立了图像之间的集合对应关系,使它们可在一个共同的参照系中进行变换、比较和分析。
3、投影变换(Warping):将其中一幅图像的图像重投影,并将图像放置在更大的画布上。
4、图像融合(Blending):通过改变边界附近的图像灰度级,去除这些缝隙,创建混合图像,从而在图像之间实现平滑过渡。混合模式(Blending Modes)用于将两层融合到一起。
二、实现方法
基于SURF的图像拼接
用SIFT算法来实现图像拼接是很常用的方法,但是因为SIFT计算量很大,所以在速度要求很高的场合下不再适用。所以,它的改进方法SURF因为在速度方面有了明显的提高(速度是SIFT的3倍),所以在图像拼接领域还是大有作为。虽说SURF精确度和稳定性不及SIFT,但是其综合能力还是优越一些。下面将详细介绍拼接的主要步骤。
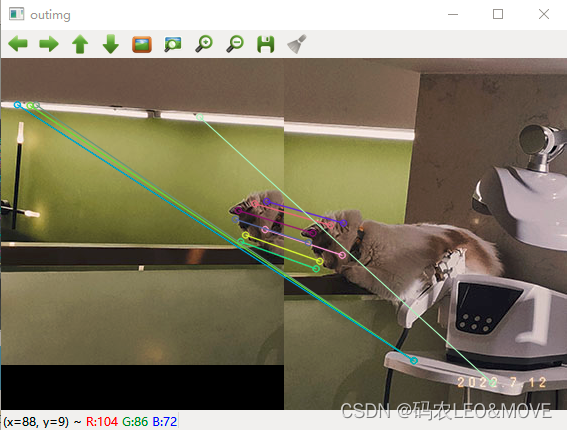
1.特征点提取和匹配
    //创建SURF对象
    //create 参数 海森矩阵阈值
    Ptr<SURF> surf;
    surf = SURF::create(800);

    //暴力匹配器
    BFMatcher matcher;

    vector<KeyPoint> key1, key2;
    Mat c, d;

    //寻找特征点
    surf->detectAndCompute(left, Mat(), key2, d);
    surf->detectAndCompute(right, Mat(), key1, c);

    //特征点对比 保存
    vector<DMatch>matches;

    //使用暴力匹配器匹配特征点 保存
    matcher.match(d, c, matches);

    //排序 从小到大
    sort(matches.begin(), matches.end());

    //保留最优的特征点收集
    vector<DMatch>good_matches;

    int ptrPoint = std::min(50, (int)(matches.size()*0.15));

    for(int i=0; i<ptrPoint; i++)
        good_matches.push_back(matches[i]);

    //最佳匹配的特征点连成一线
    Mat outimg;

    drawMatches(left, key2, right, key1, good_matches, outimg,
                Scalar::all(-1), Scalar::all(-1),
                vector<char>(), DrawMatchesFlags::NOT_DRAW_SINGLE_POINTS);

    imshow("outimg", outimg);
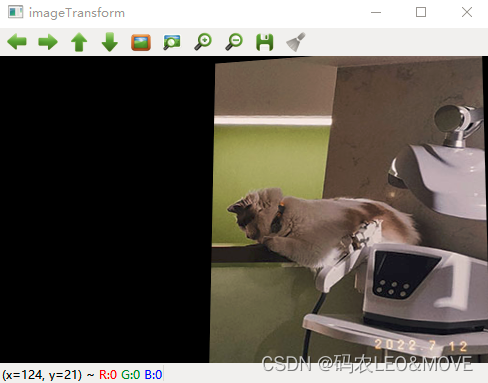
2.图像配准
这样子就得到了两幅待拼接图的匹配点集,接下来进行图像的配准,即将两张图像转换为同一坐标下,这里需要使用findHomography函数来求得变换矩阵。
但是需要注意的是,findHomography函数所要用到的点集是Point2f类型的,所以需要对刚得到的点集good_matches再做一次处理,使其转换为Point2f类型的点集。
    //特征点配准
    vector<Point2f>imagepoint1, imagepoint2;
    for(int i=0; i<good_matches.size(); i++)
    {
        imagepoint1.push_back(key1[good_matches[i].trainIdx].pt);
        imagepoint2.push_back(key2[good_matches[i].queryIdx].pt);
    }
上述操作后,用imagepoint1, imagepoint2去求变换矩阵,并且实现图像配准。
值得注意的是findHomography函数的参数中选择CV_RANSAC。使用RANSAC算法继续筛选可靠地匹配点,这使得匹配点解更为精确。
//透视转换
    Mat homo = findHomography(imagepoint1, imagepoint2, CV_RANSAC);

    imshow("homo", homo);

    //右图四个顶点坐标转换计算
    CalcCorners(homo, right);

    Mat imageTransform;
    warpPerspective(right, imageTransform, homo,
                    Size(MAX(corners.right_top.x, corners.right_bottom.x), left.rows));
    imshow("imageTransform", imageTransform);
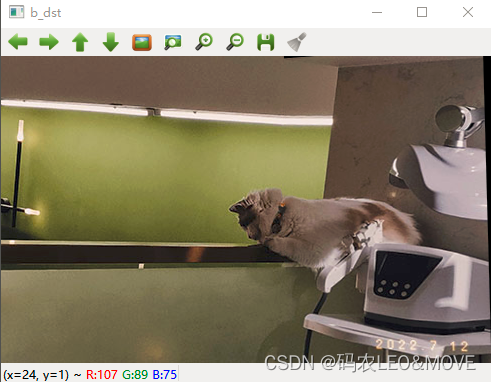
3.图像拷贝
拷贝的思路很简单,就是将左图直接拷贝到配准图上就可以了。
    int dst_width = imageTransform.cols;
    int dst_height = imageTransform.rows;

    Mat dst(dst_height, dst_width, CV_8UC3);
    dst.setTo(0);

    imageTransform.copyTo(dst(Rect(0, 0, imageTransform.cols, imageTransform.rows)));
    left.copyTo(dst(Rect(0, 0, left.cols, left.rows)));
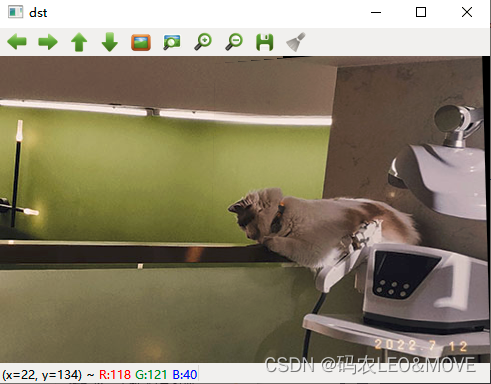
4.图像融合(去裂缝处理)
    OptimizeSeam(left, imageTransform, dst);
    imshow("dst", dst);

    waitKey(0);
//优化两图的连接处,使得拼接自然
void OptimizeSeam(Mat& img1, Mat& trans, Mat& dst)
{
    int start = MIN(corners.left_top.x, corners.left_bottom.x);//开始位置,即重叠区域的左边界

    double processWidth = img1.cols - start;//重叠区域的宽度
    int rows = dst.rows;
    int cols = img1.cols; //注意,是列数*通道数
    double alpha = 1;//img1中像素的权重
    for (int i = 0; i < rows; i++)
    {
        uchar* p = img1.ptr<uchar>(i);  //获取第i行的首地址
        uchar* t = trans.ptr<uchar>(i);
        uchar* d = dst.ptr<uchar>(i);
        for (int j = start; j < cols; j++)
        {
            //如果遇到图像trans中无像素的黑点,则完全拷贝img1中的数据
            if (t[j * 3] == 0 && t[j * 3 + 1] == 0 && t[j * 3 + 2] == 0)
            {
                alpha = 1;
            }
            else
            {
                //img1中像素的权重,与当前处理点距重叠区域左边界的距离成正比,实验证明,这种方法确实好
                alpha = (processWidth - (j - start)) / processWidth;
            }
            d[j * 3] = p[j * 3] * alpha + t[j * 3] * (1 - alpha);
            d[j * 3 + 1] = p[j * 3 + 1] * alpha + t[j * 3 + 1] * (1 - alpha);
            d[j * 3 + 2] = p[j * 3 + 2] * alpha + t[j * 3 + 2] * (1 - alpha);
        }
    }
}
三、完整代码
#include <iostream>
#include <opencv2/opencv.hpp>
#include <opencv2/highgui.hpp>
#include <opencv2/xfeatures2d.hpp>
#include <opencv2/calib3d.hpp>
#include <opencv2/imgproc.hpp>

using namespace std;
using namespace cv;
using namespace cv::xfeatures2d;

typedef struct
{
    Point2f left_top;
    Point2f left_bottom;
    Point2f right_top;
    Point2f right_bottom;
}four_corners_t;

four_corners_t corners;

void CalcCorners(const Mat& H, const Mat& src)
{
    double v2[] = { 0, 0, 1 };//左上角
    double v1[3];//变换后的坐标值
    Mat V2 = Mat(3, 1, CV_64FC1, v2);  //列向量
    Mat V1 = Mat(3, 1, CV_64FC1, v1);  //列向量

    V1 = H * V2;
    //左上角(0,0,1)
    cout << "V2: " << V2 << endl;
    cout << "V1: " << V1 << endl;
    corners.left_top.x = v1[0] / v1[2];
    corners.left_top.y = v1[1] / v1[2];

    //左下角(0,src.rows,1)
    v2[0] = 0;
    v2[1] = src.rows;
    v2[2] = 1;
    V2 = Mat(3, 1, CV_64FC1, v2);  //列向量
    V1 = Mat(3, 1, CV_64FC1, v1);  //列向量
    V1 = H * V2;
    corners.left_bottom.x = v1[0] / v1[2];
    corners.left_bottom.y = v1[1] / v1[2];

    //右上角(src.cols,0,1)
    v2[0] = src.cols;
    v2[1] = 0;
    v2[2] = 1;
    V2 = Mat(3, 1, CV_64FC1, v2);  //列向量
    V1 = Mat(3, 1, CV_64FC1, v1);  //列向量
    V1 = H * V2;
    corners.right_top.x = v1[0] / v1[2];
    corners.right_top.y = v1[1] / v1[2];

    //右下角(src.cols,src.rows,1)
    v2[0] = src.cols;
    v2[1] = src.rows;
    v2[2] = 1;
    V2 = Mat(3, 1, CV_64FC1, v2);  //列向量
    V1 = Mat(3, 1, CV_64FC1, v1);  //列向量
    V1 = H * V2;
    corners.right_bottom.x = v1[0] / v1[2];
    corners.right_bottom.y = v1[1] / v1[2];

}

//优化两图的连接处,使得拼接自然
void OptimizeSeam(Mat& img1, Mat& trans, Mat& dst)
{
    int start = MIN(corners.left_top.x, corners.left_bottom.x);//开始位置,即重叠区域的左边界

    double processWidth = img1.cols - start;//重叠区域的宽度
    int rows = dst.rows;
    int cols = img1.cols; //注意,是列数*通道数
    double alpha = 1;//img1中像素的权重
    for (int i = 0; i < rows; i++)
    {
        uchar* p = img1.ptr<uchar>(i);  //获取第i行的首地址
        uchar* t = trans.ptr<uchar>(i);
        uchar* d = dst.ptr<uchar>(i);
        for (int j = start; j < cols; j++)
        {
            //如果遇到图像trans中无像素的黑点,则完全拷贝img1中的数据
            if (t[j * 3] == 0 && t[j * 3 + 1] == 0 && t[j * 3 + 2] == 0)
            {
                alpha = 1;
            }
            else
            {
                //img1中像素的权重,与当前处理点距重叠区域左边界的距离成正比,实验证明,这种方法确实好
                alpha = (processWidth - (j - start)) / processWidth;
            }
            d[j * 3] = p[j * 3] * alpha + t[j * 3] * (1 - alpha);
            d[j * 3 + 1] = p[j * 3 + 1] * alpha + t[j * 3 + 1] * (1 - alpha);
            d[j * 3 + 2] = p[j * 3 + 2] * alpha + t[j * 3 + 2] * (1 - alpha);
        }
    }
}

//计算配准图的四个顶点坐标
int main()
{
    Mat left = imread("A.jpg");
    Mat right =imread("B.jpg");

    imshow("left", left);
    imshow("right", right);

    //1.特征点提取和匹配
    //创建SURF对象
    //create 参数 海森矩阵阈值
    Ptr<SURF> surf;
    surf = SURF::create(800);

    //暴力匹配器
    BFMatcher matcher;

    vector<KeyPoint> key1, key2;
    Mat c, d;

    //寻找特征点
    surf->detectAndCompute(left, Mat(), key2, d);
    surf->detectAndCompute(right, Mat(), key1, c);

    //特征点对比 保存
    vector<DMatch>matches;

    //使用暴力匹配器匹配特征点 保存
    matcher.match(d, c, matches);

    //排序 从小到大
    sort(matches.begin(), matches.end());

    //保留最优的特征点收集
    vector<DMatch>good_matches;

    int ptrPoint = std::min(50, (int)(matches.size()*0.15));

    for(int i=0; i<ptrPoint; i++)
        good_matches.push_back(matches[i]);

    //最佳匹配的特征点连成一线
    Mat outimg;

    drawMatches(left, key2, right, key1, good_matches, outimg,
                Scalar::all(-1), Scalar::all(-1),
                vector<char>(), DrawMatchesFlags::NOT_DRAW_SINGLE_POINTS);

    imshow("outimg", outimg);

    //2.图像配准
    //特征点配准
    vector<Point2f>imagepoint1, imagepoint2;
    for(int i=0; i<good_matches.size(); i++)
    {
        imagepoint1.push_back(key1[good_matches[i].trainIdx].pt);
        imagepoint2.push_back(key2[good_matches[i].queryIdx].pt);
    }

    //透视转换
    Mat homo = findHomography(imagepoint1, imagepoint2, CV_RANSAC);

    imshow("homo", homo);

    //右图四个顶点坐标转换计算
    CalcCorners(homo, right);

    Mat imageTransform;
    warpPerspective(right, imageTransform, homo,
                    Size(MAX(corners.right_top.x, corners.right_bottom.x), left.rows));
    imshow("imageTransform", imageTransform);


    //3.图像拷贝
    int dst_width = imageTransform.cols;
    int dst_height = imageTransform.rows;

    Mat dst(dst_height, dst_width, CV_8UC3);
    dst.setTo(0);

    imageTransform.copyTo(dst(Rect(0, 0, imageTransform.cols, imageTransform.rows)));
    left.copyTo(dst(Rect(0, 0, left.cols, left.rows)));

    //4.优化拼接最终结果图,去除黑边
    OptimizeSeam(left, imageTransform, dst);
    imshow("dst", dst);

    waitKey(0);

    return 0;
}
文章出处登录后可见!