前言
上一篇介绍过使用onnxruntime实现模型推理部署,但在我的机器上视频效果仍不理想,本篇介绍使用openvino完成模型推理部署。
openvino是Intel开发的深度学习模型推理加速引擎,支持python和C++,使用起来比较方便。
一、环境
1、硬件
Intel® Core i5-7400 CPU @ 3.00GHZ
Intel® HD Graphics 630 内存4G 核显
内存 8G
win10 64位系统
2、软件
opencv4.6.0
yolov5 6.2版本
qt5.6.2
openvino_2022.1.0.643 runtime版本(关于安装自行谷歌。。。)
二、YOLO模型
我使用的是onnx模型,如果没有训练过自己的模型,可以使用官方的yolov5s.pt模型,将其转化为yolov5s.onnx模型,转化方法如下:
python export.py
在yolov5-master目录下,可以看到yolov5s.onnx模型已生成。
三、新建Qt项目
1、pro文件
在pro文件中,添加opencv相关配置,内容如下:
#-------------------------------------------------
#
# Project created by QtCreator 2022-10-31T09:37:31
#
#-------------------------------------------------

QT       += core gui

greaterThan(QT_MAJOR_VERSION, 4): QT += widgets

TARGET = yolov5-openvino-cpp
TEMPLATE = app

CONFIG += C++11

#CONFIG(debug, debug|release){
#    DESTDIR = ../out
#}
#else {
#    DESTDIR = ../out
#}

SOURCES += main.cpp\
        mainwindow.cpp

HEADERS  += mainwindow.h

FORMS    += mainwindow.ui

INCLUDEPATH += C:/opencv4.6.0/build/include
               C:/opencv4.6.0/build/include/opencv2
LIBS += -LC:/opencv4.6.0/build/x64/vc14/lib/ -lopencv_world460

INCLUDEPATH += C:/onnxruntime-win-x64-1.11.1/include
LIBS += -LC:/onnxruntime-win-x64-1.11.1/lib/ -lonnxruntime

INCLUDEPATH += 'C:/Program Files (x86)/Intel/openvino_2022.1.0.643/runtime/include'
               'C:/Program Files (x86)/Intel/openvino_2022.1.0.643/runtime/include/ie'
               'C:/Program Files (x86)/Intel/openvino_2022.1.0.643/runtime/include/ngraph'
               'C:/Program Files (x86)/Intel/openvino_2022.1.0.643/runtime/include/openvino'

LIBS += -L'C:/Program Files (x86)/Intel/openvino_2022.1.0.643/runtime/lib/intel64/Release/' -lopenvino
LIBS += -L'C:/Program Files (x86)/Intel/openvino_2022.1.0.643/runtime/lib/intel64/Release/' -lopenvino_c
LIBS += -L'C:/Program Files (x86)/Intel/openvino_2022.1.0.643/runtime/lib/intel64/Release/' -lopenvino_ir_frontend
LIBS += -L'C:/Program Files (x86)/Intel/openvino_2022.1.0.643/runtime/lib/intel64/Release/' -lopenvino_onnx_frontend
LIBS += -L'C:/Program Files (x86)/Intel/openvino_2022.1.0.643/runtime/lib/intel64/Release/' -lopenvino_paddle_frontend
LIBS += -L'C:/Program Files (x86)/Intel/openvino_2022.1.0.643/runtime/lib/intel64/Release/' -lopenvino_tensorflow_fe
2、main.cpp
#include "mainwindow.h"
#include <QApplication>
#include <QDebug>
#include <fstream>
#include <iostream>
#include <sstream>
#include <opencv2\opencv.hpp>
#include <openvino\openvino.hpp>

using namespace std;
using namespace ov;
using namespace cv;

//数据集的标签 官方模型yolov5s.onnx为80种
vector<string> class_names = {"person", "bicycle", "car", "motorbike", "aeroplane", "bus", "train", "truck", "boat", "traffic light","fire hydrant",
                              "stop sign", "parking meter", "bench", "bird", "cat", "dog", "horse", "sheep", "cow", "elephant", "bear", "zebra", "giraffe","backpack", "umbrella",
                              "handbag", "tie", "suitcase", "frisbee", "skis", "snowboard", "sports ball", "kite", "baseball bat", "baseball glove","skateboard", "surfboard",
                              "tennis racket", "bottle", "wine glass", "cup", "fork", "knife", "spoon", "bowl", "banana", "apple", "sandwich", "orange","broccoli", "carrot",
                              "hot dog", "pizza", "donut", "cake", "chair", "sofa", "pottedplant", "bed", "diningtable", "toilet", "tvmonitor", "laptop", "mouse","remote",
                              "keyboard", "cell phone", "microwave", "oven", "toaster", "sink", "refrigerator", "book", "clock", "vase", "scissors", "teddy bear", "hair drier", "toothbrush"};


//模型文件路径
string ir_filename = "G:/yolov5s.onnx";


/*@brief 对网络的输入为图片数据的节点进行赋值,实现图片数据输入网络
 @param input_tensor 输入节点的tensor
 @param inpt_image 输入图片数据
*/
void fill_tensor_data_image(ov::Tensor& input_tensor, const cv::Mat& input_image)
{
    // 获取输入节点要求的输入图片数据的大小
    ov::Shape tensor_shape = input_tensor.get_shape();
    const size_t width = tensor_shape[3]; // 要求输入图片数据的宽度
    const size_t height = tensor_shape[2]; // 要求输入图片数据的高度
    const size_t channels = tensor_shape[1]; // 要求输入图片数据的维度
    // 读取节点数据内存指针
    float* input_tensor_data = input_tensor.data<float>();
    // 将图片数据填充到网络中
    // 原有图片数据为 H、W、C 格式,输入要求的为 C、H、W 格式
    for (size_t c = 0; c < channels; c++)
    {
        for (size_t h = 0; h < height; h++)
        {
            for (size_t w = 0; w < width; w++)
            {
                input_tensor_data[c * width * height + h * width + w] = input_image.at<cv::Vec<float, 3>>(h, w)[c];
            }
        }
    }
}

int main(int argc, char *argv[])
{
    ov::Core ie;
    ov::CompiledModel compiled_model = ie.compile_model(ir_filename, "AUTO");//AUTO  GPU CPU
    ov::InferRequest infer_request = compiled_model.create_infer_request();
    // 预处理输入数据 - 格式化操作
    cv::VideoCapture cap("G:/1.mp4");//
    //VideoCapture cap;
    if (!cap.isOpened())
    {
        std::cerr << "Error opening video file\n";
        return -1;
    }
    // 获取输入节点tensor
    Tensor input_image_tensor = infer_request.get_tensor("images");
    int input_h = input_image_tensor.get_shape()[2]; //获得"images"节点的Height
    int input_w = input_image_tensor.get_shape()[3]; //获得"images"节点的Width
    //int input_c = input_image_tensor.get_shape()[1]; //获得"images"节点的channel
    cout << "input_h:" << input_h << "; input_w:" << input_w << endl;
    cout << "input_image_tensor's element type:" << input_image_tensor.get_element_type() << endl;
    cout << "input_image_tensor's shape:" << input_image_tensor.get_shape() << endl;
    // 获取输出节点tensor
    Tensor output_tensor = infer_request.get_tensor("output");
    int out_rows = output_tensor.get_shape()[1]; //获得"output"节点的out_rows
    int out_cols = output_tensor.get_shape()[2]; //获得"output"节点的Width
    cout << "out_cols:" << out_cols << "; out_rows:" << out_rows << endl;
    //
    Mat frame;
    //连续采集处理循环
    while (true)
    {
        cap.read(frame);
        if (frame.empty())
        {
            std::cout << "End of stream\n";
            break;
        }
        //imshow("frame", frame);
        int64 start = cv::getTickCount();
        // 图像预处理 视频分辨率
        int w = frame.cols;
        int h = frame.rows;
        //qDebug()<<"w ="<<w<<"h ="<<h;
        int _max = std::max(h, w);
        cv::Mat image = cv::Mat::zeros(cv::Size(_max, _max), CV_8UC3);
        cv::Rect roi(0, 0, w, h);
        frame.copyTo(image(roi));
        cvtColor(image, image, COLOR_BGR2RGB); //交换RB通道
        //qDebug()<<"image cols ="<<image.cols<<"image rows"<<image.rows
        //       <<"input_w ="<<input_w<<"input_h ="<<input_h;
        float x_factor = image.cols / input_w;
        float y_factor = image.rows / input_h;

        cv::Mat blob_image;
        cv::resize(image, blob_image, cv::Size(input_w, input_h));
        //cv::cvtColor(blob_image, blob_image, cv::COLOR_BGR2RGB);
        blob_image.convertTo(blob_image, CV_32F);
        blob_image = blob_image / 255.0;
        // 将图片数据填充到tensor数据内存中
        fill_tensor_data_image(input_image_tensor, blob_image);
        // 执行推理计算
        infer_request.infer();
        // 获得推理结果
        const ov::Tensor& output_tensor = infer_request.get_tensor("output");
        // 解析推理结果,YOLOv5 output format: cx,cy,w,h,score
        cv::Mat det_output(out_rows, out_cols, CV_32F, (float*)output_tensor.data());
        //
        vector<cv::Rect> boxes;
        vector<int> classIds;
        vector<float> confidences;

        for (int i = 0; i < det_output.rows; i++)
        {
            float confidence = det_output.at<float>(i, 4);
            //qDebug()<<"confidence ="<<confidence;
            if (confidence < 0.4)
            {
                continue;
            }
            //官方模型为85
            cv::Mat classes_scores = det_output.row(i).colRange(5, 85);
            cv::Point classIdPoint;
            double score;
            cv::minMaxLoc(classes_scores, 0, &score, 0, &classIdPoint);
            // 置信度 0~1之间
            //qDebug()<<"score ="<<score;
            if (score > 0.8)//0.65
            {
                float cx = det_output.at<float>(i, 0);
                float cy = det_output.at<float>(i, 1);
                float ow = det_output.at<float>(i, 2);
                float oh = det_output.at<float>(i, 3);
                int x = static_cast<int>((cx - 0.5 * ow) * x_factor);
                int y = static_cast<int>((cy - 0.5 * oh) * y_factor);
                int width = static_cast<int>(ow * x_factor);
                int height = static_cast<int>(oh * y_factor);
                //qDebug()<<"cx ="<<cx<<"cy ="<<cy
                //       <<"ow ="<<ow<<"oh ="<<oh
                //      <<"x ="<<x<<"y ="<<y
                //     <<"width ="<<width<<"height ="<<height;
                //
                cv::Rect box;
                box.x = x;
                box.y = y;
                box.width = width;
                box.height = height;

                boxes.push_back(box);
                classIds.push_back(classIdPoint.x);
                confidences.push_back(score);
            }
        }
        // NMS
        vector<int> indexes;
        cv::dnn::NMSBoxes(boxes, confidences, 0.25, 0.45, indexes);
        for (size_t i = 0; i < indexes.size(); i++)
        {
            int index = indexes[i];
            int idx = classIds[index];
            float iscore = confidences[index];
            //
            cv::rectangle(frame, boxes[index], cv::Scalar(0, 0, 255), 2, 8);
            cv::rectangle(frame, cv::Point(boxes[index].tl().x, boxes[index].tl().y - 20),
                cv::Point(boxes[index].br().x, boxes[index].tl().y), cv::Scalar(0, 255, 255), -1);
            //
            String nameText = class_names[idx];
            nameText.append(to_string(iscore));
            cv::putText(frame, nameText/*class_names[idx]*/, cv::Point(boxes[index].tl().x, boxes[index].tl().y - 10), cv::FONT_HERSHEY_SIMPLEX, .5, cv::Scalar(0, 0, 0));
            //目标中心点
            Point2f point(boxes[index].x + boxes[index].width/2,boxes[index].y + boxes[index].height/2);
            circle(frame, point, 3, Scalar(0, 255, 0), -1);
            //
            String posText = "x:";
            posText.append(to_string(boxes[index].x + + boxes[index].width/2));
            posText.append(",");
            posText.append("y:");
            posText.append(to_string(boxes[index].y + + boxes[index].height/2));
            //qDebug()<<QString::fromStdString(posText);
            cv::putText(frame, posText, point, cv::FONT_HERSHEY_SIMPLEX, .8, cv::Scalar(255, 255, 255));
        }
        // 计算FPS render it
        float t = (cv::getTickCount() - start) / static_cast<float>(cv::getTickFrequency());
        //cout << "Infer time(ms): " << t * 1000 << "ms; Detections: " << indexes.size() << endl;
        putText(frame, cv::format("FPS: %.2f", 1.0 / t), cv::Point(20, 40), cv::FONT_HERSHEY_PLAIN, 2.0, cv::Scalar(255, 0, 0), 2, 8);
        cv::namedWindow("YOLOv5-6.2 + OpenVINO 2022.1 C++ Demo",0);
        cv::imshow("YOLOv5-6.2 + OpenVINO 2022.1 C++ Demo", frame);

        char c = cv::waitKey(1);
        if (c == 27)
        {
            // ESC
            break;
        }
    }

    cv::waitKey(0);
    cv::destroyAllWindows();
    return 0;
}
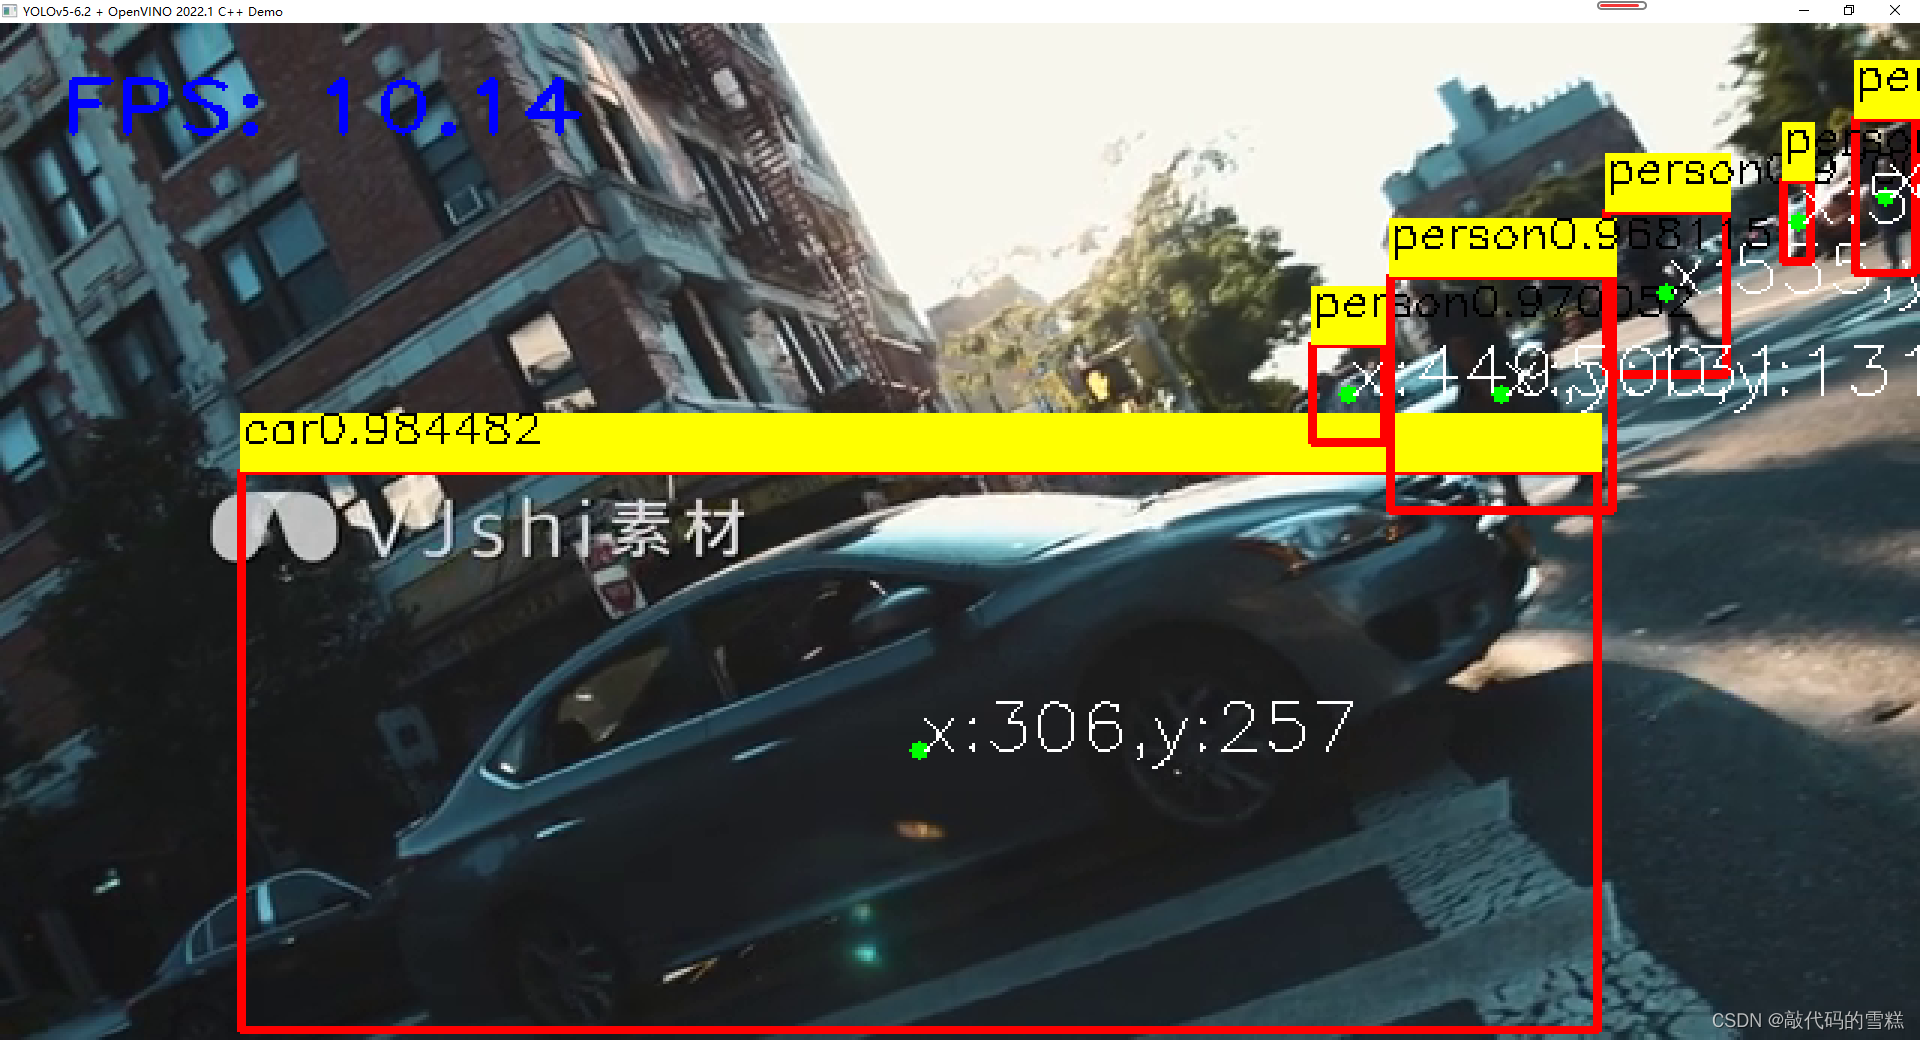
四、效果
以本地视频文件1.mp4为例,效果如下:

可以看到FPS获得较大提升,视频流明显比之前效果要好。
五、后记
以上代码是基于qt5.6.2 编译的64位程序,32位编译不通过,貌似需要自己编译openvino 32bit版本。我尝试编译过openvino 32bit,但部分库编译失败,该qt demo运行失败。如果有博主编译成功该版本openvino 32bit,辛苦告知一下,万分感谢!!!
文章出处登录后可见!
已经登录?立即刷新
