 猛戳!跟哥们一起玩蛇啊 👉 《一起玩蛇》🐍 =
💭 写在前面: 本篇是关于多伦多大学自动驾驶专业项目 Gym-CarRacing 的博客。GYM-Box2D CarRacing 是一种在 OpenAI Gym 平台上开发和比较强化学习算法的模拟环境。它是流行的 Box2D 物理引擎的一个版本,经过修改以支持模拟汽车在赛道上行驶的物理过程。由于内容比较多所以分多次更新,本篇是关于前置知识介绍,以及项目环境准备的。具体如下:
- 自动驾驶的背景知识介绍。
- 然后会讲解本项目可能所需的知识点,需要用到图像处理算法和基础车道线检测算法,这里的讲解并不会太细,读者如果对不熟悉可以在单独搜索,C站上也有不少介绍这些算法的博客。
- 项目所需的环境安装教程(这个部分是我在博客审阅阶段临时增添的),因为该项目需要 Conda 和 gym 环境和一堆必不可少的软件包(少一个都跑不了)。我看了网上有不少朋友在做该项目时,在环境安装上踩了不少坑。所以为了方便需要做该项目的同学、对该项目感兴趣的朋友,我这里准备了环境安装的教程。
🔗 多伦多大学自动驾驶专项课程:Motion Planning for Self-Driving Cars | Coursera
🔗 Gym Car Racing 文档:Car Racing – Gym Documentation
 本篇博客全站热榜排名:4
Ⅰ. 背景知识介绍
0x00 引入: 什么是自动驾驶?
" Autonomous(自动)+ driving(驾驶) "
 自动驾驶,即汽车自主认知周边环境并安全行驶的技术。
Self-driving car, autonomous vehicle, driver-less car, or robotic car……
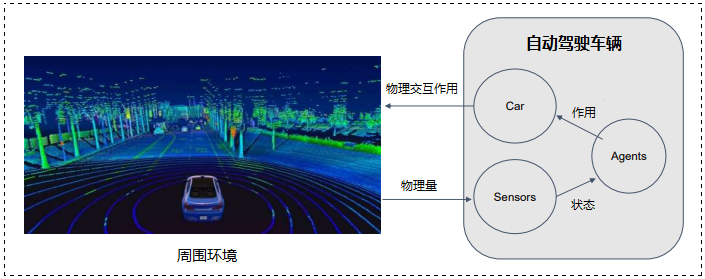
0x01 自动驾驶的基本组件
- 汽车(Car):实际移动的车辆,代理人应该控制它
- 传感器(Sensors):探测周围环境的设备
- 代理人(Agent):一个在给定的周围环境中安全地驱动 var 的物体
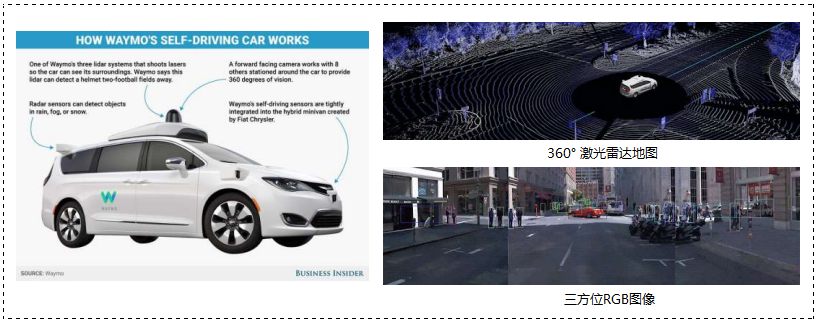
传感器(Sensors on self-driving cars):
- 460 个激光雷达摄像机、RGB 摄像机
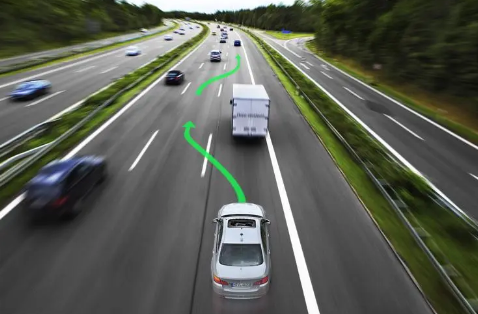
自动驾驶的目标(Goal of Autonomous Driving):
- 在给定的情况下的安全驾驶
- 根据给定的情况 (state) 安全驾驶汽车
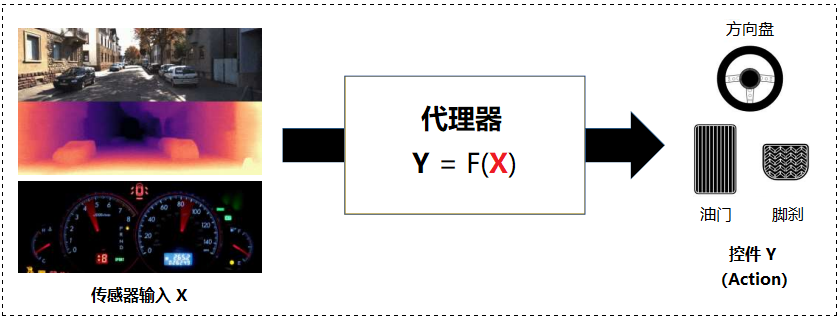
映射函数:Sensor Input → Action
- 模块化管线(modular Pipelines)
- 端到端训练(End-to-End Learning)
- 直接感知(Direct Perception)
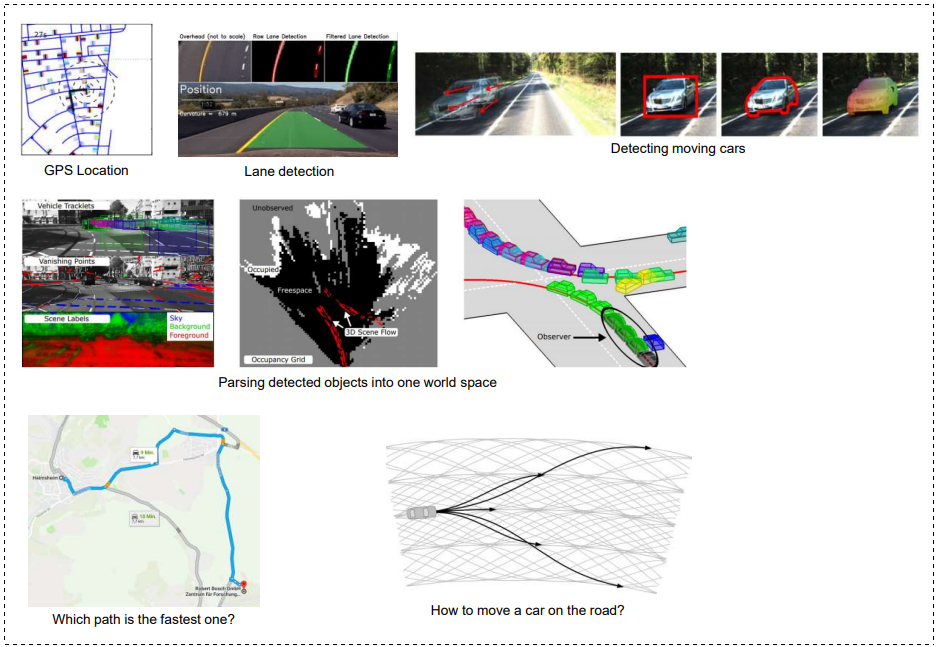
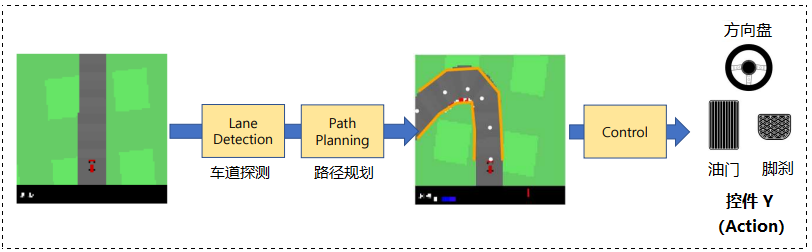
0x02 模块化组件(Modular Pipeline)
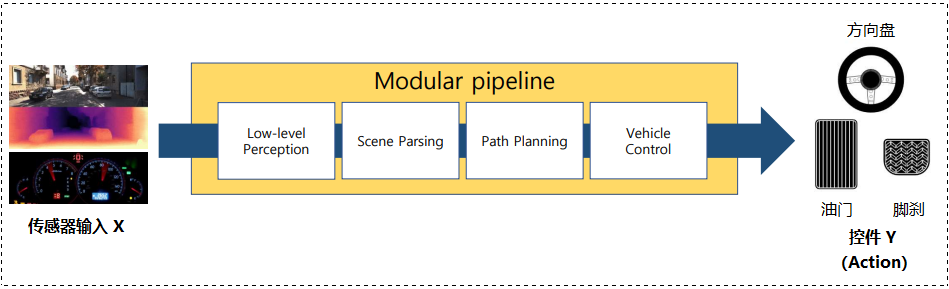
每个模块连接下一个模块的输入:低级感知、场景解析、路径训练、车辆控制。
❓ 需要思考的问题:为遵循选定的路径,我们应将手柄转多少度?我们应该以什么速度前进?
Ⅱ. 前置知识
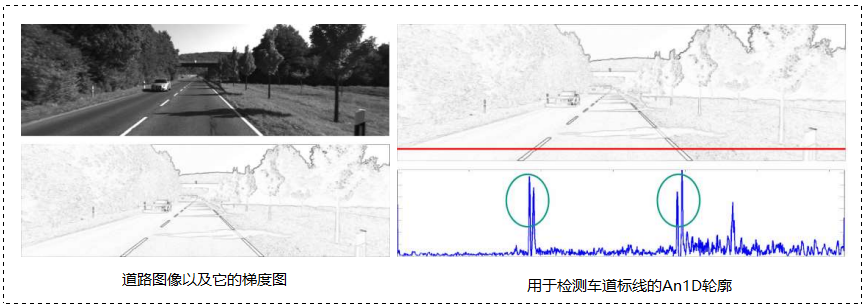
0x00 车道标记与车道检测(Lane marking & Lane detection)
- 使用梯度图或边缘过滤的图像,我们可以通过阈值处理来检测车道标记。
- 考虑在附近存在相反梯度的点。
0x01 边缘检测(Edge Detection)
- 通过用边缘过滤器对图像进行卷积,得到两个方向的梯度图。
- 这里也可以使用其他的边缘核进行边缘检测。
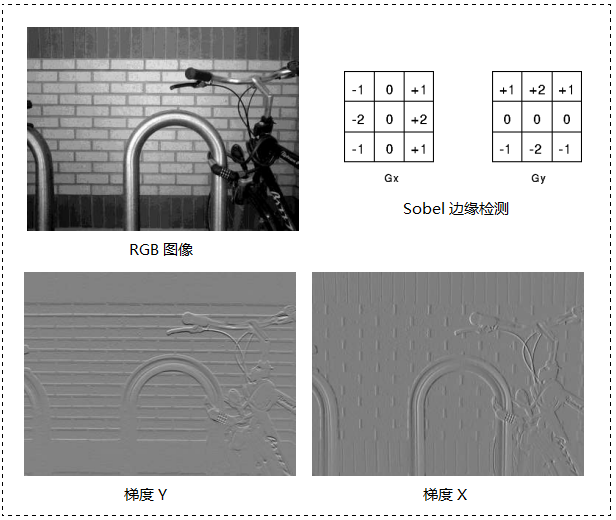
边缘检测是图像处理的一种常见技术,用于检测图像中的边缘和边界。这对于自动驾驶系统来说是非常重要的,因为边缘检测可以帮助系统识别道路、车辆、行人等重要物体。
通常边缘检测是通过使用边缘过滤器对图像进行卷积来实现的,边缘过滤器是一种特殊的卷积核,其中包含了两个方向的梯度图,可以检测出图像中的垂直和水平边缘。比如图中显示的 Sobel 过滤器,就可以得到一张图像的 方向和
方向的梯度图,其中
方向的梯度图可以检测出图像中的垂直边缘,
方向的梯度图可以检测出图像中的水平边缘。
除了 Sobel 过滤器之外,还有许多其他的边缘核可以用于边缘检测。比如 Canny 边缘检测算法,这是一种非常流行的边缘检测算法,它可以有效地消除噪声并提供清晰的边缘检测结果。
Canny 边缘检测是由 John F. Canny 在 1986 年提出的一种边缘检测算法。
它是一种多步骤的边缘检测算法,包括以下几个步骤:
- 图像高斯滤波:使用高斯滤波器对图像进行模糊处理,以减少噪声并使边缘更加明显。
- 计算图像梯度:使用 Sobel 过滤器或其他方法计算图像的梯度,并使用梯度的方向和大小来表示图像中的边缘。
- 非极大值抑制:使用非极大值抑制算法来去除图像中的假边缘。
- 双阈值检测:使用两个阈值来区分真正的边缘和假边缘。
- 边缘连接:将检测到的边缘连接起来,以形成完整的边缘。
Canny 边缘检测算法的优点是它能够有效地消除噪声,并提供清晰的边缘检测结果。但是,由于它是一种多步骤的算法,所以它的计算复杂度较高,不太适用于实时边缘检测场景。
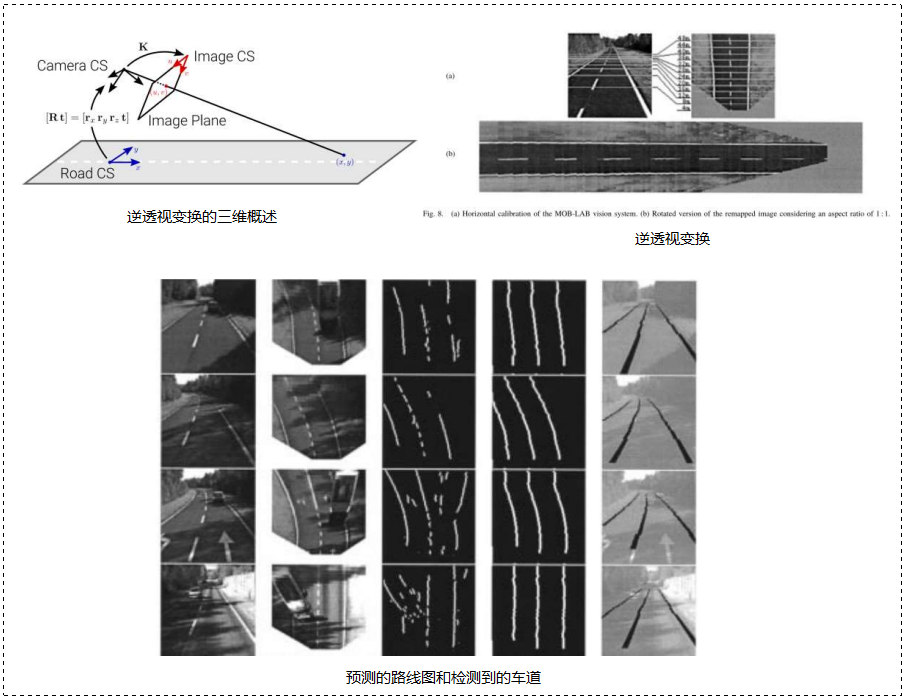
0x02 IPM 逆透视变换(Inverse Perspective Mapping)
IPM(Inverse Perspective Mapping)是一种图像处理技术,它可以将一张透视变换后的图像进行逆变换,使其看起来像是从俯视角度拍摄的。这对于自动驾驶系统来说非常重要,因为它可以帮助系统更准确地识别道路、车辆、行人等物体。
- 在通常情况下,道路是在平面上的。
- 如果三维变换是已知的,我们就可以将道路图像投射到地面平面上。
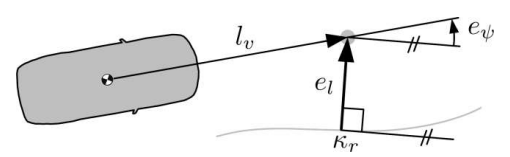
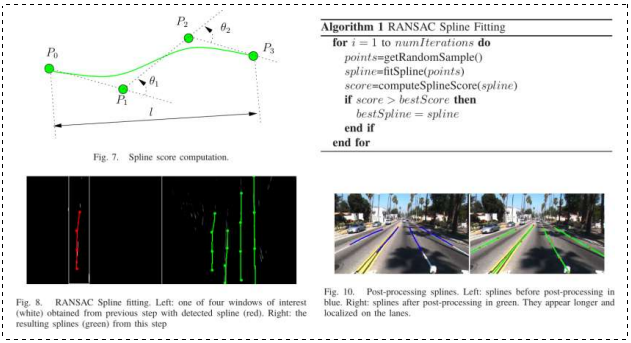
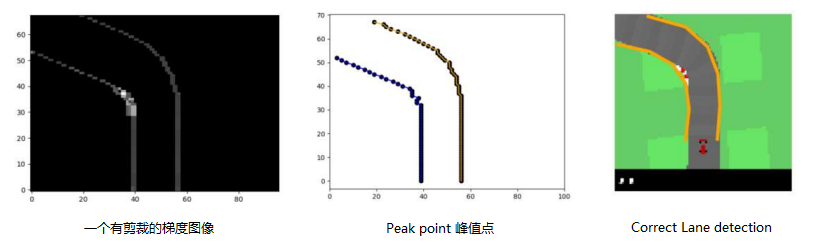
0x03 车道线检测:参数化车道标线估算(Parametric Lane Marking Estimation)
为了给汽车导航,我们需要将检测到的标记像素与一个更有语义的曲线模型与之相匹。
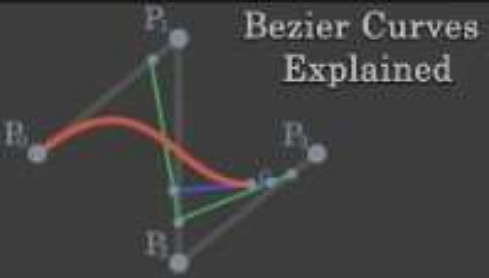
0x04 贝塞尔曲线(Bezier Curve)
贝塞尔曲线(Bézier curve)是一种数学曲线,贝塞尔曲线常用于计算机图形学中,因为它们可以用于创建平滑的曲线和图形。贝塞尔曲线是通过控制点来描述曲线形状的,其中一个或多个控制点用于指定曲线的形状。
贝塞尔曲线可以通过控制点的位置来控制曲线的形状,并可以通过改变控制点的位置来改变曲线的形状。这使得贝塞尔曲线非常适用于创建复杂的曲线和图形。
- 一个由控制点定义的多项式曲线
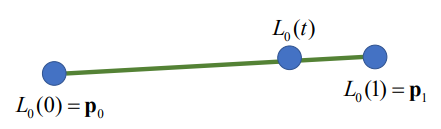
0x05 线性贝塞尔曲线(Linear Bezier Curve)
线性贝塞尔曲线是一种特殊的贝塞尔曲线,它由两个控制点和一个起始点和一个终止点组成。线性贝塞尔曲线是最简单的贝塞尔曲线之一,它可以用来描述直线。线性贝塞尔曲线的方程:
其中, 是贝塞尔曲线上的点,
是参数,
和
是控制点。
- 类似线性插值法(linear interpolation)
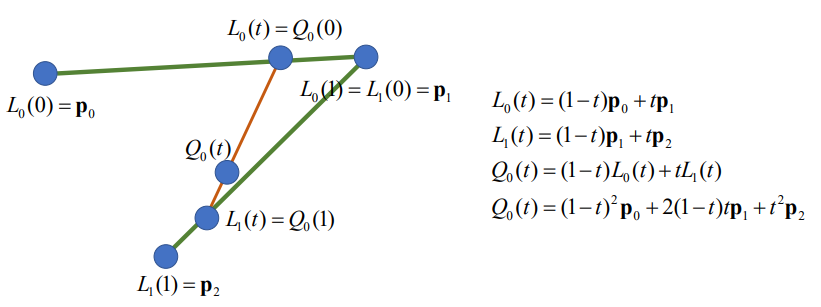
0x06 二次贝塞尔曲线(Quadratic Bezier Curve)
由一个起始点、一个终止点和两个控制点组成。二次贝塞尔曲线是一种二次方程,可用来描述曲线和复杂的形状。二次贝塞尔曲线的方程:
其中, 是贝塞尔曲线上的点,
是参数,
是控制点。
- 两个线性内插点的内插
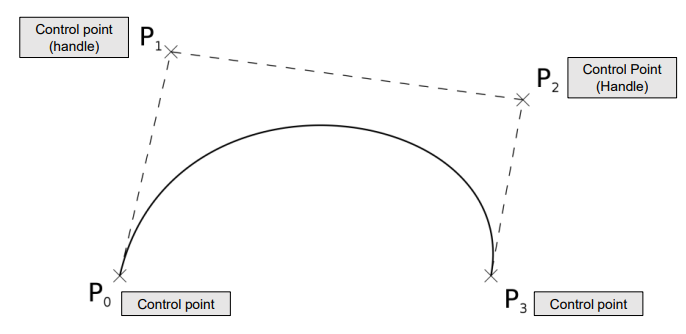
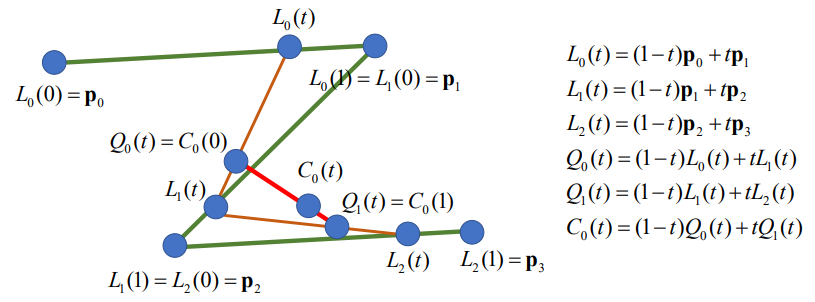
0x07 三次贝塞尔曲线(Cubic Bezier Curve)
由一个起始点、一个终止点和三个控制点组成。三次贝塞尔曲线是一种三次方程,它可以用来描述曲线和复杂的形状。三次贝塞尔曲线的方程:
其中, 是贝塞尔曲线上的点,
是参数,
是控制点。
- 二次点的插值
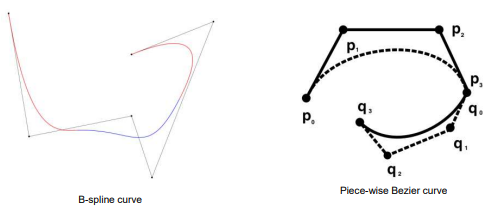
0x08 B样条曲线(B-Spline Curve)
B样条曲线是通过一系列的控制点来描述曲线形状的,这些控制点可以用来指定曲线的形状。B样条曲线通常使用 B样条曲线方程来描述,这是一个多项式方程。B样条曲线有许多不同的类型,包括二次B样条曲线、三次B样条曲线和四次B样条曲线。
已知 个控制点
,可定义
次 B 样条曲线的表达式为:
由控制点列表和程度定义的曲线,一条单片多项式曲线(它不同于与贝塞尔曲线)。
Ⅲ. 项目所需环境准备
0x00 前言
我默认读者已经安装了 Python,这里简单讲一下如何安装 Conda 和 gym。网上的资料很多,与之相比,我写的安装教程可能远没有那些专门安装环境的文章细致。我这里只是做简单介绍,旨在方便大家能快速准备好环境,能让程序正常跑起来的。因为我看了网上有不少人在做该项目时,在环境安装上踩了不少坑,很是让人头疼。所以这里我准备了 Conda 和 gym 环境安装的教程。
0x01 Step1:Python 开发环境设置 —— 安装 Conda
操作系统以 Window 为准进行说明(Linux 同理)
安装 Anaconda 或 Miniconda:
- Python 开发环境平台
- 支持各种环境设置与环境的更改
- https://docs.conda.io/en/latest/miniconda.html
- 有关安装方法和详细信息,请参阅百度

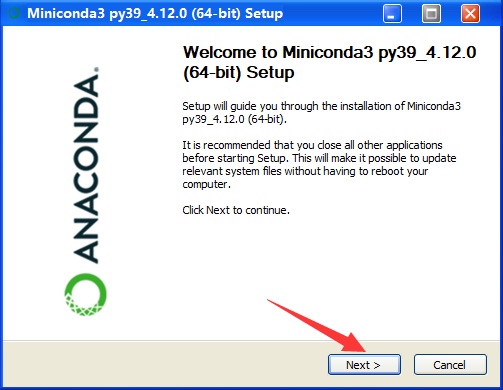
Step1:打开安装包后会进入欢迎界面,点击 Next>
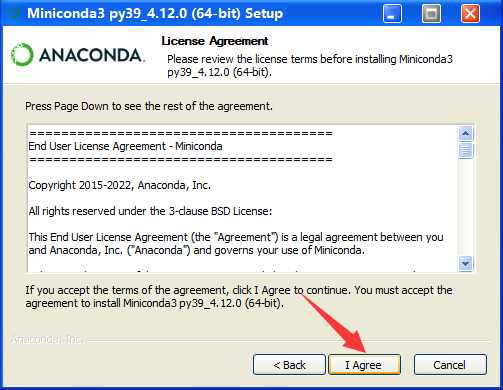
Step2:许可协议界面,选择同意:
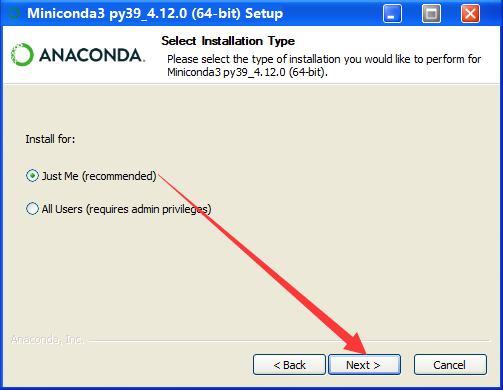
Step3:看情况选择,我们选择 Just Me:
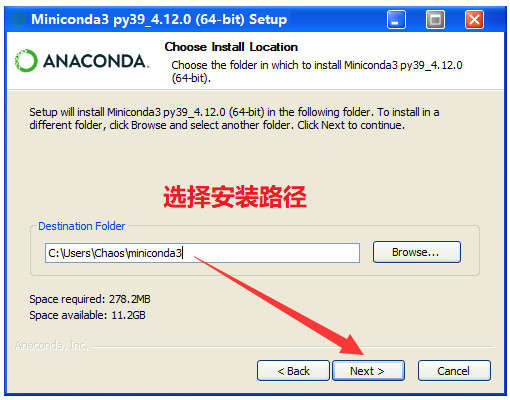
Step4:选择安装路径,默认是在 C 盘下的,点击 Browse 按钮可呼出窗口更换路径:
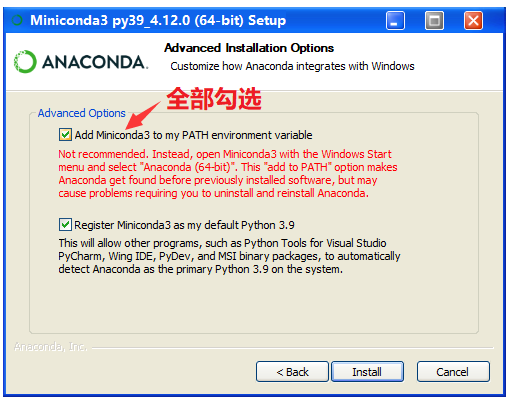
Step5:这里全部勾选
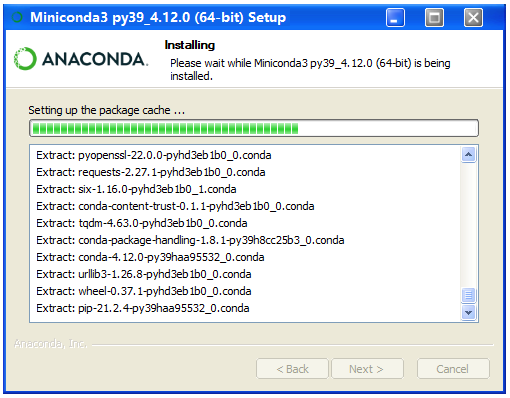
Step6:等待即可,可能有点慢,但是绝对没有 Vivado 慢!安装完毕后点击 Next >
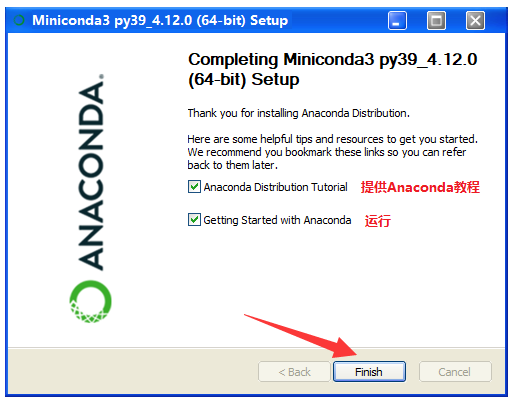
Final Step:点击 Finish

0x02 Step2:Conda 安装完毕后的环境设置
通过命令行操作,设置环境并激活即可:
🔍 官方说明:Managing environments — conda
详细查阅 Creating and activating an environment 部分。
安装命令示例:
> conda env create –n autodriving
> conda activate autodirving
> conda install python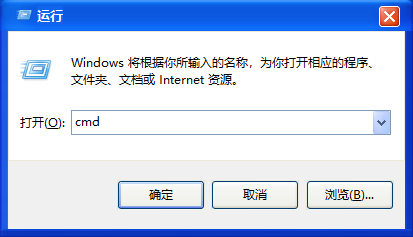
> pip install pytorchStep1:打开命令提示符,快捷键 Win+R 输入 cmd 后回车:
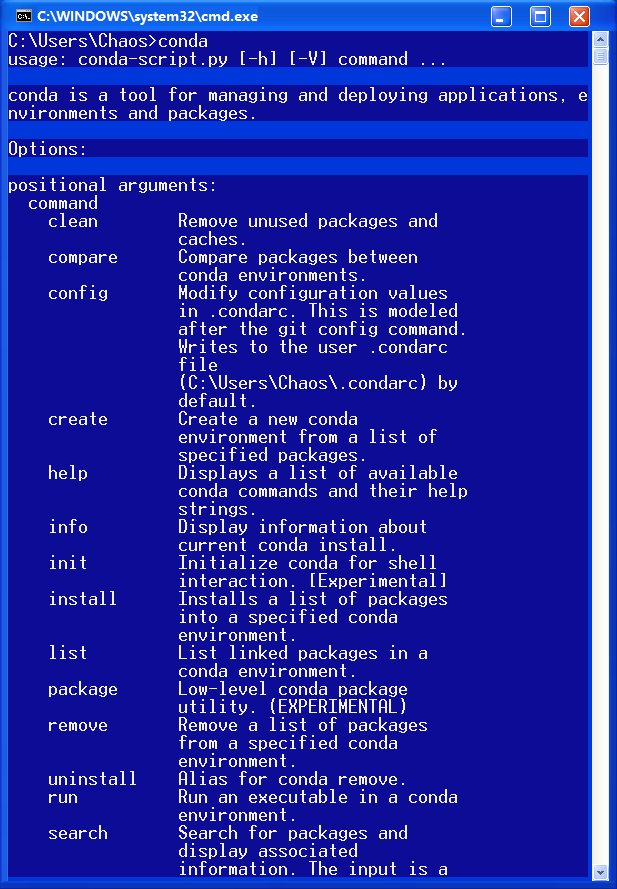
Step2:检查是否安装正常,在 cmd 中输入 conda
conda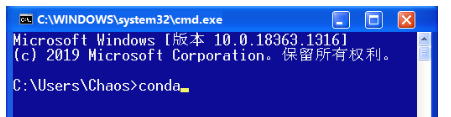
没问题:
Step3:打开命令行下输入:
conda create -n python=2.7 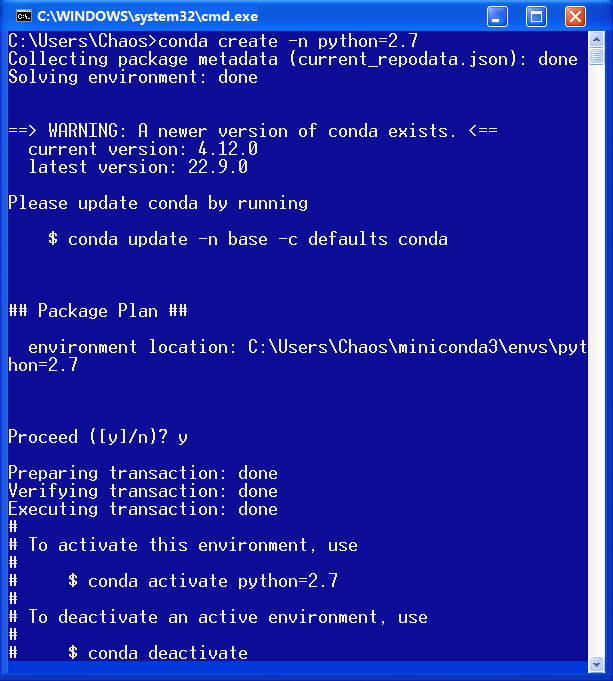
Step4:进入环境内部
conda activate [文件名]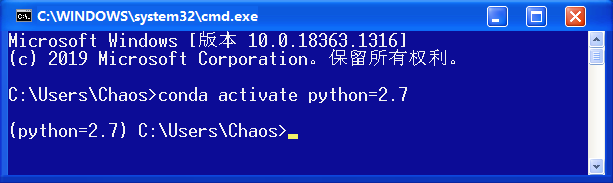
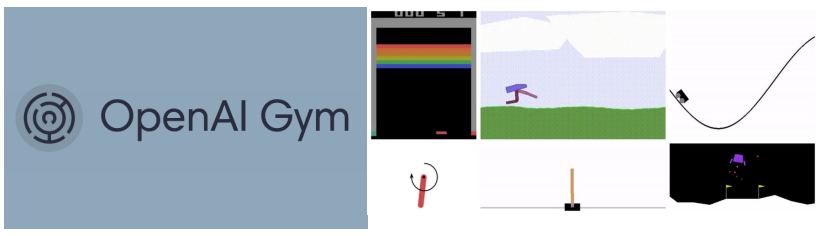
0x03 关于 OpenAI GYM 的介绍
强化学习框架(https://github.com/openai/gym)
- 开源提供多种游戏环境。
- 本项目将使用 box2d-carracing
- 参考资料:https://www.gymlibrary.dev/
0x04 安装练习所需的软件包
- 下载解压文件后自行解压。
- 显示命令窗口后设置 Conda 环境。
- 找到到解压缩文件夹后执行以下命令:
- cd 到 /envs/box2d,python car_racing 执行 py 命令,确保 Acttion 没问题(方向键可以移动汽车就行)。
CarRacing 环境基本代码示例:
gym.make()         环境配置。
env.reset()        设置初始变量。
env.step(action)   执行动作并返回以下观察值、补偿、是否结束。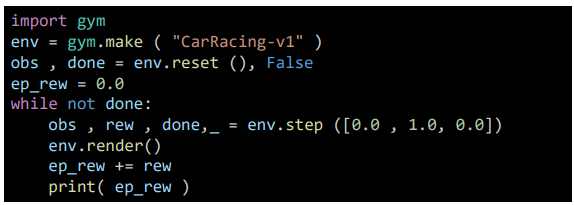
0x05 设置 GYM 环境
Step1:打开命令窗口设置准备 Conda
创建项目文件夹: conda create -n gym python=3.8
这里我去名为 3.8
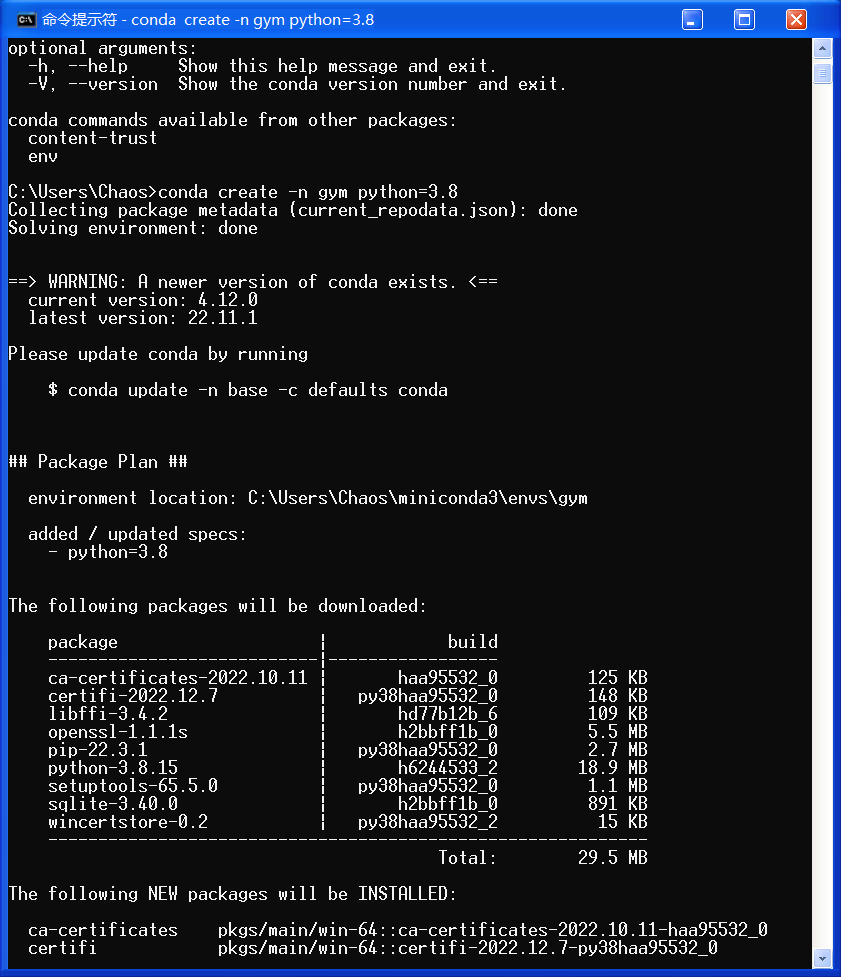
稍等片刻,会问你 yes 还是 no,我们输入 y 即可:![]()
之后会开始提取安装包,耐心等待……
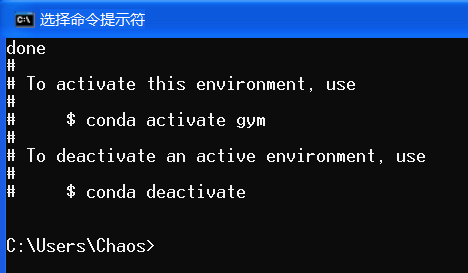
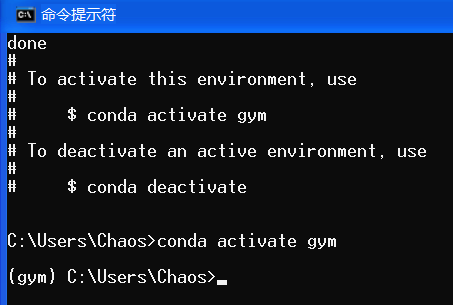
之后输入 conda activate gym 进行激活:
Step2:cd 至解压的文件夹位置
cd {{installed gym path}}我们是把 gym 解压到桌面的,我们 cd 过去即可。
Step3:输入下列指令
pip install -e .[box2d]
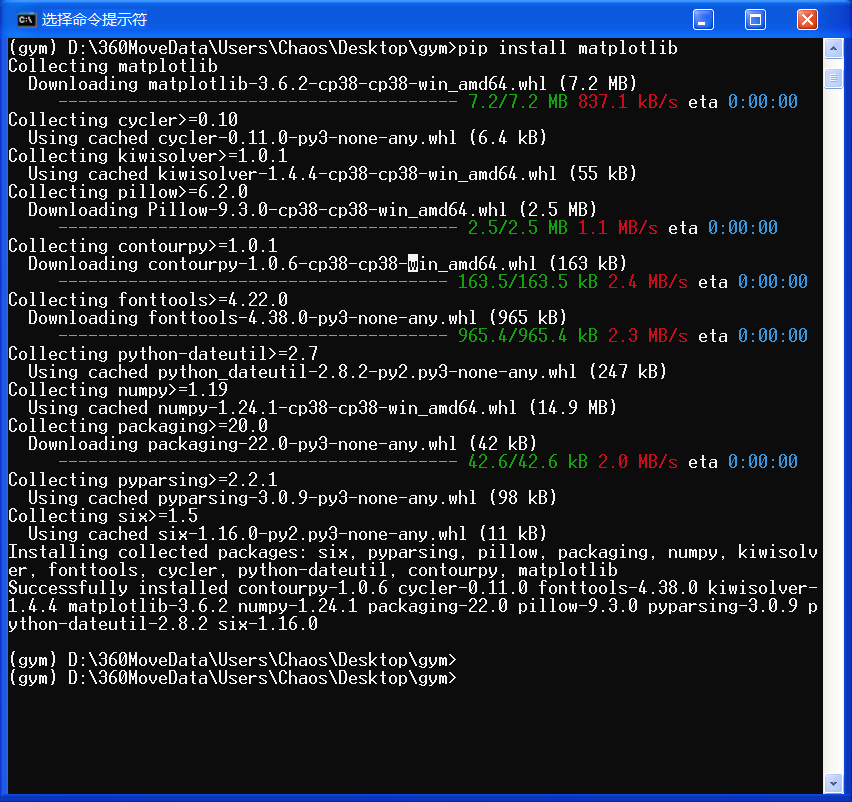
pip install matplotlib
pip install scipy
pip install pyglet
pip install pygame挨个安装即可:
如果显示安装失败,可能是因为 python无法识别安装的版本,导致 pip install Box2D 显示无法安装,可以尝试输入以下指令安装:
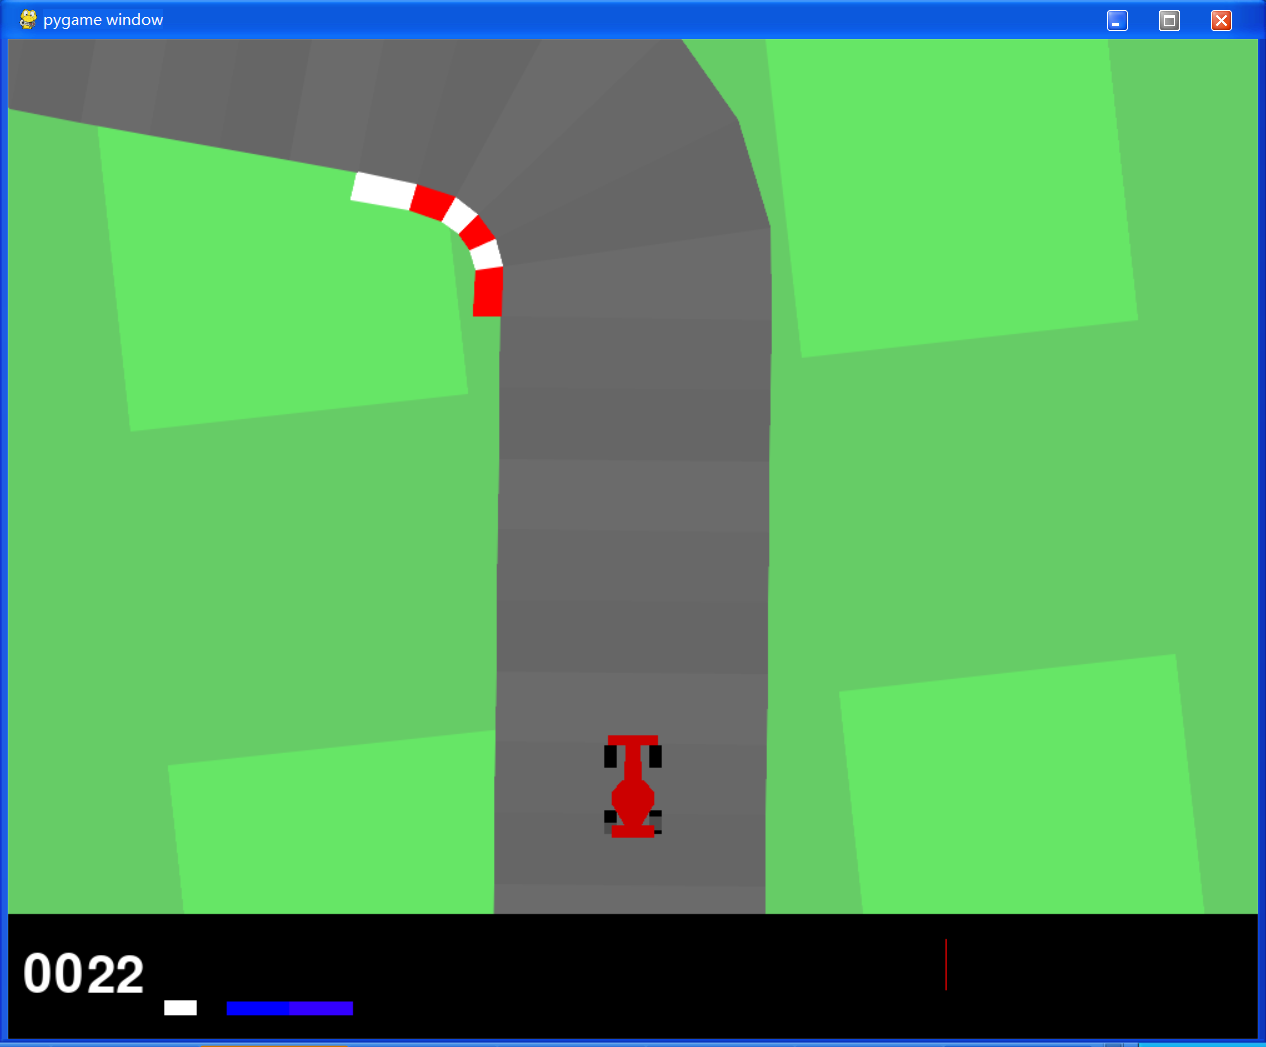
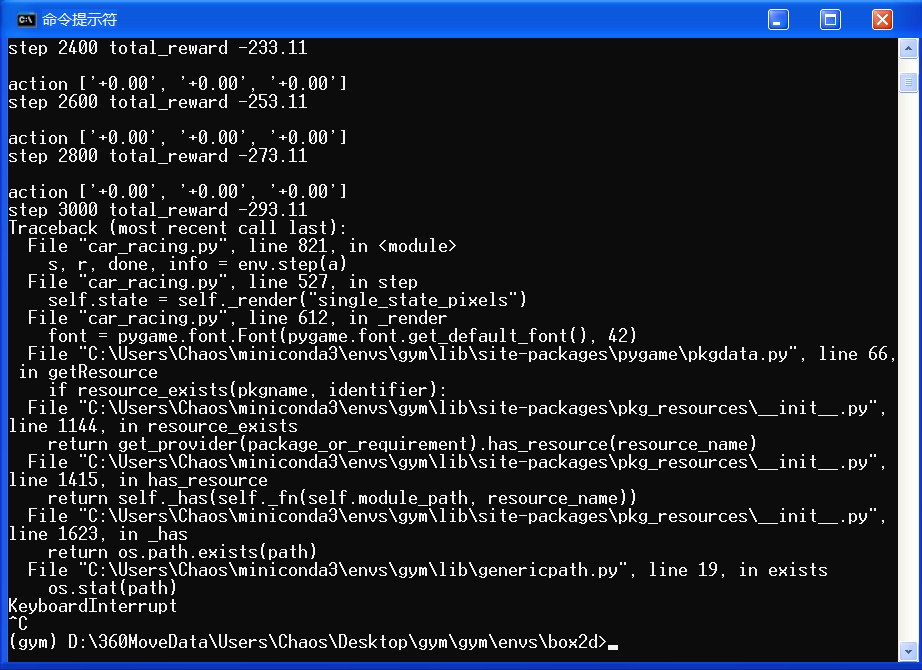
python -m pip install Box2D全部安装完毕后,跳转到 gym/envs/box2d,运行 python car_racing.py 命令测试环境:
cd gym/envs/box2d(注意,gym 文件夹还有一个 gym 文件夹)
然后输入 python car_racing.py 运行,如果正常运行,就说明环境装好了。
🚩 运行效果如下:
至此,环境已全部准备完毕!
有些人开了就不会关了,很尴尬…… 建议直接强制关机 23333(滑稽)
拉闸!简单粗暴,一步到位!!!优雅,永不过时。
Ⅳ. 项目准备
0x00 实验说明:Box2D CarRacing 的 lane_dection
🚩 实践目标:实现一个模块化组件框架,落实简化版的模块化流水线。了解基本概念,并积累开发一个简单的自驱应用程序的经验。
🔨 环境选用:OpenAI GYM
- https://www.gymlibrary.ml/
- 我们将基于 Box2D CarRacing 实现,Box2D CarRacing 基本信息如下:
- Action:转向、加速、刹车
- Sensor input:
屏幕(显示汽车的状态和路径信息)
📜 尝试:
- 为汽车上方的部分找到一个好的裁剪,一个好的方法来分配车道边界的边缘,一个好的梯度阈值和样条平滑度的参数选择。
- 尝试找到失败的案例。
* 提供基础框架,只需要在 TODO 位置填写代码即可!
我就不提供资源下载链接了,直接手动吧:首先在桌面上创建一个文件夹,我们取名 skeleton ,然后创建出如下名称的 py 文件,将代码 CV 进去。
- lane detection.py
import numpy as np
import matplotlib.pyplot as plt
from scipy.signal import find_peaks
from scipy.interpolate import splprep, splev
from scipy.optimize import minimize
import time


class LaneDetection:
    '''
    Lane detection module using edge detection and b-spline fitting

    args:
        cut_size (cut_size=65) cut the image at the front of the car
        spline_smoothness (default=10)
        gradient_threshold (default=14)
        distance_maxima_gradient (default=3)

    '''

    def __init__(self, cut_size=65, spline_smoothness=10, gradient_threshold=14, distance_maxima_gradient=3):
        self.car_position = np.array([48,0])
        self.spline_smoothness = spline_smoothness
        self.cut_size = cut_size
        self.gradient_threshold = gradient_threshold
        self.distance_maxima_gradient = distance_maxima_gradient
        self.lane_boundary1_old = 0
        self.lane_boundary2_old = 0


    def cut_gray(self, state_image_full):
        '''
        ##### TODO #####
        This function should cut the image at the front end of the car (e.g. pixel row 65)
        and translate to gray scale

        input:
            state_image_full 96x96x3

        output:
            gray_state_image 65x96x1

        '''

        return gray_state_image[::-1]


    def edge_detection(self, gray_image):
        '''
        ##### TODO #####
        In order to find edges in the gray state image,
        this function should derive the absolute gradients of the gray state image.
        Derive the absolute gradients using numpy for each pixel.
        To ignore small gradients, set all gradients below a threshold (self.gradient_threshold) to zero.

        input:
            gray_state_image 65x96x1

        output:
            gradient_sum 65x96x1

        '''


        return gradient_sum


    def find_maxima_gradient_rowwise(self, gradient_sum):
        '''
        ##### TODO #####
        This function should output arguments of local maxima for each row of the gradient image.
        You can use scipy.signal.find_peaks to detect maxima.
        Hint: Use distance argument for a better robustness.

        input:
            gradient_sum 65x96x1

        output:
            maxima (np.array) shape : (Number_maxima, 2)

        '''

        return argmaxima


    def find_first_lane_point(self, gradient_sum):
        '''
        Find the first lane_boundaries points above the car.
        Special cases like just detecting one lane_boundary or more than two are considered.
        Even though there is space for improvement ;)

        input:
            gradient_sum 65x96x1

        output:
            lane_boundary1_startpoint
            lane_boundary2_startpoint
            lanes_found  true if lane_boundaries were found
        '''

        # Variable if lanes were found or not
        lanes_found = False
        row = 0

        # loop through the rows
        while not lanes_found:

            # Find peaks with min distance of at least 3 pixel
            argmaxima = find_peaks(gradient_sum[row],distance=3)[0]

            # if one lane_boundary is found
            if argmaxima.shape[0] == 1:
                lane_boundary1_startpoint = np.array([[argmaxima[0],  row]])

                if argmaxima[0] < 48:
                    lane_boundary2_startpoint = np.array([[0,  row]])
                else:
                    lane_boundary2_startpoint = np.array([[96,  row]])

                lanes_found = True

            # if 2 lane_boundaries are found
            elif argmaxima.shape[0] == 2:
                lane_boundary1_startpoint = np.array([[argmaxima[0],  row]])
                lane_boundary2_startpoint = np.array([[argmaxima[1],  row]])
                lanes_found = True

            # if more than 2 lane_boundaries are found
            elif argmaxima.shape[0] > 2:
                # if more than two maxima then take the two lanes next to the car, regarding least square
                A = np.argsort((argmaxima - self.car_position[0])**2)
                lane_boundary1_startpoint = np.array([[argmaxima[A[0]],  0]])
                lane_boundary2_startpoint = np.array([[argmaxima[A[1]],  0]])
                lanes_found = True

            row += 1

            # if no lane_boundaries are found
            if row == self.cut_size:
                lane_boundary1_startpoint = np.array([[0,  0]])
                lane_boundary2_startpoint = np.array([[0,  0]])
                break

        return lane_boundary1_startpoint, lane_boundary2_startpoint, lanes_found


    def lane_detection(self, state_image_full):
        '''
        ##### TODO #####
        This function should perform the road detection

        args:
            state_image_full [96, 96, 3]

        out:
            lane_boundary1 spline
            lane_boundary2 spline
        '''

        # to gray
        gray_state = self.cut_gray(state_image_full)

        # edge detection via gradient sum and thresholding
        gradient_sum = self.edge_detection(gray_state)
        maxima = self.find_maxima_gradient_rowwise(gradient_sum)

        # first lane_boundary points
        lane_boundary1_points, lane_boundary2_points, lane_found = self.find_first_lane_point(gradient_sum)

        # if no lane was found,use lane_boundaries of the preceding step
        if lane_found:

            ##### TODO #####
            #  in every iteration:
            # 1- find maximum/edge with the lowest distance to the last lane boundary point
            # 2- append maximum to lane_boundary1_points or lane_boundary2_points
            # 3- delete maximum from maxima
            # 4- stop loop if there is no maximum left
            #    or if the distance to the next one is too big (>=100)

            # lane_boundary 1

            # lane_boundary 2

            ################


            ##### TODO #####
            # spline fitting using scipy.interpolate.splprep
            # and the arguments self.spline_smoothness
            #
            # if there are more lane_boundary points points than spline parameters
            # else use perceding spline
            if lane_boundary1_points.shape[0] > 4 and lane_boundary2_points.shape[0] > 4:

                # Pay attention: the first lane_boundary point might occur twice
                # lane_boundary 1

                # lane_boundary 2

            else:
                lane_boundary1 = self.lane_boundary1_old
                lane_boundary2 = self.lane_boundary2_old
            ################

        else:
            lane_boundary1 = self.lane_boundary1_old
            lane_boundary2 = self.lane_boundary2_old

        self.lane_boundary1_old = lane_boundary1
        self.lane_boundary2_old = lane_boundary2

        # output the spline
        return lane_boundary1, lane_boundary2


    def plot_state_lane(self, state_image_full, steps, fig, waypoints=[]):
        '''
        Plot lanes and way points
        '''
        # evaluate spline for 6 different spline parameters.
        t = np.linspace(0, 1, 6)
        lane_boundary1_points_points = np.array(splev(t, self.lane_boundary1_old))
        lane_boundary2_points_points = np.array(splev(t, self.lane_boundary2_old))

        plt.gcf().clear()
        plt.imshow(state_image_full[::-1])
        plt.plot(lane_boundary1_points_points[0], lane_boundary1_points_points[1]+96-self.cut_size, linewidth=5, color='orange')
        plt.plot(lane_boundary2_points_points[0], lane_boundary2_points_points[1]+96-self.cut_size, linewidth=5, color='orange')
        if len(waypoints):
            plt.scatter(waypoints[0], waypoints[1]+96-self.cut_size, color='white')

        plt.axis('off')
        plt.xlim((-0.5,95.5))
        plt.ylim((-0.5,95.5))
        plt.gca().axes.get_xaxis().set_visible(False)
        plt.gca().axes.get_yaxis().set_visible(False)
        fig.canvas.flush_events()
- detection.py (用于测试,无需修改)
import gym
from gym.envs.box2d.car_racing import CarRacing
import pygame

from lane_detection import LaneDetection
import matplotlib.pyplot as plt
import numpy as np
import pyglet
from pyglet import gl
from pyglet.window import key

# action variables
action = np.array([0.0, 0.0, 0.0])
def register_input():

    for event in pygame.event.get():
        if event.type == pygame.KEYDOWN:
            if event.key == pygame.K_LEFT:
                action[0] = -1.0
            if event.key == pygame.K_RIGHT:
                action[0] = +1.0
            if event.key == pygame.K_UP:
                action[1] = +0.5
            if event.key == pygame.K_DOWN:
                action[2] = +0.8  # set 1.0 for wheels to block to zero rotation
            if event.key == pygame.K_r:
                global retry
                retry = True
            if event.key == pygame.K_s:
                global record
                record = True
            if event.key == pygame.K_q:
                global quit
                quit = True

        if event.type == pygame.KEYUP:
            if event.key == pygame.K_LEFT and action[0] < 0.0:
                action[0] = 0
            if event.key == pygame.K_RIGHT and action[0] > 0.0:
                action[0] = 0
            if event.key == pygame.K_UP:
                action[1] = 0
            if event.key == pygame.K_DOWN:
                action[2] = 0

# init environement
env = CarRacing()
env.render()
env.reset()

# define variables
total_reward = 0.0
steps = 0
retry = False
quit = False

# init modules of the pipeline
LD_module = LaneDetection()

# init extra plot
fig = plt.figure()
plt.ion()
plt.show()

while not quit:
    env.reset()
    retry = False
    while True:
        # perform step
        register_input()
        s, r, done, speed= env.step(action)

        # lane detection
        splines = LD_module.lane_detection(s)

        # reward
        total_reward += r

        # outputs during training
        if steps % 2 == 0 or done:
            print("\naction " + str(["{:+0.2f}".format(x) for x in action]))
            print("step {} total_reward {:+0.2f}".format(steps, total_reward))
            LD_module.plot_state_lane(s, steps, fig)
        steps += 1
        env.render()

        if done or retry or quit: break


env.close()
我们会在下一章节讲解原理和有关代码的实现。

📌 [ 笔者 ]   王亦优
📃 [ 更新 ]   2022.12.29
❌ [ 勘误 ]   /* 暂无 */
📜 [ 声明 ]   由于作者水平有限,本文有错误和不准确之处在所难免,
本人也很想知道这些错误,恳望读者批评指正!| 📜 参考资料 [6] Montemerlo M, Becker J, Bhat S, et al. Junior: The Stanford entry in the Urban Challenge Slide Credit: Steven Waslander LaValle: Rapidly-exploring random trees: A new tool for path planning. Techical Report, 1998 Dolgov et al.: Practical Search Techniques in Path Planning for Autonomous Driving. STAIR, 2008. Microsoft. MSDN(Microsoft Developer Network)[EB/OL]. []. . 百度百科[EB/OL]. []. https://baike.baidu.com/. . [EB/OL]. []. https://blog.waymo.com/2021/10/the-waymo-driver-handbook-perception.html. |
文章出处登录后可见!