一、基本逻辑思路
一、前期图像处理
1. 读取图形、修改尺寸、灰度图转换
    # 读取图片
    origin = PreProcess.read_image("test_img/1.jpg", color_code=cv.IMREAD_ANYCOLOR)
    # 裁剪图片
    origin = PreProcess.resize_img(origin)
    # 彩色图片->灰度图
    img = PreProcess.convert_color(origin)
2. 直方图均衡化
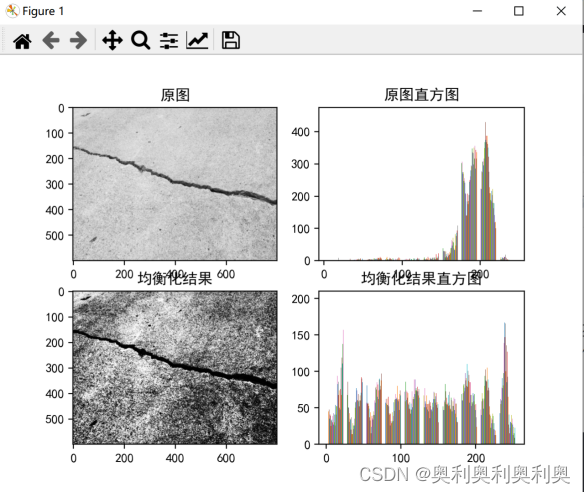
原理:
直方图均衡化通常是对图像灰度值进行归一化的方法,并且可以增强图像的对比度;
图像中像素个数多的灰度级进行展宽,而对图像中像素个数少的灰度进行压缩,从而扩展像原取值的动态范围,提高了对比度和灰度色调的变化,使图像更加清晰;
equalizeHist()函数中输入的图像必须是8-bit的单通道图像。
代码:
img = PreProcess.equalize_hist(img, flag=False) # 均值化def equalize_hist(img, flag=False):
hist_img = np.zeros(shape=img.shape)
hist_img = cv.equalizeHist(img, hist_img)
if flag:
plt.rcParams['font.sans-serif'] = ['SimHei'] # 正确打印中文
plt.subplot(2, 2, 1)
plt.imshow(img, cmap="gray")
plt.title("原图")
plt.subplot(2, 2, 2)
plt.hist(img) #
plt.title("原图直方图")
plt.subplot(2, 2, 3)
plt.imshow(hist_img, cmap="gray") #
plt.title("均衡化结果")
plt.subplot(2, 2, 4)
plt.hist(hist_img) #
plt.title("均衡化结果直方图")
plt.show()
return hist_img结果:
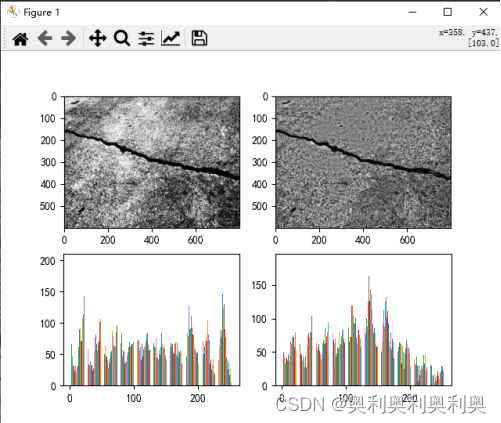
3. 手动滤波:使得图像整体的明暗变化均衡,直方图呈现中间多两边少的趋势
逻辑:
- 随机选取5块小区域、计算5块区域的灰度均值avg
- 图片按照10*10的小矩阵Matrix遍历修改:
- 计算Matrix的均值Mavg
- Matrix = Matrix*avg/Mavg
代码:
img = PreProcess.center_avg_imp(img, ksize=20, flag=False)def center_avg_imp(img, ksize=10, flag=False):
new_img = np.copy(img)
dw = int(img.shape[1] / 7) # 获取原图像长宽的1/7
dh = int(img.shape[0] / 7)
# 选取图像中的5个区域
region_1 = new_img[dh * 1: dh * 2, dw * 1: dw * 2]
region_2 = new_img[dh * 1: dh * 2, dw * 5: dw * 6]
region_3 = new_img[dh * 5: dh * 6, dw * 5: dw * 6]
region_4 = new_img[dh * 1: dh * 2, dw * 5: dw * 6]
region_5 = new_img[dh * 3: dh * 4, dw * 3: dw * 4]
# 计算5个区域的均值
avg1 = np.average(region_1)
avg2 = np.average(region_2)
avg3 = np.average(region_3)
avg4 = np.average(region_4)
avg5 = np.average(region_5)
# 5个区域均值的均值
avg = (avg1 + avg2 + avg3 + avg4 + avg5) / 5
for x in range(0, img.shape[0], ksize):
for y in range(0, img.shape[1], ksize):
# 每次运算选取10*10的像素方块进行操作 *均值/方块均值
new_img[x:x + ksize, y:y + ksize] = \
img[x:x + ksize, y:y + ksize] * (avg / np.average(img[x:x + ksize, y:y + ksize]))
# new_img = cv.medianBlur(img, 15)
# 中值滤波(Median filter)是一种典型的非线性滤波技术,基本思想是用像素点邻域灰度值的中值来代替该像素点的灰度值
# 2.ksize:核大小,必须是比1大的奇数【举个例子:3,5,7…】
if flag:
plt.subplot(2, 2, 1)
plt.imshow(img, cmap='gray')
plt.subplot(2, 2, 2)
plt.imshow(new_img, cmap='gray')
plt.subplot(2, 2, 4)
plt.hist(new_img)
plt.subplot(2, 2, 3)
plt.hist(img)
plt.show()
return new_img
结果:

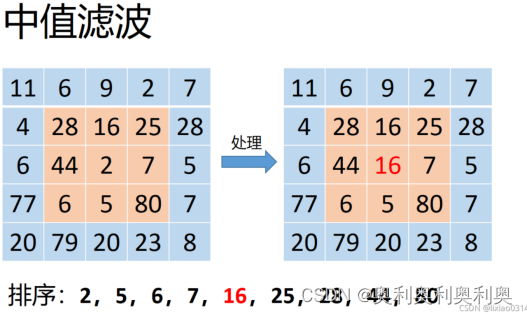
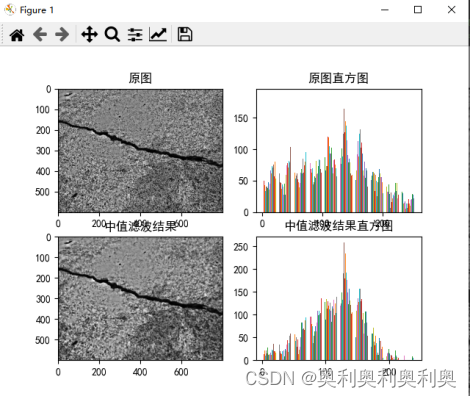
4. 中值滤波
原理:
中值滤波(Median filter)是一种典型的非线性滤波技术,基本思想是用像素点邻域灰度值的中值来代替该像素点的灰度值
ksize:核大小,必须是比1大的奇数【举个例子:3,5,7…】
代码:
img = PreProcess.med_blur(img, ksize=5, flag=False)def med_blur(img, ksize=3, flag=False):
"""
Median filter for input image
:param img: input image
:param ksize: size of filter
:return: image after median filter
"""
if img.dtype is not np.uint8:
img = img.astype(np.uint8)
new_img = cv.medianBlur(img, ksize)
if flag:
plt.rcParams['font.sans-serif'] = ['SimHei'] # 正确打印中文
plt.subplot(2, 2, 1)
plt.imshow(img, cmap="gray")
plt.title("原图")
plt.subplot(2, 2, 2)
plt.hist(img)
plt.title("原图直方图")
plt.subplot(2, 2, 3)
plt.imshow(new_img, cmap="gray")
plt.title("中值滤波结果")
plt.subplot(2, 2, 4)
plt.hist(new_img)
plt.title("中值滤波结果直方图")
plt.show()
return new_img
结果:
二、裂缝延伸
rg = RegionGrow.RegionGrow(img) #创建RegionGrow类实例 ,完整代码见博客最后面
rg.img_cut()
rg.min_pos()
img = rg.region_grow() # 延伸1. 将原图像切割成3*3小矩阵
def img_cut(self):
"""
cut the image into 9 parts
:return: list of image
"""
# determine the size of pre block
self.block_w = int(self.imw / 3)
self.block_h = int(self.imh / 3)
for i in range(3):
for j in range(3):
# 以3*3小矩形进行遍历
self.imlist.append(self.image[i * self.block_h:(i + 1) * self.block_h,
j * self.block_w:(j + 1) * self.block_w])
#返回矩阵列表len= 9
return self.imlist2. 暗度调节至1/4,寻找小矩阵图像中距离中心点最暗的点(黑点)
min_pos : [(188, 138), None, None, (214, 183), (290, 388), (337, 681), None, (479, 342), None
def min_pos(self):
"""
to find out the darkness point in each block
:return: a list of position in each block
"""
min_val = np.min(np.min(self.image))
print("min_val",min_val) # 0
block_index = 0
# 遍历小矩阵列表 (200, 266)
for block in self.imlist:
block = np.floor(block / 4) # 对输入的多维数组逐元素进行向下取整:变暗
block = block.astype(np.uint8) # 转化为图像数据0-255
posarr = np.where(block == min_val) #
# check is is this block contains min value
# 如果没找到就继续,从下一个小方块找
if len(posarr[0]) <= 0:
self.poslist.append(None)
block_index += 1
continue
# todo using a more useful method to chose the seed
# No.1 chose the point which is closest to center point
# pick a point randomly and convert to global position
center = (int(self.block_h / 2), int(self.block_w / 2)) # center point
pt = DataTool.min_distace(posarr, center) # 在posarr中找距离center最近的坐标
posw = int(block_index % 3) * self.block_w + pt[1]
posh = int(block_index / 3) * self.block_h + pt[0]
# posw,posh为 posarr_min 在大图中的绝对坐标
self.poslist.append((posh, posw))
block_index += 1
print("min_pos : ",self.poslist)
return self.poslist3.延申
a. min_pos开始,寻找临近的黑点,并扩展出一块完整的区域:timblock
b. 每个区域timblock相加,形成完整的多区域图像
def region_grow(self, mode=8):
"""
image segmentation using region grow
:type img: image
:param img: input image
:type mode: int
:param mode: 4 or 8 only(8 as default)
:return: new image after segmentation
"""
for x in range(9):
point = self.poslist[x]
timblock = np.zeros(shape=self.image.shape)
if point is None:
print("原图没有黑点!")
continue
# the position of the seed
start_point = (point[0], point[1]) # 从距离中心点最近的黑像素点开始
# print("retimg:",np.where(self.retimg > 0))
cv2.imshow("11 ",self.retimg)
cv2.waitKey()
if self.retimg[start_point[0], start_point[1]] != 0:
# 如果此点的像素不为0:证明已经被延伸到了
print("已经被延伸到了!")
continue
# the stack of point which need to be visited
point_list = [start_point]
print("point_list:",point_list)
# the dict of visited point
visited_point = dict()
visited_point[start_point] = start_point
print("visited_point : ",visited_point)
while len(point_list) > 0:
# pop the top point and grow around this point
point = point_list.pop()
# 延伸!!!!
for i in range(-1, 2):
for j in range(-1, 2):
# the point that is going to grow
new_point = point[0] + i, point[1] + j
# is the point visited, if visited pass the point
# print("延伸后的点:",new_point)
if visited_point.get(new_point) is not None:
continue
try:
# 如果延伸点在图像范围内、两个点的灰度值相差在40之内:在t imblock将此点赋为255、并将此点放入p oint_list, v isited_point[new_point] = new_point
if 0 <= new_point[0] < self.imh and 0 <= new_point[1] < self.imw and np.abs(
int(self.image[new_point[0], new_point[1]]) -
int(self.image[start_point[0], start_point[1]])) < 40:
timblock[new_point[0], new_point[1]] = 255
point_list.append(new_point)
visited_point[new_point] = new_point
except:
print(new_point)
# print("point_list:",point_list)
self.im_merge2(timblock) # timblock, self.retimg相加赋给self.retimg
self.retimg = self.retimg != 0
# cv2.imshow("retimg",self.retimg) 打印不出来
return self.retimg
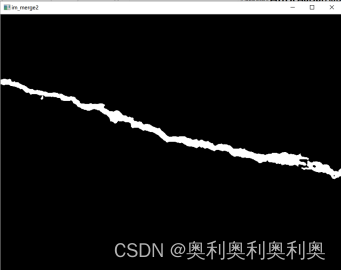
结果:图1、图2分别为两次延申的timblock,图3为重叠后的最终结果

三、裂缝识别(框选)
暂无解析
四、代码中的其他函数
1. 连通域标记图像ConnectedComponents 详解见: https://blog.csdn.net/jia20003/article/details/80662396
cv.connectedComponents(img)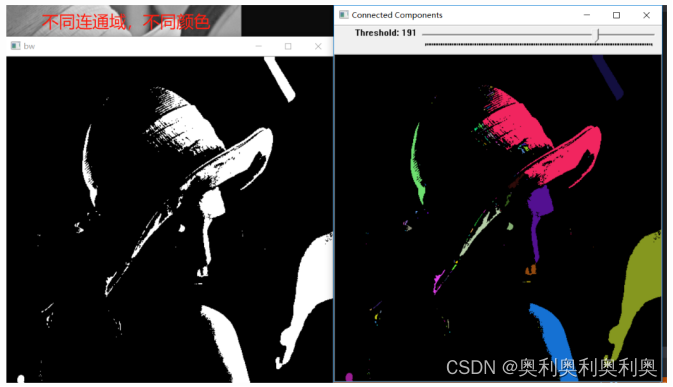
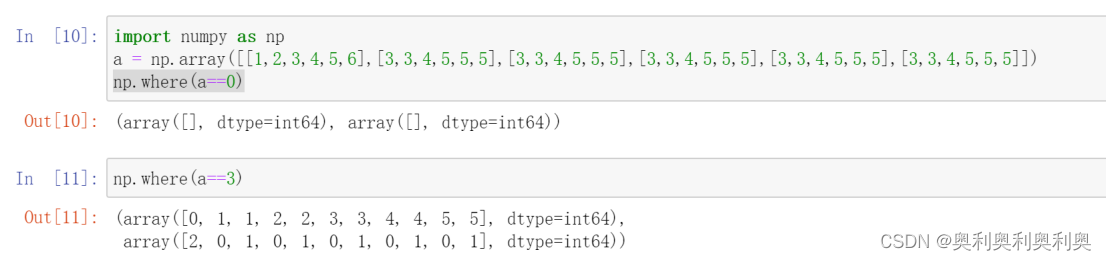
2. array寻值(项目中用来寻找黑点、找到的点将以Xarray,Yarray的形式返回,( Xarray[i],Yarray[i] )表示其中的某一点)
3. 图像重叠
self.retimg = np.add(temp_img, self.retimg) 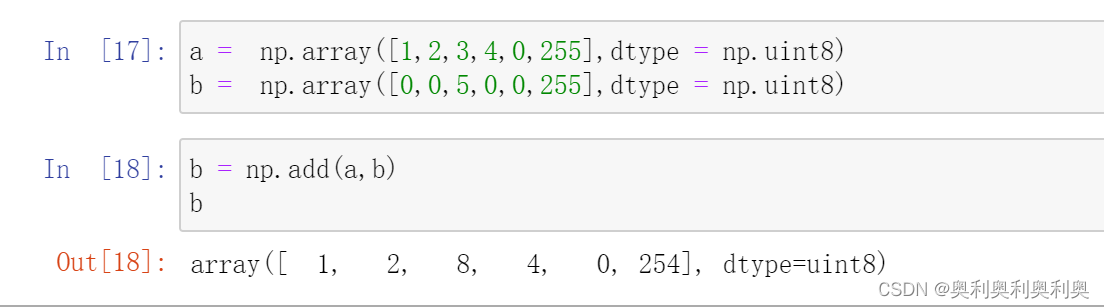
五、项目源码
1. main.py
# coding:utf-8
import time
import cv2 as cv
from matplotlib import pyplot as plt
import numpy as np
import Feature
import PreProcess
import RegionGrow
if __name__ == "__main__":
# 读取图片
origin = PreProcess.read_image("test_img/1.jpg", color_code=cv.IMREAD_ANYCOLOR) # 彩色图片
# 裁剪图片
origin = PreProcess.resize_img(origin)
# 彩色图片->灰度图
img = PreProcess.convert_color(origin)
if img is not None:
img = PreProcess.equalize_hist(img, flag=False) # 均值化
# cv.imshow("equalize_hist",img)
img = PreProcess.center_avg_imp(img, ksize=20, flag=False)
# cv.imshow("center_avg_imp2", img)
img = PreProcess.med_blur(img, ksize=5, flag=False)
start_time = time.time()
print(start_time)
rg = RegionGrow.RegionGrow(img)
rg.img_cut()
rg.min_pos()
img = rg.region_grow() # 衍生!!
end_time = time.time()
print("run in %.2f" % (end_time - start_time))
# img = rg.im_merge()
plt.imshow(img, cmap="gray")
plt.show()
# img = PreProcess.binary_image(img, 100, True)
img = PreProcess.med_blur(img, ksize=3, flag=False) # 中值滤波
plt.imsave("a.jpg", img, cmap='gray')
# img = cv.dilate(img, np.array([[1,1,1],[1,1,1],[1,1,1]]))
result, imgs = Feature.connected_region_label(img, flag=True)
# plt.imshow(imgs)
plt.imshow(imgs[0])
plt.imshow(imgs[1])
plt.imshow(imgs[2])
print(result,imgs[0].shape,imgs[1].shape,imgs[2].shape)
for img in imgs[1:]:
area_result = Feature.get_area_pos(img, flag=False)
print(area_result)
for r in area_result:
origin = cv.rectangle(origin,
(r[1], r[2]),
(r[1] + r[3], r[2] + r[4]),
(0, 0, 0),
thickness=2)
origin = cv.putText(origin,
'area:' + str(r[0]),
color=(0, 0, 255),
org=(r[1], r[2] + 30),
fontFace=cv.FONT_ITALIC,
fontScale=0.5)
origin = PreProcess.convert_color(origin, cv.COLOR_BGR2RGB)
plt.imshow(origin)
plt.rcParams['font.sans-serif'] = ['KaiTi']
plt.title("识别结果")
plt.show()
plt.imsave("b.jpg", origin)
2. PreProcess.py 前期图像处理
import cv2 as cv
import numpy as np
from matplotlib import cm
from matplotlib import pyplot as plt
from mpl_toolkits.mplot3d import Axes3D
def read_image(path, color_code=cv.IMREAD_GRAYSCALE):
"""
read a picture from path
:type path: string
:param path: the location of a picture
:type color_code: opencv color code
:param color_code: which type the image should be read, cv.IMREAD_GRAYSCALE as default
:return: the picture read from the path, None if there is an error
"""
return cv.imread(path, color_code)
def convert_color_gray(image):
"""
convert a bgr image to gray
:type image: opencv image
:param image: the image need to convert
:return: an image in gray color
"""
return cv.cvtColor(image, cv.COLOR_BGR2GRAY)
def resize_img(img, width=800):
"""
resize image
:type img: image
:param img: input image
:type width: int
:param width: width after resize,800 as default
:return: image after resize
"""
return cv.resize(img, (width, int(width * img.shape[0] / img.shape[1])))
def convert_color(image, code=cv.COLOR_BGR2GRAY):
"""
convert color space of an image
:type image: image
:param image: input image
:type code: opencv convert code
:param code: opencv color convert , COLOR_BGR2GRAY as default
:return: image after convert
"""
return cv.cvtColor(image, code)
def center_avg_imp(img, ksize=10, flag=False):
"""
improve the image pixels by image center pixel average
:type img: image
:param img: the image need to be improved
:type ksize: int
:param ksize: the filter size, 10 as default
:type flag: Boolean
:param flag: show the result or not
:return: the result after deal
"""
new_img = np.copy(img)
dw = int(img.shape[1] / 7) # 获取原图像长宽的1/7
dh = int(img.shape[0] / 7)
# 选取图像中的5个区域
region_1 = new_img[dh * 1: dh * 2, dw * 1: dw * 2]
region_2 = new_img[dh * 1: dh * 2, dw * 5: dw * 6]
region_3 = new_img[dh * 5: dh * 6, dw * 5: dw * 6]
region_4 = new_img[dh * 1: dh * 2, dw * 5: dw * 6]
region_5 = new_img[dh * 3: dh * 4, dw * 3: dw * 4]
# 计算5个区域的均值
avg1 = np.average(region_1)
avg2 = np.average(region_2)
avg3 = np.average(region_3)
avg4 = np.average(region_4)
avg5 = np.average(region_5)
# 5个区域均值的均值
avg = (avg1 + avg2 + avg3 + avg4 + avg5) / 5
for x in range(0, img.shape[0], ksize):
for y in range(0, img.shape[1], ksize):
# 每次运算选取10*10的像素方块进行操作 *均值/方块均值
new_img[x:x + ksize, y:y + ksize] = \
img[x:x + ksize, y:y + ksize] * (avg / np.average(img[x:x + ksize, y:y + ksize]))
# new_img = cv.medianBlur(img, 15)
# 中值滤波(Median filter)是一种典型的非线性滤波技术,基本思想是用像素点邻域灰度值的中值来代替该像素点的灰度值
# 2.ksize:核大小,必须是比1大的奇数【举个例子:3,5,7…】
if flag:
plt.subplot(2, 2, 1)
plt.imshow(img, cmap='gray')
plt.subplot(2, 2, 2)
plt.imshow(new_img, cmap='gray')
plt.subplot(2, 2, 4)
plt.hist(new_img)
plt.subplot(2, 2, 3)
plt.hist(img)
plt.show()
return new_img
def equalize_hist(img, flag=False):
"""
equalize hist to improve image
:type img: image
:param img: input image
:type flag: Boolean
:param flag: show the result if is True, False as default
:return: the image after equalize hist
"""
hist_img = np.zeros(shape=img.shape)
hist_img = cv.equalizeHist(img, hist_img)
if flag:
plt.rcParams['font.sans-serif'] = ['SimHei'] # 正确打印中文
plt.subplot(2, 2, 1)
plt.imshow(img, cmap="gray")
plt.title("原图")
plt.subplot(2, 2, 2)
plt.hist(img) #
plt.title("原图直方图")
plt.subplot(2, 2, 3)
plt.imshow(hist_img, cmap="gray") #
plt.title("均衡化结果")
plt.subplot(2, 2, 4)
plt.hist(hist_img) #
plt.title("均衡化结果直方图")
plt.show()
return hist_img
def med_blur(img, ksize=3, flag=False):
    """
    Median filter for input image

    :param img: input image
    :param ksize: size of filter
    :return: image after median filter
    """

    if img.dtype is not np.uint8:
        img = img.astype(np.uint8)

    new_img = cv.medianBlur(img, ksize)
    if flag:
        plt.rcParams['font.sans-serif'] = ['SimHei']  # 正确打印中文
        plt.subplot(2, 2, 1)
        plt.imshow(img, cmap="gray")
        plt.title("原图")
        plt.subplot(2, 2, 2)
        plt.hist(img)
        plt.title("原图直方图")
        plt.subplot(2, 2, 3)
        plt.imshow(new_img, cmap="gray")
        plt.title("中值滤波结果")
        plt.subplot(2, 2, 4)
        plt.hist(new_img)
        plt.title("中值滤波结果直方图")
        plt.show()
    return new_img
def gauss_blur(img, ksize=[3, 3]):
cv.GaussianBlur(img, ksize=ksize)
def adj_gamma(img, flag=False):
"""
对图像进行归一化处理
:param img: 输入图像
:param flag: 是否显示归一化之后的图像
:return: 归一化之后的图像
"""
new_image = img
new_image = new_image - np.min(np.min(new_image))
new_image = new_image / np.max(np.max(new_image))
if flag:
x = np.arange(0, new_image.shape[1], 1)
y = np.arange(0, new_image.shape[0], 1)
xg, yg = np.meshgrid(x, y)
fig = plt.figure()
ax = Axes3D(fig)
ax.plot_surface(xg, yg, new_image, rstride=1, cstride=1, cmap=cm.viridis)
plt.show()
return new_image
def binary_image(img, thresh=0.15, flag=False):
"""
对图形进行二值化
:param img: 输入图形
:param thresh: 阈值
:param flag: 是否显示结果
:return: 二值化之后的图形
"""
t = np.reshape(img, img.shape[1] * img.shape[0])
pixel = np.bincount(t)
xdata = np.linspace(1, pixel.shape[0], pixel.shape[0])
index = np.argwhere(pixel == np.max(pixel))
thresh = index[0][0] / 3
plt.plot(pixel)
plt.show()
ret, new_img = cv.threshold(img, thresh, 255, cv.THRESH_BINARY)
new_img = np.abs(new_img - 255)
if flag:
plt.subplot(2, 1, 1)
plt.imshow(img, cmap="gray")
plt.subplot(2, 1, 2)
plt.imshow(new_img, cmap="gray")
plt.show()
return new_img
def hist_segmentation(img):
"""
do image segmentation using hist
:type img: gray image
:param img: origin image
:return: image after segmentation
"""
hist = cv.calcHist([img], [0], None, [256], [0, 255])
max_index = np.where(hist == max(hist))
mask = hist[0:max_index[0][0]]
min_index = np.where(mask == min(mask))
ret, new_im = cv.threshold(img, min_index[0][0], 255, cv.THRESH_BINARY)
return new_im
3. RegionGrow.py 区域生长实现类
"""
to do image segmentation using region grow method
"""
import numpy as np
import cv2
import DataTool
class RegionGrow:
def __init__(self, image):
"""
init class
:param image: the image need to process
"""
self.image = image
self.imlist = []
self.poslist = []
self.retimg = np.zeros(shape=self.image.shape)
self.imh, self.imw = image.shape
self.block_w = 0
self.block_h = 0
def region_grow(self, mode=8):
"""
image segmentation using region grow
:type img: image
:param img: input image
:type mode: int
:param mode: 4 or 8 only(8 as default)
:return: new image after segmentation
"""
for x in range(9):
point = self.poslist[x]
timblock = np.zeros(shape=self.image.shape)
if point is None:
print("原图没有黑点!")
continue
# the position of the seed
start_point = (point[0], point[1]) # 从距离中心点最近的黑像素点开始
# print("retimg:",np.where(self.retimg > 0))
cv2.imshow("11 ",self.retimg)
cv2.waitKey()
if self.retimg[start_point[0], start_point[1]] != 0:
# 如果此点的像素不为0:证明已经被延伸到了
print("已经被延伸到了!")
continue
# the stack of point which need to be visited
point_list = [start_point]
print("point_list:",point_list)
# the dict of visited point
visited_point = dict()
visited_point[start_point] = start_point
print("visited_point : ",visited_point)
while len(point_list) > 0:
# pop the top point and grow around this point
point = point_list.pop()
# 延伸!!!!
for i in range(-1, 2):
for j in range(-1, 2):
# the point that is going to grow
new_point = point[0] + i, point[1] + j
# is the point visited, if visited pass the point
# print("延伸后的点:",new_point)
if visited_point.get(new_point) is not None:
continue
try:
# 如果延伸点在图像范围内、两个点的灰度值相差在40之内:在t imblock将此点赋为255、并将此点放入p oint_list, v isited_point[new_point] = new_point
if 0 <= new_point[0] < self.imh and 0 <= new_point[1] < self.imw and np.abs(
int(self.image[new_point[0], new_point[1]]) -
int(self.image[start_point[0], start_point[1]])) < 40:
timblock[new_point[0], new_point[1]] = 255
point_list.append(new_point)
visited_point[new_point] = new_point
except:
print(new_point)
# print("point_list:",point_list)
self.im_merge2(timblock) # timblock, self.retimg相加赋给self.retimg
self.retimg = self.retimg != 0
# cv2.imshow("retimg",self.retimg) 打印不出来
return self.retimg
    def img_cut(self):
        """
        cut the image into 9 parts
        :return: list of image
        """
        # determine the size of pre block
        self.block_w = int(self.imw / 3)
        self.block_h = int(self.imh / 3)
        for i in range(3):
            for j in range(3):
                # 以3*3小矩形进行遍历
                self.imlist.append(self.image[i * self.block_h:(i + 1) * self.block_h,
                                   j * self.block_w:(j + 1) * self.block_w])
        #返回矩阵列表len= 9
        return self.imlist
    def min_pos(self):
        """
        to find out the darkness point in each block
        :return: a list of position in each block
        """
        min_val = np.min(np.min(self.image))
        print("min_val",min_val)  # 0
        block_index = 0
        # 遍历小矩阵列表 (200, 266)
        for block in self.imlist:
            block = np.floor(block / 4)    # 对输入的多维数组逐元素进行向下取整:变暗
            block = block.astype(np.uint8)   # 转化为图像数据0-255
            posarr = np.where(block == min_val)  #
            # check is is this block contains min value
            # 如果没找到就继续,从下一个小方块找
            if len(posarr[0]) <= 0:
                self.poslist.append(None)
                block_index += 1
                continue
            # todo using a more useful method to chose the seed
            # No.1 chose the point which is closest to center point
            # pick a point randomly and convert to global position
            center = (int(self.block_h / 2), int(self.block_w / 2))  # center point
            pt = DataTool.min_distace(posarr, center)  # 在posarr中找距离center最近的坐标
            posw = int(block_index % 3) * self.block_w + pt[1]
            posh = int(block_index / 3) * self.block_h + pt[0]
            # posw,posh为 posarr_min 在大图中的绝对坐标
            self.poslist.append((posh, posw))
            block_index += 1
        print("min_pos : ",self.poslist)
        return self.poslist
def im_merge2(self, temp_img):
self.retimg = np.add(temp_img, self.retimg)
print('im_merge2:',temp_img)
cv2.imshow("im_merge2",temp_img)
cv2.waitKey()
4. DataTool.py 工具脚本
import math


def distance_calc(point1, point2):
    """
    to calculate the distance of 2 points
    :param point1: pt1
    :param point2: pt2
    :return: the distance
    """
    return math.sqrt((point1[0] - point2[0]) ** 2 + (point1[1] - point2[1]) ** 2)


def min_distace(pointlist, center):
    """
    given a group of points and a center point to find out the point which is closest to center point
    :type pointlist: tuple
    :param pointlist: the list of point
    :type center: tuple
    :param center: center point
    :return: the point closest to center
    """
    dis_dict = dict()
    dis_list = []

    # for all the point calculate distance
    for index in range(len(pointlist[0])):
        pt = (pointlist[0][index], pointlist[1][index])
        dis = distance_calc(pt, center)
        dis_dict[dis] = pt    # 距离:pointlist坐标
        dis_list.append(dis)
    dis_list.sort()
    return dis_dict[dis_list[0]]   # 在pointlist中找距离center最近的坐标
5. Feature.py 实现区域框选
import cv2 as cv
import numpy as np
from matplotlib import pyplot as plt


def get_area_pos(img, filter_size=1000, flag=False):
    """
    从图形中获取区域面积及位置

    :param img: 输入图形
    :param filter_size: 过滤的面积大小
    :param flag: show result?
    :return: list(area,pos);area:int, pos(x,y,w,h)
    """

    # 检查类型
    if img.dtype is not np.uint8:
        img = img.astype(np.uint8)
    # 获取边缘点
    contours, hierarchy = cv.findContours(img,
                                                 cv.RETR_TREE,
                                                 cv.CHAIN_APPROX_NONE)
    result_list = []
    # 统计面积以及位置
    for con in contours:
        image = cv.drawContours(img, con, -1, 255)
        area = cv.contourArea(con)
        if area > filter_size:
            x, y, w, h = cv.boundingRect(con)

            result_list.append((area, x, y, w, h))
            if w / h > 1:
                print("横向裂缝")
                print(find_min_max_width(con))
            else:
                print("纵向裂缝")
                print(find_min_max_width_vertical(con))
            if flag:
                temp_img = np.zeros(image.shape)
                temp_img = cv.drawContours(temp_img, con, -1, 255)
                print('x:%d,y:%d,w:%d,h:%d' % (x, y, w, h))
                temp_img = cv.rectangle(temp_img, (x, y), (x + w, y + h), 180)
                cv.imshow("result", temp_img)
                cv.waitKey()
    return result_list


def connected_region_label(img, flag=False):
    """
    对二值图像进行连通性分析

    :param img: 输入图像
    :param flag: 是否显示结果
    :return: 连通区域总数,标记的每个连通区域
    """

    img = img.astype(np.uint8)
    result, labels = cv.connectedComponents(img)
    if flag:
        temp = labels * 10
        plt.imshow(temp, cmap="gray")
        plt.show()
        print(result)

    labels_imgs = []
    for i in range(result):
        ret = np.asarray((labels == i), np.bool)
        labels_imgs.append(ret)
    return result, labels_imgs

def find_min_max_width(contour):
    min_dict = dict()
    max_dict = dict()
    max_width = 0
    min_width = 999
    min_pos = 0
    max_pos = 0
    for pt in contour:
        if min_dict.get(pt[0][0]) is None or max_dict.get(pt[0][0]) is None:
            min_dict[pt[0][0]] = max_dict[pt[0][0]] = pt[0][1]
        elif min_dict[pt[0][0]] > pt[0][1]:
            min_dict[pt[0][0]] = pt[0][1]
            if max_width < (max_dict[pt[0][0]] - min_dict[pt[0][0]]):
                max_width = max_dict[pt[0][0]] - min_dict[pt[0][0]]
                max_pos = pt[0][0]
            if min_width > (max_dict[pt[0][0]] - min_dict[pt[0][0]]):
                min_width = max_dict[pt[0][0]] - min_dict[pt[0][0]]
                min_pos = pt[0][0]
        elif max_dict[pt[0][0]] < pt[0][1]:
            max_dict[pt[0][0]] = pt[0][1]
            if max_width < (max_dict[pt[0][0]] - min_dict[pt[0][0]]):
                max_width = max_dict[pt[0][0]] - min_dict[pt[0][0]]
                max_pos = pt[0][0]
            if min_width > (max_dict[pt[0][0]] - min_dict[pt[0][0]]):
                min_width = max_dict[pt[0][0]] - min_dict[pt[0][0]]
                min_pos = pt[0][0]
    return max_width, min_width


def find_min_max_width_vertical(contour):
    min_dict = dict()
    max_dict = dict()
    max_width = 0
    min_width = 999
    min_pos = 0
    max_pos = 0
    for pt in contour:
        if min_dict.get(pt[0][1]) is None or max_dict.get(pt[0][1]) is None:
            min_dict[pt[0][1]] = max_dict[pt[0][1]] = pt[0][0]
        elif min_dict[pt[0][1]] > pt[0][0]:
            min_dict[pt[0][1]] = pt[0][0]
            if max_width < (max_dict[pt[0][1]] - min_dict[pt[0][1]]):
                max_width = max_dict[pt[0][1]] - min_dict[pt[0][1]]
                max_pos = pt[0][0]
            if min_width > (max_dict[pt[0][1]] - min_dict[pt[0][1]]):
                min_width = max_dict[pt[0][1]] - min_dict[pt[0][1]]
                min_pos = pt[0][0]
        elif max_dict[pt[0][1]] < pt[0][0]:
            max_dict[pt[0][1]] = pt[0][0]
            if max_width < (max_dict[pt[0][1]] - min_dict[pt[0][1]]):
                max_width = max_dict[pt[0][1]] - min_dict[pt[0][1]]
                max_pos = pt[0][0]
            if min_width > (max_dict[pt[0][1]] - min_dict[pt[0][1]]):
                min_width = max_dict[pt[0][1]] - min_dict[pt[0][1]]
                min_pos = pt[0][0]
    return max_width, min_width
文章出处登录后可见!