介绍
前面几章我们积累了足够的opencv使用技巧。这一章我们就会进入最激动人心的辩识人脸。我们知道识脸和辩识人脸有着本质的区别。
- 识脸:这是一个人的脸。
- 辩识人脸:这是谁的脸,这才是我们需要的。
我们还是使用在第五课:OpenCV Java入门五 结合摄像头识脸和拍照内的FaceRecognize这个类。
我们记得在第五课里,这个类是一个JFrame类,它长成这个样:
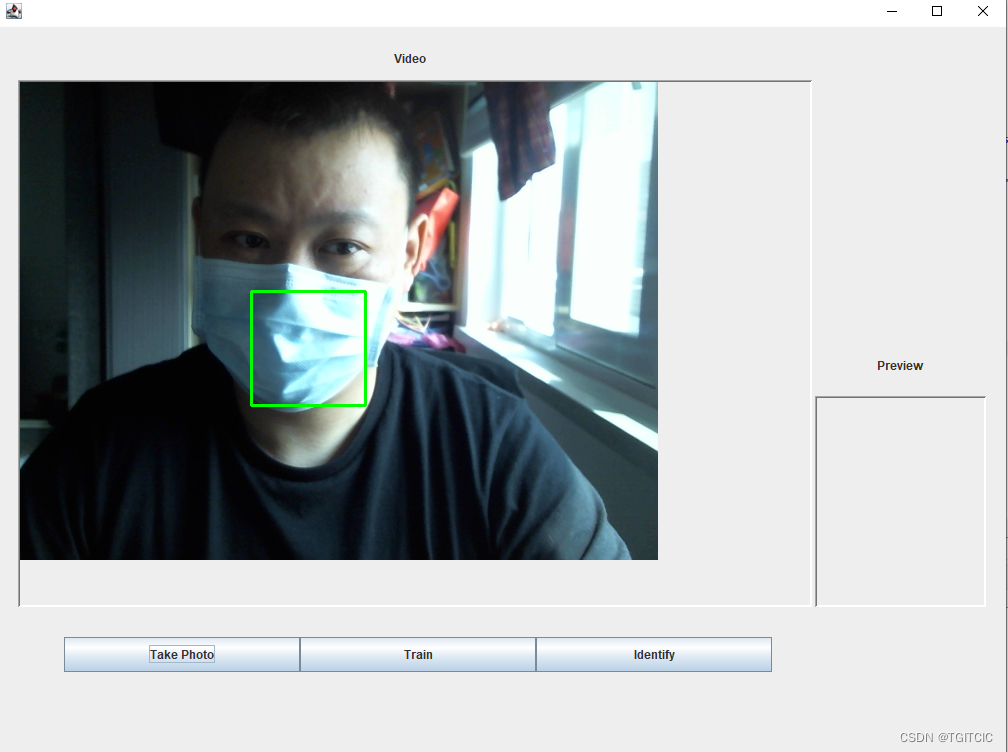
我们这次就要来完成【Train】和【Identify】这两个按钮内的动作了。
先说opencv辩识人脸的过程
- opencv通过摄像头把人脸流一个个读下来;
- 把读下来的人脸打人“这是谁”的标识;
- 然后把这是谁+这一堆人脸(越多越好,100多张照片差不多了)使用LBPHFaceRecognizer生成一个.yml的模型文件,这个就是训练模型;
- 辩识人脸时,使用LBPHFaceRecognizer读入之前的.yml训练模文件,然后通过摄像头实时读入的当前人脸使用faceRecognizer.predict(trainFace, predictedLabel, confidence);计算出:可信度;
- 在提取当前人脸的可信度和标签时,就算标签内有“姓名/标签”但是这个可信度即:confidence数值太大时我们就叫该人员和模型内的标签的人脸的可信度差距太大。差距越大、可信度越低、那么confidence数值就越大,那么越不可信。因此一般confidence取50,>50即不可信;
技术上要解决的重点
界面交互上需要注意的点
从代码上看其实一点不难,关键的是这次的应用在图形交互上很强,为了做出外面POS机、刷脸进门的实时效果,我们对于以下几个过程都需要做异步线程的分离设计。否则就会出现在显示人脸时你点了训练按钮,训练进程卡死了人脸在屏幕上的显示。或者是你在辩识这是谁时卡死了屏幕上的实时显示,那么这个用户体验会非常的不好。
因此我们对于训练、识别都做成了异步,把这些实现都套在了new Thread(){}.start()里这样去执行了。
训练模型的设计
我们准备了一个这样的文件夹
这个文件平就是和我们的训练模型相匹配的,我们可以看到在D:\opencv-demo\face\目录下是一个个以人名命名的文件平,然后把该人员的人脸全部存在这个带有人名标签的目录下。然后届时一调用opencv的生成训练模型API就可以完成训练和打标这样的层次结构了。

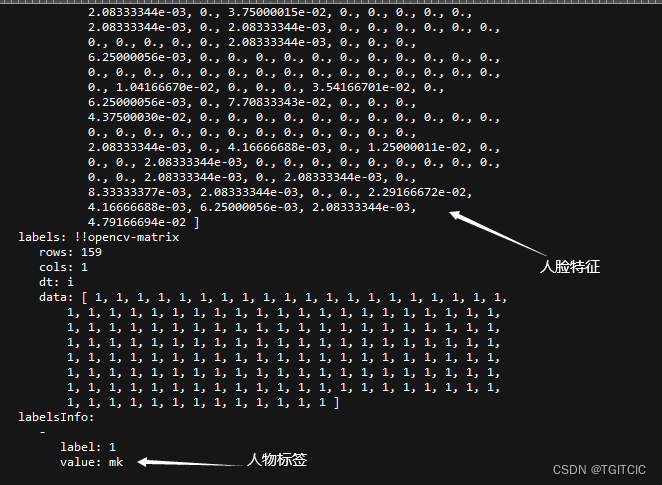
以下是一个标准的opencv生成的训练模型格式
读取:图片目录->标签->图片的工具类方法
我们用java.io.File来完成这件事,然后我们把存到一个下面这样的Java数据结构中。使得它成为一个List<FileBean> trainSamples。
然后我们再设计一个Map<String, List<Integer>> labelOfPerson = new HashMap<String, List<Integer>>();
在把图片从文件目录内读取成trainSamples后,在对这个trainSamples做populate(不好意思我这边不知道中文该如何表达这个动作,你可以认为是一边循环一边取值的这么一个意境)时把这个lable给打上,打完再通过faceRecognizer.train(images, labels)即完成了识练,然后你要输出这个训练模型那么只需要faceRecognizer.save(modelFolder + "\\face_model.yml")即可。
public class FileBean implements Serializable {

	private String fileFullPath;
	private String folderName;
	private String fileType;

	public String getFileType() {
		return fileType;
	}

	public void setFileType(String fileType) {
		this.fileType = fileType;
	}

	public String getFileFullPath() {
		return fileFullPath;
	}

	public void setFileFullPath(String fileFullPath) {
		this.fileFullPath = fileFullPath;
	}

	public String getFolderName() {
		return folderName;
	}

	public void setFolderName(String folderName) {
		this.folderName = folderName;
	}

}
完整【Train】代码
这个按钮为on/off式设计,点一下开始训练点一下停止训练。为此我们设计了一个布尔值。我们就来看这个【Train]按钮的代码吧
static {
System.loadLibrary(Core.NATIVE_LIBRARY_NAME);
}
private static Logger logger = Logger.getLogger(FaceRecognize.class);
private static final String cascadeFileFullPath = "D:\\opencvinstall\\build\\install\\etc\\lbpcascades\\lbpcascade_frontalface.xml";
private static final String photoPath = "D:\\opencv-demo\\face\\mk\\";
private static final String modelFolder = "D:\\opencv-demo\\model";
private static final String modelPath = "D:\\opencv-demo\\model\\face_model.yml";
private JPanel contentPane;
protected static VideoPanel videoCamera = new VideoPanel();
private static final Size faceSize = new Size(165, 200);
private static VideoCapture capture = new VideoCapture();
private static boolean trainSwitch = false;
private static boolean identifySwitch = false;
JButton trainButton = new JButton("Train");
trainButton.addActionListener(new ActionListener() {
public void actionPerformed(ActionEvent e) {
logger.info(">>>>>>train button performed");
List<Mat> images = new ArrayList<Mat>();
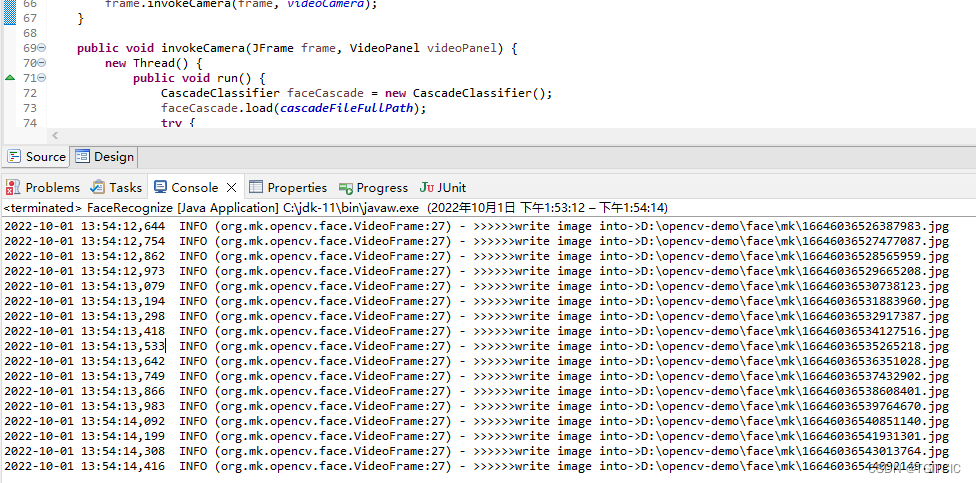
CascadeClassifier faceCascade = new CascadeClassifier();
faceCascade.load(cascadeFileFullPath);
FaceRecognizer faceRecognizer = LBPHFaceRecognizer.create();
// String trainSamplesFolder = "D:\\opencv-demo\\face";
try {
if (trainSwitch) {
trainSwitch = false;
List<FileBean> trainSamples = OpenCVUtil.getPicFromFolder(photoPath);
Map<String, List<Integer>> labelOfPerson = new HashMap<String, List<Integer>>();
logger.info(">>>>>>trainSamples has [" + trainSamples.size() + "] files");
if (trainSamples != null && trainSamples.size() > 0) {
new Thread() {
private int index = 0;
public void run() {
for (FileBean sample : trainSamples) {
if (sample.getFileType().equalsIgnoreCase("jpg")
|| sample.getFileType().equalsIgnoreCase("pgm")) {
// logger.info(">>>>>>train file->" + sample);
MatOfRect faces = new MatOfRect();
Mat grayFrame = new Mat();
Mat src = Imgcodecs.imread(sample.getFileFullPath());
Imgproc.cvtColor(src, grayFrame, Imgproc.COLOR_BGR2GRAY);
// Imgproc.equalizeHist(grayFrame, grayFrame);
// 采集人脸
faceCascade.detectMultiScale(grayFrame, faces);
Rect[] facesArray = faces.toArray();
// logger.info(">>>>>>facesArray.length->" + facesArray.length);
if (facesArray.length >= 1) {
for (int i = 0; i < facesArray.length; i++) {
// labelId = i;
String labelInfo = sample.getFolderName();
// faceRecognizer.setLabelInfo(labelId, labelInfo);
if (labelOfPerson.get(labelInfo) == null) {
index++;
List<Integer> ids = new ArrayList<Integer>();
ids.add(index);
labelOfPerson.put(labelInfo, ids);
// ids.add(index);
} else {
labelOfPerson.get(labelInfo).add(index);
}
// logger.info(">>>>>>label-> " + index + " : " + labelInfo);
faceRecognizer.setLabelInfo(index, labelInfo);
Mat faceROI = new Mat(grayFrame, facesArray[i]);
Mat trainFace = new Mat();
Imgproc.resize(faceROI, trainFace, faceSize);
// images.add(faceROI);
images.add(trainFace);
try {
Thread.sleep(50);
} catch (Exception e) {
}
// images.add(grayFrame.submat(facesArray[i]));
}
}
}
}
int[] labelsOfInt = new int[images.size()];
int i = 0;
for (String key : labelOfPerson.keySet()) {
List<Integer> labelIdList = labelOfPerson.get(key);
for (Integer labelId : labelIdList) {
logger.info(">>>>>>i: " + i + " labelId: " + labelId);
labelsOfInt[i] = labelId;
i++;
}
}
MatOfInt labels = new MatOfInt(labelsOfInt);
// 调用训练方法
faceRecognizer.train(images, labels);
// 输出持久化模型文件 训练一次后就可以一直调用
faceRecognizer.save(modelFolder + "\\face_model.yml");
}
}.start();
}
} else {
trainSwitch = true;
}
new Thread() {
public void run() {
try {
if (capture.isOpened()) {
Mat myFace = new Mat();
while (trainSwitch) {
capture.read(myFace);
if (!myFace.empty()) {
Image previewImg = ImageUtils.scale2(myFace, 165, 200, true);// 等比例缩放
TakePhotoProcess takePhoto = new TakePhotoProcess(photoPath.toString(),
myFace);
takePhoto.start();// 照片写盘
Thread.sleep(100);
}
}
}
} catch (Exception e) {
logger.error(">>>>>>train error: " + e.getMessage(), e);
}
}
}.start();
} catch (Exception ex) {
logger.error(">>>>>>take photo error: " + ex.getMessage(), ex);
}
}
});运行起来效果如下
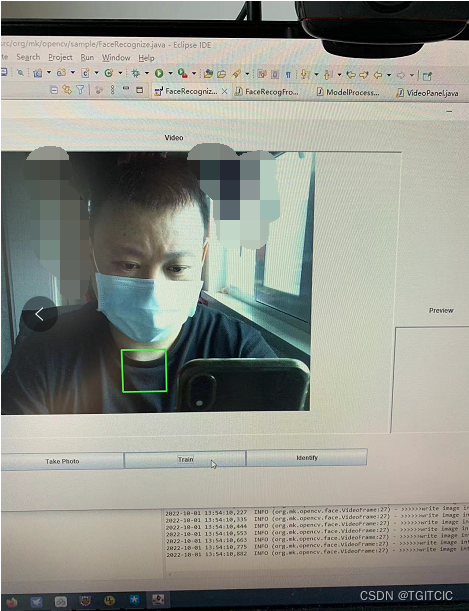
然后你自己觉得过了差不多有30秒左右了,再去点一下【Train】按钮,你会发觉在D:\opencv-demo\model下我们生成了face_model.yml这个训练模型了。
同时它会在D:\opencv-demo\face\mk下生成这么多的文件。

辩识人脸
我们把辩识人脸也做了一个按钮【Identify】,这个按钮也是一个on/off的按钮,点一下开始识别,点一下停止识别。
识别时,如果是模型认识的人脸,它就会在绿色方框圈出来的人脸的左上角打上这个人的名字,否则即显示unknow代表不认识这个人。
辩识人脸只需要读摄像头,结合模型,然后作faceRecognizer.predict(trainFace, predictedLabel, confidence)即可。
唯一有一个小技巧就是,我们要把辩识出来的人脸打上“名字”,我们用了以下这个小函数:
private static void setLabel(Mat im, String label, Point or, Scalar color) {
		int fontface = Core.NORM_L1;
		double scale = 0.8;
		int thickness = 2;
		int[] baseline = new int[1];

		Size text = Imgproc.getTextSize(label, fontface, scale, thickness, baseline);
		Imgproc.rectangle(im, new Point(or.x, or.y),
				new Point(or.x + text.width, or.y - text.height - baseline[0] - baseline[0]), color, Core.FILLED);
//	    System.out.println("识别信息-------------->"+label);
		Imgproc.putText(im, label, new Point(or.x, or.y - baseline[0]), fontface, scale, new Scalar(255, 255, 255),
				thickness);

}
下面为了让大家一次性感受到opencv在人脸辩识上的魅力,我把整个FaceRecognize.java一次给出
package org.mk.opencv.sample;

import javax.swing.JFrame;
import javax.swing.JPanel;
import javax.swing.border.EmptyBorder;

import org.apache.log4j.Logger;
import org.mk.opencv.VideoPanel;
import org.mk.opencv.face.TakePhotoProcess;
import org.mk.opencv.util.FileBean;
import org.mk.opencv.util.ImageUtils;
import org.mk.opencv.util.OpenCVUtil;
import org.opencv.core.Core;
import org.opencv.core.Mat;
import org.opencv.core.MatOfInt;
import org.opencv.core.MatOfRect;
import org.opencv.core.Point;
import org.opencv.core.Rect;
import org.opencv.core.Scalar;
import org.opencv.core.Size;
import org.opencv.face.FaceRecognizer;
import org.opencv.face.LBPHFaceRecognizer;
import org.opencv.imgcodecs.Imgcodecs;
import org.opencv.imgproc.Imgproc;
import org.opencv.objdetect.CascadeClassifier;
import org.opencv.videoio.VideoCapture;

import javax.swing.border.BevelBorder;
import javax.swing.JLabel;
import javax.swing.SwingConstants;
import java.awt.GridLayout;
import java.awt.Image;
import java.awt.event.ActionEvent;
import java.awt.event.ActionListener;
import java.util.ArrayList;
import java.util.HashMap;
import java.util.List;
import java.util.Map;

import javax.swing.JButton;

public class FaceRecognize extends JFrame {
	static {
		System.loadLibrary(Core.NATIVE_LIBRARY_NAME);
	}
	private static Logger logger = Logger.getLogger(FaceRecognize.class);
	private static final String cascadeFileFullPath = "D:\\opencvinstall\\build\\install\\etc\\lbpcascades\\lbpcascade_frontalface.xml";
	private static final String photoPath = "D:\\opencv-demo\\face\\mk\\";
	private static final String modelFolder = "D:\\opencv-demo\\model";
	private static final String modelPath = "D:\\opencv-demo\\model\\face_model.yml";
	private JPanel contentPane;
	protected static VideoPanel videoCamera = new VideoPanel();
	private static final Size faceSize = new Size(165, 200);
	private static VideoCapture capture = new VideoCapture();
	private static boolean trainSwitch = false;
	private static boolean identifySwitch = false;

	/**
	 * Launch the application.
	 */
	public static void main(String[] args) {
		FaceRecognize frame = new FaceRecognize();
		frame.setVisible(true);
		frame.invokeCamera(frame, videoCamera);
	}

	public void invokeCamera(JFrame frame, VideoPanel videoPanel) {
		new Thread() {
			public void run() {
				CascadeClassifier faceCascade = new CascadeClassifier();
				faceCascade.load(cascadeFileFullPath);
				try {
					capture.open(0);
					Scalar color = new Scalar(0, 255, 0);
					MatOfRect faces = new MatOfRect();
					// Mat faceFrames = new Mat();
					if (capture.isOpened()) {
						logger.info(">>>>>>video camera in working");
						Mat faceMat = new Mat();
						while (true) {
							capture.read(faceMat);
							if (!faceMat.empty()) {
								faceCascade.detectMultiScale(faceMat, faces);
								Rect[] facesArray = faces.toArray();
								if (facesArray.length >= 1) {
									for (int i = 0; i < facesArray.length; i++) {
										Imgproc.rectangle(faceMat, facesArray[i].tl(), facesArray[i].br(), color, 2);
										videoPanel.setImageWithMat(faceMat);
										frame.repaint();
										// videoPanel.repaint();
									}
								}
							} else {
								logger.info(">>>>>>not found anyinput");
								break;
							}
							Thread.sleep(200);
						}
					}
				} catch (Exception e) {
					logger.error("invoke camera error: " + e.getMessage(), e);
				}
			}
		}.start();
	}

	/**
	 * Create the frame.
	 */
	private static void setLabel(Mat im, String label, Point or, Scalar color) {
		int fontface = Core.NORM_L1;
		double scale = 0.8;
		int thickness = 2;
		int[] baseline = new int[1];

		Size text = Imgproc.getTextSize(label, fontface, scale, thickness, baseline);
		Imgproc.rectangle(im, new Point(or.x, or.y),
				new Point(or.x + text.width, or.y - text.height - baseline[0] - baseline[0]), color, Core.FILLED);
//	    System.out.println("识别信息-------------->"+label);
		Imgproc.putText(im, label, new Point(or.x, or.y - baseline[0]), fontface, scale, new Scalar(255, 255, 255),
				thickness);

	}

	public FaceRecognize() {

		setDefaultCloseOperation(JFrame.EXIT_ON_CLOSE);
		setBounds(100, 100, 1024, 768);
		contentPane = new JPanel();
		contentPane.setBorder(new EmptyBorder(5, 5, 5, 5));
		setContentPane(contentPane);
		contentPane.setLayout(null);

		JPanel cameraGroup = new JPanel();
		cameraGroup.setBounds(10, 10, 988, 580);
		contentPane.add(cameraGroup);
		cameraGroup.setLayout(null);

		JLabel videoDescriptionLabel = new JLabel("Video");
		videoDescriptionLabel.setHorizontalAlignment(SwingConstants.CENTER);
		videoDescriptionLabel.setBounds(0, 10, 804, 23);
		cameraGroup.add(videoDescriptionLabel);

		videoCamera.setBorder(new BevelBorder(BevelBorder.LOWERED, null, null, null, null));
		videoCamera.setBounds(10, 43, 794, 527);
		cameraGroup.add(videoCamera);

		// JPanel videoPreview = new JPanel();
		VideoPanel videoPreview = new VideoPanel();
		videoPreview.setBorder(new BevelBorder(BevelBorder.LOWERED, null, null, null, null));
		videoPreview.setBounds(807, 359, 171, 211);
		cameraGroup.add(videoPreview);

		JLabel lblNewLabel = new JLabel("Preview");
		lblNewLabel.setHorizontalAlignment(SwingConstants.CENTER);
		lblNewLabel.setBounds(807, 307, 171, 42);
		cameraGroup.add(lblNewLabel);

		JPanel buttonGroup = new JPanel();
		buttonGroup.setBounds(65, 610, 710, 35);
		contentPane.add(buttonGroup);
		buttonGroup.setLayout(new GridLayout(1, 0, 0, 0));

		JButton photoButton = new JButton("Take Photo");
		photoButton.addActionListener(new ActionListener() {
			public void actionPerformed(ActionEvent e) {
				logger.info(">>>>>>take photo performed");
				StringBuffer photoPathStr = new StringBuffer();
				photoPathStr.append(photoPath);
				try {
					if (capture.isOpened()) {
						Mat myFace = new Mat();
						while (true) {
							capture.read(myFace);
							if (!myFace.empty()) {
								Image previewImg = ImageUtils.scale2(myFace, 165, 200, true);// 等比例缩放
								TakePhotoProcess takePhoto = new TakePhotoProcess(photoPath.toString(), myFace);
								takePhoto.start();// 照片写盘
								videoPreview.SetImageWithImg(previewImg);// 在预览界面里显示等比例缩放的照片
								videoPreview.repaint();// 让预览界面重新渲染
								break;
							}
						}
					}
				} catch (Exception ex) {
					logger.error(">>>>>>take photo error: " + ex.getMessage(), ex);
				}
			}
		});
		buttonGroup.add(photoButton);

		JButton trainButton = new JButton("Train");
		trainButton.addActionListener(new ActionListener() {
			public void actionPerformed(ActionEvent e) {
				logger.info(">>>>>>train button performed");
				List<Mat> images = new ArrayList<Mat>();
				CascadeClassifier faceCascade = new CascadeClassifier();
				faceCascade.load(cascadeFileFullPath);
				FaceRecognizer faceRecognizer = LBPHFaceRecognizer.create();
				// String trainSamplesFolder = "D:\\opencv-demo\\face";
				try {
					if (trainSwitch) {
						trainSwitch = false;
						List<FileBean> trainSamples = OpenCVUtil.getPicFromFolder(photoPath);
						Map<String, List<Integer>> labelOfPerson = new HashMap<String, List<Integer>>();
						logger.info(">>>>>>trainSamples has [" + trainSamples.size() + "] files");
						if (trainSamples != null && trainSamples.size() > 0) {
							new Thread() {
								private int index = 0;

								public void run() {
									for (FileBean sample : trainSamples) {
										if (sample.getFileType().equalsIgnoreCase("jpg")
												|| sample.getFileType().equalsIgnoreCase("pgm")) {
											// logger.info(">>>>>>train file->" + sample);
											MatOfRect faces = new MatOfRect();
											Mat grayFrame = new Mat();
											Mat src = Imgcodecs.imread(sample.getFileFullPath());
											Imgproc.cvtColor(src, grayFrame, Imgproc.COLOR_BGR2GRAY);
											// Imgproc.equalizeHist(grayFrame, grayFrame);
											// 采集人脸
											faceCascade.detectMultiScale(grayFrame, faces);
											Rect[] facesArray = faces.toArray();
											// logger.info(">>>>>>facesArray.length->" + facesArray.length);
											if (facesArray.length >= 1) {
												for (int i = 0; i < facesArray.length; i++) {
													// labelId = i;
													String labelInfo = sample.getFolderName();
													// faceRecognizer.setLabelInfo(labelId, labelInfo);
													if (labelOfPerson.get(labelInfo) == null) {
														index++;
														List<Integer> ids = new ArrayList<Integer>();
														ids.add(index);
														labelOfPerson.put(labelInfo, ids);
														// ids.add(index);
													} else {
														labelOfPerson.get(labelInfo).add(index);
													}
													// logger.info(">>>>>>label-> " + index + " : " + labelInfo);
													faceRecognizer.setLabelInfo(index, labelInfo);
													Mat faceROI = new Mat(grayFrame, facesArray[i]);
													Mat trainFace = new Mat();

													Imgproc.resize(faceROI, trainFace, faceSize);
													// images.add(faceROI);
													images.add(trainFace);
													try {
														Thread.sleep(50);
													} catch (Exception e) {
													}
													// images.add(grayFrame.submat(facesArray[i]));
												}
											}
										}
									}
									int[] labelsOfInt = new int[images.size()];
									int i = 0;
									for (String key : labelOfPerson.keySet()) {
										List<Integer> labelIdList = labelOfPerson.get(key);
										for (Integer labelId : labelIdList) {
											logger.info(">>>>>>i: " + i + " labelId: " + labelId);
											labelsOfInt[i] = labelId;
											i++;
										}

									}
									MatOfInt labels = new MatOfInt(labelsOfInt);
									// 调用训练方法
									faceRecognizer.train(images, labels);
									// 输出持久化模型文件 训练一次后就可以一直调用
									faceRecognizer.save(modelFolder + "\\face_model.yml");
								}
							}.start();

						}
					} else {
						trainSwitch = true;
					}
					new Thread() {
						public void run() {
							try {
								if (capture.isOpened()) {
									Mat myFace = new Mat();
									while (trainSwitch) {
										capture.read(myFace);
										if (!myFace.empty()) {
											Image previewImg = ImageUtils.scale2(myFace, 165, 200, true);// 等比例缩放
											TakePhotoProcess takePhoto = new TakePhotoProcess(photoPath.toString(),
													myFace);
											takePhoto.start();// 照片写盘
											Thread.sleep(100);
										}
									}
								}
							} catch (Exception e) {
								logger.error(">>>>>>train error: " + e.getMessage(), e);
							}
						}
					}.start();
				} catch (Exception ex) {
					logger.error(">>>>>>take photo error: " + ex.getMessage(), ex);
				}

			}
		});
		buttonGroup.add(trainButton);

		JButton identifyButton = new JButton("Identify");
		identifyButton.addActionListener(new ActionListener() {
			public void actionPerformed(ActionEvent e) {
				if (identifySwitch) {
					identifySwitch = false;
				} else {
					identifySwitch = true;
				}
				CascadeClassifier faceCascade = new CascadeClassifier();
				faceCascade.load(cascadeFileFullPath);
				FaceRecognizer faceRecognizer = LBPHFaceRecognizer.create();
				faceRecognizer.read(modelPath);
				new Thread() {
					public void run() {
						String personName = "unknown";
						try {
							if (capture.isOpened()) {
								Mat faceMat = new Mat();
								while (identifySwitch) {
									capture.read(faceMat);
									if (!faceMat.empty()) {

										MatOfRect faces = new MatOfRect();
										Mat grayFrame = new Mat();
										// 读入要比对的脸
										// Mat faceMat = Imgcodecs.imread(humanFacePath);
										// 灰度处理
										Imgproc.cvtColor(faceMat, grayFrame, Imgproc.COLOR_BGR2GRAY);
										// Imgproc.equalizeHist(grayFrame, grayFrame);

										faceCascade.detectMultiScale(grayFrame, faces);
										Rect[] facesArray = faces.toArray();
										Scalar color = new Scalar(0, 0, 255);
										logger.info(">>>>>>facesArray size->" + facesArray.length);
										for (int i = 0; i < facesArray.length; i++) {
											int[] predictedLabel = new int[1];
											double[] confidence = new double[1];
											// faceRecognizer.predict(grayFrame.submat(facesArray[i]), predictedLabel,
											// confidence);
											Mat faceROI = new Mat(grayFrame, facesArray[i]);
											Mat trainFace = new Mat();
											Imgproc.resize(faceROI, trainFace, faceSize);
											// faceRecognizer.predict(faceROI, predictedLabel, confidence);
											faceRecognizer.predict(trainFace, predictedLabel, confidence);
											logger.info(">>>>>>personName-" + personName + " : " + confidence[0]);

											if (confidence[0] < 50) {
												personName = faceRecognizer.getLabelInfo(predictedLabel[0]);
											} else {
												personName = "unknown";
											}
											setLabel(faceMat, personName, facesArray[i].tl(), color);
											videoCamera.setImageWithMat(faceMat);
											// frame.repaint();
											// Thread.sleep(50);

										}
									} else {
										break;
									}
								}
							}
						} catch (Exception ex) {
							ex.printStackTrace();
						}
					}
				}.start();
			}
		});
		buttonGroup.add(identifyButton);
	}
}
实际运行效果
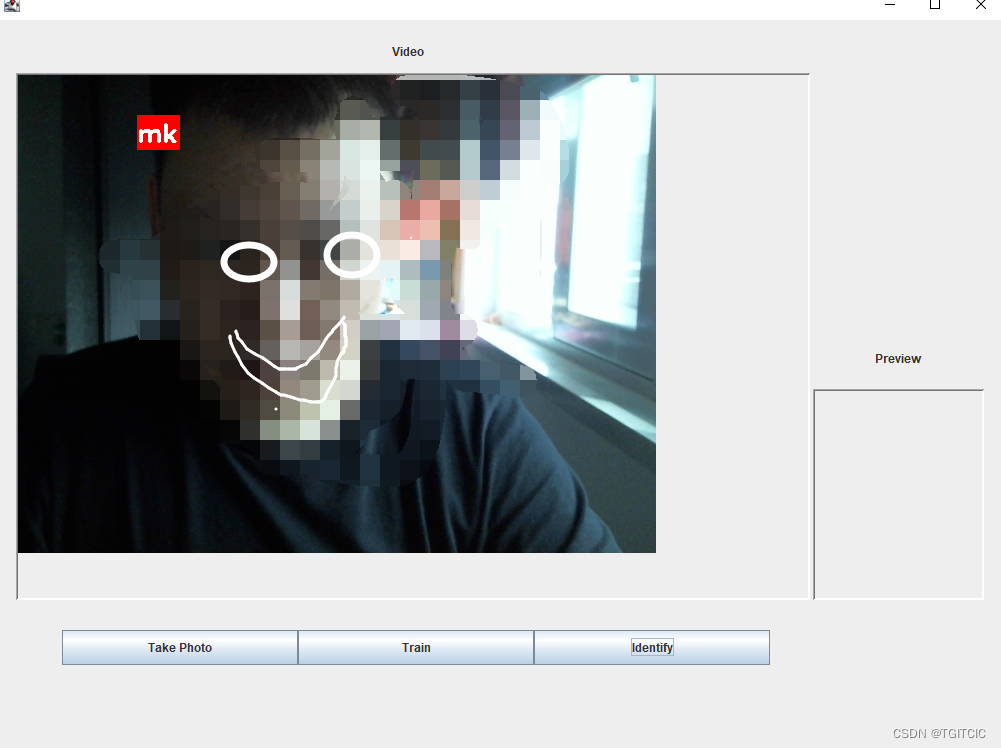
我拿我的脸训练的模型来识别我自己的效果。
识别不认识的人的效果 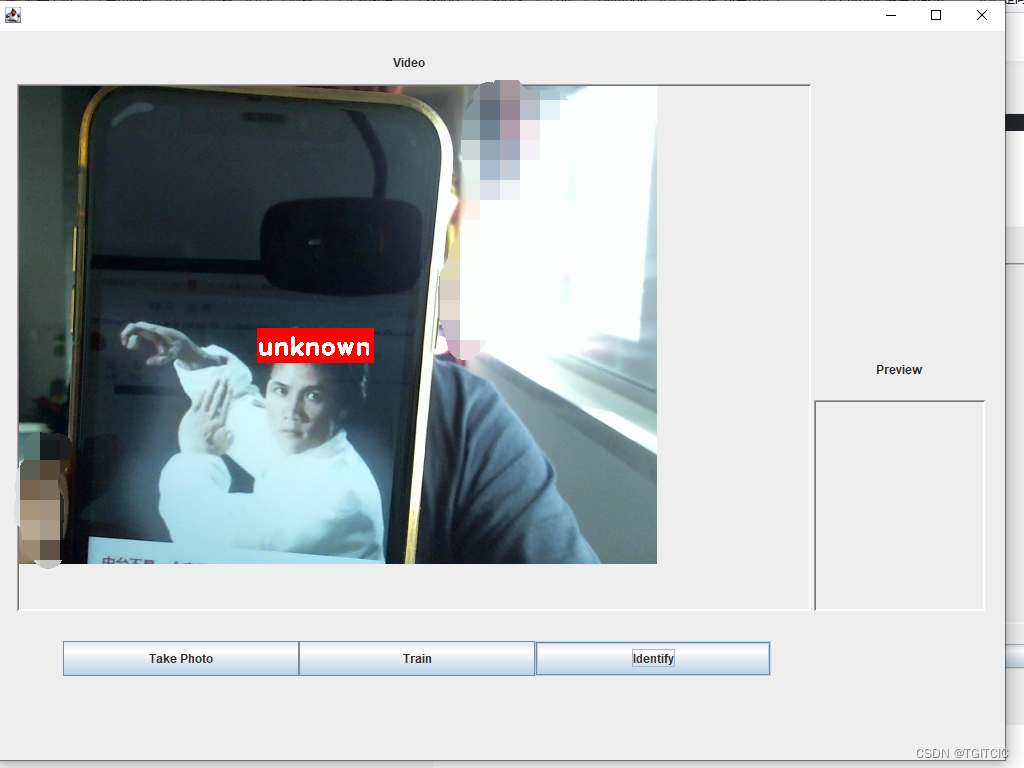
对于人脸技术的商业应用扩展知识的传授
截止至此,OpenCV入门系列已经全部完成了。
一般对于一个商业级别的人脸系统如:刷脸支付,技术核心无外乎是这样,没有太大难度和创新。无非就是商业环境使用的人脸识别有几点是和我们的教程不一样的地方:
- 活检SDK,即商业环境正式应用的人脸识别的SK是可以“活检”的。意思是:如果你搞一张照片那么是骗不过活检人脸识别的,这就是为什么我们在使用随申码、支付宝、微信的人脸识别时需要上下、左右摇摇头、张张嘴的原因;
- 双目摄像头,有了活检SDK还需要有双目红外摄像头,我在家里用的就是双目红外摄像头,它不是普通的一般的摄像头,相对也会贵个几倍。因为只有这种双目红外摄像头才能配合活检识别算法;
- 场景上要求新客输入手机号的过程就在采集人脸了(train),一般一个新客注册,屏幕提示往往会要求客户输入11位手机号,这个输入的过程快则10秒,慢则30秒内。我们通过我的教程也看到了,人脸的“训练“过程其实很快的,只需要有>100张图,这个模型的准确率就接近95%,图片越多识别准确率越高。因此训练机器对于新客的人脸识别一般就是利用这个输入手机号的阶段来完成的;
- 模型文件的存储,在我们的例子中使用的是.yml文件,实际我们会把模型写成流式存储或者使用nosql存储在redis内,以完成快速读取和检索。把标签和模型的对应我们会也使用redis做键-label,value-模型数据来作存储;
- 个人信息法,国家对人脸识别是属于个人敏感信息,相关商业应用时一定要好好熟读网安法和个人信息法,并根据两部法的规定好好采取相应的保护人脸模型、数据等隐私数据的手段;
当你完成了以上五个步骤,那么这个例子就会变成一个真正的商业级应用了,抛开第5点技术上实现一点不难,双目红外摄像头一般有点小贵,400-600CNY左右。因此不妨自己动一下手试试吧。
文章出处登录后可见!