文章目录
time模块
time模块中时间表现的格式主要有三种:
a、timestamp时间戳,时间戳表示的是从1970年1月1日00:00:00开始按秒计算的偏移量
b、struct_time时间元组,共有九个元素组。
c、format time 格式化时间,已格式化的结构使时间更具可读性。包括自定义格式和固定格式。
1、时间格式转换图:
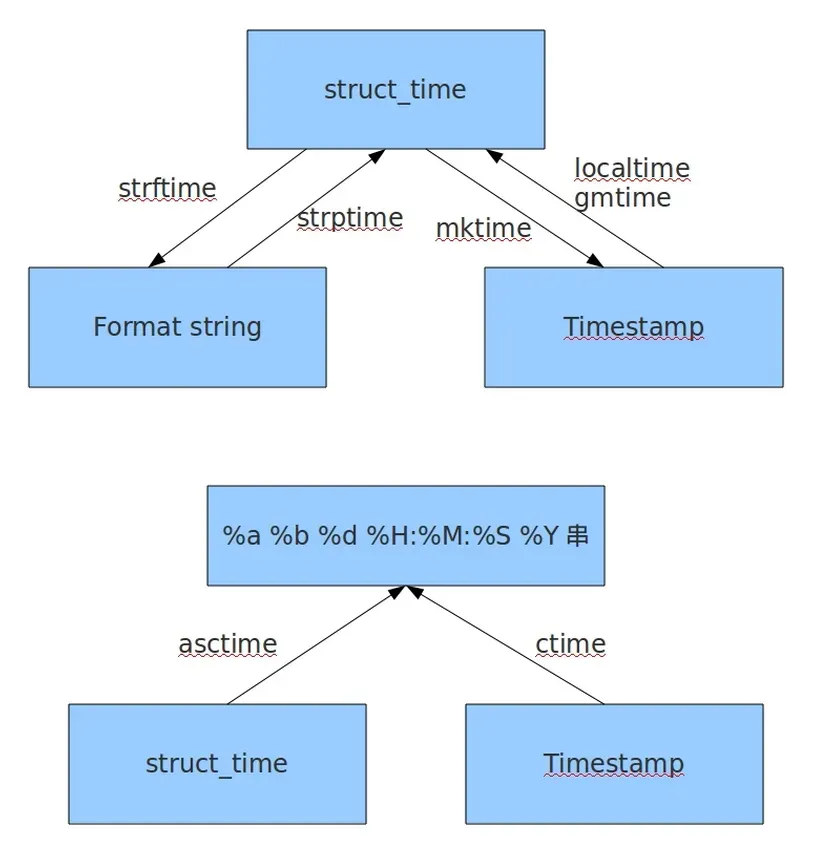
2、主要time生成方法和time格式转换方法实例:
#! /usr/bin/env python
# -*- coding:utf-8 -*-
# __author__ = "TKQ"

import time

# 生成timestamp
time.time()
# 1477471508.05#struct_time to timestamptime.mktime(time.localtime())
struct_time元组元素结构
属性                            值
tm_year(年)                  比如2011
tm_mon(月)                   1 - 12
tm_mday(日)                  1 - 31
tm_hour(时)                  0 - 23
tm_min(分)                   0 - 59
tm_sec(秒)                   0 - 61
tm_wday(weekday)             0 - 6(0表示周日)
tm_yday(一年中的第几天)        1 - 366
tm_isdst(是否是夏令时)        默认为-1
format time结构化表示
| 格式 | 含义 |
|---|---|
| 格式 | 含义 |
| %a | 本地(locale)简化星期名称 |
| %A | 本地完整星期名称 |
| %b | 本地简化月份名称 |
| %B | 本地完整月份名称 |
| %c | 本地相应的日期和时间表示 |
| %d | 一个月中的第几天(01 – 31) |
| %H | 一天中的第几个小时(24小时制,00 – 23) |
| %I | 第几个小时(12小时制,01 – 12) |
| %j | 一年中的第几天(001 – 366) |
| %m | 月份(01 – 12) |
| %M | 分钟数(00 – 59) |
| %p | 本地am或者pm的相应符 |
| %S | 秒(01 – 61) |
| %U | 一年中的星期数。(00 – 53星期天是一个星期的开始。)第一个星期天之前的所有天数都放在第0周。 |
| %w | 一个星期中的第几天(0 – 6,0是星期天) |
| %W | 和%U基本相同,不同的是%W以星期一为一个星期的开始。 |
| %x | 本地相应日期 |
| %X | 本地相应时间 |
| %y | 去掉世纪的年份(00 – 99) |
| %Y | 完整的年份 |
| %Z | 时区的名字(如果不存在为空字符) |
| %% | ‘%’字符 |
常见结构化时间组合:
print time.strftime("%Y-%m-%d %X")
#2016-10-26 20:50:13
3、time加减
#timestamp加减单位以秒为单位
import time
t1 = time.time()
t2=t1+10

print time.ctime(t1)#Wed Oct 26 21:15:30 2016
print time.ctime(t2)#Wed Oct 26 21:15:40 2016
datetime模块
datatime模块重新封装了time模块,提供更多接口,提供的类有:date,time,datetime,timedelta,tzinfo。
1、date类
datetime.date(year, month, day)
静态方法和字段
date.max、date.min:date对象所能表示的最大、最小日期;
date.resolution:date对象表示日期的最小单位。这里是天。
date.today():返回一个表示当前本地日期的date对象;
date.fromtimestamp(timestamp):根据给定的时间戮,返回一个date对象;
output
from datetime import *
import time

print   'date.max:', date.max
print   'date.min:', date.min
print   'date.today():', date.today()
print   'date.fromtimestamp():', date.fromtimestamp(time.time())

#Output======================
# date.max: 9999-12-31
# date.min: 0001-01-01
# date.today(): 2016-10-26
# date.fromtimestamp(): 2016-10-26
方法和属性
d1 = date(2011,06,03)#date对象
d1.year、date.month、date.day:年、月、日;
d1.replace(year, month, day):生成一个新的日期对象,用参数指定的年,月,日代替原有对象中的属性。(原有对象仍保持不变)
d1.timetuple():返回日期对应的time.struct_time对象;
d1.weekday():返回weekday,如果是星期一,返回0;如果是星期2,返回1,以此类推;
d1.isoweekday():返回weekday,如果是星期一,返回1;如果是星期2,返回2,以此类推;
d1.isocalendar():返回格式如(year,month,day)的元组;
d1.isoformat():返回格式如'YYYY-MM-DD’的字符串;
d1.strftime(fmt):和time模块format相同。
output
from datetime import *

now = date(2016, 10, 26)
tomorrow = now.replace(day = 27)
print 'now:', now, ', tomorrow:', tomorrow
print 'timetuple():', now.timetuple()
print 'weekday():', now.weekday()
print 'isoweekday():', now.isoweekday()
print 'isocalendar():', now.isocalendar()
print 'isoformat():', now.isoformat()
print 'strftime():', now.strftime("%Y-%m-%d")

#Output========================
# now: 2016-10-26 , tomorrow: 2016-10-27
# timetuple(): time.struct_time(tm_year=2016, tm_mon=10, tm_mday=26, tm_hour=0, tm_min=0, tm_sec=0, tm_wday=2, tm_yday=300, tm_isdst=-1)
# weekday(): 2
# isoweekday(): 3
# isocalendar(): (2016, 43, 3)
# isoformat(): 2016-10-26
# strftime(): 2016-10-26
2、time类
datetime.time(hour[ , minute[ , second[ , microsecond[ , tzinfo] ] ] ] )
静态方法和字段
time.min、time.max:time类所能表示的最小、最大时间。其中,time.min = time(0, 0, 0, 0), time.max = time(23, 59, 59, 999999);
time.resolution:时间的最小单位,这里是1微秒;
方法和属性
t1 = datetime.time(10,23,15)#time对象t1.hour、t1.minute、t1.second、t1.microsecond:时、分、秒、微秒;
t1.tzinfo:时区信息;
t1.replace([ hour[ , minute[ , second[ , microsecond[ , tzinfo] ] ] ] ] ):创建一个新的时间对象,用参数指定的时、分、秒、微秒代替原有对象中的属性(原有对象仍保持不变);
t1.isoformat():返回型如"HH:MM:SS"格式的字符串表示;
t1.strftime(fmt):同time模块中的format;
output
from  datetime import *

tm = time(23, 46, 10)
print   'tm:', tm
print   'hour: %d, minute: %d, second: %d, microsecond: %d' % (tm.hour, tm.minute, tm.second, tm.microsecond)
tm1 = tm.replace(hour=20)
print   'tm1:', tm1
print   'isoformat():', tm.isoformat()
print   'strftime()', tm.strftime("%X")

#Output==============================================
# tm: 23:46:10
# hour: 23, minute: 46, second: 10, microsecond: 0
# tm1: 20:46:10
# isoformat(): 23:46:10
# strftime() 23:46:10
3、datetime类
datetime相当于date和time结合起来。datetime.datetime (year, month, day[ , hour[ , minute[ , second[ , microsecond[ , tzinfo] ] ] ] ] )
静态方法和字段
datetime.today():返回一个表示当前本地时间的datetime对象;
datetime.now([tz]):返回一个表示当前本地时间的datetime对象,如果提供了参数tz,则获取tz参数所指时区的本地时间;
datetime.utcnow():返回一个当前utc时间的datetime对象;#格林威治时间
datetime.fromtimestamp(timestamp[, tz]):根据时间戮创建一个datetime对象,参数tz指定时区信息;
datetime.utcfromtimestamp(timestamp):根据时间戮创建一个datetime对象;
datetime.combine(date, time):根据date和time,创建一个datetime对象;
datetime.strptime(date_string, format):将格式字符串转换为datetime对象;
output
from  datetime import *
import time

print   'datetime.max:', datetime.max
print   'datetime.min:', datetime.min
print   'datetime.resolution:', datetime.resolution
print   'today():', datetime.today()
print   'now():', datetime.now()
print   'utcnow():', datetime.utcnow()
print   'fromtimestamp(tmstmp):', datetime.fromtimestamp(time.time())
print   'utcfromtimestamp(tmstmp):', datetime.utcfromtimestamp(time.time())

#output======================
# datetime.max: 9999-12-31 23:59:59.999999
# datetime.min: 0001-01-01 00:00:00
# datetime.resolution: 0:00:00.000001
# today(): 2016-10-26 23:12:51.307000
# now(): 2016-10-26 23:12:51.307000
# utcnow(): 2016-10-26 15:12:51.307000
# fromtimestamp(tmstmp): 2016-10-26 23:12:51.307000
# utcfromtimestamp(tmstmp): 2016-10-26 15:12:51.307000
方法和属性
dt=datetime.now()#datetime对象
dt.year、month、day、hour、minute、second、microsecond、tzinfo:
dt.date():获取date对象;
dt.time():获取time对象;
dt. replace ([ year[ , month[ , day[ , hour[ , minute[ , second[ , microsecond[ , tzinfo] ] ] ] ] ] ] ]):
dt. timetuple ()
dt. utctimetuple ()
dt. toordinal ()
dt. weekday ()
dt. isocalendar ()
dt. isoformat ([ sep] )
dt. ctime ():返回一个日期时间的C格式字符串,等效于time.ctime(time.mktime(dt.timetuple()));
dt. strftime (format)
4.timedelta类,时间加减
使用timedelta可以很方便的在日期上做天days,小时hour,分钟,秒,毫秒,微妙的时间计算,如果要计算月份则需要另外的办法。
#coding:utf-8
from  datetime import *

dt = datetime.now()
#日期减一天
dt1 = dt + timedelta(days=-1)#昨天
dt2 = dt - timedelta(days=1)#昨天
dt3 = dt + timedelta(days=1)#明天
delta_obj = dt3-dt
print type(delta_obj),delta_obj#<type 'datetime.timedelta'> 1 day, 0:00:00
print delta_obj.days ,delta_obj.total_seconds()#1 86400.0
** 5、tzinfo时区类**
#! /usr/bin/python
# coding=utf-8

from datetime import datetime, tzinfo,timedelta

"""
tzinfo是关于时区信息的类
tzinfo是一个抽象类,所以不能直接被实例化
"""
class UTC(tzinfo):
    """UTC"""
    def __init__(self,offset = 0):
        self._offset = offset

    def utcoffset(self, dt):
        return timedelta(hours=self._offset)

    def tzname(self, dt):
        return "UTC +%s" % self._offset

    def dst(self, dt):
        return timedelta(hours=self._offset)

#北京时间
beijing = datetime(2011,11,11,0,0,0,tzinfo = UTC(8))
print "beijing time:",beijing
#曼谷时间
bangkok = datetime(2011,11,11,0,0,0,tzinfo = UTC(7))
print "bangkok time",bangkok
#北京时间转成曼谷时间
print "beijing-time to bangkok-time:",beijing.astimezone(UTC(7))

#计算时间差时也会考虑时区的问题
timespan = beijing - bangkok
print "时差:",timespan

#Output==================
# beijing time: 2011-11-11 00:00:00+08:00
# bangkok time 2011-11-11 00:00:00+07:00
# beijing-time to bangkok-time: 2011-11-10 23:00:00+07:00
# 时差: -1 day, 23:00:00
random 模块
import random
# 大于0且小于1之间的小数
print(random.random())
0.42866657593385415
# 大于等于1且小于等于3之间的整数
print(random.randint(1, 3))
3
# 大于等于1且小于3之间的整数
print(random.randrange(1, 3))
2
# 大于1小于3的小数,如1.927109612082716
print(random.uniform(1, 3))
2.1789596280319605
# 列表内的任意一个元素,即1或者‘23’或者[4,5]
print(random.choice([1, '23', [4, 5]]))
[4, 5]
# random.sample([], n),列表元素任意n个元素的组合,示例n=2
print(random.sample([1, '23', [4, 5]], 2))
['23', 1]
lis = [1, 3, 5, 7, 9]
# 打乱l的顺序,相当于"洗牌"
random.shuffle(lis)
print(lis)
[9, 1, 5, 7, 3]
os 模块
os 模块负责程序与操作系统的交互,提供了访问操作系统底层的接口,多用于文件处理。
os.getcwd()获取当前工作目录,即当前 python 脚本工作的目录路径os.chdir(“dirname”)改变当前脚本工作目录;相当于 shell 下 cdos.curdir返回当前目录: (‘.’)os.pardir获取当前目录的父目录字符串名:(‘…’)os.makedirs(‘dirname1/dirname2’)可生成多层递归目录os.removedirs(‘dirname1’)若目录为空,则删除,并递归到上一级目录,如若也为空,则删除,依此类推os.mkdir(‘dirname’)生成单级目录;相当于 shell 中 mkdir dirnameos.rmdir(‘dirname’)删除单级空目录,若目录不为空则无法删除,报错;相当于 shell 中 rmdir dirnameos.listdir(‘dirname’)列出指定目录下的所有文件和子目录,包括隐藏文件,并以列表方式打印os.remove()删除一个文件os.rename(“oldname”,”newname”)重命名文件/目录os.stat(‘path/filename’)获取文件/目录信息os.sep输出操作系统特定的路径分隔符,win 下为””,Linux 下为”/“os.linesep输出当前平台使用的行终止符,win 下为”\r\n”,Linux 下为”\n”os.pathsep输出用于分割文件路径的字符串 win 下为;,Linux 下为:os.name 输出字符串指示当前使用平台。win->’nt’; Linux->’posix’os.system(“bash command”)运行 shell 命令,直接显示os.environ获取系统环境变量os.path.abspath(path)返回 path 规范化的绝对路径os.path.split(path)将 path 分割成目录和文件名二元组返回os.path.dirname(path)返回 path 的目录。其实就是 os.path.split(path)的第一个元素os.path.basename(path)返回 path 最后的文件名。如何 path 以/或\结尾,那么就会返回空值。即-os.path.split(path)的第二个元素os.path.exists(path)如果 path 存在,返回 True;如果 path 不存在,返回 Falseos.path.isabs(path)如果 path 是绝对路径,返回 Trueos.path.isfile(path)如果 path 是一个存在的文件,返回 True。否则返回 Falseos.path.isdir(path)如果 path 是一个存在的目录,则返回 True。否则返回 Falseos.path.join(path1[, path2[, …]])将多个路径组合后返回,第一个绝对路径之前的参数将被忽略os.path.getatime(path)返回 path 所指向的文件或者目录的最后存取时间os.path.getmtime(path)返回 path 所指向的文件或者目录的最后修改时间os.path.getsize(path)返回 path 的大小
在Linux和Mac平台上,该函数会原样返回path,在windows平台上会将路径中所有字符转换为小写,并将所有斜杠转换为饭斜杠。
>>> os.path.normcase('c:/windows\\system32\\')
'c:\\windows\\system32\\'


规范化路径,如..和/
>>> os.path.normpath('c://windows\\System32\\../Temp/')
'c:\\windows\\Temp'

>>> a='/Users/jieli/test1/\\\a1/\\\\aa.py/../..'
>>> print(os.path.normpath(a))
/Users/jieli/test1
os路径处理
#方式一:推荐使用
import os
#具体应用
import os,sys
possible_topdir = os.path.normpath(os.path.join(
    os.path.abspath(__file__),
    os.pardir, #上一级
    os.pardir,
    os.pardir
))
sys.path.insert(0,possible_topdir)

#方式二:不推荐使用
os.path.dirname(os.path.dirname(os.path.dirname(os.path.abspath(__file__))))
sys 模块
sys 模块负责程序与 python 解释器的交互,提供了一系列的函数和变量,用于操控 python 的运行时环境。
sys.argv命令行参数 List,第一个元素是程序本身路径sys.modules.keys()返回所有已经导入的模块列表sys.exc_info()获取当前正在处理的异常类,exc_type、exc_value、exc_traceback 当前处理的异常详细信息sys.exit(n)退出程序,正常退出时 exit(0)sys.hexversion获取 Python 解释程序的版本值,16 进制格式如:0x020403F0sys.version获取 Python 解释程序的版本信息sys.maxint最大的 Int 值sys.maxunicode最大的 Unicode 值sys.modules返回系统导入的模块字段,key 是模块名,value 是模块sys.path返回模块的搜索路径,初始化时使用 PYTHONPATH 环境变量的值sys.platform返回操作系统平台名称sys.stdout标准输出sys.stdin标准输入sys.stderr错误输出sys.exc_clear()用来清除当前线程所出现的当前的或最近的错误信息sys.exec_prefix返回平台独立的 python 文件安装的位置sys.byteorder本地字节规则的指示器,big-endian 平台的值是’big’,little-endian 平台的值是’little’sys.copyright记录 python 版权相关的东西sys.api_version解释器的 C 的 API 版本
json 和 pickle 模块
序列化
把对象(变量)从内存中变成可存储或传输的过程称之为序列化,在 Python 中叫 pickling,在其他语言中也被称之为 serialization,marshalling,flattening。
序列化的优点:
- 持久保存状态:内存是无法永久保存数据的,当程序运行了一段时间,我们断电或者重启程序,内存中关于这个程序的之前一段时间的数据(有结构)都被清空了。但是在断电或重启程序之前将程序当前内存中所有的数据都保存下来(保存到文件中),以便于下次程序执行能够从文件中载入之前的数据,然后继续执行,这就是序列化。
- 跨平台数据交互:序列化时不仅可以把序列化后的内容写入磁盘,还可以通过网络传输到别的机器上,如果收发的双方约定好实用一种序列化的格式,那么便打破了平台/语言差异化带来的限制,实现了跨平台数据交互。
json
Json 序列化并不是 python 独有的,json 序列化在 java 等语言中也会涉及到,因此使用 json 序列化能够达到跨平台传输数据的目的。
json 数据类型和 python 数据类型对应关系表
| Json 类型 | Python 类型 |
|---|---|
| {} | dict |
| [] | list |
| “string” | str |
| 520.13 | int 或 float |
| true/false | True/False |
| null | None |
json 模块序列化和反序列化的一个过程如下图所示
import json

struct_data = {'name': 'json', 'age': 23, 'sex': 'male'}
print(struct_data, type(struct_data))


{'name': 'json', 'age': 23, 'sex': 'male'} <class 'dict'>

data = json.dumps(struct_data)
print(data, type(data))
{"name": "json", "age": 23, "sex": "male"} <class 'str'>
# 注意:无论数据是怎样创建的,只要满足json格式(如果是字典,则字典内元素都是双引号),就可以json.loads出来,不一定非要dumps的数据才能loads
data = json.loads(data)
print(data, type(data))

{'name': 'json', 'age': 23, 'sex': 'male'} <class 'dict'>
# 序列化
with open('Json序列化对象.json', 'w') as fw:
    json.dump(struct_data, fw)
# 反序列化
with open('Json序列化对象.json') as fr:
    data = json.load(fr)
print(data)

{'name': 'json', 'age': 23, 'sex': 'male'}
pickle
Pickle 序列化和所有其他编程语言特有的序列化问题一样,它只能用于 Python,并且可能不同版本的 Python 彼此都不兼容,因此,只能用 Pickle 保存那些不重要的数据,即不能成功地反序列化也没关系。但是 pickle 的好处是可以存储 Python 中的所有的数据类型,包括对象,而 json 不可以。
pickle 模块序列化和反序列化的过程如下图所示

import pickle
struct_data = {'name': 'json', 'age': 23, 'sex': 'male'}
print(struct_data, type(struct_data))
{'name': 'json', 'age': 23, 'sex': 'male'} <class 'dict'>
data = pickle.dumps(struct_data)
print(data, type(data))
b'\x80\x03}q\x00(X\x04\x00\x00\x00nameq\x01X\x04\x00\x00\x00jsonq\x02X\x03\x00\x00\x00ageq\x03K\x17X\x03\x00\x00\x00sexq\x04X\x04\x00\x00\x00maleq\x05u.' <class 'bytes'>
data = pickle.loads(data)
print(data, type(data))
{'name': 'json', 'age': 23, 'sex': 'male'} <class 'dict'>
# 序列化(注意:pickle模块需要使用二进制存储,即'wb'模式存储)
with open('Pickle序列化对象.pkl', 'wb') as fw:
    pickle.dump(struct_data, fw)
# 反序列化
with open('Pickle序列化对象.pkl', 'rb') as fr:
    pickle = pickle.load(fr)
print(data)
{'name': 'json', 'age': 23, 'sex': 'male'}
hashlib和hmac 模块
hash 是什么
hash 是一种算法(Python3.版本里使用 hashlib 模块代替了 md5 模块和 sha 模块,主要提供 SHA1、SHA224、SHA256、SHA384、SHA512、MD5 算法),该算法接受传入的内容,经过运算得到一串 hash 值。
hash 值的特点:
- 只要传入的内容一样,得到的 hash 值一样,可用于非明文密码传输时密码校验
- 不能由 hash 值返解成内容,即可以保证非明文密码的安全性
- 只要使用的 hash 算法不变,无论校验的内容有多大,得到的 hash 值长度是固定的,可以用于对文本的哈希处理
hash 算法其实可以看成如下图所示的一座工厂,工厂接收你送来的原材料,经过加工返回的产品就是 hash 值

import hashlib

m = hashlib.md5()

m.update('hello'.encode('utf8'))
print(m.hexdigest())
5d41402abc4b2a76b9719d911017c592
m.update('hash'.encode('utf8'))
print(m.hexdigest())
97fa850988687b8ceb12d773347f7712
m2 = hashlib.md5()
m2.update('hellohash'.encode('utf8'))
print(m2.hexdigest())
97fa850988687b8ceb12d773347f7712
m3 = hashlib.md5()
m3.update('hello'.encode('utf8'))
print(m3.hexdigest())
5d41402abc4b2a76b9719d911017c592
撞库破解 hash 算法加密
hash 加密算法虽然看起来很厉害,但是他是存在一定缺陷的,即可以通过撞库可以反解,如下代码所示。
import hashlib

# 假定我们知道hash的微信会设置如下几个密码
pwd_list = [
    'hash3714',
    'hash1313',
    'hash94139413',
    'hash123456',
    '123456hash',
    'h123ash',
]


def make_pwd_dic(pwd_list):
    dic = {}
    for pwd in pwd_list:
        m = hashlib.md5()
        m.update(pwd.encode('utf-8'))
        dic[pwd] = m.hexdigest()
    return dic


def break_code(hash_pwd, pwd_dic):
    for k, v in pwd_dic.items():
        if v == hash_pwd:
            print('hash的微信的密码是===>%s' % k)


hash_pwd = '0562b36c3c5a3925dbe3c4d32a4f2ba2'
break_code(hash_pwd, make_pwd_dic(pwd_list))
hash的微信的密码是===>hash123456
hmac 模块
为了防止密码被撞库,我们可以使用 python 中的另一个 hmac 模块,它内部对我们创建 key 和内容做过某种处理后再加密。
如果要保证 hmac 模块最终结果一致,必须保证:
- hmac.new 括号内指定的初始 key 一样
- 无论 update 多少次,校验的内容累加到一起是一样的内容
import hmac

# 注意hmac模块只接受二进制数据的加密
h1 = hmac.new(b'hash')
h1.update(b'hello')
h1.update(b'world')
print(h1.hexdigest())
905f549c5722b5850d602862c34a763e
h2 = hmac.new(b'hash')
h2.update(b'helloworld')
print(h2.hexdigest())
905f549c5722b5850d602862c34a763e
h3 = hmac.new(b'hashhelloworld')
print(h3.hexdigest())
a7e524ade8ac5f7f33f3a39a8f63fd25
logging 模块
低配 logging
日志总共分为以下五个级别,这个五个级别自下而上进行匹配 debug–>info–>warning–>error–>critical,默认最低级别为 warning 级别。
V1版本
import logging

logging.debug('调试信息')
logging.info('正常信息')
logging.warning('警告信息')
logging.error('报错信息')
logging.critical('严重错误信息')
WARNING:root:警告信息
ERROR:root:报错信息
CRITICAL:root:严重错误信息
v1 版本无法指定日志的级别;无法指定日志的格式;只能往屏幕打印,无法写入文件。因此可以改成下述的代码。
v2版本
import logging

# 日志的基本配置

logging.basicConfig(filename='access.log',
                    format='%(asctime)s - %(name)s - %(levelname)s -%(module)s: %(message)s',
                    datefmt='%Y-%m-%d %H:%M:%S %p',
                    level=10)

logging.debug('调试信息')  # 10
logging.info('正常信息')  # 20
logging.warning('警告信息')  # 30
logging.error('报错信息')  # 40
logging.critical('严重错误信息')  # 50
可在logging.basicConfig()函数中可通过具体参数来更改logging模块默认行为,可用参数有:

filename:用指定的文件名创建FiledHandler(后边会具体讲解handler的概念),这样日志会被存储在指定的文件中。
filemode:文件打开方式,在指定了filename时使用这个参数,默认值为“a”还可指定为“w”。
format:指定handler使用的日志显示格式。
datefmt:指定日期时间格式。
level:设置rootlogger(后边会讲解具体概念)的日志级别
stream:用指定的stream创建StreamHandler。可以指定输出到sys.stderr,sys.stdout或者文件,默认为sys.stderr。若同时列出了filename和stream两个参数,则stream参数会被忽略。


format参数中可能用到的格式化串:

%(name)s Logger的名字
%(levelno)s 数字形式的日志级别
%(levelname)s 文本形式的日志级别
%(pathname)s 调用日志输出函数的模块的完整路径名,可能没有
%(filename)s 调用日志输出函数的模块的文件名
%(module)s 调用日志输出函数的模块名
%(funcName)s 调用日志输出函数的函数名
%(lineno)d 调用日志输出函数的语句所在的代码行
%(created)f 当前时间,用UNIX标准的表示时间的浮 点数表示
%(relativeCreated)d 输出日志信息时的,自Logger创建以 来的毫秒数
%(asctime)s 字符串形式的当前时间。默认格式是 “2003-07-08 16:49:45,896”。逗号后面的是毫秒
%(thread)d 线程ID。可能没有
%(threadName)s 线程名。可能没有
%(process)d 进程ID。可能没有
%(message)s用户输出的消息
v2 版本不能指定字符编码;只能往文件中打印。
v3版本
logging 模块包含四种角色:logger、Filter、Formatter 对象、Handler
- logger:产生日志的对象
- Filter:过滤日志的对象
- Formatter 对象:可以定制不同的日志格式对象,然后绑定给不同的 Handler 对象使用,以此来控制不同的 Handler 的日志格式
- Handler:接收日志然后控制打印到不同的地方,FileHandler 用来打印到文件中,StreamHandler 用来打印到终端
'''
critical=50
error =40
warning =30
info = 20
debug =10
'''


import logging

# 1、logger对象:负责产生日志,然后交给Filter过滤,然后交给不同的Handler输出
logger = logging.getLogger(__file__)

# 2、Filter对象:不常用,略

# 3、Handler对象:接收logger传来的日志,然后控制输出
h1 = logging.FileHandler('t1.log')  # 打印到文件
h2 = logging.FileHandler('t2.log')  # 打印到文件
sm = logging.StreamHandler()  # 打印到终端

# 4、Formatter对象:日志格式
formmater1 = logging.Formatter('%(asctime)s - %(name)s - %(levelname)s -%(module)s:  %(message)s',
                               datefmt='%Y-%m-%d %H:%M:%S %p',)

formmater2 = logging.Formatter('%(asctime)s :  %(message)s',
                               datefmt='%Y-%m-%d %H:%M:%S %p',)

formmater3 = logging.Formatter('%(name)s %(message)s',)


# 5、为Handler对象绑定格式
h1.setFormatter(formmater1)
h2.setFormatter(formmater2)
sm.setFormatter(formmater3)

# 6、将Handler添加给logger并设置日志级别
logger.addHandler(h1)
logger.addHandler(h2)
logger.addHandler(sm)

# 设置日志级别,可以在两个关卡进行设置logger与handler
# logger是第一级过滤,然后才能到handler
logger.setLevel(30)
h1.setLevel(10)
h2.setLevel(10)
sm.setLevel(10)

# 7、测试
logger.debug('debug')
logger.info('info')
logger.warning('warning')
logger.error('error')
logger.critical('critical')
高配 logging
配置日志文件
以上三个版本的日志只是为了引出我们下面的日志配置文件
import os
import logging.config

# 定义三种日志输出格式 开始
standard_format = '[%(asctime)s][%(threadName)s:%(thread)d][task_id:%(name)s][%(filename)s:%(lineno)d]' \
                  '[%(levelname)s][%(message)s]'  # 其中name为getLogger()指定的名字;lineno为调用日志输出函数的语句所在的代码行
simple_format = '[%(levelname)s][%(asctime)s][%(filename)s:%(lineno)d]%(message)s'
id_simple_format = '[%(levelname)s][%(asctime)s] %(message)s'
# 定义日志输出格式 结束

logfile_dir = os.path.dirname(os.path.dirname(os.path.abspath(__file__)))  # log文件的目录,需要自定义文件路径 # atm
logfile_dir = os.path.join(logfile_dir, 'log')  # C:\Users\oldboy\Desktop\atm\log

logfile_name = 'log.log'  # log文件名,需要自定义路径名

# 如果不存在定义的日志目录就创建一个
if not os.path.isdir(logfile_dir):  # C:\Users\oldboy\Desktop\atm\log
    os.mkdir(logfile_dir)

# log文件的全路径
logfile_path = os.path.join(logfile_dir, logfile_name)  # C:\Users\oldboy\Desktop\atm\log\log.log
# 定义日志路径 结束

# log配置字典
LOGGING_DIC = {
    'version': 1,
    'disable_existing_loggers': False,
    'formatters': {
        'standard': {
            'format': standard_format
        },
        'simple': {
            'format': simple_format
        },
    },
    'filters': {},  # filter可以不定义
    'handlers': {
        # 打印到终端的日志
        'console': {
            'level': 'DEBUG',
            'class': 'logging.StreamHandler',  # 打印到屏幕
            'formatter': 'simple'
        },
        # 打印到文件的日志,收集info及以上的日志
        'default': {
            'level': 'INFO',
            'class': 'logging.handlers.RotatingFileHandler',  # 保存到文件
            'formatter': 'standard',
            'filename': logfile_path,  # 日志文件
            'maxBytes': 1024 * 1024 * 5,  # 日志大小 5M  (*****)
            'backupCount': 5,
            'encoding': 'utf-8',  # 日志文件的编码,再也不用担心中文log乱码了
        },
    },
    'loggers': {
        # logging.getLogger(__name__)拿到的logger配置。如果''设置为固定值logger1,则下次导入必须设置成logging.getLogger('logger1')
        '': {
            # 这里把上面定义的两个handler都加上,即log数据既写入文件又打印到屏幕
            'handlers': ['default', 'console'],
            'level': 'DEBUG',
            'propagate': False,  # 向上(更高level的logger)传递
        },
    },
}


def load_my_logging_cfg():
    logging.config.dictConfig(LOGGING_DIC)  # 导入上面定义的logging配置
    logger = logging.getLogger(__name__)  # 生成一个log实例
    logger.info('It works!')  # 记录该文件的运行状态

    return logger


if __name__ == '__main__':
    load_my_logging_cfg()
使用日志
import time
import logging
import my_logging  # 导入自定义的logging配置

logger = logging.getLogger(__name__)  # 生成logger实例


def demo():
    logger.debug("start range... time:{}".format(time.time()))
    logger.info("中文测试开始。。。")
    for i in range(10):
        logger.debug("i:{}".format(i))
        time.sleep(0.2)
    else:
        logger.debug("over range... time:{}".format(time.time()))
    logger.info("中文测试结束。。。")


if __name__ == "__main__":
    my_logging.load_my_logging_cfg()  # 在你程序文件的入口加载自定义logging配置
    demo()
Django 日志配置文件
# logging_config.py

LOGGING = {
    'version': 1,
    'disable_existing_loggers': False,
    'formatters': {
        'standard': {
            'format': '[%(asctime)s][%(threadName)s:%(thread)d][task_id:%(name)s][%(filename)s:%(lineno)d]'
                      '[%(levelname)s][%(message)s]'
        },
        'simple': {
            'format': '[%(levelname)s][%(asctime)s][%(filename)s:%(lineno)d]%(message)s'
        },
        'collect': {
            'format': '%(message)s'
        }
    },
    'filters': {
        'require_debug_true': {
            '()': 'django.utils.log.RequireDebugTrue',
        },
    },
    'handlers': {
        # 打印到终端的日志
        'console': {
            'level': 'DEBUG',
            'filters': ['require_debug_true'],
            'class': 'logging.StreamHandler',
            'formatter': 'simple'
        },
        # 打印到文件的日志,收集info及以上的日志
        'default': {
            'level': 'INFO',
            'class': 'logging.handlers.RotatingFileHandler',  # 保存到文件,自动切
            'filename': os.path.join(BASE_LOG_DIR, "xxx_info.log"),  # 日志文件
            'maxBytes': 1024 * 1024 * 5,  # 日志大小 5M
            'backupCount': 3,
            'formatter': 'standard',
            'encoding': 'utf-8',
        },
        # 打印到文件的日志:收集错误及以上的日志
        'error': {
            'level': 'ERROR',
            'class': 'logging.handlers.RotatingFileHandler',  # 保存到文件,自动切
            'filename': os.path.join(BASE_LOG_DIR, "xxx_err.log"),  # 日志文件
            'maxBytes': 1024 * 1024 * 5,  # 日志大小 5M
            'backupCount': 5,
            'formatter': 'standard',
            'encoding': 'utf-8',
        },
        # 打印到文件的日志
        'collect': {
            'level': 'INFO',
            'class': 'logging.handlers.RotatingFileHandler',  # 保存到文件,自动切
            'filename': os.path.join(BASE_LOG_DIR, "xxx_collect.log"),
            'maxBytes': 1024 * 1024 * 5,  # 日志大小 5M
            'backupCount': 5,
            'formatter': 'collect',
            'encoding': "utf-8"
        }
    },
    'loggers': {
        # logging.getLogger(__name__)拿到的logger配置
        '': {
            'handlers': ['default', 'console', 'error'],
            'level': 'DEBUG',
            'propagate': True,
        },
        # logging.getLogger('collect')拿到的logger配置
        'collect': {
            'handlers': ['console', 'collect'],
            'level': 'INFO',
        }
    },
}


# -----------
# 用法:拿到俩个logger

logger = logging.getLogger(__name__)  # 线上正常的日志
collect_logger = logging.getLogger("collect")  # 领导说,需要为领导们单独定制领导们看的日志
numpy 模块
numpy 官方文档:https://docs.scipy.org/doc/numpy/reference/?v=20190307135750
numpy 是 Python 的一种开源的数值计算扩展库。这种库可用来存储和处理大型 numpy 数组,比 Python 自身的嵌套列表结构要高效的多(该结构也可以用来表示 numpy 数组)。
numpy 库有两个作用:
- 区别于 list 列表,提供了数组操作、数组运算、以及统计分布和简单的数学模型
- 计算速度快,甚至要由于 python 内置的简单运算,使得其成为 pandas、sklearn 等模块的依赖包。高级的框架如 TensorFlow、PyTorch 等,其数组操作也和 numpy 非常相似。
为什么用 numpy
lis1 = [1, 2, 3]
lis2 = [4, 5, 6]
如果我们想让lis1 * lis2得到一个结果为lis_res = [4, 10, 18],非常复杂。
创建 numpy 数组
numpy 数组即 numpy 的 ndarray 对象,创建 numpy 数组就是把一个列表传入 np.array()方法。
import numpy as np
# np.array? 相当于pycharm的ctrl+鼠标左键
# 创建一维的ndarray对象
arr = np.array([1, 2, 3])
print(arr, type(arr))
[1 2 3] <class 'numpy.ndarray'>
# 创建二维的ndarray对象
print(np.array([[1, 2, 3], [4, 5, 6]]))
[[1 2 3]
 [4 5 6]]
# 创建三维的ndarray对象
print(np.array([[1, 2, 3], [4, 5, 6], [7, 8, 9]]))
[[1 2 3]
 [4 5 6]
 [7 8 9]]
numpy 数组的常用属性
| 属性 | 解释 |
|---|---|
| T | 数组的转置(对高维数组而言) |
| dtype | 数组元素的数据类型 |
| size | 数组元素的个数 |
| ndim | 数组的维数 |
| shape | 数组的维度大小(以元组形式) |
| astype | 类型转换 |
dtype 种类:bool_, int(8,16,32,64), float(16,32,64)
arr = np.array([[1, 2, 3], [4, 5, 6]], dtype=np.float32)
print(arr)
[[1. 2. 3.]
 [4. 5. 6.]]
print(arr.T)
[[1. 4.]
 [2. 5.]
 [3. 6.]]
print(arr.dtype)
float32
arr = arr.astype(np.int32)
print(arr.dtype)
print(arr)
int32
[[1 2 3]
 [4 5 6]]
print(arr.size)
6
print(arr.ndim)
2
print(arr.shape)
(2, 3)
获取 numpy 数组的行列数
由于 numpy 数组是多维的,对于二维的数组而言,numpy 数组就是既有行又有列。
注意:对于 numpy 我们一般多讨论二维的数组。
arr = np.array([[1, 2, 3], [4, 5, 6]])
print(arr)
[[1 2 3]
 [4 5 6]]
# 获取numpy数组的行和列构成的数组
print(arr.shape)
(2, 3)
# 获取numpy数组的行
print(arr.shape[0])
2
# 获取numpy数组的列
print(arr.shape[1])
3
切割 numpy 数组
切分 numpy 数组类似于列表的切割,但是与列表的切割不同的是,numpy 数组的切割涉及到行和列的切割,但是两者切割的方式都是从索引 0 开始,并且取头不取尾。
arr = np.array([[1, 2, 3, 4], [5, 6, 7, 8], [9, 10, 11, 12]])
print(arr)
[[ 1  2  3  4]
 [ 5  6  7  8]
 [ 9 10 11 12]]
# 取所有元素
print(arr[:, :])
[[ 1  2  3  4]
 [ 5  6  7  8]
 [ 9 10 11 12]]
# 取第一行的所有元素
print(arr[:1, :])
[[1 2 3 4]]
# 取第一行的所有元素
print(arr[0, [0, 1, 2, 3]])
[1 2 3 4]
# 取第一列的所有元素
print(arr[:, :1])
[[1]
 [5]
 [9]]
# 取第一列的所有元素
print(arr[(0, 1, 2), 0])
[1 5 9]
# 取第一行第一列的元素
print(arr[(0, 1, 2), 0])
[1 5 9]
# 取第一行第一列的元素
print(arr[0, 0])
1
# 取大于5的元素,返回一个数组
print(arr[arr > 5])
[ 6 7 8 9 10 11 12]
# numpy数组按运算符取元素的原理,即通过arr > 5生成一个布尔numpy数组
print(arr > 5)
[[False False False False]
 [False  True  True  True]
 [ True  True  True  True]]
numpy 数组元素替换
numpy 数组元素的替换,类似于列表元素的替换,并且 numpy 数组也是一个可变类型的数据,即如果对 numpy 数组进行替换操作,会修改原 numpy 数组的元素,所以下面我们用.copy()方法举例 numpy 数组元素的替换。
arr = np.array([[1, 2, 3, 4], [5, 6, 7, 8], [9, 10, 11, 12]])
print(arr)
[[ 1  2  3  4]
 [ 5  6  7  8]
 [ 9 10 11 12]]
# 取第一行的所有元素,并且让第一行的元素都为0
arr1 = arr.copy()
arr1[:1, :] = 0
print(arr1)
[[ 0  0  0  0]
 [ 5  6  7  8]
 [ 9 10 11 12]]
# 取所有大于5的元素,并且让大于5的元素为0
arr2 = arr.copy()
arr2[arr > 5] = 0
print(arr2)
[[1 2 3 4]
 [5 0 0 0]
 [0 0 0 0]]
# 对numpy数组清零
arr3 = arr.copy()
arr3[:, :] = 0
print(arr3)
[[0 0 0 0]
 [0 0 0 0]
 [0 0 0 0]]
numpy 数组的合并
arr1 = np.array([[1, 2], [3, 4], [5, 6]])
print(arr1)
[[1 2]
 [3 4]
 [5 6]]
arr2 = np.array([[7, 8], [9, 10], [11, 12]])
print(arr2)
[[ 7  8]
 [ 9 10]
 [11 12]]
# 合并两个numpy数组的行,注意使用hstack()方法合并numpy数组,numpy数组应该有相同的行,其中hstack的h表示horizontal水平的
print(np.hstack((arr1, arr2)))
[[ 1  2  7  8]
 [ 3  4  9 10]
 [ 5  6 11 12]]
# 合并两个numpy数组,其中axis=1表示合并两个numpy数组的行
print(np.concatenate((arr1, arr2), axis=1))
[[ 1  2  7  8]
 [ 3  4  9 10]
 [ 5  6 11 12]]
# 合并两个numpy数组的列,注意使用vstack()方法合并numpy数组,numpy数组应该有相同的列,其中vstack的v表示vertical垂直的
print(np.vstack((arr1, arr2)))
[[ 1  2]
 [ 3  4]
 [ 5  6]
 [ 7  8]
 [ 9 10]
 [11 12]]
# 合并两个numpy数组,其中axis=0表示合并两个numpy数组的列
print(np.concatenate((arr1, arr2), axis=0))
[[ 1  2]
 [ 3  4]
 [ 5  6]
 [ 7  8]
 [ 9 10]
 [11 12]]
通过函数创建 numpy 数组
-
arange() range 的 numpy 版,支持浮点数
-
linspace() 类似 arange(),第三个参数为数组长度
-
zeros() 根据指定形状和 dtype 创建全 0 数组
-
ones() 根据指定形状和 dtype 创建全 1 数组
-
eye() 创建单位矩阵
-
empty() 创建一个元素全随机的数组
-
reshape() 重塑形状
array
arr = np.array([1, 2, 3])
print(arr)
[1 2 3]
arange
# 构造0-9的ndarray数组
print(np.arange(10))
[0 1 2 3 4 5 6 7 8 9]
# 构造1-4的ndarray数组
print(np.arange(1, 5))
[1 2 3 4]
# 构造1-19且步长为2的ndarray数组
print(np.arange(1, 20, 2))
[ 1 3 5 7 9 11 13 15 17 19]
linspace/logspace
# 构造一个等差数列,取头也取尾,从0取到20,取5个数
print(np.linspace(0, 20, 5))
[ 0. 5. 10. 15. 20.]
# 构造一个等比数列,从10**0取到10**20,取5个数
print(np.logspace(0, 20, 5))
[1.e+00 1.e+05 1.e+10 1.e+15 1.e+20]
zeros/ones/eye/empty
# 构造3*4的全0numpy数组
print(np.zeros((3, 4)))
[[0. 0. 0. 0.]
 [0. 0. 0. 0.]
 [0. 0. 0. 0.]]
# 构造3*4的全1numpy数组
print(np.ones((3, 4)))
[[1. 1. 1. 1.]
 [1. 1. 1. 1.]
 [1. 1. 1. 1.]]
# 构造3个主元的单位numpy数组
print(np.eye(3))
[[1. 0. 0.]
 [0. 1. 0.]
 [0. 0. 1.]]
# 构造一个4*4的随机numpy数组,里面的元素是随机生成的
print(np.empty((4, 4)))
[[ 2.31584178e+077 -1.49457545e-154  3.95252517e-323  0.00000000e+000]
 [ 0.00000000e+000  0.00000000e+000  0.00000000e+000  0.00000000e+000]
 [ 0.00000000e+000  0.00000000e+000  0.00000000e+000  0.00000000e+000]
 [ 0.00000000e+000  0.00000000e+000  1.29074055e-231  1.11687366e-308]]
reshape
arr = np.ones([2, 2], dtype=int)
print(arr.reshape(4, 1))
[[1]
 [1]
 [1]
 [1]]
fromstring/fromfunction(了解)
# fromstring通过对字符串的字符编码所对应ASCII编码的位置,生成一个ndarray对象
s = 'abcdef'
# np.int8表示一个字符的字节数为8
print(np.fromstring(s, dtype=np.int8))
[ 97  98  99 100 101 102]


/Applications/anaconda3/lib/python3.6/site-packages/ipykernel_launcher.py:4: DeprecationWarning: The binary mode of fromstring is deprecated, as it behaves surprisingly on unicode inputs. Use frombuffer instead
  after removing the cwd from sys.path.
def func(i, j):
    """其中i为numpy数组的行,j为numpy数组的列"""
    return i * j


# 使用函数对numpy数组元素的行和列的索引做处理,得到当前元素的值,索引从0开始,并构造一个3*4的numpy数组
print(np.fromfunction(func, (3, 4)))
[[0. 0. 0. 0.]
 [0. 1. 2. 3.]
 [0. 2. 4. 6.]]
numpy 数组运算
+两个 numpy 数组对应元素相加
-两个 numpy 数组对应元素相减
-
*两个 numpy 数组对应元素相乘 -
/两个 numpy 数组对应元素相除,如果都是整数则取商 -
%两个 numpy 数组对应元素相除后取余数 -
**n单个 numpy 数组每个元素都取 n 次方,如**2:每个元素都取平方
arrarr1 = np.array([[1, 2], [3, 4], [5, 6]])
print(arr1)
[[1 2]
 [3 4]
 [5 6]]
arr2 = np.array([[7, 8], [9, 10], [11, 12]])
print(arr2)
[[ 7  8]
 [ 9 10]
 [11 12]]
print(arr1 + arr2)
[[ 8 10]
 [12 14]
 [16 18]]
print(arr1**2)
[[ 1  4]
 [ 9 16]
 [25 36]]
numpy 数组运算函数
- np.sin(arr) 对 numpy 数组 arr 中每个元素取正弦,𝑠𝑖𝑛(𝑥)sin(x)
- np.cos(arr) 对 numpy 数组 arr 中每个元素取余弦
- np.tan(arr) 对 numpy 数组 arr 中每个元素取正切
- np.arcsin(arr) 对 numpy 数组 arr 中每个元素取反正弦
- np.arccos(arr) 对 numpy 数组 arr 中每个元素取反余弦
- np.arctan(arr) 对 numpy 数组 arr 中每个元素取反正切
- np.exp(arr) 对 numpy 数组 arr 中每个元素取指数函数
- np.sqrt(arr) 对 numpy 数组 arr 中每个元素开根号
一元函数:abs, sqrt, exp, log, ceil, floor, rint, trunc, modf, isnan, isinf, cos, sin, tan
二元函数:add, substract, multiply, divide, power, mod, maximum, mininum
arr = np.array([[1, 2, 3, 4], [5, 6, 7, 8], [9, 10, 11, 12]])
print(arr)
[[ 1  2  3  4]
 [ 5  6  7  8]
 [ 9 10 11 12]]
# 对numpy数组的所有元素取正弦
print(np.sin(arr))
[[ 0.84147098  0.90929743  0.14112001 -0.7568025 ]
 [-0.95892427 -0.2794155   0.6569866   0.98935825]
 [ 0.41211849 -0.54402111 -0.99999021 -0.53657292]]
# 对numpy数组的所有元素开根号
print(np.sqrt(arr))
[[1.         1.41421356 1.73205081 2.        ]
 [2.23606798 2.44948974 2.64575131 2.82842712]
 [3.         3.16227766 3.31662479 3.46410162]]
# 对numpy数组的所有元素取反正弦,如果元素不在定义域内,则会取nan值
print(np.arcsin(arr * 0.1))
[[0.10016742 0.20135792 0.30469265 0.41151685]
 [0.52359878 0.64350111 0.7753975  0.92729522]
 [1.11976951 1.57079633        nan        nan]]


/Applications/anaconda3/lib/python3.6/site-packages/ipykernel_launcher.py:2: RuntimeWarning: invalid value encountered in arcsin
# 判断矩阵元素中是否含有np.nan值
print(np.isnan(arr))
[[False False False]
 [False False False]]
numpy 数组的点乘
numpy 数组的点乘必须满足第一个 numpy 数组的列数等于第二个 numpy 数组的行数,即 𝑚∗𝑛·𝑛∗𝑚=𝑚∗𝑚。
arr1 = np.array([[1, 2, 3], [4, 5, 6]])
print(arr1.shape)
(2, 3)
arr2 = np.array([[7, 8], [9, 10], [11, 12]])
print(arr2.shape)
(3, 2)
assert arr1.shape[0] == arr2.shape[1]
# 2*3·3*2 = 2*2
print(arr2.shape)
(3, 2)
numpy 数组的转置
numpy 数组的转置,相当于 numpy 数组的行和列互换。
arr = np.array([[1, 2, 3], [4, 5, 6]])
print(arr)
[[1 2 3]
 [4 5 6]]
print(arr.transpose())
[[1 4]
 [2 5]
 [3 6]]
print(arr.T)
[[1 4]
 [2 5]
 [3 6]]
numpy 数组的逆
numpy 数组行和列相同时,numpy 数组才可逆。
arr = np.array([[1, 2, 3], [4, 5, 6], [9, 8, 9]])
print(arr)
[[1 2 3]
 [4 5 6]
 [9 8 9]]
print(np.linalg.inv(arr))
[[ 0.5        -1.          0.5       ]
 [-3.          3.         -1.        ]
 [ 2.16666667 -1.66666667  0.5       ]]
# 单位numpy数组的逆是单位numpy数组本身
arr = np.eye(3)
print(arr)
[[1. 0. 0.]
 [0. 1. 0.]
 [0. 0. 1.]]
print(np.linalg.inv(arr))
[[1. 0. 0.]
 [0. 1. 0.]
 [0. 0. 1.]]
numpy 数组数学和统计方法
- sum 求和
- cumsum 累加求和
- mean 求平均数
- std 求标准差
- var 求方差
- min 求最小值
- max 求最大值
- argmin 求最小值索引
- argmax 求最大值索引
- sort 排序
最大最小值
arr = np.array([[1, 2, 3], [4, 5, 6], [7, 8, 9]])
print(arr)
[[1 2 3]
 [4 5 6]
 [7 8 9]]
# 获取numpy数组所有元素中的最大值
print(arr.max())
9
# 获取numpy数组所有元素中的最小值
print(arr.min())
1
# 获取举着每一行的最大值
print(arr.max(axis=0))
[7 8 9]
# 获取numpy数组每一列的最大值
print(arr.max(axis=1))
[3 6 9]
# 获取numpy数组最大元素的索引位置
print(arr.argmax(axis=1))
[2 2 2]
平均值
arr = np.array([[1, 2, 3], [4, 5, 6], [7, 8, 9]])
print(arr)
[[1 2 3]
 [4 5 6]
 [7 8 9]]
# 获取numpy数组所有元素的平均值
print(arr.mean())
5.0
# 获取numpy数组每一列的平均值
print(arr.mean(axis=0))
[4. 5. 6.]
# 获取numpy数组每一行的平均值
print(arr.mean(axis=1))
[2. 5. 8.]
方差
方差公式为,其中 x 为 numpy 数组。
arr = np.array([[1, 2, 3], [4, 5, 6], [7, 8, 9]])
print(arr)
[[1 2 3]
 [4 5 6]
 [7 8 9]]
# 获取numpy数组所有元素的方差
print(arr.var())
6.666666666666667
# 获取numpy数组每一列的元素的方差
print(arr.var(axis=0))
[6. 6. 6.]
# 获取numpy数组每一行的元素的方差
print(arr.var(axis=1))
[0.66666667 0.66666667 0.66666667]
标准差
arr = np.array([[1, 2, 3], [4, 5, 6], [7, 8, 9]])
print(arr)
[[1 2 3]
 [4 5 6]
 [7 8 9]]
# 获取numpy数组所有元素的标准差
print(arr.std())
2.581988897471611
# 获取numpy数组每一列的标准差
print(arr.std(axis=0))
[2.44948974 2.44948974 2.44948974]
# 获取numpy数组每一行的标准差
print(arr.std(axis=1))
[0.81649658 0.81649658 0.81649658]
中位数
arr = np.array([[1, 2, 3], [4, 5, 6], [7, 8, 9]])
print(arr)
[[1 2 3]
 [4 5 6]
 [7 8 9]]
# 获取numpy数组所有元素的中位数
print(np.median(arr))
5.0
# 获取numpy数组每一列的中位数
print(np.median(arr, axis=0))
[4. 5. 6.]
# 获取numpy数组每一行的中位数
print(np.median(arr, axis=1))
[2. 5. 8.]
numpy 数组求和
arr = np.array([[1, 2, 3], [4, 5, 6], [7, 8, 9]])
print(arr)
[[1 2 3]
 [4 5 6]
 [7 8 9]]
# 对numpy数组的每一个元素求和
print(arr.sum())
45
# 对numpy数组的每一列求和
print(arr.sum(axis=0))
[12 15 18]
# 对numpy数组的每一行求和
print(arr.sum(axis=1))
[ 6 15 24]
累加和
arr = np.array([1, 2, 3, 4, 5])
print(arr)
[1 2 3 4 5]
# 第n个元素为前n-1个元素累加和
print(arr.cumsum())
[ 1 3 6 10 15]
numpy.random 生成随机数
| 函数名称 | 函数功能 | 参数说明 |
|---|---|---|
| rand(𝑑0,𝑑1,⋯,𝑑𝑛d0,d1,⋯,dn) | 产生均匀分布的随机数 | 𝑑𝑛dn 为第 n 维数据的维度 |
| randn(𝑑0,𝑑1,⋯,𝑑𝑛d0,d1,⋯,dn) | 产生标准正态分布随机数 | 𝑑𝑛dn 为第 n 维数据的维度 |
| randint(low[, high, size, dtype]) | 产生随机整数 | low:最小值;high:最大值;size:数据个数 |
| random_sample([size]) | 在[0,1)[0,1)内产生随机数 | size 为随机数的 shape,可以为元祖或者列表 |
| choice(a[, size]) | 从 arr 中随机选择指定数据 | arr 为 1 维数组;size 为数组形状 |
| uniform(low,high [,size]) | 给定形状产生随机数组 | low 为最小值;high 为最大值,size 为数组形状 |
| shuffle(a) | 与 random.shuffle 相同 | a 为指定数组 |
# RandomState()方法会让数据值随机一次,之后都是相同的数据
rs = np.random.RandomState(1)
print(rs.rand(10))
[4.17022005e-01 7.20324493e-01 1.14374817e-04 3.02332573e-01
 1.46755891e-01 9.23385948e-02 1.86260211e-01 3.45560727e-01
 3.96767474e-01 5.38816734e-01]
# 构造3*4的均匀分布的numpy数组
# seed()方法会让数据值随机一次,之后都是相同的数据
np.random.seed(1)
print(np.random.rand(3, 4))
[[4.17022005e-01 7.20324493e-01 1.14374817e-04 3.02332573e-01]
 [1.46755891e-01 9.23385948e-02 1.86260211e-01 3.45560727e-01]
 [3.96767474e-01 5.38816734e-01 4.19194514e-01 6.85219500e-01]]
# 构造3*4*5的均匀分布的numpy数组
print(np.random.rand(3, 4, 5))
[[[0.20445225 0.87811744 0.02738759 0.67046751 0.4173048 ]
  [0.55868983 0.14038694 0.19810149 0.80074457 0.96826158]
  [0.31342418 0.69232262 0.87638915 0.89460666 0.08504421]
  [0.03905478 0.16983042 0.8781425  0.09834683 0.42110763]]

 [[0.95788953 0.53316528 0.69187711 0.31551563 0.68650093]
  [0.83462567 0.01828828 0.75014431 0.98886109 0.74816565]
  [0.28044399 0.78927933 0.10322601 0.44789353 0.9085955 ]
  [0.29361415 0.28777534 0.13002857 0.01936696 0.67883553]]

 [[0.21162812 0.26554666 0.49157316 0.05336255 0.57411761]
  [0.14672857 0.58930554 0.69975836 0.10233443 0.41405599]
  [0.69440016 0.41417927 0.04995346 0.53589641 0.66379465]
  [0.51488911 0.94459476 0.58655504 0.90340192 0.1374747 ]]]
# 构造3*4的正态分布的numpy数组
print(np.random.randn(3, 4))
[[ 0.30017032 -0.35224985 -1.1425182  -0.34934272]
 [-0.20889423  0.58662319  0.83898341  0.93110208]
 [ 0.28558733  0.88514116 -0.75439794  1.25286816]]
# 构造取值为1-5内的10个元素的ndarray数组
print(np.random.randint(1, 5, 10))
[1 1 1 2 3 1 2 1 3 4]
# 构造取值为0-1内的3*4的numpy数组
print(np.random.random_sample((3, 4)))
[[0.62169572 0.11474597 0.94948926 0.44991213]
 [0.57838961 0.4081368  0.23702698 0.90337952]
 [0.57367949 0.00287033 0.61714491 0.3266449 ]]
arr = np.array([1, 2, 3])
# 随机选取arr中的两个元素
print(np.random.choice(arr, size=2))
[1 3]
arr = np.random.uniform(1, 5, (2, 3))
print(arr)
[[4.72405173 3.30633687 4.35858086]
 [3.49316845 2.29806999 3.91204657]]
np.random.shuffle(arr)
print(arr)
[[3.49316845 2.29806999 3.91204657]
 [4.72405173 3.30633687 4.35858086]]
pandas 模块
pandas 官方文档:https://pandas.pydata.org/pandas-docs/stable/?v=20190307135750
pandas 基于 Numpy,可以看成是处理文本或者表格数据。pandas 中有两个主要的数据结构,其中 Series 数据结构类似于 Numpy 中的一维数组,DataFrame 类似于多维表格数据结构。
pandas 是 python 数据分析的核心模块。它主要提供了五大功能:
- 支持文件存取操作,支持数据库(sql)、html、json、pickle、csv(txt、excel)、sas、stata、hdf 等。
- 支持增删改查、切片、高阶函数、分组聚合等单表操作,以及和 dict、list 的互相转换。
- 支持多表拼接合并操作。
- 支持简单的绘图操作。
- 支持简单的统计分析操作。
Series 数据结构
Series 是一种类似于一维数组的对象,由一组数据和一组与之相关的数据标签(索引)组成。
Series 比较像列表(数组)和字典的结合体
import numpy as np
import pandas as pd

df = pd.Series(0, index=['a', 'b', 'c', 'd'])
print(df)
a 0
b 0
c 0
d 0
dtype: int64
print(df.values)
[0 0 0 0]
print(df.index)
Index(['a', 'b', 'c', 'd'], dtype='object')
Series 支持 NumPy 模块的特性(下标)
| 详解 | 方法 |
|---|---|
| 从 ndarray 创建 Series | Series(arr) |
| 与标量运算 | df*2 |
| 两个 Series 运算 | df1+df2 |
| 索引 | df[0], df[[1,2,4]] |
| 切片 | df[0:2] |
| 通用函数 | np.abs(df) |
| 布尔值过滤 | df[df>0] |
arr = np.array([1, 2, 3, 4, np.nan])
print(arr)
[ 1. 2. 3. 4. nan]
df = pd.Series(arr, index=['a', 'b', 'c', 'd', 'e'])
print(df)
a 1.0
b 2.0
c 3.0
d 4.0
e NaN
dtype: float64
print(df**2)
a 1.0
b 4.0
c 9.0
d 16.0
e NaN
dtype: float64
print(df[0])
1.0
print(df['a'])
1.0
print(df[[0, 1, 2]])
a 1.0
b 2.0
c 3.0
dtype: float64
print(df[0:2])
a 1.0
b 2.0
dtype: float64
np.sin(df)
a 0.841471
b 0.909297
c 0.141120
d -0.756802
e NaN
dtype: float64
df[df > 1]
b 2.0
c 3.0
d 4.0
dtype: float64
Series 支持字典的特性(标签)
| 详解 | 方法 |
|---|---|
| 从字典创建 Series | Series(dic), |
| in 运算 | ’a’ in sr |
| 键索引 | sr[‘a’], sr[[‘a’, ‘b’, ‘d’]] |
df = pd.Series({'a': 1, 'b': 2})
print(df)
a 1
b 2
dtype: int64
print('a' in df)
True
print(df['a'])
1
Series 缺失数据处理
| 方法 | 详解 |
|---|---|
| dropna() | 过滤掉值为 NaN 的行 |
| fillna() | 填充缺失数据 |
| isnull() | 返回布尔数组,缺失值对应为 True |
| notnull() | 返回布尔数组,缺失值对应为 False |
df = pd.Series([1, 2, 3, 4, np.nan], index=['a', 'b', 'c', 'd', 'e'])
print(df)
a 1.0
b 2.0
c 3.0
d 4.0
e NaN
dtype: float64
print(df.dropna())
a 1.0
b 2.0
c 3.0
d 4.0
dtype: float64
print(df.fillna(5))
a 1.0
b 2.0
c 3.0
d 4.0
e 5.0
dtype: float64
print(df.isnull())
a False
b False
c False
d False
e True
dtype: bool
print(df.notnull())
a True
b True
c True
d True
e False
dtype: bool
DataFrame 数据结构
DataFrame 是一个表格型的数据结构,含有一组有序的列。
DataFrame 可以被看做是由 Series 组成的字典,并且共用一个索引。
产生时间对象数组:date_range
date_range 参数详解:
| 参数 | 详解 |
|---|---|
| start | 开始时间 |
| end | 结束时间 |
| periods | 时间长度 |
| freq | 时间频率,默认为’D’,可选 H(our),W(eek),B(usiness),S(emi-)M(onth),(min)T(es), S(econd), A(year),… |
dates = pd.date_range('20190101', periods=6, freq='M')
print(dates)
DatetimeIndex(['2019-01-31', '2019-02-28', '2019-03-31', '2019-04-30',
'2019-05-31', '2019-06-30'],
dtype='datetime64[ns]', freq='M')
np.random.seed(1)
arr = 10 * np.random.randn(6, 4)
print(arr)
[[ 16.24345364 -6.11756414 -5.28171752 -10.72968622]
[ 8.65407629 -23.01538697 17.44811764 -7.61206901]
[ 3.19039096 -2.49370375 14.62107937 -20.60140709]
[ -3.22417204 -3.84054355 11.33769442 -10.99891267]
[ -1.72428208 -8.77858418 0.42213747 5.82815214]
[-11.00619177 11.4472371 9.01590721 5.02494339]]
df = pd.DataFrame(arr, index=dates, columns=['c1', 'c2', 'c3', 'c4'])
print(df)
c1 c2 c3 c4
2019-01-31 16.243454 -6.117564 -5.281718 -10.729686
2019-02-28 8.654076 -23.015387 17.448118 -7.612069
2019-03-31 3.190391 -2.493704 14.621079 -20.601407
2019-04-30 -3.224172 -3.840544 11.337694 -10.998913
2019-05-31 -1.724282 -8.778584 0.422137 5.828152
2019-06-30 -11.006192 11.447237 9.015907 5.024943
DataFrame 属性
| 属性 | 详解 |
|---|---|
| dtype | 查看数据类型 |
| index | 查看行序列或者索引 |
| columns | 查看各列的标签 |
| values | 查看数据框内的数据,也即不含表头索引的数据 |
| describe | 查看数据每一列的极值,均值,中位数,只可用于数值型数据 |
| transpose | 转置,也可用T来操作 |
| sort_index | 排序,可按行或列 index 排序输出 |
| sort_values | 按数据值来排序 |
# 查看数据类型
print(df2.dtypes)
0 float64
1 float64
2 float64
3 float64
dtype: object
df
c1
c2
c3
c4
2019-01-31
16.243454
-6.117564
-5.281718
-10.729686
2019-02-28
8.654076
-23.015387
17.448118
-7.612069
2019-03-31
3.190391
-2.493704
14.621079
-20.601407
2019-04-30
-3.224172
-3.840544
11.337694
-10.998913
2019-05-31
-1.724282
-8.778584
0.422137
5.828152
2019-06-30
-11.006192
11.447237
9.015907
5.024943
print(df.index)
DatetimeIndex(['2019-01-31', '2019-02-28', '2019-03-31', '2019-04-30',
'2019-05-31', '2019-06-30'],
dtype='datetime64[ns]', freq='M')
print(df.columns)
Index(['c1', 'c2', 'c3', 'c4'], dtype='object')
print(df.values)
[[ 16.24345364 -6.11756414 -5.28171752 -10.72968622]
[ 8.65407629 -23.01538697 17.44811764 -7.61206901]
[ 3.19039096 -2.49370375 14.62107937 -20.60140709]
[ -3.22417204 -3.84054355 11.33769442 -10.99891267]
[ -1.72428208 -8.77858418 0.42213747 5.82815214]
[-11.00619177 11.4472371 9.01590721 5.02494339]]
df.describe()
c1
c2
c3
c4
count
6.000000
6.000000
6.000000
6.000000
mean
2.022213
-5.466424
7.927203
-6.514830
std
9.580084
11.107772
8.707171
10.227641
min
-11.006192
-23.015387
-5.281718
-20.601407
25%
-2.849200
-8.113329
2.570580
-10.931606
50%
0.733054
-4.979054
10.176801
-9.170878
75%
7.288155
-2.830414
13.800233
1.865690
max
16.243454
11.447237
17.448118
5.828152
df.T
2019-01-31 00:00:00
2019-02-28 00:00:00
2019-03-31 00:00:00
2019-04-30 00:00:00
2019-05-31 00:00:00
2019-06-30 00:00:00
c1
16.243454
8.654076
3.190391
-3.224172
-1.724282
-11.006192
c2
-6.117564
-23.015387
-2.493704
-3.840544
-8.778584
11.447237
c3
-5.281718
17.448118
14.621079
11.337694
0.422137
9.015907
c4
-10.729686
-7.612069
-20.601407
-10.998913
5.828152
5.024943
# 按行标签[c1, c2, c3, c4]从大到小排序
df.sort_index(axis=0)
c1
c2
c3
c4
2019-01-31
16.243454
-6.117564
-5.281718
-10.729686
2019-02-28
8.654076
-23.015387
17.448118
-7.612069
2019-03-31
3.190391
-2.493704
14.621079
-20.601407
2019-04-30
-3.224172
-3.840544
11.337694
-10.998913
2019-05-31
-1.724282
-8.778584
0.422137
5.828152
2019-06-30
-11.006192
11.447237
9.015907
5.024943
# 按列标签[2019-01-01, 2019-01-02...]从大到小排序
df.sort_index(axis=1)
c1
c2
c3
c4
2019-01-31
16.243454
-6.117564
-5.281718
-10.729686
2019-02-28
8.654076
-23.015387
17.448118
-7.612069
2019-03-31
3.190391
-2.493704
14.621079
-20.601407
2019-04-30
-3.224172
-3.840544
11.337694
-10.998913
2019-05-31
-1.724282
-8.778584
0.422137
5.828152
2019-06-30
-11.006192
11.447237
9.015907
5.024943
# 按c2列的值从大到小排序
df.sort_values(by='c2')
c1
c2
c3
c4
2019-02-28
8.654076
-23.015387
17.448118
-7.612069
2019-05-31
-1.724282
-8.778584
0.422137
5.828152
2019-01-31
16.243454
-6.117564
-5.281718
-10.729686
2019-04-30
-3.224172
-3.840544
11.337694
-10.998913
2019-03-31
3.190391
-2.493704
14.621079
-20.601407
2019-06-30
-11.006192
11.447237
9.015907
5.024943
DataFrame 取值
df
c1
c2
c3
c4
2019-01-31
16.243454
-6.117564
-5.281718
-10.729686
2019-02-28
8.654076
-23.015387
17.448118
-7.612069
2019-03-31
3.190391
-2.493704
14.621079
-20.601407
2019-04-30
-3.224172
-3.840544
11.337694
-10.998913
2019-05-31
-1.724282
-8.778584
0.422137
5.828152
2019-06-30
-11.006192
11.447237
9.015907
5.024943
通过 columns 取值
df['c2']
2019-01-31 -6.117564
2019-02-28 -23.015387
2019-03-31 -2.493704
2019-04-30 -3.840544
2019-05-31 -8.778584
2019-06-30 11.447237
Freq: M, Name: c2, dtype: float64
df[['c2', 'c3']]
c2
c3
2019-01-31
-6.117564
-5.281718
2019-02-28
-23.015387
17.448118
2019-03-31
-2.493704
14.621079
2019-04-30
-3.840544
11.337694
2019-05-31
-8.778584
0.422137
2019-06-30
11.447237
9.015907
loc(通过行标签取值)
# 通过自定义的行标签选择数据
df.loc['2019-01-01':'2019-01-03']
c1
c2
c3
c4
df[0:3]
c1
c2
c3
c4
2019-01-31
16.243454
-6.117564
-5.281718
-10.729686
2019-02-28
8.654076
-23.015387
17.448118
-7.612069
2019-03-31
3.190391
-2.493704
14.621079
-20.601407
iloc(类似于 numpy 数组取值)
df.values
array([[ 16.24345364, -6.11756414, -5.28171752, -10.72968622],
[ 8.65407629, -23.01538697, 17.44811764, -7.61206901],
[ 3.19039096, -2.49370375, 14.62107937, -20.60140709],
[ -3.22417204, -3.84054355, 11.33769442, -10.99891267],
[ -1.72428208, -8.77858418, 0.42213747, 5.82815214],
[-11.00619177, 11.4472371 , 9.01590721, 5.02494339]])
# 通过行索引选择数据
print(df.iloc[2, 1])
-2.493703754774101
df.iloc[1:4, 1:4]
c2
c3
c4
2019-02-28
-23.015387
17.448118
-7.612069
2019-03-31
-2.493704
14.621079
-20.601407
2019-04-30
-3.840544
11.337694
-10.998913
使用逻辑判断取值
df[df['c1'] > 0]
c1
c2
c3
c4
2019-01-31
16.243454
-6.117564
-5.281718
-10.729686
2019-02-28
8.654076
-23.015387
17.448118
-7.612069
2019-03-31
3.190391
-2.493704
14.621079
-20.601407
df[(df['c1'] > 0) & (df['c2'] > -8)]
c1
c2
c3
c4
2019-01-31
16.243454
-6.117564
-5.281718
-10.729686
2019-03-31
3.190391
-2.493704
14.621079
-20.601407
DataFrame 值替换
df
c1
c2
c3
c4
2019-01-31
16.243454
-6.117564
-5.281718
-10.729686
2019-02-28
8.654076
-23.015387
17.448118
-7.612069
2019-03-31
3.190391
-2.493704
14.621079
-20.601407
2019-04-30
-3.224172
-3.840544
11.337694
-10.998913
2019-05-31
-1.724282
-8.778584
0.422137
5.828152
2019-06-30
-11.006192
11.447237
9.015907
5.024943
df.iloc[0:3, 0:2] = 0
df
c1
c2
c3
c4
2019-01-31
0.000000
0.000000
-5.281718
-10.729686
2019-02-28
0.000000
0.000000
17.448118
-7.612069
2019-03-31
0.000000
0.000000
14.621079
-20.601407
2019-04-30
-3.224172
-3.840544
11.337694
-10.998913
2019-05-31
-1.724282
-8.778584
0.422137
5.828152
2019-06-30
-11.006192
11.447237
9.015907
5.024943
df['c3'] > 10
2019-01-31 False
2019-02-28 True
2019-03-31 True
2019-04-30 True
2019-05-31 False
2019-06-30 False
Freq: M, Name: c3, dtype: bool
# 针对行做处理
df[df['c3'] > 10] = 100
df
# 针对行做处理
df = df.astype(np.int32)
df[df['c3'].isin([100])] = 1000
df
读取 CSV 文件
import pandas as pd
from io import StringIO
test_data = '''
5.1,,1.4,0.2
4.9,3.0,1.4,0.2
4.7,3.2,,0.2
7.0,3.2,4.7,1.4
6.4,3.2,4.5,1.5
6.9,3.1,4.9,
,,,
'''
test_data = StringIO(test_data)
df = pd.read_csv(test_data, header=None)
df.columns = ['c1', 'c2', 'c3', 'c4']
df
c1
c2
c3
c4
0
5.1
NaN
1.4
0.2
1
4.9
3.0
1.4
0.2
2
4.7
3.2
NaN
0.2
3
7.0
3.2
4.7
1.4
4
6.4
3.2
4.5
1.5
5
6.9
3.1
4.9
NaN
6
NaN
NaN
NaN
NaN
处理丢失数据
df.isnull()
c1
c2
c3
c4
0
False
True
False
False
1
False
False
False
False
2
False
False
True
False
3
False
False
False
False
4
False
False
False
False
5
False
False
False
True
6
True
True
True
True
# 通过在isnull()方法后使用sum()方法即可获得该数据集某个特征含有多少个缺失值
print(df.isnull().sum())
c1 1
c2 2
c3 2
c4 2
dtype: int64
# axis=0删除有NaN值的行
df.dropna(axis=0)
c1
c2
c3
c4
1
4.9
3.0
1.4
0.2
3
7.0
3.2
4.7
1.4
4
6.4
3.2
4.5
1.5
# axis=1删除有NaN值的列
df.dropna(axis=1)
# 删除全为NaN值得行或列
df.dropna(how='all')
# 删除行不为4个值的
df.dropna(thresh=4)
# 删除c2中有NaN值的行
df.dropna(subset=['c2'])
# 填充nan值
df.fillna(value=10)
合并数据
df1 = pd.DataFrame(np.zeros((3, 4)))
df1
df2 = pd.DataFrame(np.ones((3, 4)))
df2
# axis=0合并列
pd.concat((df1, df2), axis=0)
# axis=1合并行
pd.concat((df1, df2), axis=1)
# append只能合并列
df1.append(df2)
导入导出数据
使用 df = pd.read_excel(filename)读取文件,使用 df.to_excel(filename)保存文件。
读取文件导入数据
读取文件导入数据函数主要参数:
df = pd.read_excel(filename)
df = pd.read_csv(filename)
写入文件导出数据
写入文件函数的主要参数:
| 参数 | 详解 |
|---|---|
| sep | 指定分隔符,可用正则表达式如’\s+’ |
| header=None | 指定文件无行名 |
| name | 指定列名 |
| index_col | 指定某列作为索引 |
| skip_row | 指定跳过某些行 |
| na_values | 指定某些字符串表示缺失值 |
| parse_dates | 指定某些列是否被解析为日期,布尔值或列表 |
df.to_excel(filename)
pandas 读取 json 文件
strtext = '[{"ttery":"min","issue":"20130801-3391","code":"8,4,5,2,9","code1":"297734529","code2":null,"time":1013395466000},\
{"ttery":"min","issue":"20130801-3390","code":"7,8,2,1,2","code1":"298058212","code2":null,"time":1013395406000},\
{"ttery":"min","issue":"20130801-3389","code":"5,9,1,2,9","code1":"298329129","code2":null,"time":1013395346000},\
{"ttery":"min","issue":"20130801-3388","code":"3,8,7,3,3","code1":"298588733","code2":null,"time":1013395286000},\
{"ttery":"min","issue":"20130801-3387","code":"0,8,5,2,7","code1":"298818527","code2":null,"time":1013395226000}]'
df = pd.read_json(strtext, orient='records')
df
df.to_excel('pandas处理json.xlsx',
index=False,
columns=["ttery", "issue", "code", "code1", "code2", "time"])
orient 参数的五种形式
orient 是表明预期的 json 字符串格式。orient 的设置有以下五个值:
split: dict like {index -> [index], columns -> [columns], data -> [values]}
这种就是有索引,有列字段,和数据矩阵构成的 json 格式。key 名称只能是 index,columns 和 data。
s = '{"index":[1,2,3],"columns":["a","b"],"data":[[1,3],[2,8],[3,9]]}'
df = pd.read_json(s, orient='split')
df
records: list like [{column -> value}, … , {column -> value}]
这种就是成员为字典的列表。如我今天要处理的 json 数据示例所见。构成是列字段为键,值为键值,每一个字典成员就构成了 dataframe 的一行数据。
strtext = '[{"ttery":"min","issue":"20130801-3391","code":"8,4,5,2,9","code1":"297734529","code2":null,"time":1013395466000},\
{"ttery":"min","issue":"20130801-3390","code":"7,8,2,1,2","code1":"298058212","code2":null,"time":1013395406000}]'
df = pd.read_json(strtext, orient='records')
df
index: dict like {index -> {column -> value}}
以索引为 key,以列字段构成的字典为键值。如:
s = '{"0":{"a":1,"b":2},"1":{"a":9,"b":11}}'
df = pd.read_json(s, orient='index')
df
columns: dict like {column -> {index -> value}}
这种处理的就是以列为键,对应一个值字典的对象。这个字典对象以索引为键,以值为键值构成的 json 字符串。如下图所示:
s = '{"a":{"0":1,"1":9},"b":{"0":2,"1":11}}'
df = pd.read_json(s, orient='columns')
df
values: just the values array。
values 这种我们就很常见了。就是一个嵌套的列表。里面的成员也是列表,2 层的。
s = '[["a",1],["b",2]]'
df = pd.read_json(s, orient='values')
df
pandas 读取 sql 语句
import numpy as np
import pandas as pd
import pymysql
def conn(sql):
# 连接到mysql数据库
conn = pymysql.connect(
host="localhost",
port=3306,
user="root",
passwd="123",
db="db1",
)
try:
data = pd.read_sql(sql, con=conn)
return data
except Exception as e:
print("SQL is not correct!")
finally:
conn.close()
sql = "select * from test1 limit 0, 10" # sql语句
data = conn(sql)
print(data.columns.tolist()) # 查看字段
print(data) # 查看数据
matplotlib 模块
matplotlib 官方文档:https://matplotlib.org/contents.html?v=20190307135750
matplotlib 是一个绘图库,它可以创建常用的统计图,包括条形图、箱型图、折线图、散点图、饼图和直方图。
条形图
import matplotlib.pyplot as plt
from matplotlib.font_manager import FontProperties
%matplotlib inline
font = FontProperties(fname='/Library/Fonts/Heiti.ttc')
# 修改背景为条纹
plt.style.use('ggplot')
classes = ['3班', '4班', '5班', '6班']
classes_index = range(len(classes))
print(list(classes_index))
[0, 1, 2, 3]
student_amounts = [66, 55, 45, 70]
# 画布设置
fig = plt.figure()
# 1,1,1表示一张画布切割成1行1列共一张图的第1个;2,2,1表示一张画布切割成2行2列共4张图的第一个(左上角)
ax1 = fig.add_subplot(1, 1, 1)
ax1.bar(classes_index, student_amounts, align='center', color='darkblue')
ax1.xaxis.set_ticks_position('bottom')
ax1.yaxis.set_ticks_position('left')
plt.xticks(classes_index,
classes,
rotation=0,
fontsize=13,
fontproperties=font)
plt.xlabel('班级', fontproperties=font, fontsize=15)
plt.ylabel('学生人数', fontproperties=font, fontsize=15)
plt.title('班级-学生人数', fontproperties=font, fontsize=20)
# 保存图片,bbox_inches='tight'去掉图形四周的空白
# plt.savefig('classes_students.png', dpi=400, bbox_inches='tight')
plt.show()

直方图
import numpy as np
import matplotlib.pyplot as plt
from matplotlib.font_manager import FontProperties
%matplotlib inline
font = FontProperties(fname='/Library/Fonts/Heiti.ttc')
# 修改背景为条纹
plt.style.use('ggplot')
mu1, mu2, sigma = 50, 100, 10
# 构造均值为50的符合正态分布的数据
x1 = mu1 + sigma * np.random.randn(10000)
print(x1)
[59.00855949 43.16272141 48.77109774 ... 57.94645859 54.70312714
58.94125528]
# 构造均值为100的符合正态分布的数据
x2 = mu2 + sigma * np.random.randn(10000)
print(x2)
[115.19915511 82.09208214 110.88092454 ... 95.0872103 104.21549068
133.36025251]
fig = plt.figure()
ax1 = fig.add_subplot(121)
# bins=50表示每个变量的值分成50份,即会有50根柱子
ax1.hist(x1, bins=50, color='darkgreen')
ax2 = fig.add_subplot(122)
ax2.hist(x2, bins=50, color='orange')
fig.suptitle('两个正态分布', fontproperties=font, fontweight='bold', fontsize=15)
ax1.set_title('绿色的正态分布', fontproperties=font)
ax2.set_title('橙色的正态分布', fontproperties=font)
plt.show()

折线图
import numpy as np
from numpy.random import randn
import matplotlib.pyplot as plt
from matplotlib.font_manager import FontProperties
%matplotlib inline
font = FontProperties(fname='/Library/Fonts/Heiti.ttc')
# 修改背景为条纹
plt.style.use('ggplot')
np.random.seed(1)
# 使用numpy的累加和,保证数据取值范围不会在(0,1)内波动
plot_data1 = randn(40).cumsum()
print(plot_data1)
[ 1.62434536 1.01258895 0.4844172 -0.58855142 0.2768562 -2.02468249
-0.27987073 -1.04107763 -0.72203853 -0.97140891 0.49069903 -1.56944168
-1.89185888 -2.27591324 -1.1421438 -2.24203506 -2.41446327 -3.29232169
-3.25010794 -2.66729273 -3.76791191 -2.6231882 -1.72159748 -1.21910314
-0.31824719 -1.00197505 -1.12486527 -2.06063471 -2.32852279 -1.79816732
-2.48982807 -2.8865816 -3.5737543 -4.41895994 -5.09020607 -5.10287067
-6.22018102 -5.98576532 -4.32596314 -3.58391898]
plot_data2 = randn(40).cumsum()
plot_data3 = randn(40).cumsum()
plot_data4 = randn(40).cumsum()
plt.plot(plot_data1, marker='o', color='red', linestyle='-', label='红实线')
plt.plot(plot_data2, marker='x', color='orange', linestyle='--', label='橙虚线')
plt.plot(plot_data3, marker='*', color='yellow', linestyle='-.', label='黄点线')
plt.plot(plot_data4, marker='s', color='green', linestyle=':', label='绿点图')
# loc='best'给label自动选择最好的位置
plt.legend(loc='best', prop=font)
plt.show()
散点图+直线图
import numpy as np
from numpy.random import randn
import matplotlib.pyplot as plt
from matplotlib.font_manager import FontProperties
%matplotlib inline
font = FontProperties(fname='/Library/Fonts/Heiti.ttc')
# 修改背景为条纹
plt.style.use('ggplot')
x = np.arange(1, 20, 1)
print(x)
[ 1 2 3 4 5 6 7 8 9 10 11 12 13 14 15 16 17 18 19]
# 拟合一条水平散点线
np.random.seed(1)
y_linear = x + 10 * np.random.randn(19)
print(y_linear)
[ 17.24345364 -4.11756414 -2.28171752 -6.72968622 13.65407629
-17.01538697 24.44811764 0.38793099 12.19039096 7.50629625
25.62107937 -8.60140709 9.77582796 10.15945645 26.33769442
5.00108733 15.27571792 9.22141582 19.42213747]
# 拟合一条x²的散点线
y_quad = x**2 + 10 * np.random.randn(19)
print(y_quad)
[ 6.82815214 -7.00619177 20.4472371 25.01590721 30.02494339
45.00855949 42.16272141 62.77109774 71.64230566 97.3211192
126.30355467 137.08339248 165.03246473 189.128273 216.54794359
249.28753869 288.87335401 312.82689651 363.34415698]
# s是散点大小
fig = plt.figure()
ax1 = fig.add_subplot(121)
plt.scatter(x, y_linear, s=30, color='r', label='蓝点')
plt.scatter(x, y_quad, s=100, color='b', label='红点')
ax2 = fig.add_subplot(122)
plt.plot(x, y_linear, color='r')
plt.plot(x, y_quad, color='b')
# 限制x轴和y轴的范围取值
plt.xlim(min(x) - 1, max(x) + 1)
plt.ylim(min(y_quad) - 10, max(y_quad) + 10)
fig.suptitle('散点图+直线图', fontproperties=font, fontsize=20)
ax1.set_title('散点图', fontproperties=font)
ax1.legend(prop=font)
ax2.set_title('直线图', fontproperties=font)
plt.show()

饼图
import numpy as np
import matplotlib.pyplot as plt
from pylab import mpl
mpl.rcParams['font.sans-serif'] = ['SimHei']
fig, ax = plt.subplots(subplot_kw=dict(aspect="equal"))
recipe = ['优', '良', '轻度污染', '中度污染', '重度污染', '严重污染', '缺']
data = [2, 49, 21, 9, 11, 6, 2]
colors = ['lime', 'yellow', 'darkorange', 'red', 'purple', 'maroon', 'grey']
wedges, texts, texts2 = ax.pie(data,
wedgeprops=dict(width=0.5),
startangle=40,
colors=colors,
autopct='%1.0f%%',
pctdistance=0.8)
plt.setp(texts2, size=14, weight="bold")
bbox_props = dict(boxstyle="square,pad=0.3", fc="w", ec="k", lw=0.72)
kw = dict(xycoords='data',
textcoords='data',
arrowprops=dict(arrowstyle="->"),
bbox=None,
zorder=0,
va="center")
for i, p in enumerate(wedges):
ang = (p.theta2 - p.theta1) / 2. + p.theta1
y = np.sin(np.deg2rad(ang))
x = np.cos(np.deg2rad(ang))
horizontalalignment = {-1: "right", 1: "left"}[int(np.sign(x))]
connectionstyle = "angle,angleA=0,angleB={}".format(ang)
kw["arrowprops"].update({"connectionstyle": connectionstyle})
ax.annotate(recipe[i],
xy=(x, y),
xytext=(1.25 * np.sign(x), 1.3 * y),
size=16,
horizontalalignment=horizontalalignment,
fontproperties=font,
**kw)
ax.set_title("饼图示例",fontproperties=font)
plt.show()
# plt.savefig('jiaopie2.png')

箱型图
箱型图:又称为盒须图、盒式图、盒状图或箱线图,是一种用作显示一组数据分散情况资料的统计图(在数据分析中常用在异常值检测)
包含一组数据的:最大值、最小值、中位数、上四分位数(Q3)、下四分位数(Q1)、异常值
- 中位数 → 一组数据平均分成两份,中间的数
- 上四分位数 Q1 → 是将序列平均分成四份,计算(n+1)/4 与(n-1)/4 两种,一般使用(n+1)/4
- 下四分位数 Q3 → 是将序列平均分成四份,计算(1+n)/4*3=6.75
- 内限 → T 形的盒须就是内限,最大值区间 Q3+1.5IQR,最小值区间 Q1-1.5IQR (IQR=Q3-Q1)
- 外限 → T 形的盒须就是内限,最大值区间 Q3+3IQR,最小值区间 Q1-3IQR (IQR=Q3-Q1)
- 异常值 → 内限之外 – 中度异常,外限之外 – 极度异常
import numpy as np
import pandas as pd
from numpy.random import randn
import matplotlib.pyplot as plt
from matplotlib.font_manager import FontProperties
%matplotlib inline
font = FontProperties(fname='/Library/Fonts/Heiti.ttc')
df = pd.DataFrame(np.random.rand(10, 5), columns=['A', 'B', 'C', 'D', 'E'])
plt.figure(figsize=(10, 4))
# 创建图表、数据
f = df.boxplot(
sym='o', # 异常点形状,参考marker
vert=True, # 是否垂直
whis=1.5, # IQR,默认1.5,也可以设置区间比如[5,95],代表强制上下边缘为数据95%和5%位置
patch_artist=True, # 上下四分位框内是否填充,True为填充
meanline=False,
showmeans=True, # 是否有均值线及其形状
showbox=True, # 是否显示箱线
showcaps=True, # 是否显示边缘线
showfliers=True, # 是否显示异常值
notch=False, # 中间箱体是否缺口
return_type='dict' # 返回类型为字典
)
plt.title('boxplot')
for box in f['boxes']:
box.set(color='b', linewidth=1) # 箱体边框颜色
box.set(facecolor='b', alpha=0.5) # 箱体内部填充颜色
for whisker in f['whiskers']:
whisker.set(color='k', linewidth=0.5, linestyle='-')
for cap in f['caps']:
cap.set(color='gray', linewidth=2)
for median in f['medians']:
median.set(color='DarkBlue', linewidth=2)
for flier in f['fliers']:
flier.set(marker='o', color='y', alpha=0.5)
# boxes, 箱线
# medians, 中位值的横线,
# whiskers, 从box到error bar之间的竖线.
# fliers, 异常值
# caps, error bar横线
# means, 均值的横线
plot 函数参数
- 线型 linestyle(-,-.,–,…)
- 点型 marker(v,^,s,*,H,+,x,D,o,…)
- 颜色 color(b,g,r,y,k,w,…)
图像标注参数
- 设置图像标题:plt.title()
- 设置 x 轴名称:plt.xlabel()
- 设置 y 轴名称:plt.ylabel()
- 设置 X 轴范围:plt.xlim()
- 设置 Y 轴范围:plt.ylim()
- 设置 X 轴刻度:plt.xticks()
- 设置 Y 轴刻度:plt.yticks()
- 设置曲线图例:plt.legend()
Matplolib 应用
import pandas as pd
import matplotlib.pyplot as plt
from matplotlib.font_manager import FontProperties
%matplotlib inline
# 找到自己电脑的字体路径,然后修改字体路径
font = FontProperties(fname='/Library/Fonts/Heiti.ttc')
header_list = ['方程组', '函数', '导数', '微积分', '线性代数', '概率论', '统计学']
py3_df = pd.read_excel('py3.xlsx', header=None,
skiprows=[0, 1], names=header_list)
# 处理带有NaN的行
py3_df = py3_df.dropna(axis=0)
print(py3_df)
# 自定义映射
map_dict = {
'不会': 0,
'了解': 1,
'熟悉': 2,
'使用过': 3,
}
for header in header_list:
py3_df[header] = py3_df[header].map(map_dict)
unable_series = (py3_df == 0).sum(axis=0)
know_series = (py3_df == 1).sum(axis=0)
familiar_series = (py3_df == 2).sum(axis=0)
use_series = (py3_df == 3).sum(axis=0)
unable_label = '不会'
know_label = '了解'
familiar_label = '熟悉'
use_label = '使用过'
for i in range(len(header_list)):
bottom = 0
# 描绘不会的条形图
plt.bar(x=header_list[i], height=unable_series[i],
width=0.60, color='r', label=unable_label)
if unable_series[i] != 0:
plt.text(header_list[i], bottom, s=unable_series[i],
ha='center', va='bottom', fontsize=15, color='white')
bottom += unable_series[i]
# 描绘了解的条形图
plt.bar(x=header_list[i], height=know_series[i],
width=0.60, color='y', bottom=bottom, label=know_label)
if know_series[i] != 0:
plt.text(header_list[i], bottom, s=know_series[i],
ha='center', va='bottom', fontsize=15, color='white')
bottom += know_series[i]
# 描绘熟悉的条形图
plt.bar(x=header_list[i], height=familiar_series[i],
width=0.60, color='g', bottom=bottom, label=familiar_label)
if familiar_series[i] != 0:
plt.text(header_list[i], bottom, s=familiar_series[i],
ha='center', va='bottom', fontsize=15, color='white')
bottom += familiar_series[i]
# 描绘使用过的条形图
plt.bar(x=header_list[i], height=use_series[i],
width=0.60, color='b', bottom=bottom, label=use_label)
if use_series[i] != 0:
plt.text(header_list[i], bottom, s=use_series[i],
ha='center', va='bottom', fontsize=15, color='white')
unable_label = know_label = familiar_label = use_label = ''
plt.xticks(header_list, fontproperties=font)
plt.ylabel('人数', fontproperties=font)
plt.title('Python3期数学摸底可视化', fontproperties=font)
plt.legend(prop=font, loc='upper left')
plt.show()
方程组 函数 导数 微积分 线性代数 概率论 统计学
0 使用过 使用过 不会 不会 不会 不会 不会
1 使用过 使用过 了解 不会 不会 不会 不会
2 使用过 使用过 熟悉 不会 不会 不会 不会
3 熟悉 熟悉 熟悉 了解 了解 了解 了解
4 使用过 使用过 使用过 使用过 使用过 使用过 使用过
5 使用过 使用过 使用过 不会 不会 不会 了解
6 熟悉 熟悉 熟悉 熟悉 熟悉 熟悉 不会
7 使用过 使用过 使用过 使用过 使用过 使用过 使用过
8 熟悉 熟悉 熟悉 熟悉 熟悉 使用过 使用过
9 熟悉 熟悉 使用过 不会 使用过 使用过 不会
10 使用过 使用过 熟悉 熟悉 熟悉 熟悉 熟悉
11 使用过 使用过 使用过 使用过 使用过 不会 不会
12 使用过 使用过 使用过 使用过 使用过 使用过 使用过
13 使用过 使用过 了解 不会 不会 不会 不会
14 使用过 使用过 使用过 使用过 使用过 不会 不会
15 使用过 使用过 熟悉 不会 不会 不会 不会
16 熟悉 熟悉 使用过 使用过 使用过 不会 不会
17 使用过 使用过 使用过 了解 不会 不会 不会
18 使用过 使用过 使用过 使用过 熟悉 熟悉 熟悉
19 使用过 使用过 使用过 了解 不会 不会 不会
20 使用过 使用过 使用过 使用过 使用过 使用过 使用过
21 使用过 使用过 使用过 使用过 使用过 使用过 使用过
22 使用过 很了解 熟悉 了解一点,不会运用 了解一点,不会运用 了解 不会
23 使用过 使用过 使用过 使用过 熟悉 使用过 熟悉
24 熟悉 熟悉 熟悉 使用过 不会 不会 不会
25 使用过 使用过 使用过 使用过 使用过 使用过 使用过
26 使用过 使用过 使用过 使用过 使用过 不会 不会
27 使用过 使用过 不会 不会 不会 不会 不会
28 使用过 使用过 使用过 使用过 使用过 使用过 了解
29 使用过 使用过 使用过 使用过 使用过 了解 不会
30 使用过 使用过 使用过 使用过 使用过 不会 不会
31 使用过 使用过 使用过 使用过 不会 使用过 使用过
32 熟悉 熟悉 使用过 使用过 使用过 不会 不会
33 使用过 使用过 使用过 使用过 熟悉 使用过 熟悉
34 熟悉 熟悉 熟悉 使用过 使用过 熟悉 不会
35 使用过 使用过 使用过 使用过 使用过 使用过 使用过
36 使用过 使用过 使用过 使用过 使用过 使用过 了解
37 使用过 使用过 使用过 使用过 使用过 不会 不会
38 使用过 使用过 使用过 不会 不会 不会 不会
39 使用过 使用过 不会 不会 不会 不会 不会
40 使用过 使用过 使用过 使用过 使用过 不会 不会
41 使用过 使用过 熟悉 了解 了解 了解 不会
42 使用过 使用过 使用过 不会 不会 不会 不会
43 熟悉 使用过 了解 了解 不会 不会 不会
re 模块
正则表达式
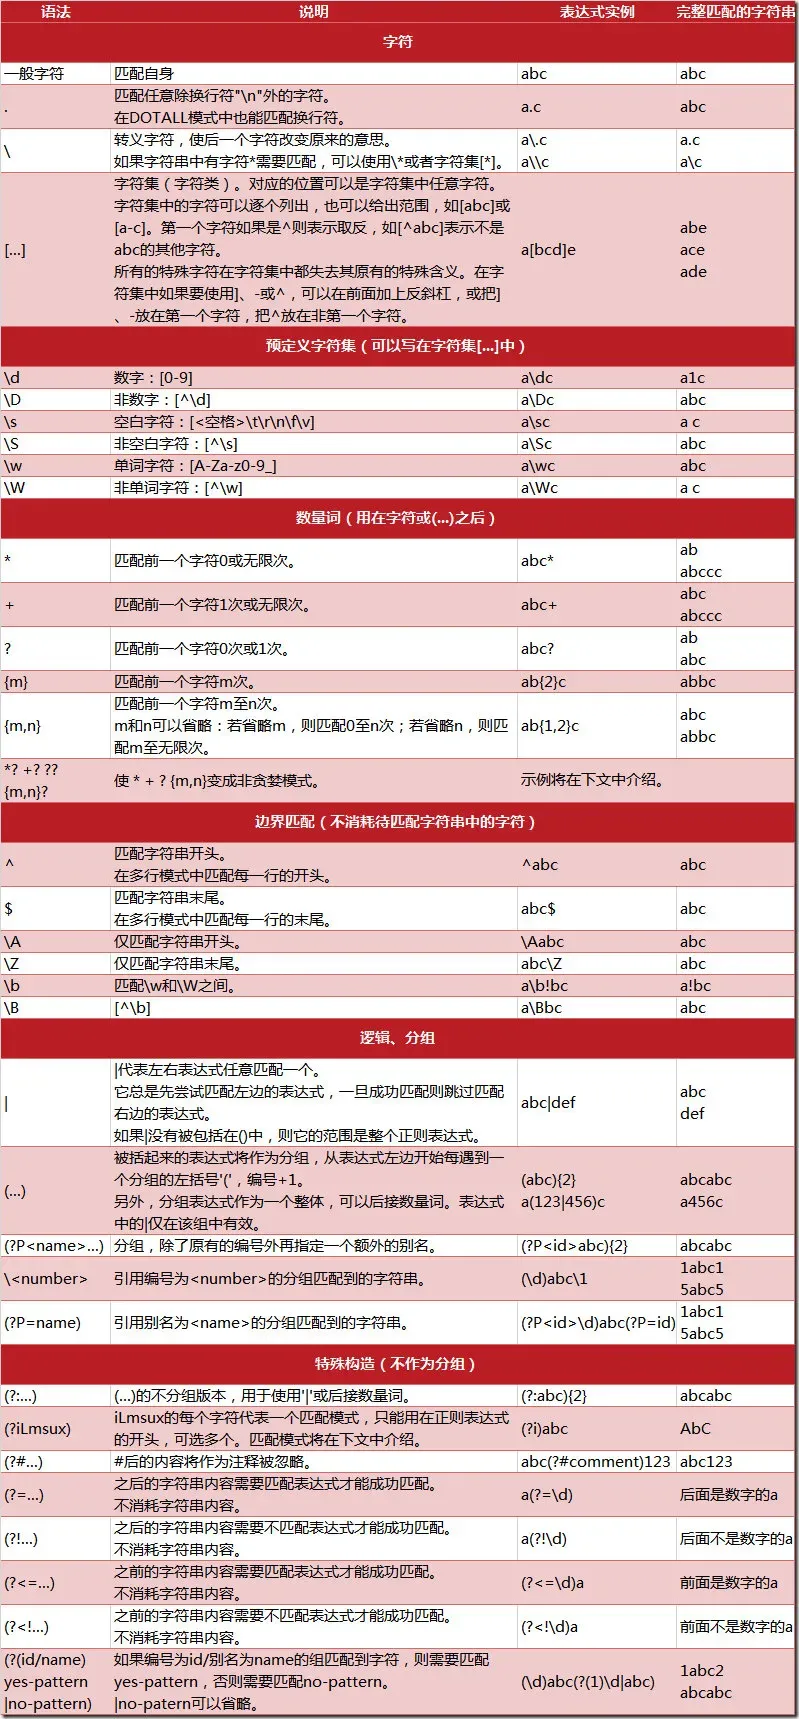
正则表达式本身是一种小型的、高度专业化的编程语言,它并不是 Python 的一部分。正则表达式是用于处理字符串的强大工具,拥有自己独特的语法以及一个独立的处理引擎,效率上可能不如 str 自带的方法,但功能十分强大。得益于这一点,在提供了正则表达式的语言里,正则表达式的语法都是一样的,区别只在于不同的编程语言实现支持的语法数量不同;但不用担心,不被支持的语法通常是不常用的部分。如果已经在其他语言里使用过正则表达式,只需要简单看一看就可以上手了。而在 python 中,通过内嵌集成 re 模块,程序员们可以直接调用来实现正则匹配。正则表达式模式被编译成一系列的字节码,然后由用 C 编写的匹配引擎执行。
下图展示了使用正则表达式进行匹配的流程:

正则表达式的大致匹配过程是:依次拿出表达式和文本中的字符比较,如果每一个字符都能匹配,则匹配成功;一旦有匹配不成功的字符则匹配失败。如果表达式中有量词或边界,这个过程会稍微有一些不同,但也是很好理解的,看下图中的示例以及自己多使用几次就能明白。
下图列出了 Python 支持的正则表达式元字符和语法:
数量词的贪婪模式与非贪婪模式
正则表达式通常用于在文本中查找匹配的字符串。Python 里数量词默认是贪婪的(在少数语言里也可能是默认非贪婪),总是尝试匹配尽可能多的字符;非贪婪的则相反,总是尝试匹配尽可能少的字符。例如:正则表达式”ab*”如果用于查找”abbbc”,将找到”abbb”。而如果使用非贪婪的数量词”ab*?”,将找到”a”。
反斜杠的困扰
与大多数编程语言相同,正则表达式里使用\作为转义字符,这就可能造成反斜杠困扰。假如你需要匹配文本中的字符\,那么使用编程语言表示的正则表达式里将需要 4 个反斜杠\\\\:前两个和后两个分别用于在编程语言里转义成反斜杠,转换成两个反斜杠后再在正则表达式里转义成一个反斜杠。Python 里的原生字符串很好地解决了这个问题,这个例子中的正则表达式可以使用r'\\'表示。同样,匹配一个数字的\\d可以写成r'\d'。有了原生字符串,你再也不用担心是不是漏写了反斜杠,写出来的表达式也更直观。
匹配模式
正则表达式提供了一些可用的匹配模式,比如忽略大小写、多行匹配等,这部分内容将在 Pattern 类的工厂方法 re.compile(pattern[, flags])中一起介绍。
re 模块的基本使用
正则表达式是用来匹配处理字符串的 python 中使用正则表达式需要引入 re 模块
import re # 第一步,要引入re模块
a = re.findall("匹配规则", "这个字符串是否有匹配规则的字符") # 第二步,调用模块函数
print(a) # 以列表形式返回匹配到的字符串
['匹配规则']
^元字符
字符串开始位置与匹配规则符合就匹配,否则不匹配
匹配字符串开头。在多行模式中匹配每一行的开头(Python3+已经失效,配合 compile 使用)
^元字符如果写到[]字符集里就是反取
import re
a = re.findall("^匹配规则", "匹配规则这个字符串是否匹配") # 字符串开始位置与匹配规则符合就匹配,否则不匹配
print(a)
#打印出 ['匹配规则']
['匹配规则']
[^a-z]反取
匹配出除字母外的字符,^元字符如果写到字符集里就是反取
import re
a = re.findall("[^a-z]", "匹配s规则这s个字符串是否s匹配f规则则re则则则") # 反取,匹配出除字母外的字符
print(a)
['匹', '配', '规', '则', '这', '个', '字', '符', '串', '是', '否', '匹', '配', '规', '则', '则', '则', '则', '则']
$元字符
字符串结束位置与匹配规则符合就匹配,否则不匹配
匹配字符串末尾,在多行模式中匹配每一行的末尾
import re
a = re.findall("匹配规则$", "这个字符串是否匹配规则") # 字符串结束位置与匹配规则符合就匹配,否则不匹配
print(a)
['匹配规则']
*元字符
需要字符串里完全符合,匹配规则,就匹配,(规则里的元字符)前面的一个字符可以是 0 个或多个原本字符
匹配前一个字符 0 或多次,贪婪匹配前导字符有多少个就匹配多少个很贪婪
如果规则里只有一个分组,尽量避免用否则会有可能匹配出空字符串
import re
# 需要字符串里完全符合,匹配规则,就匹配,(规则里的*元字符)前面的一个字符可以是0或多个原本字符
a = re.findall("匹配规则*", "这个字符串是否匹配规则则则则则")
print(a)
['匹配规则则则则则']
+元字符
需要字符串里完全符合,匹配规则,就匹配,(规则里的+元字符)前面的一个字符可以是 1 个或多个原本字符
匹配前一个字符 1 次或无限次,贪婪匹配前导字符有多少个就匹配多少个很贪婪
import re
# 需要字符串里完全符合,匹配规则,就匹配,(规则里的+元字符)前面的一个字符可以是1个或多个原本字符
a = re.findall("匹配+", "匹配配配配配规则这个字符串是否匹配规则则则则则")
print(a)
['匹配配配配配', '匹配']
?元字符(防止贪婪匹配)
需要字符串里完全符合,匹配规则,就匹配,(规则里的?元字符)前面的一个字符可以是 0 个或 1 个原本字符
匹配一个字符 0 次或 1 次
还有一个功能是可以防止贪婪匹配,详情见防贪婪匹配
import re
# 需要字符串里完全符合,匹配规则,就匹配,(规则里的?元字符)前面的一个字符可以是0个或1个原本字符
a = re.findall("匹配规则?", "匹配规这个字符串是否匹配规则则则则则")
print(a)
['匹配规', '匹配规则']
{}元字符(范围)
需要字符串里完全符合,匹配规则,就匹配,(规则里的 {} 元字符)前面的一个字符,是自定义字符数,位数的原本字符
{m}匹配前一个字符 m 次,{m,n}匹配前一个字符 m 至 n 次,若省略 n,则匹配 m 至无限次
{0,}匹配前一个字符 0 或多次,等同于*元字符{+,}匹配前一个字符 1 次或无限次,等同于+元字符{0,1}匹配前一个字符 0 次或 1 次,等同于?元字符
import re
# {m}匹配前一个字符m次,{m,n}匹配前一个字符m至n次,若省略n,则匹配m至无限次
a = re.findall("匹配规则{3}", "匹配规这个字符串是否匹配规则则则则则")
print(a)
['匹配规则则则']
[]元字符(字符集)
需要字符串里完全符合,匹配规则,就匹配,(规则里的 [] 元字符)对应位置是[]里的任意一个字符就匹配
字符集。对应的位置可以是字符集中任意字符。字符集中的字符可以逐个列出,也可以给出范围,如[abc]或[a-c]。[^abc]表示取反,即非 abc。所有特殊字符在字符集中都失去其原有的特殊含义。用\反斜杠转义恢复特殊字符的特殊含义。
import re
# 需要字符串里完全符合,匹配规则,就匹配,(规则里的 [] 元字符)对应位置是[]里的任意一个字符就匹配
a = re.findall("匹配[a,b,c]规则", "匹配a规则这个字符串是否匹配b规则则则则则")
print(a)
['匹配a规则', '匹配b规则']
[^]
非,反取,匹配出除[]里面的字符,元字符如果写到字符集里就是反取
import re
a = re.findall("[^a-z]", "匹配s规则这s个字符串是否s匹配f规则则re则则则") # 反取,匹配出除字母外的字符
print(a)
['匹', '配', '规', '则', '这', '个', '字', '符', '串', '是', '否', '匹', '配', '规', '则', '则', '则', '则', '则']
反斜杠后边跟普通字符实现特殊功能(预定义字符)
预定义字符是在字符集和组里都是有用的
\d 匹配任何十进制数,它相当于类[0-9]
import re
a = re.findall("\d", "匹配规则这2个字符串3是否匹配规则5则则则7则") # \d匹配任何十进制数,它相当于类[0-9]
print(a)
['2', '3', '5', '7']
\d+
匹配一位或者多位数的数字时用
import re
a = re.findall("\d+", "匹配规则这2个字符串134444是否匹配规则5则则则7则") # \d+如果需要匹配一位或者多位数的数字时用
print(a)
['2', '134444', '5', '7']
\D
匹配任何非数字字符,它相当于类[^0-9]
import re
a = re.findall("\D", "匹配规则这2个字符串3是否匹配规则5则则则7则") # \D匹配任何非数字字符,它相当于类[^0-9]
print(a)
['匹', '配', '规', '则', '这', '个', '字', '符', '串', '是', '否', '匹', '配', '规', '则', '则', '则', '则', '则']
\s
匹配任何空白字符,它相当于类[\t\n\r\f\v]
import re
# \s匹配任何空白字符,它相当于类[\t\n\r\f\v]
a = re.findall("\s", "匹配规则 这2个字符串3是否匹\n配规则5则则则7则")
print(a)
[' ', ' ', ' ', '\n']
\S
匹配任何非空白字符,它相当于类[^\t\n\r\f\v]
import re
# \S匹配任何非空白字符,它相当于类[^\t\n\r\f\v]
a = re.findall("\S", "匹配规则 这2个字符串3是否匹\n配规则5则则则7则")
print(a)
['匹', '配', '规', '则', '这', '2', '个', '字', '符', '串', '3', '是', '否', '匹', '配', '规', '则', '5', '则', '则', '则', '7', '则']
\w
匹配包括下划线在内任何字母数字字符,它相当于类[a-zA-Z0-9_]
import re
# \w匹配包括下划线在内任何字母数字字符,它相当于类[a-zA-Z0-9_]
a = re.findall('\w', "https://www.cnblogs.com/")
print(a)
['h', 't', 't', 'p', 's', 'w', 'w', 'w', 'c', 'n', 'b', 'l', 'o', 'g', 's', 'c', 'o', 'm']
\W
匹配非任何字母数字字符包括下划线在内,它相当于类[^a-za-z0-9_]
import re
# \w匹配包括下划线在内任何字母数字字符,它相当于类[a-zA-Z0-9_]
a = re.findall('\W', "https://www.cnblogs.com/")
print(a)
[':', '/', '/', '.', '.', '/']
()元字符(分组)
也就是分组匹配,()里面的为一个组也可以理解成一个整体
如果()后面跟的是特殊元字符如 (adc)* 那么*控制的前导字符就是()里的整体内容,不再是前导一个字符
import re
# 也就是分组匹配,()里面的为一个组也可以理解成一个整体
a = re.search("(a4)+", "a4a4a4a4a4dg4g654gb") # 匹配一个或多个a4
b = a.group()
print(b)
a4a4a4a4a4
import re
# 也就是分组匹配,()里面的为一个组也可以理解成一个整体
# 匹配 (a) (\d0-9的数字) (+可以是1个到多个0-9的数字)
a = re.search("a(\d+)", "a466666664a4a4a4dg4g654gb")
b = a.group()
print(b)
a466666664
|元字符(或)
|或,或就是前后其中一个符合就匹配
import re
a = re.findall(r"你|好", "a4a4a你4aabc4a4dgg好dg4g654g") # |或,或就是前后其中一个符合就匹配
print(a)
['你', '好']
re 模块中常用功能函数
正则表达式的两种书写方式
-
一种是直接在函数里书写规则,推荐使用
import re a = re.findall("匹配规则", "这个字符串是否有匹配规则的字符") print(a) ['匹配规则'] -
另一种是先将正则表达式的字符串形式编译为 Pattern 实例,然后使用 Pattern 实例处理文本并获得匹配结果(一个 Match 实例),最后使用 Match 实例获得信息,进行其他的操作。
import re # 将正则表达式编译成Pattern对象 pattern = re.compile(r'hello') # 使用Pattern匹配文本,获得匹配结果,无法匹配时将返回None match = pattern.match('hello world!') if match: # 使用Match获得分组信息 print(match.group()) hello
re.compile(strPattern[, flag])函数
这个方法是 Pattern 类的工厂方法,用于将字符串形式的正则表达式编译为 Pattern 对象。 第二个参数 flag 是匹配模式,取值可以使用按位或运算符’|’表示同时生效,比如 re.I | re.M。另外,你也可以在 regex 字符串中指定模式,比如 re.compile(‘pattern’, re.I | re.M)与 re.compile(‘(?im)pattern’)是等价的。
下表是所有的正则匹配模式:
| 修饰符 | 描述 |
|---|---|
| re.I | 使匹配对大小写不敏感 |
| re.L | 做本地化识别(locale-aware)匹配 |
| re.M | 多行匹配,影响 ^ 和 $ |
| re.S | 使 . 匹配包括换行在内的所有字符 |
| re.U | 根据 Unicode 字符集解析字符。这个标志影响 \w, \W, \b, \B. |
| re.X | 该标志通过给予你更灵活的格式以便你将正则表达式写得更易于理解。 |
re.S
在 Python 的正则表达式中,有一个参数为 re.S。它表示 “.” 的作用扩展到整个字符串,包括“\n”。看如下代码:
import re
a = '''asdfhellopass:
worldaf
'''
b = re.findall('hello(.*?)world', a)
c = re.findall('hello(.*?)world', a, re.S)
print('b is ', b)
print('c is ', c)
b is []
c is ['pass:\n ']
正则表达式中,“.”的作用是匹配除“\n”以外的任何字符,也就是说,它是在一行中进行匹配。这里的“行”是以“\n”进行区分的。a 字符串有每行的末尾有一个“\n”,不过它不可见。
如果不使用 re.S 参数,则只在每一行内进行匹配,如果一行没有,就换下一行重新开始,不会跨行。而使用 re.S 参数以后,正则表达式会将这个字符串作为一个整体,将“\n”当做一个普通的字符加入到这个字符串中,在整体中进行匹配。
re.I
不区分大小写
res = re.findall(r"A", "abc", re.I)
print(res)
['a']
re.M
将所有行的尾字母输出(python3+已经无效)
s = '12 34/n56 78/n90'
re.findall(r'^/d+', s, re.M) # 匹配位于行首的数字 # ['12', '56', '90']
re.findall(r'/A/d+', s, re.M) # 匹配位于字符串开头的数字 # ['12']
re.findall(r'/d+$', s, re.M) # 匹配位于行尾的数字 # ['34', '78', '90']
re.findall(r'/d+/Z', s, re.M) # 匹配位于字符串尾的数字 # ['90']
re.sub
# 要求结果:['12', '23', '34']
l = ['1 2 ', '2 3', ' 3 4']
import re
print(eval(re.sub(r'\s*', '', str(l))))
['12', '23', '34']
re.match(pattern, string[, flags])函数(常用)
match,从头匹配一个符合规则的字符串,从起始位置开始匹配,匹配成功返回一个对象,未匹配成功返回 Nonematch(pattern, string, flags=0)
- pattern: 正则模型
- string : 要匹配的字符串
- falgs : 匹配模式
注意:match()函数 与 search()函数基本是一样的功能,不一样的就是 match()匹配字符串开始位置的一个符合规则的字符串,search()是在字符串全局匹配第一个合规则的字符串
import re
# 无分组
origin = "hello egon bcd egon lge egon acd 19"
r = re.match("h\w+", origin) # match,从起始位置开始匹配,匹配成功返回一个对象,未匹配成功返回None
print(r.group()) # 获取匹配到的所有结果,不管有没有分组将匹配到的全部拿出来
print(r.groups()) # 获取模型中匹配到的分组结果,只拿出匹配到的字符串中分组部分的结果
print(r.groupdict()) # 获取模型中匹配到的分组结果,只拿出匹配到的字符串中分组部分定义了key的组结果
hello
()
{}
# 有分组
# 为何要有分组?提取匹配成功的指定内容(先匹配成功全部正则,再匹配成功的局部内容提取出来)
r = re.match("h(\w+)", origin) # match,从起始位置开始匹配,匹配成功返回一个对象,未匹配成功返回None
print(r.group()) # 获取匹配到的所有结果,不管有没有分组将匹配到的全部拿出来
print(r.groups()) # 获取模型中匹配到的分组结果,只拿出匹配到的字符串中分组部分的结果
print(r.groupdict()) # 获取模型中匹配到的分组结果,只拿出匹配到的字符串中分组部分定义了key的组结果
hello
('ello',)
{}
# 有两个分组定义了key
# 为何要有分组?提取匹配成功的指定内容(先匹配成功全部正则,再匹配成功的局部内容提取出来)
# ?P<>定义组里匹配内容的key(键),<>里面写key名称,值就是匹配到的内容
r = re.match("(?P<n1>h)(?P<n2>\w+)", origin)
print(r.group()) # 获取匹配到的所有结果,不管有没有分组将匹配到的全部拿出来
print(r.groups()) # 获取模型中匹配到的分组结果,只拿出匹配到的字符串中分组部分的结果
print(r.groupdict()) # 获取模型中匹配到的分组结果,只拿出匹配到的字符串中分组部分定义了key的组结果
hello
('h', 'ello')
{'n1': 'h', 'n2': 'ello'}
分组函数
?P<n1> # ?P<>定义组里匹配内容的 key(键),<>里面写 key 名称,值就是匹配到的内容(只对正则函数返回对象时有用)
取出匹配对象方法
只对正则函数返回对象的有用
- group() 获取匹配到的所有结果,不管有没有分组将匹配到的全部拿出来,有参取匹配到的第几个如 2
- groups() 获取模型中匹配到的分组结果,只拿出匹配到的字符串中分组部分的结果
- groupdict() 获取模型中匹配到的分组结果,只拿出匹配到的字符串中分组部分定义了 key 的组结果
re.search(pattern, string[, flags])函数
search,浏览全部字符串,匹配第一符合规则的字符串,浏览整个字符串去匹配第一个,未匹配成功返回 None
search(pattern, string, flags=0)
- pattern: 正则模型
- string : 要匹配的字符串
- falgs : 匹配模式
注意:match()函数 与 search()函数基本是一样的功能,不一样的就是 match()匹配字符串开始位置的一个符合规则的字符串,search()是在字符串全局匹配第一个合规则的字符串
import re
# 无分组
origin = "hello alex bcd alex lge alex acd 19"
# search浏览全部字符串,匹配第一符合规则的字符串,浏览整个字符串去匹配第一个,未匹配成功返回None
r = re.search("a\w+", origin)
print(r.group()) # 获取匹配到的所有结果,不管有没有分组将匹配到的全部拿出来
print(r.groups()) # 获取模型中匹配到的分组结果,只拿出匹配到的字符串中分组部分的结果
print(r.groupdict()) # 获取模型中匹配到的分组结果,只拿出匹配到的字符串中分组部分定义了key的组结果
alex
()
{}
# 有分组
# 为何要有分组?提取匹配成功的指定内容(先匹配成功全部正则,再匹配成功的局部内容提取出来)
r = re.search("a(\w+).*(\d)", origin)
print(r.group()) # 获取匹配到的所有结果,不管有没有分组将匹配到的全部拿出来
print(r.groups()) # 获取模型中匹配到的分组结果,只拿出匹配到的字符串中分组部分的结果
print(r.groupdict()) # 获取模型中匹配到的分组结果,只拿出匹配到的字符串中分组部分定义了key的组结果
alex bcd alex lge alex acd 19
('lex', '9')
{}
# 有两个分组定义了key
# 为何要有分组?提取匹配成功的指定内容(先匹配成功全部正则,再匹配成功的局部内容提取出来)
# ?P<>定义组里匹配内容的key(键),<>里面写key名称,值就是匹配到的内容
r = re.search("a(?P<n1>\w+).*(?P<n2>\d)", origin)
print(r.group()) # 获取匹配到的所有结果,不管有没有分组将匹配到的全部拿出来
print(r.groups()) # 获取模型中匹配到的分组结果,只拿出匹配到的字符串中分组部分的结果
print(r.groupdict()) # 获取模型中匹配到的分组结果,只拿出匹配到的字符串中分组部分定义了key的组结果
alex bcd alex lge alex acd 19
('lex', '9')
{'n1': 'lex', 'n2': '9'}
re.findall(pattern, string[, flags])函数(常用)
findall(pattern, string, flags=0)
- pattern: 正则模型
- string : 要匹配的字符串
- falgs : 匹配模式
浏览全部字符串,匹配所有合规则的字符串,匹配到的字符串放到一个列表中,未匹配成功返回空列表
注意:一旦匹配成,再次匹配,是从前一次匹配成功的,后面一位开始的,也可以理解为匹配成功的字符串,不在参与下次匹配
import re
# 无分组
r = re.findall("\d+\w\d+", "a2b3c4d5") # 浏览全部字符串,匹配所有合规则的字符串,匹配到的字符串放到一个列表中
print(r) # 注意:匹配成功的字符串,不在参与下次匹配,所以3c4也符合规则但是没匹配到
['2b3', '4d5']
注意:如果没写匹配规则,也就是空规则,返回的是一个比原始字符串多一位的,空字符串列表
import re
# 无分组
r = re.findall("", "a2b3c4d5") # 浏览全部字符串,匹配所有合规则的字符串,匹配到的字符串放到一个列表中
print(r) # 注意:如果没写匹配规则,也就是空规则,返回的是一个比原始字符串多一位的,空字符串列表
['', '', '', '', '', '', '', '', '']
注意:正则匹配到空字符的情况,如果规则里只有一个组,而组后面是就表示组里的内容可以是 0 个或者多过,这样组里就有了两个意思,一个意思是匹配组里的内容,二个意思是匹配组里 0 内容(即是空白)所以尽量避免用否则会有可能匹配出空字符串
注意:正则只拿组里最后一位,如果规则里只有一个组,匹配到的字符串里在拿组内容是,拿的是匹配到的内容最后一位
import re
origin = "hello alex bcd alex lge alex acd 19"
r = re.findall("(a)*", origin)
print(r)
['', '', '', '', '', '', 'a', '', '', '', '', '', '', '', '', 'a', '', '', '', '', '', '', '', '', 'a', '', '', '', '', 'a', '', '', '', '', '', '']
无分组:匹配所有合规则的字符串,匹配到的字符串放到一个列表中
import re
# 无分组
origin = "hello alex bcd alex lge alex acd 19"
r = re.findall("a\w+", origin) # 浏览全部字符串,匹配所有合规则的字符串,匹配到的字符串放到一个列表中
print(r)
['alex', 'alex', 'alex', 'acd']
有分组:只将匹配到的字符串里,组的部分放到列表里返回,相当于 groups()方法
import re
origin = "hello alex bcd alex lge alex acd 19"
r = re.findall("a(\w+)", origin) # 有分组:只将匹配到的字符串里,组的部分放到列表里返回
print(r)
['lex', 'lex', 'lex', 'cd']
多个分组:只将匹配到的字符串里,组的部分放到一个元组中,最后将所有元组放到一个列表里返
相当于在 group()结果里再将组的部分,分别,拿出来放入一个元组,最后将所有元组放入一个列表返回
import re
origin = "hello alex bcd alex lge alex acd 19"
# 多个分组:只将匹配到的字符串里,组的部分放到一个元组中,最后将所有元组放到一个列表里返回
r = re.findall("(a)(\w+)", origin)
print(r)
[('a', 'lex'), ('a', 'lex'), ('a', 'lex'), ('a', 'cd')]
分组中有分组:只将匹配到的字符串里,组的部分放到一个元组中,先将包含有组的组,看作一个整体也就是一个组,把这个整体组放入一个元组里,然后在把组里的组放入一个元组,最后将所有组放入一个列表返回
import re
origin = "hello alex bcd alex lge alex acd 19"
# 分组中有分组:只将匹配到的字符串里,组的部分放到一个元组中,先将包含有组的组,看作一个整体也就是一个组,把这个整体组放入一个元组里,然后在把组里的组放入一个元组,最后将所有组放入一个列表返回
r = re.findall("(a)(\w+(e))", origin)
print(r)
[('a', 'le', 'e'), ('a', 'le', 'e'), ('a', 'le', 'e')]
?:在有分组的情况下 findall()函数,不只拿分组里的字符串,拿所有匹配到的字符串,注意?:只用于不是返回正则对象的函数如 findall()
import re
origin = "hello alex bcd alex lge alex acd 19"
# ?:在有分组的情况下,不只拿分组里的字符串,拿所有匹配到的字符串,注意?:只用于不是返回正则对象的函数如findall()
b = re.findall("a(?:\w+)", origin)
print(b)
['alex', 'alex', 'alex', 'acd']
re.split(pattern, string[, maxsplit])函数
根据正则匹配分割字符串,返回分割后的一个列表
split(pattern, string, maxsplit=0, flags=0)
- pattern: 正则模型
- string : 要匹配的字符串
- maxsplit:指定分割个数
- flags : 匹配模式
按照一个字符将全部字符串进行分割
import re
origin = "hello alex bcd alex lge alex acd 19"
r = re.split("a", origin) # 根据正则匹配分割字符串
print(r)
['hello ', 'lex bcd ', 'lex lge ', 'lex ', 'cd 19']
将匹配到的字符串作为分割标准进行分割
import re
origin = "hello alex bcd alex lge alex 2acd 19"
r = re.split("a\w+", origin) # 根据正则匹配分割字符串
print(r)
['hello ', ' bcd ', ' lge ', ' 2', ' 19']
re.sub(pattern, repl, string[, count])函数
替换匹配成功的指定位置字符串
sub(pattern, repl, string, count=0, flags=0)
- pattern: 正则模型
- repl : 要替换的字符串
- string : 要匹配的字符串
- count : 指定匹配个数
- flags : 匹配模式
import re
origin = "hello alex bcd alex lge alex acd 19"
r = re.sub("a", "替换", origin) # 替换匹配成功的指定位置字符串
print(r)
hello 替换lex bcd 替换lex lge 替换lex 替换cd 19
re.subn(pattern, repl, string,[, count][, flags])函数
替换匹配成功的指定位置字符串,并且返回替换次数,可以用两个变量分别接受
subn(pattern, repl, string, count=0, flags=0)
- pattern: 正则模型
- repl : 要替换的字符串
- string : 要匹配的字符串
- count : 指定匹配个数
- flags : 匹配模式
import re
origin = "hello alex bcd alex lge alex acd 19"
a, b = re.subn("a", "替换", origin) # 替换匹配成功的指定位置字符串,并且返回替换次数,可以用两个变量分别接受
print(a)
print(b)
hello 替换lex bcd 替换lex lge 替换lex 替换cd 19
4
注意事项
- r 原生字符:让在 python 里有特殊意义的字符如\b,转换成原生字符(就是去除它在 python 的特殊意义),不然会给正则表达式有冲突,为了避免这种冲突可以在规则前加原始字符 r
- 正则表达式,返回类型为表达式对象的,如:<_sre.SRE_Match object; span=(6, 7), match=’a’>,返回对象时,需要用正则方法取字符串,方法有:
group() # 获取匹配到的所有结果,不管有没有分组将匹配到的全部拿出来,有参取匹配到的第几个如 2
groups() # 获取模型中匹配到的分组结果,只拿出匹配到的字符串中分组部分的结果
groupdict() # 获取模型中匹配到的分组结果,只拿出匹配到的字符串中分组部分定义了 key 的组结果 - 匹配到的字符串里出现空字符:注意:正则匹配到空字符的情况,如果规则里只有一个组,而组后面是就表示组里的内容可以是 0 个或者多过,这样组里就有了两个意思,一个意思是匹配组里的内容,二个意思是匹配组里 0 内容(即是空白)所以尽量避免用否则会有可能匹配出空字符串
- ()分组:注意:分组的意义,就是在匹配成功的字符串中,再提取()里的内容,也就是组里面的字符串
- ?:在有分组的情况下 findall()函数,不只拿分组里的字符串,拿所有匹配到的字符串,注意?:只用于不是返回正则对象的函数如 findall()
计算器(经典)
基于递归和正则将下面的字符串翻译成计算器表达式,并且获取最终结果:expression='-1-2*((60+2*(-3-40.0+42425/5)*(9-2*5/3+357/553/3*99/4*2998+10*568/14))-(-4*3)/(16-3*2))+56+(56-45)'
如果代码正确,计算结果为:-553071849.7670887
提示:content=re.search('\(([\-\+\*\/]*\d+\.?\d*)+\)',expression).group() #(-3-40.0/5)
复杂版本
#!/usr/bin/env python
# -*- coding:utf-8 -*-
"""
该计算器思路:
1、递归寻找表达式中只含有 数字和运算符的表达式,并计算结果
2、由于整数计算会忽略小数,所有的数字都认为是浮点型操作,以此来保留小数
使用技术:
1、正则表达式
2、递归
"""
import re
def compute_mul_div(arg):
""" 操作乘除
:param expression:表达式
:return:计算结果
"""
val = arg[0]
mch = re.search('\d+\.*\d*[\*\/]+[\+\-]?\d+\.*\d*', val)
if not mch:
return
content = re.search('\d+\.*\d*[\*\/]+[\+\-]?\d+\.*\d*', val).group()
if len(content.split('*')) > 1:
n1, n2 = content.split('*')
value = float(n1) * float(n2)
else:
n1, n2 = content.split('/')
value = float(n1) / float(n2)
before, after = re.split('\d+\.*\d*[\*\/]+[\+\-]?\d+\.*\d*', val, 1)
new_str = "%s%s%s" % (before, value, after)
arg[0] = new_str
compute_mul_div(arg)
def compute_add_sub(arg):
""" 操作加减
:param expression:表达式
:return:计算结果
"""
while True:
if arg[0].__contains__('+-') or arg[0].__contains__("++") or arg[
0].__contains__('-+') or arg[0].__contains__("--"):
arg[0] = arg[0].replace('+-', '-')
arg[0] = arg[0].replace('++', '+')
arg[0] = arg[0].replace('-+', '-')
arg[0] = arg[0].replace('--', '+')
else:
break
if arg[0].startswith('-'):
arg[1] += 1
arg[0] = arg[0].replace('-', '&')
arg[0] = arg[0].replace('+', '-')
arg[0] = arg[0].replace('&', '+')
arg[0] = arg[0][1:]
val = arg[0]
mch = re.search('\d+\.*\d*[\+\-]{1}\d+\.*\d*', val)
if not mch:
return
content = re.search('\d+\.*\d*[\+\-]{1}\d+\.*\d*', val).group()
if len(content.split('+')) > 1:
n1, n2 = content.split('+')
value = float(n1) + float(n2)
else:
n1, n2 = content.split('-')
value = float(n1) - float(n2)
before, after = re.split('\d+\.*\d*[\+\-]{1}\d+\.*\d*', val, 1)
new_str = "%s%s%s" % (before, value, after)
arg[0] = new_str
compute_add_sub(arg)
def compute(expression):
""" 操作加减乘除
:param expression:表达式
:return:计算结果
"""
inp = [expression, 0]
# 处理表达式中的乘除
compute_mul_div(inp)
# 处理
compute_add_sub(inp)
if divmod(inp[1], 2)[1] == 1:
result = float(inp[0])
result = result * -1
else:
result = float(inp[0])
return result
def exec_bracket(expression):
""" 递归处理括号,并计算
:param expression: 表达式
:return:最终计算结果
"""
# 如果表达式中已经没有括号,则直接调用负责计算的函数,将表达式结果返回,如:2*1-82+444
if not re.search('\(([\+\-\*\/]*\d+\.*\d*){2,}\)', expression):
final = compute(expression)
return final
# 获取 第一个 只含有 数字/小数 和 操作符 的括号
# 如:
# ['1-2*((60-30+(-40.0/5)*(9-2*5/3+7/3*99/4*2998+10*568/14))-(-4*3)/(16-3*2))']
# 找出:(-40.0/5)
content = re.search('\(([\+\-\*\/]*\d+\.*\d*){2,}\)', expression).group()
# 分割表达式,即:
# 将['1-2*((60-30+(-40.0/5)*(9-2*5/3+7/3*99/4*2998+10*568/14))-(-4*3)/(16-3*2))']
# 分割更三部分:['1-2*((60-30+( (-40.0/5) *(9-2*5/3+7/3*99/4*2998+10*568/14))-(-4*3)/(16-3*2))']
before, nothing, after = re.split('\(([\+\-\*\/]*\d+\.*\d*){2,}\)',
expression, 1)
print('before:', expression)
content = content[1:len(content) - 1]
# 计算,提取的表示 (-40.0/5),并活的结果,即:-40.0/5=-8.0
ret = compute(content)
print('%s=%s' % (content, ret))
# 将执行结果拼接,['1-2*((60-30+( -8.0 *(9-2*5/3+7/3*99/4*2998+10*568/14))-(-4*3)/(16-3*2))']
expression = "%s%s%s" % (before, ret, after)
print('after:', expression)
print("=" * 10, '上一次计算结束', "=" * 10)
# 循环继续下次括号处理操作,本次携带者的是已被处理后的表达式,即:
# ['1-2*((60-30+ -8.0 *(9-2*5/3+7/3*99/4*2998+10*568/14))-(-4*3)/(16-3*2))']
# 如此周而复始的操作,直到表达式中不再含有括号
return exec_bracket(expression)
# 使用 __name__ 的目的:
# 只有执行 python index.py 时,以下代码才执行
# 如果其他人导入该模块,以下代码不执行
if __name__ == "__main__":
print(
'*' * 20, "请计算表达式:",
"1 - 2 * ( (60-30 +(-40.0/5) * (9-2*5/3 + 7 /3*99/4*2998 +10 * 568/14 )) - (-4*3)/ (16-3*2) )",
'*' * 20)
# inpp = '1 - 2 * ( (60-30 +(-40.0/5) * (9-2*5/3 + 7 /3*99/4*2998 +10 * 568/14 )) - (-4*3)/ (16-3*2) ) '
inpp = '-1-2*((60+2*(-3-40.0+42425/5)*(9-2*5/3+357/553/3*99/4*2998+10*568/14))-(-4*3)/(16-3*2))+56+(56-45)'
# inpp = "1-2*-30/-12*(-20+200*-3/-200*-300-100)"
# inpp = "1-5*980.0"
inpp = re.sub('\s*', '', inpp)
# 表达式保存在列表中
result = exec_bracket(inpp)
print(result)
******************** 请计算表达式: 1 - 2 * ( (60-30 +(-40.0/5) * (9-2*5/3 + 7 /3*99/4*2998 +10 * 568/14 )) - (-4*3)/ (16-3*2) ) ********************
before: -1-2*((60+2*(-3-40.0+42425/5)*(9-2*5/3+357/553/3*99/4*2998+10*568/14))-(-4*3)/(16-3*2))+56+(56-45)
-3-40.0+42425/5=8442.0
after: -1-2*((60+2*8442.0*(9-2*5/3+357/553/3*99/4*2998+10*568/14))-(-4*3)/(16-3*2))+56+(56-45)
========== 上一次计算结束 ==========
before: -1-2*((60+2*8442.0*(9-2*5/3+357/553/3*99/4*2998+10*568/14))-(-4*3)/(16-3*2))+56+(56-45)
9-2*5/3+357/553/3*99/4*2998+10*568/14=16378.577154912598
after: -1-2*((60+2*8442.0*16378.577154912598)-(-4*3)/(16-3*2))+56+(56-45)
========== 上一次计算结束 ==========
before: -1-2*((60+2*8442.0*16378.577154912598)-(-4*3)/(16-3*2))+56+(56-45)
60+2*8442.0*16378.577154912598=276535956.68354434
after: -1-2*(276535956.68354434-(-4*3)/(16-3*2))+56+(56-45)
========== 上一次计算结束 ==========
before: -1-2*(276535956.68354434-(-4*3)/(16-3*2))+56+(56-45)
-4*3=-12.0
after: -1-2*(276535956.68354434--12.0/(16-3*2))+56+(56-45)
========== 上一次计算结束 ==========
before: -1-2*(276535956.68354434--12.0/(16-3*2))+56+(56-45)
16-3*2=10.0
after: -1-2*(276535956.68354434--12.0/10.0)+56+(56-45)
========== 上一次计算结束 ==========
before: -1-2*(276535956.68354434--12.0/10.0)+56+(56-45)
276535956.68354434--12.0/10.0=276535957.8835443
after: -1-2*276535957.8835443+56+(56-45)
========== 上一次计算结束 ==========
before: -1-2*276535957.8835443+56+(56-45)
56-45=11.0
after: -1-2*276535957.8835443+56+11.0
========== 上一次计算结束 ==========
-553071849.7670887
简单易懂版
import re
expression = '-1-2*((60+2*(-3-40.0+42425/5)*(9-2*5/3+357/553/3*99/4*2998+10*568/14))-(-4*3)/(16-3*2))+56+(56-45)'
question = eval(expression)
print(question)
def arithmetic(expression='1+1'):
# content = re.search('\(([\-\+\*\/]*\d+\.?\d*)+\)', expression) # (-3-40.0/5)
content = re.search('\(([-+*/]*\d+\.?\d*)+\)', expression) # (-3-40.0/5)
if content:
content = content.group()
content = content[1:-1]
print('content:', content)
replace_content = next_arithmetic(content)
expression = re.sub('\(([-+*/]*\d+\.?\d*)+\)',
replace_content,
expression,
count=1)
print('next_expression:', expression)
else:
answer = next_arithmetic(expression)
return answer
return arithmetic(expression)
def next_arithmetic(content):
while True:
next_content_mul_div = re.search('\d+\.?\d*[*/][-+]?\d+\.?\d*',
content) # 找出带有*/的式子
if next_content_mul_div: # 如果content含有带有*/的式子
next_content_mul_div = next_content_mul_div.group()
print('next_content_mul_div:', next_content_mul_div)
mul_div_content = mul_div(next_content_mul_div) # 计算出带有*/的式子
print('mul_div_content:', mul_div_content)
content = re.sub('\d+\.?\d*[*/][-+]?\d+\.?\d*',
str(mul_div_content),
content,
count=1) # 把带有*/的式子计算出来后替换掉
print('content:', content)
continue
next_content_add_sub = re.search('-?\d+\.?\d*[-+][-+]?\d+\.?\d*',
content) # 找出带有-+的式子
if next_content_add_sub: # 如果content含有带有+-的式子
next_content_add_sub = next_content_add_sub.group()
print('next_content_add_sub:', next_content_add_sub)
add_sub_content = add_sub(next_content_add_sub) # 计算出带有-+的式子
print('add_sub_content:', add_sub_content)
add_sub_content = str(add_sub_content)
content = re.sub('-?\d+\.?\d*[-+]-?\d+\.?\d*',
str(add_sub_content),
content,
count=1) # 把带有-+的式子计算出来后替换掉
print('content:', content)
continue
else:
break
return content
def add_sub(content):
if '+' in content:
content = content.split('+')
print(content)
content = float(content[0]) + float(content[1])
return content
elif '-' in content:
content = content.split('-')
# 减法情况有多种
if content[0] == '-' and content[2] == '-':
# content = content.split('-')
print(content)
content = -float(content[1]) - float(content[-1])
return content
if content[0] == '-':
# content = content.split('-')
print(content)
content = -float(content[1]) - float(content[-1])
return content
if content[1] == '-' and content[2] == '-':
# content = content.split('-')
print(content)
content = -float(content[0]) + float(content[-1])
return content
if content[1] == '':
# content = content.split('-')
print(content)
content = float(content[0]) - float(content[2])
return content
if content[0] == '' and content[2] != '':
print(content)
content = -float(content[1]) - float(content[2])
return content
if content[0] == '' and content[2] == '':
print(content)
content = -float(content[1]) + float(content[3])
return content
else:
# content = content.split('-')
print(content)
content = float(content[0]) - float(content[1])
return content
def mul_div(content):
if '*' in content:
content = content.split('*')
print(content)
content = float(content[0]) * float(content[1])
return content
elif '/' in content:
content = content.split('/')
print(content)
content = float(content[0]) / float(content[1])
return content
# expression = '1-2*((60+2*(-3-40.0/5)*(9-2*5/3+7/3*99/4*2998+10*568/14))-(-4*3)/(16-3*2))'
expression = '-1-2*((60+2*(-3-40.0+42425/5)*(9-2*5/3+357/553/3*99/4*2998+10*568/14))-(-4*3)/(16-3*2))+56+(56-45)'
answer = arithmetic(expression)
print(answer)
-553071849.7670887
content: -3-40.0+42425/5
next_content_mul_div: 42425/5
['42425', '5']
mul_div_content: 8485.0
content: -3-40.0+8485.0
next_content_add_sub: -3-40.0
['', '3', '40.0']
add_sub_content: -43.0
content: -43.0+8485.0
next_content_add_sub: -43.0+8485.0
['-43.0', '8485.0']
add_sub_content: 8442.0
content: 8442.0
next_expression: -1-2*((60+2*8442.0*(9-2*5/3+357/553/3*99/4*2998+10*568/14))-(-4*3)/(16-3*2))+56+(56-45)
content: 9-2*5/3+357/553/3*99/4*2998+10*568/14
next_content_mul_div: 2*5
['2', '5']
mul_div_content: 10.0
content: 9-10.0/3+357/553/3*99/4*2998+10*568/14
next_content_mul_div: 10.0/3
['10.0', '3']
mul_div_content: 3.3333333333333335
content: 9-3.3333333333333335+357/553/3*99/4*2998+10*568/14
next_content_mul_div: 357/553
['357', '553']
mul_div_content: 0.6455696202531646
content: 9-3.3333333333333335+0.6455696202531646/3*99/4*2998+10*568/14
next_content_mul_div: 0.6455696202531646/3
['0.6455696202531646', '3']
mul_div_content: 0.21518987341772153
content: 9-3.3333333333333335+0.21518987341772153*99/4*2998+10*568/14
next_content_mul_div: 0.21518987341772153*99
['0.21518987341772153', '99']
mul_div_content: 21.303797468354432
content: 9-3.3333333333333335+21.303797468354432/4*2998+10*568/14
next_content_mul_div: 21.303797468354432/4
['21.303797468354432', '4']
mul_div_content: 5.325949367088608
content: 9-3.3333333333333335+5.325949367088608*2998+10*568/14
next_content_mul_div: 5.325949367088608*2998
['5.325949367088608', '2998']
mul_div_content: 15967.196202531646
content: 9-3.3333333333333335+15967.196202531646+10*568/14
next_content_mul_div: 10*568
['10', '568']
mul_div_content: 5680.0
content: 9-3.3333333333333335+15967.196202531646+5680.0/14
next_content_mul_div: 5680.0/14
['5680.0', '14']
mul_div_content: 405.7142857142857
content: 9-3.3333333333333335+15967.196202531646+405.7142857142857
next_content_add_sub: 9-3.3333333333333335
['9', '3.3333333333333335']
add_sub_content: 5.666666666666666
content: 5.666666666666666+15967.196202531646+405.7142857142857
next_content_add_sub: 5.666666666666666+15967.196202531646
['5.666666666666666', '15967.196202531646']
add_sub_content: 15972.862869198312
content: 15972.862869198312+405.7142857142857
next_content_add_sub: 15972.862869198312+405.7142857142857
['15972.862869198312', '405.7142857142857']
add_sub_content: 16378.577154912598
content: 16378.577154912598
next_expression: -1-2*((60+2*8442.0*16378.577154912598)-(-4*3)/(16-3*2))+56+(56-45)
content: 60+2*8442.0*16378.577154912598
next_content_mul_div: 2*8442.0
['2', '8442.0']
mul_div_content: 16884.0
content: 60+16884.0*16378.577154912598
next_content_mul_div: 16884.0*16378.577154912598
['16884.0', '16378.577154912598']
mul_div_content: 276535896.68354434
content: 60+276535896.68354434
next_content_add_sub: 60+276535896.68354434
['60', '276535896.68354434']
add_sub_content: 276535956.68354434
content: 276535956.68354434
next_expression: -1-2*(276535956.68354434-(-4*3)/(16-3*2))+56+(56-45)
content: -4*3
next_content_mul_div: 4*3
['4', '3']
mul_div_content: 12.0
content: -12.0
next_expression: -1-2*(276535956.68354434--12.0/(16-3*2))+56+(56-45)
content: 16-3*2
next_content_mul_div: 3*2
['3', '2']
mul_div_content: 6.0
content: 16-6.0
next_content_add_sub: 16-6.0
['16', '6.0']
add_sub_content: 10.0
content: 10.0
next_expression: -1-2*(276535956.68354434--12.0/10.0)+56+(56-45)
content: 276535956.68354434--12.0/10.0
next_content_mul_div: 12.0/10.0
['12.0', '10.0']
mul_div_content: 1.2
content: 276535956.68354434--1.2
next_content_add_sub: 276535956.68354434--1.2
['276535956.68354434', '', '1.2']
add_sub_content: 276535955.48354435
content: 276535955.48354435
next_expression: -1-2*276535955.48354435+56+(56-45)
content: 56-45
next_content_add_sub: 56-45
['56', '45']
add_sub_content: 11.0
content: 11.0
next_expression: -1-2*276535955.48354435+56+11.0
next_content_mul_div: 2*276535955.48354435
['2', '276535955.48354435']
mul_div_content: 553071910.9670887
content: -1-553071910.9670887+56+11.0
next_content_add_sub: -1-553071910.9670887
['', '1', '553071910.9670887']
add_sub_content: -553071911.9670887
content: -553071911.9670887+56+11.0
next_content_add_sub: -553071911.9670887+56
['-553071911.9670887', '56']
add_sub_content: -553071855.9670887
content: -553071855.9670887+11.0
next_content_add_sub: -553071855.9670887+11.0
['-553071855.9670887', '11.0']
add_sub_content: -553071844.9670887
content: -553071844.9670887
-553071844.9670887
typing 模块
- 前言:很多人在写完代码一段时间后回过头看代码,很可能忘记了自己写的函数需要传什么参数,返回什么类型的结果,就不得不去阅读代码的具体内容,降低了阅读的速度,加上 Python 本身就是一门弱类型的语言,这种现象就变得更加的严重,而 typing 这个模块很好的解决了这个问题。系列文章
typing 模块的作用
- 类型检查,防止运行时出现参数和返回值类型不符合。
- 作为开发文档附加说明,方便使用者调用时传入和返回参数类型。
- 该模块加入后并不会影响程序的运行,不会报正式的错误,只有提醒。
- 注意:typing 模块只有在 python3.5 以上的版本中才可以使用,pycharm 目前支持 typing 检查
使用 typing 模块
from typing import List, Tuple, Dict
def add(a: int, string: str, f: float,
b: bool) -> Tuple[List, Tuple, Dict, bool]:
list1 = list(range(a))
tup = (string, string, string)
d = {"a": f}
bl = b
return list1, tup, d, bl
print(add(5, "hhhh", 2.3, False))
([0, 1, 2, 3, 4], ('hhhh', 'hhhh', 'hhhh'), {'a': 2.3}, False)
- 在传入参数时通过”参数名:类型”的形式声明参数的类型;
- 返回结果通过”-> 结果类型”的形式声明结果的类型。
- 在调用的时候如果参数的类型不正确 pycharm 会有提醒,但不会影响程序的运行。
- 对于如 list 列表等,还可以规定得更加具体一些,如:”-> List[str]”,规定返回的是列表,并且元素是字符串。
from typing import List
def func(a: int, string: str) -> List[int or str]: # 使用or关键字表示多种类型
list1 = []
list1.append(a)
list1.append(string)
return list1
typing 常用类型
- int、long、float: 整型、长整形、浮点型
- bool、str: 布尔型、字符串类型
- List、 Tuple、 Dict、 Set:列表、元组、字典、集合
- Iterable、Iterator:可迭代类型、迭代器类型
- Generator:生成器类型
collections 模块
collections 是 Python 内建的一个集合模块,提供了许多有用的集合类。
namedtuple
我们知道 tuple 可以表示不变集合,例如,一个点的二维坐标就可以表示成:
p = (1,2)
但是,看到(1, 2),很难看出这个 tuple 是用来表示一个坐标的。
定义一个 class 又小题大做了,这时,namedtuple 就派上了用场:
from collections import namedtuple
Point = namedtuple('Point', ['x', 'y'])
p = Point(1, 2)
p.x
1
p.y
2
namedtuple 是一个函数,它用来创建一个自定义的 tuple 对象,并且规定了 tuple 元素的个数,并可以用属性而不是索引来引用 tuple 的某个元素。
这样一来,我们用 namedtuple 可以很方便地定义一种数据类型,它具备 tuple 的不变性,又可以根据属性来引用,使用十分方便。
可以验证创建的 Point 对象是 tuple 的一种子类:
isinstance(p, Point)
True
isinstance(p, tuple)
True
类似的,如果要用坐标和半径表示一个圆,也可以用 namedtuple 定义:
# namedtuple('名称', [属性list]):
Circle = namedtuple('Circle', ['x', 'y', 'r'])
deque
使用 list 存储数据时,按索引访问元素很快,但是插入和删除元素就很慢了,因为 list 是线性存储,数据量大的时候,插入和删除效率很低。
deque 是为了高效实现插入和删除操作的双向列表,适合用于队列和栈:
from collections import deque
q = deque(['a', 'b', 'c'])
q.append('x')
q.appendleft('y')
q
deque(['y', 'a', 'b', 'c', 'x'])
deque 除了实现 list 的 append()和 pop()外,还支持 appendleft()和 popleft(),这样就可以非常高效地往头部添加或删除元素。
defaultdict
使用 dict 时,如果引用的 Key 不存在,就会抛出 KeyError。如果希望 key 不存在时,返回一个默认值,就可以用 defaultdict:
from collections import defaultdict
dd = defaultdict(lambda: 'N/A')
dd['key1'] = 'abc'
dd['key1'] # key1存在
'abc'
dd['key2'] # key2不存在,返回默认值
'N/A'
注意默认值是调用函数返回的,而函数在创建 defaultdict 对象时传入。
除了在 Key 不存在时返回默认值,defaultdict 的其他行为跟 dict 是完全一样的。
OrderedDict
使用 dict 时,Key 是无序的。在对 dict 做迭代时,我们无法确定 Key 的顺序。
如果要保持 Key 的顺序,可以用 OrderedDict:
from collections import OrderedDict
d = dict([('a', 1), ('b', 2), ('c', 3)])
d # dict的Key是无序的
{'a': 1, 'b': 2, 'c': 3}
od = OrderedDict([('a', 1), ('b', 2), ('c', 3)])
od # OrderedDict的Key是有序的
OrderedDict([('a', 1), ('b', 2), ('c', 3)])
注意,OrderedDict 的 Key 会按照插入的顺序排列,不是 Key 本身排序:
od = OrderedDict()
od['z'] = 1
od['y'] = 2
od['x'] = 3
od.keys() # 按照插入的Key的顺序返回
odict_keys(['z', 'y', 'x'])
OrderedDict 可以实现一个 FIFO(先进先出)的 dict,当容量超出限制时,先删除最早添加的 Key:
from collections import OrderedDict
class LastUpdatedOrderedDict(OrderedDict):
def __init__(self, capacity):
super(LastUpdatedOrderedDict, self).__init__()
self._capacity = capacity
def __setitem__(self, key, value):
containsKey = 1 if key in self else 0
if len(self) - containsKey >= self._capacity:
last = self.popitem(last=False)
print('remove:', last)
if containsKey:
del self[key]
print('set:', (key, value))
else:
print('add:', (key, value))
OrderedDict.__setitem__(self, key, value)
Counter
Counter 是一个简单的计数器,例如,统计字符出现的个数:
from collections import Counter
c = Counter()
for ch in 'programming':
c[ch] = c[ch] + 1
c
Counter({'p': 1, 'r': 2, 'o': 1, 'g': 2, 'a': 1, 'm': 2, 'i': 1, 'n': 1})
Counter 实际上也是 dict 的一个子类,上面的结果可以看出,字符’g’、’m’、’r’各出现了两次,其他字符各出现了一次。
总结
collections 模块提供了一些有用的集合类,可以根据需要选用。
pathlib 模块
pathlib 是 Python 内置库,Python 文档给它的定义是 Object-oriented filesystem paths(面向对象的文件系统路径)。pathlib 提供表示文件系统路径的类,其语义适用于不同的操作系统。路径类在纯路径之间划分,纯路径提供纯粹的计算操作而没有 I / O,以及具体路径,它继承纯路径但也提供 I / O 操作。
对于这繁琐而又冗余的话,听起来一定让人不习惯。那就对了,因为这是使用谷歌翻译直译过来的,说到这我怎么感觉我要回去偷偷补个英语,但是注意了,接下来大白话的语述并不影响你去了解并使用他。
os 和 pathlib.Path 的区别
相对于 os 模块的 path 方法,Python3 标准库 pathlib 模块的 Path 对路径的操作会更简单。
获取当前文件路径
使用 os 模块时,通过 getcwd() 方法可以直接获取当前文件路径(在 Pycharm 中,可以使用 os.path.dirname(__file__) 获取当前文件路径,因为 Python 并没有提供__file__ 这个概念,他是 Pycharm 提供的):
# python语言实现
# /Users/mac/test.py
import os
print(os.getcwd()) # '/Users/mac'
在 pathlib 模块中,通过 Path.cwd() 方法可以直接获取当前文件路径,我们可以动手试一试:
# python语言实现
# /Users/mac/test.py
import pathlib
print(pathlib.Path.cwd()) # PosixPath('/Users/mac')
通过 Pycharm 我们可以使用快捷键 ctrl+鼠标左键 点击查看该方法的详细介绍,如下图所示:
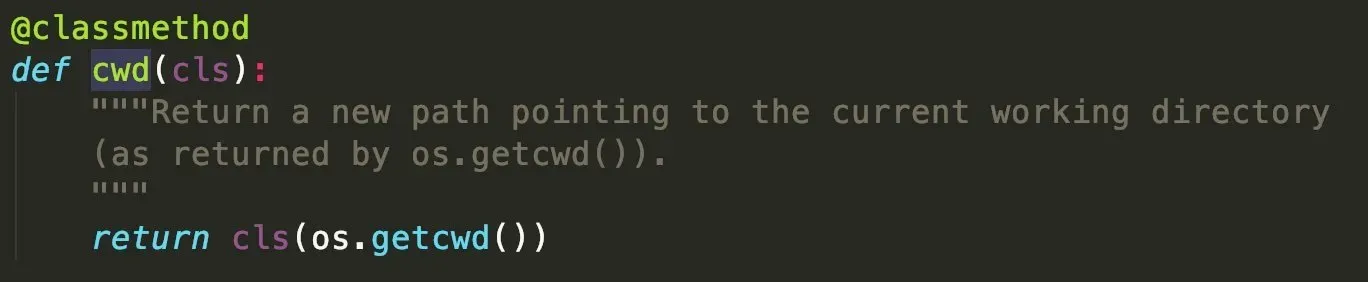
从上图中可以看出 cwd() 方法不过是对 os 库中 getcwd() 方法进行了封装,看起来好像更差劲了,但是官方的推出一定不是子虚乌有的,现在让我们一起来揭秘。
获取上层/上层目录
上面那个案例仿佛让 pashlib 库的使用变得更加复杂了,为了揭秘,我们只能一同感受下 pathlib 库的构成,了解 pathlib 库如何带给我们便捷。

在 os 模块中,如果我们要获取某一个文件的父目录,os 模块的写法为:
# python语言实现
# /Users/mac/test.py
import os
print(os.path.dirname(os.path.dirname(os.getcwd()))) # /Users
在 pathlib 库中,可以通过这样简洁方法实现:
# python语言实现
# /Users/mac/test.py
import pathlib
print(pathlib.Path.cwd().parent) # /Users
这段代码看起来是不是更符合 Pythonic ?像写英语一样。不对,这个时候的我不应该在补英语吗?/偷笑
并且,如果你需要找他爷爷,是不是再来一个 .parent 就行了。相比较 os 模块的 os.path.dirname() 是不是方便太多太多了?
路径拼接
如果你要在他父目录中拼接路径,通过 os 模块你可能需要写这么一长串代码:
# python语言实现
# /Users/mac/test.py
import os
print(os.path.join(os.path.dirname(os.getcwd()), '路径拼接', '真麻烦')) # /Users/路径拼接/真麻烦
当你使用 pathlib 的时候,我们一起来感受他的便捷之处吧!
# python语言实现
# /Users/mac/test.py
import os
paths = ('路径拼接', '真麻烦')
print(pathlib.Path.cwd().parent.joinpath(*paths)) # /Users/路径拼接/真麻烦
通过 pathlib 库拼接路径,你可以很方便的调节他在他祖辈的位置,妙哉。
其他封装
pathlib 封装了很多的 os.path 中的方法,如下所示:
# python语言实现
os.path.expanduser() --> pathlib.Path.home()
os.path.expanduser() --> pathlib.Path.expanduser()
os.stat() --> pathlib.Path.stat()
os.chmod() --> pathlib.Path.chmod()
pathlib.PurePath 的使用
上一节的操作大部分都是通过 pathlib 库中的 Path 实现,其实他还有一个更加高大上的模块,也就是我们这一节的主角:pathlib.PurePath。
PurePath 是一个纯路径对象,纯路径对象提供了实际上不访问文件系统的路径处理操作。有三种方法可以访问这些类,我们也称之为 flavor 。
上面这段话来自于官方文档,感觉听不懂也没关系,下面我们将举几个栗子来剖析他。
PurePath.match
下面让我们来实现一个神奇的功能,判断下当前的路径是否有符合’*.py’规则的文件。
# python语言实现
# /Users/mac/test.py
import pathlib
print(pathlib.PurePath(__file__).match('*.py')) # True
输出为什么会是 True 呢?因为当前文件夹下不就有一个 test.py 吗?
PurePosixPath
看见 pathlib.PurePath 后面跟着 match,那是不是能说明他是个对象,而不是一个单纯的路径字符串,因此我们可以试着打印 pathlib.PurePath 看一看。
# python语言实现
# /Users/mac/test.py
import pathlib
os_path = os.path.dirname(__file__)
print(os_path) # /Users/mac/
pure_path = pathlib.PurePath(__file__)
print(pure_path) # /Users/mac/test.py <class 'pathlib.PurePosixPath'>
print(pathlib.PurePath(__file__).match('*.py')) # True
通过打印 os.path 获取当前路径的结果,得到一个路径字符串;而通过 pathlib.PurePath 则获得了一个 PurePosixPath 对象,并且由此得到的路径包括了当前文件 test.py。
那么问题来了,PurePosixPath 究竟是什么玩意呢?能不能像机器猫的记忆面包一样帮助我速成英语。下面不得不又一次展示我们这个官方文档了:
pathlib 可以操作两种文件系统的路径,一种是 Windows 文件系统,另一种称为非 Windows 文件系统,对应的对象是 pathlib.PurePosixPath 和 pathlib.PureWindowsPath,不过不用担心,这些类并非是指定在某些操作系统上运行才能够使用,无论你运行的是哪个系统,都可以实例化所有这些类,因为它们不提供任何进行系统调用的操作。
这讲的都是啥呀?不提供任何进行系统调用的操作,纳尼???/脑补黑人脸
为了彻底的了解他,不得不放出真正的大招了,也就是我们官方文档在最开始的时候提供的这一段描述和一张图:
Pure paths are useful in some special cases; for example:If you want to manipulate Windows paths on a Unix machine (or vice versa). You cannot instantiate a WindowsPath when running on Unix, but you can instantiate PureWindowsPath.You want to make sure that your code only manipulates paths without actually accessing the OS. In this case, instantiating one of the pure classes may be useful since those simply don’t have any OS-accessing operations.
翻译:纯路径在某些特殊情况下很有用;例如:如果要在 Unix 计算机上操作 Windows 路径(反之亦然)。WindowsPath 在 Unix 上运行时无法实例化,但可以实例化 PureWindowsPath。您希望确保您的代码仅操作路径而不实际访问操作系统。在这种情况下,实例化其中一个纯类可能很有用,因为那些只是没有任何操作系统访问操作。
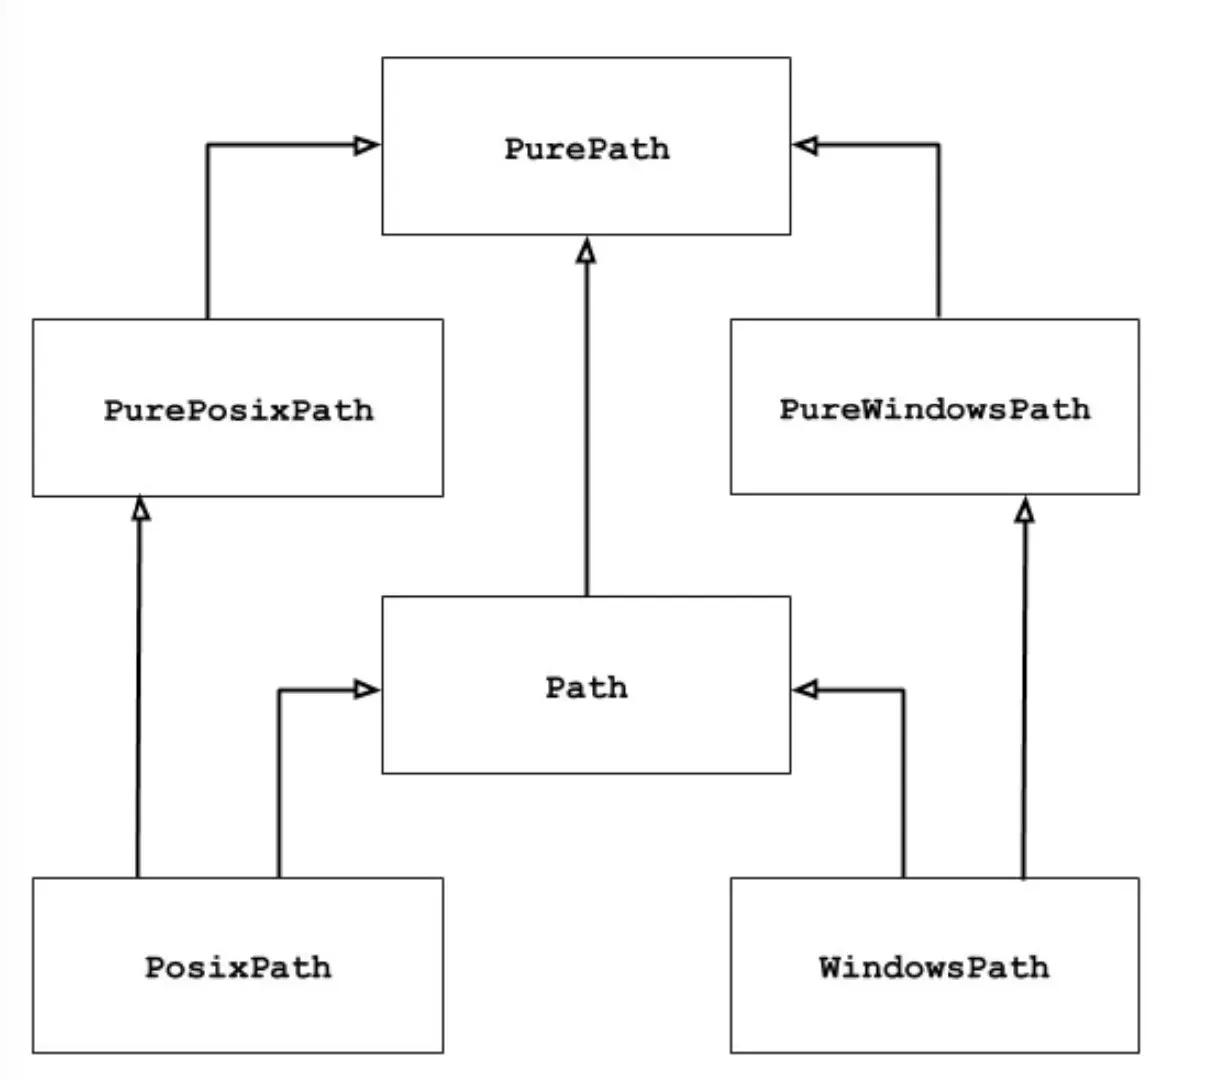
这张图看起来如此简洁,但是他的复杂程度不亚于清明上河图呀!也许朝着这张图片洒点水(请勿轻易尝试,珍惜你的女朋友——电脑)才能得知真相吧?但真相其实就藏在接下来的描述当中。
os 和 pathlib 的对应关系
少侠,上几节中老夫已经将毕生所学教给你了,未来只能靠你自己去参考这份武林秘籍——九阴真经,他详尽的描述了 os 模块和 pathlib 库的对应关系,如果忘了,别忘了多回家看看。
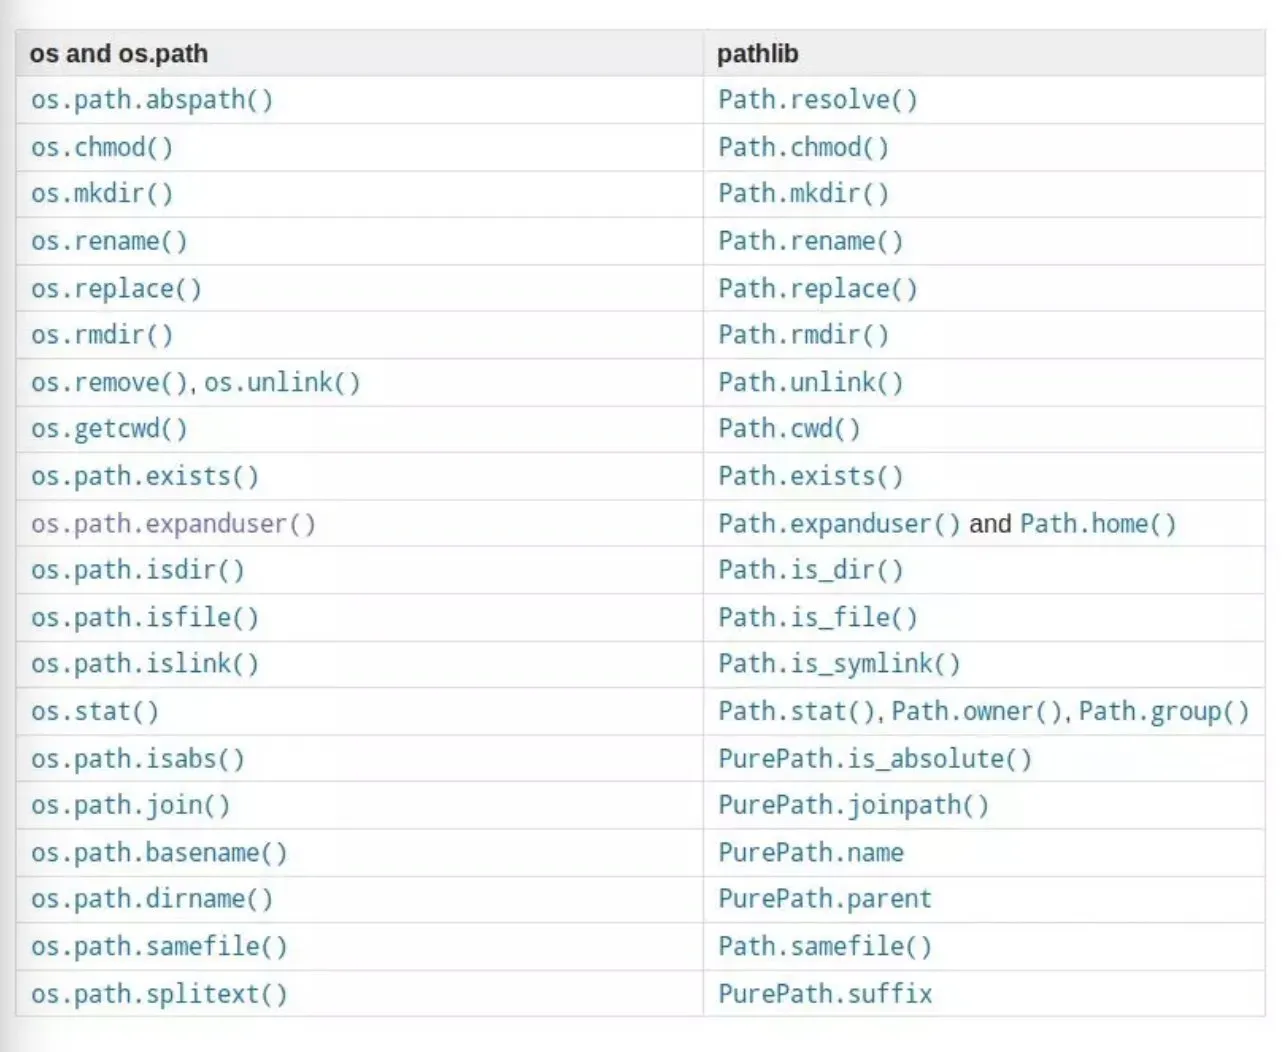
pathlib 秘籍
基本用法
# python语言实现
Path.iterdir() # 遍历目录的子目录或者文件
Path.is_dir() # 判断是否是目录
Path.glob() # 过滤目录(返回生成器)
Path.resolve() # 返回绝对路径
Path.exists() # 判断路径是否存在
Path.open() # 打开文件(支持with)
Path.unlink() # 删除文件或目录(目录非空触发异常)
基本属性
# python语言实现
Path.parts # 分割路径 类似os.path.split(), 不过返回元组
Path.drive # 返回驱动器名称
Path.root # 返回路径的根目录
Path.anchor # 自动判断返回drive或root
Path.parents # 返回所有上级目录的列表
改变路径
# python语言实现
Path.with_name() # 更改路径名称, 更改最后一级路径名
Path.with_suffix() # 更改路径后缀
拼接路径
# python语言实现
Path.joinpath() # 拼接路径
Path.relative_to() # 计算相对路径
测试路径
# python语言实现
Path.match() # 测试路径是否符合pattern
Path.is_dir() # 是否是文件
Path.is_absolute() # 是否是绝对路径
Path.is_reserved() # 是否是预留路径
Path.exists() # 判断路径是否真实存在
其他方法
# python语言实现
Path.cwd() # 返回当前目录的路径对象
Path.home() # 返回当前用户的home路径对象
Path.stat() # 返回路径信息, 同os.stat()
Path.chmod() # 更改路径权限, 类似os.chmod()
Path.expanduser() # 展开~返回完整路径对象
Path.mkdir() # 创建目录
Path.rename() # 重命名路径
Path.rglob() # 递归遍历所有子目录的文件
pathlib 回顾
通过上面的几个例子,我们对 pathlib 应该有一个大体的了解,接下来再回顾一下官方给 pathlib 库的定义:
This module offers classes representing filesystem paths with semantics appropriate for different operating systems. Path classes are divided between pure paths, which provide purely computational operations without I/O, and concrete paths, which inherit from pure paths but also provide I/O operations.
释义:pathlib 提供表示文件系统路径的类,其语义适用于不同的操作系统。路径类在纯路径之间划分,纯路径提供纯粹的计算操作而没有 I / O,以及具体路径,它继承纯路径但也提供 I / O 操作。
回顾上一章清明上河图:
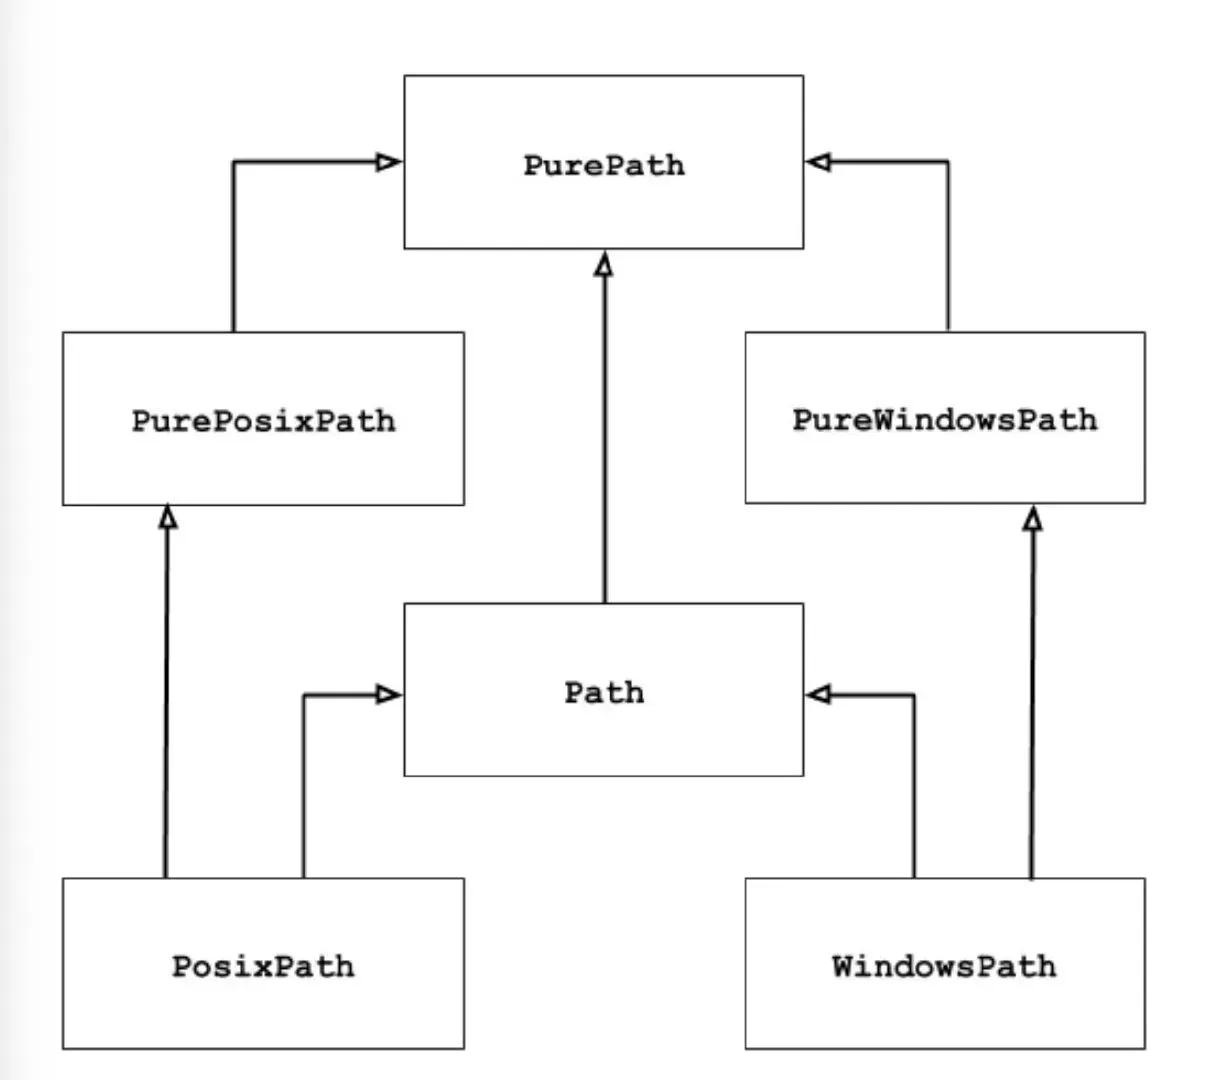
如果你以前从未使用过这个模块,或者只是不确定哪个类适合您的任务,那么 Path 很可能就是您所需要的。他会为代码运行的不同的系统实例化属于该系统的具体路径,而不需要你自己设定。
总结
pathlib 不是单纯的对 os 中的一些方法进行封装,而是为了兼容不同的操作系统而生。他为每类操作系统定义了接口,也就是说你希望在 UNIX 系统上操作 Windows 系统的路径,直接操作是不可能的,所以他为你创建了一套接口 PurePath,你可以通过接口来实现你的目的(反之亦然)。
shutil 模块
高级的文件、文件夹、压缩包处理模块。
import shutil
# shutil.copyfileobj(fsrc, fdst[, length]),将文件内容拷贝到另一个文件中
shutil.copyfileobj(open('old.xml', 'r'), open('new.xml', 'w'))
# shutil.copyfile(src, dst),拷贝文件
shutil.copyfile('f1.log', 'f2.log') # 目标文件无需存在
# shutil.copymode(src, dst),仅拷贝权限。内容、组、用户均不变
shutil.copymode('f1.log', 'f2.log') # 目标文件必须存在
# shutil.copystat(src, dst),仅拷贝状态的信息,包括:mode bits, atime, mtime, flags
shutil.copystat('f1.log', 'f2.log') # 目标文件必须存在
# shutil.copy(src, dst),拷贝文件和权限
shutil.copy('f1.log', 'f2.log')
# shutil.copy2(src, dst),拷贝文件和状态信息
shutil.copy2('f1.log', 'f2.log')
# shutil.ignore_patterns(*patterns)
# shutil.copytree(src, dst, symlinks=False, ignore=None),递归的去拷贝文件夹
# 目标目录不能存在,注意对folder2目录父级目录要有可写权限,ignore的意思是排除
shutil.copytree('folder1', 'folder2', ignore=shutil.ignore_patterns('*.pyc', 'tmp*'))
# shutil.rmtree(path[, ignore_errors[, onerror]]),递归的去删除文件
shutil.rmtree('folder1')
# shutil.move(src, dst),递归的去移动文件,它类似mv命令,其实就是重命名
shutil.move('folder1', 'folder3')
# shutil.make_archive(base_name, format, ...),创建压缩包并返回文件路径,例如:zip、tar
'''
base_name: 压缩包的文件名,也可以是压缩包的路径。只是文件名时,则保存至当前目录,否则保存至指定路径,如 data_bak = >保存至当前路径;/ tmp/data_bak = >保存至/tmp/
format:压缩包种类,“zip”, “tar”, “bztar”,“gztar”
root_dir:要压缩的文件夹路径(默认当前目录)
owner:用户,默认当前用户
group:组,默认当前组
logger:用于记录日志,通常是logging.Logger对象
'''
# 将 /data 下的文件打包放置当前程序目录
import shutil
ret = shutil.make_archive("data_bak", 'gztar', root_dir='/data')
# 将 /data下的文件打包放置 /tmp/目录
ret = shutil.make_archive("/tmp/data_bak", 'gztar', root_dir='/data')
zipfile 压缩解压缩
# shutil 对压缩包的处理是调用 ZipFile 和 TarFile 两个模块来进行的,详细:
import zipfile
# 压缩
z = zipfile.ZipFile('laxi.zip', 'w')
z.write('a.log')
z.write('data.data')
z.close()
# 解压
z = zipfile.ZipFile('laxi.zip', 'r')
z.extractall(path='.')
z.close()
tarfile 压缩解压缩
import tarfile
# 压缩
t=tarfile.open('/tmp/egon.tar','w')
t.add('/test1/a.py',arcname='a.bak')
t.add('/test1/b.py',arcname='b.bak')
t.close()
# 解压
t=tarfile.open('/tmp/egon.tar','r')
t.extractall('/egon')
t.close()
xml 模块
xml 是实现不同语言或程序之间进行数据交换的协议,跟 json 差不多,但 json 使用起来更简单,不过,古时候,在 json 还没诞生的黑暗年代,大家只能选择用 xml 呀,至今很多传统公司如金融行业的很多系统的接口还主要是 xml。
xml 的格式如下,就是通过<>节点来区别数据结构的:
<?xml version="1.0"?>
<data>
<country name="Liechtenstein">
<rank updated="yes">2</rank>
<year>2008</year>
<gdppc>141100</gdppc>
<neighbor name="Austria" direction="E"/>
<neighbor name="Switzerland" direction="W"/>
</country>
<country name="Singapore">
<rank updated="yes">5</rank>
<year>2011</year>
<gdppc>59900</gdppc>
<neighbor name="Malaysia" direction="N"/>
</country>
<country name="Panama">
<rank updated="yes">69</rank>
<year>2011</year>
<gdppc>13600</gdppc>
<neighbor name="Costa Rica" direction="W"/>
<neighbor name="Colombia" direction="E"/>
</country>
</data>
Python 使用 xml
xml 协议在各个语言里的都 是支持的,在 python 中可以用以下模块操作 xml:
# print(root.iter('year')) #全文搜索
# print(root.find('country')) #在root的子节点找,只找一个
# print(root.findall('country')) #在root的子节点找,找所有
import xml.etree.ElementTree as ET
tree = ET.parse("xmltest.xml")
root = tree.getroot()
print(root.tag)
#遍历xml文档
for child in root:
print('========>', child.tag, child.attrib, child.attrib['name'])
for i in child:
print(i.tag, i.attrib, i.text)
#只遍历year 节点
for node in root.iter('year'):
print(node.tag, node.text)
#---------------------------------------
import xml.etree.ElementTree as ET
tree = ET.parse("xmltest.xml")
root = tree.getroot()
#修改
for node in root.iter('year'):
new_year = int(node.text) + 1
node.text = str(new_year)
node.set('updated', 'yes')
node.set('version', '1.0')
tree.write('test.xml')
#删除node
for country in root.findall('country'):
rank = int(country.find('rank').text)
if rank > 50:
root.remove(country)
tree.write('output.xml')
#在country内添加(append)节点year2
import xml.etree.ElementTree as ET
tree = ET.parse("a.xml")
root = tree.getroot()
for country in root.findall('country'):
for year in country.findall('year'):
if int(year.text) > 2000:
year2 = ET.Element('year2')
year2.text = '新年'
year2.attrib = {'update': 'yes'}
country.append(year2) #往country节点下添加子节点
tree.write('a.xml.swap')
自己创建 xml 文档
import xml.etree.ElementTree as ET
new_xml = ET.Element("namelist")
name = ET.SubElement(new_xml, "name", attrib={"enrolled": "yes"})
age = ET.SubElement(name, "age", attrib={"checked": "no"})
sex = ET.SubElement(name, "sex")
sex.text = '33'
name2 = ET.SubElement(new_xml, "name", attrib={"enrolled": "no"})
age = ET.SubElement(name2, "age")
age.text = '19'
et = ET.ElementTree(new_xml) #生成文档对象
et.write("test.xml", encoding="utf-8", xml_declaration=True)
ET.dump(new_xml) #打印生成的格式
subprocess 模块
subprocess 模块允许你去创建一个新的进程让其执行另外的程序,并与它进行通信,获取标准的输入、标准输出、标准错误以及返回码等。更多查看官网:https://docs.python.org/2/library/subprocess.html?highlight=subprocess#frequently-used-arguments
import subprocess
import subprocess
'''
sh-3.2# ls /Users/nick/Desktop |grep txt$
mysql.txt
tt.txt
事物.txt
'''
res1 = subprocess.Popen('ls /Users/jieli/Desktop',
shell=True,
stdout=subprocess.PIPE)
res = subprocess.Popen('grep txt$',
shell=True,
stdin=res1.stdout,
stdout=subprocess.PIPE)
print(res.stdout.read().decode('utf-8'))
# 等同于上面,但是上面的优势在于,一个数据流可以和另外一个数据流交互,可以通过爬虫得到结果然后交给grep
res1 = subprocess.Popen('ls /Users/jieli/Desktop |grep txt$',
shell=True,
stdout=subprocess.PIPE)
print(res1.stdout.read().decode('utf-8'))
# windows下:
# dir | findstr 'test*'
# dir | findstr 'txt$'
res1 = subprocess.Popen(r'dirC:\Users\Administrator\PycharmProjects\test\函数备课',
shell=True,
stdout=subprocess.PIPE)
res = subprocess.Popen('findstr test*',
shell=True,
stdin=res1.stdout,
stdout=subprocess.PIPE)
# subprocess使用当前系统默认编码,得到结果为bytes类型,在windows下需要用gbk解码
print(res.stdout.read().decode('gbk'))
configparser模块
该模块适用于配置文件的格式与windows ini文件类似,可以包含一个或多个节(section),每个节可以有多个参数(键=值)。
创建文件 来看一个好多软件的常见文档格式如下:
[DEFAULT]
ServerAliveInterval = 45
Compression = yes
CompressionLevel = 9
ForwardX11 = yes
[bitbucket.org]
User = hg
[topsecret.server.com]
Port = 50022
ForwardX11 = no
如果想用python生成一个这样的文档怎么做呢?
import configparser
config = configparser.ConfigParser()
config["DEFAULT"] = {'ServerAliveInterval': '45',
'Compression': 'yes',
'CompressionLevel': '9',
'ForwardX11':'yes'
}
config['bitbucket.org'] = {'User':'hg'}
config['topsecret.server.com'] = {'Host Port':'50022','ForwardX11':'no'}
with open('example.ini', 'w') as configfile:
config.write(configfile)
查找文件
import configparser
config = configparser.ConfigParser()
#---------------------------查找文件内容,基于字典的形式
print(config.sections()) # []
config.read('example.ini')
print(config.sections()) # ['bitbucket.org', 'topsecret.server.com']
print('bytebong.com' in config) # False
print('bitbucket.org' in config) # True
print(config['bitbucket.org']["user"]) # hg
print(config['DEFAULT']['Compression']) #yes
print(config['topsecret.server.com']['ForwardX11']) #no
print(config['bitbucket.org']) #<Section: bitbucket.org>
for key in config['bitbucket.org']: # 注意,有default会默认default的键
print(key)
print(config.options('bitbucket.org')) # 同for循环,找到'bitbucket.org'下所有键
print(config.items('bitbucket.org')) #找到'bitbucket.org'下所有键值对
print(config.get('bitbucket.org','compression')) # yes get方法Section下的key对应的value
增删改操作
import configparser
config = configparser.ConfigParser()
config.read('example.ini')
config.add_section('yuan')
config.remove_section('bitbucket.org')
config.remove_option('topsecret.server.com',"forwardx11")
config.set('topsecret.server.com','k1','11111')
config.set('yuan','k2','22222')
config.write(open('new2.ini', "w"))
Python 常用模块小结
time 模块
- 打印三种不同形式的时间,时间戳/格式化时间/结构化时间
datetime 模块
- 时间的加减
random 模块
- 随机数
os 模块
- 与操作系统交互,多用于文件操作
sys 模块
- 与 python 解释器交互,多用于环境变量配置
json 模块
- 序列化:把数据从内存读入硬盘(以 json 格式)
- 反序列化:把数据从硬盘读入内存(以 json 格式)
- 跨平台性质,它可以序列化 dict/list/str/int/float/bool/None 数据类型
pickle 模块
- 序列化:把数据从内存读入硬盘(以 pickle 格式,二进制形式)
- 反序列化:把数据从硬盘读入内存(以 pickle 格式,以二进制形式)
- 无法跨平台,但是可以序列化 Python 的任意数据类型,
hashlib 模块
- 加密
hmac 模块
- 加盐加密
logging 模块
- 日志模块
- 步骤
创建 logger 对象
创建 handler 对象
创建 formatter 对象
把 formatter 绑定到 handler 对象上
把 handler 对象绑定到 logger 对象上
设置级别
测试
numpy 模块
- 多维数组(矩阵/张量)的运算
pandas 模块
- 处理表格/json 等文件,数据库
matplotlib 模块
- 数据可视化
re 模块
- 正则表达式,从文本中匹配特定的内容
typing 模块
- 导入 Python 的数据类型
shutil 模块(了解)
- 文件的压缩与解压缩,文件的拷贝
subprocess 模块(了解)
- 运行子程序,即运行 linux 命令
xml 模块(了解)
- 类似于 json 模块,做不同程序间的数据交互
文章出处登录后可见!