

标题:T2I-Adapter: Learning Adapters to Dig out More Controllable Ability for Text-to-Image Diffusion Models
论文:https://arxiv.org/pdf/2302.08453.pdf
博客:https://huggingface.co/blog/t2i-sdxl-adapters
代码:https://github.com/TencentARC/T2I-Adapter
使用地址:https://huggingface.co/spaces/TencentARC/T2I-Adapter-SDXL
大家好,AI 绘画太火了,现在boss直聘上一大堆岗位都是,游戏公司,设计公司等等都在疯狂招,都是潜在机会!!!
由于文本输入对AI生成的图片控制不够精细,而 ControlNet 的出现,很好的解决了这个问题,也有了更多想象的空间,我们使用线稿、边缘、深度图、姿态、人脸关键点等等来控制生成的结果,但是 ControlNet 的计算成本很高,因为,ControlNet 在反向扩散过程的每个去噪步骤中,都需要运行 ControlNet 和 UNet。另外,ControlNet强调复制UNet编码器作为控制模型的重要性,导致参数数量更大。因此,生成受到 ControlNet 大小的瓶颈(越大,过程变得越慢)。
https://github.com/lllyasviel/ControlNet
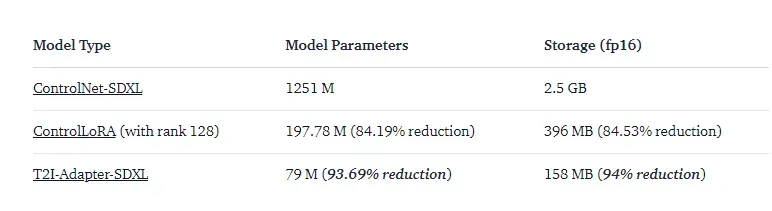
因此,今天要分析的一个工作,T2I-Adapter 是一种高效的即插即用模型,它为预训练的文本到图像模型提供额外的指导,同时冻结原始的大型文本到图像模型。T2I-Adapter 将 T2I 模型中的内部知识与外部控制信号结合起来。我们可以根据不同的情况训练各种适配器,实现丰富的控制和编辑效果。T2I-Adapter 的尺寸较小,并且与 ControlNet 不同,T2I-Adapter 在整个去噪过程中仅运行一次。

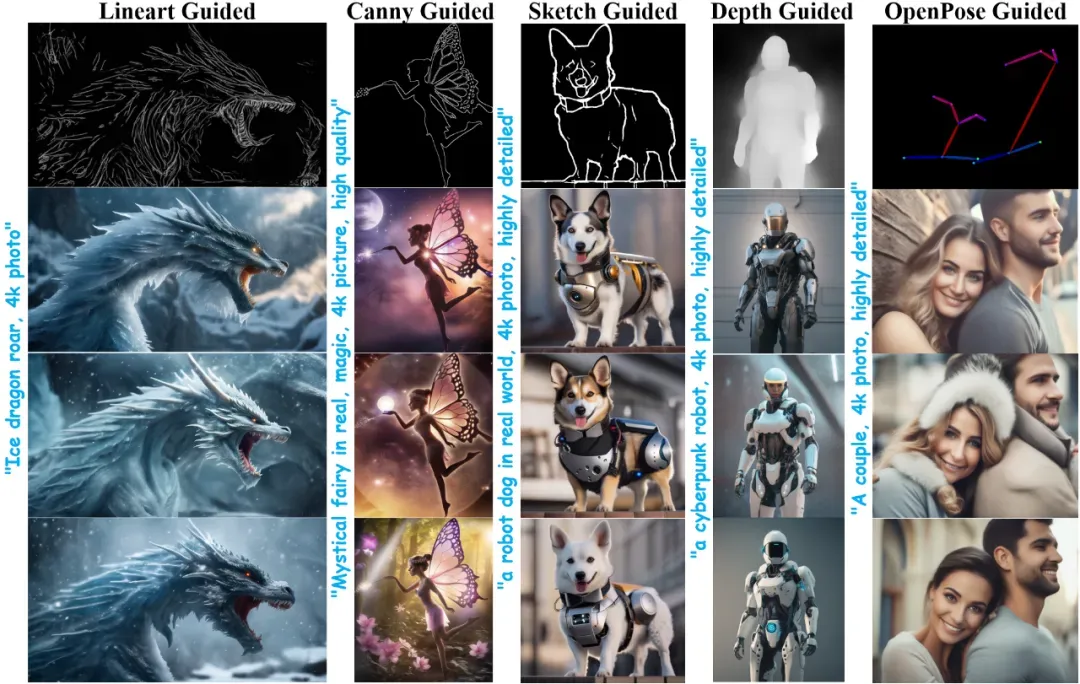
在过去的几周里,Diffusers 团队和 T2I-Adapter 作者一直在合作,为 diffusers 中的 Stable Diffusion XL (SDXL) 提供 T2I-Adapters 支持。本文,将分享从头开始在 SDXL 上训练 T2I-Adapters 的结果,当然还有各种控制条件(草图、canny、艺术线条、深度和 openpose)上的 T2I-Adapter checkpoints!

与之前版本的T2I-Adapter(SD-1.4/1.5)相比,T2I-Adapter-SDXL仍然采用原来的设置,用79M Adapter驱动2.6B SDXL!T2I-Adapter-SDXL在继承一代SDXL高品质的同时,保持了强大的控制能力!
使用 diffusers 训练 T2I-Adapter-SDXL
我们根据 diffusers 提供的官方示例构建了训练脚本。
https://github.com/huggingface/diffusers/blob/main/examples/t2i_adapter/README_sdxl.md
文中提到的大多数 T2I-Adapter 模型都是在 LAION-Aesthetics V2 的 3M 高分辨率图像文本对上进行训练的,设置如下:
Training steps: 20000-35000
Batch size: Data parallel with a single GPU batch size of 16 for a total batch size of 128.
Learning rate: Constant learning rate of 1e-5.
Mixed precision: fp16
建议使用项目中的脚本来训练自定义且功能强大的T2I-Adapters,在速度、内存和质量之间实现竞争性权衡。
在 diffusers 中使用 T2I-Adapter-SDXL
以线稿条件为例来演示T2I-Adapter-SDXL的使用。首先,首先安装所需的依赖项:
项目地址:https://github.com/TencentARC/T2I-Adapter
pip install -U git+https://github.com/huggingface/diffusers.git
pip install -U controlnet_aux==0.0.7 # for conditioning models and detectors
pip install transformers accelerate
T2I-Adapter-SDXL的生成过程主要包括以下两个步骤:
Condition images 准备成合适的 control image 格式(例如输入的图片要先转为合适的线稿图片表示)
控制图像(线稿)和提示(prompt)被传递到 StableDiffusionXLAdapterPipeline
使用艺术线条Adapter的简单示例。首先初始化 SDXL 的 T2I-Adapter 管道和线稿检测器。
import torch
from controlnet_aux.lineart import LineartDetector
from diffusers import (AutoencoderKL, EulerAncestralDiscreteScheduler,
                       StableDiffusionXLAdapterPipeline, T2IAdapter)
from diffusers.utils import load_image, make_image_grid


# load adapter
adapter = T2IAdapter.from_pretrained(
    "TencentARC/t2i-adapter-lineart-sdxl-1.0", torch_dtype=torch.float16, varient="fp16"
).to("cuda")


# load pipeline
model_id = "stabilityai/stable-diffusion-xl-base-1.0"
euler_a = EulerAncestralDiscreteScheduler.from_pretrained(
    model_id, subfolder="scheduler"
)
vae = AutoencoderKL.from_pretrained(
    "madebyollin/sdxl-vae-fp16-fix", torch_dtype=torch.float16
)
pipe = StableDiffusionXLAdapterPipeline.from_pretrained(
    model_id,
    vae=vae,
    adapter=adapter,
    scheduler=euler_a,
    torch_dtype=torch.float16,
    variant="fp16",
).to("cuda")


# load lineart detector
line_detector = LineartDetector.from_pretrained("lllyasviel/Annotators").to("cuda")
然后,加载图像来检测线稿:
url = "https://huggingface.co/Adapter/t2iadapter/resolve/main/figs_SDXLV1.0/org_lin.jpg"
image = load_image(url)
image = line_detector(image, detect_resolution=384, image_resolution=1024)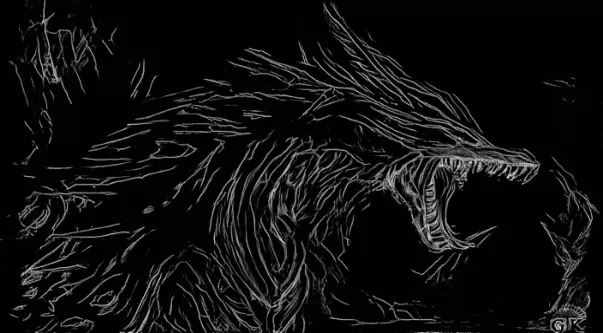

然后生成:
prompt = "Ice dragon roar, 4k photo"
negative_prompt = "anime, cartoon, graphic, text, painting, crayon, graphite, abstract, glitch, deformed, mutated, ugly, disfigured"
gen_images = pipe(
    prompt=prompt,
    negative_prompt=negative_prompt,
    image=image,
    num_inference_steps=30,
    adapter_conditioning_scale=0.8,
    guidance_scale=7.5,
).images[0]
gen_images.save("out_lin.png")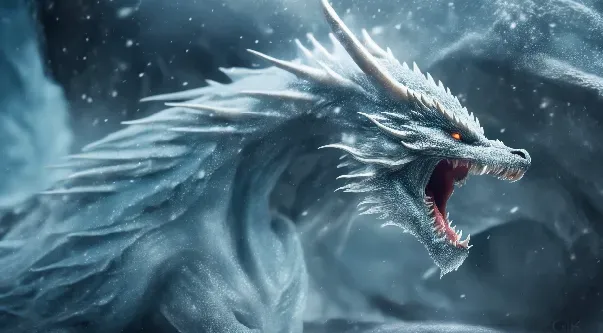
有两个重要的参数需要理解,可以帮助控制调节量。
adapter_conditioning_scale – 适配器调节规模
该参数控制调节对输入的影响程度。高值意味着更高的控制效果,反之亦然。
adapter_conditioning_factor – 适配器调节因子
该参数控制应用条件的初始生成步骤数。该值应设置在 0-1 之间(默认值为 1)。adapter_conditioning_factor=1 的值表示适配器应应用于所有时间步,而adapter_conditioning_factor=0.5 表示它将仅应用于前 50% 的步。
更多详情查看官方文档。https://huggingface.co/docs/diffusers/main/en/api/pipelines/stable_diffusion/adapter
文章出处登录后可见!