参考代码
ImageBind:GitHub – facebookresearch/ImageBind: ImageBind One Embedding Space to Bind Them All
ImageBind + stable-diffusion-2-1-unclip:GitHub – Zeqiang-Lai/Anything2Image: Generate image from anything with ImageBind and Stable Diffusion
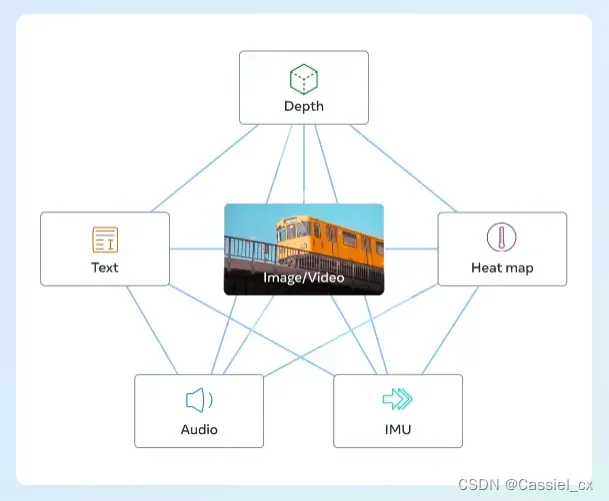
最近很火的ImageBind,它通过利用多种类型(depth、text、heatmap、audio、IMU)的图像配对数据来学习单个共享表示空间。ImageBind不需要所有模态同时出现的数据集,它利用了图像的绑定属性,只要将每个模态的embedding与图像embedding对齐,就能实现所有模态的迅速对齐。

但从ImageBind开源的代码来看,作者只开源了encode部分(把不同模态的数据映射到对齐的embedding space中),无法直接实现text2img、audio2img等功能。为了实现上述功能,大佬们便把ImageBind提供的“unified latent space”和stable diffusion中的decoder结合起来,感兴趣的可以去Github上搜Anything2Image或者BindDiffusion。这里我参考了ImageBind和Anything2Image的代码,复现了audio+img to img、text to img等功能,代码运行的依赖库可参考ImageBind的(pip install -r requirements.txt),再加上diffusers即可(pip install diffusers)。
代码示例
import torch
from diffusers import StableUnCLIPImg2ImgPipeline
import sys
sys.path.append("..")
from models import data
from models import imagebind_model
from models.imagebind_model import ModalityType


model = imagebind_model.imagebind_huge(pretrained=True).to("cuda").eval()
pipe = StableUnCLIPImg2ImgPipeline.from_pretrained("stabilityai/stable-diffusion-2-1-unclip", torch_dtype=torch.float16).to("cuda")

with torch.no_grad():
    ## image
    image_path = ["/kaxier01/projects/GPT/ImageBind/assets/image/bird.png"]
    embeddings = model.forward({ModalityType.VISION: data.load_and_transform_vision_data(image_path, "cuda")}, normalize=False)
    img_embeddings = embeddings[ModalityType.VISION]
    ## audio
    audio_path = ["/kaxier01/projects/GPT/ImageBind/assets/wav/wave.wav"]
    embeddings = model.forward({ModalityType.AUDIO: data.load_and_transform_audio_data(audio_path, "cuda")}, normalize=True)
    audio_embeddings = embeddings[ModalityType.AUDIO]
    embeddings = (img_embeddings + audio_embeddings) / 2

    images = pipe(image_embeds=embeddings.half()).images
    images[0].save("/kaxier01/projects/GPT/ImageBind/results/bird_wave_audioimg2img.png")
遇到问题及解决方法
这块遇到的问题主要是模型下载超时的问题,解决方法如下:
方法一:
到官网(Hugging Face – The AI community building the future.)去搜索模型并下载(最好全部文件都下下来),如
下载好后,在代码中指定模型路径即可,如
# 模型路径: "/kaxier01/projects/GPT/ImageBind/checkpoints/stable-diffusion-2-1-unclip"
pipe = StableUnCLIPImg2ImgPipeline.from_pretrained("/kaxier01/projects/GPT/ImageBind/checkpoints/stable-diffusion-2-1-unclip", torch_dtype=torch.float16).to("cuda")
方法二:
下载git-lfs
apt-get update
apt-get install git-lfs
git lfs install
下载并安装好后,即可使用该指令来下载模型,如
git lfs clone https://huggingface.co/stabilityai/stable-diffusion-2-1-unclip结果展示
thermal2img
input
output
audio+img2img
input
语音(wave.wav)+图片
output
text2img
input
'a photo of an astronaut riding a horse on mars'output
版权声明:本文为博主作者:chen_znn原创文章,版权归属原作者,如果侵权,请联系我们删除!
原文链接:https://blog.csdn.net/qq_38964360/article/details/130886233