文章目录
1. 背景
LSTM因其具有记忆的功能,可以利用很长的序列信息来建立学习模型,所以用它来进行时间序列的预测会很有优势。实际操作中利用LSTM预测有两大难点:一是模型如何搭建,二是前期的数据如何处理,我们依次介绍。本文主要参考来源于这篇文章。
2. 模型搭建
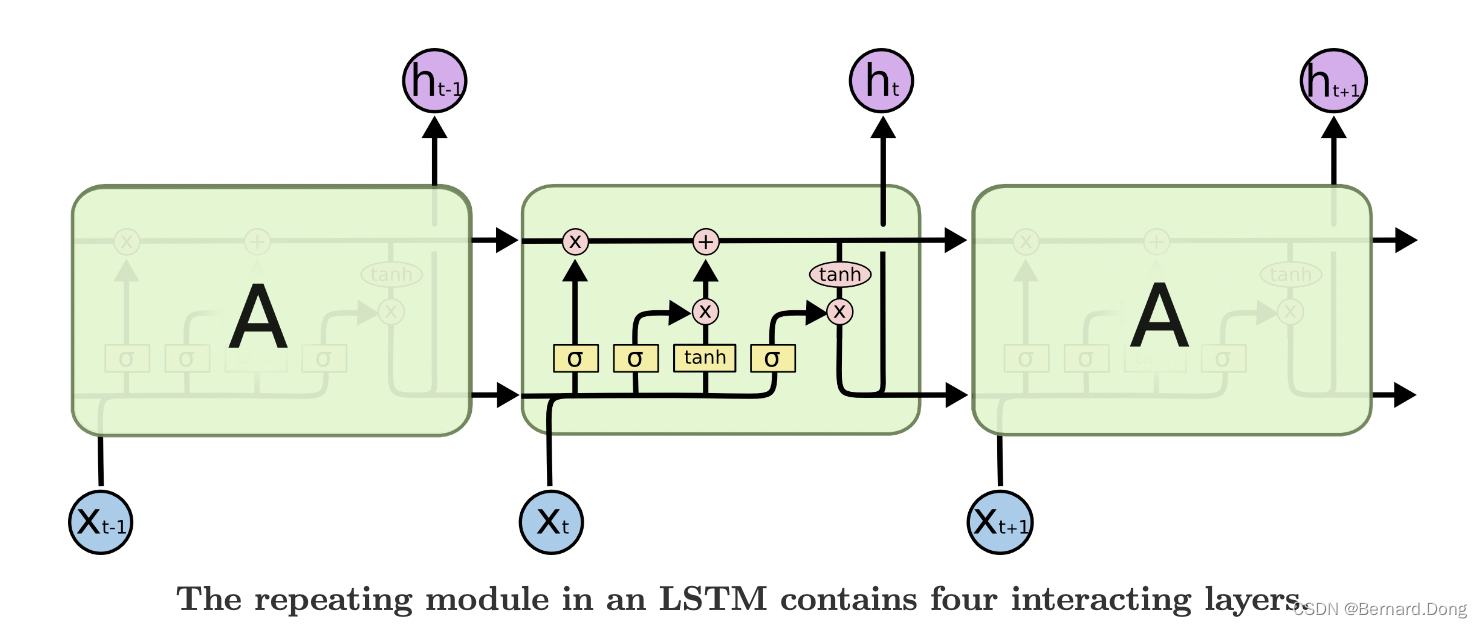
pytorch网络搭建我在之前的文章已初步介绍过,但对于循环神经网络,还有很多需要补充的部分。下图是LSTM单元的结构,每一个格子代表一个时间步(time-step),想深入了解请看LSTM单元的详细介绍。

那么在pytorch中是如何实现的呢?pytorch中的LSTM结构实现
2.1 定义LSTM
几个参数的含义为(红字是比较常用的参数):
rnn = nn.LSTM(input_size, hidden_size, num_layers )
- input_size:是我们输入的数据的维度,可以理解为我们每一天数据的维度。在这个问题里,每一天我们有的数据只有价格,因此input_size是1。如果每一天数据有n个特征,那么input_size是n。
- hidden_size:是隐藏状态h的特征数。
- num_layers:我们要堆叠几个LSTM层,默认为1,实际取1或2均可。
- bias – If False, then the layer does not use bias weights b_ih and b_hh. Default: True
- batch_first – If True, then the input and output tensors are provided as (batch, seq, feature) instead of (seq, batch, feature). Note that this does not apply to hidden or cell states. See the Inputs/Outputs sections below for details. Default: False
- dropout – If non-zero, introduces a Dropout layer on the outputs of each LSTM layer except the last layer, with dropout probability equal to dropout. Default: 0
- bidirectional – If True, becomes a bidirectional LSTM. Default: False
- proj_size – If > 0, will use LSTM with projections of corresponding size. Default: 0
2.2 LSTM层的输入和输出
Inputs: input, (h_0, c_0)
输入的数据由两部分,一是input,也就是要输入的张量,其结构在下文中会详细介绍,二是元组(h_0, c_0),包含隐藏状态h和单元状态c的初始值,也可以不写入这一项,那么将默认为0.
Outputs: output, (h_n, c_n)
输出的除了输出值output,还包括了(h_n, c_n),即当前的隐藏状态和单元状态。
output, (hn, cn) = rnn(input, (h0, c0))
2.3 网络建立
如卷积神经网络一般,网络除了卷积层还要包含全连接层,LSTM层也是如此,在LSTM后方的全连接层也可以看做是一个回归操作 regression。
LSTM+一个全连接层的简单例子:
class RegLSTM(nn.Module):

    def __init__(self, inp_dim, out_dim, mid_dim, mid_layers):
        super(RegLSTM, self).__init__()
        self.rnn = nn.LSTM(inp_dim, mid_dim, mid_layers)  # rnn
        self.reg = nn.Sequential(
            nn.Tanh(),
            nn.Linear(mid_dim, out_dim),
        )  # regression

    def forward(self, x):
        y = self.rnn(x)[0]
        y = self.reg(y)
        return y
我们的网络在此基础上做了调整,一是增加了一个线性层,且在张量进出线性区时进行了降维和恢复的操作,二是增加了一个output_y_hc()方法。
class RegLSTM(nn.Module):
    def __init__(self, inp_dim, out_dim, mid_dim, mid_layers):
        super(RegLSTM, self).__init__()
        self.rnn = nn.LSTM(inp_dim, mid_dim, mid_layers)  # rnn
        self.reg = nn.Sequential(
             nn.Tanh(),
            nn.Linear(mid_dim, mid_dim),
            nn.Tanh(),
            nn.Linear(mid_dim, out_dim)
        )  # regression

    def forward(self, x):
        y = self.rnn(x)[0]  # y, (h, c) = self.rnn(x)
        seq_len, batch_size, hid_dim = y.shape
        y = y.view(-1, hid_dim) #降维
        y = self.reg(y)
        y = y.view(seq_len, batch_size, -1)  #恢复原来的维度
        return y

    def output_y_hc(self, x, hc):
        y, hc = self.rnn(x, hc)  # y, (h, c) = self.rnn(x)
        seq_len, batch_size, hid_dim = y.size()
        y = y.view(-1, hid_dim)
        y = self.reg(y)
        y = y.view(seq_len, batch_size, -1)
        return y, hc
进入线性区前的降维提高了收敛速度,而output_y_hc()方法与forward()很像,区别在于输入和输出时都包含了(h,c),这个方法主要用于训练后的预测,后面会详细说明。
3. 时序数据处理
3.1 三种输入模式
时序数据如何处理,与pytorch中LSTM层张量的输入格式有关,上文提到的input,有三种输入模式,其中
- L:序列长度,就是时间长短
- M:输入的数据的维度,同上文input_size
- N:batch_size批次数,后面会讲到。
- 单线模式:数据维度(L, M)。举个例子,我们有三天,每天有两个维度的数据,那么L=3,M=2,最后要输入的是
tensor([[ 2, 11],[ 3, 12],[ 4, 13]])。 - 多线模式一:当参数
batch_first=False时(默认状态),数据维度为(L, N, M)。还是上图这个例子,时间点有三个,但我们想将其分为两个批次(day-1, day-2)和(day-1, day-2, day-3),所以L=3,N=2,M=2。最后要输入的如下,注意这里用pad_sequence进行了补零操作。
tensor([[[ 2, 11],
         [ 3, 12]],

        [[ 3, 12],
         [ 4, 13]],

        [[ 4, 13],
         [ 0,  0]]])
- 多线模式二:当参数
batch_first=True时,数据维度为(N, L, M,),最后要输入的如下。
tensor([[[ 2, 11],
         [ 3, 12],
         [ 4, 13]],

        [[ 3, 12],
         [ 4, 13],
         [ 0,  0]]])
3.2 归一化与反归一化
实践证明,如果训练前后不进行数据的归一化与反归一化处理,可能会让结果产生较大偏差。我们用MaxMin归一化方法,但要注意一点,我们的量纲,也就是最大值最小值要与训练数据保持一致。
def minmaxscaler(x):#训练数据归一化
    minx = np.amin(x)
    maxx = np.amax(x)
    return (x - minx)/(maxx - minx), (minx, maxx)

def preminmaxscaler(x, minx, maxx):#用训练数据的最大值最小值归一化预测数据
    return (x - minx)/(maxx - minx)

def unminmaxscaler(x, minx, maxx):#预测完毕的数据反归一化
    return x * (maxx - minx) + minx
3.3 X和Y是什么
对于时序数据,我们会有一个疑问,我们训练时的特征集和标签集是什么,或者说X和Y都是什么?
在这里我们的处理是:前一段时间作为X,后一段时间作为Y,取time_diff=1。比如我们的时间步是1 2 3 4 5 6 7,其中一个X就可以取1 2 3 4,对应的Y为2 3 4 5。
3.4 多线模式
假如原始数据为[[1,2],[3,4,5],[6,7,8,9]] ,pad_sequence()可以将其转化为多线模式一:
tensor([[1, 3, 6],
        [2, 4, 7],
        [0, 5, 8],
        [0, 0, 9]])
pad_sequence(batch_first=False)将其转化为多线模式二:
tensor([[1, 2, 0, 0],
        [3, 4, 5, 0],
        [6, 7, 8, 9]])
多线模式是将时序数据切割成小段进行训练,其目的是充分利用原数据的信息,我们的项目使用的也是这种模式。总体时间步有150,训练集有100,每一个时间仅对应一个值,我们定义一个长度为40的时间窗口,每隔三个时间取为一批次,一共有20批,即batch_size=20,然后将转化为多线模式一。
#数据预处理  归一化
train_x, train_x_minmax = minmaxscaler(data_x[:train_size])
train_y, train_y_minmax = minmaxscaler(data_y[:train_size])

#转换为tensor格式
train_x = torch.tensor(train_x, dtype=torch.float32, device=device)
train_y = torch.tensor(train_y, dtype=torch.float32, device=device)

#对时序数据进行切割、重组
window_len = 40
batch_x,batch_y=list(),list()
for i in range(len(train_x),window_len,-3):
    batch_x.append(train_x[i-window_len:i])
    batch_y.append(train_y[i-window_len:i])

#多线模式一
batch_x = pad_sequence(batch_x)
batch_y = pad_sequence(batch_y)
最后得到的batch_x及batch_y的维度均为(40,20,1)对应着我们之前说的(L, N, M)。
4. 模型训练
模型训练过程与其他神经网络一致,具体如下:
# 加载模型
net = RegLSTM(inp_dim=1, out_dim=1, mid_dim=16, mid_layers=2)#定义模型
loss = nn.MSELoss()#定义损失函数
optimizer = torch.optim.Adam(net.parameters(), lr=1e-2)#定义优化器

# 开始训练
print("Training......")
for e in range(1000):
    out = net(batch_x)#向前传播

    Loss = loss(out, batch_y)#计算损失

    optimizer.zero_grad()#梯度清零

    Loss.backward()#反向传播

    optimizer.step()#梯度更新

    if e % 10 == 0:
        print('Epoch: {:4}, Loss: {:.5f}'.format(e, Loss.item()))
5. 预测
预测的思路简单来说是我们有时间步1 2 3 4 5,先预测出6,然后用1 2 3 4 5 6预测7,以此类推。可以看出这个过程每一次都需要把整个序列重新输入,但如果我们能把每一步当前的信息(h,c)储存起来,下一步就不用重复前面的步骤了。所以我们前面提到的output_y_hc()方法就是这时候使用的。
#定义初始状态
zero_ten = torch.zeros((mid_layers, eval_size, mid_dim), dtype=torch.float32)

#预测
test_len = 40
for i in range(train_size, len(new_data_x)):  # 要预测的是i
    test_x = new_data_x[i-test_len:i, np.newaxis, :]
    test_x = preminmaxscaler(test_x, train_x_minmax[0], train_x_minmax[1])
    batch_test_x = torch.tensor(test_x, dtype=torch.float32, device=device)
    if i == train_size:
        test_y, hc = net.output_y_hc(batch_test_x, (zero_ten, zero_ten))
    else:
        test_y, hc = net.output_y_hc(batch_test_x, hc)
#     test_y = net(batch_test_x)
    predict_y = test_y[-1].item()
    predict_y = unminmaxscaler(predict_y, train_x_minmax[0], train_y_minmax[1])
    new_data_x[i] = predict_y
训练了几次,每次结果都不太一样,取了一个相对不错的。由于使用的是原油价格,随机性比较大,如果是规律性强的数据效果会好得多。
完整代码及数据
文章出处登录后可见!
