pytest介绍
- pytest是一个非常成熟的全功能的Python测试框架。
- 简单灵活,容易上手
- 支持参数化
- 测试用例的skip和xfail,自动失败重试等处理
- 能够支持简单的单元测试和复杂的功能测试,还可以用来做selenium/appnium等自动化测试,接口自动化测试(pytest+requests)
- pytest具有很多第三方插件,并且可以自定义扩展,比较好用的如pytest-allure(完美html测试报告生成),pytest-xdist(多CPU并发)等
- 可以很好的和jenkins集成
- 文档:http://docs.pytest.org/en/latest/contents.html#toc
- 第三方库:https://pypi.org/search/?q=pytest
- Github地址:https://github.com/pytest-dev/pytest/
pytest安装与依赖
依赖
pytest requires: Python 3.7+ or PyPy3.
安装
 # 安装pytest:
 pip install pytest

 # 升级pytest
  pip install -U pytest

# 查看pytest版本
pytest --version

# 查看已安装包列表
pip list

# 查看pytest帮助文档
pytest -h

# 安装第三方插件
 pip install pytest-sugar
 pip install pytest-rerunfailures
 pip install pytest-xdist
 pip install pytest-assume
 pip install pytest-html
pytest测试用例的识别与运行
- 发现用例的规则
a) 文件test_.py开头和_test.py结尾
b) Test开头的类中test开头的方法(测试类不能带有__init__方法)
c) 模块中test开头的函数(可以不在class中)
注意点:
pytest是以方法为单位发现用例的,你写不写测试类根本不重要
在哪个目录下执行pytest就在哪个目录下按照上述规则去查找
-
自定义查找规则:pytest.ini
-
用例执行顺序
- Unittest用例执行顺序(pytest可以执行unittest框架写的用例和方法)
- 根据ASCII码来排序
- Pytest用例执行顺序
- 文件名称按ASCII码排序
- 文件内根据定义的方法的先后顺序,从上到下执行
参数解析
pytest / py.test- 打印详细运行日志信息:
pytest -v (最高级别信息-verbose) - s是带控制台输出结果,也是输出详细,可以打印测试用例中print的输出:
pytest -v -s 文件名 - 执行单独一个pytest模块:
pytest 文件名.py - 运行某个模块里面某个类:
pytest 文件名.py::类名 - 运行某个模块里面某个类里面的方法:
pytest 文件名.py::类名::方法名 - 跳过某个用例:
pytest -k "类名 and not 方法名",如pytest -k "TestDemo and not test_one" - 运行带有某标记的测试用例(pytest.mark.标记名):
pytest -m 标记名 - 一旦运行到报错就停止运行:
pytest -x 文件名 - 当错误达到num的时候就停止运行:
pytest --maxfile=[num]
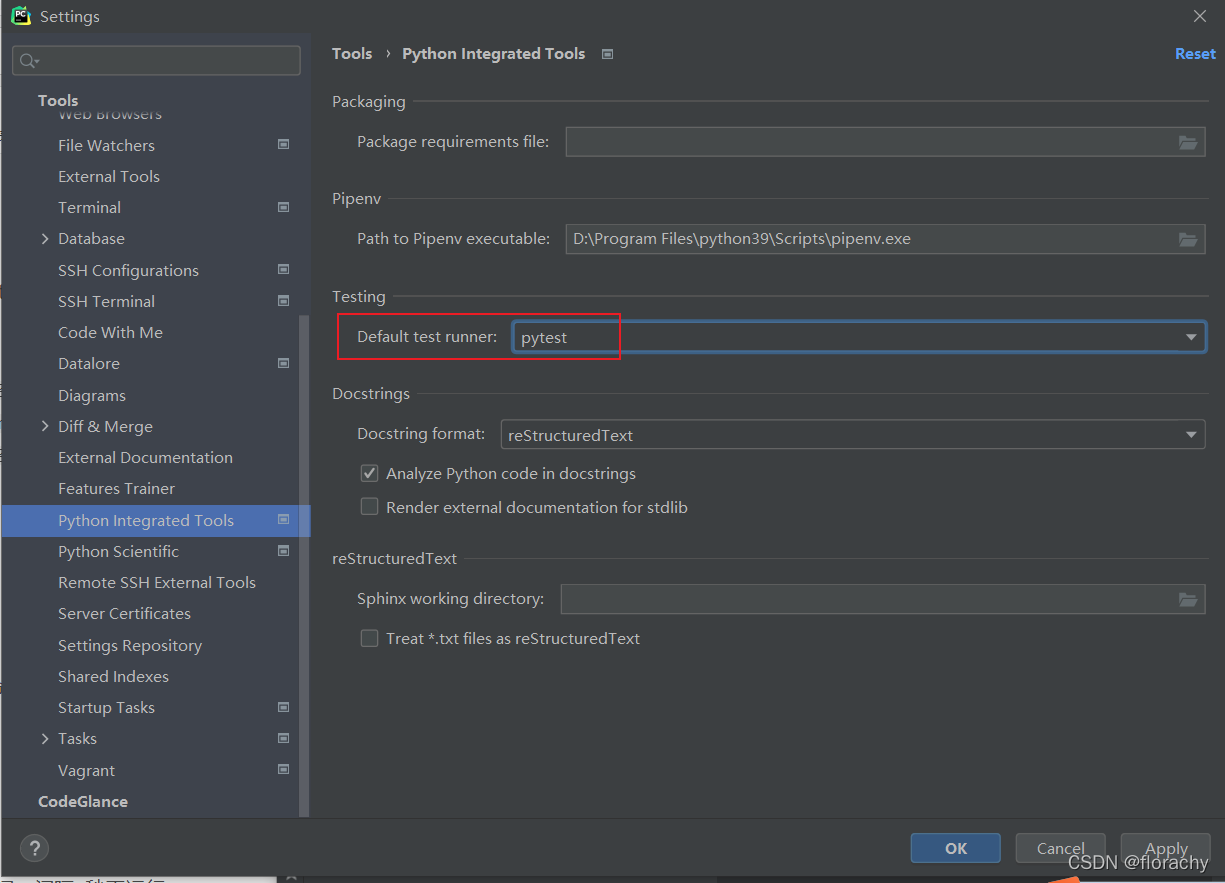
pycharm配置与执行pytest
运行方式:pytest.main([“-v”, “TestDemo”]) (所有的参数和pytest命令行方式是一样的)
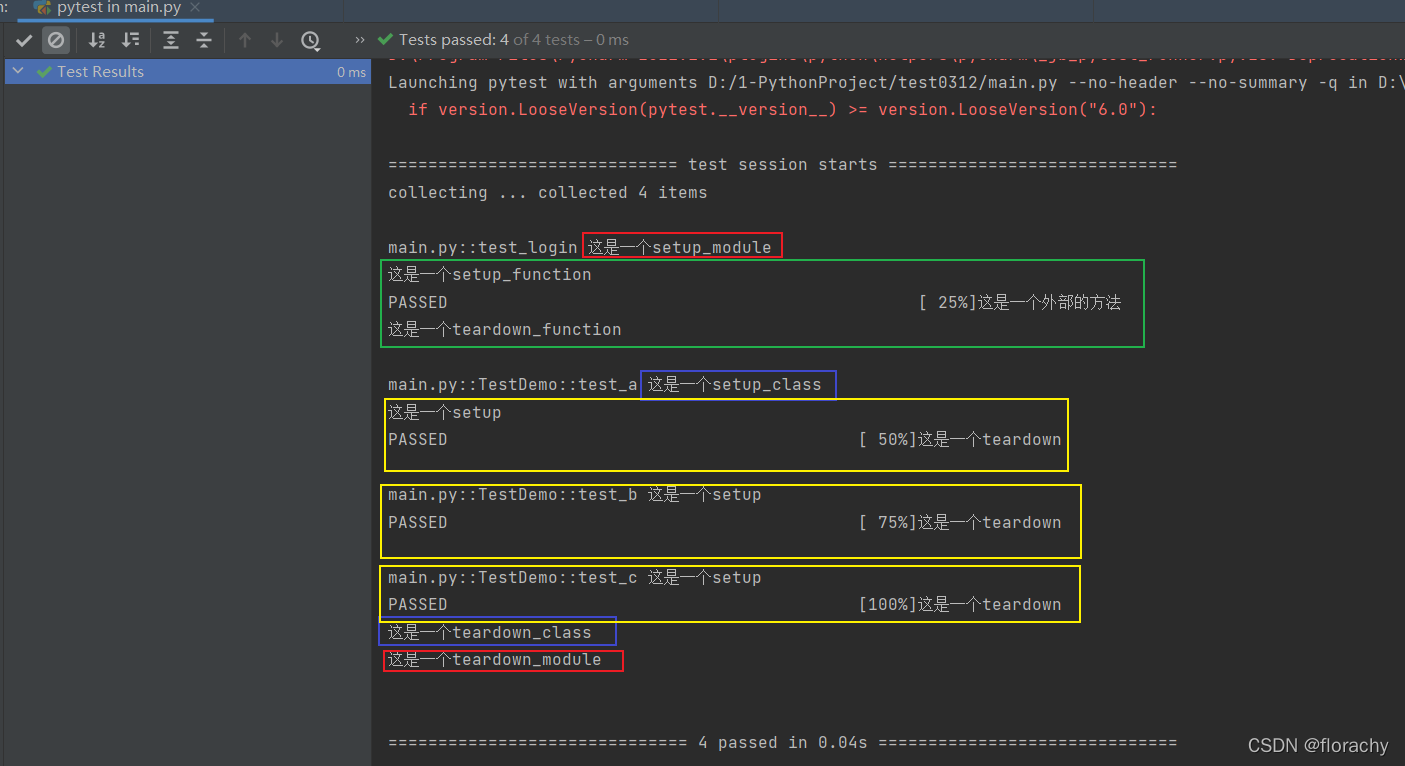
pytest框架结构
import pytest类似的setup,teardown同样更灵活
– 模块级别(setup_module / teardown_module)模块始末,全局的(优先最高)
– 函数级(setup_function / teardown_function)只对函数用例生效 (不在类中)
– 类级 (setup_class / teardown_class)只在类中前后运行一次 (在类中)
– 方法级 (setup_method / teardown_method)开始于方法始末 (在类中)
– 类里面 (setup / teardown)运行在调用方法的前后
演示代码:
import pytest
def setup_module():
print("这是一个setup_module")
def teardown_module():
print("这是一个teardown_module")
def setup_function():
print("这是一个setup_function")
def teardown_function():
print("这是一个teardown_function")
def test_login():
print("这是一个外部的方法")
assert "admin" == "admin"
class TestDemo:
def setup_class(self):
print("这是一个setup_class")
def teardown_class(self):
print("这是一个teardown_class")
def setup(self):
print("这是一个setup")
def teardown(self):
print("这是一个teardown")
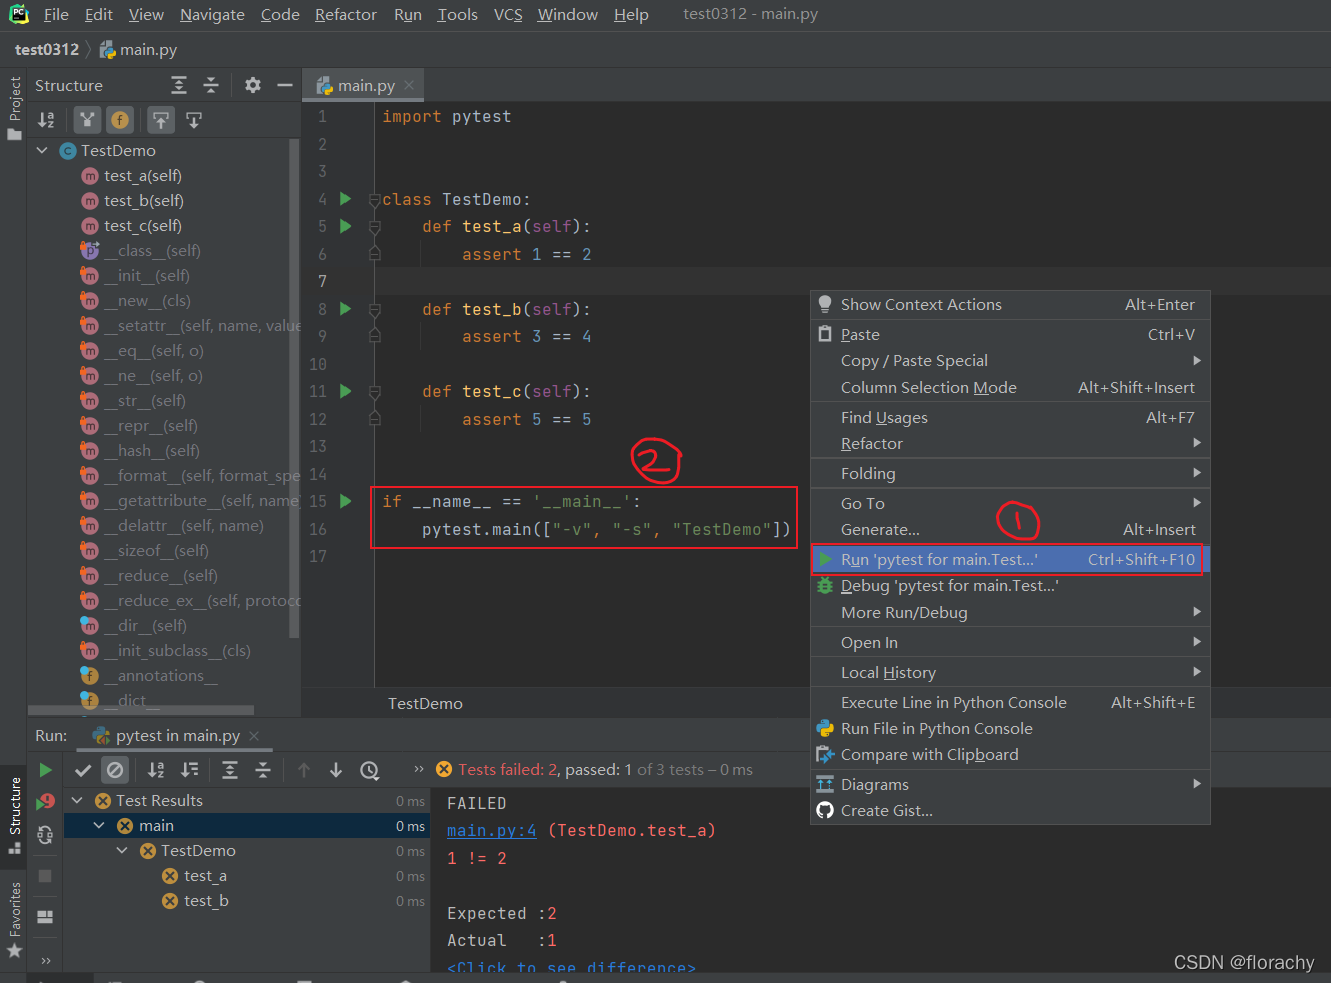
def test_a(self):
assert 2 == 2
def test_b(self):
assert 3 == 3
def test_c(self):
assert 5 == 5
if __name__ == '__main__':
pytest.main()
运行结果:
pytest实战
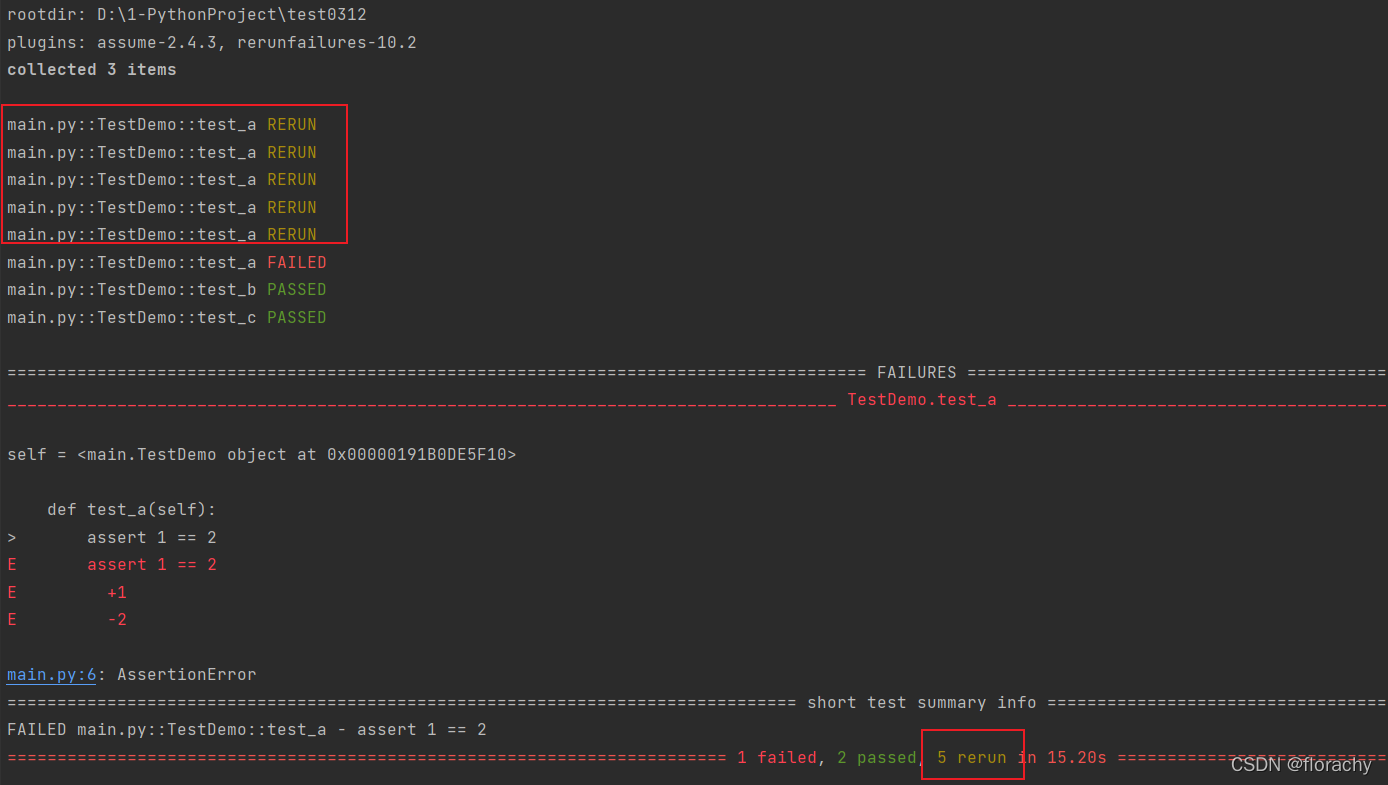
失败重新运行
场景:测试失败后要重新运行n次,要在重新运行之间添加延迟时间,间隔n秒再运行。
安装:pip install pytest-rerunfailures
执行:
– 测试失败后重新运行3次:pytest --reruns 3 -v -s test_class.py
– 测试失败后重新运行5次且每次重新运行间隔1秒:pytest -v --reruns 5 --reruns-delay 1
代码:
import pytest


class TestDemo:
    def test_a(self):
        assert 1 == 2

    def test_b(self):
        assert 3 == 3

    def test_c(self):
        assert 5 == 5


if __name__ == '__main__':
    pytest.main()
运行结果:
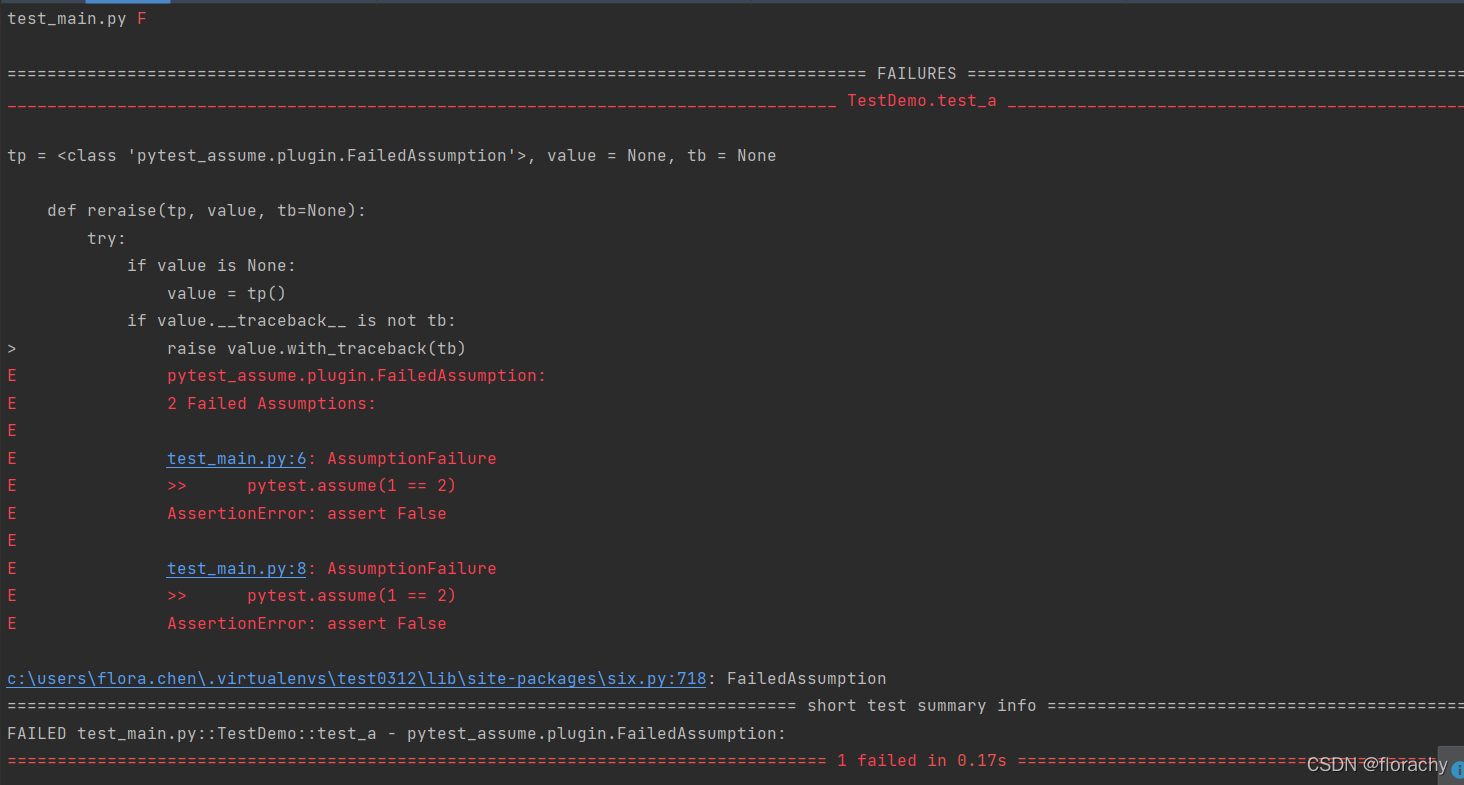
多条断言有失败也都运行
场景:一个方法中写多条断言,通常第一条断言失败,下面的断言也不执行了。但是我们希望即使第一条断言失败,后续断言还是继续执行。
安装:pip install pytest-assume
执行:pytest.assume(断言表达式), 如:pytest.assume(2==4)
代码:
import pytest


class TestDemo:
    def test_a(self):
        pytest.assume(1 == 2)
        pytest.assume(2 == 2)
        pytest.assume(1 == 2)


if __name__ == '__main__':
    pytest.main()
运行结果:
pytest-fixture的用法
场景:测试用例执行时,有的用例需要登录才能执行,有的用例不需要登录。这种场景setup与teardown无法满足,但是fixture可以。默认scope(范围)是function。
步骤:
– 导入pytest:import pytest
– 在登录的函数上面加上 @pytest.fixture()
– 在要使用的测试方法中传入(登录函数名称),就先登录
– 不传入的就不登录直接执行测试方法
代码:
import pytest


@pytest.fixture()
def login():
    print("这是登录方法")


def test_case1(login):
    print("test_case1")
    pass


def test_case2():
    print("test_case2")
    pass


def test_case3(login):
    print("test_case3")
    pass


if __name__ == '__main__':
    pytest.main(["-s"])
运行结果:

conftest的使用
conftest.py配置需要注意:
– conftest文件名是不能自定义的,不能更改
– conftest.py与运行的用例要在同一个package下,并且有__init__.py文件
– 不需要import导入conftest.py, pytest用例会自动查找
– 全局的配置和前期工作都可以写在这里,放在某个包下,就是这个包数据共享的地方
场景:当你与其他测试工程师合作一起开发时,公共模块要在不同文件中,要在大家都能访问到的地方。
解决:conftest.py这个文件进行数据共享,并且他可以放在不同位置起着不同的范围共享作用。
执行:系统执行到参数login时先从本文件中查找是否有这个名字的变量,之后再在conftest.py中查找是否有
步骤:将登录模块带有@pytest.fixture写在conftest.py
代码:
conftest.py
import pytest

@pytest.fixture()
def login():
    print("这是登录方法")
test_main.py
import pytest


def test_case1(login):
    print("test_case1")
    pass


def test_case2():
    print("test_case2")
    pass


def test_case3(login):
    print("test_case3")
    pass


if __name__ == '__main__':
    pytest.main(["-s"])
运行结果:
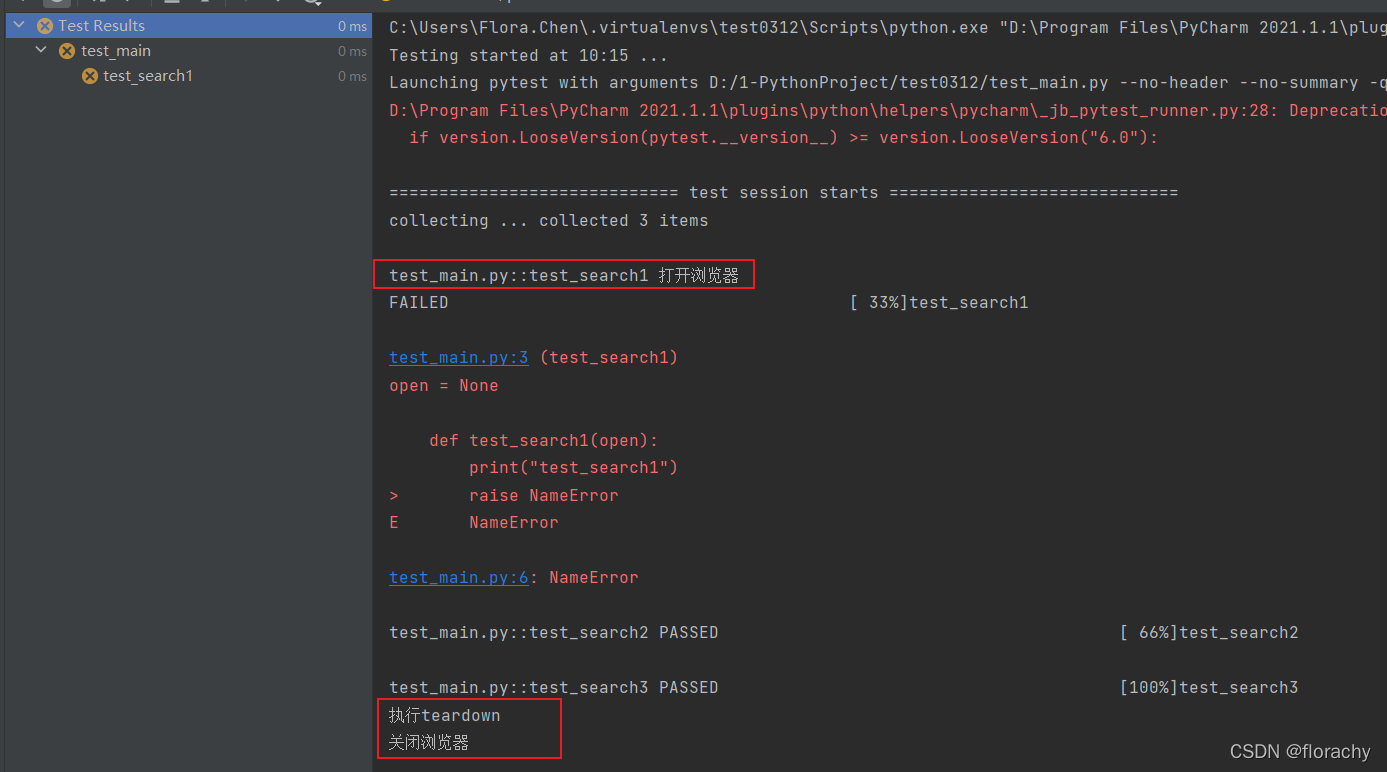
yield关键字的使用
场景:你已经可以将测试方法前要执行的或依赖的解决了,测试方法后销毁清除数据的要如何进行呢?范围是模块级别的。类似setupClass。
解决:通过在同一个模块中加入yield关键字,yield是调用第一次返回结果,第二次执行它下面的语句返回。
步骤:
- 在方法上加上
@pytest.fixture(scope=module) - 在方法中加
yield,之后加销毁清除的步骤 - 注意:这种方式没有返回值,如果希望返回使用
addfinalizer
代码:
conftest.py
import pytest


# 作用域:module是在模块之前执行,模块之后执行
@pytest.fixture(scope="module")
def open():
    print("打开浏览器")
    yield
    print("执行teardown")
    print("关闭浏览器")
test_main.py
import pytest


def test_search1(open):
    print("test_search1")
    raise NameError
    pass


def test_search2(open):
    print("test_search2")
    pass


def test_search3(open):
    print("test_search3")
    pass


if __name__ == '__main__':
    pytest.main(["-s"])
运行结果:
由于open方法是模块级别的,因此里面的前置后置方法在该测试模块test_main.py运行时均只执行一次。
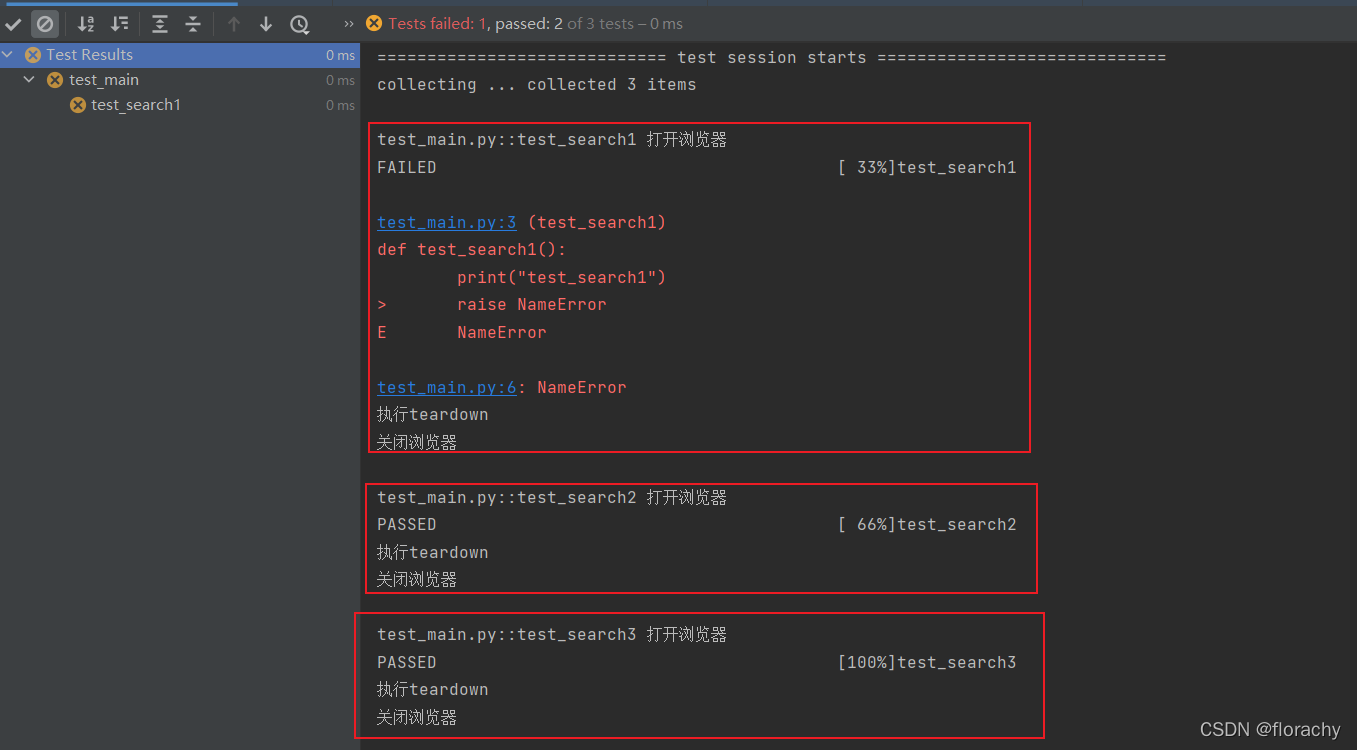
fixture的自动应用
场景:不想原测试方法有任何改动,或全部都自动实现自动应用,没特例,也都不需要返回值时可以选择自动应用。
解决:使用fixture中参数autouse=True实现。
步骤:
– 在方法上加上@pytest.fixture(autouse=True)
– 在测试方法上加@pytest.mark.usefixtures("start")
代码:
conftest.py
import pytest


# 作用域:module是在模块之前执行,模块之后执行
@pytest.fixture(autouse=True)
def open():
    print("打开浏览器")
    yield
    print("执行teardown")
    print("关闭浏览器")
test_main.py
import pytest


def test_search1():
    print("test_search1")
    raise NameError
    pass


def test_search2():
    print("test_search2")
    pass


def test_search3():
    print("test_search3")
    pass


if __name__ == '__main__':
    pytest.main(["-s"])
运行结果:
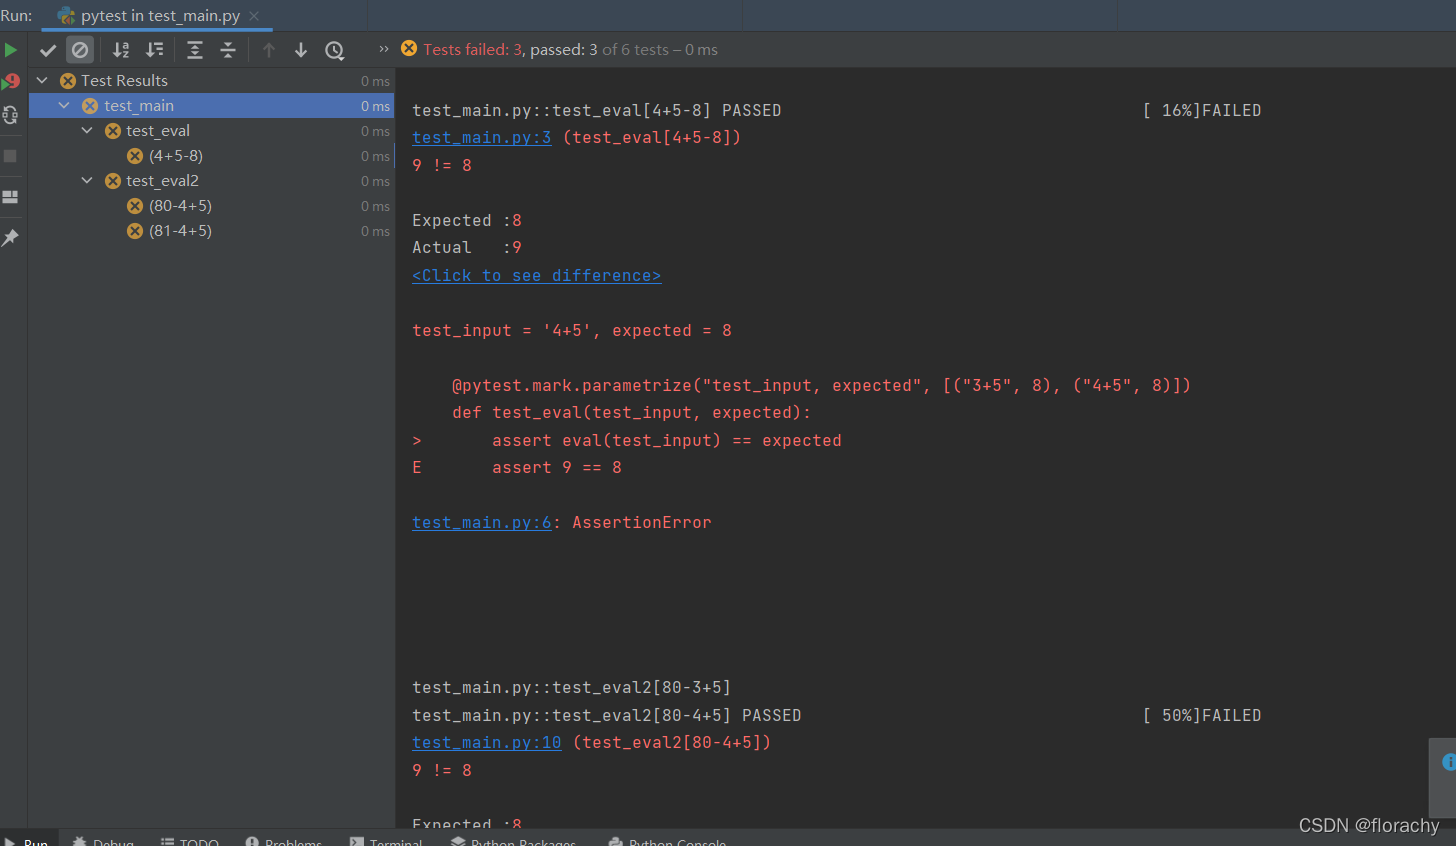
测试数据的传递parametrize
用法:@pytest.mark.parametrize(“用例方法中接收的参数名”,数据)
场景:我们在测试过程中,涉及到测试数据的传递。
解决:使用@pytest.mark.parametrize()进行测试数据的传递。
代码:
import pytest


@pytest.mark.parametrize("test_input, expected", [("3+5", 8), ("4+5", 8)])
def test_eval(test_input, expected):
    assert eval(test_input) == expected


# 上面和下面这两种方法的结果是一样的

@pytest.mark.parametrize("test_input", ["3+5", "4+5"])
@pytest.mark.parametrize("expected", [8, 8])
def test_eval2(test_input, expected):
    assert eval(test_input) == expected


if __name__ == '__main__':
    pytest.main(["-s"])
运行结果:
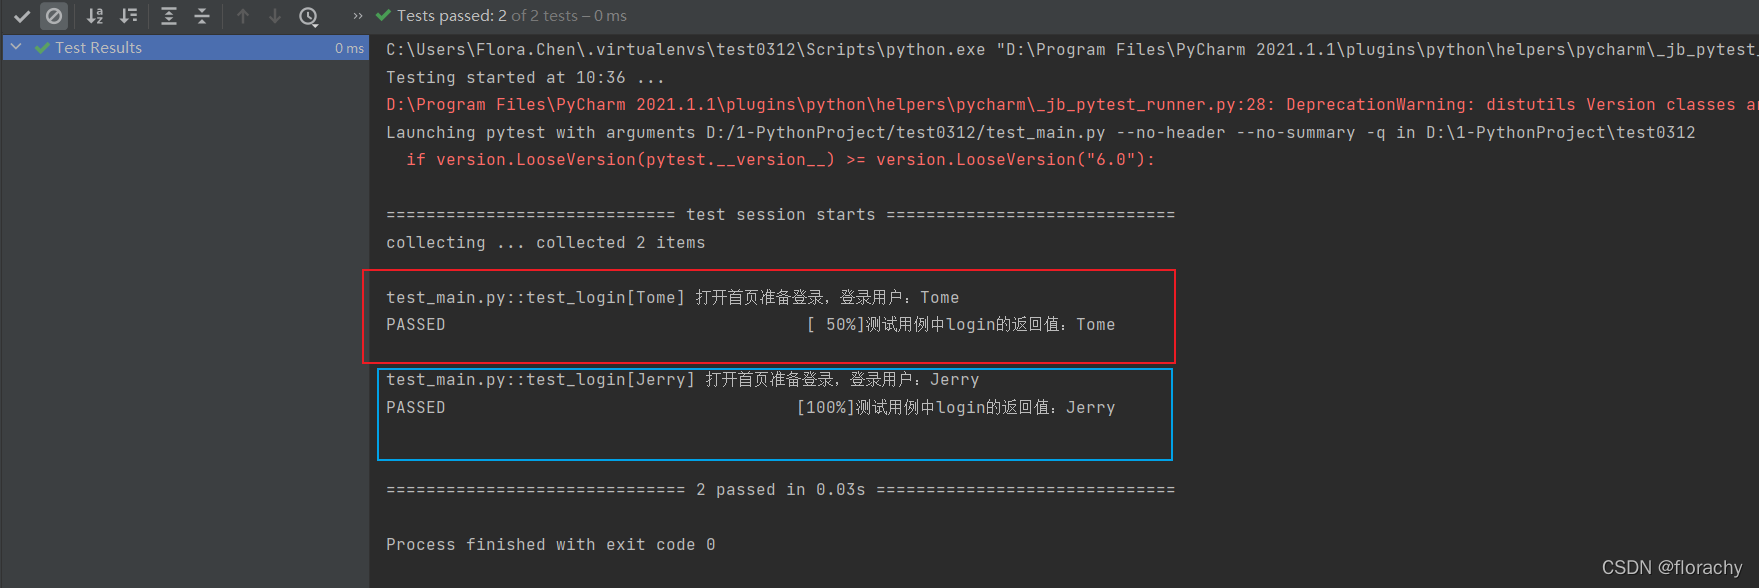
fixture带参数传递
场景:测试离不开数据,为了数据灵活,一般数据都是通过参数传的。
解决:fixture通过固定参数request传递。
步骤:在fixture中增加@pytest.fixture(params=[1,2,“linda”]),在方法参数中写request。
代码:
conftest.py
import pytest


# 作用域:module是在模块之前执行,模块之后执行
@pytest.fixture(autouse=True)
def login_r(request):
    # 这里接收并传入参数
    user = request.param
    print(f"打开首页准备登录,登录用户:{user}")
    return user
test_main.py
import pytest

test_user_data = ["Tome", "Jerry"]


# indirect=True可以把传递过来的参数当函数执行
@pytest.mark.parametrize("login_r", test_user_data, indirect=True)
def test_login(login_r):
    a = login_r
    print(f"测试用例中login的返回值:{a}")
    assert a != ""


if __name__ == '__main__':
    pytest.main(["-s"])
运行结果:
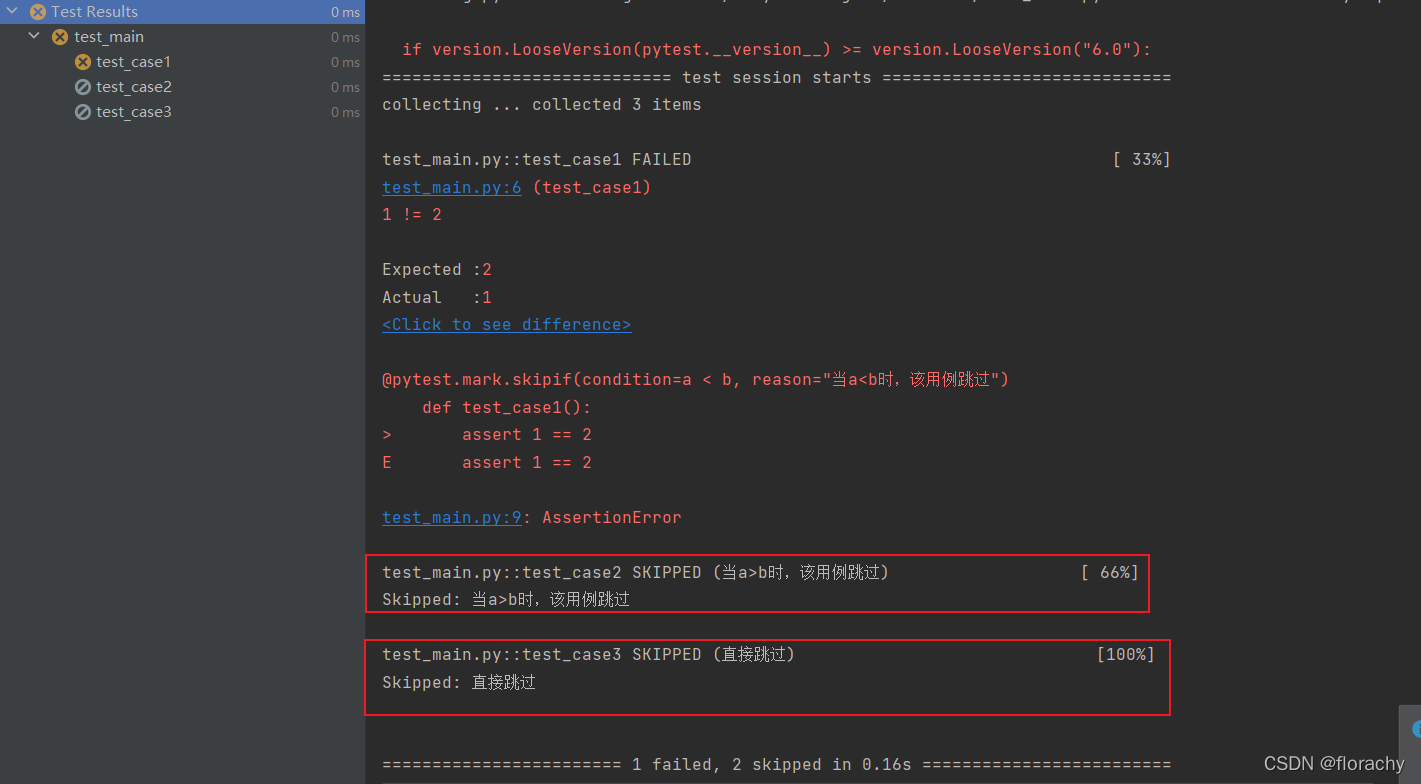
skip跳转测试用例
用法:
• @pytest.mark.skip pytest.mark.skip(*, reason=None)
• @pytest.mark.skipif pytest.mark.skipif(condition, *, reason=None)
使用场景:
– 调试时不想运行这个用例
– 标记无法在某些平台上运行的测试功能
– 在某些版本中执行,其他版本中跳过
– 当前外部资源不可用时跳过(如果测试数据是从数据库中获取的,连接数据库未成功则跳过-因为执行会报错)
代码:
import pytest

a = 4
b = 3


@pytest.mark.skipif(condition=a < b, reason="当a<b时,该用例跳过")
def test_case1():
    assert 1 == 2


@pytest.mark.skipif(condition=a > b, reason="当a>b时,该用例跳过")
def test_case2():
    assert 1 == 2


@pytest.mark.skip(reason="直接跳过")
def test_case3():
    assert 1 == 2


if __name__ == '__main__':
    pytest.main(["-s"])
运行结果:
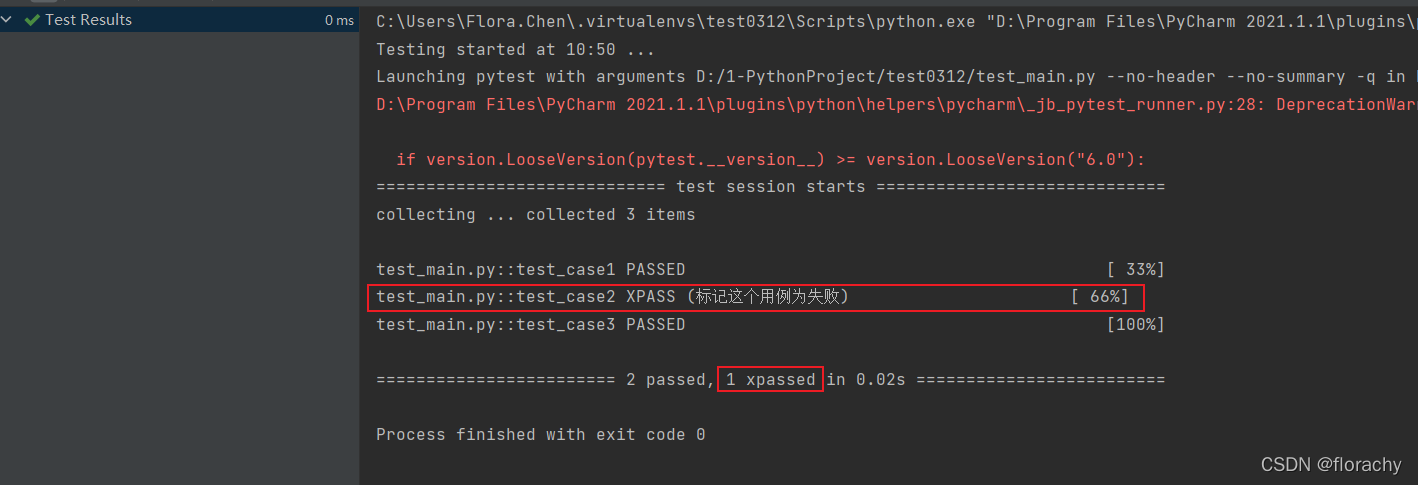
xfail标记用例为失败
用法:pytest.mark.xfail(condition=None, *, reason=None, raises=None, run=True, strict=False)
使用场景:
– 功能测试尚未实施或尚未修复的错误,当测试通过时尽管预计会失败(标记为pytest.mark.xfail),它是一个xpass,将在测试摘要中报告。
– 你希望测试由于某种情况而就应该失败。
代码:
import pytest


def test_case1():
    assert 2 == 2


@pytest.mark.xfail(reason="标记这个用例为失败")
def test_case2():
    assert 2 == 2


def test_case3():
    assert 2 == 2


if __name__ == '__main__':
    pytest.main(["-s"])
运行结果:
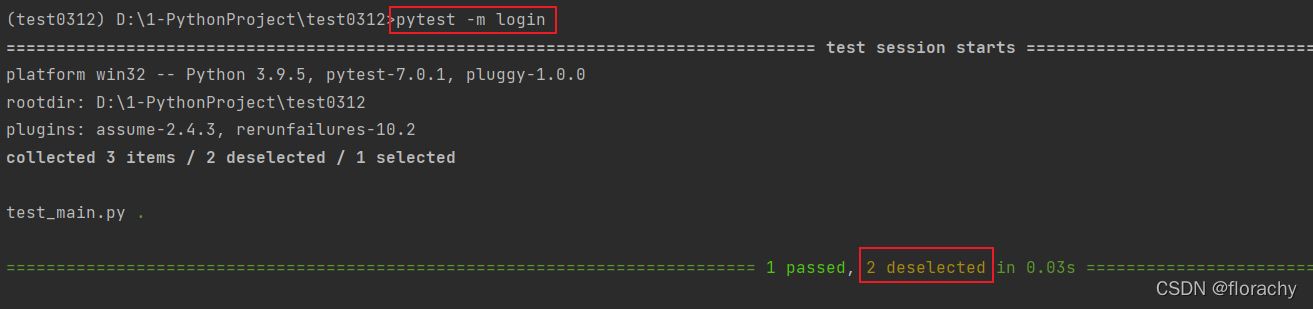
使用自定义标记mark只执行某部分用例
场景:
– 只执行符合要求的某一部分用例,可以把一个web项目划分多个模块,然后指定模块名称执行。
– APP自动化时,如果想Android和IOS公用同一套代码时,也可以使用标记功能,标明哪些是IOS的用例,哪些是Android的,运行代码时指定mark名称运行就可以。
**解决:**在测试用例方法上加@pytest.mark.标记名
执行:
– s参数:输出所有测试用的print信息
– -m: 执行自定义标记相关用例,如pytest -s -m 自定义标记名称
方法一:在conftest.py中配置自定义标记
conftest.py
# import pytest
def pytest_configure(config):
    marker_list = ["search", "login"]  # 标签名集合

    for markers in marker_list:
        config.addinivalue_line("markers", markers)
方法二:通过pytest.ini配置自定义标记
[pytest]
markers =
    login: 登录测试用例
    search: 搜索用例
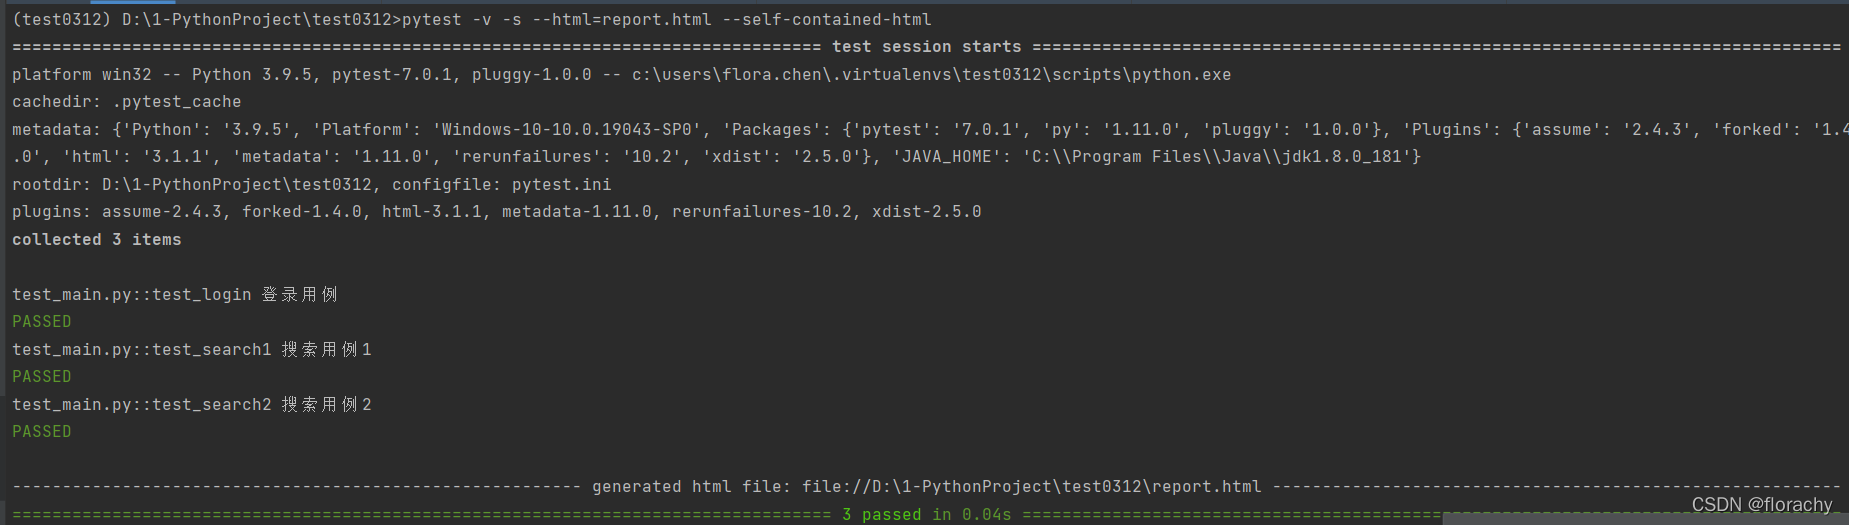
测试用例代码执行相同。
test_main.py
import pytest


@pytest.mark.login
def test_login():
    print("登录用例")


@pytest.mark.search
def test_search1():
    print("搜索用例1")


@pytest.mark.search
def test_search2():
    print("搜索用例2")


if __name__ == '__main__':
    pytest.main()
运行结果:
多线程并行与分布式执行
**场景:**测试用例1000条,一个用例执行1分钟,一个测试人员执行需要1000分钟。通过我们会用人力成本换取时间成本,加几个人一起执行,时间就会缩短。如果10个人一起执行只需要100分钟,这就是一种并行测试,分布式场景。
解决: pytest分布式执行插件pytest-xdist,多个CPU或主机执行。前提条件:用例之间都是独立的,没有先后顺序,随机都能执行,可重复运行不影响其他用例。
安装:
– pip install pytest-xdist
– 多个CPU并行执行用例,直接加-n 3是并行数量 pytest -n 3
– 在多个终端下一起执行
pytest-html生成报告
安装:pip install pytest-html
生成html报告:pytest -v -s --html=report.html --self-contained-html
文章出处登录后可见!