1.DeepstreamApp是什么?
如果你安装完毕deepstream整体框架,会在你的系统执行目录内有可执行文件,文件名字是deepstream-app。这是一个可执行脚本文件,通过deepstream框架中的代码在安装的时候编译后install到系统根目录内。
此脚本文件可以通过终端命令行使用,使用的同时必须使用txt文本文件作为配置文件。此脚本可以通过txt配置一个“相当简单的”deepstream管道,管道中的视频源可以通过txt文本设置为各种输入,包括但不限于本地视频文件,网络上的rtsp推流等等。管道中的堆叠,一级、二级推理、跟踪、OSD等也可以通过txt文本文件进行相当简单快速的配置。
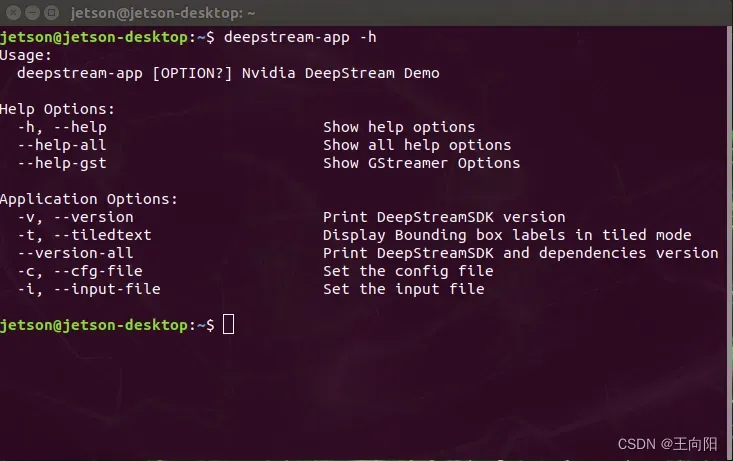
使用终端输入deepstream-app -h即可查看如何使用此脚本。
这个deepstream-app程序是安装deepstream的时候就已经编译好安装在系统里,可以在任意位置的命令终端进行调用。App分为deepstream-app和deepstream-test5-app两种。两者功能上的差别就是tset5支持类型设置为6的sink,也就是向kafka服务器收发数据的组件。其余二者大致相同。英伟达也附赠了两个app的源代码,基于C++的源代码的位置位于:(可以学习参考)
opt/nvidia/deepstream/deepstream-5.1/sources/apps/sample_apps/deepstream-app
opt/nvidia/deepstream/deepstream-5.1/sources/apps/sample_apps/deepstream-test5
2.Deepstream-App存在的意义?
deepstream-app脚本存在主要有两个意义。
首先第一个,用于工程快速验证性开发。因为deepstream-app是一个通过文本文件就能配置的管道,因此可以在您视频应用的早期阶段进行深度学习网络性能和设备硬件性能的快速测试。譬如您设计、训练了一个网络,要部署到nx上面,需要实时处理8路视频。此时您对nx的性能没有底,或者是并不知道这个网络在nx上能不能跑八路。这时候总不能现用c++或者python开发个系统再去测试吧。代码的时间是宝贵的,为了快速验证可行性,通常会先把网络设计训练完毕,然后通过deepstream-app脚本装载到简单管道里做一下压力测试。这样可以快速验证项目可行性。
其次第二个,deepstream-app可以验证网络性能瓶颈和辅助排除Bug。我之前遇到过一个大学的学生设计制作矿井安全监控,他们在3090上面跑了20多路1080p的视频流,开到22个视频流就开始卡顿,无推理结果,他们使用了c++脚本二次开发。因为他们的代码揉合了自己的代码和deepstream官方代码,有很多自定义的方法和类,短时间摸透他们的代码并不容易,且代码风格一团糟。也没有注释,这时候就开始把他们的网络通过deepstream-app配置一个22路视频同时输入的管道,通过配置发现deepstream-app本身工作正常,并没有出现卡顿无推理的情况。所以基本排除了deepstream本身的关键组件出现问题的可能。将问题锁定在了他们自己的代码位置。最后通过排查发现他们是版本控制太乱,有个学生在管道内通过tee组件插了一个支路,这个支路导致了线程崩溃。再者说,如果您的deepstream工程出现了卡顿、性能瓶颈等,完全可以把网络模型单独拿出来用txt写个简单管道,挨个排查deepstream每个单元可能的问题。如果deepstream-app都没问题,就需要自己排查自己写的部分代码。
3.Deepstream-app怎么用?
Deepstream-app的用法非常简洁。即脚本+配置文件。具体写法如下所示:
deepstream-app -c 您的配置文件.txt脚本会自动解析您配置文件里面的内容然后组成管道。所以我们的重点应该放在这个配置文件如何写。下面,我贴出来一份以YoloV5m为范例的配置文件,逐行进行分析。
################################################################################
# Copyright (c) 2018-2020, NVIDIA CORPORATION. All rights reserved.
#
# Permission is hereby granted, free of charge, to any person obtaining a
# copy of this software and associated documentation files (the "Software"),
# to deal in the Software without restriction, including without limitation
# the rights to use, copy, modify, merge, publish, distribute, sublicense,
# and/or sell copies of the Software, and to permit persons to whom the
# Software is furnished to do so, subject to the following conditions:
#
# The above copyright notice and this permission notice shall be included in
# all copies or substantial portions of the Software.
#
# THE SOFTWARE IS PROVIDED "AS IS", WITHOUT WARRANTY OF ANY KIND, EXPRESS OR
# IMPLIED, INCLUDING BUT NOT LIMITED TO THE WARRANTIES OF MERCHANTABILITY,
# FITNESS FOR A PARTICULAR PURPOSE AND NONINFRINGEMENT.  IN NO EVENT SHALL
# THE AUTHORS OR COPYRIGHT HOLDERS BE LIABLE FOR ANY CLAIM, DAMAGES OR OTHER
# LIABILITY, WHETHER IN AN ACTION OF CONTRACT, TORT OR OTHERWISE, ARISING
# FROM, OUT OF OR IN CONNECTION WITH THE SOFTWARE OR THE USE OR OTHER
# DEALINGS IN THE SOFTWARE.
################################################################################

[application]
enable-perf-measurement=1
perf-measurement-interval-sec=5
#gie-kitti-output-dir=streamscl

[tiled-display]
enable=1
rows=1
columns=1
width=1920
height=1080

[source0]
enable=1
#Type - 1=CameraV4L2 2=URI 3=MultiURI 4=RTSP
type=3
uri=rtsp://admin:HuaWei123@113.128.197.19:54388/LiveMedia/ch1/Media1
#uri=file:///home/jetson/vedio/1.mp4
num-sources=1
gpu-id=0
# (0): memtype_device   - Memory type Device
# (1): memtype_pinned   - Memory type Host Pinned
# (2): memtype_unified  - Memory type Unified
cudadec-memtype=0

[sink0]
enable=1
#Type - 1=FakeSink 2=EglSink 3=File 4=RTSPStreaming 5=Overlay 6=send message to cloud(only enable in test5-app)
type=6
msg-conv-config=./MsgConfig/config.txt
msg-conv-payload-type=0
#(0): PAYLOAD_DEEPSTREAM - Deepstream schema payload
#(1): PAYLOAD_DEEPSTREAM_MINIMAL - Deepstream schema payload minimal
#(256): PAYLOAD_RESERVED - Reserved type
#(257): PAYLOAD_CUSTOM   - Custom schema payload
msg-broker-proto-lib=/opt/nvidia/deepstream/deepstream-5.1/lib/libnvds_kafka_proto.so
#msg-broker-conn-str=127.0.0.1;9092;RawData
msg-broker-conn-str=192.168.1.104;9092;RawData
topic=RawData

[sink1]
enable=1
#Type - 1=FakeSink 2=EglSink 3=File 4=RTSPStreaming 5=Overlay
type=4
#1=h264 2=h265
codec=1
#encoder type 0=Hardware 1=Software
enc-type=0
sync=0
bitrate=4000000
#H264 Profile - 0=Baseline 2=Main 4=High
#H265 Profile - 0=Main 1=Main10
profile=0
# set below properties in case of RTSPStreaming
rtsp-port=8554
udp-port=5400


[osd]
enable=1
border-width=2
text-size=15
text-color=1;1;1;1;
text-bg-color=0.3;0.3;0.3;1
font=Serif
show-clock=0
clock-x-offset=800
clock-y-offset=820
clock-text-size=12
clock-color=1;0;0;0

[streammux]
##Boolean property to inform muxer that sources are live
live-source=0
batch-size=1
##time out in usec, to wait after the first buffer is available
##to push the batch even if the complete batch is not formed
batched-push-timeout=40000
## Set muxer output width and height
width=1920
height=1080
## If set to TRUE, system timestamp will be attached as ntp timestamp
## If set to FALSE, ntp timestamp from rtspsrc, if available, will be attached
# attach-sys-ts-as-ntp=1

# config-file property is mandatory for any gie section.
# Other properties are optional and if set will override the properties set in
# the infer config file.

[primary-gie]
enable=1
bbox-border-color0=1;0;0;1
bbox-border-color1=0;1;1;1
bbox-border-color2=0;0;1;1
bbox-border-color3=0;1;0;1
gie-unique-id=1
config-file=./Models/config.txt

[tracker]
enable=1
# For the case of NvDCF tracker, tracker-width and tracker-height must be a multiple of 32, respectively
tracker-width=640
tracker-height=384
ll-lib-file=/opt/nvidia/deepstream/deepstream-5.1/lib/libnvds_mot_iou.so
#ll-lib-file=/opt/nvidia/deepstream/deepstream-5.1/lib/libnvds_nvdcf.so
#ll-lib-file=/opt/nvidia/deepstream/deepstream-5.1/lib/libnvds_mot_klt.so
#ll-config-file required for DCF/IOU only
#ll-config-file=tracker_config.yml
#ll-config-file=iou_config.txt
gpu-id=0
#enable-batch-process and enable-past-frame applicable to DCF only
enable-batch-process=1
enable-past-frame=0
display-tracking-id=1

[tests]
file-loop=0
让我们逐组件逐行来进行翻译和解释。说在最前面,这份配置文件是通过“#”字符来进行注释的,如果有不需要的设置或者需要更改设置,建议使用“#”来进行无效化,不建议直接删,否则可能会记不住删除了那些东西。
[application]
enable-perf-measurement=1
perf-measurement-interval-sec=5
首先来看application总体配置。enable-perf-measurement的意思是开启每秒帧数测试。是否开启fps帧率检测,0代表不开启1代表开始,下面的perf-measurement-interval-sec参数是多少帧率计算一次用来做数据平滑。
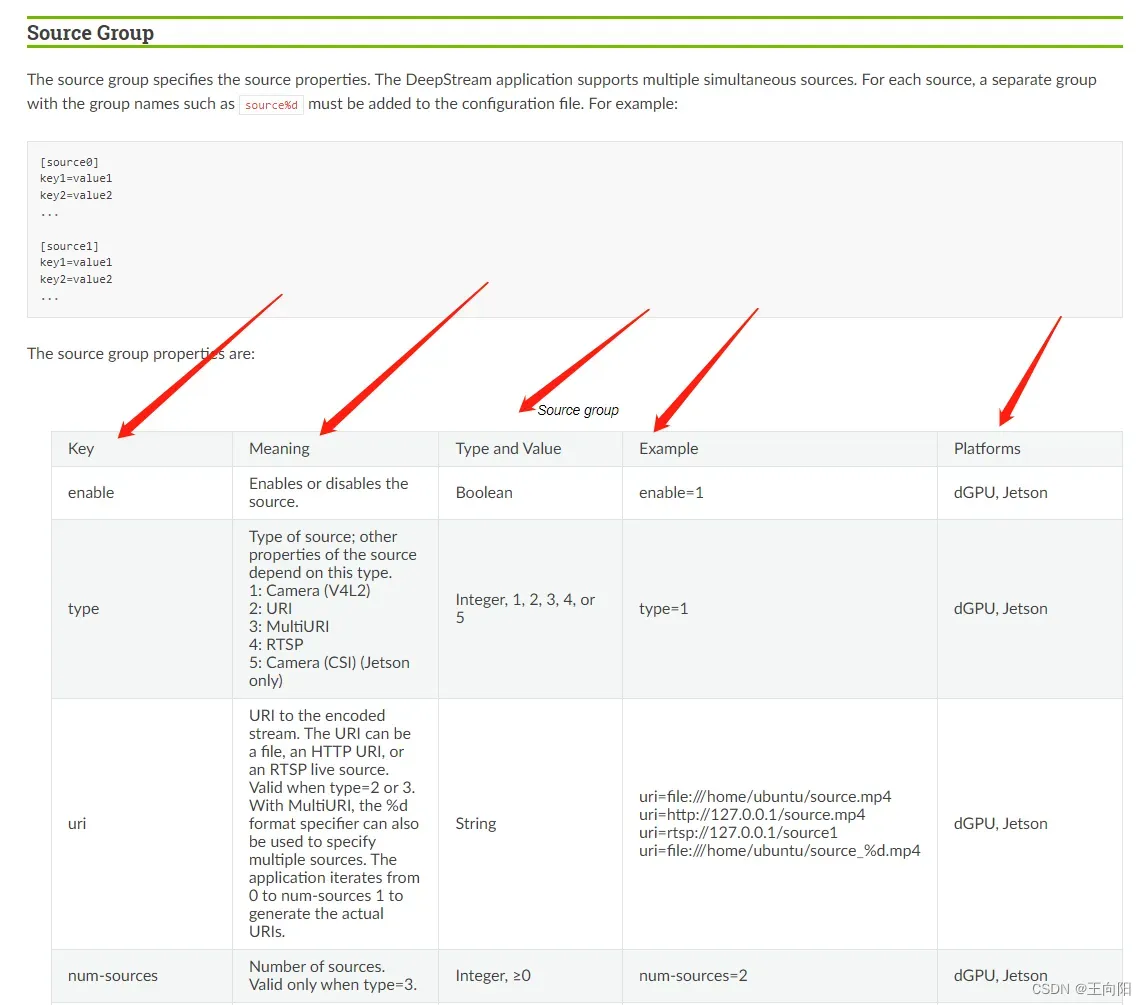
[source0]
enable=1
#Type - 1=CameraV4L2 2=URI 3=MultiURI 4=RTSP
type=3
uri=rtsp://admin:HuaWei123@113.128.197.19:54388/LiveMedia/ch1/Media1
#uri=file:///home/jetson/vedio/1.mp4
num-sources=1
gpu-id=0
# (0): memtype_device   - Memory type Device
# (1): memtype_pinned   - Memory type Host Pinned
# (2): memtype_unified  - Memory type Unified
cudadec-memtype=0
然后来看source0,这个是deepstream的输入源,您可以在这个source组件进行视频流输入的配置。如果您有一个视频流就写[source0],如果有多个就[source1],[source2],[source3]依次往下递增序号即可。enable不用说了还是一个使能设置,0则关闭1则开启。type类型是告诉deepstream-app大概是什么类型的输入,1是V4L2也就是linux硬件设备树上面的摄像头,2是网络URI,3是万能设置,比2更好,可以读取本地文件。4是指定的RTSP视频流。我一般直接用3即可。
然后是Uri链接,如果是网络连接或者是ip摄像头,直接把rtsp地址copy过来即可。就如同上面的:uri=rtsp://admin:HuaWei123@113.128.197.19:54388/LiveMedia/ch1/Media1。如果是本地的视频文件,需要特定的写法。这个我也是论坛查了好久才查到的,具体写法就是uri:///加上文件在系统内的绝对路径加上文件名字。这样写deepstream-app就能直接读取本地视频流进行推理。
[streammux]
##Boolean property to inform muxer that sources are live
live-source=0
batch-size=1
##time out in usec, to wait after the first buffer is available
##to push the batch even if the complete batch is not formed
batched-push-timeout=40000
## Set muxer output width and height
width=1920
height=1080
## If set to TRUE, system timestamp will be attached as ntp timestamp
## If set to FALSE, ntp timestamp from rtspsrc, if available, will be attached
# attach-sys-ts-as-ntp=1
Streammux插件是deepstream的混流插件,比如你输入是30路视频流,需要通过Streammux插件将视频流混流到一起,组成一个视频流。这里需要注意的是batch-size改成了1,还有输入输出的尺寸需要设计好。
[primary-gie]
enable=1
bbox-border-color0=1;0;0;1
bbox-border-color1=0;1;1;1
bbox-border-color2=0;0;1;1
bbox-border-color3=0;1;0;1
gie-unique-id=1
config-file=./Models/config.txt
[primary-gie]插件就是我们需要用到的推理插件,这个插件在deepstream-app的txt配置文件中需要写的东西不多,上面的几个参数分别是使能,bbox框颜色,bbox框是否生成唯一id。后面这个config-file目录才是重点。这里文件目录采用的是和终端命令行相似的相对目录,在deepstream-app的txt配置文件的同级目录下的Models的文件夹内的config文件。这个目录和文件名到时候根据您的项目来随意写。网络推理的相关参数都在这个config文本内。接下来我们看一下这个config.txt文本内到底是什么。
################################################################################
# Copyright (c) 2019-2020, NVIDIA CORPORATION. All rights reserved.
#
# Permission is hereby granted, free of charge, to any person obtaining a
# copy of this software and associated documentation files (the "Software"),
# to deal in the Software without restriction, including without limitation
# the rights to use, copy, modify, merge, publish, distribute, sublicense,
# and/or sell copies of the Software, and to permit persons to whom the
# Software is furnished to do so, subject to the following conditions:
#
# The above copyright notice and this permission notice shall be included in
# all copies or substantial portions of the Software.
#
# THE SOFTWARE IS PROVIDED "AS IS", WITHOUT WARRANTY OF ANY KIND, EXPRESS OR
# IMPLIED, INCLUDING BUT NOT LIMITED TO THE WARRANTIES OF MERCHANTABILITY,
# FITNESS FOR A PARTICULAR PURPOSE AND NONINFRINGEMENT.  IN NO EVENT SHALL
# THE AUTHORS OR COPYRIGHT HOLDERS BE LIABLE FOR ANY CLAIM, DAMAGES OR OTHER
# LIABILITY, WHETHER IN AN ACTION OF CONTRACT, TORT OR OTHERWISE, ARISING
# FROM, OUT OF OR IN CONNECTION WITH THE SOFTWARE OR THE USE OR OTHER
# DEALINGS IN THE SOFTWARE.
################################################################################

# Following properties are mandatory when engine files are not specified:
#   int8-calib-file(Only in INT8), model-file-format
#   Caffemodel mandatory properties: model-file, proto-file, output-blob-names
#   UFF: uff-file, input-dims, uff-input-blob-name, output-blob-names
#   ONNX: onnx-file
#
# Mandatory properties for detectors:
#   num-detected-classes
#
# Optional properties for detectors:
#   cluster-mode(Default=Group Rectangles), interval(Primary mode only, Default=0)
#   custom-lib-path
#   parse-bbox-func-name
#
# Mandatory properties for classifiers:
#   classifier-threshold, is-classifier
#
# Optional properties for classifiers:
#   classifier-async-mode(Secondary mode only, Default=false)
#
# Optional properties in secondary mode:
#   operate-on-gie-id(Default=0), operate-on-class-ids(Defaults to all classes),
#   input-object-min-width, input-object-min-height, input-object-max-width,
#   input-object-max-height
#
# Following properties are always recommended:
#   batch-size(Default=1)
#
# Other optional properties:
#   net-scale-factor(Default=1), network-mode(Default=0 i.e FP32),
#   model-color-format(Default=0 i.e. RGB) model-engine-file, labelfile-path,
#   mean-file, gie-unique-id(Default=0), offsets, process-mode (Default=1 i.e. primary),
#   custom-lib-path, network-mode(Default=0 i.e FP32)
#
# The values in the config file are overridden by values set through GObject
# properties.

[property]
gpu-id=0
net-scale-factor=0.0039215697906911373
#0=RGB, 1=BGR
model-color-format=0
custom-network-config=yolov5s
model-file=yolov5s.wts
model-engine-file=yolov5s_fp16.engine
labelfile-path=labels.txt
int8-calib-file=yolov5s.trt.calib.table
## 0=FP32, 1=INT8, 2=FP16 mode
network-mode=2
num-detected-classes=2
gie-unique-id=1
network-type=0
is-classifier=0
## 0=Group Rectangles, 1=DBSCAN, 2=NMS, 3= DBSCAN+NMS Hybrid, 4 = None(No clustering)
cluster-mode=2
maintain-aspect-ratio=1
parse-bbox-func-name=NvDsInferParseCustomYoloV5
custom-lib-path=libnvdsinfer_custom_impl_yolov5.so
engine-create-func-name=NvDsInferYoloCudaEngineGet
#scaling-filter=0
#scaling-compute-hw=0
首先,前面的大段都是nvidia的版权声明,从poperty这里开始是推理引擎的配置。gpu-id是指定相关gpu,单卡就是0,多卡依次按序号指定。net-scale-factor一般是默认数据。需要注意的是,这里的:
custom-network-config=yolov5s
model-file=yolov5s.wts
model-engine-file=yolov5s_fp16.engine
parse-bbox-func-name=NvDsInferParseCustomYoloV5
custom-lib-path=libnvdsinfer_custom_impl_yolov5.so
engine-create-func-name=NvDsInferYoloCudaEngineGet
几行要合起来看,因为我这里使用的是deepstream的第三方网络也就是yolov5m,deepstream并不能直接加载且解析网络、构建网络的加速引擎、并且对网络推理的后处理bbox进行解析,所以需要你自己编写一个.so来进行上述工作。parse-bbox-func-name就是指出bbox解析的api名称,custom-lib-path是你的.so库名字,engine-create-func-name是你库的解析yolov5模型创建引擎的api名称。需要注意的是,如果你使用的英伟达TAO或者TLT迁移学习,深度学习网络模型是从nvidia官网上下载的resnet19等训练好的etlt模型,可以无缝接入Deepstream不用做这个第三方库。直接就可以简化为:
model-file=resnet19.etlt
model-engine-file=resnet19_fp16.engine
剩下的关于深度学习网络的配置我就不一一介绍了,基本都是推理相关,我等会会把每一条都是什么的官网查询文档贴出来。
接着来看跟踪器相关设置。
[tracker]
enable=1
# For the case of NvDCF tracker, tracker-width and tracker-height must be a multiple of 32, respectively
tracker-width=640
tracker-height=384
ll-lib-file=/opt/nvidia/deepstream/deepstream-5.1/lib/libnvds_mot_iou.so
#ll-lib-file=/opt/nvidia/deepstream/deepstream-5.1/lib/libnvds_nvdcf.so
#ll-lib-file=/opt/nvidia/deepstream/deepstream-5.1/lib/libnvds_mot_klt.so
#ll-config-file required for DCF/IOU only
#ll-config-file=tracker_config.yml
#ll-config-file=iou_config.txt
gpu-id=0
#enable-batch-process and enable-past-frame applicable to DCF only
enable-batch-process=1
enable-past-frame=0
display-tracking-id=1
Tracker组件用于对推理目标进行跟踪,譬如一个摄像头30FPS,但是推理性能不够只有15FPS,需要跳帧推理的时候,中间没有进行推理的帧就通过跟踪器进行追踪,确保不会丢失bbox。或者是针对目标进行单一id化,确保目标识别出来后在画面内始终保持同一个id。在车船人员计数方面还是有一定作用,防止bbox推理丢失后产生多重计数等。
nvidia这边提供了三种跟踪方式,分别是iou、nvdcf、klt光流。iou最简单算力使用最低,但是效果最差劲,klt光流法最好但是最吃算力。nvdcf是英伟达自己开发的算法,通过概率去预测。是一个比较均衡的。此Tracker组件需要根据选用的算法指定具体.so,追踪宽高基本是默认的。
需要注意的是上述追踪算法在jetson平台默认自动运行于VIC内,会减少CPU占用。
[osd]
enable=1
border-width=2
text-size=15
text-color=1;1;1;1;
text-bg-color=0.3;0.3;0.3;1
font=Serif
show-clock=0
clock-x-offset=800
clock-y-offset=820
clock-text-size=12
clock-color=1;0;0;0
OSD插件适用于bbox可视化,基本就是线宽,是否展示id,颜色等等,不做过多赘述。此插件也是在jetson平台用VIC进行硬件加速的,会减少cpu占用。
[sink0]
enable=1
#Type - 1=FakeSink 2=EglSink 3=File 4=RTSPStreaming 5=Overlay 6=msgbroker(only enable in test5-app)
type=6
msg-conv-config=./MsgConfig/config.txt
msg-conv-payload-type=0
#(0): PAYLOAD_DEEPSTREAM - Deepstream schema payload
#(1): PAYLOAD_DEEPSTREAM_MINIMAL - Deepstream schema payload minimal
#(256): PAYLOAD_RESERVED - Reserved type
#(257): PAYLOAD_CUSTOM   - Custom schema payload
msg-broker-proto-lib=/opt/nvidia/deepstream/deepstream-5.1/lib/libnvds_kafka_proto.so
#msg-broker-conn-str=127.0.0.1;9092;RawData
msg-broker-conn-str=192.168.1.104;9092;RawData
topic=RawData
sink是管道最后的sink接受终端,enable-1代表开启,type种类非常丰富。1就是假的sink,啥也不干。算法纯在后台运行不做任何显示或者处理。2是图像显示,格式是EGL。3是文件sink,在接收到视频流后直接在本地存文件。4是RTSP推流。5是全屏直接显示,6是服务器收发消息组件,仅在deepstream-test5-app有效。此处选择了6。
msg-conv-config参数是配置摄像头位置信息的,仅仅在360度扭曲变换那个例子有用,这里直接抄过来了怕出错。不过里边的东西没用。msg-conv-payload-type就是每一帧发送什么样的消息,0就是所有的都发,1简短一些,256 257是自定义和预留的参数。msg-broker-proto-lib是选择底层用什么通讯,这里选用了kafka。msg-broker-conn-str参数是服务参数配置,这里nx代表了kafka的producer,需要给一个broker发送消息。Kafka的broker就相当于是个托管服务器,消费者和生产者的消息都要过这个broker中间人。第一个是broker服务的地址,第二个是端口,第三个是Topic。下面的Topic参数和上面的写一致即可。
上面这个主要是为了给kafka服务器发送数据,如果只是做本地显示,改成如下即可。
[sink0]
enable=1
#Type - 1=FakeSink 2=EglSink 3=File 4=RTSPStreaming 5=Overlay 6=msgbroker(only enable in test5-app)
type=2
如果你想通过deepstream-app推流,也可以如下设置sink组件来达到推流效果:
[sink1]
enable=1
#Type - 1=FakeSink 2=EglSink 3=File 4=RTSPStreaming 5=Overlay
type=4
#1=h264 2=h265
codec=1
#encoder type 0=Hardware 1=Software
enc-type=0
sync=0
bitrate=4000000
#H264 Profile - 0=Baseline 2=Main 4=High
#H265 Profile - 0=Main 1=Main10
profile=0
# set below properties in case of RTSPStreaming
rtsp-port=8554
udp-port=5400
sink1是rtsp的推流sink,可以接受管道数据然后在局域网转推出来。Codec是选择编码格式,默认h264。Enc-type是编码器选择,这里肯定选硬件编码器。Sync是同步选择,就是视频源头推送一帧我这个sink就推送一帧,是同步且实时的,但是有点不好的就是读取带有延迟的网络视频流,经过网络的传输实时延迟已经很大了,就会造成sync报错视频卡顿,所以sync还是不开了,给关掉了。Bitrate是编码比特率,默认参数。Profile暂时没搞懂,默认的参数。Rtsp port和udp port都是网络端口信息。这俩都是默认即可,可以根据网络环境更改。最后管道在运行的时候就可以得到一个实时推流地址。
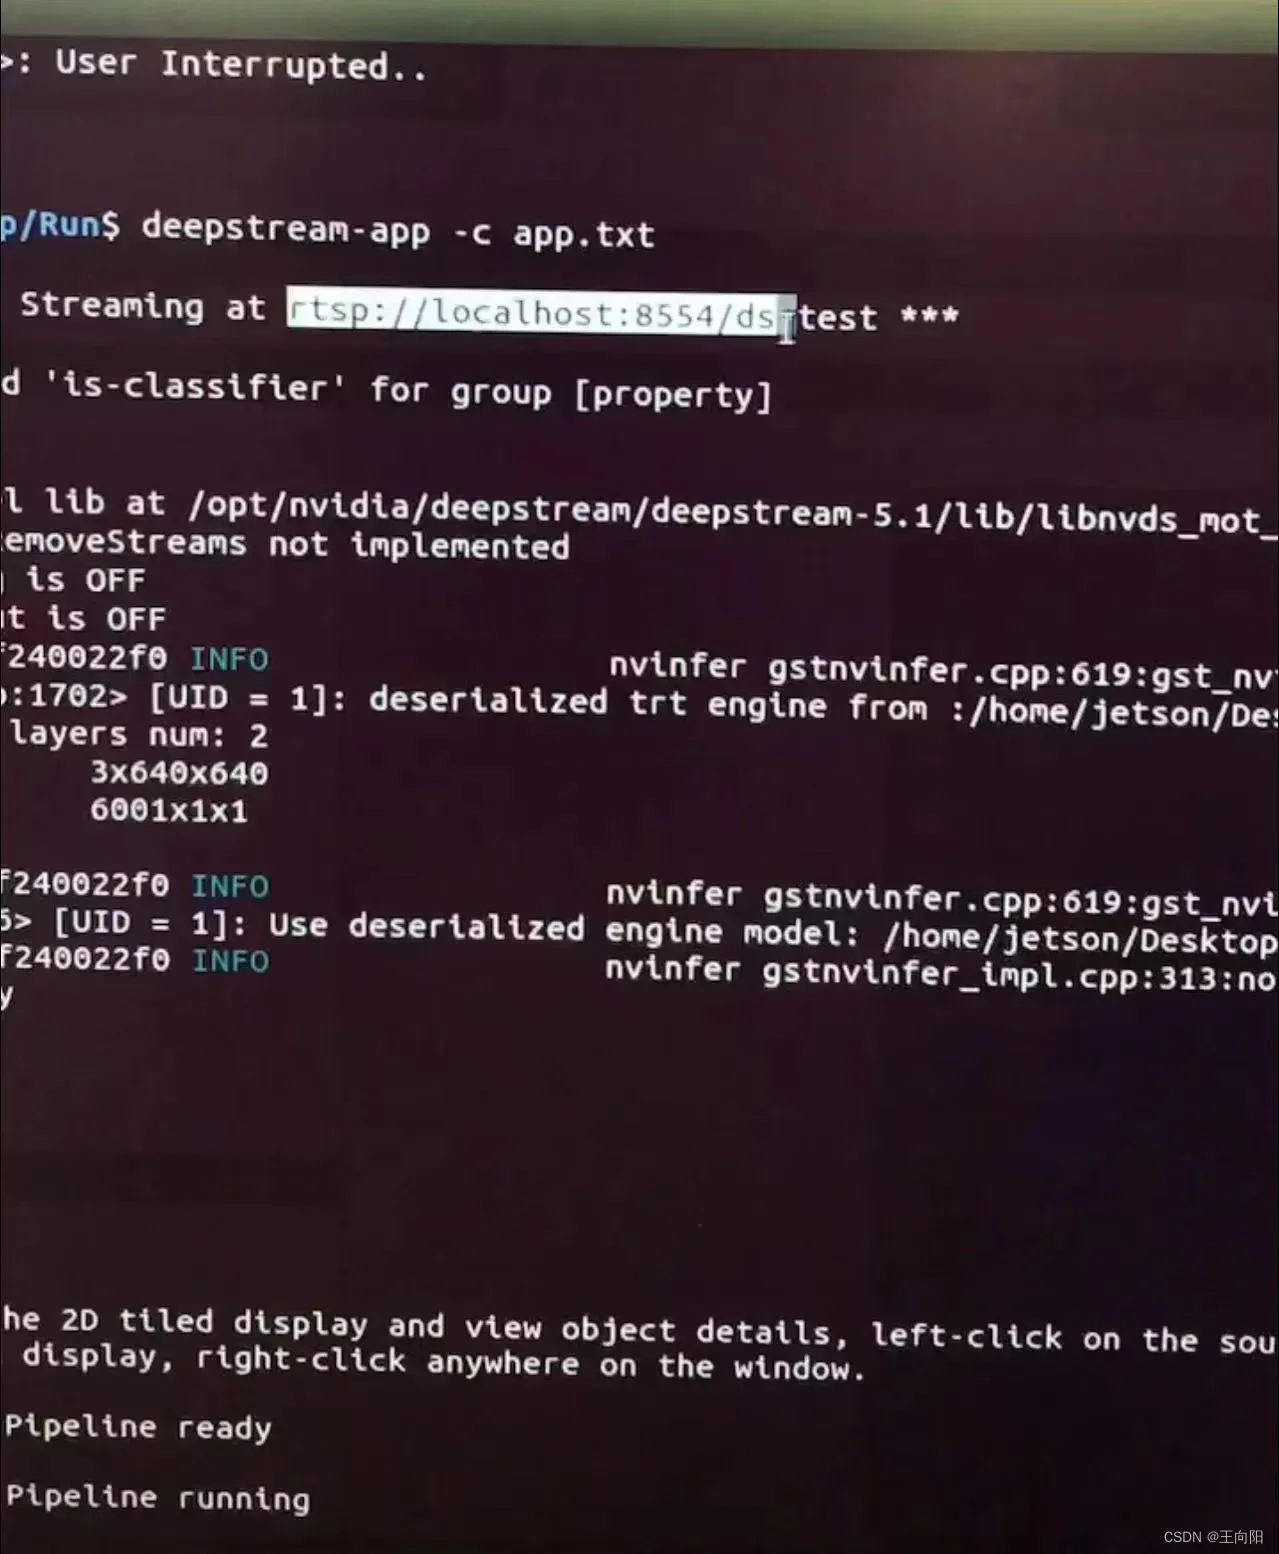
4.实机演示
验证平台:Jetson NX 8 GB 、yolov5m 、deeepstream 5.1
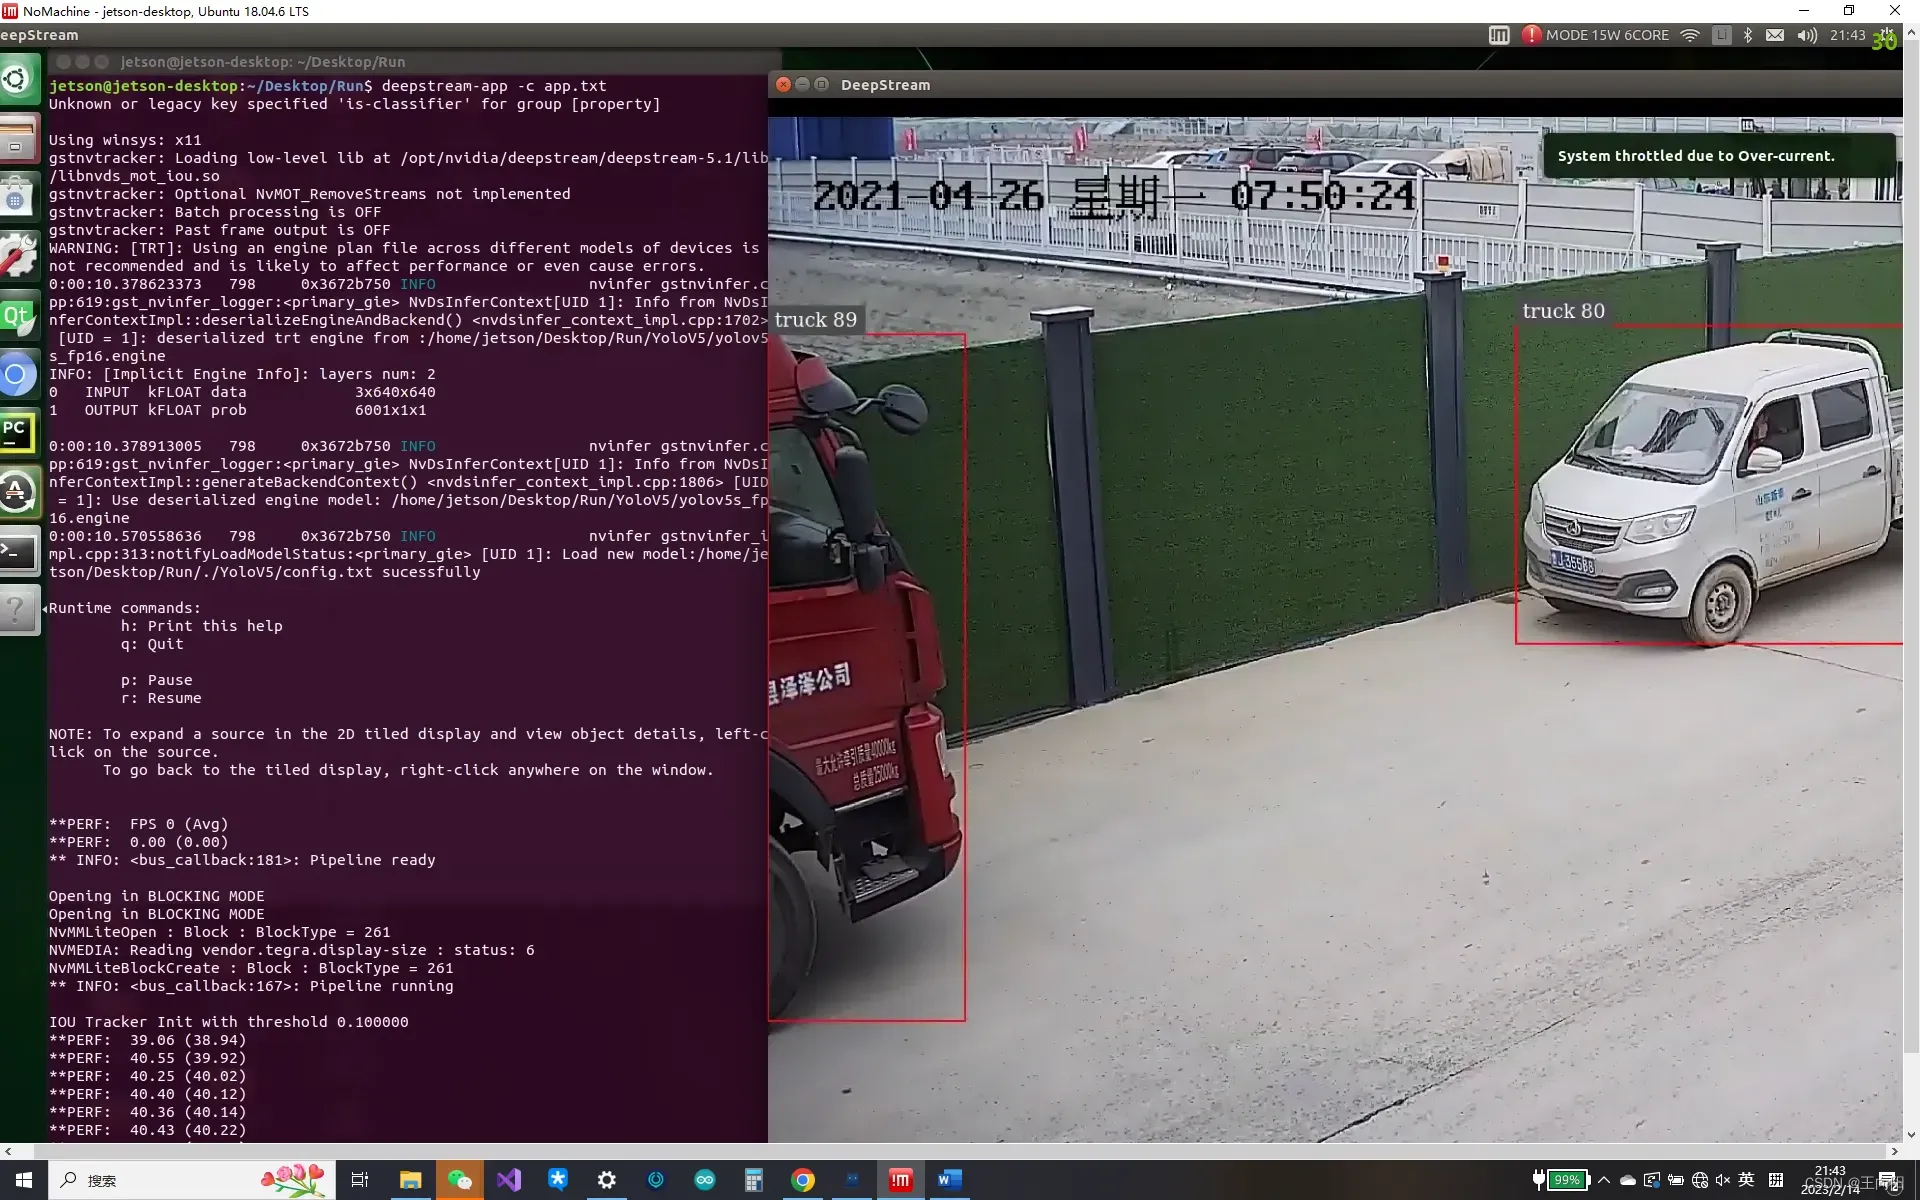
运行效果如上图所示。 如果你还增加了rtsp推流,将结果推出,脚本会输出rtsp地址以供查看。
5.概括Deepstream-app脚本优缺点
优点1.快速搭建用于验证的管道模型。
优点2.通过控制关键组件enable的0、1来排查bug或者性能瓶颈。
缺点:基本就是个直肠子,只能组建source-mux混流-gie推理-(gie二级推理)-tracker-osd-sink这样的简单管道,至于您要想搞什么tee插件分流,搞什么opencv挂探针取图,基本不可能,只能靠二次开发。如果您的管道设计非常简单,甚至不用二次开发用deepstream-app脚本挂管道就行了。但是如果您的设计较为复杂,此脚本远远无法满足。还是得搞开发环境二次开发。
6.相关资料
上述配置文件中各种眼花缭乱的配置有些很重要有些是次要的,好多都没写,我只写了主要的。但是要查这些组件的配置去哪里查呢?英伟达doc文档中心有deepstream的设置参数手册,里边罗列了非常详细的参数列表和建议参数还有参数含义。在这里将地址挂出来您自行查询。
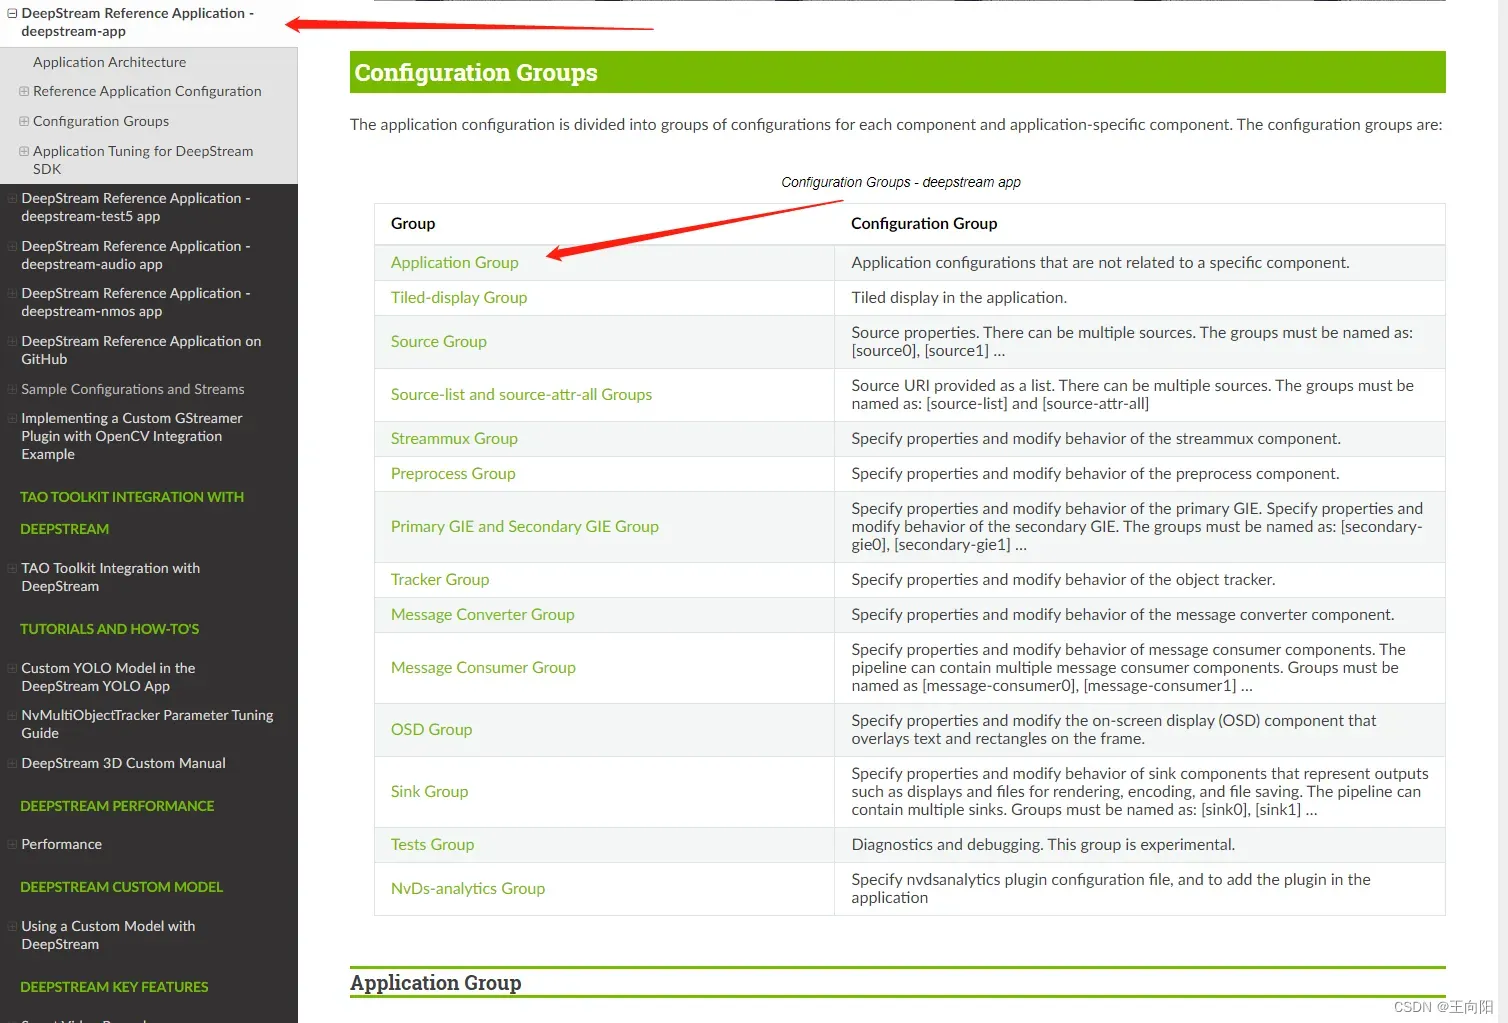
地址在这里:
https://docs.nvidia.com/metropolis/deepstream/dev-guide/text/DS_ref_app_deepstream.html感谢您的阅读!
文章出处登录后可见!