特别说明:参考官方开源的yolov8代码、瑞芯微官方文档、地平线的官方文档,如有侵权告知删,谢谢。
模型和完整仿真测试代码,放在github上参考链接 模型和代码。
跟上技术的步伐,yolov8 首个板端芯片部署。
1 模型和训练
训练代码参考官方开源的yolov8训练代码,由于SiLU在有些板端芯片上还不支持,因此将其改为ReLU。
2 导出 yolov8 onnx
后处理中有些算在板端芯片上效率低或者不支持,导出 onnx 需要将板端芯片不友好或不支持算子规避掉。导出onnx修改的部分。
第一步:
进行预测将pt只保存权重,增加代码如下图。

        # 保存权重值
        import torch
        self.model.fuse()
        self.model.eval()
        torch.save(self.model.state_dict(), './weights/Yolov8_dict.pt')
        # self.model.load_state_dict(torch.load('./weights/Yolov8_dict.pt', map_location='cpu'))
修改后运行以下代码:
from ultralytics import YOLO
model = YOLO('./weights/yolov8n_coco128.pt')
results = model(task='detect', mode='predict', source='./images/test.jpg', line_thickness=3, show=True, save=True, device='cpu')
第二步:
导出onnx,去除不需要的算子。修改代码如下。

# heads
class Detect(nn.Module):
    # YOLOv8 Detect head for detection models
    dynamic = False  # force grid reconstruction
    export = False  # export mode
    shape = None
    anchors = torch.empty(0)  # init
    strides = torch.empty(0)  # init

    def __init__(self, nc=80, ch=()):  # detection layer
        super().__init__()
        self.nc = nc  # number of classes
        self.nl = len(ch)  # number of detection layers
        self.reg_max = 16  # DFL channels (ch[0] // 16 to scale 4/8/12/16/20 for n/s/m/l/x)
        self.no = nc + self.reg_max * 4  # number of outputs per anchor
        self.stride = torch.zeros(self.nl)  # strides computed during build

        c2, c3 = max((16, ch[0] // 4, self.reg_max * 4)), max(ch[0], self.nc)  # channels
        self.cv2 = nn.ModuleList(
            nn.Sequential(Conv(x, c2, 3), Conv(c2, c2, 3), nn.Conv2d(c2, 4 * self.reg_max, 1)) for x in ch)
        self.cv3 = nn.ModuleList(nn.Sequential(Conv(x, c3, 3), Conv(c3, c3, 3), nn.Conv2d(c3, self.nc, 1)) for x in ch)
        self.dfl = DFL(self.reg_max) if self.reg_max > 1 else nn.Identity()

        # 导出 onnx 增加
        self.conv1x1 = nn.Conv2d(16, 1, 1, bias=False).requires_grad_(False)
        x = torch.arange(16, dtype=torch.float)
        self.conv1x1.weight.data[:] = nn.Parameter(x.view(1, 16, 1, 1))

    def forward(self, x):
        shape = x[0].shape  # BCHW

        y = []
        for i in range(self.nl):
            t1 = self.cv2[i](x[i])
            t2 = self.cv3[i](x[i])
            y.append(self.conv1x1(t1.view(t1.shape[0], 4, 16, -1).transpose(2, 1).softmax(1)))
            # y.append(t2.sigmoid())
            y.append(t2)
        return y

        for i in range(self.nl):
            x[i] = torch.cat((self.cv2[i](x[i]), self.cv3[i](x[i])), 1)
        if self.training:
            return x
        elif self.dynamic or self.shape != shape:
            self.anchors, self.strides = (x.transpose(0, 1) for x in make_anchors(x, self.stride, 0.5))
            self.shape = shape

        box, cls = torch.cat([xi.view(shape[0], self.no, -1) for xi in x], 2).split((self.reg_max * 4, self.nc), 1)
        dbox = dist2bbox(self.dfl(box), self.anchors.unsqueeze(0), xywh=True, dim=1) * self.strides
        y = torch.cat((dbox, cls.sigmoid()), 1)
        return y if self.export else (y, x)

    def bias_init(self):
        # Initialize Detect() biases, WARNING: requires stride availability
        m = self  # self.model[-1]  # Detect() module
        # cf = torch.bincount(torch.tensor(np.concatenate(dataset.labels, 0)[:, 0]).long(), minlength=nc) + 1
        # ncf = math.log(0.6 / (m.nc - 0.999999)) if cf is None else torch.log(cf / cf.sum())  # nominal class frequency
        for a, b, s in zip(m.cv2, m.cv3, m.stride):  # from
            a[-1].bias.data[:] = 1.0  # box
            b[-1].bias.data[:m.nc] = math.log(5 / m.nc / (640 / s) ** 2)  # cls (.01 objects, 80 classes, 640 img)
增加保存onnx模型代码,如下:
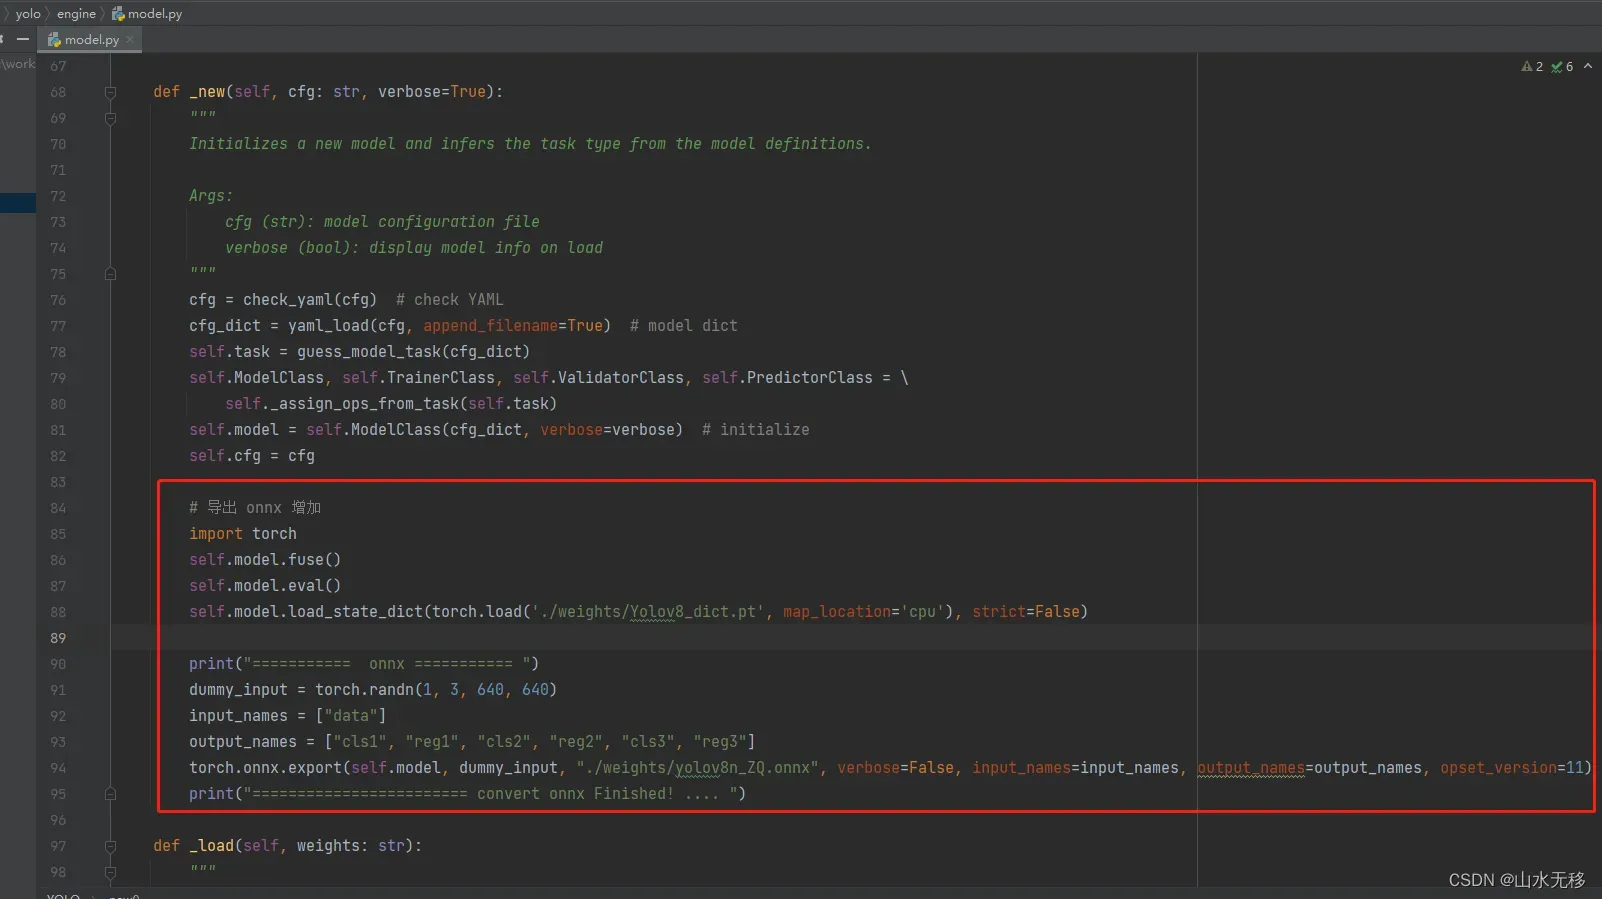
        # 导出 onnx 增加
        import torch
        self.model.fuse()
        self.model.eval()
        self.model.load_state_dict(torch.load('./weights/Yolov8_dict.pt', map_location='cpu'), strict=False)

        print("===========  onnx =========== ")
        dummy_input = torch.randn(1, 3, 640, 640)
        input_names = ["data"]
        output_names = ["cls1", "reg1", "cls2", "reg2", "cls3", "reg3"]
        torch.onnx.export(self.model, dummy_input, "./weights/yolov8n_ZQ.onnx", verbose=False, input_names=input_names, output_names=output_names, opset_version=11)
        print("======================== convert onnx Finished! .... ")
以上修改后完运行以下代码:
from ultralytics import YOLO

model = YOLO('./ultralytics/models/v8/yolov8n.yaml')
results = model(task='detect', mode='predict', source='./images/test3.jpg', line_thickness=3, show=False, save=True, device='cpu')
3 yolov8 onnx 测试效果
onnx模型和测试完整代码,放在github上代码。
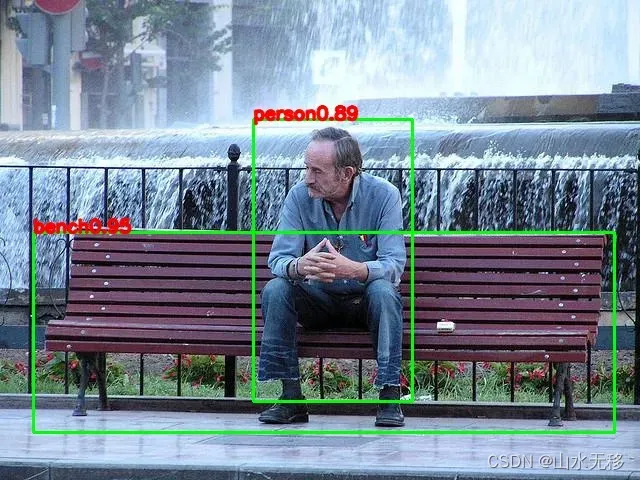
注:图片来源coco128
4 yolov8导出瑞芯微rknn和地平线horizon仿真测试
4.1 瑞芯微 rknn 仿真
瑞芯微环境搭建和详细步骤参考上一篇 【瑞芯微RKNN模型转换和PC端仿真】。
yolov8导出rknn模型代码和后处理参考 yolov8_rknn
4.2 地平线仿真
地平线环境搭建和详细步骤参考上一篇 【地平线Horizon模型转换和PC端仿真测试】。
yolov8导出地平线模型代码和后处理参考 yolov8_horizon
文章出处登录后可见!
已经登录?立即刷新