1、双目标定
双目标定的目的是获取左右目相机的内参矩阵、畸变向量、旋转矩阵和平移矩阵。
除了Matlab的标定工具箱之外,OpenCV同样也实现了张友正标定法,而我们只需要调用相关的函数即可对相机进行标定。
双目相机标定步骤:
- 检测棋盘格角点
retL, cornersL = cv2.findChessboardCorners(ChessImaL,(self.width, self.height), cv2.CALIB_CB_ADAPTIVE_THRESH | cv2.CALIB_CB_FILTER_QUADS)  # 提取左图每一张图片的角点
retR, cornersR = cv2.findChessboardCorners(ChessImaR,(self.width, self.height), cv2.CALIB_CB_ADAPTIVE_THRESH | cv2.CALIB_CB_FILTER_QUADS)  # 提取右图每一张图片的角点
- 对角点进行亚像素精细化
criteria = (cv2.TERM_CRITERIA_EPS + cv2.TERM_CRITERIA_MAX_ITER, 30, 0.001)
cv2.cornerSubPix(ChessImaL, cornersL, (11, 11), (-1, -1), criteria)  # 亚像素精确化,对粗提取的角点进行精确化
cv2.cornerSubPix(ChessImaR, cornersR, (11, 11), (-1, -1), criteria)  # 亚像素精确化,对粗提取的角点进行精确化
- 单目标定
#   左侧相机单独标定
retL, K1, D1, rvecsL, tvecsL = cv2.calibrateCamera(objpoints,imgpointsL,ChessImaL.shape[::-1], None, None)
#   右侧相机单独标定
retR, K2, D2, rvecsR, tvecsR = cv2.calibrateCamera(objpoints,imgpointsR,ChessImaR.shape[::-1], None, None)
- 双目标定
criteria_stereo = (cv2.TERM_CRITERIA_EPS + cv2.TERM_CRITERIA_MAX_ITER, 100, 1e-5)

flags = 0
flags |= cv2.CALIB_FIX_INTRINSIC

# 内参、畸变系数、平移向量、旋转矩阵
retS, K1, D1, K2, D2,  R, T, E, F = cv2.stereoCalibrate(objpoints,imgpointsL,imgpointsR,K1,D1,K2,D2,ChessImaR.shape[::-1], criteria_stereo,flags)
我们要注意函数中的flags:
- CV_CALIB_FIX_INTRINSIC:固定K和D矩阵。这是默认标志。如果你校准好你的相机,那就只求解𝑅,𝑇,𝐸,𝐹。
- CV_CALIB_USE_INTRINSIC_GUESS: K和D个矩阵将被优化。对于这个计算,你应该给出经过良好校准的矩阵,以便(可能)得到更好的结果。
- CV_CALIB_FIX_PRINCIPAL_POINT: 修复K矩阵中的参考点。
- CV_CALIB_FIX_FOCAL_LENGTH: 在K矩阵中固定焦距。
- CV_CALIB_FIX_ASPECT_RATIO: 固定长宽比。
- CV_CALIB_SAME_FOCAL_LENGTH: 校准焦距,并设置Fx和Fy相同的校准结果。
- CV_CALIB_ZERO_TANGENT_DIST: 去掉畸变。
- CV_CALIB_FIX_K1, …, CV_CALIB_FIX_K6: 移除K1到K6的畸变。
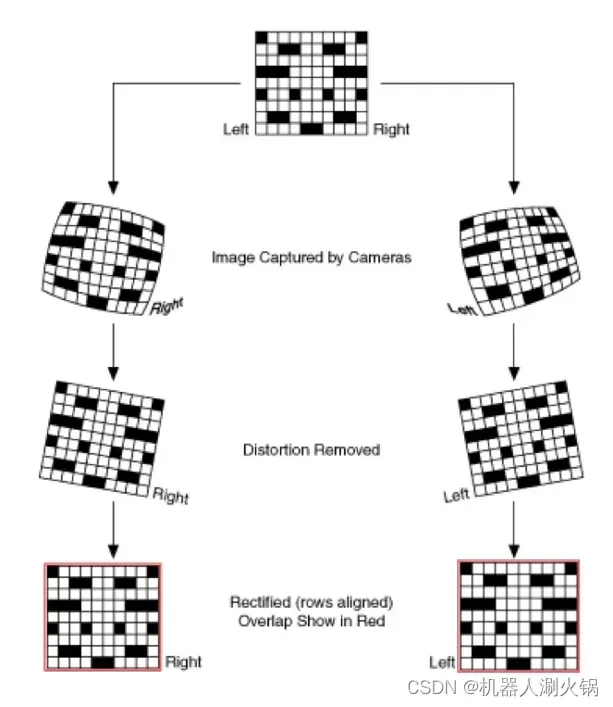
2、双目校正
双目校正的目的是得到立体校正所需的映射矩阵,然后对图像进行畸变校正和立体校正(极线校正)。
立体校正最常见的校正方法就是Bouguet极线校正方法。
Bouguet极线校正方法:左右相机成像平面各旋转一半,使得左右图像重投影造成的误差最小,左右视图的共同面积最大。
# 左校正变换矩阵、右校正变换矩阵、左投影矩阵、右投影矩阵、深度差异映射矩阵
R_l,R_r,P_l,P_r,Q, roi_left, roi_right = cv2.stereoRectify(K1, D1, K2, D2,(width, height),R, T,flags=cv2.CALIB_ZERO_DISPARITY, alpha=0.9)
在这个函数中,只有一个标志CALIB_ZERO_DISPARITY,它用于匹配图像之间的y轴。alpha值用于转换后的黑色部分,因为图像会旋转,而显示的图像大小不会改变,所以一些图像边缘部分会是黑色的,而原始图像会小得多:
- alpha= -1: 让 OpenCV 优化黑色部分。
- alpha= 0 : 旋转和裁切图像,使没有黑色的部分。这个选项在大多数情况下会严重削减图像,你不会得到一个像样的高质量的图像,但可以一试。
- alpha= 1 : 进行变换,但不要裁切任何部分。
- alpha= experimental: 尝试设置不同的值,在某个特定的alpha值,可能有一些黑色的区域,但图像质量整体高。
# 计算畸变矫正和立体校正的映射变换。
map_lx, map_ly = cv2.initUndistortRectifyMap(K1, D1, R_l, P_l,(width,height),cv2.CV_32FC1)
map_rx, map_ry = cv2.initUndistortRectifyMap(K2, D2, R_r, P_r, (width,height),cv2.CV_32FC1)

# 得到畸变校正和立体校正后的图像
rec_img_L = cv2.remap(imgL,map_lx, map_ly,  cv2.INTER_LINEAR, cv2.BORDER_CONSTANT)  # 使用remap函数完成映射
rec_img_R = cv2.remap(imgR,map_rx, map_ry,  cv2.INTER_LINEAR, cv2.BORDER_CONSTANT)
initUndistortRectifyMap函数可以同时实现图像的畸变校正和校准。对于左相机,我们使用K1(相机矩阵)和D1(失真矩阵)进行畸变校正,使用R1(从左到右旋转)和P1(从左到右投影矩阵)进行校正。在对remap进行变换后,我们将得到修正后的图像。对于右相机,我们会用相同的步骤做一遍。至此双目校正部分就完成了。
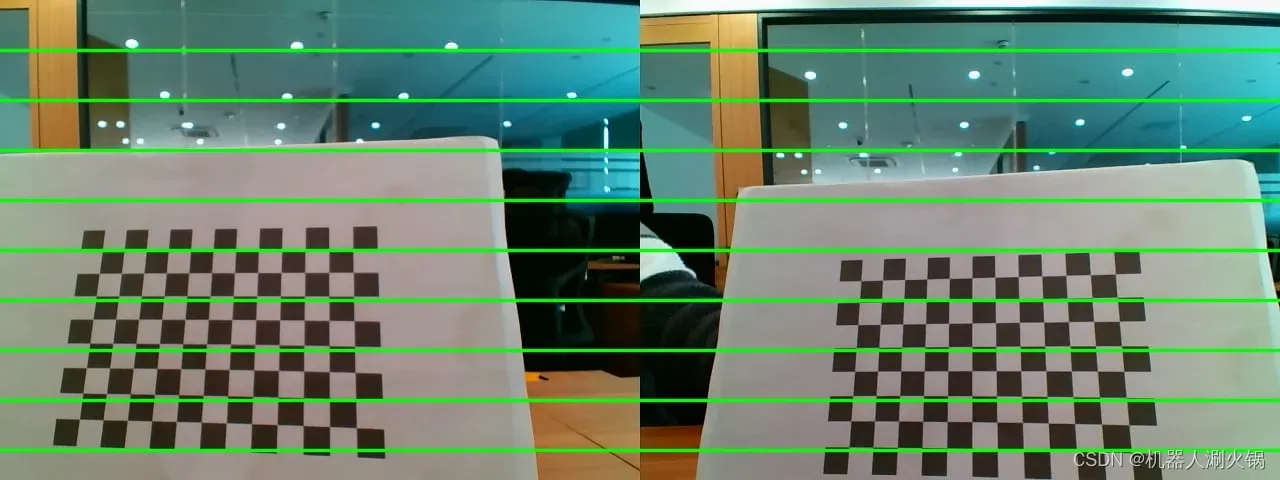
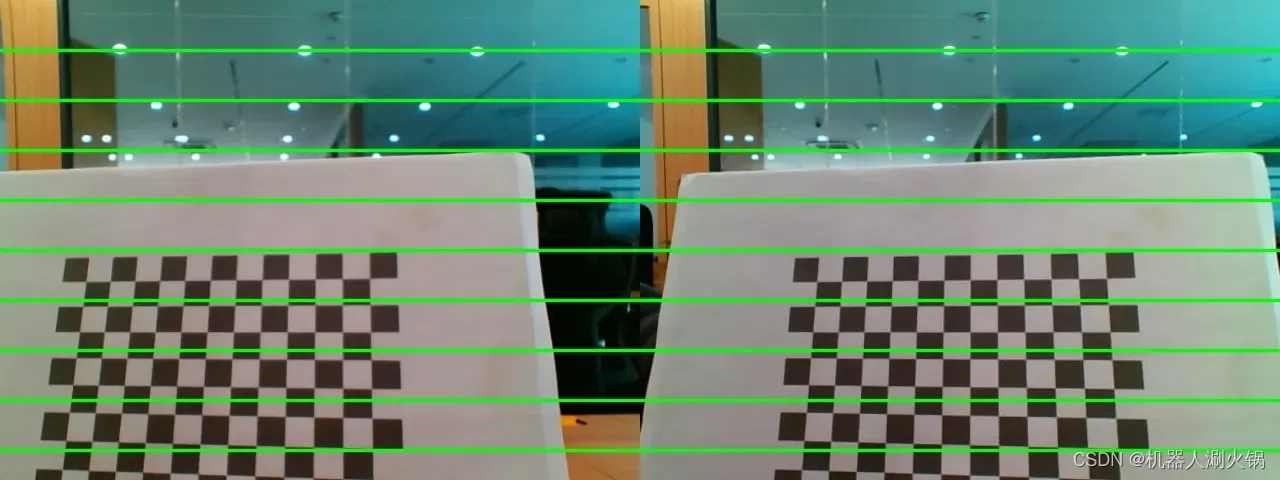
标定效果如下所示。可以看到原图中左右图像存在畸变,并且棋盘格位置明显未对齐;校正后左右图像畸变被消除,且极线对齐效果明显。
原图:
校正后:
4、参数保存
4.1 保存参数
为方便查看和读取,首先将需要保存的参数放到一个空字典中,然后保存为json文件。如下所示:
params_dict = {}
params_dict['size']        = [width, height]
params_dict['K1']          = left_K.tolist()
params_dict['D1']          = left_D.tolist()
params_dict['K2']          = right_K.tolist()
params_dict['D2']          = right_D.tolist()
params_dict['left_map_x']  = map_lx.tolist()
params_dict['left_map_y']  = map_ly.tolist()
params_dict['right_map_x'] = map_rx.tolist()
params_dict['right_map_y'] = map_ry.tolist()
params_dict['R']           = R.tolist()
params_dict['T']           = T.tolist()
params_dict['Q']           = Q.tolist()

# 保存为.json文件
file_path = args.save_dir + args.file_name + ".json"
    with open(file_path,"w") as f:
        json.dump(params_dict, f, indent=1)
4.2 读取参数
# 读取.json文件
with open(params_file, "r") as f:
    dict = json.load(f)

for d in dict:
    dict[d] = np.asarray(dict[d], "f")
5、代码示例
#-*- coding:utf-8 -*-
import os
import numpy as np
import cv2
import glob
import argparse

import json
import pickle


class Stereo_Camera_Calibration(object):
    def __init__(self, width, height, lattice):
        self.width       = width         # 棋盘格宽方向黑白格子相交点个数
        self.height      = height       # 棋盘格长方向黑白格子相交点个数
        self.lattice     = lattice

        # 设置迭代终止条件
        self.criteria = (cv2.TERM_CRITERIA_EPS + cv2.TERM_CRITERIA_MAX_ITER, 30, 0.001)
        self.criteria_stereo = (cv2.TERM_CRITERIA_EPS + cv2.TERM_CRITERIA_MAX_ITER, 100, 1e-5)

    # =========================== 双目标定 =============================== #
    def stereo_calibration(self, file_L, file_R):
        # 设置 object points, 形式为 (0,0,0), (1,0,0), (2,0,0) ....,(6,5,0)
        objp = np.zeros((self.width * self.height, 3), np.float32)  #我用的是6×7的棋盘格,可根据自己棋盘格自行修改相关参数
        objp[:, :2] = np.mgrid[0:self.width, 0:self.height].T.reshape(-1, 2)
        objp       *= self.lattice

        # 用arrays存储所有图片的object points 和 image points
        objpoints = []  # 3d points in real world space
        imgpointsR = []  # 2d points in image plane
        imgpointsL = []

        for i in range(len(file_L)):
            ChessImaL = cv2.imread(file_L[i],0)  # 左视图
            ChessImaR = cv2.imread(file_R[i],0)  # 右视图

            retL, cornersL = cv2.findChessboardCorners(ChessImaL,(self.width, self.height), cv2.CALIB_CB_ADAPTIVE_THRESH | cv2.CALIB_CB_FILTER_QUADS)  # 提取左图每一张图片的角点
            retR, cornersR = cv2.findChessboardCorners(ChessImaR,(self.width, self.height), cv2.CALIB_CB_ADAPTIVE_THRESH | cv2.CALIB_CB_FILTER_QUADS)  # 提取右图每一张图片的角点

            if (True == retR) & (True == retL):
                objpoints.append(objp)
                cv2.cornerSubPix(ChessImaL, cornersL, (11, 11), (-1, -1), self.criteria)  # 亚像素精确化,对粗提取的角点进行精确化
                cv2.cornerSubPix(ChessImaR, cornersR, (11, 11), (-1, -1), self.criteria)  # 亚像素精确化,对粗提取的角点进行精确化
                imgpointsL.append(cornersL)
                imgpointsR.append(cornersR)


                # ret_l = cv2.drawChessboardCorners(ChessImaL, (self.width, self.height), cornersL, retL)
                # cv2.imshow(file_L[i], ChessImaL)
                # cv2.waitKey()

                # ret_r = cv2.drawChessboardCorners(ChessImaR, (self.width, self.height), cornersR, retR)
                # cv2.imshow(file_R[i], ChessImaR)
                # cv2.waitKey(500)

        # 相机的单双目标定、及校正
        #   左侧相机单独标定
        retL, K1, D1, rvecsL, tvecsL = cv2.calibrateCamera(objpoints,imgpointsL,ChessImaL.shape[::-1], None, None)
        #   右侧相机单独标定
        retR, K2, D2, rvecsR, tvecsR = cv2.calibrateCamera(objpoints,imgpointsR,ChessImaR.shape[::-1], None, None)

        # --------- 双目相机的标定 ----------#
        flags = 0
        flags |= cv2.CALIB_FIX_INTRINSIC         # K和D个矩阵是固定的。这是默认标志。如果你校准好你的相机,只求解𝑅,𝑇,𝐸,𝐹。
        #flags |= cv2.CALIB_FIX_PRINCIPAL_POINT  # 修复K矩阵中的参考点。
        # flags |= cv2.CALIB_USE_INTRINSIC_GUESS    # K和D个矩阵将被优化。对于这个计算,你应该给出经过良好校准的矩阵,以便(可能)得到更好的结果。
        #flags |= cv2.CALIB_FIX_FOCAL_LENGTH      # 在K矩阵中固定焦距。
        # flags |= cv2.CALIB_FIX_ASPECT_RATIO     # 固定长宽比。
        #flags |= cv2.CALIB_ZERO_TANGENT_DIST     # 去掉畸变。

        # 内参、畸变系数、平移向量、旋转矩阵
        retS, K1, D1, K2, D2,  R, T, E, F = cv2.stereoCalibrate(objpoints,imgpointsL,imgpointsR,K1,D1,K2,D2,
                                                                ChessImaR.shape[::-1], self.criteria_stereo,flags)

        # 左内参矩阵、左畸变向量、右内参矩阵、右畸变向量、旋转矩阵、平移矩阵
        return K1, D1, K2, D2, R, T
    # ==================================================================== #

    # =========================== 双目校正 =============================== #
    # 获取畸变校正、立体校正、重投影矩阵
    def getRectifyTransform(self, width,height,K1 ,D1 ,K2 ,D2 , R, T):
        #得出进行立体矫正所需要的映射矩阵
        # 左校正变换矩阵、右校正变换矩阵、左投影矩阵、右投影矩阵、深度差异映射矩阵
        R_l,R_r,P_l,P_r,Q, roi_left, roi_right = cv2.stereoRectify(K1, D1, K2, D2,
                                              (width, height),R, T,
                                              flags=cv2.CALIB_ZERO_DISPARITY, alpha=0)
                                            # # 标志CALIB_ZERO_DISPARITY,它用于匹配图像之间的y轴


        # 计算畸变矫正和立体校正的映射变换。
        map_lx, map_ly = cv2.initUndistortRectifyMap(K1, D1, R_l, P_l, (width,height),cv2.CV_32FC1)
        map_rx, map_ry = cv2.initUndistortRectifyMap(K2, D2, R_r, P_r, (width,height),cv2.CV_32FC1)

        return map_lx, map_ly,map_rx, map_ry, Q

    # 得到畸变校正和立体校正后的图像
    def get_rectify_img(self, imgL, imgR,map_lx, map_ly,map_rx, map_ry):
        rec_img_L = cv2.remap(imgL,map_lx, map_ly,  cv2.INTER_LINEAR, cv2.BORDER_CONSTANT)  # 使用remap函数完成映射
        rec_img_R = cv2.remap(imgR,map_rx, map_ry,  cv2.INTER_LINEAR, cv2.BORDER_CONSTANT)

        return rec_img_L, rec_img_R

    # 立体校正检验——极线对齐
    def draw_line(self, rec_img_L,rec_img_R):
        #建立输出图像
        width  = max(rec_img_L.shape[1],rec_img_R.shape[1])
        height = max(rec_img_L.shape[0],rec_img_R.shape[0])

        output = np.zeros((height,width*2,3),dtype=np.uint8)
        output[0:rec_img_L.shape[0],0:rec_img_L.shape[1]] = rec_img_L
        output[0:rec_img_R.shape[0],rec_img_L.shape[1]:]  = rec_img_R

        # 绘制等间距平行线
        line_interval = 50  # 直线间隔:50
        for k in range(height // line_interval):
            cv2.line(output, (0, line_interval * (k + 1)), (2 * width, line_interval * (k + 1)), (0, 255, 0), thickness=2, lineType=cv2.LINE_AA)

        return output # 可显示的图像
    # ===================================================================== #


def get_parser():
    parser = argparse.ArgumentParser(description='Camera calibration')
    parser.add_argument('--width', type=int, default=12, help='chessboard width size')
    parser.add_argument('--height', type=int, default=8, help='chessboard height size')
    parser.add_argument('--lattice', type=float, default=12.5, help='lattice length')
    parser.add_argument('--image_dir', type=str, default="data/", help='images path')
    parser.add_argument('--save_dir', type=str, default="config/", help='path to save file')
    parser.add_argument('--file_name', type=str, default="camera_params", help='camera params save file')
    return parser

def get_file(path):          #获取文件路径
    img_path = []
    for root, dirs, files in os.walk(path):
        for file in files:
            img_path.append(os.path.join(root,file))
    return img_path


if __name__ == "__main__":
    args = get_parser().parse_args()

    params_dict = {}

    file_L = get_file(args.image_dir + 'left')
    file_R = get_file(args.image_dir + 'right')

    imgL = cv2.imread(file_L[2])
    imgR = cv2.imread(file_R[2])

    height, width = imgL.shape[0:2]

    calibration = Stereo_Camera_Calibration(args.width, args.height, args.lattice)
    left_K,left_D, right_K, right_D, R, T = calibration.stereo_calibration(file_L, file_R)
    map_lx, map_ly,map_rx, map_ry, Q = calibration.getRectifyTransform(width,height,left_K,left_D,
                                                                       right_K, right_D, R, T)

    # 查看校正效果
    img_ = calibration.draw_line(imgL,imgR)
    cv2.imshow("img",img_)
    rec_img_L, rec_img_R = calibration.get_rectify_img(imgL,imgR,map_lx, map_ly,map_rx, map_ry)
    img_show = calibration.draw_line(rec_img_L,rec_img_R)
    cv2.imshow("output",img_show)
    cv2.waitKey(0)


    params_dict['size']        = [width, height]
    params_dict['K1']          = left_K.tolist()
    params_dict['D1']          = left_D.tolist()
    params_dict['K2']          = right_K.tolist()
    params_dict['D2']          = right_D.tolist()
    params_dict['map_lx']      = map_lx.tolist()
    params_dict['map_ly']      = map_ly.tolist()
    params_dict['map_rx']      = map_rx.tolist()
    params_dict['map_ry']      = map_ry.tolist()
    params_dict['R']           = R.tolist()
    params_dict['T']           = T.tolist()
    params_dict['Q']           = Q.tolist()


    # =========== 保存相机参数 =========== #
    # 保存为.json文件
    file_path = args.save_dir + args.file_name + ".json"
    with open(file_path,"w") as f:
        json.dump(params_dict, f, indent=1)

    print("ALL Make Done!")
文章出处登录后可见!
已经登录?立即刷新