安装并测试yolov7
一、下载yolov7
GitHub – WongKinYiu/yolov7: Implementation of paper – YOLOv7: Trainable bag-of-freebies sets new state-of-the-art for real-time object detectors
下载工程以及yolov7-x权重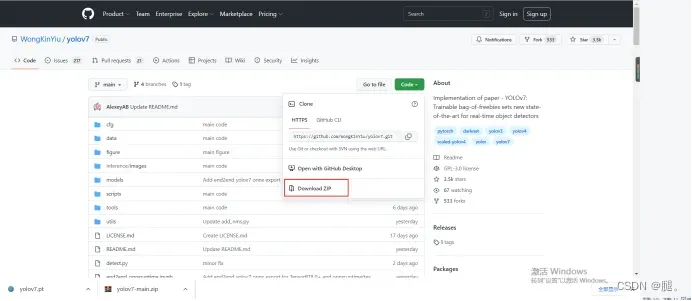
二、创建虚拟环境
conda create -n yolov7 python=3.7
activate yolov7
进入yolov7-main所在文件夹,在直接输入命令安装所需环境之前先修改一下。
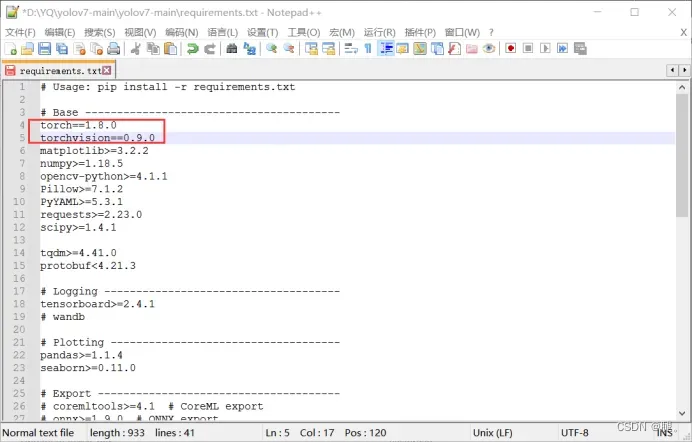
打开requirements.txt,修改torch以及torchvision版本,这里直接指定好版本让其版本对应,不然后面会报错。
pip install -r requirements.txt-f https://download.pytorch.org/whl/torch_stable.html -i https://pypi.tuna.tsinghua.edu.cn/simple解决安装慢问题
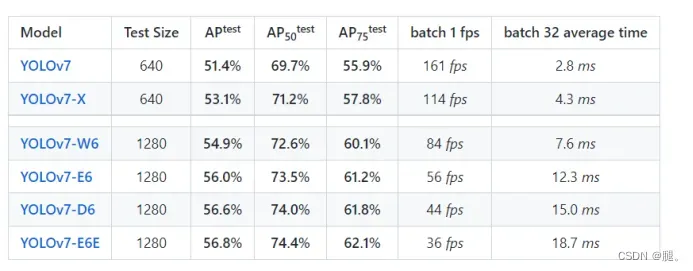
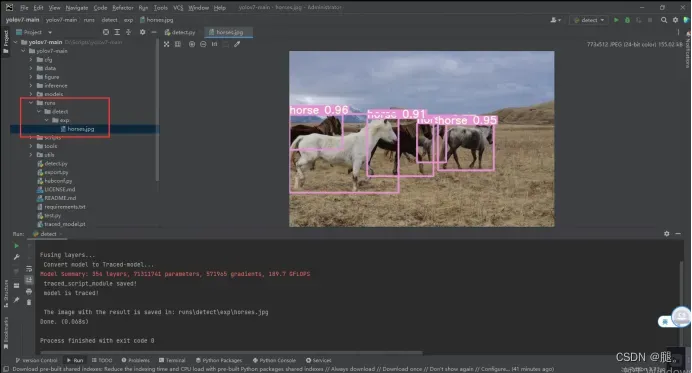
三、测试结果
环境装好后打开detect.py,–weights中default修改为下载的权重,这里我使用的是7x,其他默认即可
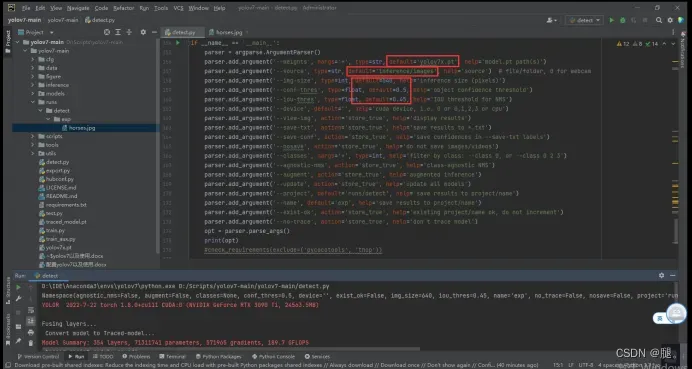
运行完成后,成功
训练自己的数据
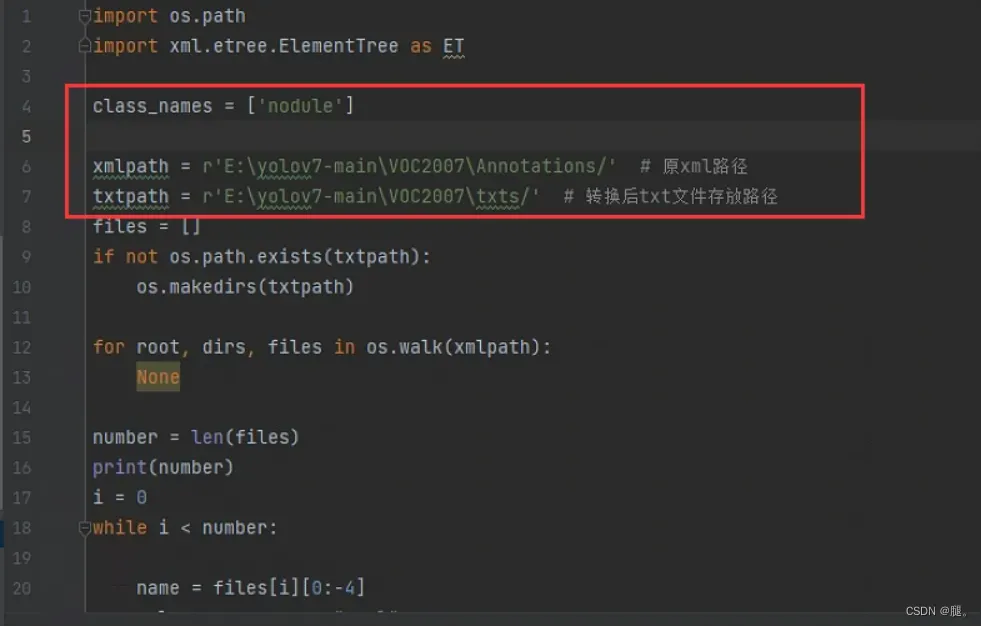
一、转换数据
之前的数据都是VOC格式的拿来训练yolox,这里需要将VOC 转为YOLO格式。根据Annotations下的.xml文件得到.txt文件并保存在txts文件夹中

1、将代码中红框位置,改为你的类别名和地址(我这里只有一类)
import os.path
import xml.etree.ElementTree as ET

class_names = ['nodule']

xmlpath = r'E:\yolov7-main\VOC2007\Annotations/'  # 原xml路径
txtpath = r'E:\yolov7-main\VOC2007\txts/'  # 转换后txt文件存放路径
files = []
if not os.path.exists(txtpath):
    os.makedirs(txtpath)

for root, dirs, files in os.walk(xmlpath):
    None

number = len(files)
print(number)
i = 0
while i < number:

    name = files[i][0:-4]
    xml_name = name + ".xml"
    txt_name = name + ".txt"
    xml_file_name = xmlpath + xml_name
    txt_file_name = txtpath + txt_name

    xml_file = open(xml_file_name)
    tree = ET.parse(xml_file)
    root = tree.getroot()
    # filename = root.find('name').text

    # image_name = root.find('filename').text
    w = int(root.find('size').find('width').text)
    h = int(root.find('size').find('height').text)

    f_txt = open(txt_file_name, 'w+')
    content = ""

    first = True

    for obj in root.iter('object'):

        name = obj.find('name').text
        # class_num = class_names.index(name)
        class_num = 0

        xmlbox = obj.find('bndbox')

        x1 = int(xmlbox.find('xmin').text)
        x2 = int(xmlbox.find('xmax').text)
        y1 = int(xmlbox.find('ymin').text)
        y2 = int(xmlbox.find('ymax').text)

        if first:
            content += str(class_num) + " " + \
                       str((x1 + x2) / 2 / w) + " " + str((y1 + y2) / 2 / h) + " " + \
                       str((x2 - x1) / w) + " " + str((y2 - y1) / h)
            first = False
        else:
            content += "\n" + \
                       str(class_num) + " " + \
                       str((x1 + x2) / 2 / w) + " " + str((y1 + y2) / 2 / h) + " " + \
                       str((x2 - x1) / w) + " " + str((y2 - y1) / h)

    # print(str(i / (number - 1) * 100) + "%\n")
    print(content)
    f_txt.write(content)
    f_txt.close()
    xml_file.close()
    i += 1
txts文件夹下的结果。第一列的0代表class_names中只有一类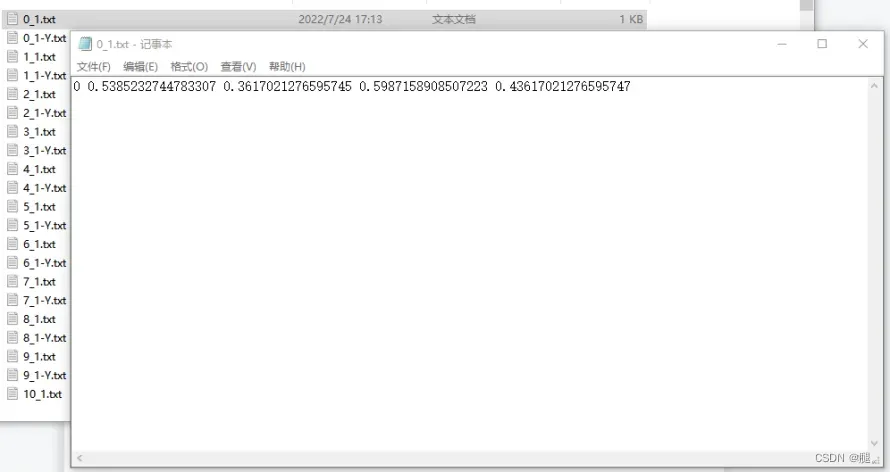
2、在ImagesSets/Main下生成train.txt,val.txt

代码
import os
import random
random.seed(0)
xmlfilepath=r'E:\yolov7-main\VOC2007\Annotations'
saveBasePath=r'E:\yolov7-main\VOC2007\ImageSets\Main/'
#----------------------------------------------------------------------#
# 想要增加测试集修改trainval_percent
# train_percent不需要修改
#----------------------------------------------------------------------#
trainval_percent = 1
train_percent = 0.8
temp_xml = os.listdir(xmlfilepath)
total_xml = []
for xml in temp_xml:
if xml.endswith(".xml"):
total_xml.append(xml)
num=len(total_xml)
list=range(num)
tv=int(num*trainval_percent)
tr=int(tv*train_percent)
trainval= random.sample(list,tv)
train=random.sample(trainval,tr)
print("train and val size",tv)
print("traub suze",tr)
ftrainval = open(os.path.join(saveBasePath,'trainval.txt'), 'w')
ftest = open(os.path.join(saveBasePath,'test.txt'), 'w')
ftrain = open(os.path.join(saveBasePath,'train.txt'), 'w')
fval = open(os.path.join(saveBasePath,'val.txt'), 'w')
for i in list:
name=total_xml[i][:-4]+'\n'
if i in trainval:
ftrainval.write(name)
if i in train:
ftrain.write(name)
else:
fval.write(name)
else:
ftest.write(name)
ftrainval.close()
ftrain.close()
fval.close()
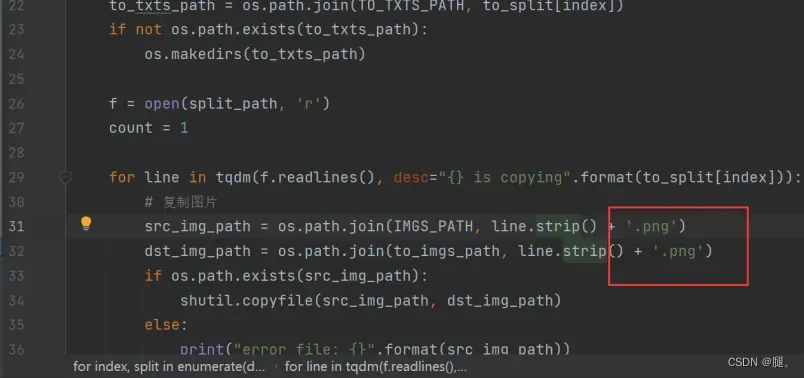
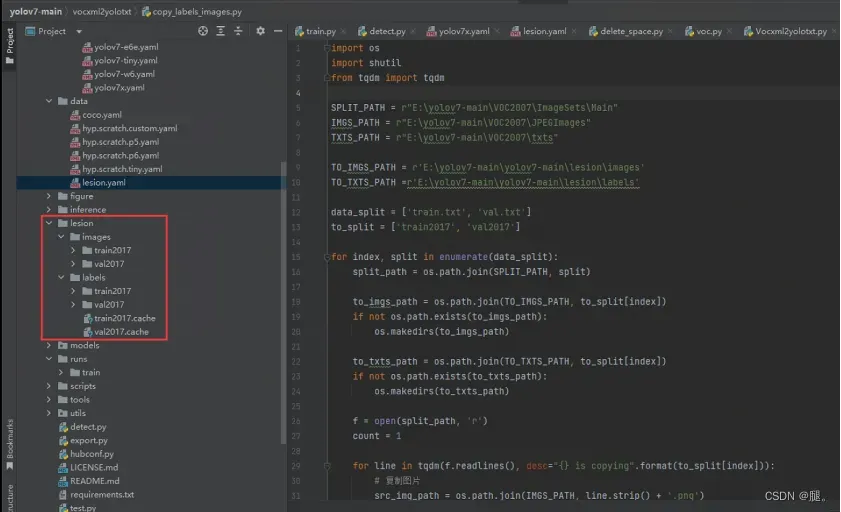
ftest .close()3、 根据train.txt和val.txt将图片和txt分别复制到labels和images,注意修改各种路径,以及图片的后缀名

import os
import shutil
from tqdm import tqdm

SPLIT_PATH = r"E:\yolov7-main\VOC2007\ImageSets\Main"
IMGS_PATH = r"E:\yolov7-main\VOC2007\JPEGImages"
TXTS_PATH = r"E:\yolov7-main\VOC2007\txts"

TO_IMGS_PATH = r'E:\yolov7-main\yolov7-main\lesion\images'
TO_TXTS_PATH =r'E:\yolov7-main\yolov7-main\lesion\labels'

data_split = ['train.txt', 'val.txt']
to_split = ['train2017', 'val2017']

for index, split in enumerate(data_split):
    split_path = os.path.join(SPLIT_PATH, split)

    to_imgs_path = os.path.join(TO_IMGS_PATH, to_split[index])
    if not os.path.exists(to_imgs_path):
        os.makedirs(to_imgs_path)

    to_txts_path = os.path.join(TO_TXTS_PATH, to_split[index])
    if not os.path.exists(to_txts_path):
        os.makedirs(to_txts_path)

    f = open(split_path, 'r')
    count = 1

    for line in tqdm(f.readlines(), desc="{} is copying".format(to_split[index])):
        # 复制图片
        src_img_path = os.path.join(IMGS_PATH, line.strip() + '.png')
        dst_img_path = os.path.join(to_imgs_path, line.strip() + '.png')
        if os.path.exists(src_img_path):
            shutil.copyfile(src_img_path, dst_img_path)
        else:
            print("error file: {}".format(src_img_path))

        # 复制txt标注文件
        src_txt_path = os.path.join(TXTS_PATH, line.strip() + '.txt')
        dst_txt_path = os.path.join(to_txts_path, line.strip() + '.txt')
        if os.path.exists(src_txt_path):
            shutil.copyfile(src_txt_path, dst_txt_path)
        else:
            print("error file: {}".format(src_txt_path))
4、最后生成的结果
Lesion/images/train2017 中存放的是所有训练图片
Lesion/images/val2017 中存放的是所有验证图片
Lesion/labels/train2017 中存放的是所有训练图片的目标框txt
Lesion/labels/val2017 中存放的是所有验证图片的目标框txt
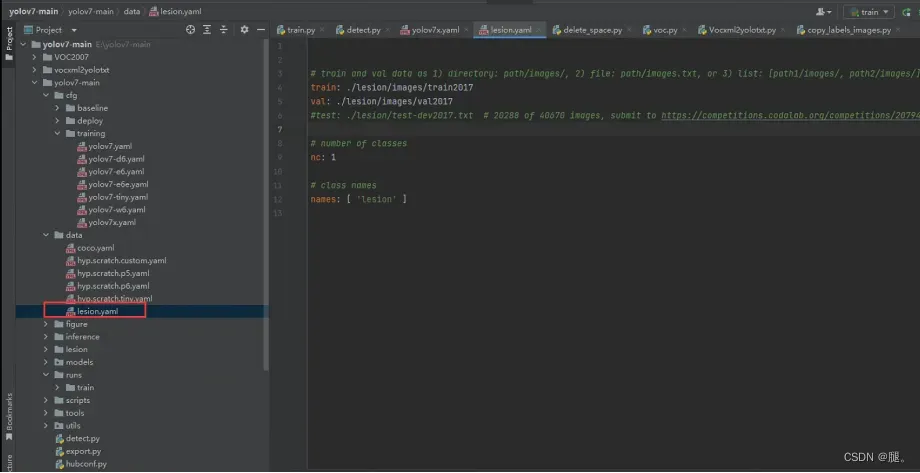
二、创建自己的lesion.yaml
1、接下来仿照data/coco.yaml 创建自己的lesion.yaml。将里面的参数修改为自己的数据集所对应的。我这里只有一类
2、打开training/yolov7x.yaml,修改nc:1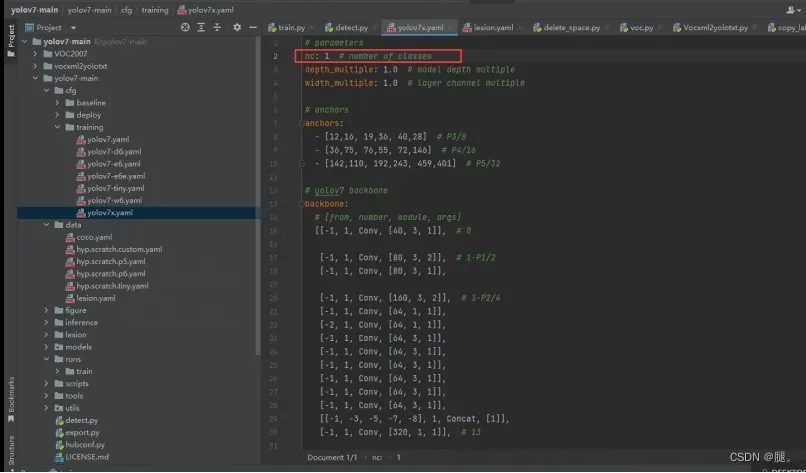
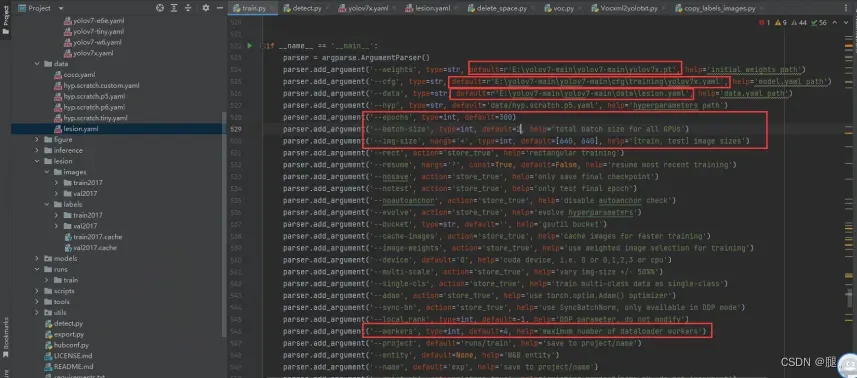
3、打开train.py,根据自己的地址以及机器修改红框中的参数
4、开始训练,结果保存在runs/train/exp下


文章出处登录后可见!