OpenGL相机自由移动旋转缩放,四元数,欧拉角,LookAt
- 定义相机
- 摄像机位置
- 右轴
- 上轴
- Look At
- 自由移动相机
- 左右移动
- 移动速度
- 视角移动
- 欧拉角
- 通过欧拉角计算实际的方向向量
- 缩放
- 四元数
- 解读四元数
- 基本操作
- 怎样用GLSL创建四元数?
- 怎样把四元数转换为矩阵?
- 其他操作
- 那究竟该用哪一个呢?
- 怎样判断两个四元数是否相同?
- 怎样旋转一个点?
- 怎样累积两个旋转?
- 怎样计算两向量之间的旋转?
- 我需要一个类似gluLookAt的函数。怎样旋转物体使之朝向某点?
- 怎样使用LookAt且限制旋转速度?
- LookAt矩阵实现
先看效果,完整工程下载链接在最后:

相机实现参考:learnopengl-cn
定义相机
当我们讨论摄像机/观察空间(Camera/View Space)的时候,是我们在讨论以摄像机的透视图作为场景原点时场景中所有可见顶点坐标。观察矩阵把所有的世界坐标变换到观察坐标,这些新坐标是相对于摄像机的位置和方向的。定义一个摄像机,我们需要一个摄像机在世界空间中的位置、观察的方向、一个指向它的右侧的向量以及一个指向它上方的向量。细心的读者可能已经注意到我们实际上创建了一个三个单位轴相互垂直的、以摄像机的位置为原点的坐标系。
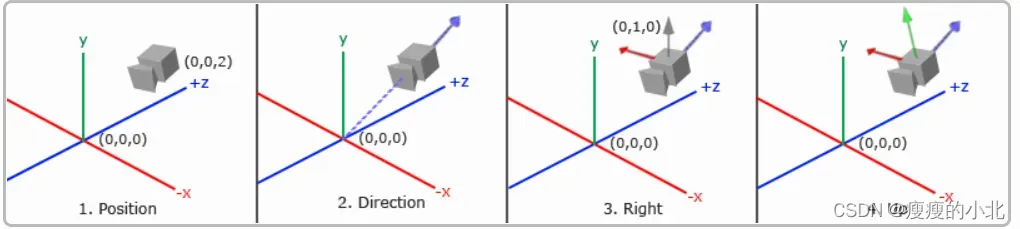
摄像机位置
glm::vec3 cameraPos = glm::vec3(0.0f, 0.0f, 3.0f);
不要忘记正z轴是从屏幕指向你的,如果我们希望摄像机向后移动,我们就往z轴正方向移动。
摄像机方向
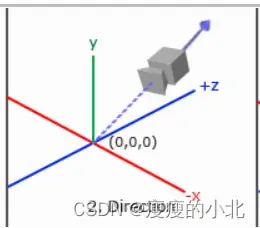
glm::vec3 cameraTarget = glm::vec3(0.0f, 0.0f, 0.0f);
glm::vec3 cameraDirection = glm::normalize(cameraPos - cameraTarget);
方向向量(Direction Vector)并不是最好的名字,因为它正好指向从它到目标向量的相反方向。
右轴
我们需要的另一个向量是一个右向量(Right Vector),它代表摄像机空间的x轴的正方向。为获取右向量我们需要先使用一个小技巧:定义一个上向量(Up Vector)。我们把上向量和第二步得到的摄像机方向向量进行叉乘。两个向量叉乘的结果就是同时垂直于两向量的向量,因此我们会得到指向x轴正方向的那个向量(如果我们交换两个向量的顺序就会得到相反的指向x轴负方向的向量):
glm::vec3 up = glm::vec3(0.0f, 1.0f, 0.0f);
glm::vec3 cameraRight = glm::normalize(glm::cross(up, cameraDirection));
上轴
现在我们已经有了x轴向量和z轴向量,获取摄像机的正y轴相对简单;我们把右向量和方向向量(Direction Vector)进行叉乘:
glm::vec3 cameraUp = glm::cross(cameraDirection, cameraRight);
使用这些摄像机向量我们就可以创建一个LookAt矩阵了,它在创建摄像机的时候非常有用。
Look At
使用矩阵的好处之一是如果你定义了一个坐标空间,里面有3个相互垂直的轴,你可以用这三个轴外加一个平移向量来创建一个矩阵,你可以用这个矩阵乘以任何向量来变换到那个坐标空间。这正是LookAt矩阵所做的,现在我们有了3个相互垂直的轴和一个定义摄像机空间的位置坐标,我们可以创建我们自己的LookAt矩阵了:
R是右向量,U是上向量,D是方向向量,P是摄像机位置向量。
注意,位置向量是相反的,因为我们最终希望把世界平移到与我们自身移动的相反方向。
它会创建一个观察矩阵looks at(看着)一个给定目标。
// 定义了一个从 (0.0f, 0.0f, 3.0f),看向(0.0f, 0.0f, 0.0f)的相机
glm::mat4 view = glm::lookAt(glm::vec3(0.0f, 0.0f, 3.0f),
                       glm::vec3(0.0f, 0.0f, 0.0f),
                       glm::vec3(0.0f, 1.0f, 0.0f));
自由移动相机
定义相机的位置,朝向(和Direction 相反),向上方向
glm::vec3 cameraPos   = glm::vec3(0.0f, 0.0f,  3.0f);
glm::vec3 cameraFront = glm::vec3(0.0f, 0.0f, -1.0f);
glm::vec3 cameraUp    = glm::vec3(0.0f, 1.0f,  0.0f);
使用LookAt生成View:
view = glm::lookAt(cameraPos, cameraPos + cameraFront, cameraUp);
左右移动
void do_movement()
{
  // 摄像机控制
  GLfloat cameraSpeed = 0.01f;
  if(keys[GLFW_KEY_W])
    cameraPos += cameraSpeed * cameraFront;
  if(keys[GLFW_KEY_S])
    cameraPos -= cameraSpeed * cameraFront;
  if(keys[GLFW_KEY_A])
    cameraPos -= glm::normalize(glm::cross(cameraFront, cameraUp)) * cameraSpeed;
  if(keys[GLFW_KEY_D])
    cameraPos += glm::normalize(glm::cross(cameraFront, cameraUp)) * cameraSpeed;
}
移动速度
实际情况下根据处理器的能力不同,有的人在同一段时间内会比其他人绘制更多帧。也就是调用了更多次do_movement函数。每个人的运动速度就都不同了。当你要发布的你应用的时候,你必须确保在所有硬件上移动速度都一样。
GLfloat deltaTime = 0.0f;   // 当前帧遇上一帧的时间差
GLfloat lastFrame = 0.0f;   // 上一帧的时间
在每一帧中我们计算出新的deltaTime以备后用
GLfloat currentFrame = glfwGetTime();
deltaTime = currentFrame - lastFrame;
lastFrame = currentFrame;
视角移动
为了能够改变方向,我们必须根据鼠标的输入改变cameraFront向量。
欧拉角
有三种欧拉角:俯仰角(Pitch)、偏航角(Yaw)和滚转角(Roll),下面的图片展示了它们的含义:
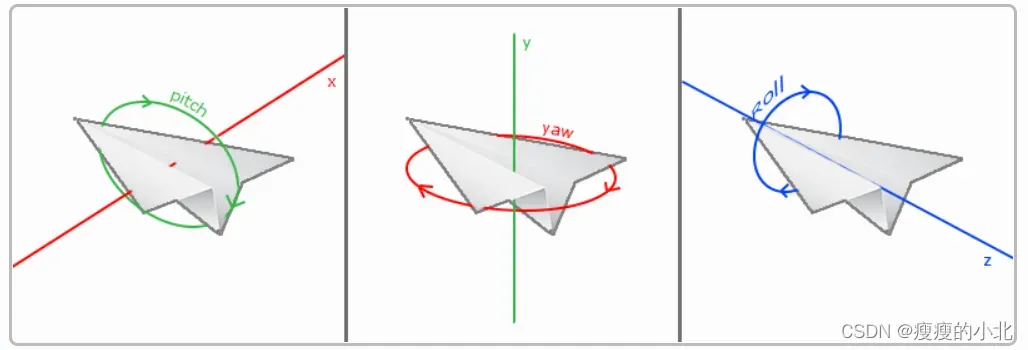
对于我们的摄像机系统来说,我们只关心俯仰角和偏航角,所以我们不会讨论滚转角。
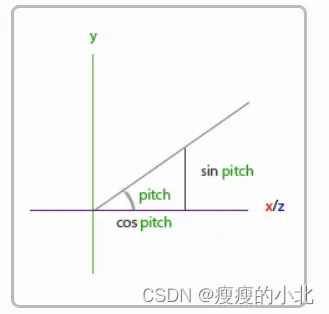
如果我们想象自己在xz平面上,正望向y轴,我们可以基于第一个三角形计算长度/y方向的强度(我们往上或往下看多少)。从图中我们可以看到一个给定俯仰角的y值等于sinθ:
计算俯仰角:
direction.y = sin(glm::radians(pitch)); // 注意我们先把角度转为弧度
这里我们只更新了y值,仔细观察x和z元素也被影响了。从三角形中我们可以看到它们的值等于:
direction.x = cos(glm::radians(pitch));
direction.z = cos(glm::radians(pitch));
计算偏航角:
就像俯仰角一样我们可以看到x元素取决于cos(偏航角)的值,z值同样取决于偏航角的正弦值。把这个加到前面的值中,会得到基于俯仰角和偏航角的方向向量:
direction.x = cos(glm::radians(pitch)) * cos(glm::radians(yaw));
//译注:direction代表摄像机的“前”轴,但此前轴是和本文第一幅图片的第二个摄像机的direction是相反的
direction.y = sin(glm::radians(pitch));
direction.z = cos(glm::radians(pitch)) * sin(glm::radians(yaw));
这里的球坐标与笛卡尔坐标的转换把x和z弄反了,如果你去看最后的源码,会发现作者在摄像机源码那里写了yaw = yaw – 90,实际上在这里x就应该是sin(glm::radians(yaw)),z也是同样处理,当然也可以认为是这个诡异的坐标系,但是在这里使用球坐标转笛卡尔坐标有个大问题,就是在初始渲染时,无法指定摄像机的初始朝向,还要花一些功夫自己实现这个;此外这只能实现像第一人称游戏一样的简易摄像机,类似Maya、Unity3D编辑器窗口的那种摄像机还是最好自己设置摄像机的位置、上、右、前轴,在旋转时用四元数对这四个变量进行调整,才能获得更好的效果,而不是仅仅调整摄像机前轴。
通过欧拉角计算实际的方向向量
glm::vec3 front;
front.x = cos(glm::radians(pitch)) * cos(glm::radians(yaw));
front.y = sin(glm::radians(pitch));
front.z = cos(glm::radians(pitch)) * sin(glm::radians(yaw));
cameraFront = glm::normalize(front);
缩放
视野(Field of View或fov)定义了我们可以看到场景中多大的范围。当视野变小时可视区域就会减小,产生放大了的感觉。我们用鼠标滚轮来放大。和鼠标移动、键盘输入一样我们需要一个鼠标滚轮的回调函数:
void scroll_callback(GLFWwindow* window, double xoffset, double yoffset)
{
  if(aspect >= 1.0f && aspect <= 45.0f)
    aspect -= yoffset;
  if(aspect <= 1.0f)
    aspect = 1.0f;
  if(aspect >= 45.0f)
    aspect = 45.0f;
}
yoffset值代表我们滚动的大小。当scroll_callback函数调用后,我们改变全局aspect变量的内容。因为45.0f是默认的fov,我们将会把缩放级别限制在1.0f到45.0f。
我们现在在每一帧都必须把透视投影矩阵上传到GPU,但这一次使aspect变量作为它的fov:
projection = glm::perspective(aspect, (GLfloat)WIDTH/(GLfloat)HEIGHT, 0.1f, 100.0f);
完整代码
#pragma once
#include <glm/ext/matrix_transform.hpp>
#include<glm/glm.hpp>
#include<iostream>
using namespace std;

class CameraObject_LookAt
{
    float moveSpeed = 0.05f;
    float pitch = 0.f, yaw = -90.f;

    glm::vec3 cameraPos = glm::vec3(0.0f, 0.0f, 6.0f);

    glm::vec3 cameraFront = glm::vec3(0.f, 0.f, -1.f);

    // 摄像机方向:(相机面向方向的反方向)
    // 指向哪个方向,cameraTarget:目标(指向)位置,cameraDirection:相机指向方向
    glm::vec3 cameraTarget = glm::vec3(0.0f, 0.0f, 0.0f);
    glm::vec3 cameraDirection = glm::normalize(cameraPos - cameraTarget);

    // 右轴:
    // 为获取右向量我们需要先使用一个小技巧:定义一个上向量(Up Vector)。
    glm::vec3 up = glm::vec3(0.0f, 1.0f, 0.0f);
    glm::vec3 cameraRight = glm::normalize(glm::cross(up, cameraDirection));

    // 上轴:
    glm::vec3 cameraUp = glm::cross(cameraDirection, cameraRight);
public:
    glm::mat4 genView() {
        return glm::lookAt(cameraPos, cameraPos + cameraFront, cameraUp);
    }

    void movePre() {
        this->cameraPos += cameraFront * moveSpeed;
    }

    void moveBack() {
        this->cameraPos -= cameraFront * moveSpeed;
    }

    void moveLeft() {
        glm::vec3 right = glm::cross(cameraFront, cameraUp); // 计算出相机的右方向
        cameraPos -= glm::normalize(right) * moveSpeed; // 将相机的世界坐标向右方向进行移动
    }

    void moveRight() {
        glm::vec3 right = glm::cross(cameraFront, cameraUp);
        cameraPos += glm::normalize(right) * moveSpeed;
    }

    // pitch: 上下旋转(俯视角),yaw:左右旋转(偏航角)
    void rotation(float pitch, float yaw) {
        pitch += this->pitch;
        yaw += this->yaw;

        // 防止俯视角超过90
        if (pitch > 89.0f) pitch = 89.0f;
        if (pitch < -89.0f)  pitch = -89.0f;

        glm::vec3 direction = glm::vec3(0.f); // 相机面向方向
        direction.x = cos(glm::radians(pitch)) * cos(glm::radians(yaw));
        direction.y = sin(glm::radians(pitch));
        direction.z = cos(glm::radians(pitch)) * sin(glm::radians(yaw));
        this->cameraFront = glm::normalize(direction);
        this->pitch = pitch;
        this->yaw = yaw;
    }
};
处理事件:
  if (Input::getKey(GLFW_KEY_D)) {
        cameraFPS.moveRight();
    }
    if (Input::getKey(GLFW_KEY_A)) {
        cameraFPS.moveLeft();
    }
    if (Input::getKey(GLFW_KEY_W)) {
        cameraFPS.movePre();
    }
    if (Input::getKey(GLFW_KEY_S)) {
        cameraFPS.moveBack();
    }

    if (Input::getKey(GLFW_MOUSE_BUTTON_1)) {
        vec2 mouse_move_dir = Input::getMouseMoveDir() * 0.08f;
        this->cameraFPS.rotation(mouse_move_dir.y, -mouse_move_dir.x);
    }
四元数
参考:四元数
OpenGL教程
四元数由4个数[x y z w]构成,表示了如下的旋转:
RotationAxis,顾名思义即旋转轴。RotationAngle是旋转的角度。
// RotationAngle is in radians
x = RotationAxis.x * sin(RotationAngle / 2)
y = RotationAxis.y * sin(RotationAngle / 2)
z = RotationAxis.z * sin(RotationAngle / 2)
w = cos(RotationAngle / 2)
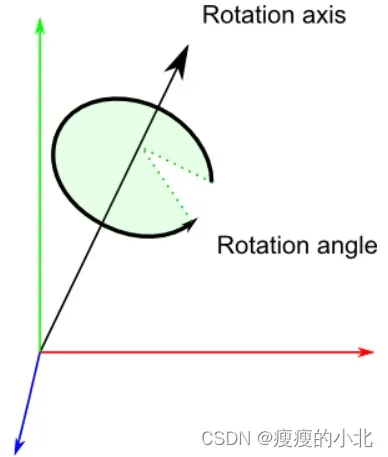
因此,四元数实际上存储了一个旋转轴和一个旋转角度。这让旋转的组合变简单了。
解读四元数
xyz分量大致代表了各个轴上的旋转分量,而w=acos(旋转角度/2)。举个例子,假设你在调试器中看到了这样的值[ 0.7 0 0 0.7 ]。x=0.7,比y、z的大,因此主要是在绕X轴旋转;而2acos(0.7) = 1.59弧度,所以旋转角度应该是90°。
同理,[0 0 0 1] (w=1)表示旋转角度 = 2acos(1) = 0,因此这是一个单位四元数(unit quaternion),表示没有旋转。
基本操作
#include <glm/gtc/quaternion.hpp> and <glm/gtx/quaternion.hpp>
// Don't forget to #include <glm/gtc/quaternion.hpp> and <glm/gtx/quaternion.hpp>

// Creates an identity quaternion (no rotation)
quat MyQuaternion;

// Direct specification of the 4 components
// You almost never use this directly
MyQuaternion = quat(w,x,y,z);

// Conversion from Euler angles (in radians) to Quaternion
vec3 EulerAngles(90, 45, 0);
MyQuaternion = quat(EulerAngles);


// Conversion from axis-angle
// In GLM the angle must be in degrees here, so convert it.
MyQuaternion = gtx::quaternion::angleAxis(degrees(RotationAngle), RotationAxis);
怎样用GLSL创建四元数?
不要在shader中创建四元数。应该把四元数转换为旋转矩阵,用于模型矩阵中。顶点会一如既往地随着MVP矩阵的变化而旋转。
某些情况下,你可能确实需要在shader中使用四元数。例如,GPU骨骼动画。GLSL中没有四元数类型,但是可以将四元数存在vec4变量中,然后在shader中计算。
怎样把四元数转换为矩阵?
mat4 RotationMatrix = quaternion::toMat4(quaternion);
这下可以像往常一样建立模型矩阵了:
mat4 RotationMatrix = quaternion::toMat4(quaternion);
…
mat4 ModelMatrix = TranslationMatrix * RotationMatrix * ScaleMatrix;
// You can now use ModelMatrix to build the MVP matrix
其他操作
那究竟该用哪一个呢?
在欧拉角和四元数之间作选择还真不容易。欧拉角对于美工来说显得很直观,因此如果要做一款3D编辑器,请选用欧拉角。但对程序员来说,四元数却是最方便的。所以在写3D引擎内核时应该选用四元数。
一个普遍的共识是:在程序内部使用四元数,在需要和用户交互的地方就用欧拉角。
这样,在处理各种问题时,你才能得心应手(至少会轻松一点)。如果确有必要(如上文所述的FPS相机,设置角色朝向等情况),不妨就用欧拉角,附加一些转换工作。
怎样判断两个四元数是否相同?
向量点积是两向量夹角的余弦值。若该值为1,那么这两个向量同向。判断两个四元数是否相同的方法与之十分相似:
float matching = quaternion::dot(q1, q2);
if ( abs(matching-1.0) < 0.001 ){ // 0.001是因为浮点数不能使用=号判断
// q1 and q2 are similar
}
由点积的acos值还可以得到q1和q2间的夹角。
怎样旋转一个点?
rotated_point = orientation_quaternion * point;
……但如果想计算模型矩阵,你得先将其转换为矩阵。注意,旋转的中心始终是原点。如果想绕别的点旋转:
rotated_point = origin + (orientation_quaternion * (point-origin));
怎样对两个四元数插值
SLERP意为球面线性插值(Spherical Linear intERPolation)、可以用GLM中的mix函数进行SLERP:
glm::quat interpolatedquat = quaternion::mix(quat1, quat2, 0.5f); // or whatever factor
怎样累积两个旋转?
只需将两个四元数相乘即可。顺序和矩阵乘法一致。亦即逆序相乘:
quat combined_rotation = second_rotation * first_rotation;
怎样计算两向量之间的旋转?
(也就是说,四元数得把v1旋转到v2)
基本思路很简单:
● 两向量间的夹角很好找:由点积可知其cos值。
● 旋转轴很好找:两向量的叉乘积。
如下的算法就是依照上述思路实现的,此外还处理了一些特例:
quat RotationBetweenVectors(vec3 start, vec3 dest){
    start = normalize(start);
    dest = normalize(dest);

    float cosTheta = dot(start, dest);
    vec3 rotationAxis;

    if (cosTheta < -1 + 0.001f){
        // special case when vectors in opposite directions:
        // there is no "ideal" rotation axis
        // So guess one; any will do as long as it's perpendicular to start
        rotationAxis = cross(vec3(0.0f, 0.0f, 1.0f), start);
        if (gtx::norm::length2(rotationAxis) < 0.01 ) // bad luck, they were parallel, try again!
        	rotationAxis = cross(vec3(1.0f, 0.0f, 0.0f), start);

        rotationAxis = normalize(rotationAxis);
        	return gtx::quaternion::angleAxis(180.0f, rotationAxis);
    }

    rotationAxis = cross(start, dest);

    float s = sqrt( (1+cosTheta)*2 );
    float invs = 1 / s;

    return quat(
                s * 0.5f,
                rotationAxis.x * invs,
                rotationAxis.y * invs,
                rotationAxis.z * invs
        	);
}
我需要一个类似gluLookAt的函数。怎样旋转物体使之朝向某点?
调用RotationBetweenVectors函数!
RotationBetweenVectors 就是上面的计算两个向量间的旋转
// Find the rotation between the front of the object (that we assume towards +Z,
// but this depends on your model) and the desired direction
quat rot1 = RotationBetweenVectors(vec3(0.0f, 0.0f, 1.0f), direction);
现在,你也许想让物体保持竖直:
// Recompute desiredUp so that it's perpendicular to the direction
// You can skip that part if you really want to force desiredUp
vec3 right = cross(direction, desiredUp);
desiredUp = cross(right, direction);
// Because of the 1rst rotation, the up is probably completely screwed up.
// Find the rotation between the "up" of the rotated object, and the desired up
vec3 newUp = rot1 * vec3(0.0f, 1.0f, 0.0f);
quat rot2 = RotationBetweenVectors(newUp, desiredUp);
组合到一起:
quat targetOrientation = rot2 * rot1; // remember, in reverse order.
注意,“direction”仅仅是方向,并非目标位置!你可以轻松计算出方向:targetPos – currentPos。
得到目标朝向后,你很可能想对startOrientation和targetOrientation进行插值
怎样使用LookAt且限制旋转速度?
基本思想是采用SLERP(用glm::mix函数),但要控制插值的幅度,避免角度偏大。
float mixFactor = maxAllowedAngle / angleBetweenQuaternions;
quat result = glm::gtc::quaternion::mix(q1, q2, mixFactor);
如下是更为复杂的实现。该实现处理了许多特例。注意,出于优化的目的,代码中并未使用mix函数。
quat RotateTowards(quat q1, quat q2, float maxAngle){

	if( maxAngle < 0.001f ){
		// No rotation allowed. Prevent dividing by 0 later.
		return q1;
	}

	float cosTheta = dot(q1, q2);

    // q1 and q2 are already equal.
    // Force q2 just to be sure
    if(cosTheta > 0.9999f){
    	return q2;
    }

	// Avoid taking the long path around the sphere
    if (cosTheta < 0){
        q1 = q1*-1.0f;
        cosTheta *= -1.0f;
    }

    float angle = acos(cosTheta);

    // If there is only a 2° difference, and we are allowed 5°,
    // then we arrived.
    if (angle < maxAngle){
    	return q2;
    }

    float fT = maxAngle / angle;
    angle = maxAngle;

    quat res = (sin((1.0f - fT) * angle) * q1 + sin(fT * angle) * q2) / sin(angle);
    res = normalize(res);
    return res;

}
可以这样用RotateTowards函数:
CurrentOrientation = RotateTowards(CurrentOrientation,
                            TargetOrientation,
                            3.14f * deltaTime );
LookAt矩阵实现
// Custom implementation of the LookAt function
glm::mat4 calculate_lookAt_matrix(glm::vec3 position, glm::vec3 target, glm::vec3 worldUp)
{
    // 1. Position = known
    // 2. Calculate cameraDirection
    glm::vec3 zaxis = glm::normalize(position - target);
    // 3. Get positive right axis vector
    glm::vec3 xaxis = glm::normalize(glm::cross(glm::normalize(worldUp), zaxis));
    // 4. Calculate camera up vector
    glm::vec3 yaxis = glm::cross(zaxis, xaxis);

    // Create translation and rotation matrix
    // In glm we access elements as mat[col][row] due to column-major layout
    glm::mat4 translation = glm::mat4(1.0f); // Identity matrix by default
    translation[3][0] = -position.x; // Third column, first row
    translation[3][1] = -position.y;
    translation[3][2] = -position.z;
    glm::mat4 rotation = glm::mat4(1.0f);
    rotation[0][0] = xaxis.x; // First column, first row
    rotation[1][0] = xaxis.y;
    rotation[2][0] = xaxis.z;
    rotation[0][1] = yaxis.x; // First column, second row
    rotation[1][1] = yaxis.y;
    rotation[2][1] = yaxis.z;
    rotation[0][2] = zaxis.x; // First column, third row
    rotation[1][2] = zaxis.y;
    rotation[2][2] = zaxis.z;

    // Return lookAt matrix as combination of translation and rotation matrix
    return rotation * translation; // Remember to read from right to left (first translation then rotation)
}
// Don't forget to replace glm::lookAt with your own version
// view = glm::lookAt(glm::vec3(camX, 0.0f, camZ), glm::vec3(0.0f, 0.0f, 0.0f), glm::vec3(0.0f, 1.0f, 0.0f));
view = calculate_lookAt_matrix(glm::vec3(camX, 0.0f, camZ), glm::vec3(0.0f, 0.0f, 0.0f), glm::vec3(0.0f, 1.0f, 0.0f));
相机旋转完整工程下载地址:
https://download.csdn.net/download/qq_41709801/86911892
文章出处登录后可见!