文章目录
- 博主精品专栏导航
- 生成式模型
- (算法一)深度梦境(DeepDream)
- (算法二)风格迁移(Style Transfer)
- (算法三)图像修复(Image Inpainting)
- (一)实战:基于VGG19的深度梦境(DeepDream)
- (二)实战:基于VGG19的风格迁移(Style Transfer)
- (三)实战:基于上下文解码器(Context Encoders)的图像修复(Image Inpainting)
博主精品专栏导航
- 🍕 【Pytorch项目实战目录】算法详解 + 项目详解 + 数据集 + 完整源码
- 🍔 【sklearn】线性回归、最小二乘法、岭回归、Lasso回归
- 🥘 三万字硬核详解:yolov1、yolov2、yolov3、yolov4、yolov5、yolov7
- 🍰 卷积神经网络CNN的发展史
- 🍟 卷积神经网络CNN的实战知识
- 🍝 Pytorch基础(全)
- 🌭 Opencv图像处理(全)
- 🥙 Python常用内置函数(全)
生成式模型
(算法一)深度梦境(DeepDream)
DeepDearm 模型在2015年由谷歌提出,理论基础是2013年所提出的《Visualizing and Understanding Convolutional Neural Networks》
具体方式: 使用梯度上升的方法可视化网络每一层的特征;
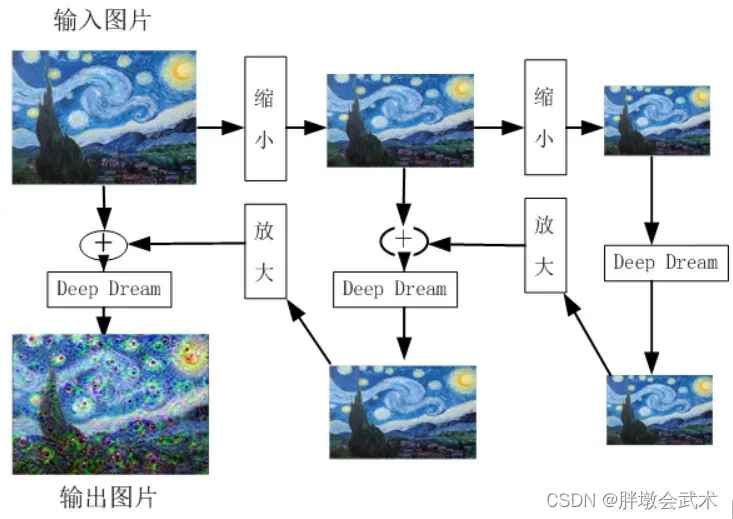
- (1)用一张噪声图像输入网络,但反向更新的时候不更新网络权重,而是更新初始图像的像素值,以这种” 训练图像 “的方式可视化网络。此外输入图像也可以是一些正常的图片,这样的话就是生成背景图像之类的。
- (2)为了提高训练质量,采用高斯模糊以使图像更平滑,并使用多尺度(又称为八度)的图像进行计算:先连续缩小输入图像,然后,再逐步放大,并将结果合并为一个图像输出。
如何放大图像特征? 现有一个猫狗分类网络模型,当输入一张云的图像进行判断时,假设这朵云比较像狗,则机器提取的特征也会偏向于狗的特征。假设特征对应的概率分别为:[狗,猫] = [x1,x2] = [0.6,0.4],那么采用L2范数(L2 = x1 ^ 2 + x2 ^ 2)可以很好达到放大特征的效果,最终图像越来越像狗。
先对图像连续做二次等比例缩小,该比例是1.5,之所以要缩小,图像缩小是为了让图像的像素点调整后所得结果图案能显示的更加平滑,过程主要是抑制了图像的高频成分,放大了低频成分。缩小二次后,把图像每个像素点当作参数,对它们求偏导,这样就可以知道如何调整图像像素点能够对给定网络层的输出产生最大化的刺激。机器学习:DeepDearm模型(与书上完全相同)
(算法二)风格迁移(Style Transfer)
2015年,德国Gatys提出基于神经网络的图像风格迁移。
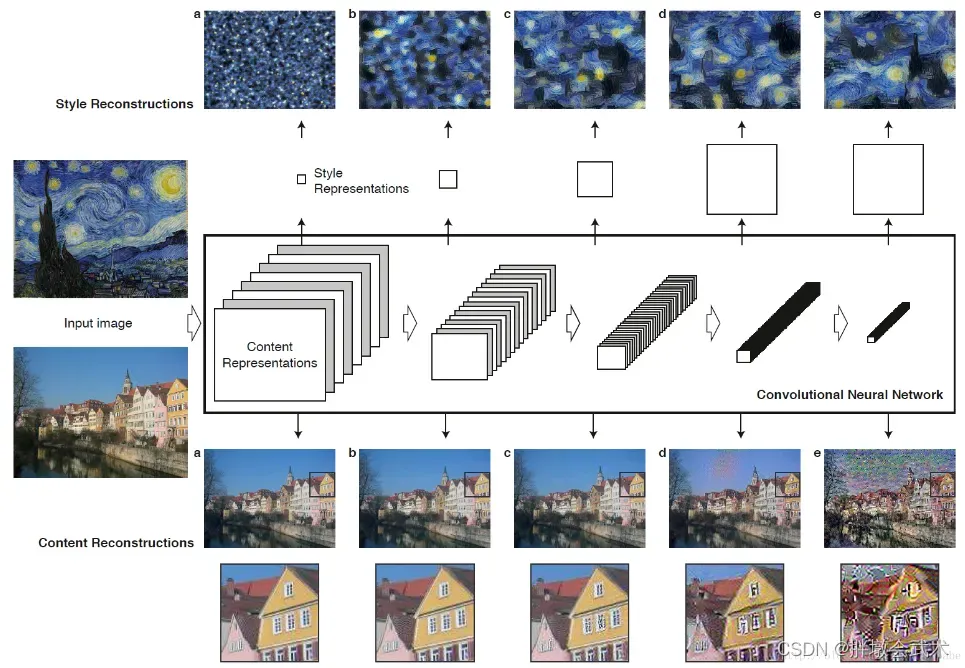
输入数据包括:一张代表内容的图像(上海外滩图)、一张代表风格的图像(梵高的星空图)
- 主要原理:将风格图像的艺术风格应用于内容图像,同时保留内容图像的内容(比如:人物、景物等)。
- 核心思想:定义损失函数,包括内容损失和风格损失。(其中,风格损失权重系数远大于内容损失,达到风格迁移的效果)
- 内容损失:卷积网络不同层学到的图像特征是不一样的。研究发现,使用靠近底层但不能靠太近的层来衡量图像内容比较理想。
(1)靠近底层的卷积层(输入端):学到的是图像局部特征。如:位置、形状、颜色、纹理等。
(2)靠近顶部的卷积层(输出端):学到的图像特征更全面、更抽象,但也会丢失图像的详细信息。
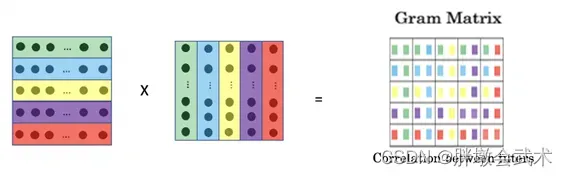
卷积神经网络图像风格转移(演示)- 风格损失:采用基于通道的
格拉姆矩阵(Gram Matrix)来衡量风格。内积可以理解为该层特征之间相互关系的映射,映射关系反映了图像的纹理统计规律。
计算过程:计算向量与其转置向量的内积,从而得到该向量的格拉姆矩阵。
矩阵特点:对称。一个n维的向量可以得到n ∗ n维的格拉姆矩阵,其中每一个元素都可以表示为特征 i 与特征 j 的相关性,而矩阵对角线上的元素可以表示为某个特征 i 在整个图像中的强度。
格拉姆矩阵(Gram matrix)详细解读
(算法三)图像修复(Image Inpainting)
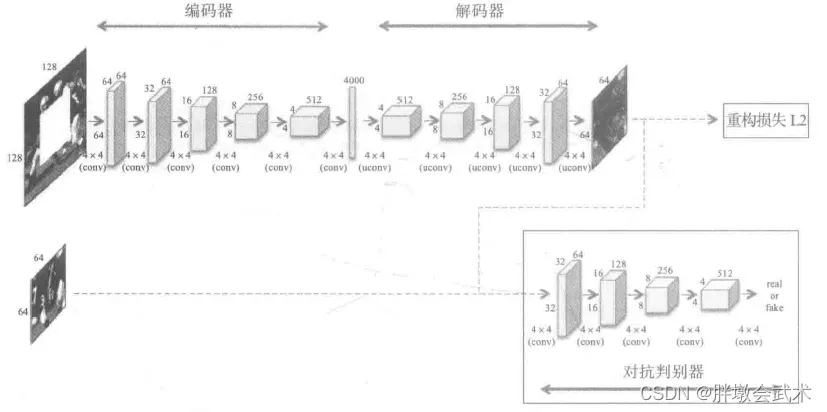
本文主要介绍一种基于上下文编码器(Context Encoders)的图像修复方法,上下文编码器主要构成:编码器解码器。上下文编码器的特点:根据上下文预测的原理。
网络架构:
- (1)编码器与解码器之间不是采样全连接层,而是采样Channel-Wise Fully-Connected Layer,可以极大地降低参数量。
- (2)采用对抗判定器,用来区分预测值与真实值。
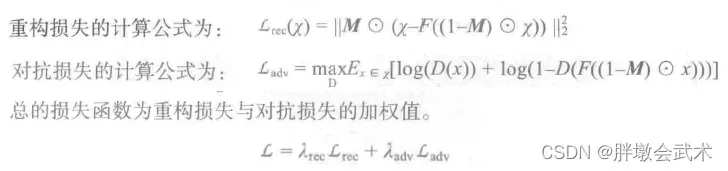
- (3)解码器。基于 AlexNet 网络:5个卷积+池化。主要通过一系列操作,使其恢复到与原图一样的大小。 如果输入图像大小为227 x 227,可以得到一个6 x 6 6 256的特征图。
- (4)损失函数:整个模型的损失值由重构损失(Reconstruction Loss)与对抗损失(Adversarial Loss)组成。
(一)实战:基于VGG19的深度梦境(DeepDream)
######################################################################
# 取VGG19模型为预训练模型,将获取的特征最大化之后展示在一张普通的图像上(梵高的星空图)。
# 为了训练更加有效,还使用对图像进行不同大小的缩放处理。
######################################################################
import torch
import matplotlib.pyplot as plt
import numpy as np
from PIL import Image, ImageFilter, ImageChops
from torchvision import models
from torchvision import transforms
import os
os.environ['KMP_DUPLICATE_LIB_OK'] = 'True' # "OMP: Error #15: Initializing libiomp5md.dll"
######################################################################
def deprocess(image, device):
"""反归一化:在图像处理过程中有归一化的操作,所以要"反归一化"。"""
image = image * torch.tensor([0.229, 0.224, 0.225], device=device) + torch.tensor([0.485, 0.456, 0.406], device=device)
return image
def prod(image, feature_layers, iterations, lr, transform, device, vgg, modulelist):
"""主要功能:传入输入图像,正向传播到VGG19的指定层(如:第8层、32层等),然后,用梯度上升更新输入图像的特征值。"""
# 传入输入图像,正 向传播到VGG19的指定层,然后,用梯度上升更新 输入图像的特征值。
input = transform(image).unsqueeze(0) # 对图像进行resize,转成tensor和归一化操作,要增加一个维度,表示一个样本,[1, C, H, W]
input = input.to(device).requires_grad_(True) # 对图片进行追踪计算梯度
vgg.zero_grad() # 梯度清零
for i in range(iterations):
out = input
for j in range(feature_layers): # 遍历features模块的各层
out = modulelist[j + 1](out) # 以上一层的输出特征作为下一层的输入特征
loss = out.norm() # 计算特征的二范数
loss.backward() # 反向传播计算梯度,其中图像的每个像素点都是参数
with torch.no_grad():
input += lr * input.grad # 更新原始图像的像素值
input = input.squeeze() # 训练完成后将表示样本数的维度去除
# 交互维度
# input = input.transpose(0, 1)
# input = input.transpose(1, 2)
input = input.permute(1, 2, 0) # 维度转换,因为tensor的维度是(C, H, W),而array是(H, W, C)
input = np.clip(deprocess(input, device).detach().cpu().numpy(), 0, 1) # 将像素值限制在(0, 1)之间
image = Image.fromarray(np.uint8(input * 255)) # 将array类型的图像转成PIL类型图像,要乘以255是因为转成tensor时函数自动除以了255
return image
def deep_dream_vgg(image, feature_layers, iterations, lr, transform, device, vgg, modulelist, octave_scale=2, num_octaves=20):
"""递归函数,多次缩小图像,然后调用函数prod。接着再放大结果,并与按一定比例图像混合在一起,最终得到与输入图像相同大小的输出图像。"""
# (1)octave_scale参数决定了有多少个尺度的图像, num_octaves参数决定一共有多少张图像
# (2)octave_scale和num_octaves两个参数的选定对生成图像的影响很大。
if num_octaves > 0:
image1 = image.filter(ImageFilter.GaussianBlur(2)) # 高斯模糊
if (image1.size[0] / octave_scale < 1 or image1.size[1] / octave_scale < 1): # 当图像的大小小于octave_scale时图像尺度不再变化
size = image1.size
else:
size = (int(image1.size[0] / octave_scale), int(image1.size[1] / octave_scale))
image1 = image1.resize(size, Image.ANTIALIAS) # 连续缩小图片
"""递归"""
image1 = deep_dream_vgg(image1, feature_layers, iterations, lr, transform, device, vgg, modulelist, octave_scale, num_octaves - 1)
size = (image.size[0], image.size[1])
image1 = image1.resize(size, Image.ANTIALIAS) # 放大图像
image = ImageChops.blend(image, image1, 0.6) # 按一定比例将图像混合在一起
# PIL.ImageChops.blend(image1, image2, alpha)
# out = image1 * (1.0 - alpha) + image2 * alpha
"""调用"""
img_result = prod(image, feature_layers, iterations, lr, transform, device, vgg, modulelist)
img_result = img_result.resize(image.size)
return img_result
if __name__ == '__main__':
# (1)图像预处理(裁剪、格式转换、标准化)
tranform = transforms.Compose([transforms.Resize((224, 224)), transforms.ToTensor(),
transforms.Normalize(mean=[0.485, 0.456, 0.406], std=[0.229, 0.224, 0.225])])
#############################################################################
# VGG19预模型:基于ImageNet大数据集训练的模型,该数据集共有1000个类别。
# 包括三种不同的模块:(1)特征提取模块(features) 共有36层;(2)池化层(avgpool) 只有一层;(3)分类层(classifier) 共有6层。
# 备注:越靠近顶部的层,其激活值表现就越全面或抽象,如像某些类别(比如狗)的图案。
#############################################################################
device = torch.device("cuda:0" if torch.cuda.is_available() else "cpu")
vgg = models.vgg19(pretrained=True).to(device) # 下载预训练模型
print(vgg) # 打印网络层
modulelist = list(vgg.features.modules()) # 网络层转成列表结构:下标0表示全部网络层,下标从1开始为迭代网络层
# (2)开始训练
night_sky = Image.open(r'starry_night.jpg') # 加载图像
night_sky_04 = deep_dream_vgg(image=night_sky, feature_layers=4, iterations=6, lr=0.2,
transform=tranform, device=device, vgg=vgg, modulelist=modulelist,
octave_scale=2, num_octaves=6)
night_sky_08 = deep_dream_vgg(image=night_sky, feature_layers=8, iterations=6, lr=0.2,
transform=tranform, device=device, vgg=vgg, modulelist=modulelist,
octave_scale=2, num_octaves=6)
night_sky_16 = deep_dream_vgg(image=night_sky, feature_layers=16, iterations=6, lr=0.2,
transform=tranform, device=device, vgg=vgg, modulelist=modulelist,
octave_scale=2, num_octaves=6)
night_sky_20 = deep_dream_vgg(image=night_sky, feature_layers=20, iterations=6, lr=0.2,
transform=tranform, device=device, vgg=vgg, modulelist=modulelist,
octave_scale=2, num_octaves=6)
night_sky_24 = deep_dream_vgg(image=night_sky, feature_layers=24, iterations=6, lr=0.2,
transform=tranform, device=device, vgg=vgg, modulelist=modulelist,
octave_scale=2, num_octaves=6)
night_sky_28 = deep_dream_vgg(image=night_sky, feature_layers=28, iterations=6, lr=0.2,
transform=tranform, device=device, vgg=vgg, modulelist=modulelist,
octave_scale=2, num_octaves=6)
night_sky_32 = deep_dream_vgg(image=night_sky, feature_layers=32, iterations=6, lr=0.2,
transform=tranform, device=device, vgg=vgg, modulelist=modulelist,
octave_scale=2, num_octaves=6)
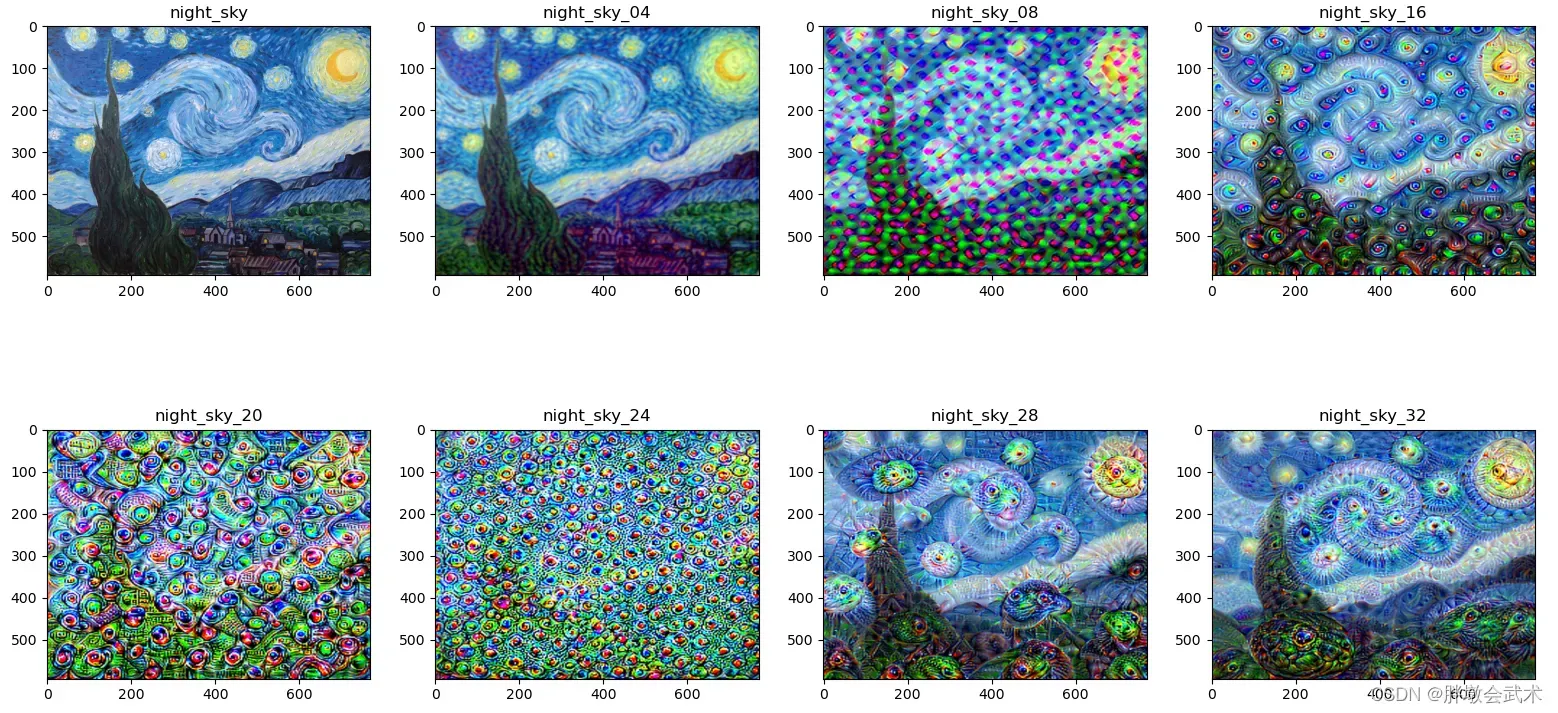
plt.subplot(241), plt.imshow(night_sky, 'gray'), plt.title('night_sky')
plt.subplot(242), plt.imshow(night_sky_04, 'gray'), plt.title('night_sky_04')
plt.subplot(243), plt.imshow(night_sky_08, 'gray'), plt.title('night_sky_08')
plt.subplot(244), plt.imshow(night_sky_16, 'gray'), plt.title('night_sky_16')
plt.subplot(245), plt.imshow(night_sky_20, 'gray'), plt.title('night_sky_20')
plt.subplot(246), plt.imshow(night_sky_24, 'gray'), plt.title('night_sky_24')
plt.subplot(247), plt.imshow(night_sky_28, 'gray'), plt.title('night_sky_28')
plt.subplot(248), plt.imshow(night_sky_32, 'gray'), plt.title('night_sky_32')
plt.show()
(二)实战:基于VGG19的风格迁移(Style Transfer)
from __future__ import print_function
import torch
import torch.nn as nn
import torch.nn.functional as F
import torch.optim as optim
from PIL import Image
import matplotlib.pyplot as plt
import torchvision.transforms as transforms
import torchvision.models as models
import copy
import os
os.environ['KMP_DUPLICATE_LIB_OK'] = 'True' # "OMP: Error #15: Initializing libiomp5md.dll"
###################################################################################
def image_loader(image_name):
"""加载图像"""
image = Image.open(image_name) # 打开图像
image = loader(image).unsqueeze(0) # 增加一个维度,其值为1
return image.to(device, torch.float)
def Image_trans(tensor):
"""格式转换"""
image = tensor.cpu().clone() # 为避免因image修改影响tensor的值,这里采用clone
image = image.squeeze(0) # 去掉一个维度
unloader = transforms.ToPILImage() # reconvert into PIL image
image = unloader(image)
return image
class ContentLoss(nn.Module):
"""内容损失函数"""
def __init__(self, target, ):
super(ContentLoss, self).__init__()
# 必须要用detach来分离出target,这时候target不再是一个Variable
# 这是为了动态计算梯度,否则forward会出错,不能向前传播
self.target = target.detach()
def forward(self, input):
self.loss = F.mse_loss(input, self.target)
return input
def gram_matrix(input):
"""格拉姆矩阵"""
a, b, c, d = input.size() # a is batch size. b is number of channels. c is height and d is width.
features = input.view(a * b, c * d) # x矩阵
G = torch.mm(features, features.t()) # 计算内积(矩阵 * 转置矩阵)
return G.div(a * b * c * d) # 除法(格拉姆矩阵 - 归一化处理)
class StyleLoss(nn.Module):
"""风格损失函数"""
def __init__(self, target_feature):
super(StyleLoss, self).__init__()
self.target = gram_matrix(target_feature).detach()
def forward(self, input):
G = gram_matrix(input)
self.loss = F.mse_loss(G, self.target)
return input
class Normalization(nn.Module):
"""标准化处理"""
def __init__(self, mean, std):
super(Normalization, self).__init__()
# .view the mean and std to make them [C x 1 x 1] so that they can directly work with image Tensor of shape [B x C x H x W].
# B is batch size. C is number of channels. H is height and W is width.
self.mean = mean.clone().detach().view(-1, 1, 1) # self.mean = torch.tensor(mean).view(-1, 1, 1)
self.std = std.clone().detach().view(-1, 1, 1) # self.std = torch.tensor(std).view(-1, 1, 1)
def forward(self, img):
return (img - self.mean) / self.std
###################################################################################
# 卷积网络不同层学到的图像特征是不一样的。研究发现,使用靠近底层但不能太靠近的层来衡量图像内容比较理想。
# (1)靠近底层的卷积层(输入端):学到的是图像局部特征。如:位置、形状、颜色、纹理等。
# (2)靠近顶部的卷积层(输出端):学到的图像特征更全面、更抽象,但也会丢失图像详细信息。
###################################################################################
def get_style_model_and_losses(cnn, # VGG19网络主要用来做内容识别
normalization_mean, normalization_std, style_img, content_img,
content_layers=['conv_4'], # 为计算内容损失和风格损失,指定使用的卷积层
# 研究发现:使用前三层已经能够达到比较好的内容重建工作,而后两层保留一些比较高层的特征。
style_layers=['conv_1', 'conv_2', 'conv_3', 'conv_4', 'conv_5']):
cnn = copy.deepcopy(cnn) # 深复制
normalization = Normalization(normalization_mean, normalization_std).to(device) # 标准化
content_losses = [] # 初始化(内容)损失值
style_losses = [] # 初始化(风格)损失值
model = nn.Sequential(normalization) # 使用sequential方法构建模型
i = 0 # 每次迭代增加1
for layer in cnn.children():
if isinstance(layer, nn.Conv2d): # isinstance(object, classinfo):判断两个对象类型是否相同。
i += 1
name = 'conv_{}'.format(i)
elif isinstance(layer, nn.ReLU):
name = 'relu_{}'.format(i)
layer = nn.ReLU(inplace=False)
elif isinstance(layer, nn.MaxPool2d):
name = 'pool_{}'.format(i)
elif isinstance(layer, nn.BatchNorm2d):
name = 'bn_{}'.format(i)
else:
raise RuntimeError('Unrecognized layer: {}'.format(layer.__class__.__name__))
model.add_module(name, layer) # 添加指定的网络层(conv、relu、pool、bn)到模型中
if name in content_layers: # 累加内容损失
target = model(content_img).detach() # 前向传播
content_loss = ContentLoss(target) # 内容损失
model.add_module("content_loss_{}".format(i), content_loss)
content_losses.append(content_loss)
if name in style_layers: # 累加风格损失
target_feature = model(style_img).detach() # 前向传播
style_loss = StyleLoss(target_feature) # 风格损失
model.add_module("style_loss_{}".format(i), style_loss)
style_losses.append(style_loss)
# 我们需要对在内容损失和风格损失之后的层进行修剪
for i in range(len(model) - 1, -1, -1):
if isinstance(model[i], ContentLoss) or isinstance(model[i], StyleLoss):
break
model = model[:(i + 1)]
return model, style_losses, content_losses
def run_style_transfer(cnn, normalization_mean, normalization_std, content_img, style_img, input_img, num_steps=600, style_weight=1000000, content_weight=1):
"""风格迁移"""
model, style_losses, content_losses = get_style_model_and_losses(cnn, normalization_mean, normalization_std, style_img, content_img)
optimizer = optim.LBFGS([input_img.requires_grad_()]) # requires_grad_():需要对输入图像进行梯度计算。采用LBFGS优化方法
run = [0]
while run[0] <= num_steps: # 批次数
def closure():
input_img.data.clamp_(0, 1) # 将输入张量的每个元素收紧到区间内,并返回结果到一个新张量。
optimizer.zero_grad() # 梯度清零
model(input_img) # 前向传播
# 计算当前批次的损失
style_score = 0
content_score = 0
for sl in style_losses:
style_score += sl.loss # (叠加)风格得分
for cl in content_losses:
content_score += cl.loss # (叠加)内容得分
style_score *= style_weight # 风格权重系数:1000000
content_score *= content_weight # 内容权重系数:1
loss = style_score + content_score # 总损失
loss.backward() # 反向传播
# 打印损失值
run[0] += 1
if run[0] % 50 == 0:
print("run {}:".format(run))
print('Style Loss : {:4f} Content Loss: {:4f}'.format(style_score.item(), content_score.item()))
print()
return style_score + content_score
optimizer.step(closure) # 梯度更新
input_img.data.clamp_(0, 1)
return input_img
###################################################################################
# (1)图像预处理
device = torch.device("cuda" if torch.cuda.is_available() else "cpu") # 可用设备
# torchvision.transforms.Normalize # Normalize的作用是用均值和标准差对Tensor进行标准化处理。
loader = transforms.Compose([transforms.Resize((512, 600)), transforms.ToTensor()]) # 数据预处理
style_img = image_loader(r"./pytorch-12/油画.jpg") # 风格图像
content_img = image_loader(r"./pytorch-12/大黄蜂.jpg") # 内容图像
print("style size:", style_img.size())
print("content size:", content_img.size())
assert style_img.size() == content_img.size(), "we need to import style and content images of the same size"
###################################################################################
# (2)风格迁移
cnn = models.vgg19(pretrained=True).features.to(device).eval() # 下载预训练模型
cnn_normalization_mean = torch.tensor([0.485, 0.456, 0.406]).to(device) # 标准化(均值)
cnn_normalization_std = torch.tensor([0.229, 0.224, 0.225]).to(device) # 标准化(标准差)
input_img = content_img.clone() # 复制图像
# input_img = torch.randn(content_img.data.size(), device=device) # 随机添加白噪声
output_img = run_style_transfer(cnn=cnn, normalization_mean=cnn_normalization_mean,
normalization_std=cnn_normalization_std,
content_img=content_img, style_img=style_img, input_img=input_img,
num_steps=500, style_weight=1000000, content_weight=1)
###################################################################################
# (3)画图
style_img = Image_trans(style_img) # 格式转换
content_img = Image_trans(content_img) # 格式转换
output_img = Image_trans(output_img) # 格式转换
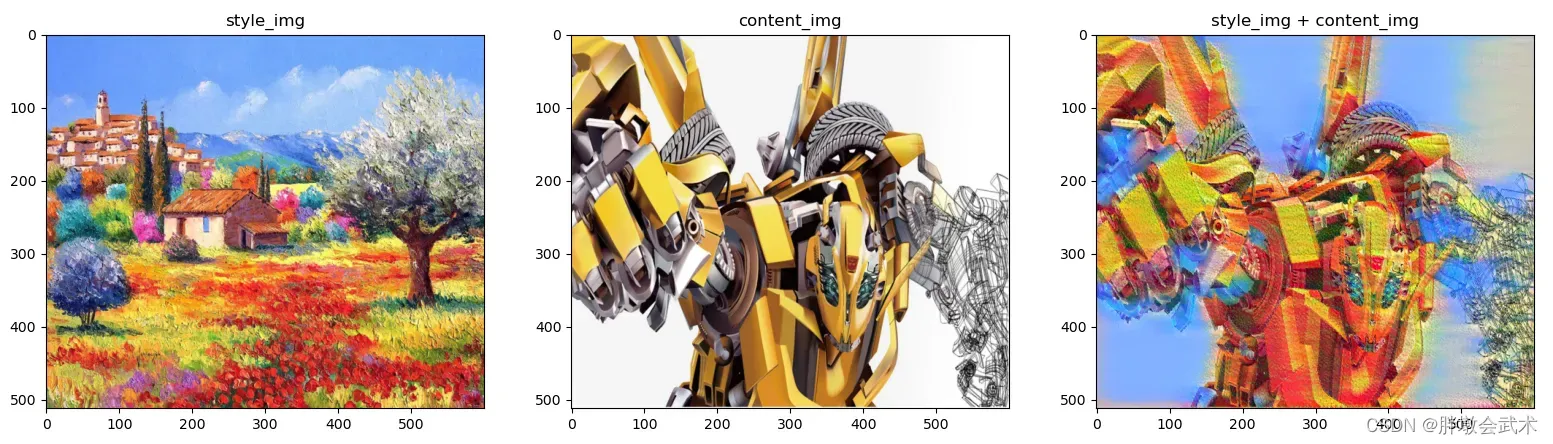
plt.subplot(131), plt.imshow(style_img, 'gray'), plt.title('style_img')
plt.subplot(132), plt.imshow(content_img, 'gray'), plt.title('content_img')
plt.subplot(133), plt.imshow(output_img, 'gray'), plt.title('style_img + content_img')
plt.show()
(三)实战:基于上下文解码器(Context Encoders)的图像修复(Image Inpainting)
from __future__ import print_function
import argparse
import random
import torch
import torch.nn as nn
import torch.nn.parallel
import torch.backends.cudnn as cudnn
import torch.optim as optim
import torch.utils.data
import torchvision.datasets as dset
import torchvision.transforms as transforms
import torchvision.utils as vutils
import torchvision.models as models
from PIL import Image
import matplotlib.image as mpimg
import matplotlib.pyplot as plt
import os
os.environ['KMP_DUPLICATE_LIB_OK'] = 'True' # "OMP: Error #15: Initializing libiomp5md.dll"
##########################################################################################################
parser = argparse.ArgumentParser(description='Process some params')
parser.add_argument('--dataset', default='streetview', help='cifar10 | lsun | imagenet | folder | lfw ')
parser.add_argument('--test_image', default='pytorch-12/油画.jpg', required=False, help='path to dataset')
parser.add_argument('--workers', type=int, help='number of data loading workers', default=4)
parser.add_argument('--batchSize', type=int, default=64, help='input batch size')
parser.add_argument('--imageSize', type=int, default=128, help='the height / width of the input image to network')
parser.add_argument('--nz', type=int, default=100, help='size of the latent z vector')
parser.add_argument('--ngf', type=int, default=64)
parser.add_argument('--ndf', type=int, default=64)
parser.add_argument('--nc', type=int, default=3)
parser.add_argument('--niter', type=int, default=50, help='number of epochs to train for')
parser.add_argument('--lr', type=float, default=0.0002, help='learning rate, default=0.0002')
parser.add_argument('--beta1', type=float, default=0.5, help='beta1 for adam. default=0.5')
parser.add_argument('--cuda', action='store_true', help='enables cuda')
parser.add_argument('--ngpu', type=int, default=1, help='number of GPUs to use')
parser.add_argument('--netG', default='pytorch_12_xf/model/netG_streetview.pth', help="path to netG (to continue training)")
parser.add_argument('--netD', default='', help="path to netD (to continue training)")
parser.add_argument('--outf', default='.', help='folder to output images and model checkpoints')
parser.add_argument('--manualSeed', type=int, help='manual seed')
parser.add_argument('--nBottleneck', type=int, default=4000,help='of dim for bottleneck of encoder')
parser.add_argument('--overlapPred', type=int, default=4,help='overlapping edges')
parser.add_argument('--nef', type=int, default=64, help='of encoder filters in first conv layer')
parser.add_argument('--wtl2', type=float, default=0.999, help='0 means do not use else use with this weight')
opt = parser.parse_args(['--dataset', 'streetview'])
print(opt)
##########################################################################################################
def load_image(filename, size=None, scale=None):
"""加载图像"""
img = Image.open(filename)
if size is not None:
img = img.resize((size, size), Image.ANTIALIAS)
elif scale is not None:
img = img.resize((int(img.size[0] / scale), int(img.size[1] / scale)), Image.ANTIALIAS)
return img
def save_image(filename, data):
"""保存图像"""
img = data.clone().add(1).div(2).mul(255).clamp(0, 255).cpu().numpy()
img = img.transpose(1, 2, 0).astype("uint8")
img = Image.fromarray(img)
img.save(filename)
class netG(nn.Module):
"""测试-网络模型"""
def __init__(self, opt):
super(netG, self).__init__()
self.ngpu = opt.ngpu # ngpu表示gpu个数,如果大于1,将使用并发处理
self.main = nn.Sequential( # 输入通道数opt.nc, 输出通道数为opt.nef, opt.ngf为该层输出通道数
nn.Conv2d(opt.nc,opt.nef,4,2,1, bias=False), nn.LeakyReLU(0.2, inplace=True),
nn.Conv2d(opt.nef,opt.nef,4,2,1, bias=False), nn.BatchNorm2d(opt.nef), nn.LeakyReLU(0.2, inplace=True),
nn.Conv2d(opt.nef,opt.nef*2,4,2,1, bias=False), nn.BatchNorm2d(opt.nef*2), nn.LeakyReLU(0.2, inplace=True),
nn.Conv2d(opt.nef*2,opt.nef*4,4,2,1, bias=False), nn.BatchNorm2d(opt.nef*4), nn.LeakyReLU(0.2, inplace=True),
nn.Conv2d(opt.nef*4,opt.nef*8,4,2,1, bias=False), nn.BatchNorm2d(opt.nef*8), nn.LeakyReLU(0.2, inplace=True),
nn.Conv2d(opt.nef*8,opt.nBottleneck,4, bias=False), nn.BatchNorm2d(opt.nBottleneck), nn.LeakyReLU(0.2, inplace=True),
# 后面采用转置卷积
nn.ConvTranspose2d(opt.nBottleneck, opt.ngf * 8, 4, 1, 0, bias=False), nn.BatchNorm2d(opt.ngf * 8), nn.ReLU(True),
nn.ConvTranspose2d(opt.ngf * 8, opt.ngf * 4, 4, 2, 1, bias=False), nn.BatchNorm2d(opt.ngf * 4), nn.ReLU(True),
nn.ConvTranspose2d(opt.ngf * 4, opt.ngf * 2, 4, 2, 1, bias=False), nn.BatchNorm2d(opt.ngf * 2), nn.ReLU(True),
nn.ConvTranspose2d(opt.ngf * 2, opt.ngf, 4, 2, 1, bias=False), nn.BatchNorm2d(opt.ngf), nn.ReLU(True),
nn.ConvTranspose2d(opt.ngf, opt.nc, 4, 2, 1, bias=False), nn.Tanh())
def forward(self, input):
if isinstance(input.data, torch.cuda.FloatTensor) and self.ngpu > 1:
output = nn.parallel.data_parallel(self.main, input, range(self.ngpu))
else:
output = self.main(input)
return output
##########################################################################################################
device = torch.device("cuda:0" if torch.cuda.is_available() else "cpu") # 可选设备
# 加载预训练模型实现图像修复(该模型基于大量街道数据训练得到)
# checkpoint = torch.load('checkpoint.pth') # 加载已经训练好的权重参数
netG = netG(opt) # 模型实例化
# netG.load_state_dict(checkpoint['state_dict']) # 加载该模型的权重参数
netG.eval() # 验证模型
transform = transforms.Compose([transforms.ToTensor(), transforms.Normalize((0.5, 0.5, 0.5), (0.5, 0.5, 0.5))])
image = load_image(opt.test_image, opt.imageSize) # 加载测试图像
image = transform(image) # 图像预处理
image = image.repeat(1, 1, 1, 1)
criterionMSE = nn.MSELoss() # 定义MSE损失函数
input_real = torch.FloatTensor(1, 3, opt.imageSize, opt.imageSize) # 真实
input_cropped = torch.FloatTensor(1, 3, opt.imageSize, opt.imageSize) # 裁剪
real_center = torch.FloatTensor(1, 3, opt.imageSize//2, opt.imageSize//2) # 中心
# 将数据加载到设备中
netG.to(device)
criterionMSE.to(device)
input_real, input_cropped, real_center = input_real.to(device), input_cropped.to(device), real_center.to(device)
input_cropped.data.resize_(image.size()).copy_(image)
real_center_cpu = image[:, :, opt.imageSize//4:opt.imageSize//4+opt.imageSize//2, opt.imageSize//4:opt.imageSize//4+opt.imageSize//2]
real_center.data.resize_(real_center_cpu.size()).copy_(real_center_cpu)
input_cropped.data[:, 0, opt.imageSize//4+opt.overlapPred:opt.imageSize//4+opt.imageSize//2-opt.overlapPred, opt.imageSize//4+opt.overlapPred:opt.imageSize//4+opt.imageSize//2-opt.overlapPred] = 2*117.0/255.0 - 1.0
input_cropped.data[:, 1, opt.imageSize//4+opt.overlapPred:opt.imageSize//4+opt.imageSize//2-opt.overlapPred, opt.imageSize//4+opt.overlapPred:opt.imageSize//4+opt.imageSize//2-opt.overlapPred] = 2*104.0/255.0 - 1.0
input_cropped.data[:, 2, opt.imageSize//4+opt.overlapPred:opt.imageSize//4+opt.imageSize//2-opt.overlapPred, opt.imageSize//4+opt.overlapPred:opt.imageSize//4+opt.imageSize//2-opt.overlapPred] = 2*123.0/255.0 - 1.0
# 开始测试
fake = netG(input_cropped) # 前向传播
errG = criterionMSE(fake, real_center) # 损失函数
recon_image = input_cropped.clone() # 复制图像
recon_image.data[:, :, opt.imageSize//4:opt.imageSize//4+opt.imageSize//2, opt.imageSize//4:opt.imageSize//4+opt.imageSize//2] = fake.data
##########################################################################################################
# 保存图像
save_image('val_real_samples.png', image[0]) # 真实图像
save_image('val_cropped_samples.png', input_cropped.data[0]) # 裁剪图像
save_image('val_recon_samples.png', recon_image.data[0]) # 修复图像
print('%.4f' % errG.item())
# 加载图像
val_real_samples = 'val_real_samples.png'
val_recon_samples = 'val_recon_samples.png'
val_cropped_samples = 'val_cropped_samples.png'
# reconsPath = 'pytorch-12/油画.jpg'
val_real_samples = mpimg.imread(val_real_samples)
val_cropped_samples = mpimg.imread(val_cropped_samples)
val_recon_samples = mpimg.imread(val_recon_samples)
# 画图
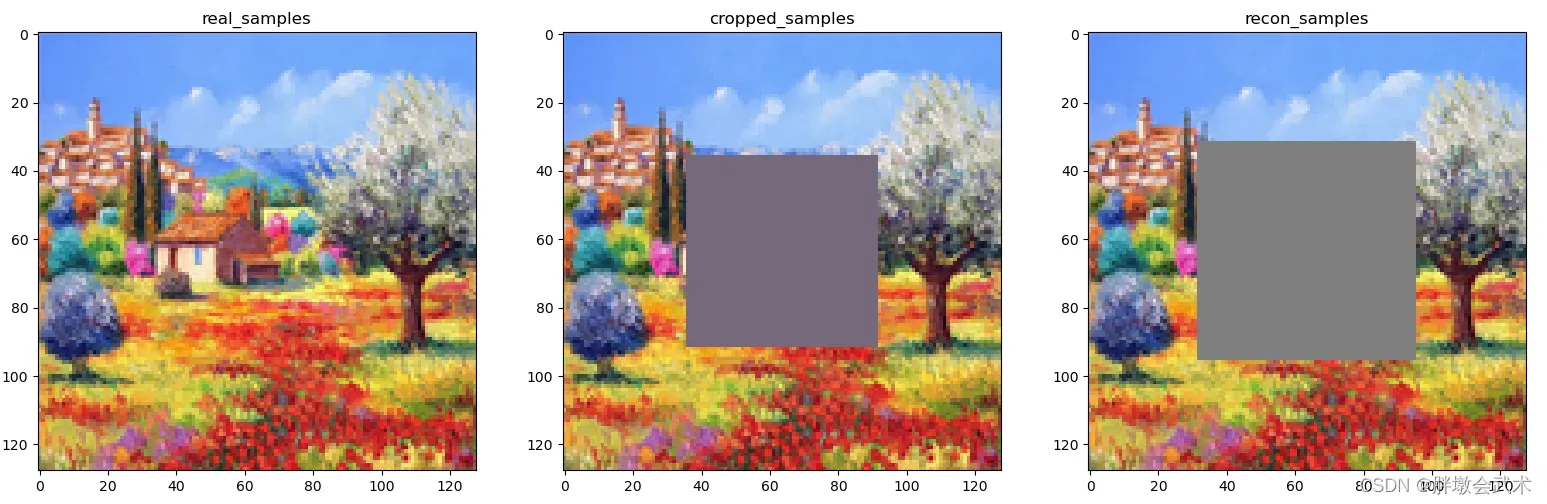
plt.subplot(131), plt.imshow(val_real_samples, 'gray'), plt.title('real_samples')
plt.subplot(132), plt.imshow(val_cropped_samples, 'gray'), plt.title('cropped_samples')
plt.subplot(133), plt.imshow(val_recon_samples, 'gray'), plt.title('recon_samples')
plt.show()
文章出处登录后可见!
已经登录?立即刷新