文章目录
- 0 前言
- 2 开发简介
- 3 识别原理
- 3.1 传统图像识别原理
- 3.2 深度学习水果识别
- 4 数据集
- 5 部分关键代码
- 5.1 处理训练集的数据结构
- 5.2 模型网络结构
- 5.3 训练模型
- 6 识别效果
- 7 最后
0 前言
🔥 这两年开始毕业设计和毕业答辩的要求和难度不断提升,传统的毕设题目缺少创新和亮点,往往达不到毕业答辩的要求,这两年不断有学弟学妹告诉学长自己做的项目系统达不到老师的要求。
为了大家能够顺利以及最少的精力通过毕设,学长分享优质毕业设计项目,今天要分享的是
🚩 深度学习的水果识别 opencv python
🥇学长这里给一个题目综合评分(每项满分5分)
- 难度系数:3分
- 工作量:3分
- 创新点:4分
🧿 选题指导, 项目分享:
https://gitee.com/dancheng-senior/project-sharing-1/blob/master/%E6%AF%95%E8%AE%BE%E6%8C%87%E5%AF%BC/README.md
2 开发简介
深度学习作为机器学习领域内新兴并且蓬勃发展的一门学科, 它不仅改变着传统的机器学习方法, 也影响着我们对人类感知的理解, 已经在图像识别和语音识别等领域取得广泛的应用。 因此, 本文在深入研究深度学习理论的基础上, 将深度学习应用到水果图像识别中, 以此来提高了水果图像的识别性能。
3 识别原理
3.1 传统图像识别原理
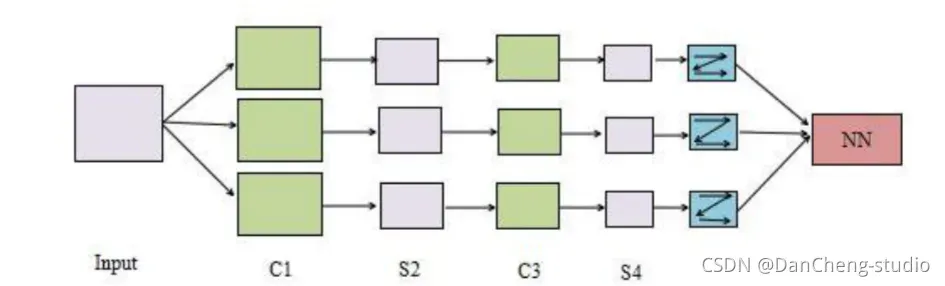
传统的水果图像识别系统的一般过程如下图所示,主要工作集中在图像预处理和特征提取阶段。
在大多数的识别任务中, 实验所用图像往往是在严格限定的环境中采集的, 消除了外界环境对图像的影响。 但是实际环境中图像易受到光照变化、 水果反光、 遮挡等因素的影响, 这在不同程度上影响着水果图像的识别准确率。
在传统的水果图像识别系统中, 通常是对水果的纹理、 颜色、 形状等特征进行提取和识别。

3.2 深度学习水果识别
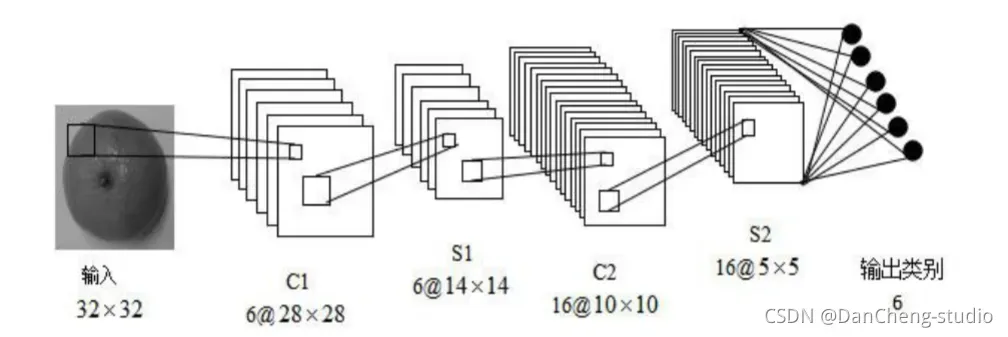
CNN 是一种专门为识别二维特征而设计的多层神经网络, 它的结构如下图所示,这种结构对平移、 缩放、 旋转等变形具有高度的不变性。
学长本次采用的 CNN 架构如图:
4 数据集
-
数据库分为训练集(train)和测试集(test)两部分
-
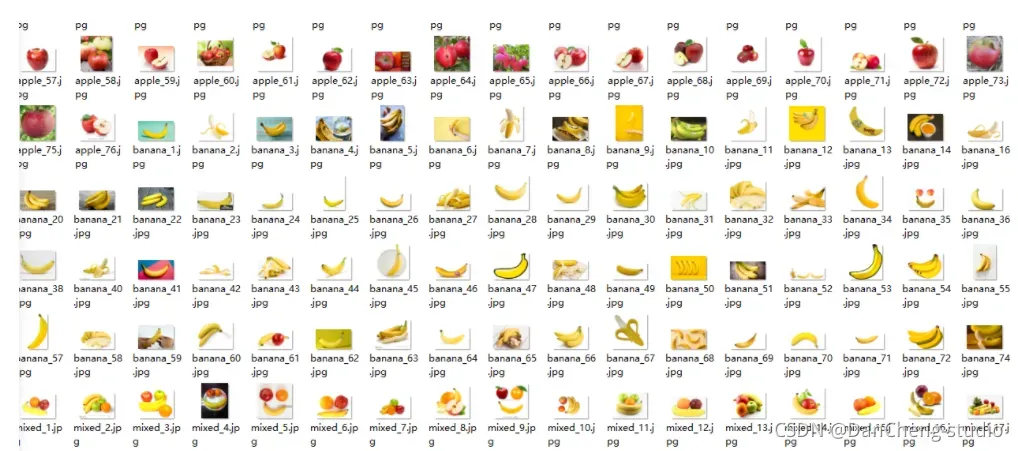
训练集包含四类apple,orange,banana,mixed(多种水果混合)四类237张图片;测试集包含每类图片各两张。图片集如下图所示。
-
图片类别可由图片名称中提取。
训练集图片预览
测试集预览

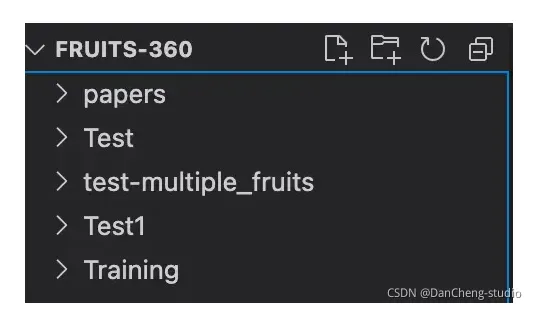
数据集目录结构
5 部分关键代码
5.1 处理训练集的数据结构
import os
import pandas as pd

train_dir = './Training/'
test_dir = './Test/'
fruits = []
fruits_image = []

for i in os.listdir(train_dir):
    for image_filename in os.listdir(train_dir + i):
        fruits.append(i) # name of the fruit
        fruits_image.append(i + '/' + image_filename)
train_fruits = pd.DataFrame(fruits, columns=["Fruits"])
train_fruits["Fruits Image"] = fruits_image

print(train_fruits)
5.2 模型网络结构
import matplotlib.pyplot as plt
import seaborn as sns
from keras.preprocessing.image import ImageDataGenerator, img_to_array, load_img
from glob import glob
from keras.models import Sequential
from keras.layers import Conv2D, MaxPooling2D, Activation, Dropout, Flatten, Dense
img = load_img(train_dir + "Cantaloupe 1/r_234_100.jpg")
plt.imshow(img)
plt.axis("off")
plt.show()

array_image = img_to_array(img)

# shape (100,100)
print("Image Shape --> ", array_image.shape)

# 131个类目
fruitCountUnique = glob(train_dir + '/*' )
numberOfClass = len(fruitCountUnique)
print("How many different fruits are there --> ",numberOfClass)

# 构建模型
model = Sequential()
model.add(Conv2D(32,(3,3),input_shape = array_image.shape))
model.add(Activation("relu"))
model.add(MaxPooling2D())
model.add(Conv2D(32,(3,3)))
model.add(Activation("relu"))
model.add(MaxPooling2D())
model.add(Conv2D(64,(3,3)))
model.add(Activation("relu"))
model.add(MaxPooling2D())
model.add(Flatten())
model.add(Dense(1024))
model.add(Activation("relu"))
model.add(Dropout(0.5))

# 区分131类
model.add(Dense(numberOfClass)) # output
model.add(Activation("softmax"))
model.compile(loss = "categorical_crossentropy",

              optimizer = "rmsprop",

              metrics = ["accuracy"])

print("Target Size --> ", array_image.shape[:2])
5.3 训练模型
train_datagen = ImageDataGenerator(rescale= 1./255,
                                   shear_range = 0.3,
                                   horizontal_flip=True,
                                   zoom_range = 0.3)

test_datagen = ImageDataGenerator(rescale= 1./255)
epochs = 100
batch_size = 32
train_generator = train_datagen.flow_from_directory(
                train_dir,
                target_size= array_image.shape[:2],
                batch_size = batch_size,
                color_mode= "rgb",
                class_mode= "categorical")

test_generator = test_datagen.flow_from_directory(
                test_dir,
                target_size= array_image.shape[:2],
                batch_size = batch_size,
                color_mode= "rgb",
                class_mode= "categorical")

for data_batch, labels_batch in train_generator:
    print("data_batch shape --> ",data_batch.shape)
    print("labels_batch shape --> ",labels_batch.shape)
    break

hist = model.fit_generator(
        generator = train_generator,
        steps_per_epoch = 1600 // batch_size,
        epochs=epochs,
        validation_data = test_generator,
        validation_steps = 800 // batch_size)

#保存模型 model_fruits.h5
model.save('model_fruits.h5')
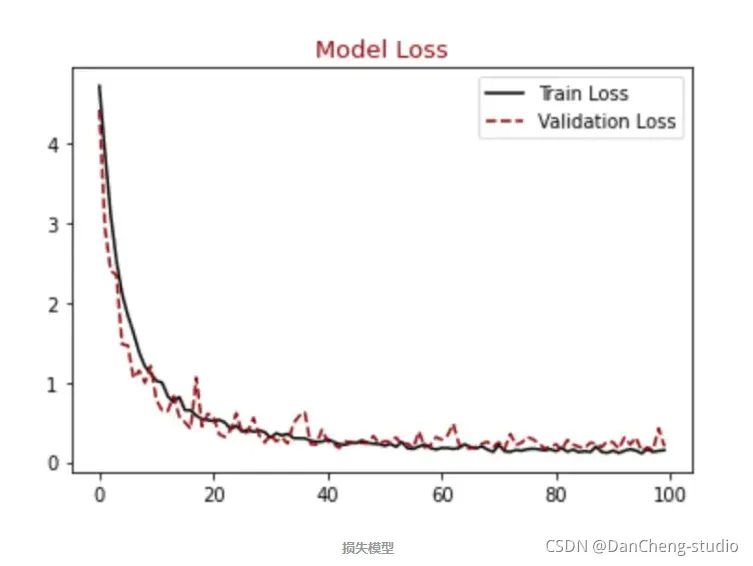
顺便输出训练曲线
#展示损失模型结果
plt.figure()
plt.plot(hist.history["loss"],label = "Train Loss", color = "black")
plt.plot(hist.history["val_loss"],label = "Validation Loss", color = "darkred", linestyle="dashed",markeredgecolor = "purple", markeredgewidth = 2)
plt.title("Model Loss", color = "darkred", size = 13)
plt.legend()
plt.show()
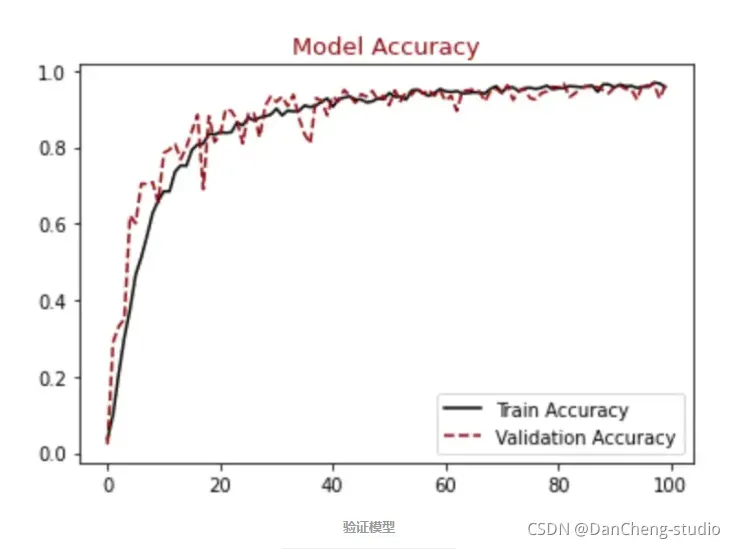
#展示精确模型结果
plt.figure()
plt.plot(hist.history["accuracy"],label = "Train Accuracy", color = "black")
plt.plot(hist.history["val_accuracy"],label = "Validation Accuracy", color = "darkred", linestyle="dashed",markeredgecolor = "purple", markeredgewidth = 2)
plt.title("Model Accuracy", color = "darkred", size = 13)
plt.legend()
plt.show()
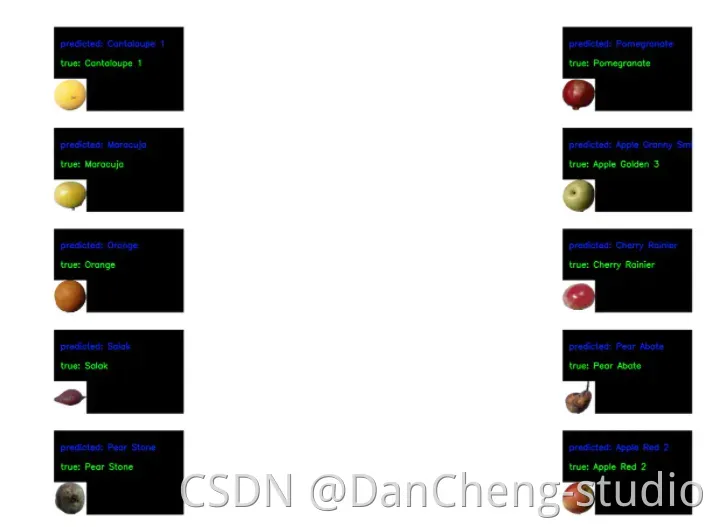
6 识别效果
from tensorflow.keras.models import load_model
import os
import pandas as pd

from keras.preprocessing.image import ImageDataGenerator,img_to_array, load_img
import cv2,matplotlib.pyplot as plt,numpy as np
from keras.preprocessing import image

train_datagen = ImageDataGenerator(rescale= 1./255,
                                    shear_range = 0.3,
                                    horizontal_flip=True,
                                    zoom_range = 0.3)

model = load_model('model_fruits.h5')
batch_size = 32
img = load_img("./Test/Apricot/3_100.jpg",target_size=(100,100))
plt.imshow(img)
plt.show()

array_image = img_to_array(img)
array_image = array_image * 1./255
x = np.expand_dims(array_image, axis=0)
images = np.vstack([x])
classes = model.predict_classes(images, batch_size=10)
print(classes)
train_dir = './Training/'

train_generator = train_datagen.flow_from_directory(
        train_dir,
        target_size= array_image.shape[:2],
        batch_size = batch_size,
        color_mode= "rgb",
        class_mode= "categorical”)
print(train_generator.class_indices)
fig = plt.figure(figsize=(16, 16))
axes = []
files = []
predictions = []
true_labels = []
rows = 5
cols = 2

# 随机选择几个图片
def getRandomImage(path, img_width, img_height):
    """function loads a random image from a random folder in our test path"""
    folders = list(filter(lambda x: os.path.isdir(os.path.join(path, x)), os.listdir(path)))
    random_directory = np.random.randint(0, len(folders))
    path_class = folders[random_directory]
    file_path = os.path.join(path, path_class)
    file_names = [f for f in os.listdir(file_path) if os.path.isfile(os.path.join(file_path, f))]
    random_file_index = np.random.randint(0, len(file_names))
    image_name = file_names[random_file_index]
    final_path = os.path.join(file_path, image_name)
    return image.load_img(final_path, target_size = (img_width, img_height)), final_path, path_class

def draw_test(name, pred, im, true_label):
    BLACK = [0, 0, 0]
    expanded_image = cv2.copyMakeBorder(im, 160, 0, 0, 300, cv2.BORDER_CONSTANT, value=BLACK)
    cv2.putText(expanded_image, "predicted: " + pred, (20, 60), cv2.FONT_HERSHEY_SIMPLEX,
        0.85, (255, 0, 0), 2)
    cv2.putText(expanded_image, "true: " + true_label, (20, 120), cv2.FONT_HERSHEY_SIMPLEX,
        0.85, (0, 255, 0), 2)
    return expanded_image
IMG_ROWS, IMG_COLS = 100, 100

# predicting images
for i in range(0, 10):
    path = "./Test"
    img, final_path, true_label = getRandomImage(path, IMG_ROWS, IMG_COLS)
    files.append(final_path)
    true_labels.append(true_label)
    x = image.img_to_array(img)
    x = x * 1./255
    x = np.expand_dims(x, axis=0)
    images = np.vstack([x])
    classes = model.predict_classes(images, batch_size=10)
    predictions.append(classes)

class_labels = train_generator.class_indices
class_labels = {v: k for k, v in class_labels.items()}
class_list = list(class_labels.values())

for i in range(0, len(files)):
    image = cv2.imread(files[i])
    image = draw_test("Prediction", class_labels[predictions[i][0]], image, true_labels[i])
    axes.append(fig.add_subplot(rows, cols, i+1))
    plt.imshow(cv2.cvtColor(image, cv2.COLOR_BGR2RGB))
    plt.grid(False)
    plt.axis('off')
plt.show()
7 最后
文章出处登录后可见!