文章目录
- 前言
- 一、ChatGLM-6B是什么?
- 二、安装虚拟的python环境
- 1.下载
- 2.安装
- 3.设置国内源(危险)
- 4.虚拟环境使用简介
- 三、部署ChatGLM-6B
- 1. clone代码
- 2. 运行
- 1.创建虚拟环境
- 2.装包
- 2.1 找到合适的pytorch版本
- 2.1 安装依赖
- 2.2 验证pytorch是否为GPU版本
- 3.运行
- 四、部署过程中遇到的问题
- 1. 问题1
- 2.问题2
- 3.问题3
- 4.问题4
- 总结
- 参考文章
前言
最近chatgpt比较火,正好看到国内有个类似开源的框架,那不得试试、
一、ChatGLM-6B是什么?
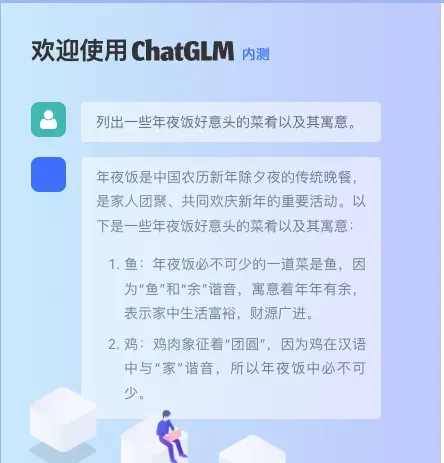
ChatGLM-6B是清华大学知识工程和数据挖掘小组(Knowledge Engineering Group (KEG) & Data Mining at Tsinghua University)发布的一个开源的对话机器人。根据官方介绍,这是一个千亿参数规模的中英文语言模型。并且对中文做了优化。本次开源的版本是其60亿参数的小规模版本,约60亿参数,本地部署仅需要6GB显存。
二、安装虚拟的python环境
ChatGLM-6B 代码中有一些python3.7支持的语法,所以要有python3.7+ 的环境。我们使用conda来管理python环境
conda分为anaconda和miniconda。anaconda是包含一些常用包的版本,miniconda则是精简版.本文中我们将使用anaconda
1.下载
可以在官网中找到自己需要的版本进行下载,如果你系统也是ubutu 64位的,也可以使用我下载的版本进行安装
2.安装
在上一步下载的安装包同级,使用命令行执行以下命令
# 此处需写实际下载名称
bash Anaconda3-2023.03-Linux-x86_64.sh
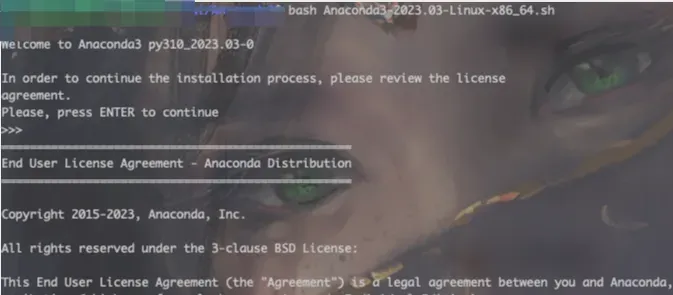
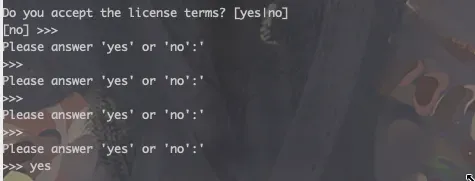
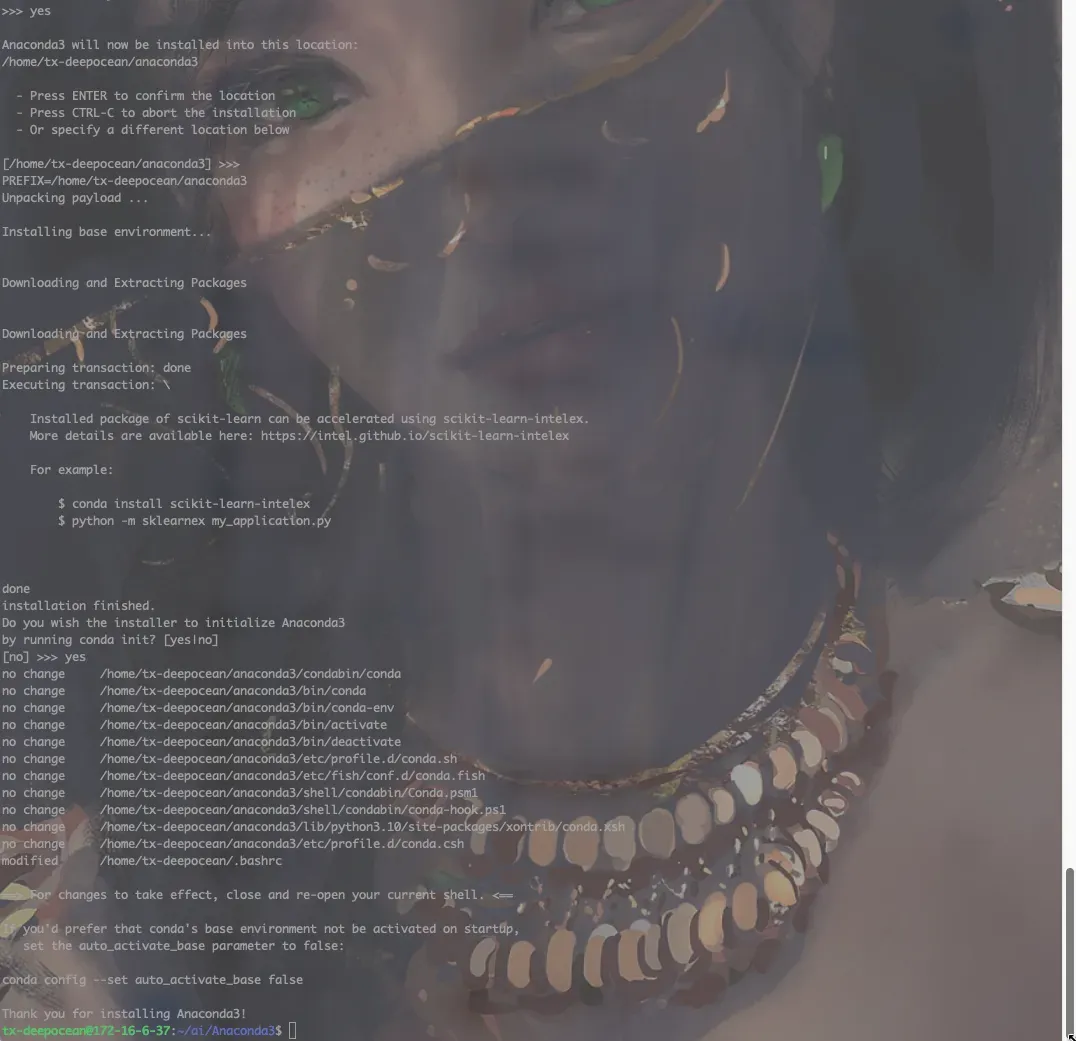
然后根据提示操作即可
3.设置国内源(危险)
可以参考此文章。当然,如果不换源可以顺利装所有的包的话,尽量不要执行此操作。我就因为换了源,导致后边出了很多小问题。
4.虚拟环境使用简介
# 创建虚拟环境
conda create -n xxx python=3.8
# 进入虚拟环境
conda activate xxx
# 退出当前虚拟环境
conda deactivate
# 查看本地虚拟环境
conda info --env
# 删除虚拟环境
conda remove -n xxx --all
三、部署ChatGLM-6B
1. clone代码
git clone https://github.com/THUDM/ChatGLM-6B.git
2. 运行
1.创建虚拟环境
# 新建chatglm环境
conda create -n chatglm python=3.8
# 激活chatglm环境
conda activate chatglm
2.装包
2.1 找到合适的pytorch版本
我们可以通过以下命令查看自己的cuda及cuda驱动版本
nvidia-smi
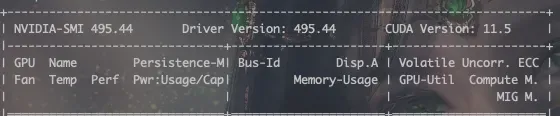
我们可以看到,cuda版本是11.5,驱动版本是493.44,然后我们去官网寻找合适的pytorch装包指令,官网链接如下:
https://pytorch.org/get-started/locally/
https://pytorch.org/get-started/previous-versions/
如果找不到对应版本的话,可以参考此链接,通过驱动找到合适的cuda toolkit版本,然后再去官网寻找合适的装包指令
注:驱动是向下兼容的,其决定了可安装的CUDA Toolkit的最高版本。
2.1 安装依赖
# 根据上一步找到的安装指令进行安装:
pip install torch==1.12.1+cu113 torchvision==0.13.1+cu113 torchaudio==0.12.1 --extra-index-url https://download.pytorch.org/whl/cu113
# 安装gradio用于启动图形化web界面
pip install gradio
# 安装运行依赖
pip install -r requirement.txt
2.2 验证pytorch是否为GPU版本
import torch
torch.cuda.is_available()  ## 输出应该是True
3.运行
在运行前,我们需要修改一些文件内容
# web_demo.py
# 1. 新增mirror='https://mirrors.tuna.tsinghua.edu.cn/hugging-face-models,下载模型使用清华源
tokenizer = AutoTokenizer.from_pretrained("THUDM/chatglm-6b", trust_remote_code=True, mirror='https://mirrors.tuna.tsinghua.edu.cn/hugging-face-models')
model = AutoModel.from_pretrained("THUDM/chatglm-6b", trust_remote_code=True, mirror='https://mirrors.tuna.tsinghua.edu.cn/hugging-face-models').half().cuda()
# 2. 增加server_name和server_port参数
demo.queue().launch(share=True,server_name="0.0.0.0",server_port=9234)
四、部署过程中遇到的问题
1. 问题1
报错如下:
ERROR: Could not find a version that satisfies the requirement protobuf<3.20.1,>=3.19.5 (from versions: none)
ERROR: No matching distribution found for protobuf<3.20.1,>=3.19.5

原因及解决方案:
是因为上一步换了国内的镜像源,所以只需要指定装包路径即可l sls
pip install -r requirements.txt -i https://pypi.Python.org/simple/
2.问题2
报错如下:
ImportError: Using SOCKS proxy, but the 'socksio' package is not installed. Make sure to install httpx using `pip install httpx[socks]`.

原因及解决方案:
是因为我在命令行设置了“科学上网”,关掉即可
# 因为我设置的是临时的,所以在命令行输入如下代码即可
unset http_proxy
unset https_proxy
3.问题3
报错如下:
RuntimeError: CUDA out of memory. Tried to allocate 128.00 MiB (GPU 0; 7.93 GiB total capacity; 7.40 GiB already allocated; 53.19 MiB free; 7.40 GiB reserved in total by PyTorch) If reserved memory is >> allocated memory try setting max_split_size_mb to avoid fragmentation. See documentation for Memory Management and PYTORCH_CUDA_ALLOC_CONF
原因及解决方案:
默认情况下,模型以 FP16 精度加载,运行上述代码需要大概 13GB 显存。如果你的 GPU 显存有限,可以尝试以量化方式加载模型,使用方法如下:
# int4精度加载,需要6G显存
# web_demo.py
model = AutoModel.from_pretrained("THUDM/chatglm-6b", trust_remote_code=True).half().quantize(4).cuda()
4.问题4
报错如下:
RuntimeError: Library cudart is not initialized
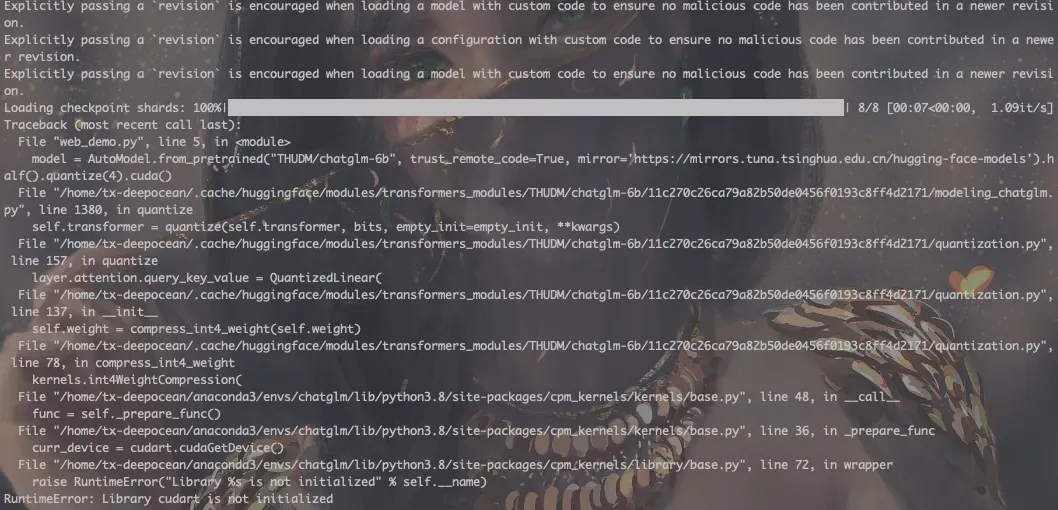
原因及解决方案:
我是用conda管理的环境,此时应该是cudatoolkit有问题,参考此issue
# 使用conda安装cudatoolkit
conda install cudatoolkit=11.3 -c nvidia
总结
例如:整个部署其实最难的应该还是环境了,虽然项目的README写的比较简单,但是真实搭建起来确实各种问题,希望此文章能给大家一些帮助吧。
参考文章
清华大学开源中文版ChatGPT模型——ChatGLM-6B发布
PyTorch、CUDA Toolkit 及显卡驱动版本对应关系
验证pytorch是否为GPU版本
文章出处登录后可见!