一、引言
- 同样是项目需求,需要利用视觉惯性导航做一些开发,所以第一步先做些算法的测试–仿真与实物测验,通过仿真的测试结果,最终是决定使用ORB-SLAM3来完成任务,当然了,Vins-fusion作为备用方案。
- 系统版本与ROS版本:Ubuntu18.04、Melodic
- 内容:(1)zed2的SDK以及开发例程安装(2)cuda与cudnn安装(3)双目相机、IMU标定以及联合标定(4)算法运行结果展示(5)分享一些遇到的问题以及解决方式
- 写此文一方面是为了阶段性总结,一方面是还有一些问题希望能有人一起讨论下,也算是把网上所有相关博客都看了一遍,提炼出来了精华部分做此总结,再次感谢各位前辈的肩膀~~
- 本文属于综合性博客,涉及面比较广,希望给大家更全面的帮助~~(手动狗头)
- 之前的博客好像有些烂尾,也没办法,真就是四处炼丹。。。。
- 至于可能编译过程会出现一些问题,基本上就是缺少依赖包,注意看error信息,还有可能是Cmakelist文件的问题,根据报错信息做相应修改就行,学会自己百度,之后熟悉了就能很快定位问题
二、安装显卡驱动、cuda、cudnn
正常做linux系统下的开发都缺少不了三件套:显卡驱动、cuda、cudnn
2.1 安装显卡驱动
这部分可以参考我之前的博客
2.2 安装cuda和cudnn
这里很容易,总结起来就是去官网下载文件,然后配置下bashrc的环境变量
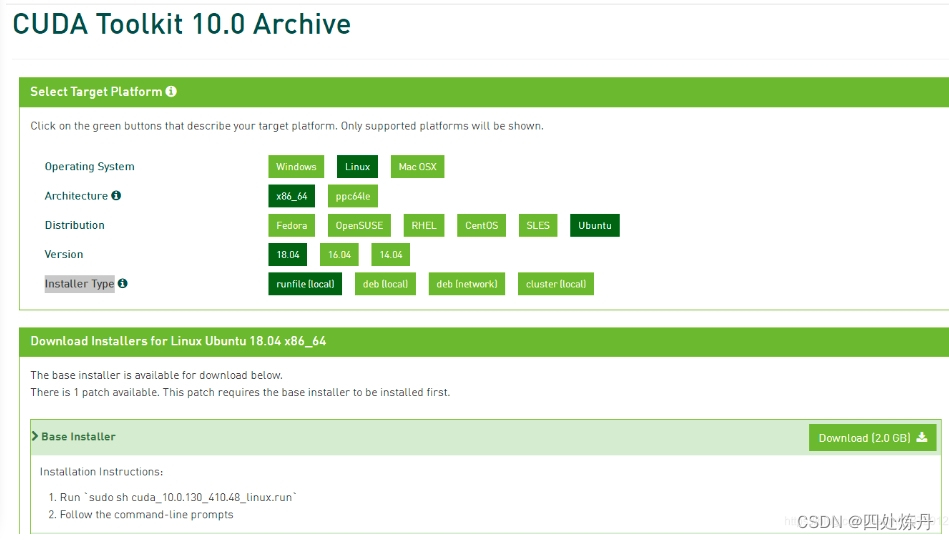
首先是cuda,点击进入官网后,选择cuda11.0或者cuda11.1或者其他版本的,之后下载会得到一个.run文件,跟下图一致。
执行以下命令执行安装(文件名记得改成自己的)
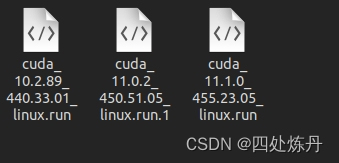
sudo sh cuda_10.2.89_440.33.01_linux.run
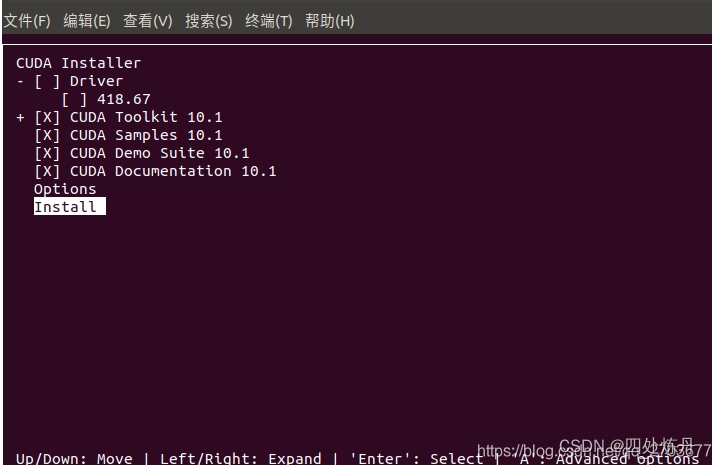
之后其他地方不是accept就回车就行,只是到了下图的地方配置要注意,取消Driver的选择(按回车可以取消),取消驱动下载选项后可以选择Install,静候结果就可以了
完成之后进入bashrc添加环境变量
sudo gedit ~/.bashrc
在文件末尾添加:(同样记得改成自己的版本号)
export CUDA_HOME=/usr/local/cuda
export PATH=$PATH:$CUDA_HOME/bin
export LD_LIBRARY_PATH=/usr/local/cuda-11.0/lib64${LD_LIBRARY_PATH:+:${LD_LIBRARY_PATH}}
最后测试是否安装成功
cd /usr/local/cuda/samples/1_Utilities/deviceQuery
sudo make
./deviceQuery
输出为Pass即安装成功,否则就重新安装一次
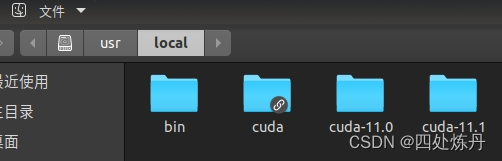
如果想要安装多个版本的cuda进行切换的话,第一个地方要把环境变量改了,第二个地方如下图我安装了两个cuda,cuda-11.0和cuda11.1,还有一个cuda文件是软连接,切换时候需要将这个软链接删除,重新指向cuda-11.0或cuda11.1文件夹即可,第三个地方就是需要重新安装下cudnn文件,具体如果还是不明白,评论区见~~
接下来安装cudnn,同样需要进入官网下载文件,这里下载的文件需要和安装的cuda版本对应起来, 最后的操作也很简单,只要把文件复制到原来安装的cuda的对应位置即可。
sudo cp cuda/include/cudnn.h /usr/local/cuda/include/
sudo cp cuda/lib64/libcudnn* /usr/local/cuda/lib64/
之后修改访问权限:
sudo chmod a+r  /usr/local/cuda/include/cudnn.h
sudo chmod a+r /usr/local/cuda/lib64/libcudnn*
完事儿~~最麻烦的是下载文件了,其他的我觉得操作挺easy的,熟练之后就好了
三、安装ZED2的SDK以及Python与ROS的API
总之都是从官网上扒下来的,官网上的东西都挺全的,各种功能,不愧是产品化的东西~~
(ps:这里本来分享了个链接。。。。结果违规了。。。。我还是删掉)
3.1 下载ZED2的SDK
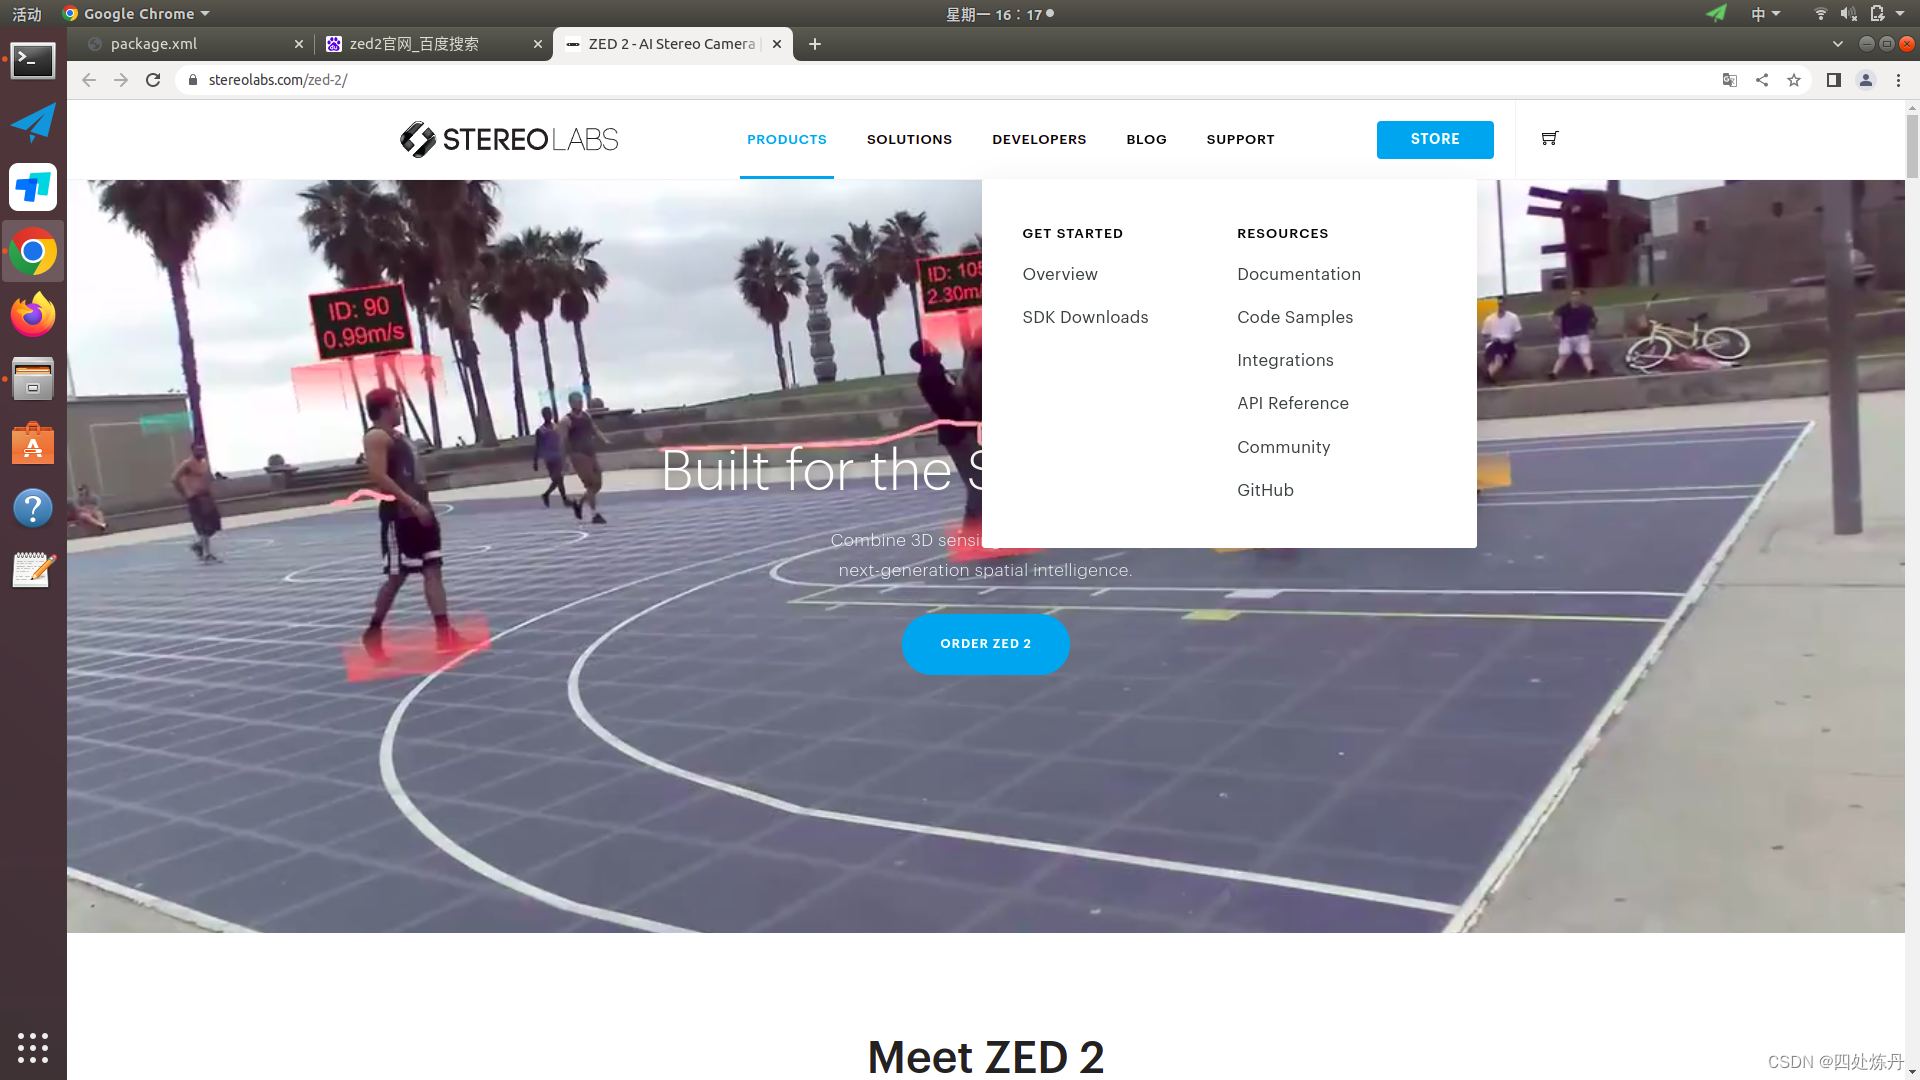
进入官网https://www.stereolabs.com/zed-2/
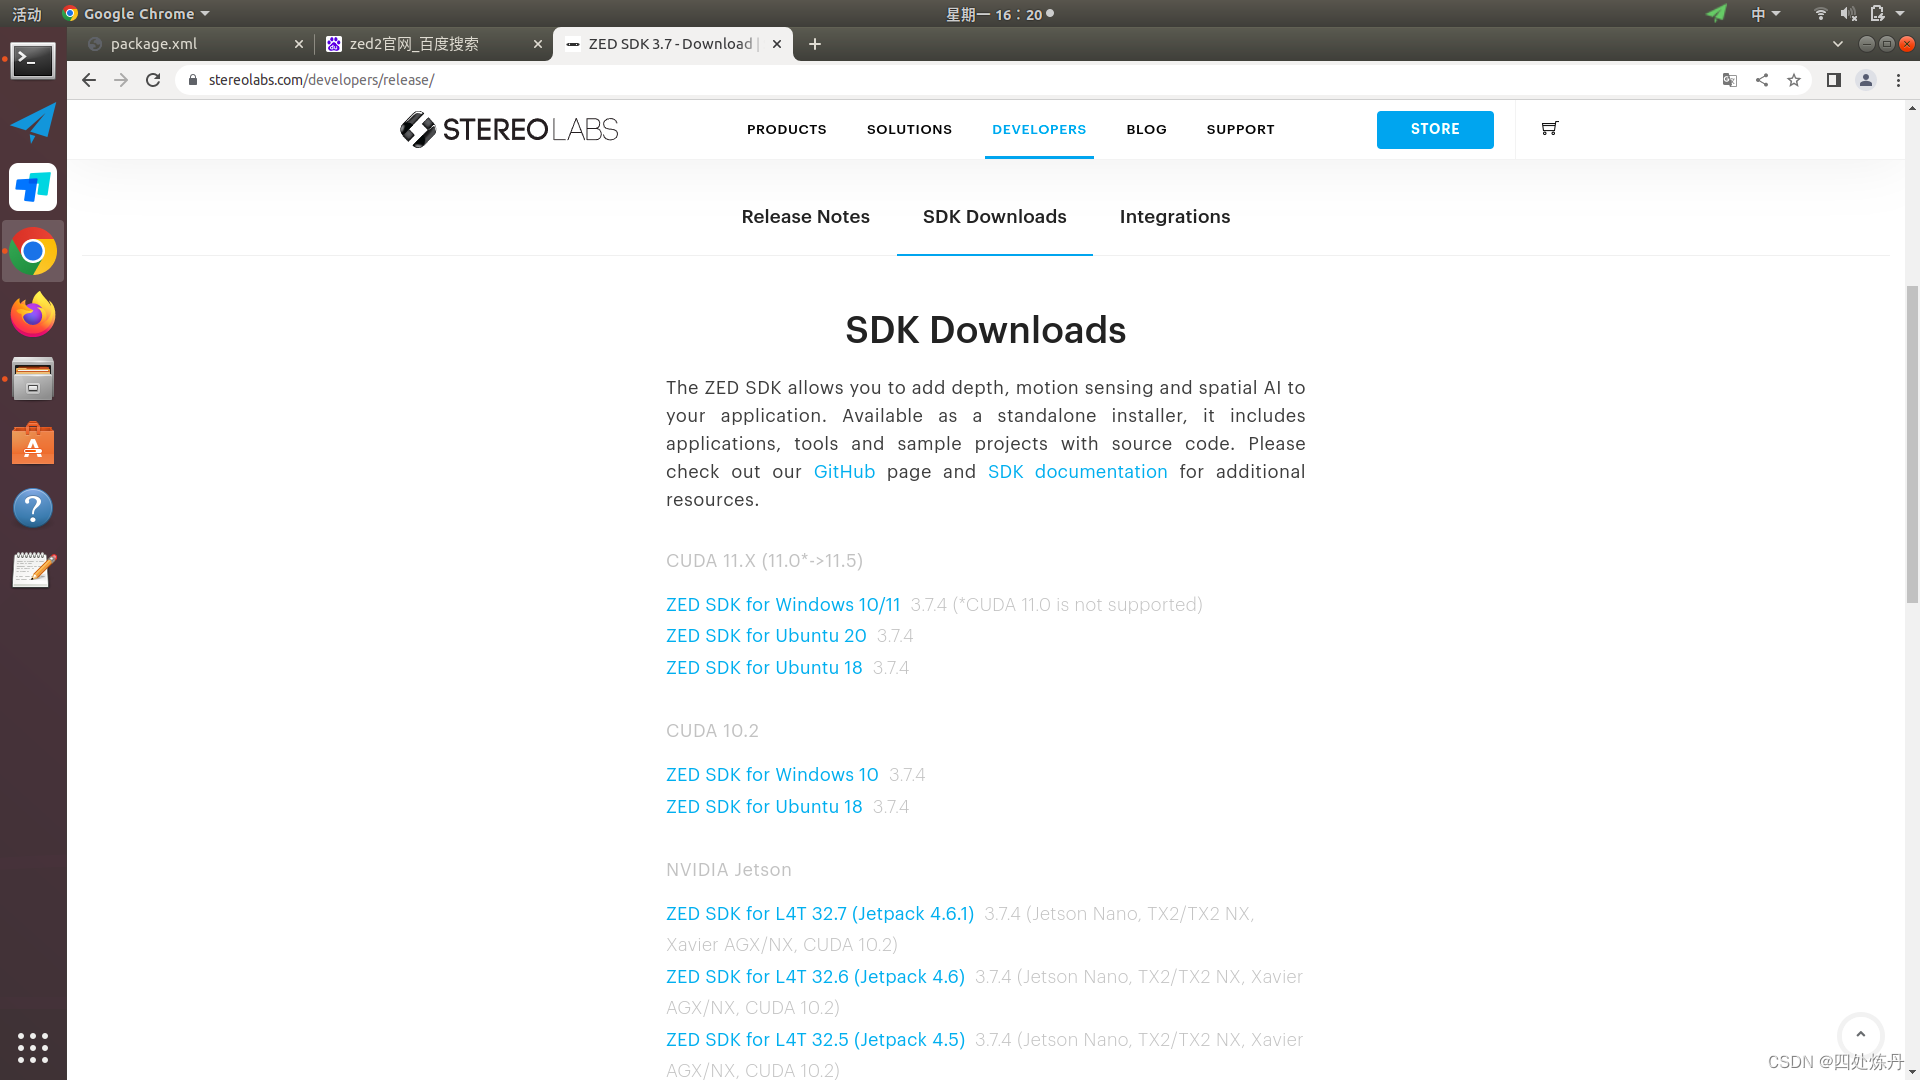
选择下图SDK Downloads
选择ZED SDK for ubuntu18,可以下载得到一个.run文件(记得修改文件名)
chmod +x ZED_SDK_Ubuntu18_cuda11.1_v3.7.4.run
./ZED_SDK_Ubuntu18_cuda11.1_v3.7.4.run
后面一直y就可以了
3.2 下载ZED2的python的API
GitHub下载python的API然后安装(前面安装SDK的时候其实也会执行安装,但是因为网络的问题不会成功,所以直接手动安)
git clone https://github.com/stereolabs/zed-python-api.git
cd zed-python-api/src
pip3 install -r requirements.txt -i http://pypi.douban.com/simple --trusted-host pypi.douban.com
python3 setup.py build
python3 setup.py install
安装完成后测试是否成功,这里记住一定要用USB3.0口,否则可能会启动SDK失败
cd /usr/local/zed/tools
./ZED_Depth_Viewer
出现双目的界面就是成功了
3.3 安装zed ros wrapper
这里默认各位已经有自己的工作空间了
cd ~/catkin_ws/src
git clone --recursive https://github.com/stereolabs/zed-ros-wrapper.git
git clone https://github.com/stereolabs/zed-ros-examples.git
cd ../
catkin_make
source ./devel/setup.bash
roslaunch zed_display_rviz display_zed.launch
能正常显示图像就是安装成功
四、双目相机、IMU、联合标定
4.1 安装标定工具
首先安装相关依赖
sudo apt-get install python-setuptools python-rosinstall ipython libeigen3-dev libboost-all-dev doxygen libopencv-dev ros-melodic-vision-opencv ros-melodic-image-transport-plugins ros-melodic-cmake-modules software-properties-common software-properties-common libpoco-dev python-matplotlib python-scipy python-git python-pip ipython libtbb-dev libblas-dev liblapack-dev python-catkin-tools libv4l-dev
sudo add-apt-repository ppa:igraph/ppa
sudo apt-get update                       # update your package database
sudo apt-get install python-igraph
创建新的工作空间,记得在bashrc里面添加环境变量 source ~/kalibr_workspace/devel/setup.bash
mkdir -p ~/kalibr_workspace/src
cd ~/kalibr_workspace
catkin_make
下载源码并编译(catkin_make和catkin_build不一样,所以需要创建新的工作空间)
cd ~/kalibr_workspace/src
git clone https://github.com/ethz-asl/Kalibr.git
catkin build -DCMAKE_BUILD_TYPE=Release -j4
下载编译code_utils(这里要在catkin_make创建的工作空间下编译,我的是catkin_ws)
cd ~/catkin_ws/src
git clone  https://github.com/gaowenliang/code_utilsarget_type: 'aprilgrid' #gridtype
tagCols: 6               #number of apriltags
tagRows: 6               #number of apriltags
tagSize: 0.088           #size of apriltag, edge to edge [m]
tagSpacing: 0.3          #ratio of space between tags to tagSize
sudo apt-get install libdw-dev
cd ../
catkin_make
下载编译imu_utils
git clone  https://github.com/gaowenliang/imu_utils
cd ../
catkin_make
4.2 下载标定板和yaml文件
进入GitHub下载相关参数文件https://github.com/ethz-asl/kalibr/wiki/downloads#calibration-targets
选择 Aprilgrid 6×6 0.8×0.8 m (A0 page),下载其pdf和yaml文件
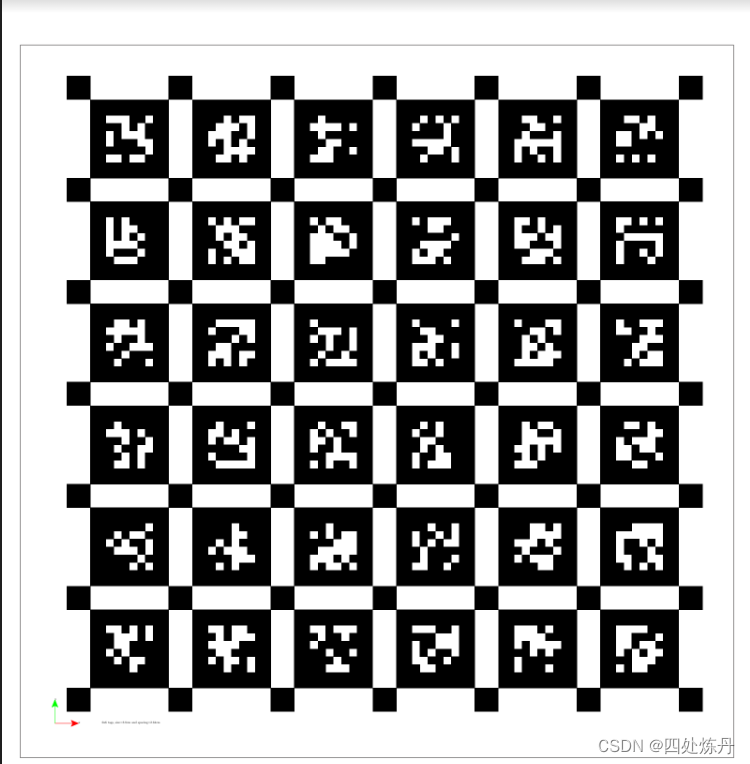
以下是yaml文件内容:
其中codeOffset参数没用,可以删掉,tagSize就是黑色大方格的边长,tagSpacing是黑色小方格的边长/黑色大方格的边长
target_type: 'aprilgrid' #gridtype
tagCols: 6               #number of apriltags
tagRows: 6               #number of apriltags
tagSize: 0.088           #size of apriltag, edge to edge [m]
tagSpacing: 0.3          #ratio of space between tags to tagSize
codeOffset: 0            #code offset for the first tag in the aprilboard
4.3 ZED2录制bag包准备标定
在catkin_ws/src/zed-ros-wrapper/zed_wrapper/params文件夹下找到common.yaml(参数配置文件),里面可以配置相机输出分辨率,我设置了resolution为2,分辨率大小为1280720,但是实际上标定时订阅ros话题获取的图像分辨率是这个的一半,即640360,感觉很离谱,继续继续~~,要是同志们知道为啥麻烦评论区告诉我一声。
接下来启动ZED2:
roslaunch zed_wrapper zed2.launch
rqt_image_view ## 可视化图像,选择/zed2/zed_node/stereo/image_rect_color
默认的相机发布频率是15Hz,IMU发布频率为200Hz,下面要开始录制用于标定的bag包了,有几个注意事项:(1)注意录制的时候要让二维码的全貌暴露在在双目相机的两个摄像头的视野中,通过rqt_image_view可以查看。(2)充分让二维码移动到相机视野的每个角落(3)沿着相机的三个轴分别前后左右移动三个轮回,绕着三个轴来回摆动三个轮回,具体的操作可以先看下这个视频https://youtu.be/puNXsnrYWTY?t=57
rosbag record -O Kalib_data_HD720.bag /zed2/zed_node/imu/data_raw /zed2/zed_node/left/image_rect_color /zed2/zed_node/right/image_rect_color
一共录制三个话题,相机图像和IMU的。网上有很多人说要降低频率,倒是没啥大必要,直接录制就行。
4.4 相机标定
记得Kalib_data_HD720.bag(录制的bag包)和april.yaml(标定板参数文件)替换为自己实际位置所在的路径,一会儿就标好了,反正我是没有报错的,如果真的报错了,建议重新录制。 在标定过程中可以可视化角点检测情况是否良好,发现角点重投影出现严重错误; –approx-sync 0.04,其中0.04可以看情况调整到0.1,作用是使各个摄像头数据同步。
roscore
rosrun kalibr kalibr_calibrate_cameras --bag Kalib_data_HD720.bag --topics /zed2/zed_node/left/image_rect_color /zed2/zed_node/right/image_rect_color --models pinhole-radtan pinhole-radtan --target april.yaml
标定结束后会获得相机的内参等文件,其中yaml文件可用于联合标定。
我的Kalib_data_HD720-camchain.yaml文件内容:
cam0:
  cam_overlaps: [1]
  camera_model: pinhole
  distortion_coeffs: [-0.020457937535071292, 0.01104746035697357, 0.00020521550183980535, -0.0015638016748186173]
  distortion_model: radtan
  intrinsics: [256.5277384633465, 258.08249705047217, 325.50319459226085, 180.96517806223522]
  resolution: [640, 360]
  rostopic: /zed2/zed_node/left/image_rect_color
cam1:
  T_cn_cnm1:
  - [0.9999953299145323, -0.0004175552431604406, -0.0030275066874908296, -0.1187894654449685]
  - [0.0004273153754671597, 0.9999947119574588, 0.003223888752289577, -5.5098799754223526e-05]
  - [0.0030261445262547908, -0.003225167396610463, 0.999990220324463, 7.990539895358612e-05]
  - [0.0, 0.0, 0.0, 1.0]
  cam_overlaps: [0]
  camera_model: pinhole
  distortion_coeffs: [-0.04197232826018052, 0.043604460293796686, 9.290216968896611e-05, -0.0025178786825268214]
  distortion_model: radtan
  intrinsics: [256.7217295800593, 258.5591545191309, 326.7180901852667, 180.36186639653016]
  resolution: [640, 360]
  rostopic: /zed2/zed_node/right/image_rect_color
4.5 IMU标定
(1)用imu_utils手动标定
rosbag record -O imu_calibration /zed2/zed_node/imu/data_raw
要录制超过两小时,创建launch文件,命名为ZED2_calibration.launch
<launch>
    <node pkg="imu_utils" type="imu_an" name="imu_an" output="screen">
        <param name="imu_topic" type="string" value= "/zed2/zed_node/imu/data_raw"/>
        <param name="imu_name" type="string" value= "ZED2"/>
        <param name="data_save_path" type="string" value= "$(find imu_utils)/data/"/>
        <param name="max_time_min" type="int" value= "120"/>
        <param name="max_cluster" type="int" value= "200"/>
    </node>
</launch>
启动标定
roslaunch imu_utils ZED2_calibration.launch
rosbag play -r 200 imu_calibration.bag
最后到标定结果文件,从而创建对应的imu.yaml(取标定结果Acc及Gyr的平均值填入imu.yaml文件)
(2)直接用官方数据
创建imu.yaml
填入
#Accelerometers
accelerometer_noise_density: 1.4e-03   #Noise density (continuous-time)
accelerometer_random_walk:   8.0e-05   #Bias random walk

#Gyroscopes
gyroscope_noise_density:     8.6e-05   #Noise density (continuous-time)
gyroscope_random_walk:       2.2e-06   #Bias random walk

rostopic:                    /zed2/zed_node/imu/data_raw      #the IMU ROS topic
update_rate:                200.0     #Hz (for discretization of the values above)
4.6 双目相机/IMU联合标定
注意Kalib_data_HD720.bag 、camchain-Kalib_data_HD720.yaml、imu.yaml 、april.yaml这几个文件尽量用绝对路径
roscore
rosrun kalibr kalibr_calibrate_imu_camera --bag Kalib_data_HD720.bag --cam camchain-Kalib_data_HD720.yaml --imu imu.yaml --target april.yaml
最终可以获得联合标定参数Kalib_data_HD720-imu.yaml:
cam0:
  T_cam_imu:
  - [0.011189492088057723, -0.9999089154286149, 0.007546927400109649, 0.030171769239718378]
  - [-0.005170435177808852, -0.0076051555206256005, -0.9999577132107034, 0.006834916768468505]
  - [0.999924028047573, 0.011149998021449559, -0.0052550620584632945, -0.018995636408175094]
  - [0.0, 0.0, 0.0, 1.0]
  cam_overlaps: [1]
  camera_model: pinhole
  distortion_coeffs: [-0.020457937535071292, 0.01104746035697357, 0.00020521550183980535, -0.0015638016748186173]
  distortion_model: radtan
  intrinsics: [256.5277384633465, 258.08249705047217, 325.50319459226085, 180.96517806223522]
  resolution: [640, 360]
  rostopic: /zed2/zed_node/left/image_rect_color
  timeshift_cam_imu: 0.018432058955920882
cam1:
  T_cam_imu:
  - [0.008164322092594406, -0.9999348268895338, 0.0079803394769285, -0.0885631816490655]
  - [-0.001941982567148115, -0.007996445404659519, -0.9999661422091248, 0.006731434867725931]
  - [0.9999647856542138, 0.008148547986540189, -0.002007141557983233, -0.01884628485444885]
  - [0.0, 0.0, 0.0, 1.0]
  T_cn_cnm1:
  - [0.9999953299145328, -0.0004175552431604405, -0.003027506687490829, -0.1187894654449685]
  - [0.00042731537546715964, 0.9999947119574593, 0.0032238887522895773, -5.5098799754223526e-05]
  - [0.0030261445262547903, -0.0032251673966104634, 0.9999902203244635, 7.990539895358612e-05]
  - [0.0, 0.0, 0.0, 1.0]
  cam_overlaps: [0]
  camera_model: pinhole
  distortion_coeffs: [-0.04197232826018052, 0.043604460293796686, 9.290216968896611e-05, -0.0025178786825268214]
  distortion_model: radtan
  intrinsics: [256.7217295800593, 258.5591545191309, 326.7180901852667, 180.36186639653016]
  resolution: [640, 360]
  rostopic: /zed2/zed_node/right/image_rect_color
  timeshift_cam_imu: 0.018616236206986332
五、ZED2跑ORB-SLAM3
5.1 编译安装ORB-SLAM3
这里直接引用一个博主的内容吧,我在三台计算机设备上都配置过,其实问题一个是环境变量,在bashrc中添加
export ROS_PACKAGE_PATH=${ROS_PACKAGE_PATH}:/home/lixushi/ORB_SLAM3-master/Examples_old/ROS(路径要换成自己的),一个是缺少依赖库,如Sophus库,这里可以安《视觉SLAM14讲》里的那个库不会有什么奇怪的问题,其他的遇到了自己根据报错信息安就行,官网讲的挺详细了,还有一个问题是CmakeList文件,编译时候一方面opencv指向要改一下,编译ros的那个CmakeList文件中,有关AR的.cc文件编译部分删掉,后面基本没有其他问题了.
git clone https://github.com/UZ-SLAMLab/ORB_SLAM3.git
cd ORB_SLAM3-master
chmod +x build.sh
./build.sh

cd ORB_SLAM3-master/Examples_old/ROS/ORB_SLAM3
mkdir build
cd build
cmake ..
make
下面添加配置文件
cd  ORB_SLAM3-master/Examples_old/ROS/ORB_SLAM3/src
touch zed2_stereo_inertial.cc
touch zed2_stereo_inertial.yaml
在zed2_stereo_inertial.cc文件中添加以下信息
/**
* This file is part of ORB-SLAM3
*
* Copyright (C) 2017-2021 Carlos Campos, Richard Elvira, Juan J. Gómez Rodríguez, José M.M. Montiel and Juan D. Tardós, University of Zaragoza.
* Copyright (C) 2014-2016 Raúl Mur-Artal, José M.M. Montiel and Juan D. Tardós, University of Zaragoza.
*
* ORB-SLAM3 is free software: you can redistribute it and/or modify it under the terms of the GNU General Public
* License as published by the Free Software Foundation, either version 3 of the License, or
* (at your option) any later version.
*
* ORB-SLAM3 is distributed in the hope that it will be useful, but WITHOUT ANY WARRANTY; without even
* the implied warranty of MERCHANTABILITY or FITNESS FOR A PARTICULAR PURPOSE. See the
* GNU General Public License for more details.
*
* You should have received a copy of the GNU General Public License along with ORB-SLAM3.
* If not, see <http://www.gnu.org/licenses/>.
*/

#include<iostream>
#include<algorithm>
#include<fstream>
#include<chrono>
#include<vector>
#include<queue>
#include<thread>
#include<mutex>

#include<ros/ros.h>
#include<cv_bridge/cv_bridge.h>
#include<sensor_msgs/Imu.h>

#include<opencv2/core/core.hpp>

#include"../../../include/System.h"
#include"include/ImuTypes.h"

using namespace std;

class ImuGrabber
{
public:
    ImuGrabber(){};
    void GrabImu(const sensor_msgs::ImuConstPtr &imu_msg);

    queue<sensor_msgs::ImuConstPtr> imuBuf;
    std::mutex mBufMutex;
};

class ImageGrabber
{
public:
    ImageGrabber(ORB_SLAM3::System* pSLAM, ImuGrabber *pImuGb, const bool bRect, const bool bClahe): mpSLAM(pSLAM), mpImuGb(pImuGb), do_rectify(bRect), mbClahe(bClahe){}

    void GrabImageLeft(const sensor_msgs::ImageConstPtr& msg);
    void GrabImageRight(const sensor_msgs::ImageConstPtr& msg);
    cv::Mat GetImage(const sensor_msgs::ImageConstPtr &img_msg);
    void SyncWithImu();

    queue<sensor_msgs::ImageConstPtr> imgLeftBuf, imgRightBuf;
    std::mutex mBufMutexLeft,mBufMutexRight;

    ORB_SLAM3::System* mpSLAM;
    ImuGrabber *mpImuGb;

    const bool do_rectify;
    cv::Mat M1l,M2l,M1r,M2r;

    const bool mbClahe;
    cv::Ptr<cv::CLAHE> mClahe = cv::createCLAHE(3.0, cv::Size(8, 8));
};


int main(int argc, char **argv)
{
  ros::init(argc, argv, "Stereo_Inertial");
  ros::NodeHandle n("~");
  ros::console::set_logger_level(ROSCONSOLE_DEFAULT_NAME, ros::console::levels::Info);
  bool bEqual = false;
  if(argc < 4 || argc > 5)
  {
    cerr << endl << "Usage: rosrun ORB_SLAM3 Stereo_Inertial path_to_vocabulary path_to_settings do_rectify [do_equalize]" << endl;
    ros::shutdown();
    return 1;
  }

  std::string sbRect(argv[3]);
  if(argc==5)
  {
    std::string sbEqual(argv[4]);
    if(sbEqual == "true")
      bEqual = true;
  }

  // Create SLAM system. It initializes all system threads and gets ready to process frames.
  ORB_SLAM3::System SLAM(argv[1],argv[2],ORB_SLAM3::System::IMU_STEREO,true);

  ImuGrabber imugb;
  ImageGrabber igb(&SLAM,&imugb,sbRect == "true",bEqual);

    if(igb.do_rectify)
    {
        // Load settings related to stereo calibration
        cv::FileStorage fsSettings(argv[2], cv::FileStorage::READ);
        if(!fsSettings.isOpened())
        {
            cerr << "ERROR: Wrong path to settings" << endl;
            return -1;
        }

        cv::Mat K_l, K_r, P_l, P_r, R_l, R_r, D_l, D_r;
        fsSettings["LEFT.K"] >> K_l;
        fsSettings["RIGHT.K"] >> K_r;

        fsSettings["LEFT.P"] >> P_l;
        fsSettings["RIGHT.P"] >> P_r;

        fsSettings["LEFT.R"] >> R_l;
        fsSettings["RIGHT.R"] >> R_r;

        fsSettings["LEFT.D"] >> D_l;
        fsSettings["RIGHT.D"] >> D_r;

        int rows_l = fsSettings["LEFT.height"];
        int cols_l = fsSettings["LEFT.width"];
        int rows_r = fsSettings["RIGHT.height"];
        int cols_r = fsSettings["RIGHT.width"];

        if(K_l.empty() || K_r.empty() || P_l.empty() || P_r.empty() || R_l.empty() || R_r.empty() || D_l.empty() || D_r.empty() ||
                rows_l==0 || rows_r==0 || cols_l==0 || cols_r==0)
        {
            cerr << "ERROR: Calibration parameters to rectify stereo are missing!" << endl;
            return -1;
        }

        cv::initUndistortRectifyMap(K_l,D_l,R_l,P_l.rowRange(0,3).colRange(0,3),cv::Size(cols_l,rows_l),CV_32F,igb.M1l,igb.M2l);
        cv::initUndistortRectifyMap(K_r,D_r,R_r,P_r.rowRange(0,3).colRange(0,3),cv::Size(cols_r,rows_r),CV_32F,igb.M1r,igb.M2r);
    }

  // Maximum delay, 5 seconds
  //ros::Subscriber sub_imu = n.subscribe("/imu", 1000, &ImuGrabber::GrabImu, &imugb);
  //ros::Subscriber sub_img_left = n.subscribe("/camera/left/image_raw", 100, &ImageGrabber::GrabImageLeft,&igb);
  //ros::Subscriber sub_img_right = n.subscribe("/camera/right/image_raw", 100, &ImageGrabber::GrabImageRight,&igb);

  ros::Subscriber sub_imu = n.subscribe("/zed2/zed_node/imu/data_raw", 1000, &ImuGrabber::GrabImu, &imugb);
  ros::Subscriber sub_img_left = n.subscribe("/zed2/zed_node/left/image_rect_color", 100, &ImageGrabber::GrabImageLeft,&igb);
  ros::Subscriber sub_img_right = n.subscribe("/zed2/zed_node/right/image_rect_color", 100, &ImageGrabber::GrabImageRight,&igb);


  std::thread sync_thread(&ImageGrabber::SyncWithImu,&igb);

  ros::spin();

  return 0;
}


void ImageGrabber::GrabImageLeft(const sensor_msgs::ImageConstPtr &img_msg)
{
  mBufMutexLeft.lock();
  if (!imgLeftBuf.empty())
    imgLeftBuf.pop();
  imgLeftBuf.push(img_msg);
  mBufMutexLeft.unlock();
}

void ImageGrabber::GrabImageRight(const sensor_msgs::ImageConstPtr &img_msg)
{
  mBufMutexRight.lock();
  if (!imgRightBuf.empty())
    imgRightBuf.pop();
  imgRightBuf.push(img_msg);
  mBufMutexRight.unlock();
}

cv::Mat ImageGrabber::GetImage(const sensor_msgs::ImageConstPtr &img_msg)
{
  // Copy the ros image message to cv::Mat.
  cv_bridge::CvImageConstPtr cv_ptr;
  try
  {
    cv_ptr = cv_bridge::toCvShare(img_msg, sensor_msgs::image_encodings::MONO8);
  }
  catch (cv_bridge::Exception& e)
  {
    ROS_ERROR("cv_bridge exception: %s", e.what());
  }

  if(cv_ptr->image.type()==0)
  {
    return cv_ptr->image.clone();
  }
  else
  {
    std::cout << "Error type" << std::endl;
    return cv_ptr->image.clone();
  }
}

void ImageGrabber::SyncWithImu()
{
  const double maxTimeDiff = 0.01;
  while(1)
  {
    cv::Mat imLeft, imRight;
    double tImLeft = 0, tImRight = 0;
    if (!imgLeftBuf.empty()&&!imgRightBuf.empty()&&!mpImuGb->imuBuf.empty())
    {
      tImLeft = imgLeftBuf.front()->header.stamp.toSec();
      tImRight = imgRightBuf.front()->header.stamp.toSec();

      this->mBufMutexRight.lock();
      while((tImLeft-tImRight)>maxTimeDiff && imgRightBuf.size()>1)
      {
        imgRightBuf.pop();
        tImRight = imgRightBuf.front()->header.stamp.toSec();
      }
      this->mBufMutexRight.unlock();

      this->mBufMutexLeft.lock();
      while((tImRight-tImLeft)>maxTimeDiff && imgLeftBuf.size()>1)
      {
        imgLeftBuf.pop();
        tImLeft = imgLeftBuf.front()->header.stamp.toSec();
      }
      this->mBufMutexLeft.unlock();

      if((tImLeft-tImRight)>maxTimeDiff || (tImRight-tImLeft)>maxTimeDiff)
      {
        // std::cout << "big time difference" << std::endl;
        continue;
      }
      if(tImLeft>mpImuGb->imuBuf.back()->header.stamp.toSec())
          continue;

      this->mBufMutexLeft.lock();
      imLeft = GetImage(imgLeftBuf.front());
      imgLeftBuf.pop();
      this->mBufMutexLeft.unlock();

      this->mBufMutexRight.lock();
      imRight = GetImage(imgRightBuf.front());
      imgRightBuf.pop();
      this->mBufMutexRight.unlock();

      vector<ORB_SLAM3::IMU::Point> vImuMeas;
      mpImuGb->mBufMutex.lock();
      if(!mpImuGb->imuBuf.empty())
      {
        // Load imu measurements from buffer
        vImuMeas.clear();
        while(!mpImuGb->imuBuf.empty() && mpImuGb->imuBuf.front()->header.stamp.toSec()<=tImLeft)
        {
          double t = mpImuGb->imuBuf.front()->header.stamp.toSec();
          cv::Point3f acc(mpImuGb->imuBuf.front()->linear_acceleration.x, mpImuGb->imuBuf.front()->linear_acceleration.y, mpImuGb->imuBuf.front()->linear_acceleration.z);
          cv::Point3f gyr(mpImuGb->imuBuf.front()->angular_velocity.x, mpImuGb->imuBuf.front()->angular_velocity.y, mpImuGb->imuBuf.front()->angular_velocity.z);
          vImuMeas.push_back(ORB_SLAM3::IMU::Point(acc,gyr,t));
          mpImuGb->imuBuf.pop();
        }
      }
      mpImuGb->mBufMutex.unlock();
      if(mbClahe)
      {
        mClahe->apply(imLeft,imLeft);
        mClahe->apply(imRight,imRight);
      }

      if(do_rectify)
      {
        cv::remap(imLeft,imLeft,M1l,M2l,cv::INTER_LINEAR);
        cv::remap(imRight,imRight,M1r,M2r,cv::INTER_LINEAR);
      }

      mpSLAM->TrackStereo(imLeft,imRight,tImLeft,vImuMeas);

      std::chrono::milliseconds tSleep(1);
      std::this_thread::sleep_for(tSleep);
    }
  }
}

void ImuGrabber::GrabImu(const sensor_msgs::ImuConstPtr &imu_msg)
{
  mBufMutex.lock();
  imuBuf.push(imu_msg);
  mBufMutex.unlock();
  return;
}
在zed2_stereo_inertial.yaml中添加以下信息(这里是我的相机参数,大家根据自己情况修改)
这里面的DKRP数据我是直接用的ZED左右目原始图像的camera_info话题中的数据,大家可以rostopic list找一下,此外,zed2相机基线长度为120
参数说明可以参考博客:
https://blog.csdn.net/chenguowen21/article/details/83044654
https://blog.csdn.net/sinat_16643223/article/details/115224938
https://blog.csdn.net/zhubaohua_bupt/article/details/80222321
%YAML:1.0

#--------------------------------------------------------------------------------------------
# Camera Parameters. Adjust them!
#--------------------------------------------------------------------------------------------
Camera.type: "PinHole"

# Camera calibration and distortion parameters (OpenCV) (equal for both cameras after stereo rectification)
Camera.fx: 256.5277384633465
Camera.fy: 258.08249705047217
Camera.cx: 325.50319459226085
Camera.cy: 180.96517806223522

# 用的是校正过的节点,所以畸变参数设置为0
Camera.k1: -0.020457937535071292
Camera.k2: 0.01104746035697357
Camera.p1: 0.00020521550183980535
Camera.p2: -0.0015638016748186173

Camera.width: 640
Camera.height: 360

# Camera frames per second
Camera.fps: 15.0

# stereo baseline times fx 基线和fx的乘积
Camera.bf: 30.7824

# Color order of the images (0: BGR, 1: RGB. It is ignored if images are grayscale)
Camera.RGB: 1

# Close/Far threshold. Baseline times.
ThDepth: 40.0 # 35

# Transformation from camera 0 to body-frame (imu)
# 从左目转换到IMU坐标系
Tbc: !!opencv-matrix
        rows: 4
        cols: 4
        dt: f
        data: [ 0.011189492088057723, -0.005170435177808852, 0.999924028047573, -0.030171769239718378,
                -0.9999089154286149, -0.0076051555206256005, 0.011149998021449559, +0.006834916768468505,
                0.007546927400109649, -0.9999577132107034, -0.0052550620584632945, -0.018995636408175094,
                0.0, 0.0, 0.0, 1.0]

# IMU noise
# get it from Project of **zed-examples/tutorials/tutorial 7 - sensor data/**.
IMU.NoiseGyro: 8.6e-05 # 1.6968e-04
IMU.NoiseAcc:  0.0014 # 2.0000e-3
IMU.GyroWalk:  2.2e-06
IMU.AccWalk:   8.0e-05 # 3.0000e-3
IMU.Frequency: 200

#--------------------------------------------------------------------------------------------
# Stereo Rectification. Only if you need to pre-rectify the images.
# Camera.fx, .fy, etc must be the same as in LEFT.P
#--------------------------------------------------------------------------------------------
LEFT.height: 360
LEFT.width: 640
LEFT.D: !!opencv-matrix
        rows: 1
        cols: 5
        dt: d
        data: [-0.040750399231910706, 0.009019049815833569, -0.004655580036342144, -0.0006361529813148081, 0.0003129479882773012]
LEFT.K: !!opencv-matrix
        rows: 3
        cols: 3
        dt: d
        data: [264.1424865722656, 0.0, 328.0299987792969, 0.0, 263.9525146484375, 180.45175170898438, 0.0, 0.0, 1.0]
LEFT.R:  !!opencv-matrix
        rows: 3
        cols: 3
        dt: d
        data: [1.0, 0.0, 0.0, 0.0, 1.0, 0.0, 0.0, 0.0, 1.0]
LEFT.Rf:  !!opencv-matrix
        rows: 3
        cols: 3
        dt: f
        data: [1.0, 0.0, 0.0, 0.0, 1.0, 0.0, 0.0, 0.0, 1.0]
LEFT.P:  !!opencv-matrix
        rows: 3
        cols: 4
        dt: d
        data: [264.1424865722656, 0.0, 328.0299987792969, 0.0, 0.0, 263.9525146484375, 180.45175170898438, 0.0, 0.0, 0.0, 1.0, 0.0]

RIGHT.height: 360
RIGHT.width: 640
RIGHT.D: !!opencv-matrix
        rows: 1
        cols: 5
        dt: d
        data: [-0.03843430057168007, 0.005912320222705603, -0.0034095800947397947, 6.041819870006293e-05, -0.00011238799925195053]
RIGHT.K: !!opencv-matrix
        rows: 3
        cols: 3
        dt: d
        data: [263.0425109863281, 0.0, 326.2799987792969, 0.0, 262.93499755859375, 180.3209991455078, 0.0, 0.0, 1.0]
RIGHT.R:  !!opencv-matrix
        rows: 3
        cols: 3
        dt: d
        data: [1.0, 0.0, 0.0, 0.0, 1.0, 0.0, 0.0, 0.0, 1.0]
RIGHT.P:  !!opencv-matrix
        rows: 3
        cols: 4
        dt: d
        data: [263.0425109863281, 0.0, 326.2799987792969, -31.668317794799805, 0.0, 262.93499755859375, 180.3209991455078, 0.0, 0.0, 0.0, 1.0, 0.0]

#--------------------------------------------------------------------------------------------
# ORB Parameters
#--------------------------------------------------------------------------------------------

# ORB Extractor: Number of features per image
ORBextractor.nFeatures: 2200

# ORB Extractor: Scale factor between levels in the scale pyramid
ORBextractor.scaleFactor: 1.2

# ORB Extractor: Number of levels in the scale pyramid
ORBextractor.nLevels: 8

# ORB Extractor: Fast threshold
# Image is divided in a grid. At each cell FAST are extracted imposing a minimum response.
# Firstly we impose iniThFAST. If no corners are detected we impose a lower value minThFAST
# You can lower these values if your images have low contrast
ORBextractor.iniThFAST: 20
ORBextractor.minThFAST: 7

#--------------------------------------------------------------------------------------------
# Viewer Parameters
#--------------------------------------------------------------------------------------------
Viewer.KeyFrameSize: 0.05
Viewer.KeyFrameLineWidth: 1
Viewer.GraphLineWidth: 0.9
Viewer.PointSize:2
Viewer.CameraSize: 0.08
Viewer.CameraLineWidth: 3
Viewer.ViewpointX: 0
Viewer.ViewpointY: -0.7
Viewer.ViewpointZ: -1.8
Viewer.ViewpointF: 500
编辑CMakeLists.txt文件
cd ORB_SLAM3-master/Examples_old/ROS/ORB_SLAM3
gedit CMakeLists.txt
在最下面添加
rosbuild_add_executable(zed2_stereo_inertial
src/zed2_stereo_inertial.cc
)

target_link_libraries(zed2_stereo_inertial
${LIBS}
)
重新编译即可,如果找不到可执行文件,运行
rospack profile
5.2 运行ORB-SLAM3
这里我是在学校里面录了bag包
roscore

rosrun ORB_SLAM3 zed2_stereo_inertial /home/lixushi/ORB_SLAM3-master/Vocabulary/ORBvoc.txt /home/lixushi/ORB_SLAM3-master/Examples_old/ROS/ORB_SLAM3/src/zed2_stereo_inertial.yaml true

rosbag play Kalib_data_HD720-4.bag
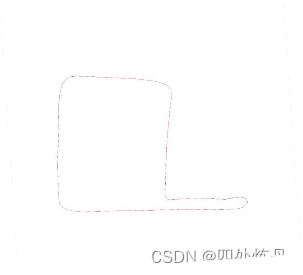
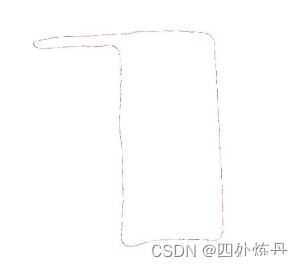
运行效果如下图,还是可以的,都跑了六百米左右
六、总结
总体来说标定一次成功还是很开心的,网上没有详细的教程走了很多坑,希望能帮到各位,但是还有个问题。。。为啥rosbag运行完以后不会保存轨迹文件呢???有人能告诉我一下不。。。
七、参考文献
[1] https://blog.csdn.net/m0_37201243/article/details/103439613
[2]https://blog.csdn.net/slamer111/article/details/124360452
[3]https://blog.csdn.net/xiaojinger_123/article/details/120849737?spm=1001.2014.3001.5501
[4]https://blog.csdn.net/xiaojinger_123/article/details/121232948
[5]https://blog.csdn.net/sinat_16643223/article/details/115416277?spm=1001.2014.3001.5506
[6]https://blog.csdn.net/weixin_43492473/article/details/124476546?spm=1001.2014.3001.5502
[7]https://blog.csdn.net/xiaojinger_123/article/details/121232948
[8]https://blog.csdn.net/slender_1031/article/details/115030053
文章出处登录后可见!