JavaScript请求数据有4种主流方式,分别是Ajax、fetch、jQuery和axios。
一、Ajax、fetch、jQuery和axios的详细解释:
1、 Ajax
Ajax(Asynchronous JavaScript and XML)是一种使用JavaScript在用户的浏览器上发送请求的技术,可以在不重新加载整个网页的情况下从服务器获取数据。它允许网页在后台与服务器进行少量数据交换,从而实现网页的异步更新。这意味着可以在不干扰用户浏览体验的情况下,从服务器获取数据并更新网页的部分内容。
2、fetch
fetch API是现代浏览器提供的一种用于发起网络请求的新方法。它返回一个Promise对象,可以用来替代传统的XMLHttpRequest。fetch API提供了一个更现代、更强大的方式来处理网络请求,并支持包括CORS在内的更多功能。
3、jQuery
jQuery是一种流行的JavaScript库,旨在简化HTML文档遍历和操作、事件处理、动画和Ajax操作。它提供了一组简单易用的API,使得JavaScript编程更为简单、快速和有趣。jQuery大大简化了跨浏览器的DOM操作、事件处理和动画效果,同时它也提供了一些工具函数,使得JavaScript编程更加高效。
4、axios
axios是一个基于Promise的HTTP客户端,用于浏览器和node.js。它提供了一种简单且灵活的方式来进行HTTP请求,包括XMLHttpRequests和HTTP请求。axios返回的是一个包含响应数据的Promise对象,这使得异步处理更加简单和直观。axios还支持拦截请求和响应、转换请求和响应数据、取消请求等功能,使得HTTP请求的管理更加方便。
二、Ajax、fetch、jQuery和axios的主要区别:
1、Ajax 数据请求:
原生js提供的(内置),核心使用XMLHttpRequest对象,多个请求之间如果有先后关系的话,就会出现回调地狱。
2、fetch 数据请求:
原生js提供的(内置),和ajax同级,使用promise形式,关注分离思想,但兼容性不太好,所以用的不是很多。
3、jquery数据请求:
第三方库提供的,封装原生的ajax请求,使用回调形式,可能出现回调地狱。
4、axios数据请求:
第三方库提供的,封装原生的ajax请求,使用promise的形式,并且可以在请求和响应阶段进行拦截。
三、Ajax、fetch、jQuery和axios的代码详解:
在测试Ajax、fetch、jQuery和axios的示例代码之前,这里使用nodejs写一个简单的web服务器(server.js)做响应。
启动命令:node server.js

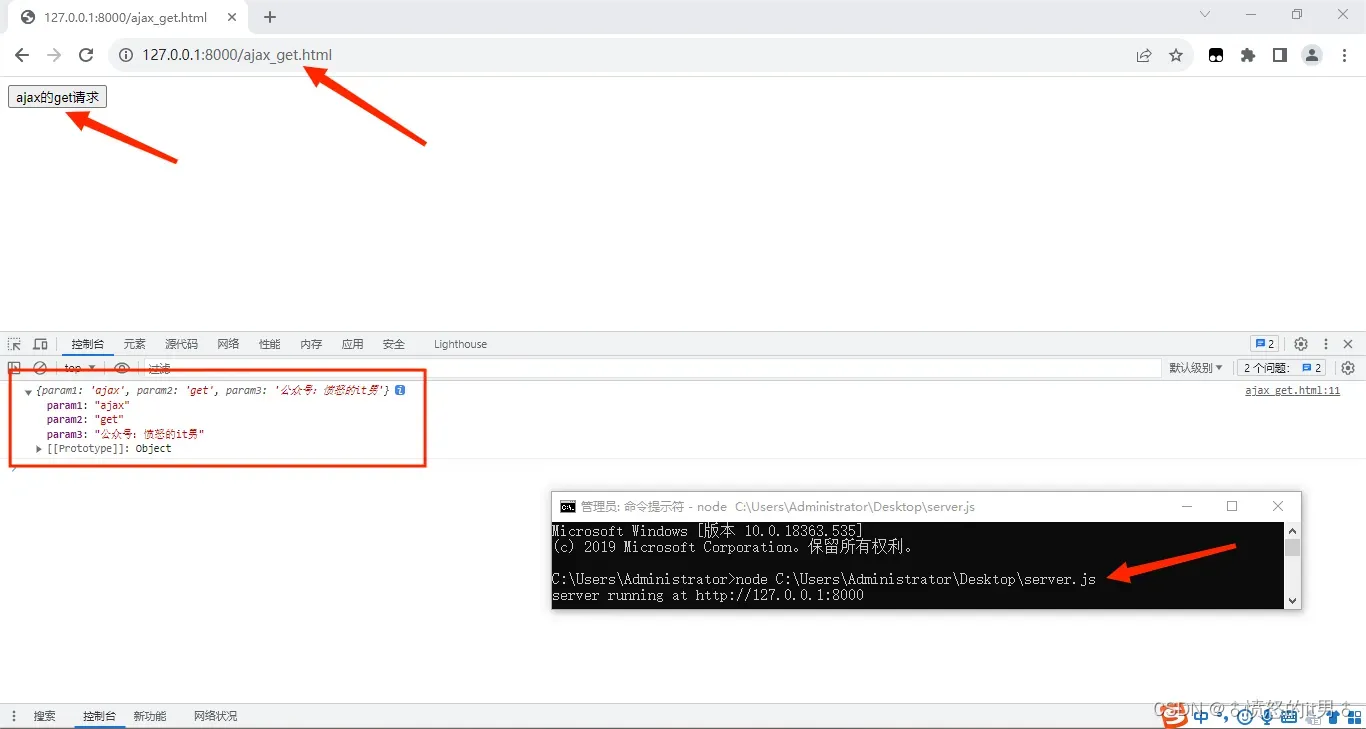
ajax的get请求示例:http://127.0.0.1:8000/ajax_get.html

ajax的post请求示例:http://127.0.0.1:8000/ajax_post.html

fetch的get请求示例:http://127.0.0.1:8000/fetch_get.html

fetch的post请求示例:http://127.0.0.1:8000/fetch_post.html

jQuery的get请求示例:http://127.0.0.1:8000/jQuery_get.html

jQuery的post请求示例:http://127.0.0.1:8000/jQuery_post.html

axios的get请求示例:http://127.0.0.1:8000/axios_get.html

axios的post请求示例:http://127.0.0.1:8000/axios_post.html

axios请求(高级用法)示例:http://127.0.0.1:8000/axios_other.html

axios请求(实例用法)示例:http://127.0.0.1:8000/axios_instance.html
代码如下:
const http = require('http');
const path = require('path');
const url = require('url')
const fs = require('fs');

const server = http.createServer()
server.on('request',(req,res)=>{
    const urlObj = url.parse(req.url, true);
    if(urlObj.pathname === '/test'){

        if(req.method === 'GET'){
            const str = JSON.stringify(urlObj.query);
            res.end(str);
        }
        if(req.method === 'POST'){
            let params = '';
            req.on('data', chunk=>{
                params += chunk;
            });
            req.on('end', ()=>{
                res.end(params);
            });
        }
    }else{
        fs.readFile(path.join(__dirname, urlObj.pathname), 'utf8', function(err, dataStr){
            if(err){
                return console.log(err.message)
            }
        res.setHeader('Content-type', 'text/html; charset=utf-8');
        res.end(dataStr);
         })
    }
})
server.listen(8000, ()=>{
    console.log('server running at http://127.0.0.1:8000')
})

1、Ajax请求
Ajax使用五个步骤:
步骤1:创建一个XMLHttpRequest对象
var xmlhttp=new XMLHttpRequest();
步骤2:设置请求方式和请求地址(使用open(method,url,async)方法)
method:请求方式,get或者post。(默认为get)
url:请求路径,文件在服务器上的位置
async:是否为异步请求。(默认为true,异步请求)
步骤3:发送send() 请求
若为post方式时需要使用setRequestHeader()来添加http头
步骤4:监听状态的变化
每当readyState状态改变时,就会触发 onreadystatechange事件,执行回调函数。readyState存有XMLHttpRequest的5种状态。从 0 到 4 发生变化。
0: 请求未初始化
1: 服务器连接已建立
2: 请求已接收
3: 请求处理中
4: 请求已完成,且响应已就绪
步骤5:处理返回的结果
根据请求服务器返回状态码(status),大于200,小于300,或等于304,则表示请求成功, 否则服务器请求失败。获取服务器中响应,使用XMLHttpRequest对象的responseText或responseXML属性。
responseText:获得字符串形式的响应数据。
responseXML:获得 XML 形式的响应数据。
ajax的get请求示例代码:
<button>ajax的get请求</button>
<script>
const btn = document.querySelector("button");
btn.onclick = function () {
var xmlhttp = new XMLHttpRequest();
xmlhttp.open("GET", "http://127.0.0.1:8000/test?param1=ajax¶m2=get¶m3=公众号:愤怒的it男", true);
xmlhttp.send();
xmlhttp.onreadystatechange = function () {
if (xmlhttp.readyState === 4) {
if (xmlhttp.status >= 200 && xmlhttp.status < 300 || xmlhttp.status === 304) {
console.log(JSON.parse(xmlhttp.responseText));
} else {
console.log("没有接收到服务器的数据");
}
}
}
}
</script>ajax的post请求示例代码:
<button>ajax的post请求</button>
<script>
const btn = document.querySelector("button");
btn.onclick = function () {
    var xmlhttp=new XMLHttpRequest();
    xmlhttp.open("POST","http://127.0.0.1:8000/test",true);
    xmlhttp.setRequestHeader("Content-Type","application/x-www-form-urlencoded");
    xmlhttp.send(JSON.stringify({'param1':'ajax','param2':'post','param3':'公众号:愤怒的it男'}));
    xmlhttp.onreadystatechange=function () {
        if (xmlhttp.readyState === 4) {
            if (xmlhttp.status>=200 && xmlhttp.status<300 ||xmlhttp.status===304 ){
                console.log(JSON.parse(xmlhttp.responseText));
            }else{
                console.log("没有接收到服务器的数据");
            }
        }
    }
}
</script>
2、fetch请求
(1)POST请求的2种内容类型:
//如果是application/x-www-form-urlencoded,body请求体内容为FormData对象:
var formData = new FormData()
formData.append('param1','fetch')
formData.append('param1','post')
formData.append('param1','公众号:愤怒的it男')
//如果是application/json,body请求体内容为JSON字符串:
JSON.stringify({'param1':'fetch','param2':'post','param3':'公众号:愤怒的it男'})
(2)response返回的3种数据格式:
//如果是json格式
fetch(url [,options]).then(rsp => {return rsp.json()}).then(data => {console.log(data)})
//如果是文本格式
fetch(url [,options]).then(rsp => {return rsp.text()}).then(data => {console.log(data)})
//如果是二进制流
fetch(url [,options]).then(rsp => {return rsp.blob()}).then(data => {console.log(data)})
fetch的get请求示例代码:
<button>fetch的get请求</button>
<script>
const btn = document.querySelector("button");
btn.onclick = function() {
fetch('http://127.0.0.1:8000/test?param1=fetch¶m2=get¶m3=公众号:愤怒的it男', {
'method': 'GET',
'body': null,
'headers': {
"accept": "*/*",
"sec-fetch-dest": "empty",
"sec-fetch-mode": "cors",
"sec-fetch-site": "none",
'content-type': 'application/json, text/plain, */*'
}
}).then(res => {return res.json()}).then(data => {
console.log(data)
});
}
</script>
fetch的post请求示例代码:
<button>fetch的post请求</button>
<script>
    const btn = document.querySelector("button");
    btn.onclick = function() {
        fetch('http://127.0.0.1:8000/test', {
            'method': 'POST',
            'body': JSON.stringify({'param1':'fetch','param2':'post','param3':'公众号:愤怒的it男'}),
            'headers': {
              "accept": "*/*",
              "sec-fetch-dest": "empty",
              "sec-fetch-mode": "cors",
              "sec-fetch-site": "none",
              'content-type': 'application/json; charset=UTF-8'
            }
        }).then(res => {return res.json()}).then(data => {
          console.log(data)
        });
    }
</script>
3、jQuery请求
jQuery的get请求示例代码:
<script src="https://apps.bdimg.com/libs/jquery/2.1.4/jquery.min.js"></script>
<button>jQuery的get请求</button>
<script>
const btn = document.querySelector("button");
btn.onclick = function() {
$.get("http://127.0.0.1:8000/test?param1=jQuery¶m2=get¶m3=公众号:愤怒的it男",function(data,status){
console.log(JSON.parse(data));
});
}
</script>jQuery的post请求示例代码:
<script src="https://apps.bdimg.com/libs/jquery/2.1.4/jquery.min.js"></script>
<button>jQuery的post请求</button>
<script>
    const btn = document.querySelector("button");
    btn.onclick = function() {
        data = JSON.stringify({'param1':'fetch','param2':'post','param3':'公众号:愤怒的it男'});
        $.post("http://127.0.0.1:8000/test", data, function(data,status){
            console.log(JSON.parse(data));
        });
    }
</script>
$.get等价于jQuery.get,$.post等价于jQuery.post。
4、axios请求
axios的get请求基础使用示例代码:
<script src="https://cdn.jsdelivr.net/npm/axios/dist/axios.min.js"></script>
<button>axios的get请求</button>
<script>
const btn = document.querySelector("button");
btn.onclick = function() {
axios.get("http://127.0.0.1:8000/test?param1=axios¶m2=get¶m3=公众号:愤怒的it男").then(response => {
console.log(response.data)
});
}
</script>axios的post请求基础使用示例代码:
<script src="https://cdn.jsdelivr.net/npm/axios/dist/axios.min.js"></script>
<button>axios的post请求</button>
<script>
    const btn = document.querySelector("button");
    btn.onclick = function() {
        data={
            param1:'axios',
            param2:'post',
            param3:'公众号:愤怒的it男'
        }
        axios.post('http://127.0.0.1:8000/test',data).then(response => {
            console.log(response.data)
        });
    }
</script>
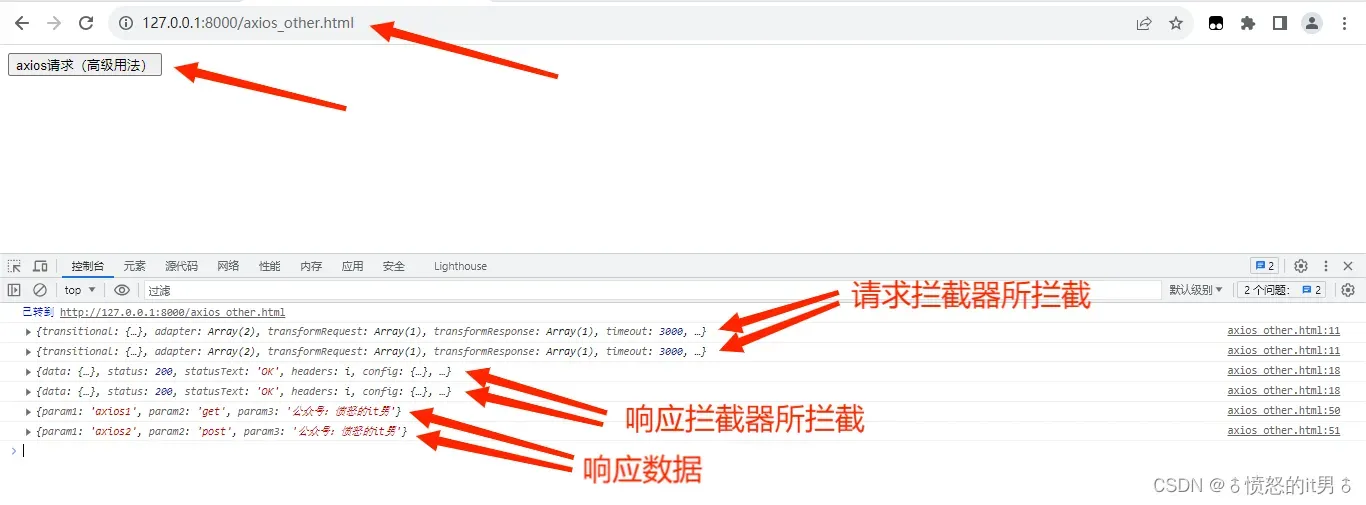
axios支持多请求并发,可以添加全局或局部配置,也可以添加请求拦截器和响应拦截器。拦截器会在发生响应请求之前和收到响应数据之后第一时间被调用,其中请求拦截器是先发的请求先拦截,而响应拦截器则是先发的请求后拦截。如下代码涉及axios的多个高级用法:
<script src="https://cdn.jsdelivr.net/npm/axios/dist/axios.min.js"></script>
<button>axios请求(高级用法)</button>
<script>
    const btn = document.querySelector("button");
    btn.onclick = function() {
        // 全局配置baseURL和timeout
        axios.defaults.baseURL = 'http://127.0.0.1:8000';
        axios.defaults.timeout = 3000;
        // 添加请求拦截器
        axios.interceptors.request.use(config =>{
            console.log(config);
            return config;
        },err => {
            console.log(err);
        })
        // 添加响应拦截器
        axios.interceptors.response.use(res=>{
            console.log(res);
            return res;
        },err=>{
            console.log(err);
        })
        // 多个请求并发
        axios.all([
            axios({
                method:"get",        // 请求方式不写则默认为get请求
                //单个axios配置baseURL和timeout
                //baseURL:'http://127.0.0.1:8000',
                //timeout:3000,
                url:"/test",
                params:{        // get请求中,url后面的参数可以分开单独放在params中
                    param1:'axios1',
                    param2:'get',
                    param3:'公众号:愤怒的it男'
                }
            }),
            axios({
                method:"post",
                //单个axios配置baseURL和timeout
                //baseURL:'http://127.0.0.1:8000',
                //timeout:3000,
                url:"/test",
                data:{
                    param1:'axios2',
                    param2:'post',
                    param3:'公众号:愤怒的it男'
                }
            }),
        ]).then(response => {
            console.log(response[0].data);
            console.log(response[1].data);
        });
    }
</script>
输出结果如下:

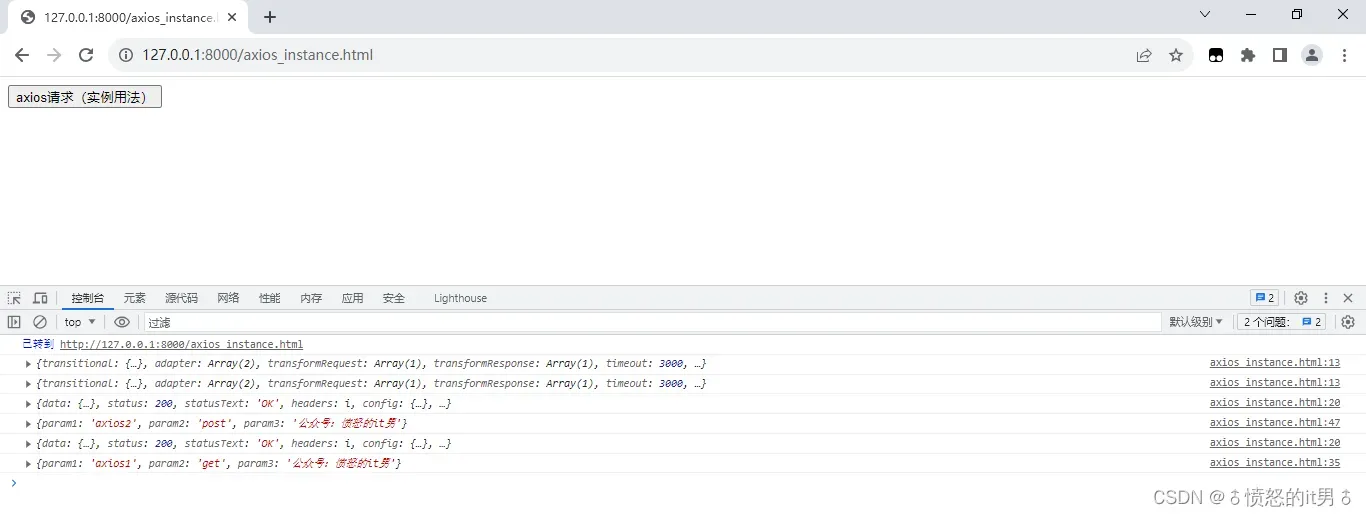
有时候请求不想使用全局的配置或者拦截器,则我们可以创建axios实例,在该axios实例中配置或者添加拦截器,则之后只在该实例内有效。具体示例代码如下:
<script src="https://cdn.jsdelivr.net/npm/axios/dist/axios.min.js"></script>
<button>axios请求(实例用法)</button>
<script>
    const btn = document.querySelector("button");
    btn.onclick = function() {
        // 创建实例并为实例配置
        const instance = axios.create({
            baseURL:'http://127.0.0.1:8000',
            timeout:3000,
        });
        // 为实例添加请求拦截器
        instance.interceptors.request.use(config =>{
            console.log(config);
            return config;
        },err => {
            console.log(err);
        });
        // 为实例添加响应拦截器
        instance.interceptors.response.use(res=>{
            console.log(res);
            return res;
        },err=>{
            console.log(err);
        });
        // 发起get请求
        instance({
            method:"get",
            url:"/test",
            params:{
                param1:'axios1',
                param2:'get',
                param3:'公众号:愤怒的it男'
            }
        }).then(response => {
            console.log(response.data);
        });
        // 发起post请求
        instance({
            method:"post",
            url:"/test",
            data:{
                param1:'axios2',
                param2:'post',
                param3:'公众号:愤怒的it男'
            }
        }).then(response => {
            console.log(response.data);
        });
    }
</script>
输出结果如下:

更多爬虫知识以及实例源码,可关注微信公众号【愤怒的it男】
文章出处登录后可见!
