目录
asserts: 存放一些资源,配置文件,图片
bin: 编译后会生成的一些文件,包括我们关心的apk
lib: 依赖库
res:
drawable:存放app程序要用到的一些图片
layout: 存放局文件的文件夹一般一个activity(安卓页面)对应一个布局
values: 存放一些参数,或者自定义控件的文件
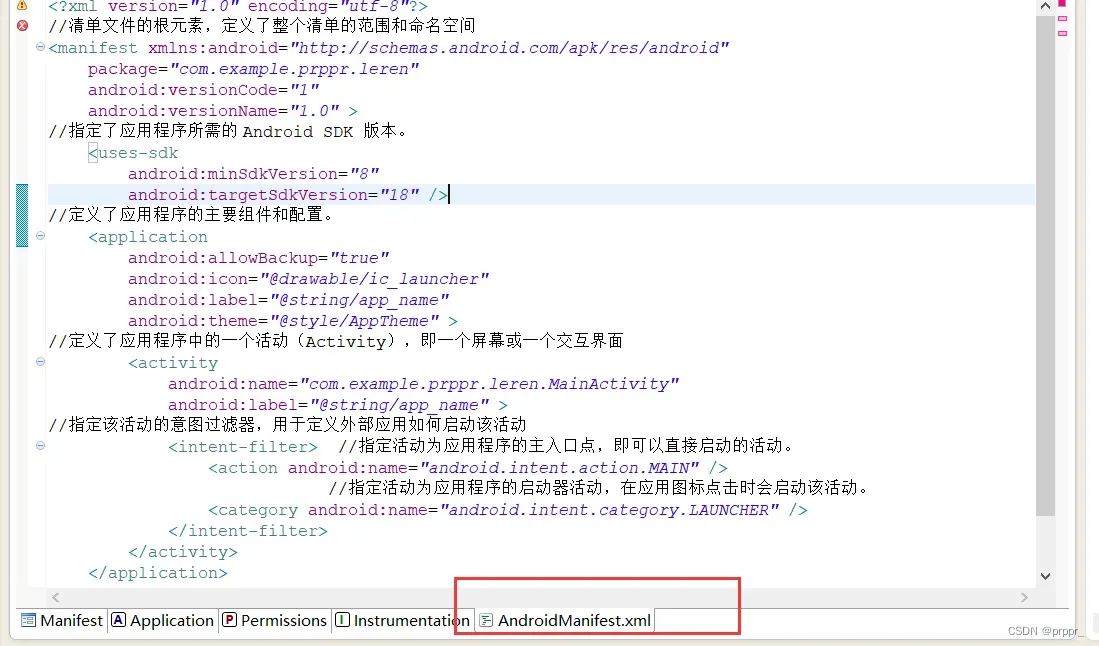
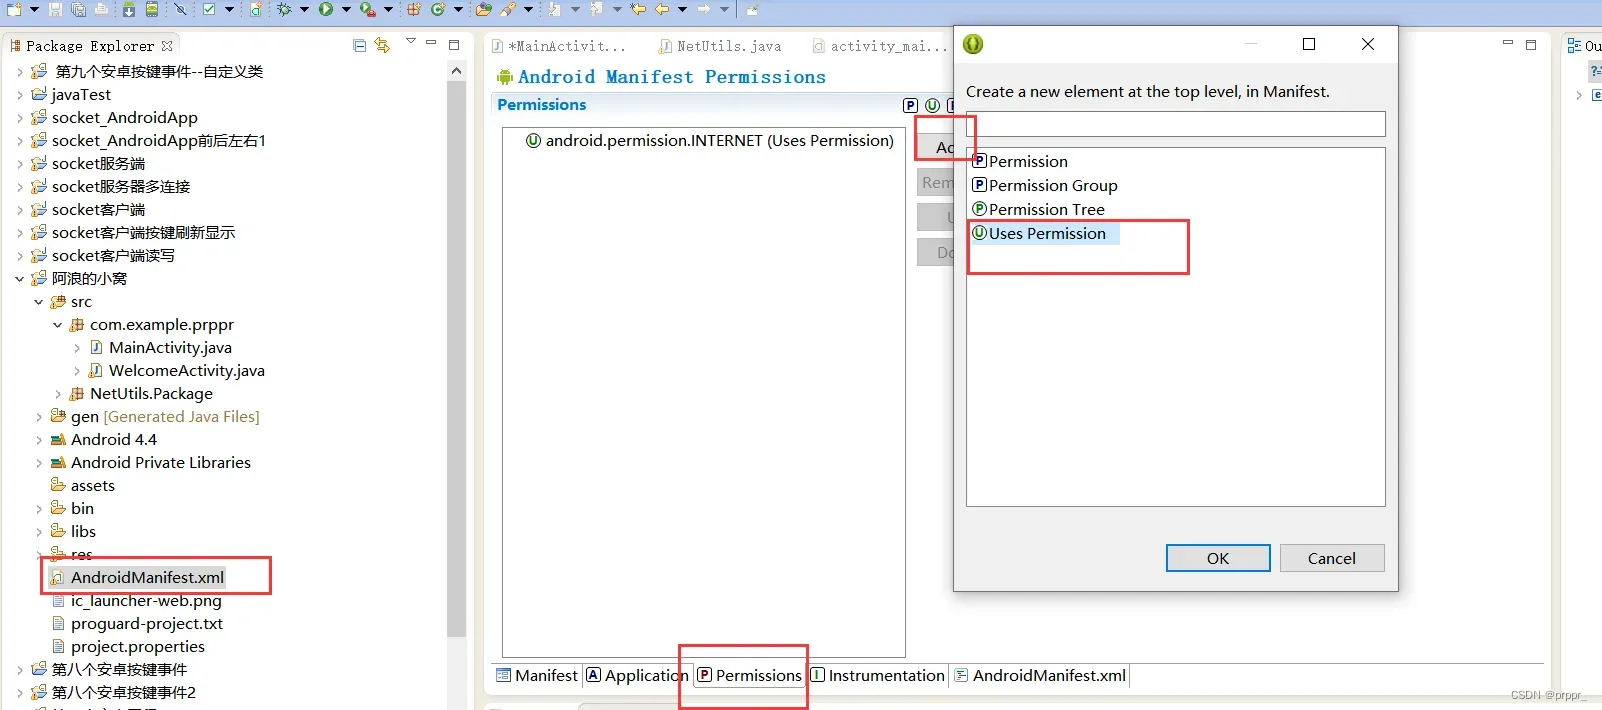
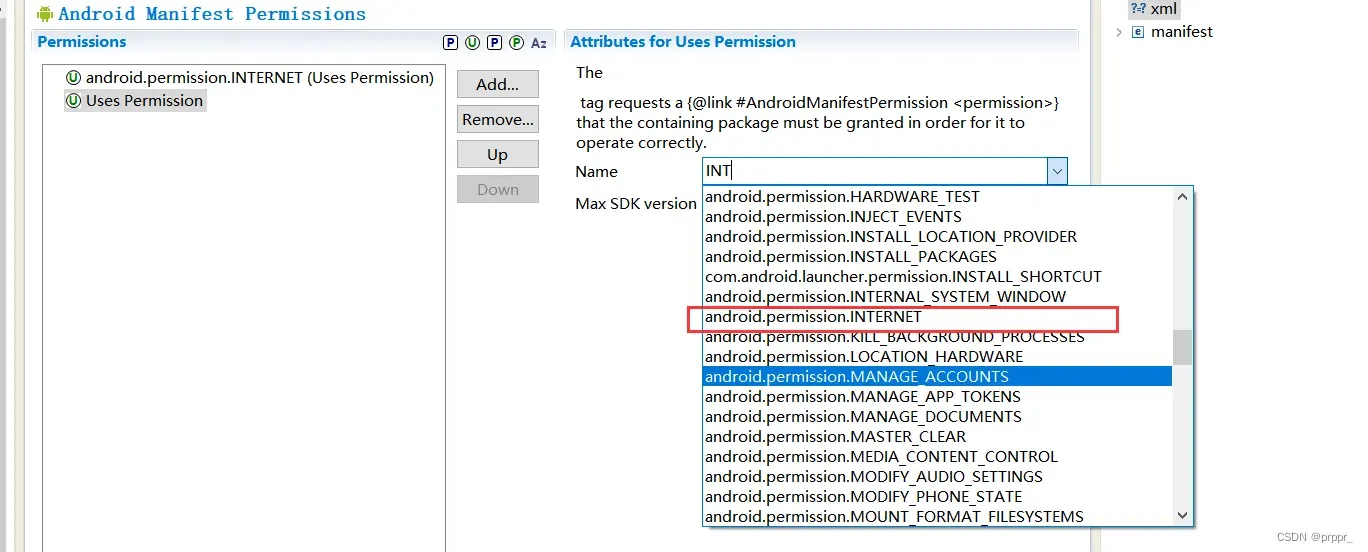
AndroidMainfirst.xml: APP的配置权限:网络访问权限,名片夹访问权限,相机访问权限
目标机器SDK版本:APP的名字APP的图标 配置第一个被加载,启动页面
Laucher->mainifirst(执行数据初始化)->lauch(当app被按下)标签的activity被加载->oncreat被调用->java关联xml布局页面->显示->等待用户触摸等操作
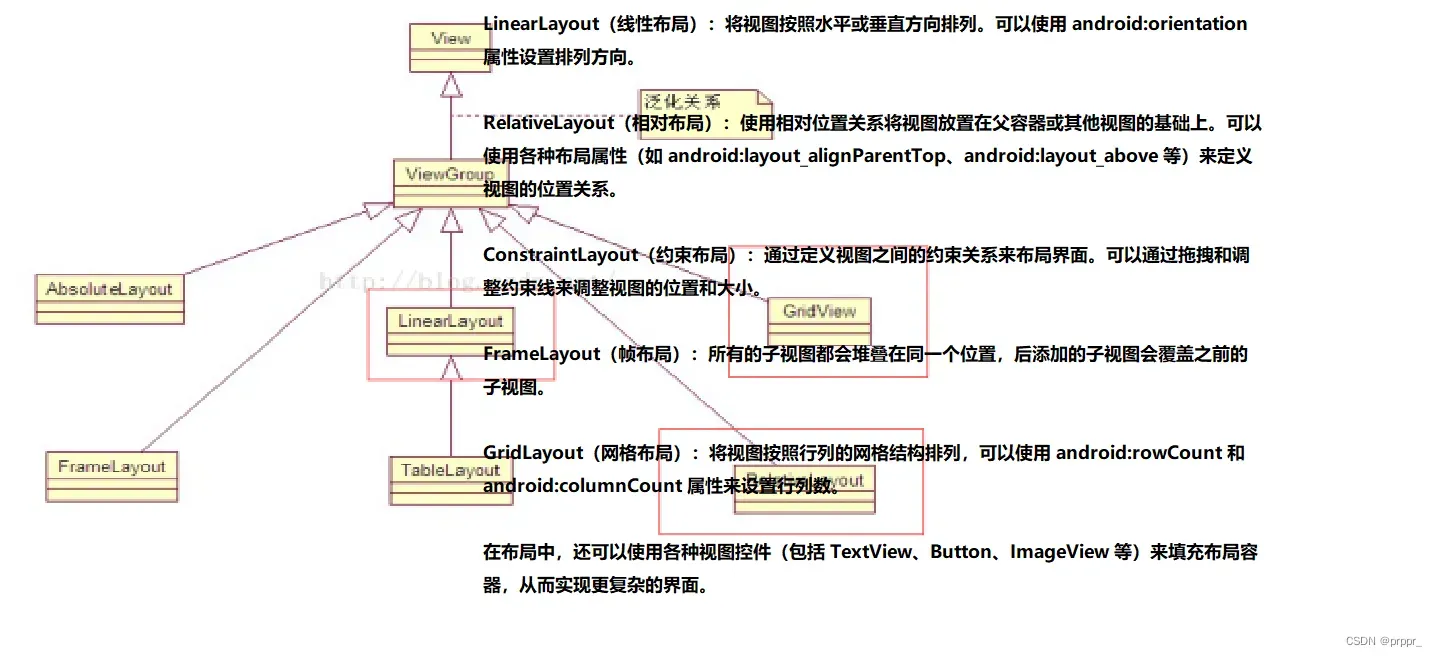
相对布局
除了布局容器,您还可以使用布局属性来控制视图的布局行为,例如:
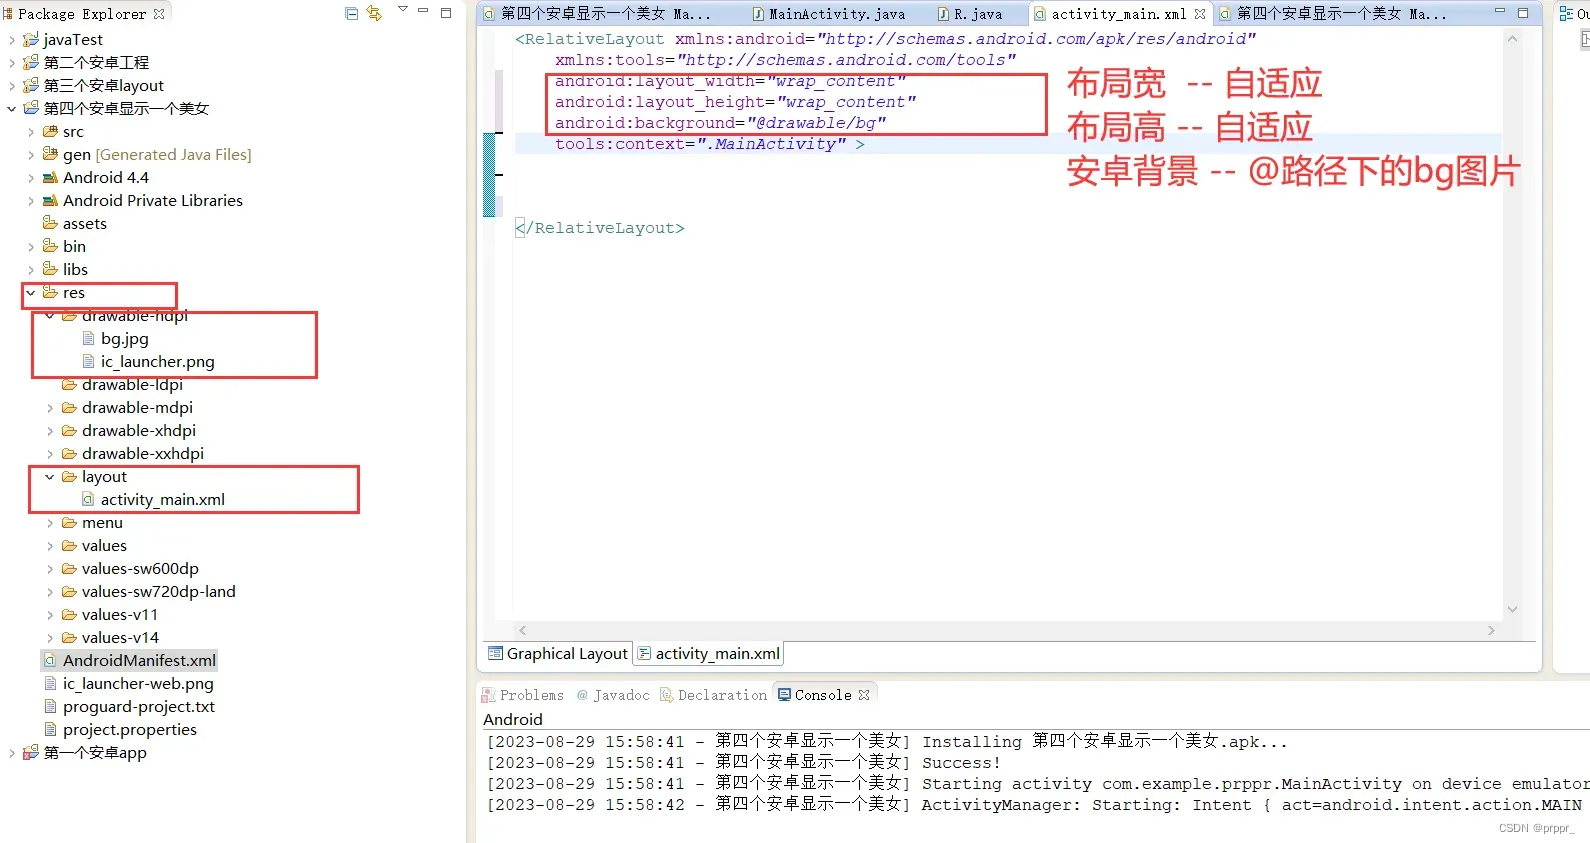
显示一个美女
控件的宽度
android:layout_width=“match_parent”
控件的高度
android:layout_height=“match_parent”
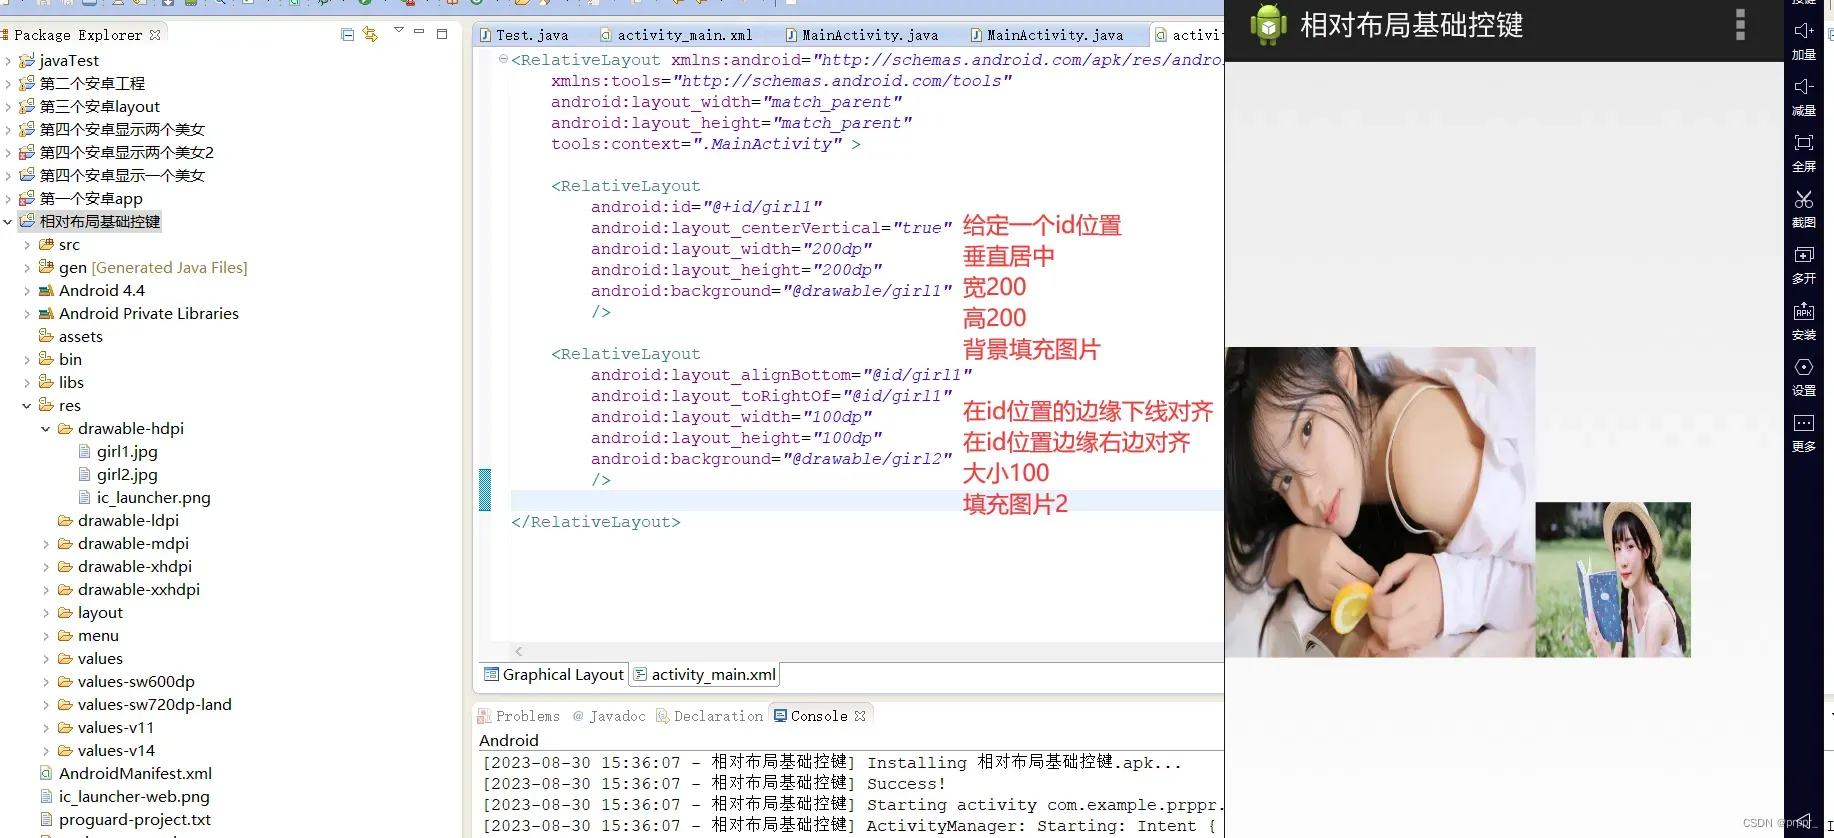
显示两个美女
相对布局 引入安卓的库和工具
<RelativeLayout xmlns:android="http://schemas.android.com/apk/res/android"
    xmlns:tools="http://schemas.android.com/tools"
    android:layout_width="match_parent"    布局宽度 自适应
    android:layout_height="match_parent"   布局高度 自适应
    tools:context=".MainActivity" >        <布局头>

	<RelativeLayout                        布局
	    android:id="@+id/girl"             布局一个位置id
	    android:layout_width="wrap_content"布局宽
	    android:layout_height="300dp"       布局高300分辨率
	    android:background="@drawable/girl" 布局背景为grawable下的girl图片
	    />                                  /关闭布局

	<RelativeLayout
	    android:layout_below = "@id/girl"  在这个布局位置的下面
	    android:layout_width = "wrap_content"
	    android:layout_height="300dp"
	    android:background= "@drawable/girl2"
	    />

</RelativeLayout>   <布局尾>
RelativeLayout中子控件常用属性:
1、相对于父控件,例如:android:layout_alignParentTop=“true”
android:layout_alignParentTop 控件的顶部与父控件的顶部对齐;
android:layout_alignParentBottom 控件的底部与父控件的底部对齐;
android:layout_alignParentLeft 控件的左部与父控件的左部对齐;
android:layout_alignParentRight 控件的右部与父控件的右部对齐;
//给定id位置的四周位置
android:layout_above 控件的底部置于给定ID的控件之上;
android:layout_below 控件的底部置于给定ID的控件之下;
android:layout_toLeftOf 控件的右边缘与给定ID的控件左边缘对齐;
android:layout_toRightOf 控件的左边缘与给定ID的控件右边缘对齐;
//给定id位置的内部上下左右
android:layout_alignBaseline 布局顶部上线对齐
android:layout_alignTop 控件的顶部边缘上线对齐
android:layout_alignBottom 控件的底部边缘下线对齐
android:layout_alignLeft 控件的左边缘与给定ID的左边缘对齐;
android:layout_alignRight 控件的右边缘与给定ID的右边缘对齐;
3、居中,例如:android:layout_centerInParent=“true”
android:layout_centerHorizontal 水平居中;
android:layout_centerVertical 垂直居中;
android:layout_centerInParent 父控件的中央;
<RelativeLayout xmlns:android="http://schemas.android.com/apk/res/android" xmlns:tools="http://schemas.android.com/tools" android:layout_width="match_parent" android:layout_height="match_parent" tools:context=".MainActivity" > <!-- 在中间创建一个页面 --> <RelativeLayout android:layout_width="300dp" android:layout_height="120dp" android:background="#00ff00" android:layout_centerInParent="true" > <!-- 在这个页面中创建字符串 id位置 宽 高 大小 颜色 内容 --> <TextView android:id="@+id/usr1" android:layout_width="wrap_content" android:layout_height="wrap_content" android:textSize="30dp" android:textColor="#ffffff" android:text="用户:" /> <!-- 在这个页面中创建一个文本框 id位置 宽 高 在usr1的右边 --> <EditText android:id="@+id/kuang1" android:layout_width="250dp" android:layout_height="40dp" android:layout_toRightOf="@id/usr1" /> <!-- 在这个页面中创建字符串 id位置 宽 高 大小 颜色 内容 --> <TextView android:id="@+id/passwd" android:layout_width="wrap_content" android:layout_height="wrap_content" android:textSize="30dp" android:textColor="#ffffff" android:text="密码:" android:layout_below="@id/usr1" /> <!-- 在这个页面中创建一个文本框 id位置 宽 高 在usr2的右边 在kuang1的下面 --> <EditText android:id="@+id/kuang2" android:layout_width="250dp" android:layout_height="40dp" android:layout_toRightOf="@id/passwd" android:layout_below="@id/kuang1" /> <!-- 在这个页面中创建按键 id位置 宽 高 大小 在kuang2下面 父控件右边 内容 --> <Button android:id="@+id/anjian1" android:layout_width="wrap_content" android:layout_height="wrap_content" android:layout_below="@id/kuang2" android:layout_alignParentRight="true" android:text="取消" /> <!-- 在这个页面中创建字符串 id位置 宽 高 大小 在kuang2下面 按键1左边 passwd右边内容 --> <Button android:id="@+id/anjian1" android:layout_width="wrap_content" android:layout_height="wrap_content" android:layout_below="@id/kuang2" android:layout_toLeftOf="@id/anjian1" android:layout_toRightOf="@id/passwd" android:text="确认" /> </RelativeLayout></RelativeLayout>
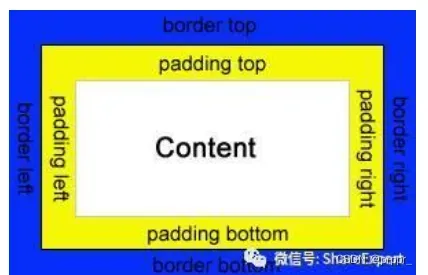
外边距(margin):外边距定义了元素与其周围元素之间的空白区域。
外边距可以设置为正值、负值或百分比。
外边距可以用来控制元素之间的间距、对齐元素、扩展元素的可点击区域等。
外边距不会影响元素的背景颜色或边框。
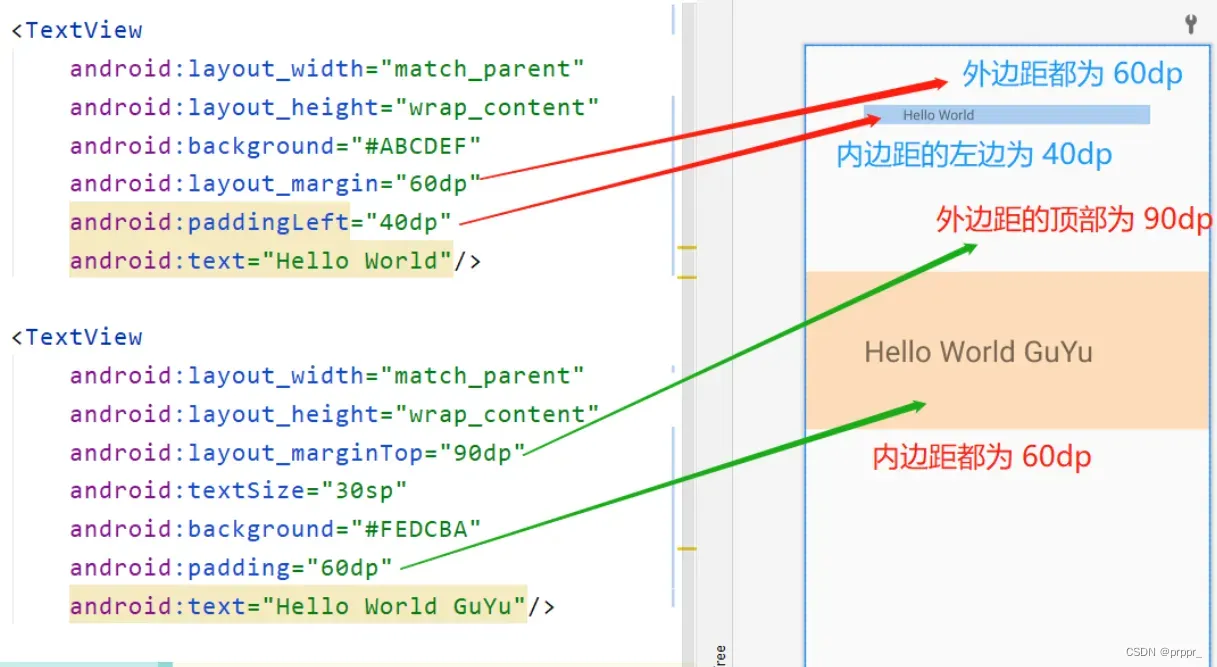
android:layout_margin:本组件离上下左右各组件的外边距。
android:layout_marginStart:本组件离开始的位置的外边距。
android:layout_marginEnd:本组件离结束位置的外边距。
android:layout_marginBottom:本组件离下部组件的外边距。
android:layout_marginTop:本组件离上部组件的外边距。
android:layout_marginLeft:本组件离左部组件的外边距。
android:layout_marginRight:本组件离右部组件的外边距
-
安卓APP启动过程
-
安卓布局控件
android:layout_width和android:layout_height:设置视图的宽度和高度。android:layout_margin:设置视图的外边距。android:layout_padding:设置视图的内边距。android:layout_gravity:设置视图在布局容器中的对齐方式。android:layout_weight:定义视图在线性布局中的权重,用于实现灵活的伸缩布局。- android:background=”#ff0000″ 设置背景颜色 #代表十六进制 ff红色 00 00 红绿蓝三基色
-
常用布局之相对布局
- 相对给定Id控件,例如:android:layout_above=“@id/**”
-
常用布局之相对布局
- 相对给定Id控件,例如:android:layout_above=“@id/**”
-
padding和margin
-
内边距(padding):内边距定义了元素的内容与其边框之间的空白区域。
内边距可以设置为正值、负值或百分比。
内边距可以用来控制元素内容与边框之间的间距、增加元素的可点击区域等。
内边距会影响元素的背景颜色。android:padding:为组件的四边设置相同的内边距。
android:paddingLeft:为组件的左边设置内边距。
android:paddingRight:为组件的右边设置内边距。
android:paddingTop:为组件的上边设置内边距。
android:paddingBottom:为组件的下边设置内边距。
-
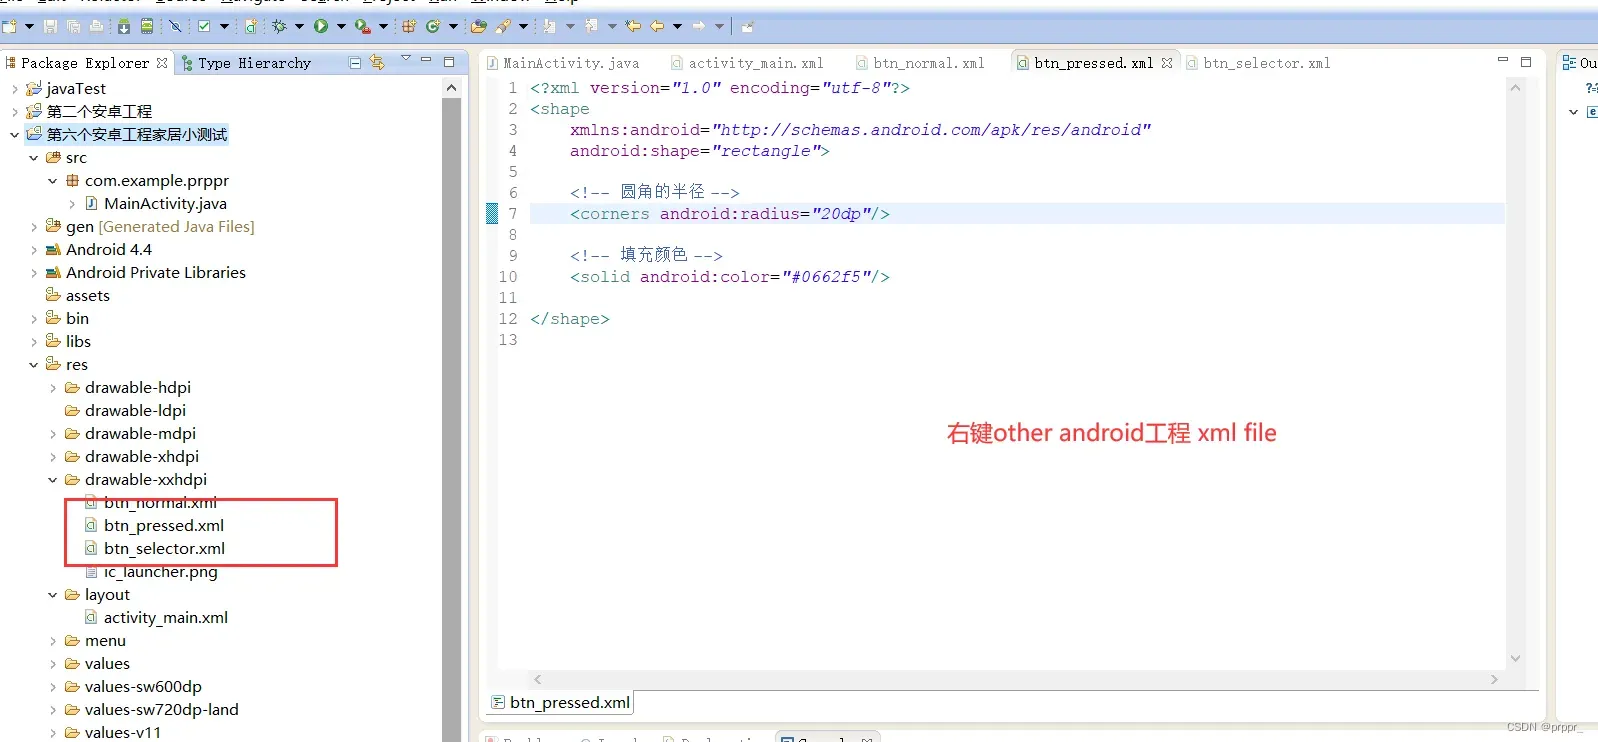
按键美化
参考博文
- https://blog.csdn.net/tracydragonlxy/article/details/88552262
代码块
<RelativeLayout xmlns:android="http://schemas.android.com/apk/res/android"
    xmlns:tools="http://schemas.android.com/tools"
    android:layout_width="match_parent"
    android:layout_height="match_parent"
    android:background="@drawable/bg_shopping_menu"
    tools:context=".MainActivity" >

    <RelativeLayout
        android:id="@+id/relativeLayout1"
        android:layout_width="wrap_content"
        android:layout_height="50dp"
        android:background="#ff99cc" >

        <TextView
            android:id="@+id/smartHome"
            android:layout_width="wrap_content"
            android:layout_height="wrap_content"
            android:layout_marginLeft="15dp"
            android:layout_marginTop="8dp"
            android:textSize="18dp"
            android:text="prppr -- 智能家居页面" />

        <Button
            android:id="@+id/bnt2ZhuCe"
            android:layout_width="wrap_content"
            android:layout_height="wrap_content"
            android:layout_alignParentRight="true"
            android:layout_alignParentTop="true"
            android:text="注册" />

         <Button
            android:layout_width="wrap_content"
            android:layout_height="wrap_content"
            android:layout_toLeftOf="@id/bnt2ZhuCe"
            android:layout_alignParentTop="true"
            android:layout_marginRight="10dp"
            android:text="查询信息" />

    </RelativeLayout>

    <RelativeLayout
        android:id="@+id/minAction"
        android:layout_width="90dp"
        android:layout_height="70dp"
        android:layout_centerHorizontal="true"
        android:layout_centerVertical="true"
        android:background="@drawable/pic_rf" />

    <RelativeLayout
        android:id="@+id/car"
        android:layout_width="60dp"
        android:layout_height="40dp"
        android:layout_alignLeft="@+id/minAction"
        android:layout_centerVertical="true"
        android:layout_marginLeft="60dp"
        android:background="@drawable/card" />

    <Button
        android:id="@+id/bnt1Shuaka"
        android:layout_width="wrap_content"
        android:layout_height="wrap_content"
        android:layout_alignBottom="@id/minAction"
        android:layout_alignParentBottom="true"
        android:layout_centerHorizontal="true"
        android:layout_marginBottom="15dp"
        android:background="@drawable/btn_selector"
        android:text="刷卡" />

</RelativeLayout>-
常用布局之线性布局

常用且易错 api
android:layout_weight=”1” 权重1分配占比 看是水平还是垂直布局相对应width和height为0dp
android:layout_width=”match_parent” 用于指定一个 View 或布局应该与其父容器的大小匹配。 android:layout_width=”wrap_content “ 是使视图的宽度或高度根据内容的实际尺寸来动态调整
android:gravity=”center” 是用于控制视图内部内容的对齐方式。它可以应用于诸如 TextView、Button 等具有文本内容的视图,以确定文本在视图内部的对齐方式。例如,使用 android:gravity="center" 可以使文本在视图中水平和垂直方向上都居中显示。
android:layout_gravity=”” 用于控制视图在其父布局中的对齐方式。它可以影响视图在父布局中水平和垂直方向上的位置。
<RelativeLayout xmlns:android="http://schemas.android.com/apk/res/android"
    xmlns:tools="http://schemas.android.com/tools"
    android:layout_width="match_parent"
    android:layout_height="match_parent"

    android:background="@drawable/bg_shopping_menu"
    tools:context=".MainActivity" >

   		 <!-- 在中间创建线性布局 水平布局 -->
		<LinearLayout
		    android:layout_width="280dp"
		    android:layout_height="100dp"
		    android:layout_centerInParent="true"
		    android:orientation="horizontal"
		    >
		    		<!-- 线性布局 占比例1 垂直方向布局 weight是权重 垂直方向heigh为0dp权重分配 -->
					<LinearLayout
					    android:layout_weight="1"
					    android:layout_width="0dp"
					    android:layout_height="100dp"
					    android:orientation="vertical"
					    >
					    		<!-- 在这个垂直方向上分配三个字符串 match_parent匹配父组件发小wrap_content会自动分配 -->
					    		<TextView
					    		    android:layout_weight="1"
					    		    android:layout_width="match_parent"
					    		    android:layout_height="0dp"
					    		    android:text="用户"
					    		    android:gravity="center"
					    		    />
					    		<!-- gravity组件子元素对齐方式 center中心对齐 -->
					    		<TextView
					    		    android:layout_weight="1"
					    		    android:layout_width="match_parent"
					    		    android:layout_height="0dp"
					    		    android:text="登录"
					    		    android:gravity="center"
					    		    />
					    		<TextView
					    		    android:layout_weight="1"
					    		    android:layout_width="match_parent"
					    		    android:layout_height="0dp"
					    		    android:text="ID"
					    		    android:gravity="center"
					    		    />

					</LinearLayout>
					<!-- 注意相对布局和线性布局要注意关闭 -->


					<LinearLayout
					    android:layout_weight="5"
					    android:layout_width="0dp"
					    android:layout_height="100dp"
					    android:orientation="vertical"
					    >
					    		<EditText
					    		    android:layout_weight="1"
					    		    android:layout_width="match_parent"
					    		    android:layout_height="0dp"
					    		    />
					    		<EditText
					    		    android:layout_weight="1"
					    		    android:layout_width="match_parent"
					    		    android:layout_height="0dp"
					    		    />
					    		<EditText
					    		    android:layout_weight="1"
					    		    android:layout_width="match_parent"
					    		    android:layout_height="0dp"
					    		    />
					</LinearLayout>

		</LinearLayout>

</RelativeLayout>
使用
-
安卓按键响应的几种方式
-
setOnClickListener():是 View 类的一个方法,用于为 View 设置一个 OnClickListener。通过调用这个方法,可以将一个实现了 OnClickListener 接口的对象设置给需要监听点击事件的 View。当用户点击该 View 时,系统会调用 OnClickListener 中的onClick(View v)方法。 -
OnClickListener:是一个接口,用于监听用户点击事件。它包含一个抽象方法
onClick(View v),需要在这个方法中编写点击事件的逻辑。通过实现 OnClickListener 接口,可以自定义点击事件的响应。 -
onClick(View v):是 View.OnClickListener 接口中的抽象方法,用于处理用户点击事件。当用户点击一个 View 时,系统会调用该方法,并将被点击的 View 作为参数传入。开发者需要实现这个方法,以执行自定义的点击事件逻辑 -
直接设置按键的onClick绑定的函数
//activity
<RelativeLayout xmlns:android="http://schemas.android.com/apk/res/android"
    xmlns:tools="http://schemas.android.com/tools"
    android:layout_width="match_parent"
    android:layout_height="match_parent"
    tools:context=".MainActivity" >


	<!-- 以响应用户点击事件 电机button则调用main函数中"buttonBeOnclick" -->
    <Button
        android:id="@+id/button1"
        android:layout_width="wrap_content"
        android:layout_height="wrap_content"
        android:onClick="buttonBeOnclick"
        android:text="按键1" />

    <Button
        android:id="@+id/button2"
        android:layout_width="wrap_content"
        android:layout_height="wrap_content"
        android:layout_alignParentLeft="true"
        android:layout_below="@+id/button1"
        android:layout_marginTop="93dp"
       // 以响应用户点击事件 电机button则调用main函数中"buttonBeOnclick"
        android:onClick="buttonBeOnclick"
        android:text="按键2" />

</RelativeLayout>
//Mainactivity
package com.example.prppr.leren;

import android.os.Bundle;
import android.app.Activity;
import android.view.Menu;
import android.view.View;
import android.widget.Toast;

public class MainActivity extends Activity {

	@Override
	protected void onCreate(Bundle savedInstanceState) {
		super.onCreate(savedInstanceState);
		setContentView(R.layout.activity_main);
	}

	// View 类似于通配符 名字叫v v.getId获取传过来v的id
	public void buttonBeOnclick(View v) {
		switch (v.getId()) {
		// 创建一个短暂的 Toast 弹窗,并显示文本 “按键一被按下
		// v的id是 R中的idR.id.button1 用于引用应用程序中的资源。
		// toast静态方法 this当前对象即 MainActivity 第二个参数是要显示内容,
		// 第三个参数是持续时间,0 表示 Toast.LENGTH_SHORT,即短暂的显示。
		//show() 方法是 Toast 类的方法,用于显示 Toast 弹窗
		case R.id.button1:
			Toast.makeText(this, "按键一被按下", 0).show();
			break;
		case R.id.button2:
			Toast.makeText(this, "按键二被按下", 0).show();
			break;
		}
	}

}

-
自定义类实现按键监听事件的接口
package com.example.prppr;

import android.app.Activity;
import android.os.Bundle;
import android.view.View;
import android.widget.Button;

// 自定义的点击事件处理类,实现了View.OnClickListener接口 继承
class myOnclieckHandler implements View.OnClickListener{

	@Override//方法重写触控事件 有触控这日志输出   没用toast因为toast得调用主函数中
	public void onClick(View v) {
		// TODO Auto-generated method stub
		switch (v.getId()){
    	case R.id.button1:
    		//Toast.makeText(this, "按键一被按下", 0).show(); //没用toast因为toast得调用主函数中
    		System.out.println("按键一被按下");
    		break;
    	case R.id.button2:
    		//Toast.makeText(this, "按键二被按下", 0).show();
    		System.out.println("按键二被按下");
    		break;
    	}
	}

}

public class MainActivity extends Activity {

	//声明两个按键名
	Button bnt1;
	Button bnt2;

    @Override
    protected void onCreate(Bundle savedInstanceState) {
        super.onCreate(savedInstanceState);
        setContentView(R.layout.activity_main);

        // 通过ID在布局中找到按钮1和按钮2
        bnt1 = (Button) findViewById(R.id.button1);
        bnt2 = (Button) findViewById(R.id.button2);

     // new myClickHandler() 来创建了一个 myClickHandler 的实例,并将其作为参数传递给 setOnClickListener
     //setOnClickListener 是 Button 类的一个方法,用于设置按钮的点击事件监听器。
     //它接受一个实现了 View.OnClickListener 接口的对象作为参数,以便在按钮被点击时调用相应的事件处理方法。
        bnt1.setOnClickListener(new myOnclieckHandler());
        bnt2.setOnClickListener(new myOnclieckHandler());
    }


}
-
匿名内部类实现按键响应
//mainjava
package com.example.prppr.leren;
import android.app.Activity;
import android.os.Bundle;
import android.view.View;
import android.widget.Button;
import android.widget.Toast;

public class MainActivity extends Activity {

	Button bnt1;
	Button bnt2;

    @Override
    protected void onCreate(Bundle savedInstanceState) {
        super.onCreate(savedInstanceState);
        setContentView(R.layout.activity_main);

        bnt1 = (Button) findViewById(R.id.button1);
        bnt2 = (Button) findViewById(R.id.button2);

        //调用bnt1得方法 里面有个匿名内部类
        bnt1.setOnClickListener(new View.OnClickListener(){//匿名内部类

			@Override//匿名内部类中重写方法
			public void onClick(View v) {
				// TODO Auto-generated method stub
				Toast.makeText(MainActivity.this, "按键一被按下", 0).show();
			}

        });


        bnt2.setOnClickListener(new View.OnClickListener() {

			@Override
			public void onClick(View v) {
				// TODO Auto-generated method stub
				Toast.makeText(MainActivity.this, "按键二被按下", 0).show();
			}
		});

    }

}
//xml
<RelativeLayout xmlns:android="http://schemas.android.com/apk/res/android"
    xmlns:tools="http://schemas.android.com/tools"
    android:layout_width="match_parent"
    android:layout_height="match_parent"
    android:paddingBottom="@dimen/activity_vertical_margin"
    android:paddingLeft="@dimen/activity_horizontal_margin"
    android:paddingRight="@dimen/activity_horizontal_margin"
    android:paddingTop="@dimen/activity_vertical_margin"
    tools:context=".MainActivity" >

    <Button
        android:id="@+id/button1"
        android:layout_width="wrap_content"
        android:layout_height="wrap_content"
        android:text="按键一"
        />

    <Button
        android:id="@+id/button2"
        android:layout_width="wrap_content"
        android:layout_height="wrap_content"
        android:layout_alignLeft="@+id/button1"
        android:layout_below="@+id/button1"
        android:layout_marginTop="71dp"
        android:text="按键二" />

</RelativeLayout>
-
mainActivity实现了oclick接口
package com.example.prppr.leren;

import android.app.Activity;
import android.os.Bundle;
import android.view.View;
import android.widget.Button;
import android.widget.Toast;
                                           //继承这个接口的方法
public class MainActivity extends Activity implements View.OnClickListener {

	Button bnt1;
	Button bnt2;

	@Override
	// 重写 调用方法
	protected void onCreate(Bundle savedInstanceState) {
		// 调用父类得初始化
		super.onCreate(savedInstanceState);
		setContentView(R.layout.activity_main);
		// 把组件按键初始化显示
		bnt1 = (Button) findViewById(R.id.button1);
		bnt2 = (Button) findViewById(R.id.button2);

		// 实现了 OnClickListener 接口的对象设置给需要监听点击事件的 View。
		// 当用户点击该 View 时,系统会调用 OnClickListener 中的 onClick(View v) 方法。
		bnt1.setOnClickListener(this);//this是MainActivity
		bnt2.setOnClickListener(this);
	}

	@Override
	public void onClick(View v) {
		// TODO Auto-generated method stub
		switch (v.getId()) {
		case R.id.button1:
			Toast.makeText(this, "按键一被按下", 0).show(); // 没用toast因为toast得调用主函数中
			System.out.println("按键一被按下");
			break;
		case R.id.button2:
			Toast.makeText(this, "按键二被按下", 0).show();
			System.out.println("按键二被按下");
			break;
		}
	}

}
页面跳转
如何创建 右键new other 、Android activity 。。。。创建多个页面
如何跳转 Intent 配合onclick
//mainactivity
package com.example.prppr;

import android.app.Activity;
import android.content.Intent;
import android.os.Bundle;
import android.view.View;

public class MainActivity extends Activity {

    @Override
    protected void onCreate(Bundle savedInstanceState) {
        super.onCreate(savedInstanceState);
        setContentView(R.layout.activity_main);

    }
    public void nextPage(View v){//onclick 函数按下按键时执行此函数
    	// 创建一个对象 指定要从那跳转到哪里
    	Intent intent = new Intent(this,TwoActivity.class);
        startActivity(intent);
    }
}
//layout
<RelativeLayout xmlns:android="http://schemas.android.com/apk/res/android"
    xmlns:tools="http://schemas.android.com/tools"
    android:layout_width="match_parent"
    android:layout_height="match_parent"
    tools:context=".MainActivity" >

    <TextView
        android:id="@+id/textView1"
        android:layout_width="wrap_content"
        android:layout_height="wrap_content"
        android:text="这是界面一" />

    <Button
        android:layout_width="wrap_content"
        android:layout_height="wrap_content"
        android:layout_alignParentRight="true"
        android:layout_alignTop="@+id/textView1"
        android:layout_marginRight="16dp"
        android:onClick="nextPage"
        android:text="点击进入界面二" />

</RelativeLayout>
如何传参 方式一 直接putExtra传参数
//传参数可以说字符串 数组 小数 ------发送方
package com.example.prppr;

import android.app.Activity;
import android.content.Intent;
import android.os.Bundle;
import android.view.View;

public class MainActivity extends Activity {

    @Override
    protected void onCreate(Bundle savedInstanceState) {
        super.onCreate(savedInstanceState);
        setContentView(R.layout.activity_main);
    }

    public void nextPage(View v){
    	    Intent intent = new Intent(this,TwoActivity.class);
    	    intent.putExtra("key_data", "杨浪很帅");//键值对 传参数
    	    startActivity(intent);
    }
}
//页面二收 打印
package com.example.prppr;

import android.app.Activity;
import android.content.Intent;
import android.os.Bundle;
import android.view.View;
import android.widget.Toast;

public class TwoActivity extends Activity {

	public String data1;

	@Override
	protected void onCreate(Bundle savedInstanceState) {
		super.onCreate(savedInstanceState);
		setContentView(R.layout.activity_two);

		Intent itwo = getIntent();//获取 Intent 对象 实例化
		data1 = itwo.getStringExtra("key_data");//根据键值对 赋值内容 注意类型
		Toast.makeText(this, "收到数据:"+data1, 0).show();//显示并打印出来
	}

    public void nextPage(View v){
	    Intent intent = new Intent(this,ThreeActivity.class);
	    intent.putExtra("key_data","good lucky!!");//传给页面三

	    startActivity(intent);
}


}
如何传参 方式二 通过Bundle搭配putExtras
//页面二传到页面三
package com.example.prppr;

import android.app.Activity;
import android.content.Intent;
import android.os.Binder;
import android.os.Bundle;
import android.view.View;
import android.widget.Toast;

public class TwoActivity extends Activity {

	public String data1;

	@Override
	protected void onCreate(Bundle savedInstanceState) {
		super.onCreate(savedInstanceState);
		setContentView(R.layout.activity_two);


		//页面1到二时 获取Intent 根据键值对 输出内容显示在屏幕上
		Intent itwo = getIntent();//获取 Intent 对象 实例化
		data1 = itwo.getStringExtra("key_data");//根据键值对 赋值内容 注意类型
		Toast.makeText(this, "收到数据:"+data1, 0).show();//显示并打印出来
	}


    public void nextPage(View v){
    	//在页面二按下按键时 配置好bundle内容 和跳转页面 传过去在页面三中接收显示
    	Intent intent = new Intent(this,ThreeActivity.class);//实例化
    	Bundle bunble = new Bundle();

    	bunble.putString("MyData", "杨浪咯咯咯咯咯");//填充内容
    	bunble.putInt("ID", 100);

    	intent.putExtras(bunble);//放进去

    	startActivity(intent);//开始

    }
}
//页面三接收
package com.example.prppr;

import java.io.ObjectOutputStream.PutField;

import android.app.Activity;
import android.content.Intent;
import android.os.Bundle;
import android.widget.Toast;

public class ThreeActivity extends Activity {

	@Override
	protected void onCreate(Bundle savedInstanceState) {
		super.onCreate(savedInstanceState);
		setContentView(R.layout.activity_three);

		Intent intent = this.getIntent ();
		Bundle bundle = intent.getExtras();

		String datas = bundle.getString("MyData");
		int    datai = bundle.getInt("ID");

		Toast.makeText(this, "获取到:"+datas +datai, 0).show();
	}
}
-
安卓线程
实现页面的诺干秒后的自动跳转效果
run方法(函数)是线程要做的”事情”,相当linuxC线程的回调函数
启动线程
//界面一线程延时三秒后自动跳转
//必须新建线程 否则会跟ui界面的线程冲突 并且使用try和catch
package com.example.prppr;

import android.app.Activity;
import android.content.Intent;
import android.os.Bundle;

public class MainActivity extends Activity {

    @Override
    protected void onCreate(Bundle savedInstanceState) {
        super.onCreate(savedInstanceState);
        setContentView(R.layout.activity_main);

        Thread t = new Thread(new Runnable() { //实例化线程和线程中的匿名类对象 并重写执行run方法

			@Override
			public void run() {	//重写并执行方法
				// TODO Auto-generated method stub
				try {
					Thread.sleep(3000);//可能异常所以try catch
					Intent intent = new Intent(MainActivity.this,TwoActivity.class);
					intent.putExtra("key_data","浪滚滚");
					startActivity(intent);

				} catch (InterruptedException e) {
					// TODO Auto-generated catch block
					e.printStackTrace();
				}
			}
		});
        t.start();


    }

//    public void nextPage(View v){
//    	    Intent intent = new Intent(this,TwoActivity.class);
//    	    intent.putExtra("key_data", "杨浪很帅");//键值对 传参数
//    	    startActivity(intent);
//    }
}
-
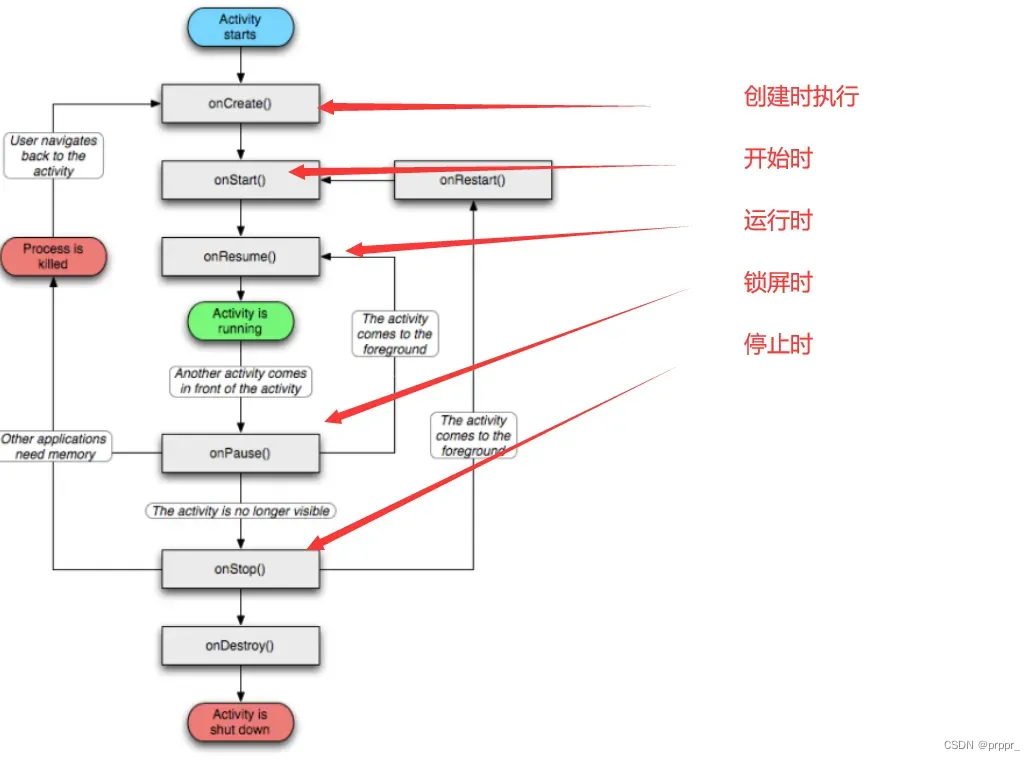
Activity(页面)的生命周期 面试常考点
package com.example.prppr;

import android.app.Activity;
import android.content.Intent;
import android.os.Bundle;
import android.widget.Toast;

public class MainActivity extends Activity {


    @Override
    protected void onCreate(Bundle savedInstanceState) {
        super.onCreate(savedInstanceState);
        setContentView(R.layout.activity_main);

        System.out.println("onCreat!!");

        Thread t = new Thread(new Runnable() { //实例化线程和线程中的匿名类对象 并重写执行run方法
			@Override
			public void run() {	//重写并执行方法
				// TODO Auto-generated method stub
				try {
					Thread.sleep(3000);//可能异常所以try catch
					Intent intent = new Intent(MainActivity.this,TwoActivity.class);
					intent.putExtra("key_data","浪滚滚");
					startActivity(intent);

				} catch (InterruptedException e) {
					// TODO Auto-generated catch block
					e.printStackTrace();
				}
			}
		});
        t.start();
    }

    @Override
    protected void onStart() {//开始时打印日志
    	// TODO Auto-generated method stub
    	System.out.println("onStart");
		Toast.makeText(this, "onStart", 0).show();//显示并打印出来
    	super.onStart();
    }

    @Override
    protected void onResume() {//运行时打印日志
    	// TODO Auto-generated method stub
    	System.out.println("onResume");
		Toast.makeText(this, "onResume", 0).show();//显示并打印出来
    	super.onResume();
    }

    @Override
    protected void onPause() {//锁住时打印
    	// TODO Auto-generated method stub
    	System.out.println("onPause");
		Toast.makeText(this, "onPause", 0).show();//显示并打印出来
    	super.onPause();
    }

    @Override
    protected void onStop() {
    	// TODO Auto-generated method stub
    	System.out.println("onStop");
		Toast.makeText(this, "onStop", 0).show();//显示并打印出来
    	super.onStop();
    }
}
-
安卓网络编程
javaSocket服务端开发
//单个单次socket连接
import java.io.IOException;
import java.io.InputStream;
import java.io.ObjectInputStream.GetField;
import java.io.StringReader;
import java.net.ServerSocket;
import java.net.Socket;
import java.nio.ByteBuffer;

public class Server {
		public static void main(String[] args) {
			byte[] data = new byte[128];
			int len;

			try {
				//创建socket套接字和端口号
				ServerSocket server = new ServerSocket(8888);
				System.out.println("socket创建成功");

				//根据socket创建连接套接字
				Socket c_fd = server.accept();
				System.out.println("accept连接成功");

				//根据连接获取数据流 并创建数据套接字
				InputStream msg = c_fd.getInputStream();

				//根据数据流读取内容大豆data数组中 len长度
				len  = msg.read(data);

				//打印数据		//字节数组 data 转换为字符串的方式之一。String格式 哪里开始 长度
				System.out.println("获取到内容:" + new String(data, 0, len));

			} catch (IOException e) {
				e.printStackTrace();
			}
		}

}
多连接
import java.io.IOException;
import java.io.InputStream;
import java.net.ServerSocket;
import java.net.Socket;

public class Server {
		public static void main(String[] args) {
			try {
				//  1   创建socket套接字和端口号
				ServerSocket server = new ServerSocket(8888);
				System.out.println("socket创建成功");

				while(true){ //  2 不断阻塞连接

					//根据socket创建连接套接字
					final Socket c_fd = server.accept();
					System.out.println("accept连接成功");

					new Thread(new Runnable() {  //  3 连接上一个就新建一个线程对接读取数据
												 // 实例化线程 钩爪方法 中重写方法并执行 防止异常错误try
						public void run() {

							try {
								byte[] data = new byte[128];
								int len;

								//根据连接获取数据流 并创建数据套接字
								InputStream msg;
								msg = c_fd.getInputStream();
								//根据数据流读取内容大豆data数组中 len长度
								len  = msg.read(data);

								//打印数据		//字节数组 data 转换为字符串的方式之一。String格式 哪里开始 长度
								System.out.println("获取到内容:" + new String(data, 0, len));
							} catch (IOException e) {
								// TODO Auto-generated catch block
								e.printStackTrace();
							}


						}
					}).start();

				}

			} catch (IOException e) {
				e.printStackTrace();
			}
		}

}
JavaSocket 客户端开发:
import java.io.IOException;
import java.io.OutputStream;
import java.net.Socket;
import java.net.UnknownHostException;
import java.util.Scanner;


public class Client {
		public static void main(String[] args) {
			try {
				//实例化客户端连接
				Socket client = new Socket("172.16.107.146",8889);
				//连接上 捕获输出流 返回套接字c_fd
				OutputStream c_fd = client.getOutputStream();

				//捕获按键输入 存放到msg中
				Scanner sc = new Scanner(System.in);
				String msg = sc.next();

				//通过输出流方法 以beyes类型发送
				c_fd.write(msg.getBytes());

			}catch (IOException e) {
				// TODO Auto-generated catch block
				e.printStackTrace();
			}

		}
}
//客户端实现收和发
import java.io.IOException;
import java.io.InputStream;
import java.io.OutputStream;
import java.net.Socket;
import java.util.Scanner;


public class Client {
		public static void main(String[] args) {
			try {
				//实例化客户端连接
				Socket client = new Socket("172.16.106.130",8883);
				//连接上 捕获输出流 返回套接字c_fd
				OutputStream out = client.getOutputStream();

				//捕获按键输入 存放到msg中
				Scanner sc = new Scanner(System.in);
				String msg = sc.next();

				//通过输出流方法 以beyes类型发送
				out.write(msg.getBytes());


				int len;
				byte[] datas = new byte[128];
				//客户端捕获输入流
				InputStream in = client.getInputStream();
				//读取输入流存放到datas里
				len = in.read(datas);
				System.out.println("客户端获取到数据:"+new String(datas,0,len));


			}catch (IOException e) {
				// TODO Auto-generated catch block
				e.printStackTrace();
			}

		}
}
安卓app中创建客户端连接java服务器
模拟器—-安卓ip和 服务器端必须是在同一个网段 可通过驱动桥接模式
//java服务器端 while不断等待连接 创建线程对接处理数据
import java.io.IOException;
import java.io.InputStream;
import java.net.ServerSocket;
import java.net.Socket;

public class Server {
		public static void main(String[] args) {
			try {
				//  1   创建socket套接字和端口号
				ServerSocket server = new ServerSocket(8999);
				System.out.println("socket创建成功");

				while(true){ //  2 不断阻塞连接

					//根据socket创建连接套接字
					final Socket c_fd = server.accept();
					System.out.println("accept连接成功");

					new Thread(new Runnable() {  //  3 连接上一个就新建一个线程对接读取数据
												 // 实例化线程 钩爪方法 中重写方法并执行 防止异常错误try
						public void run() {

							try {
								byte[] data = new byte[128];
								int len;

								//根据连接获取数据流 并创建数据套接字
								InputStream msg;
								msg = c_fd.getInputStream();
								//根据数据流读取内容大豆data数组中 len长度
								len  = msg.read(data);

								//打印数据		//字节数组 data 转换为字符串的方式之一。String格式 哪里开始 长度
								System.out.println("获取到内容:" + new String(data, 0, len));
							} catch (IOException e) {
								// TODO Auto-generated catch block
								e.printStackTrace();
							}


						}
					}).start();

				}

			} catch (IOException e) {
				e.printStackTrace();
			}
		}

}
//安卓app客户端
package com.example.socket_androidapp;

import java.io.IOException;
import java.io.OutputStream;
import java.net.Socket;
import java.util.Scanner;

import android.app.Activity;
import android.os.Bundle;
import android.view.View;
import android.widget.Toast;

public class MainActivity extends Activity {

    @Override
    protected void onCreate(Bundle savedInstanceState) {
        super.onCreate(savedInstanceState);
        setContentView(R.layout.activity_main);
    }

	public void sendMessageHandler(){

		try {
			//实例化客户端连接
			Socket client = new Socket("172.20.10.4",8999);//主义ip地址!!!本地ip地址
			//连接上 捕获输出流 返回套接字c_fd
			OutputStream c_fd = client.getOutputStream();

			String msg = "message form Client";

			//通过输出流方法 以beyes类型发送
			c_fd.write(msg.getBytes());

		}catch (IOException e) {
			// TODO Auto-generated catch block
			e.printStackTrace();
		}
    }

    public void sendMessage(View v){
		Toast.makeText(MainActivity.this, "按键按下", 0).show();
    	new Thread(new Runnable() {

			public void run() {
				sendMessageHandler();
			}
		}).start();
    }

}
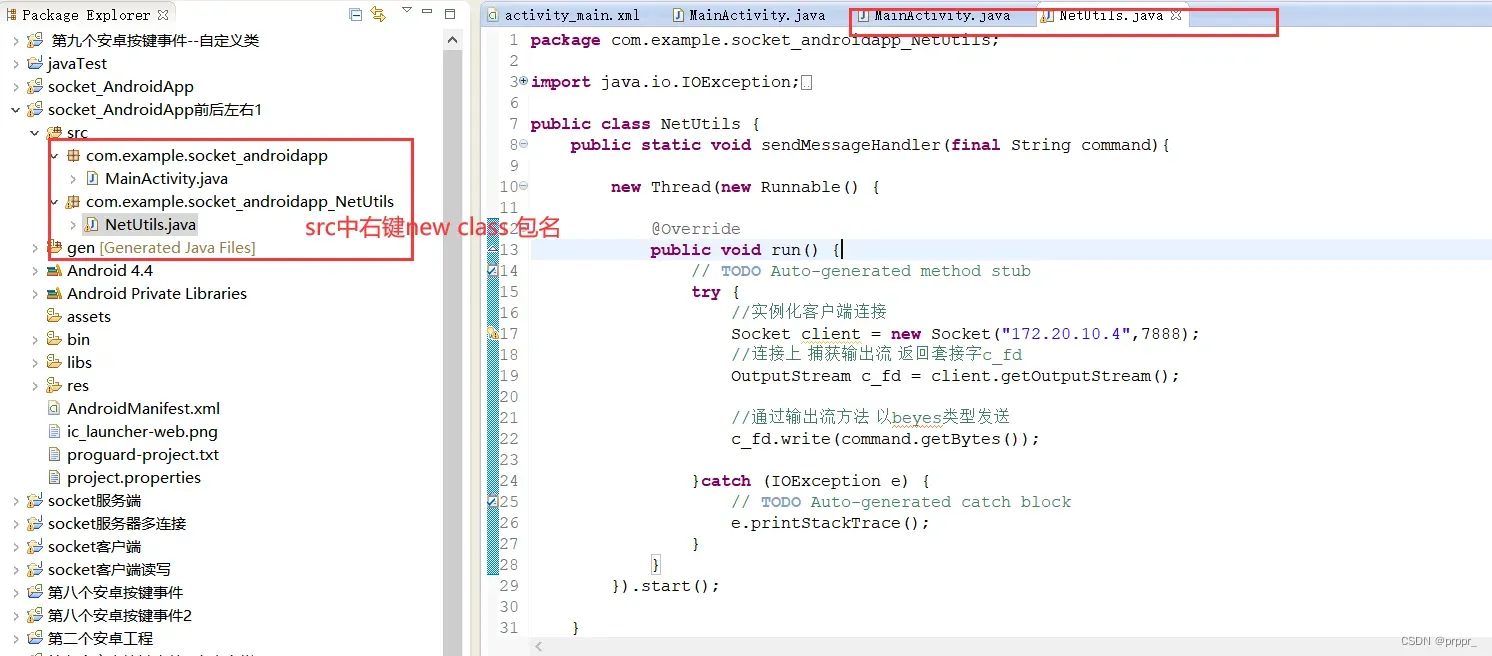
客户端不同连接服务器–方向
//把sendMessageHandler封装在NetUtils这个包中 函数要Static

package com.example.socket_androidapp;

import android.app.Activity;
import android.os.Bundle;
import android.view.View;
import com.example.socket_androidapp_NetUtils.NetUtils;//导入连接网络 创建线程对接的包

public class MainActivity extends Activity {

    protected void onCreate(Bundle savedInstanceState) {
	        super.onCreate(savedInstanceState);
	        setContentView(R.layout.activity_main);
    }

    public void sendMessage(View v){
			switch(v.getId()){
					//解析是哪个按键按下   调用这个包中的类并传递参数过去
			    	case R.id.goForword:NetUtils.sendMessageHandler("goForword");break;
			    	case R.id.goBack:NetUtils.sendMessageHandler("goBack");break;
			    	case R.id.goLeft:NetUtils.sendMessageHandler("goLeft");break;
			    	case R.id.goRight:NetUtils.sendMessageHandler("goRight");break;
	    	}
    }

}
//网络连接部分   封装包class
package com.example.socket_androidapp_NetUtils;

import java.io.IOException;
import java.io.OutputStream;
import java.net.Socket;

public class NetUtils {
	public static void sendMessageHandler(final String command){

		new Thread(new Runnable() {

			@Override
			public void run() {
				// TODO Auto-generated method stub
				try {
					//实例化客户端连接
					Socket client = new Socket("172.20.10.4",7888);
					//连接上 捕获输出流 返回套接字c_fd
					OutputStream c_fd = client.getOutputStream();

					//通过输出流方法 以beyes类型发送
					c_fd.write(command.getBytes());

				}catch (IOException e) {
					// TODO Auto-generated catch block
					e.printStackTrace();
				}
			}
		}).start();

    }
}
不能通过除UI外的线程去改变UI的控件 public TextView textview;
//不能通过除UI线程外的线程去控制UI控件

package com.example.prppr;

import android.app.Activity;
import android.os.Bundle;
import android.view.View;
import android.widget.TextView;

public class MainActivity extends Activity {

	public TextView textview;//  1  初始化创建

    @Override
    protected void onCreate(Bundle savedInstanceState) {
        super.onCreate(savedInstanceState);
        setContentView(R.layout.activity_main);
        textview = (TextView) findViewById(R.id.show1);  // 2 找到这个控建id

    }

    public void testFunc(View v){//必须加View 否则会程序异常退出 因为按键无法绑定

    	new Thread(new Runnable() { //  3  创建线程

			@Override
			public void run() {
				// TODO Auto-generated method stub
		    	for (int i = 0; i < 10; i++) {
		        	textview.setText("hello ,world!!---"+i);
		        	try {
		    			Thread.sleep(1000);
		    		} catch (InterruptedException e) {
		    			// TODO Auto-generated catch block
		    			e.printStackTrace();
		    		}
				}
			}
		}).start();

    }


}
倒计时 Handler 、TextView、Message、 handler.sendMessage(msg);
package com.example.prppr;

import android.os.Bundle;
import android.os.Handler;
import android.os.Message;
import android.app.Activity;
import android.view.Menu;
import android.view.View;
import android.widget.TextView;

public class MainActivity extends Activity {

	public TextView textView;//接收TextView组件id
	public Handler handler;	 //handler函数实例化等待信息 handlerMessage 等待电话 收到电话则处理

    @Override
    protected void onCreate(Bundle savedInstanceState) {
        super.onCreate(savedInstanceState);
        setContentView(R.layout.activity_main);
        textView = (TextView) findViewById(R.id.TextView1);//强转类型

        handler = new Handler(){//得选带括号的
        		@Override
        		public void handleMessage(Message msg) {
        			// TODO Auto-generated method stub
        			super.handleMessage(msg);
		        	textView.setText(""+msg.what + "s");
        		}
        };
    }

    public void funcHandler(View v){//没用view的话会异常

    	new Thread(new Runnable() { //创建线程 在线程中 循环打印 并延时

			@Override
			public void run() {
				// TODO Auto-generated method stub
				for (int i = 10; i >= 0; i--) {
					Message msg = new Message(); //实例化Message 用来存放东西
					msg.what = i;
					handler.sendMessage(msg); 		//通过handler的发送函数把message发送出去

		        	try {
						Thread.sleep(1000);
					} catch (InterruptedException e) {
						// TODO Auto-generated catch block
						e.printStackTrace();
					}
				}
			}
		}).start();
    }
}

socket客户端和按键显示输入输出流
//xml
<RelativeLayout xmlns:android="http://schemas.android.com/apk/res/android"
    xmlns:tools="http://schemas.android.com/tools"
    android:layout_width="match_parent"
    android:layout_height="match_parent"
	android:background="#000000"
    tools:context=".MainActivity" >

    <Button
        android:id="@+id/bnt1"
        android:layout_width="match_parent"
        android:layout_height="wrap_content"
        android:onClick="changeDatas"
        android:text="按键"
        />

    <TextView
        android:id="@+id/TextView"
        android:layout_width="wrap_content"
        android:layout_height="wrap_content"
        android:layout_centerInParent="true"
        android:textSize="35dp"
        android:textColor="#ffffff"
        android:text="@string/hello_world" />

</RelativeLayout>
//main
package com.example.socket.prppr;

import NetUtils.NetUtils;
import android.app.Activity;
import android.os.Bundle;
import android.os.Handler;
import android.os.Message;
import android.view.View;
import android.widget.TextView;

public class MainActivity extends Activity {

	public TextView textView;
	public Handler  handler;

    @Override
    protected void onCreate(Bundle savedInstanceState) {
        super.onCreate(savedInstanceState);
        setContentView(R.layout.activity_main);

        textView = (TextView) findViewById(R.id.TextView);

        //获取到数据输入流时调用 handler.sendMessage(msg);会执行handlermessage
        handler = new Handler(){
        		@Override
        		public void handleMessage(Message msg) {
        			// TODO Auto-generated method stub
        			super.handleMessage(msg);
        			//获取到msg 把msg中bundler赋值给bundle bundle中的字符串赋值给String 通过setText显示在主屏幕中
	    			Bundle bundle = msg.getData();
	    			String string = bundle.getString("msg");
	    			textView.setText(string);
        		}
        };
    }

    //按键按下 把参数传过去 并连接socket网络获取数据输出流  用handler和message来处理数据输入流
    public void changeDatas(View v){
    	switch(v.getId()){
    			case R.id.bnt1:
	    			NetUtils.sendMessageHandler("goForwd",handler);
	    			break;
    	}
    }

}
//net网络连接 数据处理细节
package NetUtils;

import java.io.IOException;
import java.io.InputStream;
import java.io.OutputStream;
import java.net.Socket;

import android.os.Bundle;
import android.os.Handler;
import android.os.Message;

public class NetUtils {
    public static void sendMessageHandler(final String command,final Handler handler){
    	new Thread(new Runnable() {

			public void run() {
				// TODO Auto-generated method stub
				try {		//连接网络
					Socket client = new Socket("172.20.10.4",8999);
							//数据输出流
					OutputStream outMessage = client.getOutputStream();
					outMessage.write(command.getBytes());

							//数据输入流 利用bundle存放输入流数据 用message和handle把数据发送到handler
					InputStream inMessage = client.getInputStream();
					int len;
					byte[] rcvDatas = new byte[128];
					len = inMessage.read(rcvDatas);
					//获取输入流数据 转换成字符串
					String string = new String(rcvDatas,0,len);
					//实例化message 用来存放bundle
					Message msg = new Message();
					//实例化bundle
					Bundle b = new Bundle();
					//bundle中绑定字符串 键值为msg 内容为string
					b.putString("msg", string);
					//把bundler的内容放到msg中
					msg.setData(b);
					//发送msg到handler.message
					handler.sendMessage(msg);


				} catch (IOException e) {
					e.printStackTrace();
				}
			}
		}).start();

    }
}

网页创建 注意权限问题
参考博文 Android WebView 的使用(超详细用法)_webview实现_wt-cai的博客-CSDN博客
//main
package com.example.prppr;

import android.app.Activity;
import android.os.Bundle;
import android.view.KeyEvent;
import android.webkit.WebView;
import android.webkit.WebViewClient;
import android.widget.EditText;
import android.widget.TextView;

public class MainActivity extends Activity {

    protected void onCreate(Bundle savedInstanceState) {
        super.onCreate(savedInstanceState);
        setContentView(R.layout.activity_main);

        final WebView  we = (WebView) findViewById(R.id.we);
        final EditText ed = (EditText) findViewById(R.id.ed);
        //WebViewClient 用于处理 WebView 中发生的各种事件,例如页面加载和链接点击等
        //创建一个新的 WebViewClient 对象并将其传递给 setWebViewClient()
        //方法来将其设置为 WebView 的 WebViewClient
        we.setWebViewClient(new WebViewClient());

        //通过实现 OnEditorActionListener 接口的匿名类来实现监听器
        //并在 onEditorAction() 方法内获取 EditText 中的文本内容,并将其作为 URL 加载到 WebView 中
        //监听器返回的布尔值表示该事件是否已被处理。这里判断按下的按键是否是回车键,并返回相应结果
        ed.setOnEditorActionListener(new TextView.OnEditorActionListener() {

			@Override
			public boolean onEditorAction(TextView arg0, int arg1, KeyEvent event) {
				// TODO Auto-generated method stub
				String string = ed.getText().toString();//把回车的内容转换成字符串赋值给string
		        we.loadUrl(string);//然后进入这个网页

				return (event.getKeyCode() == KeyEvent.KEYCODE_ENTER);
			}
		});
    }
}
//xml
<RelativeLayout xmlns:android="http://schemas.android.com/apk/res/android"
    xmlns:tools="http://schemas.android.com/tools"
    android:layout_width="match_parent"
    android:layout_height="match_parent"
    tools:context=".MainActivity" >

    <LinearLayout
        android:id="@+id/li1"
        android:layout_width="match_parent"
        android:layout_height="wrap_content"
        >
            <EditText
            android:id="@+id/ed"
            android:layout_width="match_parent"
            android:layout_height="match_parent"
            android:hint="请输入网址"
            />

    </LinearLayout>

    <WebView
        android:layout_below="@id/li1"
        android:id="@+id/we"
        android:layout_width="match_parent"
        android:layout_height="match_parent"
        android:layout_alignParentLeft="true"
        android:layout_marginLeft="24dp" />

</RelativeLayout>
智能家居页面
注意权限问题 、调整主页面和欢迎页面的顺序
//欢迎页面 main
package com.example.prppr;

import android.app.Activity;
import android.content.Intent;
import android.os.Bundle;
import android.os.Handler;
import android.os.Message;
import android.widget.TextView;

public class WelcomeActivity extends Activity {

	//声明一个文字 和一个handler处理函数
	public TextView textView;
	public Handler handler;

	@Override
	protected void onCreate(Bundle savedInstanceState) {
		super.onCreate(savedInstanceState);
		setContentView(R.layout.activity_welcome);

		//文字找到 文字对应id
		textView = (TextView) findViewById(R.id.textView1);

		//当线程中handler.sendMessage时会调用handlerMessage处理函数 在里面打印文字 防止和ui界面冲突
		handler  = new Handler(){
			@Override
			public void handleMessage(Message msg) {
				super.handleMessage(msg);
				textView.setText(msg.what + "s");
			}
		};


		//创建线程    格式new Thread(new Runable){}.start;
		new Thread(new Runnable() {

			public void run() {

				for (int i = 5; i >= 0; i--) {

					//创建一个message存放信息通过handler发送过去处理
					Message message = new Message();
					message.what = i;
					handler.sendMessage(message);

					//try可能异常
					try {
						Thread.sleep(1000);
					} catch (InterruptedException e) {
						// TODO Auto-generated catch block
						e.printStackTrace();
					}

				}

				//刷新三秒后跳转页面到MainActivity.class 开始
				Intent intent = new Intent(WelcomeActivity.this,MainActivity.class);
				startActivity(intent);

			}
		}).start();
	}


}
//欢迎页面 xml
<RelativeLayout xmlns:android="http://schemas.android.com/apk/res/android"
    xmlns:tools="http://schemas.android.com/tools"
    android:layout_width="match_parent"
    android:layout_height="match_parent"
	android:background="@drawable/welcome"
    tools:context=".WelcomeActivity" >

    <TextView
        android:id="@+id/textView1"
        android:layout_width="wrap_content"
        android:layout_height="wrap_content"
        android:layout_alignParentRight="true"
        android:textSize="23dp"
        android:layout_margin="26dp"
        android:textColor="#ffffff"
        />

</RelativeLayout>
//main
package com.example.prppr;

import NetUtils.Package.NetUtils;
import android.app.Activity;
import android.os.Bundle;
import android.view.View;
import android.webkit.WebView;
import android.webkit.WebViewClient;

public class MainActivity extends Activity {

	//声明一个网页!!网页要注意权限
	public WebView we;

    @Override
    protected void onCreate(Bundle savedInstanceState) {
        super.onCreate(savedInstanceState);
        setContentView(R.layout.activity_main);

        //找到一个网页id		显示网页填入网页地址		跳过默认浏览器网页
        we = (WebView) findViewById(R.id.webView1);
        we.loadUrl("https://blog.csdn.net/prppr_?type=blog");
        we.setWebViewClient(new WebViewClient());


    }


    //通过onClick按下按键时跳转到这里 根据v.getid解析是哪个id 调用NetUtils类中的函数
    //并把字符串传过去,通过socket连接ip和端口后 数据输出流 发送数据
    public void sendMsg(View v){
    	switch(v.getId()){
    						//调用NetUtils中的包
    		case R.id.bnt1: NetUtils.sendMessageHandler("SO");break;//开二楼灯
    		case R.id.bnt2: NetUtils.sendMessageHandler("BO");break;//开浴室灯
    		case R.id.bnt3: NetUtils.sendMessageHandler("LO");break;//开客厅灯
    		case R.id.bnt4: NetUtils.sendMessageHandler("RO");break;//开餐厅灯
    		case R.id.bnt5: NetUtils.sendMessageHandler("aO");break;//灯全开

    		case R.id.bnt6: NetUtils.sendMessageHandler("SC");break;//关二楼灯
    		case R.id.bnt7: NetUtils.sendMessageHandler("BC");break;//关浴室灯
    		case R.id.bnt8: NetUtils.sendMessageHandler("LC");break;//关客厅灯
    		case R.id.bnt9: NetUtils.sendMessageHandler("RC");break;//关餐厅灯
    		case R.id.bnt10: NetUtils.sendMessageHandler("aC");break;//关闭所有灯

    		case R.id.bnt11: NetUtils.sendMessageHandler("fO");break;//开启人脸识别
    	}
    };
}
//调用网络部分
package NetUtils.Package;

import java.io.IOException;
import java.io.OutputStream;
import java.net.Socket;

public class NetUtils {
    public static void sendMessageHandler(final String command){
		new Thread(new Runnable() {
			public void run() {
				// TODO Auto-generated method stub
					try {
						//连接服务器
						Socket client = new Socket("172.20.10.2",8887);

						//连接后发送数据流
						OutputStream outMsg = client.getOutputStream();


						//发送数据
						outMsg.write(command.getBytes());

					} catch (IOException e) {
						// TODO Auto-generated catch block
						e.printStackTrace();
					}
			}
		}).start();
};

}
//xml页面部分
<RelativeLayout xmlns:android="http://schemas.android.com/apk/res/android"
    xmlns:tools="http://schemas.android.com/tools"
    android:layout_width="match_parent"
    android:layout_height="match_parent"
	android:background="@drawable/bg"
    tools:context=".MainActivity" >

    <WebView
        android:id="@+id/webView1"
        android:layout_width="280dp"
        android:layout_height="170dp"
        android:layout_centerHorizontal="true"
        android:layout_marginTop="164dp"
        />
    <LinearLayout
        android:id="@+id/wenShiHuo"
        android:layout_width="355dp"
		android:layout_height="120dp"
		android:layout_below="@id/webView1"
		android:layout_centerHorizontal="true"
		android:orientation="horizontal"
     >
	        <LinearLayout
	            android:layout_weight="1"
	            android:layout_width="0dp"
	            android:layout_height="120dp"
	            android:orientation="vertical"
	            android:layout_marginLeft="75dp"
	            android:padding="15dp"
	            >
	            <TextView
	                android:layout_weight="1"
	                android:layout_width="wrap_content"
	                android:layout_height="wrap_content"
	                android:textColor="#ffffff"
	                android:textSize="16sp"
	                android:text="温度:"
	                />

	            	<TextView
	                android:layout_weight="1"
	                android:layout_width="wrap_content"
	                android:layout_height="wrap_content"
	                android:textColor="#ffffff"
	                android:textSize="16sp"
	                android:text="湿度:"
	                />

	            	<TextView
	                android:layout_weight="1"
	                android:layout_width="wrap_content"
	                android:layout_height="wrap_content"
	                android:textColor="#ffffff"
	     	        android:textSize="16sp"
	                android:text="火警"
	                />

	        </LinearLayout>

	        <LinearLayout
	            android:layout_width="0dp"
	            android:layout_height="120dp"

	            android:layout_weight="1"
	            android:orientation="vertical"
	            android:padding="15dp" >

	            <TextView
	                android:layout_width="wrap_content"
	                android:layout_height="wrap_content"
	                android:layout_weight="1"
	                android:text="26°"
	                android:textColor="#ffffff"

	                android:textSize="16sp" />

	            <TextView
	                android:layout_width="wrap_content"
	                android:layout_height="wrap_content"
	                android:layout_weight="1"
	                android:text="78"
	                android:textColor="#ffffff"
	                android:textSize="16sp" />

	            <TextView
	                android:layout_width="wrap_content"
	                android:layout_height="wrap_content"
	                android:layout_weight="1"
	                android:text="监测"
	                android:textColor="#ffffff"
	                android:textSize="14sp" />
	        </LinearLayout>

    </LinearLayout>


    //第一排灯控制
    <Button
		android:id="@+id/bnt1"
		android:layout_width="55dp"
		android:layout_height="27dp"
		android:layout_below="@id/wenShiHuo"
		android:layout_marginLeft="35dp"
		android:background="@drawable/btn_selector"
		android:textSize="16sp"
		android:text="二楼开"
		android:onClick="sendMsg"
        />

    <Button
		android:id="@+id/bnt2"
		android:layout_width="55dp"
		android:layout_height="27dp"
		android:layout_below="@id/wenShiHuo"
		android:layout_marginLeft="95dp"
		android:background="@drawable/btn_selector"
		android:textSize="16sp"
		android:onClick="sendMsg"
		android:text="浴室开"
        />

    <Button
		android:id="@+id/bnt3"
		android:layout_width="55dp"
		android:layout_height="27dp"
		android:layout_below="@id/wenShiHuo"
		android:layout_marginLeft="155dp"
		android:background="@drawable/btn_selector"
		android:textSize="16sp"
		android:onClick="sendMsg"
		android:text="客厅开"
        />

    <Button
		android:id="@+id/bnt4"
		android:layout_width="55dp"
		android:layout_height="27dp"
		android:layout_below="@id/wenShiHuo"
		android:layout_marginLeft="215dp"
		android:background="@drawable/btn_selector"
		android:textSize="16sp"
		android:onClick="sendMsg"
		android:text="餐厅开"
        />

    <Button
		android:id="@+id/bnt5"
		android:layout_width="55dp"
		android:layout_height="27dp"
		android:layout_below="@id/wenShiHuo"
		android:layout_marginLeft="275dp"
		android:background="@drawable/btn_selector"
		android:textSize="16sp"
		android:onClick="sendMsg"
		android:text="灯全开"
        />


    //第二排灯控制
     <Button
		android:id="@+id/bnt6"
		android:layout_width="55dp"
		android:layout_height="27dp"
		android:layout_below="@id/bnt1"
		android:layout_marginLeft="35dp"
		android:background="@drawable/btn_selector"
		android:layout_marginTop="15dp"
		android:textSize="16sp"
		android:text="二楼关"
		android:onClick="sendMsg"
        />

    <Button
		android:id="@+id/bnt7"
		android:layout_width="55dp"
		android:layout_height="27dp"
		android:layout_below="@id/bnt2"
		android:layout_toRightOf="@id/bnt6"
		android:layout_marginLeft="5dp"
		android:background="@drawable/btn_selector"
		android:layout_marginTop="15dp"
		android:textSize="16sp"
		android:onClick="sendMsg"
		android:text="浴室关"
        />

    <Button
        android:id="@+id/bnt8"
		android:layout_width="55dp"
		android:layout_height="27dp"
		android:layout_below="@id/bnt3"
		android:layout_toRightOf="@id/bnt7"
		android:layout_marginLeft="5dp"
		android:background="@drawable/btn_selector"
		android:layout_marginTop="15dp"
		android:textSize="16sp"
		android:onClick="sendMsg"
		android:text="客厅关"
        />

    <Button
		android:id="@+id/bnt9"
		android:layout_width="55dp"
		android:layout_height="27dp"
		android:layout_below="@id/bnt4"
		android:layout_toRightOf="@id/bnt8"
		android:layout_marginLeft="5dp"
		android:background="@drawable/btn_selector"
		android:layout_marginTop="15dp"
		android:textSize="16sp"
		android:onClick="sendMsg"
		android:text="餐厅关"
        />

    <Button
		android:id="@+id/bnt10"
		android:layout_width="55dp"
		android:layout_height="27dp"
		android:layout_below="@id/bnt5"
		android:layout_toRightOf="@id/bnt9"
		android:layout_marginLeft="5dp"
		android:background="@drawable/btn_selector"
		android:layout_marginTop="15dp"
		android:textSize="16sp"
		android:onClick="sendMsg"
		android:text="灯全关"
        />

    <Button
        android:id="@+id/bnt11"
        android:layout_width="wrap_content"
        android:layout_height="wrap_content"
        android:layout_below="@id/bnt6"
        android:layout_marginTop="20dp"
        android:layout_centerHorizontal="true"
        android:onClick="sendMsg"
        android:text="人脸识别检测" />

</RelativeLayout>

版权声明:本文为博主作者:prppr_原创文章,版权归属原作者,如果侵权,请联系我们删除!