文章目录
- 前言
- web3.js 介绍
- web3.js安装
- web3.js库模块介绍
- 连接区块链节点
- 向区块链网络发送数据
- 查询区块链网络数据
前言
通过前面的文章我们可以知道基于区块链开发一个DApp,而DApp结合了智能合约和用户界面(客户端),那客户端是如何与区块链进行连接交互的、如何调用智能合约的、如何发送一个交易到区块链、如何获取区块链上的数据,这就是本文要介绍的 web3.js。
web3.js 介绍
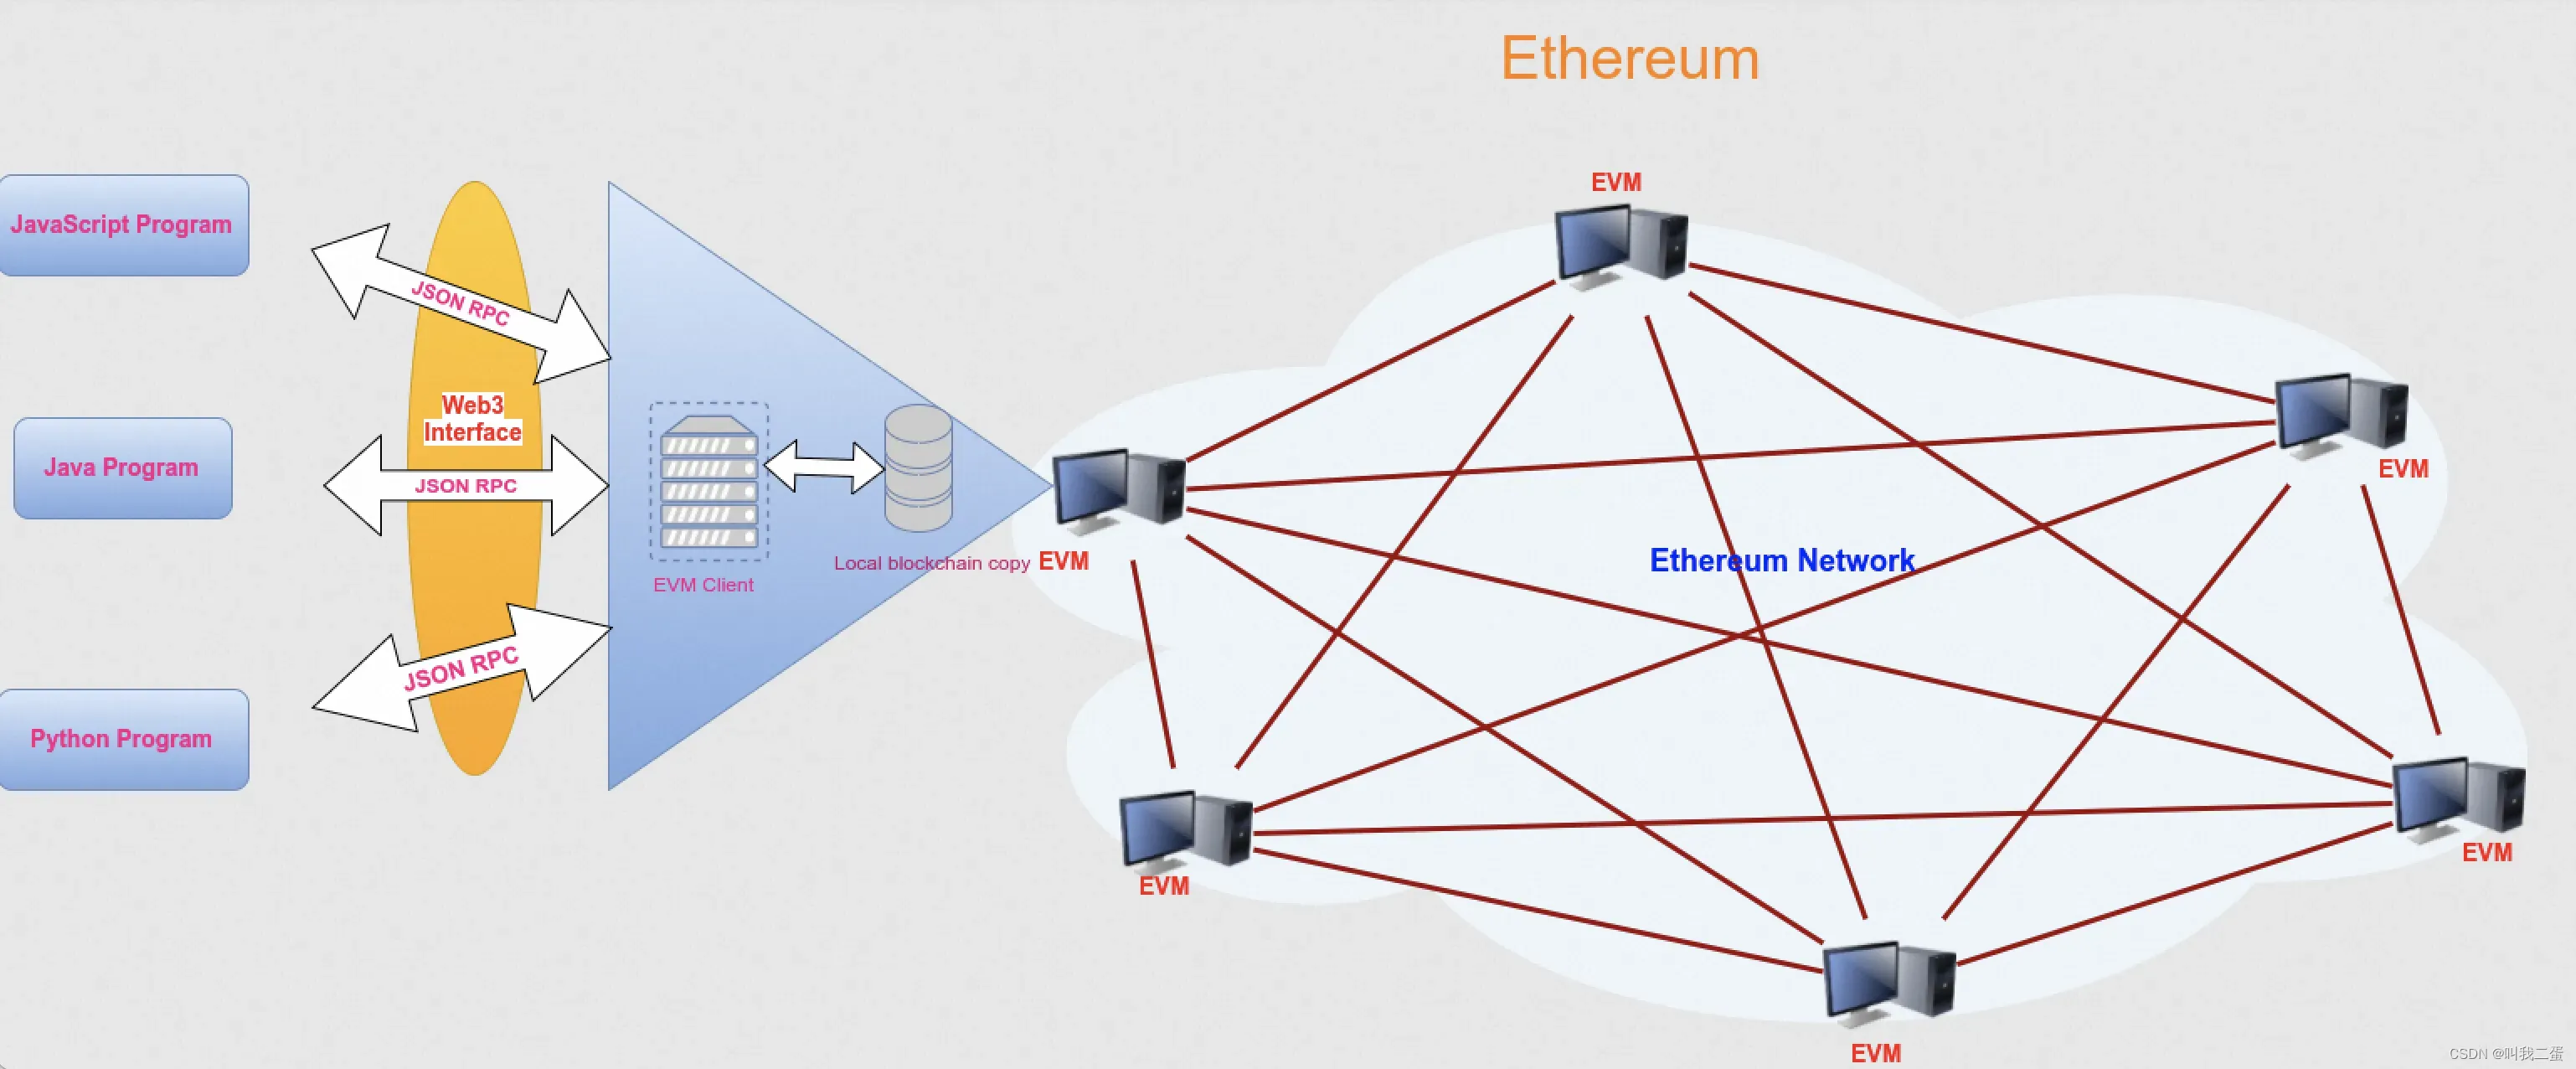
如下图,区块链网络中的每个节点都会得到一份区块链上所有数据的副本,它们互相通信,实现对公共账本状态的共识。如果要与整个区块链对话,需要连接任意一个节点地址加入该网络,而 web3.js 就是连接节点与区块链对话的一个 js 库,可以与任何暴露了RPC接口、ws 协议的区块链节点(本地或远程节点)连接交互,同时可以结合一些前端技术(如 react),使用户通过页面与区块链交互。
与 web3.js 相同作用的还有 ethers.js ,web3.js 由基金会开发和维护,因此,有更多的开发人员使用它。
web3.js安装
前置条件:安装 nodejs 环境
node -v
vXX.xx
查看node版本,npm版本:
admin@MacBook-Pro-2 test % node -v
v18.16.1
admin@MacBook-Pro-2 test % npm -v
9.5.1
安装web3.js库:
admin@MacBook-Pro-2 test % npm install web3

added 88 packages in 53s

35 packages are looking for funding
  run `npm fund` for details
npm notice
npm notice New minor version of npm available! 9.5.1 -> 9.8.0
npm notice Changelog: https://github.com/npm/cli/releases/tag/v9.8.0
npm notice Run npm install -g npm@9.8.0 to update!
npm notice
web3.js库模块介绍
web3.js库是包含生态系统功能的模块集合。
web3-eth:用于区块链和智能合约的交互。web3-shh: 是用于whisper协议,用于p2p和广播通信。web3-bzz: 针对swarm协议的去中心化文件存储。web3-utils:包含对Dapp开发人员有用的帮助函数。
具体使用参考web3.js
连接区块链节点
web3.js库安装好后就可以连接节点了,可以在本地安装一个区块链进行连接,也可以连接主网节点以及测试节点。
- 本地区块链:ganache,是一个区块链的个人开发环境,可以在上面部署合约、开发程序和进行测试,目的是为了节省大量开发时间。ganache详细的安装教程可以参考这篇博文。
- 以太测试/主网络:通过 Infura 可以获取连接区块链网络的端点,使用这些端点来与区块链网络交互。
获取到连接节点后就可以通过web3建立连接了,代码如下:
const Web3 = require('web3')
//下面为主网端点,测试端点为'https://ropsten.infura.io/YOUR_INFURA_API_KEY'
const rpcURL = "https://mainnet.infura.io/YOUR_INFURA_API_KEY"
const web3 = new Web3(rpcURL)
向区块链网络发送数据
区块链中,交易操作是指把数据写入区块链,改变区块链状态的操作。例如,转账、调用写数据的智能合约函数,以及部署智能合约,这些操作都会被看作是交易。
根据区块链工作原理,会使用私钥签名交易数据然后向网络广播。为了签署交易,我们使用 JavaScript 库 ethereumjs-tx 在本地签署交易。
npm install ethereumjs-tx
下面展示一个发送数据的代码示例:
var Tx     = require('ethereumjs-tx').Transaction
const Web3 = require('web3')
const web3 = new Web3('https://ropsten.infura.io/v3/YOUR_INFURA_API_KEY')

//账户地址
const account1 = '0x...'
const account2 = '0x...'
// 私钥
const privateKey1 = Buffer.from("", 'hex'

// getTransactionCount 获取从此地址发送的事务数。
web3.eth.getTransactionCount(account1, (err, txCount) => {
  // 创建对象
  const txObject = {
    nonce:    web3.utils.toHex(txCount),
    to:       account2,
    value:    web3.utils.toHex(web3.utils.toWei('1', 'ether')),
    gasLimit: web3.utils.toHex(21000),
    gasPrice: web3.utils.toHex(web3.utils.toWei('10', 'gwei'))
  }

  // 签署
  const tx = new Tx(txObject, { chain: 'ropsten'})
  tx.sign(privateKey1)

  const serializedTx = tx.serialize()
  const raw = '0x' + serializedTx.toString('hex')

  // 广播
  web3.eth.sendSignedTransaction(raw, (err, txHash) => {
    console.log('txHash:', txHash)
    // 可以去ropsten.etherscan.io查看交易详情,如果连接的主网节点,那么可以通过etherscan.io查看
  })
})
更多web3.js使用参考web3.js
查询区块链网络数据
const Web3 = require('web3')
const web3 = new Web3('https://ropsten.infura.io/v3/YOUR_INFURA_API_KEY')

// 查询最新区块
web3.eth.getBlock('latest').then(console.log)
// 查询指定哈希值的区块
web3.eth.getBlock('0x...').then(console.log)
// 查询指定序号区块
web3.eth.getBlock(0).then(console.log)
// 查询某个区块中的指定信息
web3.eth.getTransactionFromBlock('0x...', 2).then(console.log)
// 查询Gas费
web3.eth.getGasPrice().then((result) => {
    console.log("wei: " + result)
    console.log("ether: " + web3.utils.fromWei(result, 'ether'))
})
更多web3.js使用参考web3.js
版权声明:本文为博主作者:王二蛋!原创文章,版权归属原作者,如果侵权,请联系我们删除!
原文链接:https://blog.csdn.net/qq_28314431/article/details/131684312