
- 🎥 个人主页:Dikz12
- 📕格言:那些在暗处执拗生长的花,终有一日会馥郁传香
- 欢迎大家👍点赞✍评论⭐收藏
目录
创建线程
1.创建类继承Thread,重写run()
class MyThread extends Thread {
    @Override
    public void run() {
        //这个就是线程的入口方法
        while (true) {
            System.out.println("hello thread");
            try {
                Thread.sleep(1000);
            } catch (InterruptedException e) {
                e.printStackTrace();
            }
        }
    }
}
public class Demo1 {
    public static void main(String[] args) {
        Thread t = new MyThread(); //向上转型
        t.start();
        while (true) {
            System.out.println("hello main");
            try {
                Thread.sleep(1000);
            } catch (InterruptedException e) {
                e.printStackTrace();
            }
        }
    }
}
2.实现Runnable,重写run()
class  MyRunnable implements Runnable {
    @Override
    public void run() {
        while (true) {
            System.out.println("hello thread");
            try {
                Thread.sleep(1000);
            } catch (InterruptedException e) {
                e.printStackTrace();
            }
        }

    }
}
3.继承Thread,使用匿名内部类
  /* //实现了Runnable,匿名内部类的写法
      Thread t = new Thread(new Runnable() {
            @Override
            public void run() {
                while (true) {
                    System.out.println("hello thread");
                    try {
                        Thread.sleep(1000);
                    } catch (InterruptedException e) {
                        e.printStackTrace();
                    }
                }
            }
        });*/
        Thread t = new Thread() {
            @Override
            public void run() {
                while (true) {
                    System.out.println("hello thread");
                    try {
                        Thread.sleep(1000);
                    } catch (InterruptedException e) {
                        e.printStackTrace();
                    }
                }
            }
        };
4.使用lambda表达式(推荐)
 public static void main(String[] args) {
        //lambda 表达式 本质上是一个匿名函数,用来实现回调函数
        Thread t = new Thread(() ->{
            while (true) {
                System.out.println("hello thread");
                try {
                    Thread.sleep(1000);
                } catch (InterruptedException e) {
                    e.printStackTrace();
                }
            }
        });
        t.start();
        while (true) {
            System.out.println("hello main");
            try {
                Thread.sleep(1000);
            } catch (InterruptedException e) {
                e.printStackTrace();
            }
        }
    }
不单单只有上诉这几种,还有其它方式就不在演示了!
线程启动
线程启动是通过start(). 而不是run().
run(): 只是单纯的描述了当前线程要执行的内容.
start() : 才是真的会调用 系统api,在系统内核上创建线程.
线程中断
1.手动设置标志位
    private static boolean isQuit = false; //成员变量
    public static void main(String[] args) {
        Thread t = new Thread(() -> {
            while (!isQuit) {
                System.out.println("线程开始");
                try {
                    Thread.sleep(1000);
                } catch (InterruptedException e) {
                    e.printStackTrace();
                }
            }
            System.out.println("线程结束");
        });
        t.start();
        try {
            Thread.sleep(3000);
        } catch (InterruptedException e) {
            e.printStackTrace();
        }
        isQuit = true;
        System.out.println("设置 isQuit 为 true");
}要注意的是:这里用的是lambda表达式的写法,会发生变量捕获,自动捕获上层域涉及的局部变量.
是有前提限制的,就是只能捕获一个要保证是实际上的final 变量.
2.使用内部自带的标志位(interrupt)
public static void main(String[] args) {
Thread t = new Thread(() -> {
while (!Thread.currentThread().isInterrupted()) {
System.out.println("线程工作中");
try {
Thread.sleep(1000);
} catch (InterruptedException e) {
e.printStackTrace();
//1.什么都不加, 假装没听见; 继续执行
//2.加上break, 表示线程立即结束
//break;
//3. 可以做一些其它工作,(代码放到这里)执行完之后,在结束
break;
}
}
System.out.println("线程结束");
});
t.start();
try {
Thread.sleep(3000);
} catch (InterruptedException e) {
e.printStackTrace();
}
t.interrupt();
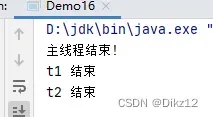
}线程等待
让一个线程,等待另一个线程执行结束,然后在执行. 本质上就可以理解为控制线程的结束顺序.
join() -> 个哪线程调用,哪个线程就阻塞等待.
    public static void main(String[] args) {
        Thread t1 = new Thread(() -> {
            for (int i = 0; i < 5; i++) {
                try {
                    Thread.sleep(1000);
                } catch (InterruptedException e) {
                    e.printStackTrace();
                }
            }
            System.out.println("t1 结束");
        });
        Thread t2 = new Thread(() -> {
            try {
                t1.join();
            } catch (InterruptedException e) {
                e.printStackTrace();
            }
            System.out.println("t2 结束");
        });
        t1.start();
        t2.start();
        System.out.println("主线程结束!");
    }
线程状态
在Java中,又给线程赋予了一些其它的状态.比如:
NEW: Thread对象已经创建好了,到时start()还没调用.
TERMINATED : Thread对象还在,内核中的线程已经被销毁了.
RUNNABLE: (就绪状态) 线程已经在cpu上执行了/正在排队等待cpu执行.
WAITING(阻塞): 由于wait()引起的阻塞.
TIMED_WAITING: 由于sleep() 引起的阻塞.
BLOCKED: 由于锁竞争导致的阻塞.
线程状态在调试的时候,可以使用jdk文件下bin目录中的
查看线程状态.
线程安全
想要解决线程安全问题,就要先了解产生线程不安全的原因.
1.在操作系统中,线程的调度顺序是随机的.(这是由系统内核决定的,除非换个系统)
2.两个线程,对一个变量进行修改
3.修改操作不是原子性的
4.内存可见性问题
5.指令重排序问题
比如: 针对一个变量进行修改.
 private static int count = 0;
    public static void main(String[] args) throws InterruptedException {
        Object locker1 = new Object();
        Object locker2 = new Object();
        Thread t1 = new Thread(() -> {
           for (int i = 0; i < 50000; i++) {
               //加锁
               synchronized (locker1) {
                   count++;
               }
           }
        });
        Thread t2 = new Thread(() -> {
            for (int i = 0; i < 50000; i++) {
                synchronized(locker1) {
                    count++;
                }
            }
        });
        t1.start();
        t2.start();
        //如果没有这俩 join, 肯定不行的. 线程还没自增完, 就开始打印了.
        t1.join();
        t2.join();
        //预期结果应该是10W
        System.out.println(count);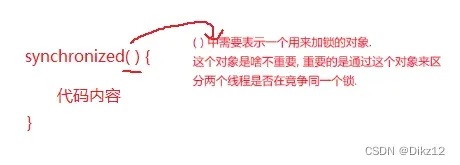
}这里引入锁synchronized(可重入锁),作用就是把count 这个变量,成为 原子的, 也就是降低了并发程度.
synchronized(可重入锁) 使用方法
1.搭配代码块使用
2.搭配实例方法或者静态方法
    public int count;
    public void increase () {
        synchronized (this) {
            count++;
        }
    }
    //简化版
    synchronized  public void increase2() {
        count++;
    }
    //静态方法
    public static  void incresae3() {
        synchronized (Fun.class) {

        }
    }
    synchronized public static void increase4() {

    }
死锁
关于死锁问题
1.一个线程,针对 同一把锁,连续加锁,如果不是可重入锁,就会发生死锁.(Java中的synchronized是可重入的;C++的std::mutex 就是不可重入锁).
2.两个线程,两把锁.
线程t1,得到一把锁A 后,又尝试获取锁B; 线程t2 ,得到一把锁B后,有尝试获取锁A.
    public static Object locker1 = new Object();
    public static Object locker2 = new Object();
    public static void main(String[] args) {
        Thread t1 = new Thread(() -> {
           synchronized (locker1) {
               // 加上sleep 为了t1 和 t2 线程都能获得一把锁
               try {
                   Thread.sleep(1000);
               } catch (InterruptedException e) {
                   e.printStackTrace();
               }
               synchronized (locker2) {
                   System.out.println("t1 加锁成功!");
               }
           }
        });
        Thread t2 = new Thread(() -> {
            synchronized (locker2) {
                try {
                    Thread.sleep(1000);
                } catch (InterruptedException e) {
                    e.printStackTrace();
                }
                synchronized (locker1) {
                    System.out.println("t1 加锁成功!");
                }
            }
        });
        t1.start();
        t2.start();
    }
通过调试可以看到,这两个线程进入了BLOCKED的状态(死锁)
这种情况是可以避免的,调整代码结构,上述代码两个synchronized 是嵌套关系,不是并列关系.


3.N 个线程,M把锁.
典型的例子: 操作系统中的 科学家就餐问题.(就不在详细讨论了)
死锁能产生,一定涉及到四个必要条件
1. 互斥使用(锁的基本特性): 一个线程得到一把锁之后,另一个线程也想得到这把锁,就要阻塞等待.
2.不可抢占(锁的基本特性): 一把锁已经被一个线程得到后,另一个线程只能等该线程主动释放,不能强行抢占.
3.请求保持 : 一个线程想获取多把锁(例子:死锁问题的第二个).
4.循环等待/ 环路等待: 线程之间的等待关系成环了. (例子:科学家就餐问题)
所以,解决死锁问题,只要破坏上述四个条件中的其中一个就可以.
1和2,是锁的基本特性,是破坏不了的,也就破坏这两个中的其中一个.
破坏3 : 只需要调整代码结结构,避免出现”嵌套” 逻辑.
破坏4: 约定加锁的顺序,就可以避免循环等待.

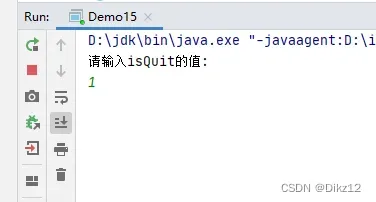
volatile关键字(解决内存可见性问题)
    private static int isQuit = 0;
    public static void main(String[] args) {
        Thread t1 = new Thread(() ->  {
           while(isQuit == 0) {
               //循环体
           }
            System.out.println("t1 退出");
        });
        t1.start();
        Thread t2 = new Thread(() ->  {
            System.out.println("请输入isQuit的值:");
            Scanner scanner = new Scanner(System.in);
             isQuit = scanner.nextInt();
        });
        t2.start();
    }
上述代码 运行效果:
期望的结果是,输入1,线程结束. 而这里并没有结束.
就需要站在cpu的分析下,整个数据的过程:
1.load 读取内存的isQuit值放到寄存器里
2.通过cmp指令比较寄存器得值是否等于0,决定是否要继续执行
读取内存的速度就已经是非常快的了,而读取寄存器的速度是 读取内存速度的 几千倍 几万倍.
所以,Java的编译器就自主做了一个大胆的决定,编译优化,只有第一次循环的时候,才读了内存,后面都是读取寄存器.
解决方案就是通过 volatile 关键字,告诉编译器不要优化!!!
版权声明:本文为博主作者:Dikz12原创文章,版权归属原作者,如果侵权,请联系我们删除!
原文链接:https://blog.csdn.net/m0_65465009/article/details/136086318