非常热门的 20 个Spring Boot 技术面试中经常被问到的问题。
1. Spring Boot 有哪些特点?
Spring Boot 是 Spring 的扩展,它消除了设置 Spring 应用程序所需的样板配置。
- 自动配置
这是 Spring Boot 最重要的特性。这极大地消除了手动配置。基础框架附带了一个名为 auto-configure 的内置库,它为我们完成了这项工作。它检测某些类的存在以及类路径上的存在,并为我们自动配置它们。
例如:— 当我们在项目中添加spring-boot-starter-web依赖项时,Spring Boot 自动配置会查找 Spring MVC 是否在类路径中。它自动配置dispatcherServlet、默认错误页面和web jars。— 同样,当我们添加
spring-boot-starter-data-jpa依赖项时,我们会看到 Spring Boot 自动配置,自动配置一个数据源和一个实体管理器。
- 嵌入式 Tomcat Web 服务器
Spring Boot 默认随 Tomcat 服务器一起提供。因此,我们不需要配置服务器来运行应用程序(如果我们的首选服务器是 Tomcat)。
- 入门 POM
Spring Boot 本身提供了许多启动 POM 来完成开发生活中最常见的任务。我们可以依赖它们和框架本身,而不需要去第三方库。我在这里列出了其中的一些。
- spring-boot-starter-web:创建 REST API
- spring-boot-starter-data-jpa:连接 SQL 数据库
- spring-boot-starter-data-mongodb:连接 MongoDB
- spring-boot-starter -aop:应用面向方面的编程概念
- spring-boot-starter-security:实现安全性,如基于角色的身份验证
- spring-boot-starter-test:实现单元测试
- Actuator执行器 API
Spring Boot Actuator 是 Spring Boot 框架的一个子项目。它使我们能够通过一组 API 端点查看见解和指标并监控正在运行的应用程序。我们不需要手动创建它们。
- 数据库统计信息:数据源使用情况
- CPU内存使用情况
- GC 周期
- 跟踪 HTTP 请求
- SpringBoot初始化器
这是一个基于 Web 的 UI,主要提供了使用可用依赖项创建新 Spring Boot 项目并下载创建为 zip 的项目的能力。所以我们不必从头开始创建它。该项目的所有基本结构都已在此下载的 zip 中。Spring Initializer 作为 IDE 插件提供,也具有不同的名称。
例如:对于 IntelliJ – 插件是 Spring Assistant 或 Spring Initializer。
2、你知道“@SpringBootApplication”注解在内部是如何工作的吗?
Spring Boot 应用程序使用此注解执行。实际上它是其他 3 个注释的组合:
ComponentScan、EnableAutoConfiguration和Configuration。
@SpringBootApplication = @ComponentScan + @EnableAutoConfiguration + @Configuration- “@Configuration” ——所有带注释的类都被视为 Spring Boot 的广告配置,它们有资格创建 bean 并返回到 IOC 容器。
- “@ComponentScan” ——所有带注释的类都将通过包(在哪里寻找)进行扫描,并帮助创建这些类的实例。
- “@EnableAutoConfiguration” ——这是神奇的注解。这会寻找类路径。基础框架附带了一个名为auto-configure的内置库,它为我们完成了这项工作。它检测某些类的存在以及类路径上的存在,并为我们自动配置它们。我在下面放了图书馆的快照。如果您前往 spring.factories 文件,您将看到可用的类配置。
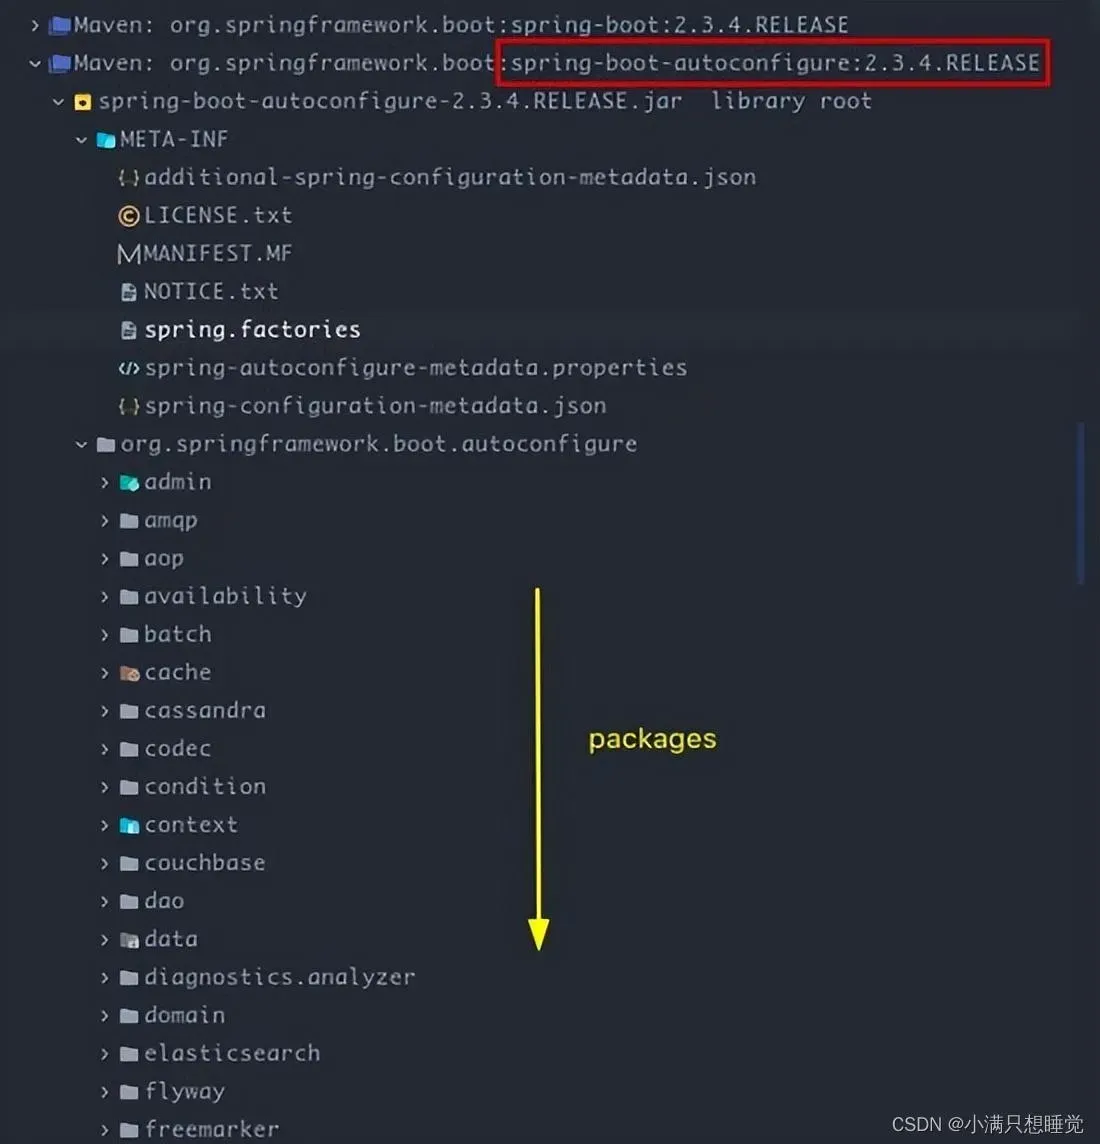
上图是自动配置依赖 JAR
假设我们添加了 JPA 依赖项:Spring Boot 检查 class-path 以查看可用的内容以及
application.properties/yml 文件中定义的属性。这里将是数据库 URL 和凭据。
JPA Repository 类也使用一些条件注释进行注释,例如“@ConditionalOnBean”、“@ConditionalOnClass”,根据这些规则,生成配置。
3. 什么是 Bean?
Bean 只是普通的 Java 对象。在 Spring Boot 上下文中,它们被视为 Java 对象 + 在应用程序启动时自动初始化并由 Spring IOC 容器管理的对象。我们有“@Bean”注解来实现这一点。
4、什么是Spring中的控制反转(IOC)?
控制反转:
将对象或程序部分的控制权转移到容器或框架的原理。我们最常在 面向对象 编程的上下文中使用它。简单地说,控制是由框架来处理的,而不是由我们来处理——程序控制流的逆向。反者道之动。
Spring IOC 容器:
创建对象、配置和组装它们的依赖关系、管理它们的整个生命周期的容器。它使用依赖注入 (DI)来管理构成应用程序的组件。
5、我们如何在Spring Boot中实现依赖注入?
DI — 将对象作为依赖项传递给另一个对象
在 Spring Boot 中,我们可以使用“@Autowired”注解来实现这一点。然后 Spring IOC 容器将代表我们创建对象。通常,在控制器层我们注入服务,在服务层我们注入存储库来使用这个注解。
6、Spring Boot微服务有哪些层?
- 控制器层:所有具有 API 端点定义方法的控制器。类使用“@RestController”注解进行注解。
- Repository/DAO层:所有repository接口都包含在这一层中,用于查询已选择的数据库(SQL/no SQL)。接口使用“@Repository”注解进行注解。
- 服务层:所有业务逻辑都包含在这里。通常在该层访问DAO层以执行一些操作。类使用“@Service”注解进行注解。
- 实体层:映射到现实世界的所有类都包含在该层中。通常所有与 ORM 相关的注释都放在这些类中。— 如果它与 MySQL 连接,我们用“@Entity”注释表名。— 如果它连接到 MongoDB,我们用“@Document”注释集合名称。
此外,我们可以使用 Lombok 之类的库在此处定义 getter 和 setter。
9. 如何使用 Spring Boot 连接数据库?
通常我们不需要创建单例数据库类、连接池方法和任何其他实现。Spring Boot Auto Configuration 将为我们完成所有这些类和配置设置。只需要设置。
- 将数据库(MySQL/MongoDB/Redis)的启动器依赖项添加到 POM。
- 在 application.properties/yml 文件中定义配置 – 例如:数据库 URL 和凭据
10.如何在DAO层编写自定义查询?
通常在 Repository 层,我们使用 JPARepository 或 MongoRepository 接口扩展接口。之后,我们的 Repository(DAO) 将拥有 Spring Boot Repository 接口中可用的所有方法。Es:save()、saveAll()、findById()、find() 等。
但是根据我们的业务需求,我们可能还需要一些其他的方法。
例如:findByEmail()、findUsersByRegion() 等等……单例
因此,我们必须在这种情况下提供自定义查询。我们有“@Query”注释来实现这一点。只需在每个方法定义之前定义查询即可。就这样!
如果我们使用 JPA,我们必须使用JPQL (Java Persistence Query Language)创建查询。它在 JPA 规范中定义,是一种面向对象的查询语言,用于对持久实体执行数据库操作。
例如:仅查找给定区域中的用户
@Query(<font>"select u from users u where u.region =: region"</font><font>)
Optional<List<User>> findUsersByRegion(String region);
</font>
11. Spring Boot 中如何处理事务?使用的任何注释?
Spring Boot 提供了一个名为“@Transactional”的注解来管理事务。
让我们假设一个产品订购场景。我们需要在 Order Service 中处理订单,并通过 REST 调用将付款详情发送到 Payment Service。想象一下,支付服务突然停止了。如果在向支付服务发送 API 调用之前将订单详细信息保存在自己的数据库中,那么将来会出现差异,因为支付服务数据正在丢失该记录!
为了避免这种情况,我们可以将“@Transactional”注解放入订单服务的方法中。然后从那里开始,如果调用支付服务时出现故障,正在进行的流程中的所有数据都将回滚!
@Transactional
 <b>public</b> Order orderProduct(Product product, Double payment) {
    <font><i>// 处理订单</i></font><font>
    </font><font><i>// 向支付服务发送 REST 调用</i></font><font>
}
</font>
12.我们需要在哪里使用“@Qualifier”注解?
此注解用于专门告诉 Spring Boot 从其所有可用实现 bean 中获取特定类。@Qualifier注解与“ @Autowired”注解一起用于依赖注入。
假设我们有1 个接口和 2 个不同的实现类。
例如:UserService 接口 => AdminUserService、StaffUserService 类
AdminUserService、StaffUserService 都在实现 UserService 接口。我们必须在服务启动时选择StaffUserService 。否则 Spring Boot 将抛出异常并抱怨候选人太多。
请参阅下面的错误…
Description:
Field userService in com.example.demo.UserExecutor required a single bean, but 2 were found:
 - adminUserService: defined in file [/home/salitha/Downloads/demo/target/<b>class</b>es/com/example/demo/AdminUserService.<b>class</b>]
 - staffUserService: defined in file [/home/salitha/Downloads/demo/target/<b>class</b>es/com/example/demo/StaffUserService.<b>class</b>]
Action:
Consider marking one of the beans as @Primary, updating the consumer to accept multiple beans, or using @Qualifier to identify the bean that should be consumed
所以我们应该在 Autowired 之后放置 Qualifier 注释来解决这个问题:
@Autowired
@Qualifier(<font>"staffUserService"</font><font>)
<b>private</b> UserService userService;
</font>
示例 Java 类设置来测试这一点:
<b>import</b> org.springframework.beans.factory.annotation.Autowired;
<b>import</b> org.springframework.beans.factory.annotation.Qualifier;
<b>import</b> org.springframework.boot.SpringApplication;
<b>import</b> org.springframework.boot.autoconfigure.SpringBootApplication;
<b>import</b> org.springframework.context.annotation.AnnotationConfigApplicationContext;
<b>import</b> org.springframework.context.annotation.ComponentScan;
<b>import</b> org.springframework.context.annotation.Configuration;
<b>import</b> org.springframework.stereotype.Component;
<b>import</b> org.springframework.stereotype.Service;

<b>import</b> javax.annotation.PostConstruct;

@SpringBootApplication
<b>public</b> <b>class</b> DemoApplication {
   <b>public</b> <b>static</b> <b>void</b> main(String args) {
      SpringApplication.run(DemoApplication.<b>class</b>, args);
   }
}

<b>interface</b> UserService {
   <b>void</b> login();
}

@Service
<b>class</b> AdminUserService implements UserService {
   @Override
   <b>public</b> <b>void</b> login() {
      System.out.println(<font>"Admin Login"</font><font>);
   }
}

@Service
<b>class</b> StaffUserService  implements UserService {
   @Override
   <b>public</b> <b>void</b> login() {
      System.out.println(</font><font>"Staff Login"</font><font>);
   }
}

@Configuration
@ComponentScan(</font><font>"com.example.demo"</font><font>)
<b>class</b> AppConfig {
   @Autowired
   UserExecutor userExecutor;

   @PostConstruct
   <b>void</b> testBeans() {
      userExecutor.getLogin();
   }
}

@Component
<b>class</b> UserExecutor {
   @Autowired
   @Qualifier(</font><font>"staffUserService"</font><font>)
   <b>private</b> UserService userService;
   <b>public</b> <b>void</b> getLogin() {
      userService.login();
   }
}
</font>
13. Spring Boot项目中可以替换Tomcat服务器吗?
是的。如果需要,我们可以通过在 POM 中添加 maven 排除来删除 Tomcat 服务器。实际上,Web 服务器捆绑在started-web Spring Boot starter 依赖项中。应该添加排除。
<dependency>
  <groupId>org.springframework.boot</groupId>
  <artifactId>spring-boot-starter-web</artifactId>
  <exclusions>
    <exclusion>
      <groupId>org.springframework.boot</groupId>
      <artifactId> spring-boot-starter-tomcat</artifactId>
    </exclusion>
  </exclusions>
</dependency>
然后我们必须将任何其他服务器(如 Jetty)添加到 POM。无论如何,我们必须在删除 tomcat 后添加一个 Web 服务器。
<dependency> <groupId>org.springframework.boot</groupId> <artifactId>spring-boot-starter-jetty</artifactId> </dependency><dependency>
  <groupId>org.springframework.boot</groupId>
  <artifactId>spring-boot-starter-jetty</artifactId>
</dependency>
您现在将看到 Jetty 服务器日志,而不是 Tomcat。
2022-08-03 13:22:12.551 INFO 57495 --- [main] osbweb.embedded.jetty.JettyWebServer:Jetty 在端口 8080 (http/1.1) 上启动,上下文路径为“/”14.“@PathVariable”和“@RequestParam”有什么区别?
PathVariable – 当我们设置 API 端点时使用以“/”分隔的参数。
@GetMapping(path = <font>"/profile/{username}"</font><font>)
<b>public</b> ResponseEntity<?> getUser( @PathVariable(</font><font>"username"</font><font>) String username) {
    <b>return</b> ResponseEntity.ok().body(authService.findUserByUsername(username));
}
</font>
API 端点:
http://localhost/api/profile/salitha
RequestParam – 当我们设置 API 端点时使用,查询参数以“&”分隔并以“?”开头。
@GetMapping(path = <font>"/confirm"</font><font>)
<b>public</b> ResponseEntity<?> confirmUser( @RequestParam(</font><font>"token"</font><font>) String token) {
    <b>return</b> ResponseEntity. ok ().body(authService.confirmUser(token));
}
</font>
API 端点:
http://localhost/api/profile?token=12345678
15、“@Primary”注解有什么用?
@Primary表示当多个候选者有资格自动连接单值依赖项时,应优先考虑 bean。
17. 如何验证传入的请求并将错误通知给用户?
为此需要执行几个主要步骤。如果我们遵循这些,只需验证请求即可。
- 我们已将启动器验证依赖项添加到 POM 中。
<dependency>
   <groupId>org.springframework.boot</groupId>
   <artifactId>spring-boot-starter-validation</artifactId>
</dependency>
2. 在“RequestBody”注解前添加“@Valid”注解。
3. 为要显示验证约束消息的请求创建单独的 DTO。
4. 使用“@RestControllerAdvice”创建全局异常处理程序,并在单独的方法中处理
MethodArgumentNotValidException 。
5. 创建逻辑以根据需要将错误返回给最终用户。我们可以在这个 logic.es 中提取异常消息
18、什么是Spring Boot Actuator?
简单地说,Spring Boot 框架的一个子项目,它使用 HTTP 端点来公开有关任何正在运行的应用程序的操作信息。
这些信息包括应用程序指标、连接的数据库状态、应用程序状态、bean 信息、请求跟踪等。
它可作为启动器依赖项使用。我们可以通过安装以下依赖项来使用该库。
<dependency>
    <groupId>org.springframework.boot</groupId>
    <artifactId>spring-boot-starter-actuator</artifactId>
</dependency>
19、Spring Boot微服务中的异常如何处理?
我们可以以集中的方式做到这一点。我们需要一个全局配置类,为每个异常类预定义异常处理方法。我们也可以使用处理程序本身定义返回的 HTTP 状态代码。
- 使用“@RestControllerAdvice”创建一个全局异常处理程序,并在单独的方法中处理每个异常。
- 创建逻辑以根据需要将错误返回给最终用户。我们可以在这个逻辑中提取异常消息
@RestControllerAdvice
<b>public</b> <b>class</b> GlobalExceptionHandler {

    @ExceptionHandler(MethodArgumentNotValidException.<b>class</b>)
    <b>public</b> ResponseEntity<Map<String, List<String>>> handleValidationErrors(MethodArgumentNotValidException ex) {
        List<String> errors = ex.getBindingResult().getFieldErrors()
                .stream().map(FieldError::getDefaultMessage).collect(Collectors.toList());
        <b>return</b> <b>new</b> ResponseEntity<>(getErrorsMap(errors), <b>new</b> HttpHeaders(), HttpStatus.BAD_REQUEST);
    }

    @ExceptionHandler(UserNotFoundException.<b>class</b>)
    <b>public</b> ResponseEntity<Map<String, List<String>>> handleNotFoundException(UserNotFoundException ex) {
        List<String> errors = Collections.singletonList(ex.getMessage());
        <b>return</b> <b>new</b> ResponseEntity<>(getErrorsMap(errors), <b>new</b> HttpHeaders(), HttpStatus.NOT_FOUND);
    }

    @ExceptionHandler(Exception.<b>class</b>)
    <b>public</b> <b>final</b> ResponseEntity<Map<String, List<String>>> handleGeneralExceptions(Exception ex) {
        List<String> errors = Collections.singletonList(ex.getMessage());
        <b>return</b> <b>new</b> ResponseEntity<>(getErrorsMap(errors), <b>new</b> HttpHeaders(), HttpStatus.INTERNAL_SERVER_ERROR);
    }

    @ExceptionHandler(RuntimeException.<b>class</b>)
    <b>public</b> <b>final</b> ResponseEntity<Map<String, List<String>>> handleRuntimeExceptions(RuntimeException ex) {
        List<String> errors = Collections.singletonList(ex.getMessage());
        <b>return</b> <b>new</b> ResponseEntity<>(getErrorsMap(errors), <b>new</b> HttpHeaders(), HttpStatus.INTERNAL_SERVER_ERROR);
    }

    <b>private</b> Map<String, List<String>> getErrorsMap(List<String> errors) {
        Map<String, List<String>> errorResponse = <b>new</b> HashMap<>();
        errorResponse.put(<font>"errors"</font><font>, errors);
        <b>return</b> errorResponse;
    }

}
</font>
20、“@Entity”和“@Table”注解有什么区别?
实体表示您将在程序中使用的类,表表示您将通过程序访问的实际数据库表。
以上就是为大家整理出来的最全面、在面试中百分之九十以上会被问到的问题,有需要完整版的PDF档可【戳一戳】
版权声明:本文为博主作者:小满只想睡觉原创文章,版权归属原作者,如果侵权,请联系我们删除!
原文链接:https://blog.csdn.net/xxxzzzqqq_/article/details/129926457