上一篇文章中已经详细叙述了如何用tensorRT将onnx转为engine【利用python版tensorRT导出engine【以yolov5为例】_爱吃肉的鹏的博客-CSDN博客】。
本篇文章将继续讲解trt的推理部分。
与之前一样,在讲解之前需要先介绍一些专业术语,让大家看看这些内置函数都有什么功能。
1.Binding含义
Binding翻译过来就是绑定。
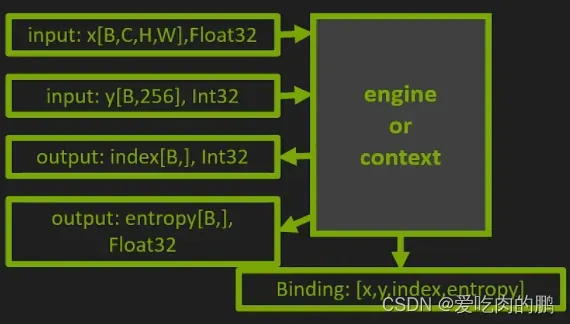
engine/context会给所有的输入输出安排位置。总共有engine.num_bindings个binding。
这里借用一张图来说明,下面图中如果模型有两个输入张量x、y,两个输出张量index和entropy,那么engine和context会按照这四个张量的拓扑顺序给一个Binding。在运行期间绑定张量的时候,也会按照指定的位置进行绑定,比如:
context.set_binding_shape(0,[4,1,28,28]) # 张量x
context.set_binding_shape(1,[4,256]) # 张量y
输出张量shape会自动计算,从(-1,)变成(4,)
【图像参考:一、TensorRT简介与入门_lansfair的博客-CSDN博客_tensorrt】
2.Context推理进程:
语法:context = engine.creat_execution_context()
常用方法:
context.set_binding_shape(i,shapeOfInputTensor) # 设定第i个绑定张量的形状(Dynamic Shape中使用)
context.get_binding_shape(i) # 获取第i个绑定张量的shape
context.execute_v2(listOfBuffer) # Explit batch模型的同步执行
context.execute_async_v2(listOfBuffer,srteam) # Explit batch模型的异步执行
目录
1.创建Binding
2.log记录器
3.反序列化engine(得到model)
4.构建context
5.获取model的输入和输出
forward推理部分
构建Execute
当我们生成yolov5s.engine后,在推理时需要进行模型的实例化。这里先附上代码:
            import tensorrt as trt
            # 判断版本
            check_version(trt.__version__, '7.0.0', hard=True)  # require tensorrt>=7.0.0
            if device.type == 'cpu':
                device = torch.device('cuda:0')
            # 1.创建一个Binding对象,该对象包含'name', 'dtype', 'shape', 'data', 'ptr'这些属性
            Binding = namedtuple('Binding', ('name', 'dtype', 'shape', 'data', 'ptr'))
            logger = trt.Logger(trt.Logger.INFO)
            # 2.读取engine文件并记录log
            with open(w, 'rb') as f, trt.Runtime(logger) as runtime:
                # 将engine进行反序列化,这里的model就是反序列化中的model
                model = runtime.deserialize_cuda_engine(f.read())  # model <class 'tensorrt.tensorrt.ICudaEngine'> num_bindings=2,num_layers=163
            # 3.构建可执行的context(上下文:记录执行任务所需要的相关信息)
            context = model.create_execution_context()  # <IExecutionContext>
            bindings = OrderedDict()
            output_names = []
            fp16 = False  # default updated below
            dynamic = False
            for i in range(model.num_bindings):
                name = model.get_binding_name(i) # 获得输入输出的名字"images","output0"
                dtype = trt.nptype(model.get_binding_dtype(i))
                if model.binding_is_input(i):  # 判断是否为输入
                    if -1 in tuple(model.get_binding_shape(i)):  # dynamic get_binding_shape(0)->(1,3,640,640) get_binding_shape(1)->(1,25200,85)
                        dynamic = True
                        context.set_binding_shape(i, tuple(model.get_profile_shape(0, i)[2]))
                    if dtype == np.float16:
                        fp16 = True
                else:  # output
                    output_names.append(name)  # 放入输出名字 output_names = ['output0']
                shape = tuple(context.get_binding_shape(i))  # 记录输入输出shape
                im = torch.from_numpy(np.empty(shape, dtype=dtype)).to(device)  # 创建一个全0的与输入或输出shape相同的tensor
                bindings[name] = Binding(name, dtype, shape, im, int(im.data_ptr()))  # 放入之前创建的对象中
            binding_addrs = OrderedDict((n, d.ptr) for n, d in bindings.items())  # 提取name以及对应的Binding
            batch_size = bindings['images'].shape[0]  # if dynamic, this is instead max batch size
接下来将会对上述代码中重要部分通过debug的方法逐步解释。
1.创建Binding
# 1.创建一个Binding对象,该对象包含'name', 'dtype', 'shape', 'data', 'ptr'这些属性
Binding = namedtuple('Binding', ('name', 'dtype', 'shape', 'data', 'ptr'))
2.log记录器
这个trt.Logger在之前的文章中有提到,这里就不说了。
logger = trt.Logger(trt.Logger.INFO)3.反序列化engine(得到model)
这里的w就是我们的yolov5s.engine。
获得model的关键语句是deserialize_cuda_engine.前面我们得到的engine文件是序列化的,现在要得到反序列后的model。该函数返回的结果是一个类型为ICudaEngine。
            with open(w, 'rb') as f, trt.Runtime(logger) as runtime:
                # 将engine进行反序列化,这里的model就是反序列化中的model
                model = runtime.deserialize_cuda_engine(f.read())  # model <class 'tensorrt.tensorrt.ICudaEngine'> num_bindings=2,num_layers=163
我们来看一下反序列后以后得到的model都包含了什么吧。我们可以绑定的张量有2个【一个输入,一个输出】,网络有163层。
model含有的属性:
device_memory_size = 34304512
max_batch_size = 1
name = 'Unnamed Network 0'
num_bindings = 2
num_layers = 163
4.构建context
context推理进程(相当于CPU中的一个进程)
创建context的时候会将执行model任务所需要的相关信息记录下来。
context = model.create_execution_context() # <IExecutionContext> 记录的相关信息也就是此时context中的属性,如下: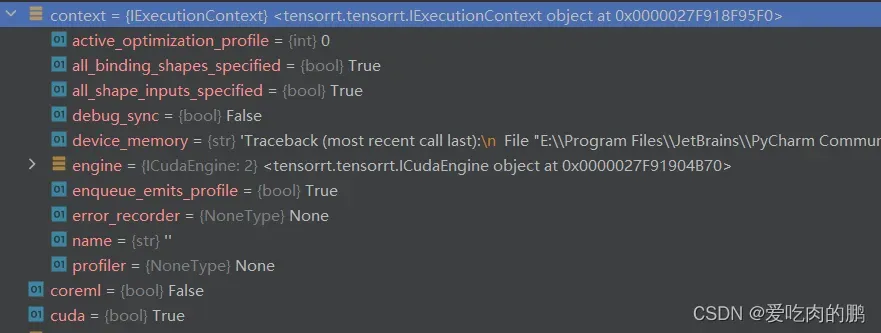
all_binding_shapes_specified是确认所有绑定的输入输出张量形状均被指定 。
5.获取model的输入和输出
我们前面已经知道了model中绑定了两个张量【输入输出】,可以获得绑定每个张量的name【这个name在我们之前转onnx的时候就已经定义好了,分别是images和output0】。
同时利用get_binding_shape记录每次获取绑定张量的shape,输入张量的shape是[1,3,640,640],输出张量是[1,25200,85]。
创建一个和Input或者output shape相同的全0张量im【就是分别创建一个输入和输出的buffer】,将name作为key值,Binding作为value值记录在bindings中
            for i in range(model.num_bindings):
                name = model.get_binding_name(i) # 获得输入输出的名字"images","output0"
                dtype = trt.nptype(model.get_binding_dtype(i))
                if model.binding_is_input(i):  # 判断是否为输入
                    if -1 in tuple(model.get_binding_shape(i)):  # dynamic get_binding_shape(0)->(1,3,640,640) get_binding_shape(1)->(1,25200,85)
                        dynamic = True
                        context.set_binding_shape(i, tuple(model.get_profile_shape(0, i)[2]))
                    if dtype == np.float16:
                        fp16 = True
                else:  # output
                    output_names.append(name)  # 放入输出名字 output_names = ['output0']
                shape = tuple(context.get_binding_shape(i))  # 记录输入输出shape
                im = torch.from_numpy(np.empty(shape, dtype=dtype)).to(device)  # 创建一个全0的与输入或输出shape相同的tensor
                bindings[name] = Binding(name, dtype, shape, im, int(im.data_ptr()))  # 放入之前创建的对象中
此时的bindings内容如下:

然后是获取绑定的地址(输入输出指针的初始化)。
会在上面得到的bindings进行遍历,下面代码中的n就是表示images和ouput0[就是输入和输出的name而已],同时获取对应的输入输出以及Binding的ptr,该指针指向的是bindings中的输入和输出的data。并获得输入的batch大小。
binding_addrs = OrderedDict((n, d.ptr) for n, d in bindings.items())  # 提取name以及对应的Binding
batch_size = bindings['images'].shape[0]  # if dynamic, this is instead max batch size
forward推理部分
            s = self.bindings['images'].shape
            assert im.shape == s, f"input size {im.shape} {'>' if self.dynamic else 'not equal to'} max model size {s}"
            self.binding_addrs['images'] = int(im.data_ptr())
            # 调用计算核心执行计算过程
            self.context.execute_v2(list(self.binding_addrs.values()))
            y = [self.bindings[x].data for x in sorted(self.output_names)]
在上面的代码中首先需要利用前面定义的bindings获取输入的shape。
im就是我们的图像。bingding_addrs中存储的是输入和输出的指针地址。
self.binding_addrs[‘images’ ] = int(im.data_ptr())就是指针的传递,将图像im的数据指针传递给binding_addrs[‘images’]中的指针。
构建Execute
context.execute_v2为执行计算过程。传入的参数是表示网络的输入与输出buffer地址列表,返回值为True或False.
我们来看一个很明显的区别:
在未执行execute之前,我们bindings内output0内的数据是下面这样的:

可以看到在未计算之前我们的output0 buffer内的内容全是0【默认初始化】。
在执行execute之后,output0中的内容是下面这样的,可以看到这就已经给出了网络最终的输出内容。

下面这行代码的意思是将网络execute之后的output0 buffer内的数据放在列表y中。
y = [self.bindings[x].data for x in sorted(self.output_names)]上面得到y或者是执行execute的过程是在GPU上完成。
然后在对输出从tensor转numpy形式。
        if isinstance(y, (list, tuple)):
            return self.from_numpy(y[0]) if len(y) == 1 else [self.from_numpy(x) for x in y]
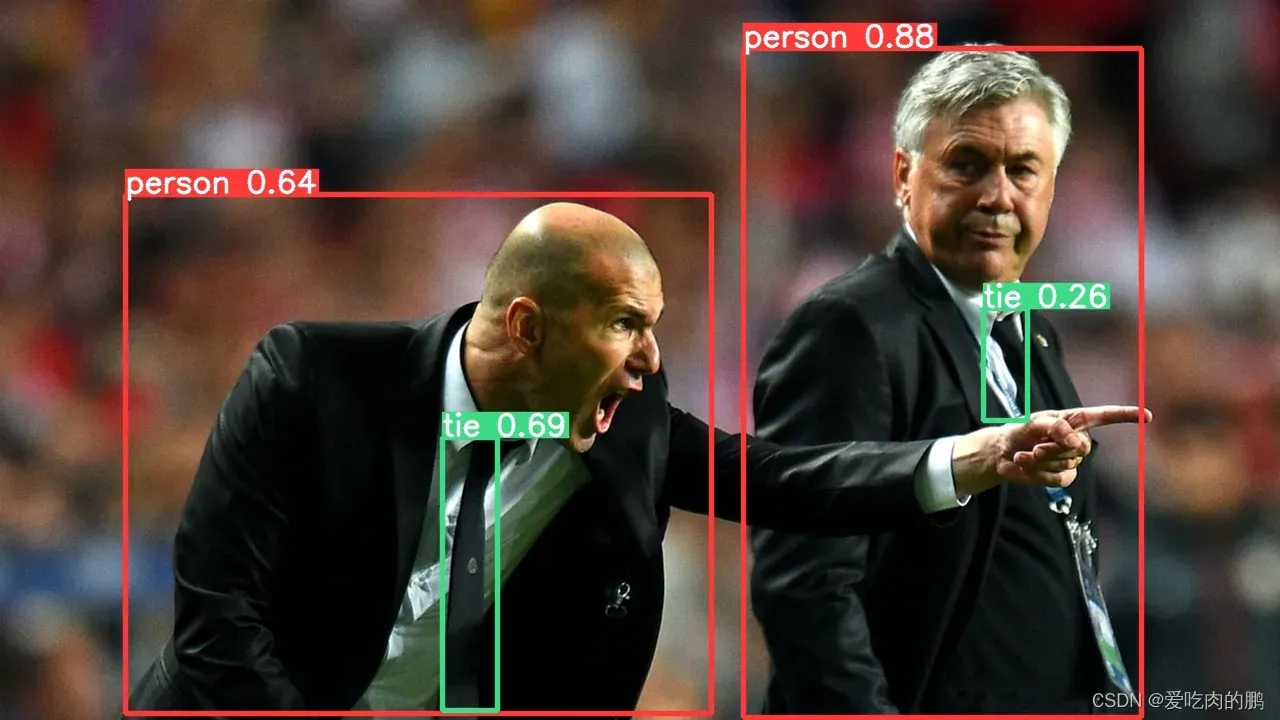
获得上面的输出以后就和正常的推理一样了,将pred进行置信度以及NMS处理即可。

文章出处登录后可见!