前言
本篇文章将介绍如何使用Python利用OpenCV图像捕捉,配合强大的Mediapipe库来实现人体动作检测与识别;将识别结果实时同步至Unity中,实现人物模型在Unity中运动身体结构识别
Demo演示
Demo展示:https://hackathon2022.juejin.cn/#/works/detail?unique=WJoYomLPg0JOYs8GazDVrw
本篇文章所用的技术会整理后开源,后续可以持续关注:
项目地址:https://github.com/BIGBOSS-dedsec/OpenCV-Unity-To-Build-3DPerson
GitHub:https://github.com/BIGBOSS-dedsec
CSDN: https://blog.csdn.net/weixin_50679163?type=edu
同时本篇文章实现的技术参加了稀土掘金2022编程挑战赛-游戏赛道
作品展示:https://hackathon2022.juejin.cn/#/works/detail?unique=WJoYomLPg0JOYs8GazDVrw

认识Mediapipe
项目的实现,核心是强大的Mediapipe ,它是google的一个开源项目:
| 功能 | 详细 |
|---|---|
| 人脸检测 FaceMesh | 从图像/视频中重建出人脸的3D Mesh |
| 人像分离 | 从图像/视频中把人分离出来 |
| 手势跟踪 | 21个关键点的3D坐标 |
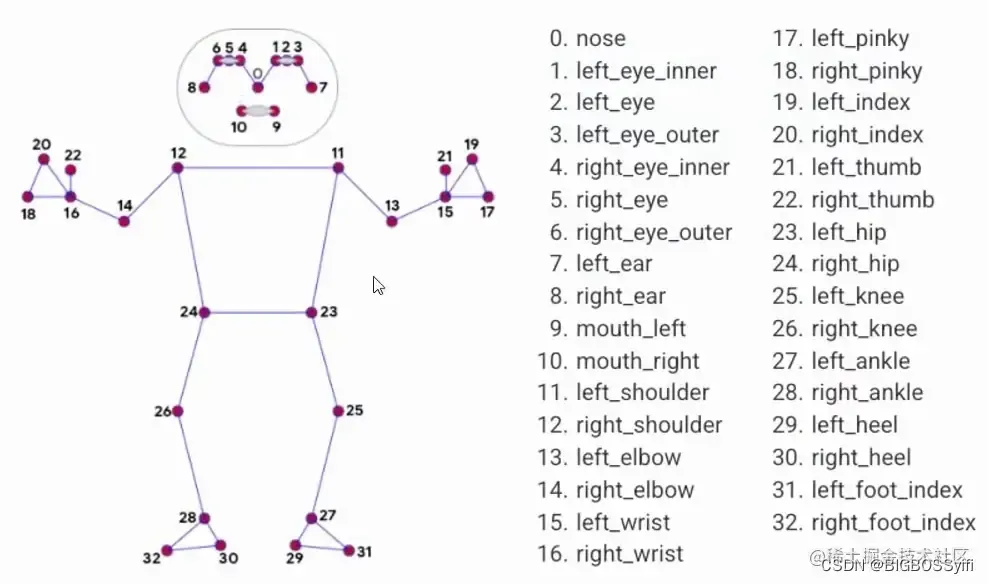
| 人体3D识别 | 33个关键点的3D坐标 |
| 物体颜色识别 | 可以把头发检测出来,并图上颜色 |
Mediapipe Dev
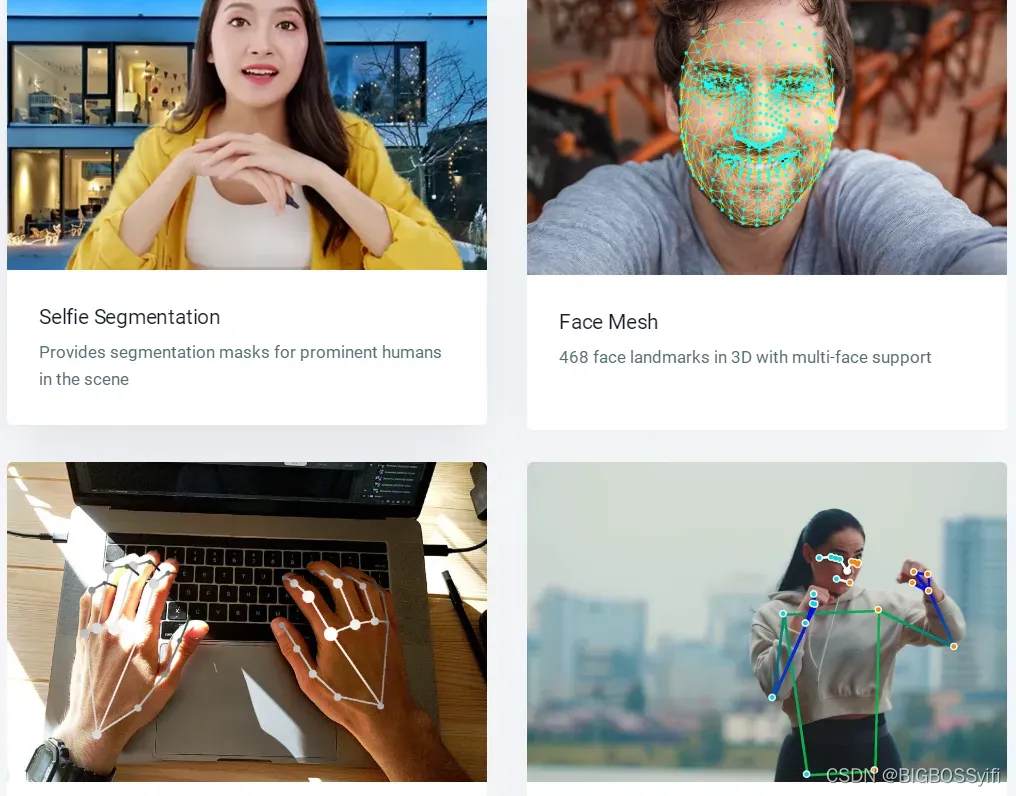
以上是Mediapipe的几个常用功能 ,这几个功能我们会在后续一一讲解实现
Python安装Mediapipe
pip install mediapipe==0.8.9.1
也可以用 setup.py 安装
https://github.com/google/mediapipe
项目环境
Python 3.7
Mediapipe 0.8.9.1
Numpy 1.21.6
OpenCV-Python 4.5.5.64
OpenCV-contrib-Python 4.5.5.64
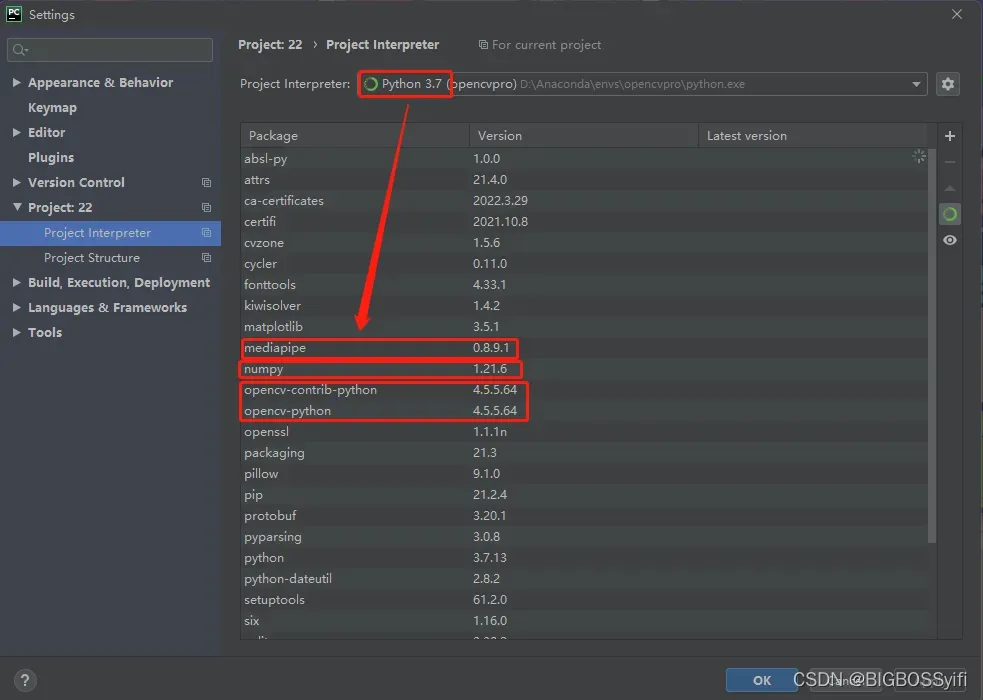
实测也支持Python3.8-3.9
身体动作捕捉部分
身体数据文件
这部分是我们通过读取视频中人物计算出每个特征点信息进行数据保存,这些信息很重要,后续在untiy中导入这些动作数据

关于身体特征点
核心代码
摄像头捕捉部分:
import cv2

cap = cv2.VideoCapture(0)       #OpenCV摄像头调用:0=内置摄像头(笔记本)   1=USB摄像头-1  2=USB摄像头-2

while True:
    success, img = cap.read()
    imgRGB = cv2.cvtColor(img, cv2.COLOR_BGR2RGB)       #cv2图像初始化
    cv2.imshow("HandsImage", img)       #CV2窗体
    cv2.waitKey(1)      #关闭窗体
视频帧率计算
import time

#帧率时间计算
pTime = 0
cTime = 0

while True
cTime = time.time()
    fps = 1 / (cTime - pTime)
    pTime = cTime

    cv2.putText(img, str(int(fps)), (10, 70), cv2.FONT_HERSHEY_PLAIN, 3,
                (255, 0, 255), 3)       #FPS的字号,颜色等设置
身体动作捕捉:
while True:
    if bboxInfo:
        lmString = ''
        for lm in lmList:
            lmString += f'{lm[1]},{img.shape[0] - lm[2]},{lm[3]},'
        posList.append(lmString)
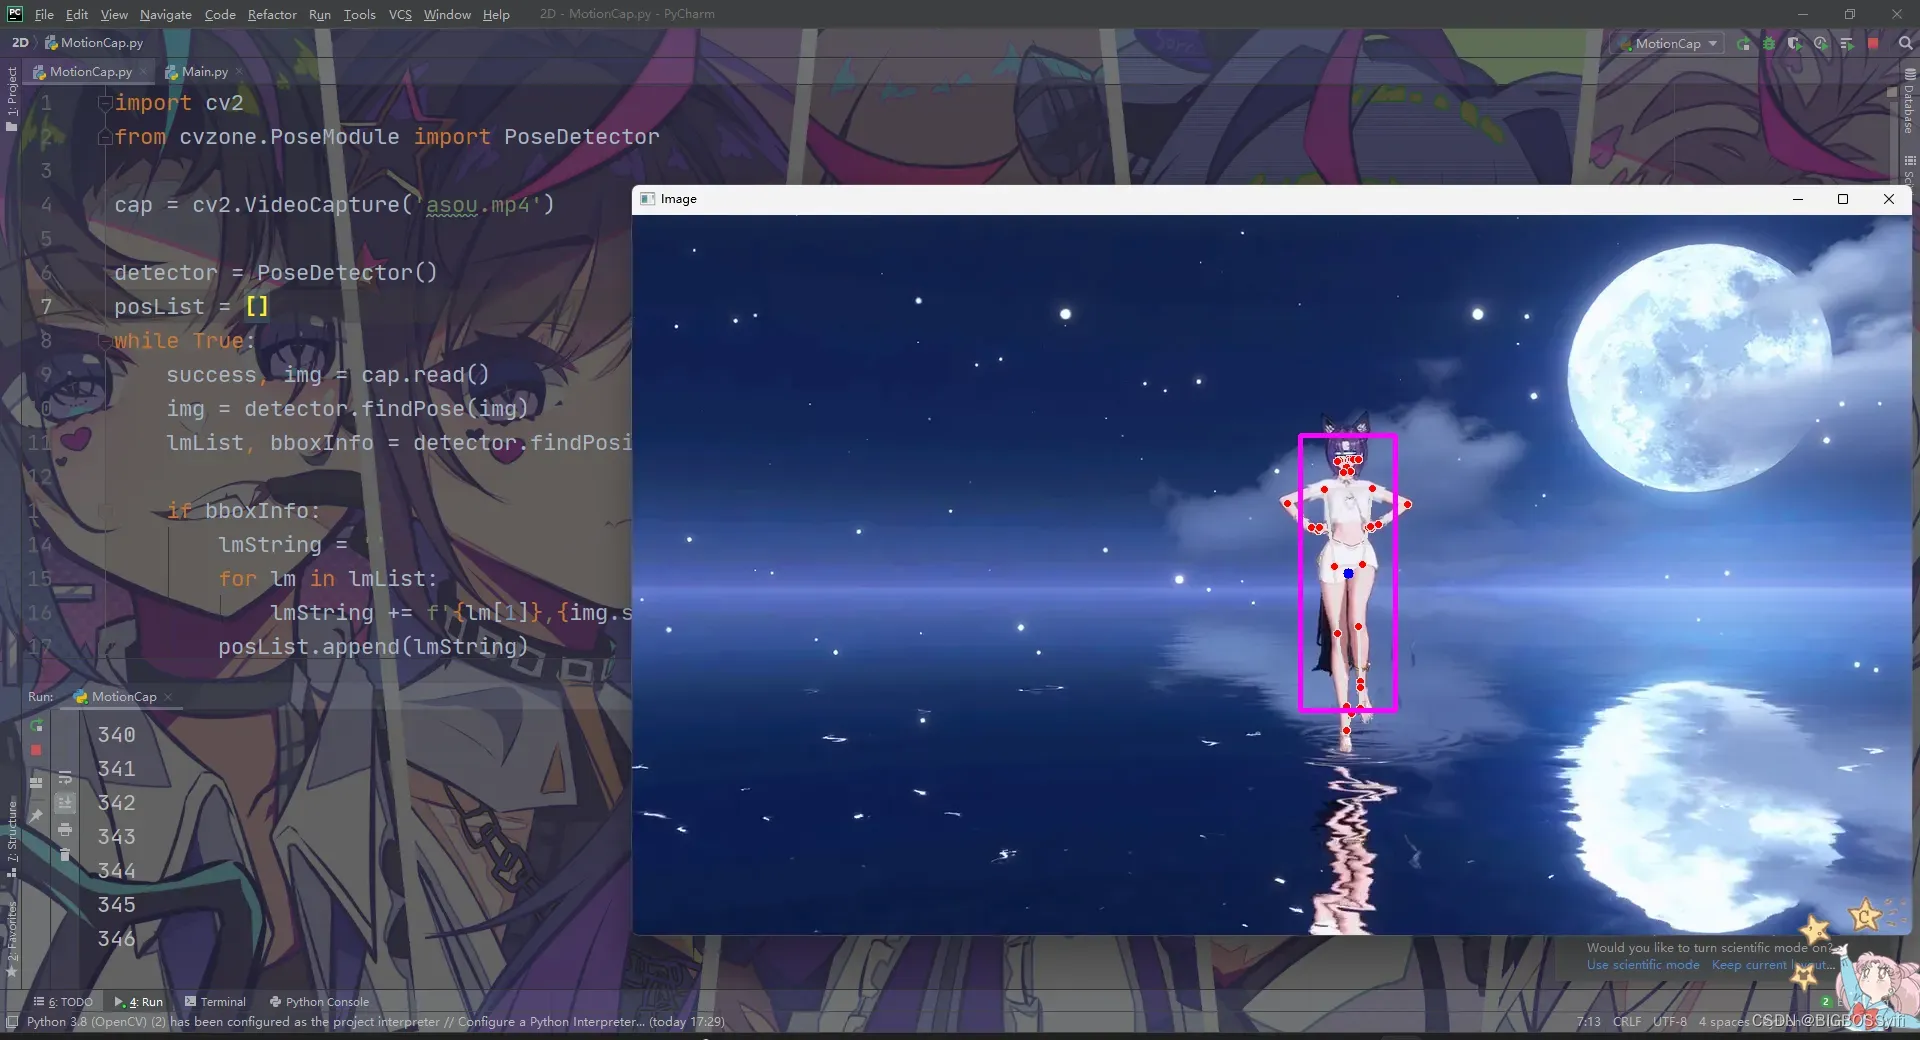
完整代码
Motion.py
import cv2
from cvzone.PoseModule import PoseDetector

# 读取cv来源,也可以调用摄像头使用
cap = cv2.VideoCapture('asoul.mp4')

detector = PoseDetector()
posList = []

while True:
    success, img = cap.read()
    img = detector.findPose(img)
    lmList, bboxInfo = detector.findPosition(img)

    if bboxInfo:
        lmString = ''
        for lm in lmList:
            lmString += f'{lm[1]},{img.shape[0] - lm[2]},{lm[3]},'
        posList.append(lmString)

    cv2.imshow("Image", img)
    key = cv2.waitKey(1)
    if key == ord('s'):
        with open("MotionFile.txt", 'w') as f:		# 将动作数据保存下来
            f.writelines(["%s\n" % item for item in posList])
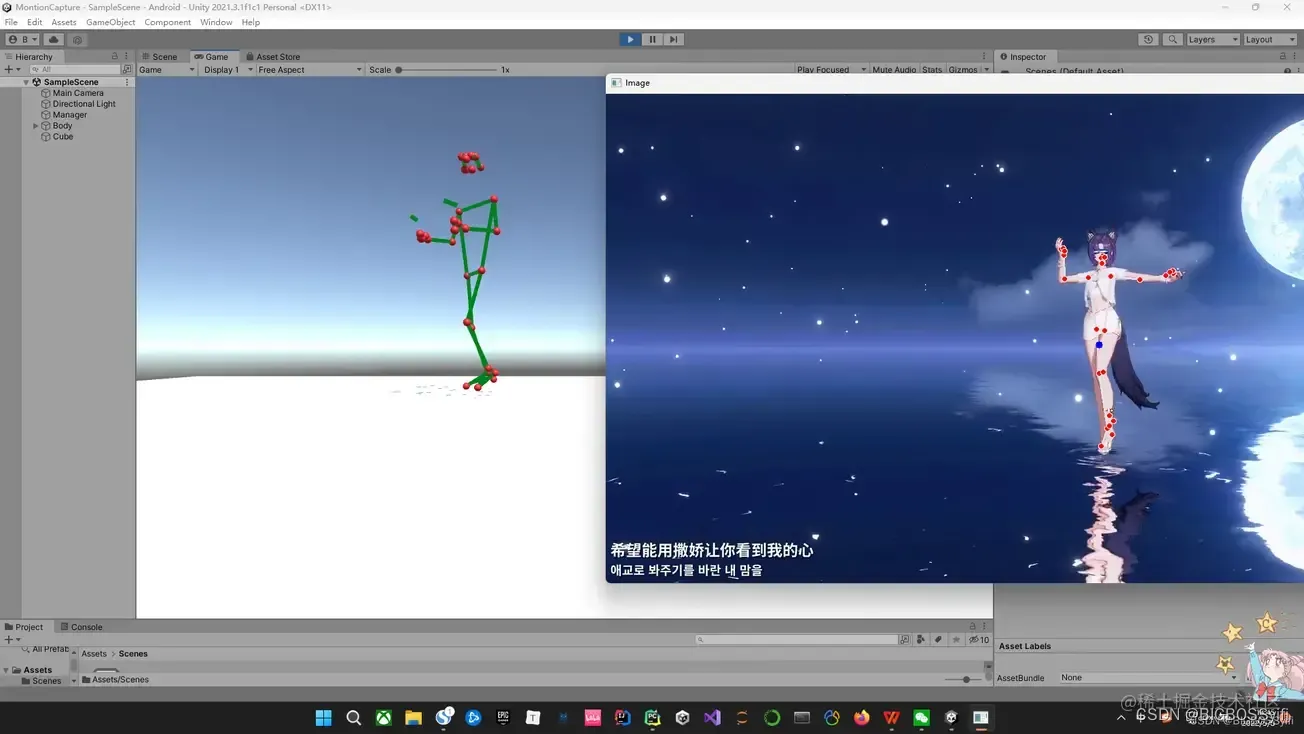
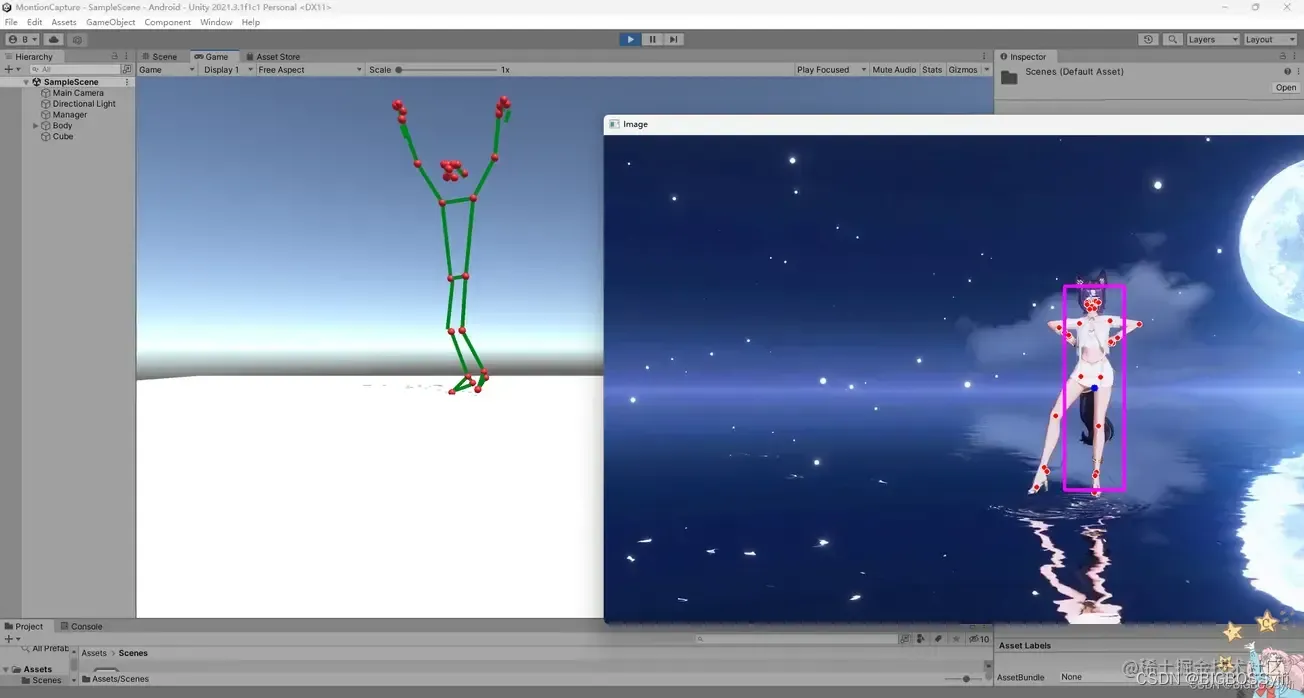
运行效果
Unity 部分
建模
在Unity中,我们需要搭建一个人物的模型,这里需要一个33个Sphere作为身体的特征点和33个Cube作为中间的支架
具体文件目录如下:
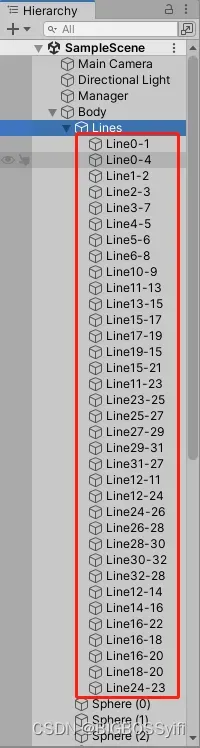
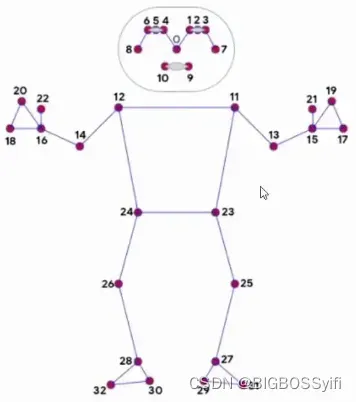
Line的编号对应人物模型特征点
Line.cs
这里是每个Line对应cs文件,实现功能:使特征点和Line连接在一起
using System.Collections;
using System.Collections.Generic;
using UnityEngine;

public class LineCode : MonoBehaviour
{

    LineRenderer lineRenderer;

    public Transform origin;
    public Transform destination;

    void Start()
    {
        lineRenderer = GetComponent<LineRenderer>();
        lineRenderer.startWidth = 0.1f;
        lineRenderer.endWidth = 0.1f;
    }
// 连接两个点
    void Update()
    {
        lineRenderer.SetPosition(0, origin.position);
        lineRenderer.SetPosition(1, destination.position);
    }
}
Action.cs
这里是读取上文识别并保存的人物动作数据,并将每个子数据循环遍历到每个Sphere点,使特征点随着视频中人物动作运动
using System.Collections;
using System.Collections.Generic;
using System.Linq;
using UnityEngine;
using System.Threading;

public class AnimationCode : MonoBehaviour
{

    public GameObject[] Body;
    List<string> lines;
    int counter = 0;

    void Start()
    {
    	// 读取MotionFile.txt的动作数据文件
        lines = System.IO.File.ReadLines("Assets/MotionFile.txt").ToList();
    }

    void Update()
    {
        string[] points = lines[counter].Split(',');

	// 循环遍历到每一个Sphere点
        for (int i =0; i<=32;i++)
        {
            float x = float.Parse(points[0 + (i * 3)]) / 100;
            float y = float.Parse(points[1 + (i * 3)]) / 100;
            float z = float.Parse(points[2 + (i * 3)]) / 300;
            Body[i].transform.localPosition = new Vector3(x, y, z);
        }

        counter += 1;
        if (counter == lines.Count) { counter = 0; }
        Thread.Sleep(30);
    }
}
最终实现效果
这里的视频与Unity运行有延时
Good Luck,Have Fun and Happy Coding!!!
文章出处登录后可见!