1. 前言
最近,学了人脸关键点检测算法,发现一个比较好的人脸关键点检测模型,打算学一学,让我们来看看算法是如何实现的吧!
论文地址:https://arxiv.org/pdf/1902.10859.pdf
2. PFLD介绍
PFLD的全称是A Practical Facial Landmark Detector,论文提出在非限定条件下的具有理想检测精度的轻量级landmark检测模型,在移动设备上能达到超实时的性能。
PFLD采用辅助网络来估计人脸样本的集合信息。针对数据不平衡,设计新的损失函数,加大对难样本的惩罚力度。使用multi-scale fc层扩展感受野精确定位人脸的特征点。使用MobilenetV2 Block构建网络的Backbone提升模型的推理速度及减少模型的计算量。
2.1 PFLD网络结构
网络结构如下图所示。
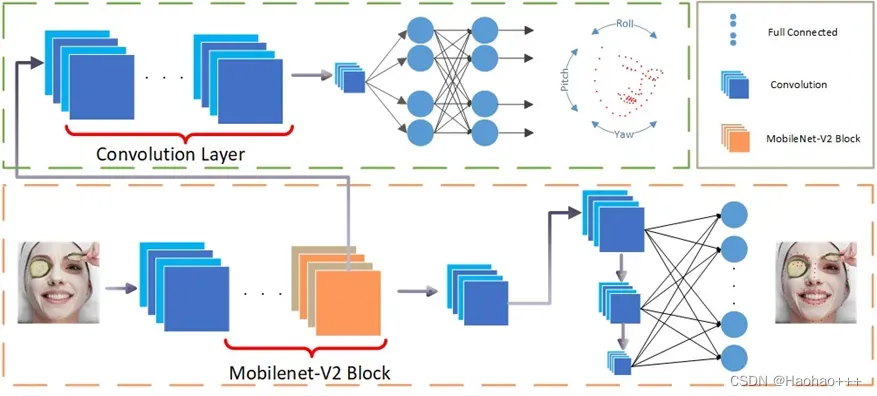
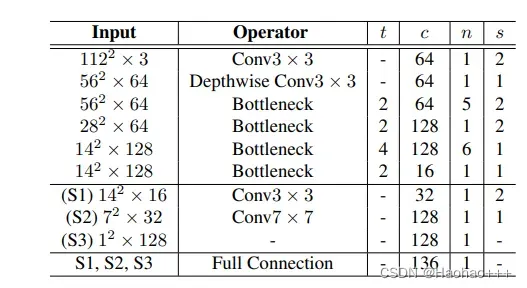
其中,黄色圈起来的是PFLD是主干网络,也是主分支网络,用于预测关键的位置。主分支网络使用了普通卷积+MobilenetV2 Block+多尺度融合来增强网络的特征提取能力。
具体网络结构如下:
# ---------------------------- #
# 普通卷积
# ---------------------------- #
def conv_bn(filters, kernel_size, strides, padding='same'):
    def _conv_bn(x):
        x = Conv2D(filters=filters, kernel_size=kernel_size, strides=strides, padding=padding, use_bias=False)(x)
        x = BatchNormalization()(x)
        x = Activation('relu')(x)
        return x

    return _conv_bn

# ---------------------------- #
# 倒残差网络块
# ---------------------------- #
def InvertedResidual(filters, strides, use_res_connect, expand_ratio=6,name=''):
    def _InvertedResidual(inputs):
        x = Conv2D(filters=filters*expand_ratio, kernel_size=1, strides=1, padding='valid', use_bias=False)(inputs)
        x = BatchNormalization()(x)
        x = Activation('relu')(x)
        x = DepthwiseConv2D(kernel_size=3, strides=strides, padding='same', use_bias=False)(x)
        x = BatchNormalization()(x)
        x = Activation('relu')(x)
        x = Conv2D(filters=filters, kernel_size=1, strides=1, padding='valid', use_bias=False)(x)
        x = BatchNormalization()(x)

        if use_res_connect:
            if name:
                x = Add(name=name)([inputs, x])
                return x
            else:
                x = Add()([inputs, x])
                return x
        else:
            return x

    return _InvertedResidual


def PFLDInference(inputs, is_train=True, keypoints=196):
    inputs = Input(shape=inputs)
    x = Conv2D(filters=64, kernel_size=3, strides=2, padding='same', use_bias=False)(inputs)
    x = BatchNormalization()(x)
    x = Activation('relu')(x)

    x = Conv2D(filters=64, kernel_size=3, strides=1, padding='same', use_bias=False)(x)
    x = BatchNormalization()(x)
    x = Activation('relu')(x)

    x = InvertedResidual(64, 2, False, 2)(x)

    x = InvertedResidual(64, 1, True, 2)(x)
    x = InvertedResidual(64, 1, True, 2)(x)
    x = InvertedResidual(64, 1, True, 2)(x)

    out1 = InvertedResidual(64, 1, True, 2)(x)

    x = InvertedResidual(128, 2, False, 2)(out1)

    x = InvertedResidual(128, 1, False, 4)(x)
    x = InvertedResidual(128, 1, True, 4)(x)
    x = InvertedResidual(128, 1, True, 4)(x)
    x = InvertedResidual(128, 1, True, 4)(x)
    x = InvertedResidual(128, 1, True, 4)(x)
    x = InvertedResidual(128, 1, True, 4)(x)

    x = InvertedResidual(16, 1, False, 2)(x)

    x1 = AvgPool2D(pool_size=(14, 14))(x)
    x1 = Reshape((x1.shape[1]*x1.shape[2]*x1.shape[3],))(x1)

    x = conv_bn(32, 3, 2, padding='same')(x)
    x2 = AvgPool2D(pool_size=(7, 7))(x)
    x2 = Reshape((x2.shape[1]*x2.shape[2]*x2.shape[3],))(x2)

    x3 = Conv2D(filters=128, kernel_size=7, strides=1, padding='valid')(x)
    x3 = Activation('relu')(x3)
    x3 = Reshape((x3.shape[1]*x3.shape[2]*x3.shape[3],))(x3)


    multi_scale = Concatenate()([x1, x2, x3])

    landmarks = Dense(keypoints, name='landmarks')(multi_scale)

    if is_train:
        out1 = AuxiliaryNet(out1)
        return Model(inputs, [Concatenate(name='train_out')([landmarks,out1]), landmarks])
    else:
        return Model(inputs, landmarks)
2.2 辅助网络
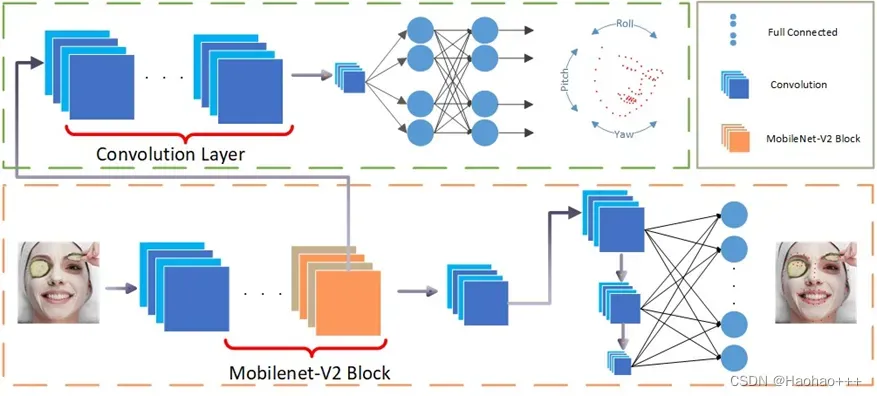
如上图,绿色圈起来的部分是辅助网络的结构,其内部是卷积层+全连接层,用于在训练阶段关键点回归的同时预测人脸姿态,使得模型更加关注那些稀有以及姿态角度过大的样本,从而提高预测的精度。
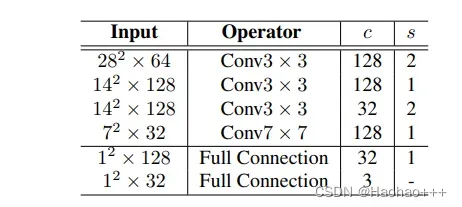
该子网络对每一个输入的人脸样本进行三维欧拉角估计,它的Ground Truth由训练数据中的关键点信息进行估计,虽然估计不太精确,但是作为区分数据分布的依据已经足够了,因为这个辅助网络的目的是监督和辅助关键点检测主分支。另外需要注意的一点是,这个辅助网络的输入不是训练数据,而是PFLD主分支网络的中间输出(第4个Block)。
具体网络结构如下:
# --------------------------------- #
# 辅助网络,辅助网络用以监督PFLD网络模型的训练
# 该子网络仅在训练的阶段起作用,在推理阶段不起作用。
# --------------------------------- #
def AuxiliaryNet(inputs):
    x = conv_bn(128, 3, 2)(inputs)
    x = conv_bn(128, 3, 1)(x)
    x = conv_bn(32, 3, 2)(x)
    x = conv_bn(128, 7, 1)(x)
    x = MaxPool2D(pool_size=(3, 3))(x)
    x = Flatten()(x)
    x = Dense(32)(x)
    x = Dense(3, name='out1')(x)
    return x
2.3 损失函数
RetinaNet中提出的Focal Loss可以较好的应对二分类中的数据不均衡情况,受到这一启发,作者设计了下面的损失函数来缓解数据不均衡的情况:

其中:
代表权重。
分别表示GT和Prediction在yaw、pitch、roll三种角度之间的偏差,其中pitch代表上下翻转,yaw代表水平翻转,roll代表平面内旋转,都表示人脸的一种姿态。
表示不同的类别的人脸: 正脸、侧脸、抬头、低头、表情以及遮挡情况,
根据样本类别分数进行调整,论文中使用的分数样本数的导数计算的。
由主分支网络计算得到,
由辅助网络计算得到,然后由Loss来建立联系。
import tensorflow as tf
import tensorflow.keras.backend as K

def PFLDLoss():
    def _PFLDLoss(y_true, y_pred):
        """
        y_pred: N 199
        y_true: N 205
        """
        train_batchsize = tf.cast(K.shape(y_pred)[0], tf.float32)
        landmarks, angle = y_pred[:, :196], y_pred[:, 196:]
        # ----------------------- #
        # landmark_gt 标注点
        # attribute_gt 6个属性。
        # euler_angle_gt 三种角度 角度越大cos值越小,权重越大
        # ----------------------- #
        landmark_gt, attribute_gt, euler_angle_gt = tf.cast(y_true[:,:196], tf.float32),tf.cast(y_true[:,196:202], tf.float32),tf.cast(y_true[:,202:],tf.float32)
        weight_angle = K.sum(1 - tf.cos(angle - euler_angle_gt), axis=1) # [8,]
        """
        landmark_gt: N, 196
        landmarks: N, 196
        attribute_gt: N 6
        euler_angle_gt: N 3
        angle: N 3
        """
        attributes_w_n = tf.cast(attribute_gt[:, 1:6], tf.float32)
        mat_ratio = K.mean(attributes_w_n, axis=0)
        N = K.shape(mat_ratio)[0]
        mat_ratio = tf.where(mat_ratio>0, 1.0/mat_ratio, train_batchsize)
        weight_attribute = K.sum(tf.matmul(attributes_w_n, K.reshape(mat_ratio, (N,1))), axis=1) # [8,1]
        l2_distant = K.sum(
            (landmark_gt - landmarks) * (landmark_gt - landmarks), axis=1)
        return K.mean(weight_angle * weight_attribute *
                          l2_distant)
    return _PFLDLoss
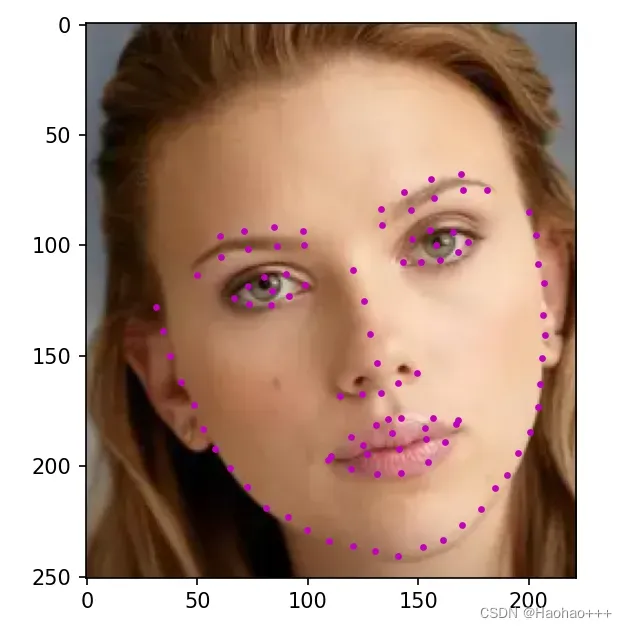
3. 代码预测效果
4. 数据集
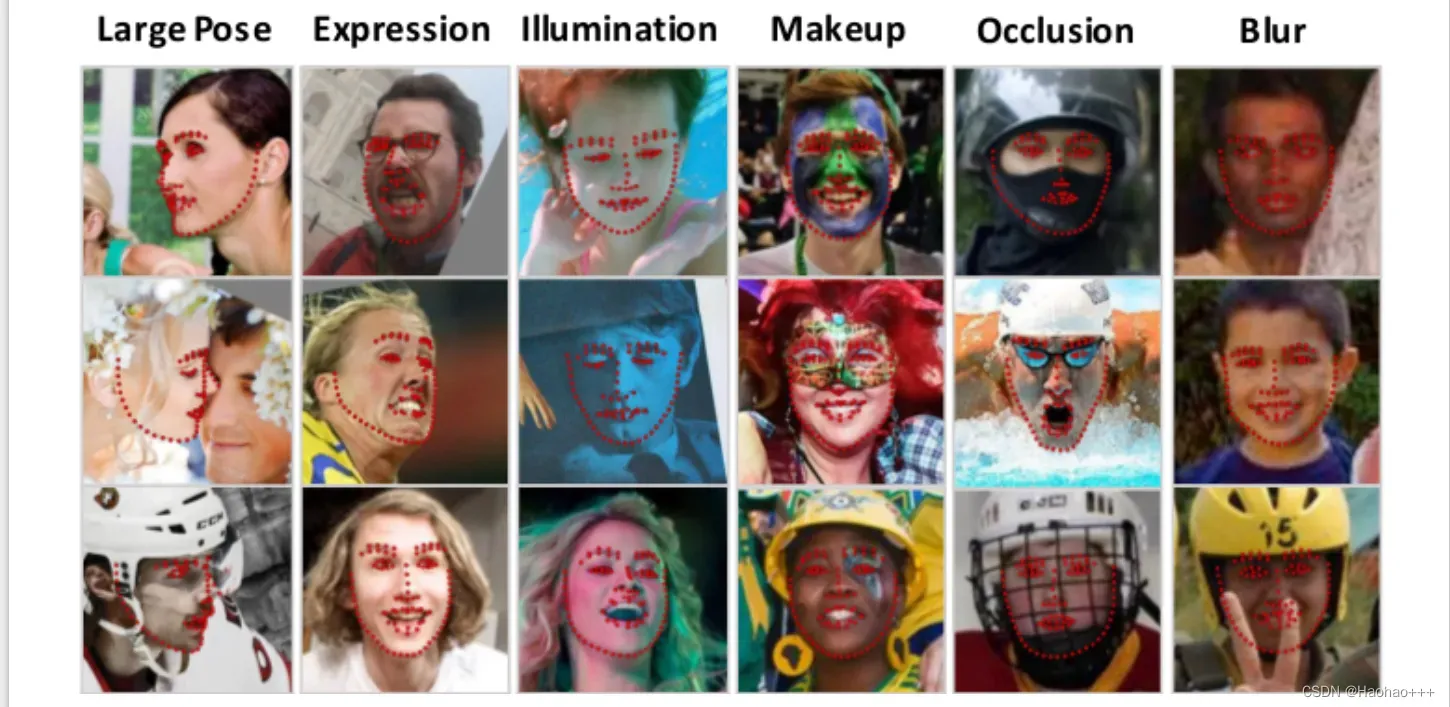
地址:https://wywu.github.io/projects/LAB/WFLW.html
或者百度网盘:
链接:https://pan.baidu.com/s/1CyMGCIX_3m2W1kdk7oOcFA
提取码:fh3e
5. 代码下载仓库
github地址:https://github.com/hao-ux/PFLD-tf2
gitee地址:https://gitee.com/Hao_gg/pfld-tf2
文章出处登录后可见!
