这里用RANSAC来过滤误匹配
本代码主要是实现图像误匹配,理论部分及参考文章移步:
计算机视觉:RANSAC剔除基础矩阵F错误匹配(Python实现)_Sunrise永不言弃的博客-CSDN博客
以下为代码部分,只需要修改350-366行就可以了,自己根据实际情况修改
import os
import cv2
import numpy as np
import random
os.environ["KMP_DUPLICATE_LIB_OK"] = "TRUE"
if int(cv2.__version__[0]) < 3:  # pragma: no cover
    print('Warning: OpenCV 3 is not installed')

#ransac
def compute_fundamental(x1, x2):
    n = x1.shape[1]
    if x2.shape[1] != n:
        raise ValueError("Number of points don't match.")

    # build matrix for equations
    A = np.zeros((n, 9))
    for i in range(n):
        A[i] = [x1[0, i] * x2[0, i], x1[0, i] * x2[1, i], x1[0, i] * x2[2, i],
                x1[1, i] * x2[0, i], x1[1, i] * x2[1, i], x1[1, i] * x2[2, i],
                x1[2, i] * x2[0, i], x1[2, i] * x2[1, i], x1[2, i] * x2[2, i]]

    # compute linear least square solution
    U, S, V = np.linalg.svd(A)
    F = V[-1].reshape(3, 3)

    # constrain F
    # make rank 2 by zeroing out last singular value
    U, S, V = np.linalg.svd(F)
    S[2] = 0
    F = np.dot(U, np.dot(np.diag(S), V))

    return F / F[2, 2]


def compute_fundamental_normalized(x1, x2):
    """    Computes the fundamental matrix from corresponding points
        (x1,x2 3*n arrays) using the normalized 8 point algorithm.
        从相应点计算基本矩阵
         (x1,x2 3*n数组)使用标准化的8点算法

        """

    n = x1.shape[1]
    if x2.shape[1] != n:
        raise ValueError("Number of points don't match.")

    # normalize image coordinates
    #标准化图像坐标
    x1 = x1 / x1[2]
    mean_1 = np.mean(x1[:2], axis=1)
    S1 = np.sqrt(2) / np.std(x1[:2])
    T1 = np.array([[S1, 0, -S1 * mean_1[0]], [0, S1, -S1 * mean_1[1]], [0, 0, 1]])
    x1 = np.dot(T1, x1)

    x2 = x2 / x2[2]
    mean_2 = np.mean(x2[:2], axis=1)
    S2 = np.sqrt(2) / np.std(x2[:2])
    T2 = np.array([[S2, 0, -S2 * mean_2[0]], [0, S2, -S2 * mean_2[1]], [0, 0, 1]])
    x2 = np.dot(T2, x2)

    # compute F with the normalized coordinates
    #用归一化坐标计算F
    F = compute_fundamental(x1, x2)
    # print (F)
    # reverse normalization
    F = np.dot(T1.T, np.dot(F, T2))

    return F / F[2, 2]

def randSeed(good, num = 8):
    '''
    :param good: 初始的匹配点对
    :param num: 选择随机选取的点对数量
    :return: 8个点对list
    '''
    eight_point = random.sample(good, num)
    return eight_point

def PointCoordinates(eight_points, keypoints1, keypoints2):  #随机八点求  eight_points是匹配好的点
    '''
    :param eight_points: 随机八点
    :param keypoints1: 点坐标
    :param keypoints2: 点坐标
    :return:8个点
    '''
    x1 = []
    x2 = []
    tuple_dim = [1.,]             #这里改成了np类型类型
    #print(type(eight_points))   类型是list
    #print(eight_points)

    fin_list_1=[]           #初始化保存8点的坐标
    fin_list_2 = []
    for i in eight_points:
        #        pts[0, :] = ys
        #        pts[1, :] = xs
        #print(type(keypoints1))   #元组

        #tuple_x1 = keypoints1[i][:2] + tuple_dim
        #tuple_x2 = keypoints2[i][:2] + tuple_dim
        idex_0=i[0].queryIdx                  #查询的描述符索引
        idex_1 = i[0].trainIdx                #目标的描述符索引
        #print("xxxxxxx",idex_0)
        tuple_x1 = keypoints1[idex_0][:2]           #得到关键点1的坐标  关键点转置后是N*3的矩阵,取前2维度
        tuple_x2 = keypoints2[idex_1][:2]           #得到关键点2的坐标
        #print("坐标是",tuple_x1,tuple_x2)           目前输出[257. 418.] [220. 464.]

        # 转化为其次,最后+1个维度的那种
        new_tuple_x1=np.append(tuple_x1,tuple_dim)
        new_tuple_x2 = np.append(tuple_x2, tuple_dim)
        #print("xxxxxxx",new_tuple_x1,new_tuple_x2)    #  [663. 445.   1.] [269. 246.   1.]

        fin_list_1=np.append(fin_list_1,new_tuple_x1)
        fin_list_2 = np.append(fin_list_2, new_tuple_x2)
        #print(type(fin_list_1))   #fin_list_1 np类型的,24个数的集合
        #arr = np.arange(24).reshape(3, 8)

        #原来的
        #tuple_x1 = keypoints1[i[0].queryIdx].pt + tuple_dim
        #tuple_x2 = keypoints2[i[0].trainIdx].pt + tuple_dim
        #x1.append(tuple_x1)
        #x2.append(tuple_x2)
    #print("xxxxxxx",fin_list_1.shape)
    x1 = fin_list_1.reshape(-1, 3)     #列是3 ,行数计算
    x2 = fin_list_2.reshape(-1, 3)     #列是3 ,行数计算
    #print(x1)
    #print("xxxxxxxx",x1.shape)
    return np.array(x1, dtype=float), np.array(x2, dtype=float)


def ransac(good, keypoints1, keypoints2, confidence,iter_num):
    Max_num = 0
    good_F = np.zeros([3,3])
    inlier_points = []
    for i in range(iter_num):
        eight_points = randSeed(good)
        x1,x2 = PointCoordinates(eight_points, keypoints1, keypoints2)
        F = compute_fundamental_normalized(x1.T, x2.T)
        num, ransac_good = inlier(F, good, keypoints1, keypoints2, confidence)
        if num > Max_num:
            Max_num = num
            good_F = F
            inlier_points = ransac_good
    print(Max_num, good_F)
    return Max_num, good_F, inlier_points


def computeReprojError(x1, x2, F):
    """
    计算投影误差
    """
    ww = 1.0/(F[2,0]*x1[0]+F[2,1]*x1[1]+F[2,2])
    dx = (F[0,0]*x1[0]+F[0,1]*x1[1]+F[0,2])*ww - x2[0]
    dy = (F[1,0]*x1[0]+F[1,1]*x1[1]+F[1,2])*ww - x2[1]
    return dx*dx + dy*dy

def inlier(F,good, keypoints1,keypoints2,confidence):   #找到内点
    num = 0
    ransac_good = []
    x1, x2 = PointCoordinates(good, keypoints1, keypoints2)
    for i in range(len(x2)):
        line = F.dot(x1[i].T)
        #在对极几何中极线表达式为[A B C],Ax+By+C=0,  方向向量可以表示为[-B,A]
        line_v = np.array([-line[1], line[0]])
        err = h = np.linalg.norm(np.cross(x2[i,:2], line_v)/np.linalg.norm(line_v))
        # err = computeReprojError(x1[i], x2[i], F)
        if abs(err) < confidence:
            ransac_good.append(good[i])
            num += 1
    return num, ransac_good


def nn_match_two_way(desc1, desc2, nn_thresh):
    assert desc1.shape[0] == desc2.shape[0]
    if desc1.shape[1] == 0 or desc2.shape[1] == 0:
        return np.zeros((3, 0))
    if nn_thresh < 0.0:
        raise ValueError('\'nn_thresh\' should be non-negative')
    # Compute L2 distance. Easy since vectors are unit normalized.
    #计算L2距离容易,因为向量已归一化
    dmat = np.dot(desc1.T, desc2)
    dmat = np.sqrt(2 - 2 * np.clip(dmat, -1, 1))

    # Get NN indices and scores.
    #获取NN索引和分数。
    idx = np.argmin(dmat, axis=1)                 #最近邻索引   argmin返回这个数组中最小的索引
    scores = dmat[np.arange(dmat.shape[0]), idx]  #最近邻分数
    # Threshold the NN matches.
    #NN匹配的阈值
    keep = scores < nn_thresh
    # Check if nearest neighbor goes both directions and keep those.
    #检查最近的邻居是否两个方向并保留这些方向
    idx2 = np.argmin(dmat, axis=0)
    keep_bi = np.arange(len(idx)) == idx2[idx]
    keep = np.logical_and(keep, keep_bi)
    idx = idx[keep]
    scores = scores[keep]
    # Get the surviving point indices.
    #获取幸存点索引
    m_idx1 = np.arange(desc1.shape[1])[keep]  #keep是布尔类型的 ture或者false  ,输出这样的[[0 1 2 3 4]]
    m_idx2 = idx
    # Populate the final 3xN match data structure.
    #填充最终的3XN匹配数据结构
    matches = np.zeros((3, int(keep.sum())))
    matches[0, :] = m_idx1
    #print(matches[0])  # 5.  22.  40.  68.  85.  94.  96. 109. 110. 126. 132. 135
    matches[1, :] = m_idx2
    #print(matches[1])  #56.  11. 369. 286.  94
    matches[2, :] = scores   #最近邻分数
    #print(matches[2])  #0.64095849 0.58723611 0.68436664 0.55057442
    return matches    #matches保存的就是点对的对应关系


def match_descriptors(kp1, desc1, kp2, desc2):
    # Match the keypoints with the warped_keypoints with nearest neighbor search
    bf = cv2.BFMatcher(cv2.NORM_L2, crossCheck=True)
    ##是一个暴力匹配的对象,取desc1中一个描述子,再与desc2中的所有描述子计算欧式距离
    matches = bf.match(desc1, desc2)

    ##上一行的返回值类似元组的集合(i,j)代表第一个集合的第i个点的最佳匹配是第二个集合的第j个点
    matches_idx = np.array([m.queryIdx for m in matches])
    m_kp1 = [kp1[idx] for idx in matches_idx]
    matches_idx = np.array([m.trainIdx for m in matches])
    m_kp2 = [kp2[idx] for idx in matches_idx]

    ####m_kp1是第一张图片的特征点,m_kp2是第二张图片的特征点,此时它们已经一一对应了(至少是最对应的,距离最小的
    return m_kp1, m_kp2, matches


def showpoint(img, ptx):
    for i in range(ptx.shape[1]):
        x = int(round(ptx[0, i]))
        y = int(round(ptx[1, i]))
        # if x>20 and y>20 and x<640 and y <450:
        #   None
        cv2.circle(img, (x, y), 3, color=(255, 0, 0))
    return img
## test def drawMatches(img1, kp1, img2, kp2, matches)
def drawMatches(img1, kp1, img2, kp2, matches):
    """
    My own implementation of cv2.drawMatches as OpenCV 2.4.9
    does not have this function available but it's supported in
    OpenCV 3.0.0
    This function takes in two images with their associated
    keypoints, as well as a list of DMatch data structure (matches)
    that contains which keypoints matched in which images.
    An image will be produced where a montage is shown with
    the first image followed by the second image beside it.
    Keypoints are delineated with circles, while lines are connected
    between matching keypoints.
    img1,img2 - Grayscale images #灰度图像
    kp1,kp2 - Detected list of keypoints through any of the OpenCV keypoint
              detection algorithms
    #通过任何OPENCV关键点检测到的关键点列表
               检测算法
    matches - A list of matches of corresponding keypoints through any
              OpenCV keypoint matching algorithm
    #通过任何OPENCV关键点匹配算法
    """

    # Create a new output image that concatenates the two images together
    #创建一个新的输出图像,将两个图像串联在一起
    # (a.k.a) a montage #剪辑
    rows1 = img1.shape[0]
    cols1 = img1.shape[1]
    rows2 = img2.shape[0]
    cols2 = img2.shape[1]


    #将第一个图像放在左侧
    #i1 = np.dstack([img1, img1, img1])
    #i2 = np.dstack([img2, img2, img2])
    #i1 = cv2.imread("D:\essay\SuperPoint\SuperPointPretrainedNetwork-master/assets/test/1.png")
    #i2 = cv2.imread("D:\essay\SuperPoint\SuperPointPretrainedNetwork-master/assets/test/2.png")

    #cv2.imshow("image1", i1)
    #cv2.imshow("image2", i1)
    #np.hstack将参数元组的元素数组按水平方向进行叠加
    #就是图像并排放一起
    out = np.hstack([img1, img2])
    #cv2.imshow("image2", out)
    print("输出尺寸", out.shape)
    # Place the next image to the right of it
    # out[0:480,640:1280] = np.dstack([img2, img2, img2])

    # For each pair of points we have between both images
    # draw circles, then connect a line between them
    #对于每对点,我们在这两个图像之间都有
    #绘制圆圈,然后在它们之间连接一条线
    for i in range(matches.shape[1]):   #[1]点的个数
        # Get the matching keypoints for each of the images
        #获取每个图像的匹配关键点

        img1_idx = matches[0, i]
        img2_idx = matches[1, i]
        x11 = int(img1_idx)
        y11 = int(img1_idx)
        x22 = int(img2_idx)
        y22 = int(img2_idx)

        # x - columns    x列
        # y - rows       y行
        x1 = kp1[0, x11]
        y1 = kp1[1, y11]
        x2 = kp2[0, x22]
        y2 = kp2[1, y22]

        # Draw a small circle at both co-ordinates
        # radius 4
        # colour blue
        # thickness = 1
        # a = np.random.randint(0, 256)  #返回一个随机整数值
        # b = np.random.randint(0, 256)
        # c = np.random.randint(0, 256)

        a = np.random.randint(5, 7)     #B 蓝色返回一个随机整数值
        b = np.random.randint(5, 7)     #G 绿色
        c = np.random.randint(244, 246) #R 红色

        cv2.circle(out, (int(np.round(x1)), int(np.round(y1))), 2, (a, b, c), 1)  # 画圆,cv2.circle()参考官方文档
        cv2.circle(out, (int(np.round(x2) + cols1), int(np.round(y2))), 2, (a, b, c), 1)

        # Draw a line in between the two points
        # thickness = 1
        # colour blue
        cv2.line(out, (int(np.round(x1)), int(np.round(y1))), (int(np.round(x2) + cols1), int(np.round(y2))),
                 (a, b, c),2, shift=0)  # 画线,cv2.line()参考官方文档

    # Also return the image if you'd like a copy
    return out


if __name__ == '__main__':
    font = cv2.FONT_HERSHEY_DUPLEX  # 设置可视化字体
    font_clr = (255, 255, 255)
    font_pt = (4, 12)
    font_sc = 0.4


    #读图
    #第一,二图的特征点和描述符
    #.d2-net是NPZ文件,你换成自己的就就好了
    data_1 = np.load("D:\essay\SuperPoint\superpoint\pictuer\style_image\match/11.jpg.d2-net")
    data_2 = np.load("D:\essay\SuperPoint\superpoint\pictuer\style_image\match/12.jpg.d2-net")

    #读入2张图像
    imgx_1 = cv2.imread('D:\essay\SuperPoint\superpoint\pictuer\style_image\match/11.jpg', 1)
    imgx_2 = cv2.imread('D:\essay\SuperPoint\superpoint\pictuer\style_image\match/12.jpg', 1)

    #可以用这个看下你的npz文件的属性
    # print(data.files)

    #我这里是(3473, 3)维,N是3473,不同的网络提取的特征点不一样。如果你的不是这样,你可以转置下  例如pts=pts.T
    #如果你的是(3473, 2)也是没问题的
    pts = data_1['keypoints']  # np类型  (3473, 3)  3473是N    pts[0]是[231.68674 271.08926   1.     ]  齐次坐标都有了
    # print(pts[0])
    desc = data_1['descriptors']  # np类型  (3473, 512)
    print("图1提取特征点数目", pts.shape[0])


    #imgx = img1.copy()  #不要copy就不是灰色的
    pts=pts.T                               # 因为其他函数写的时候都是对应3*N的来写的,转置以后成为3*N
    desc=desc.T                     #转职后成为512*N,本身是(3473, 512)
    img11 = showpoint(imgx_1, pts)
    cv2.namedWindow('imgone', 0)
    cv2.imshow("imgone", img11)  #第一张图显示特征点
    #cv2.waitKey(0)   有这个才能显示窗口
    ##第2图的特征点和描述符

    pts1 = data_2['keypoints']  # np类型  (3473, 3)  3473是N    pts[0]是[231.68674 271.08926   1.     ]  齐次坐标都有了
    desc1 = data_2['descriptors']  # np类型  (3473, 512)
    desc1=desc1.T
    print("图1提取特征点数目", pts1.shape[0])
    pts1=pts1.T
    img22 = showpoint(imgx_2, pts1)
    cv2.namedWindow('imgtwo', 0)
    cv2.imshow("imgtwo", img22)  #第一张图显示特征点
    #cv2.waitKey(0)   #有这个才能显示窗口


    #下面都是共同使用的东西
    # 尝试暴力匹配+KNN算法实现
    desc_test_0=desc.T    #矩阵转置后 #可以顺利输出 这里必须(1099, 128)N在前
    desc_test_1 = desc1.T
    pts_test_0 =pts.T       #特征点也转置
    pts_test_1 =pts1.T
    #特征点转为元组
    pts_test_0 = tuple(pts_test_0)
    pts_test_1 = tuple(pts_test_1)

    match_test = cv2.BFMatcher()
    matches = match_test.knnMatch(desc_test_0, desc_test_1, k=2)
    #print("这里的长度是",len(matches))  #tuple  长度893

    good = []
    for m, n in matches:
        if m.distance < 0.8 * n.distance:   #可以自己改
            good.append([m])
    print("number of feature points:",pts.shape[1], pts1.shape[1])  #特征点个数,调试正确
    print("good match num:{} good match points:".format(len(good))) #正确  knn匹配到25个


    #
    #这里只能将pts, pts1抓换后才能用
    Max_num, good_F, inlier_points = ransac(good, pts_test_0, pts_test_1, confidence=30, iter_num=500)
    print(pts.shape[1], "/", pts1.shape[1], "/", len(good), "/", Max_num, "/", '%.2f' % (Max_num / len(good)))
    #print(inlier_points)   #这个就是得出的ransac后的匹配数

    #inlier_points 转化为match的坐标  #match是一个3*67的数组,这里转换后还要转置下T
    #print("xxxxxxxxx",len(inlier_points))
    #print(inlier_points)
    tuple_x = []
    tuple_y = []
    #matche = np.zeros((2,len(inlier_points)))   #初始化matche, 0填充 M行 2列,M为匹配到的点数量  最后转置下T
    #print(type(matche))  #np类型的
    for i in inlier_points:
        #print(i)
        idex_x=i[0].queryIdx                  #查询的描述符索引 845个
        idex_y = i[0].trainIdx                #目标的描述符索引 对应555个
        #print("xxxxxxx",idex_0)
        tuple_x=np.append(tuple_x,idex_x)       #  查询的描述符的索引弄到一起
        #print(tuple_x)
        tuple_y = np.append(tuple_y, idex_y )   #  目标的描述符的索引弄到一起


    match=np.vstack((tuple_x,tuple_y))


    #画图  test
    out =drawMatches(imgx_1, pts, imgx_2,pts1, match)   #传入了彩色图
    cv2.namedWindow("matcher", 0)
    cv2.imshow("matcher", out)
    cv2.waitKey(0) # 函数的功能是不断刷新图像 , 频率时间为delay , 单位为ms ,处理视频的时候用的
    print('==> Finshed ')

    #
最终显示图片 D2-net实现
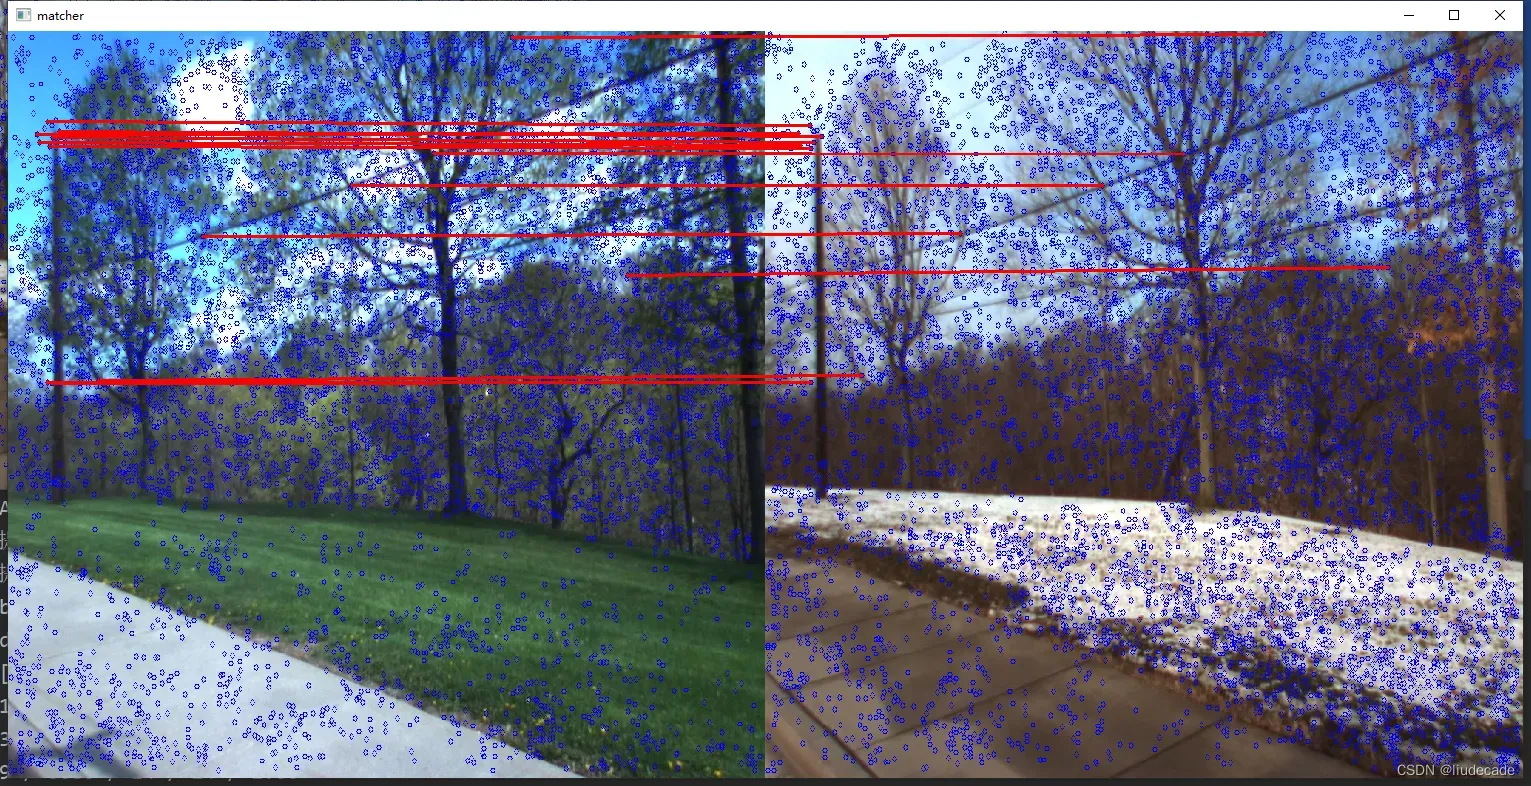
这个是Superpoint实现的
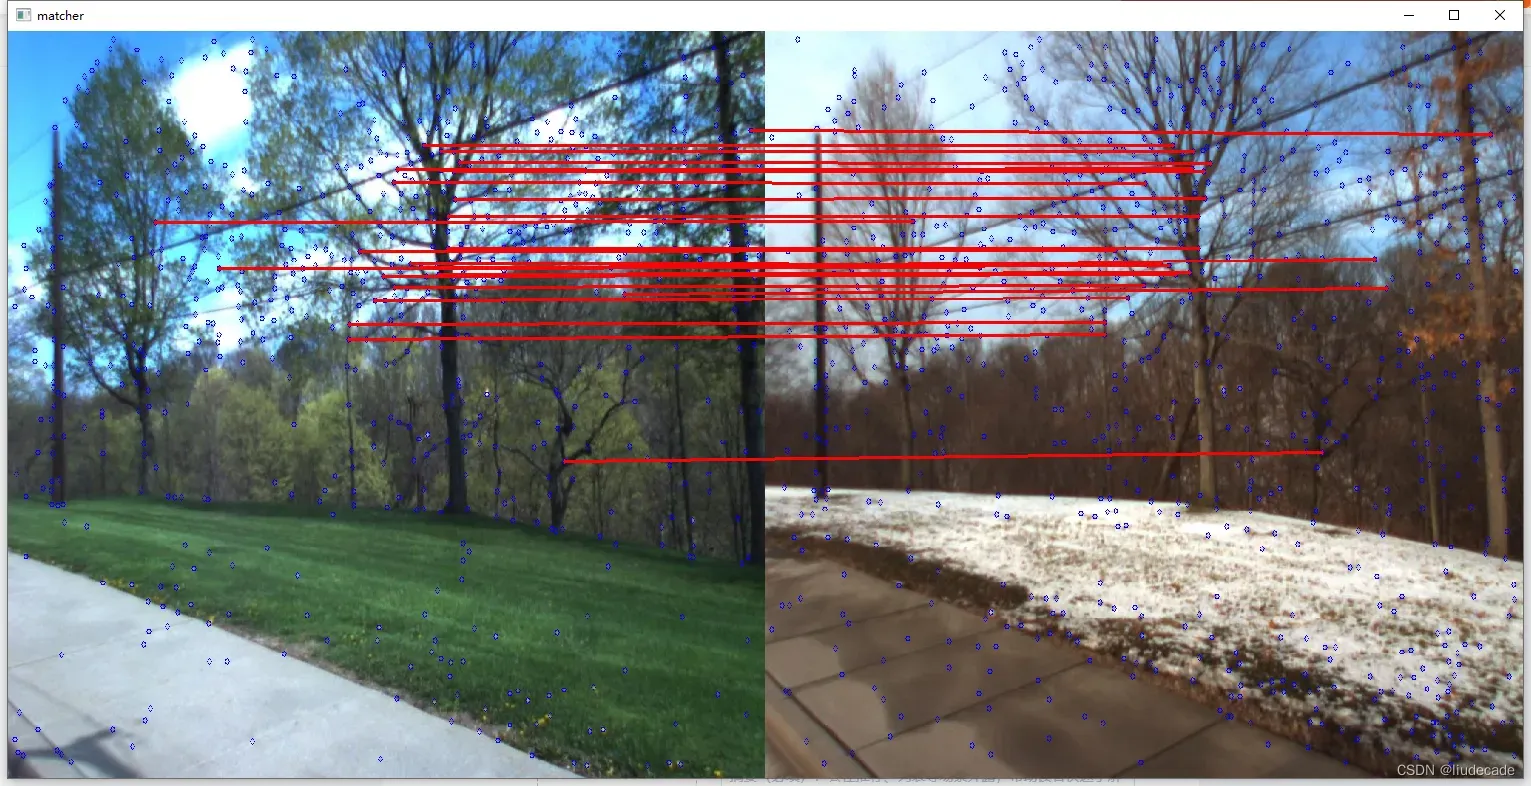
这里显示的是 :特征点数量 A,B/匹配对数/正确对数/准确率

文章出处登录后可见!
已经登录?立即刷新