一、DeepSort介绍
论文地址:
https://arxiv.org/pdf/1703.07402.pdf
参考文章:
代码地址:
https://github.com/mikel-brostrom/Yolov5_DeepSort_OSNet(可参考这个源代码,如果需要我这边的源代码可私信)
SORT对比DeepSORT:
虽然SORT是一个非常简单、有效、实用的多目标跟踪算法,但仅仅通过IOU来匹配虽然速度很快,相应的ID Switch次数也多;
DeepSORT在原有基础上,通过集成表观信息,使得模型能够处理目标长时间被遮挡的情况,将ID Switch这个指标降低了45%;表观信息是通过一个ReID的模型训练出来的;
思考:SORT算法中ID Switch次数较多的原因?
因为采用的关联矩阵旨在状态预测不确定性较小的时候比较准确(也就是状态估计存在一定问题)
DeepSORT改进了这个状态估计的代价计算方法,用结合运动和外观信息的代价计算来替换原先的;
二、行人ReID特征训练
行人数据集介绍:
Market 1501数据集:在清华大学校园中采集于2015年公开,总共有1501个行人、32668个检测到的行人检测框;
可在该连接下下载:下载地址
训练步骤:
1、由于数据集没有对人进行分类,首先要根据图片名称上的信息,将同一个人存放在一个文件夹下;
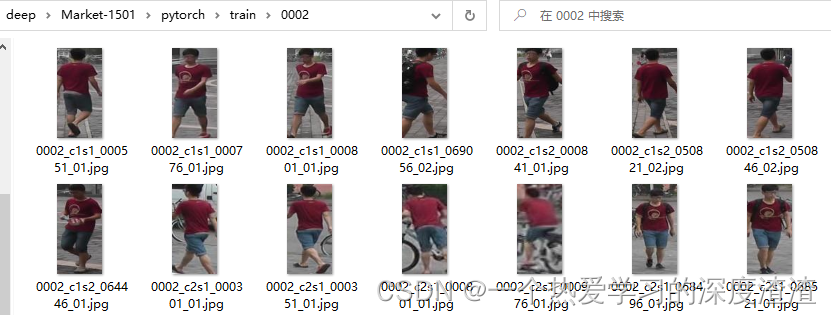
说明:
从上图可以看出,文件夹0002下为同一个人的所有图片,总共有751个这样的文件夹,也就是分为751类;
2、定义网络结构,最终将输出一个类别数量相同的特征向量,在该任务中是751维的向量;
网络结构:
前面通过几层Conv层和ReLU激活函数,对输入特征进行下采样,重点关注最后的分类层;

最终通过两层全连接层,将特征信息输出为751维度的一个特征向量;
实际上最终的输出类似于一个分类任务,通过输入一个图像,得到该图像的751维度的向量特征;
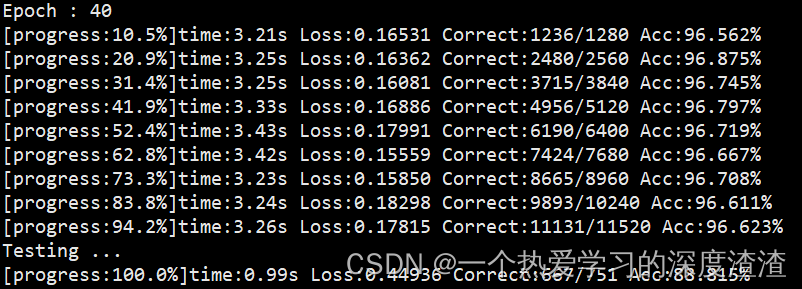
训练结果:
这里仅仅是训练40个epochs,在该数据集下就能达到一个很好的效果:
三、工具类代码讲解
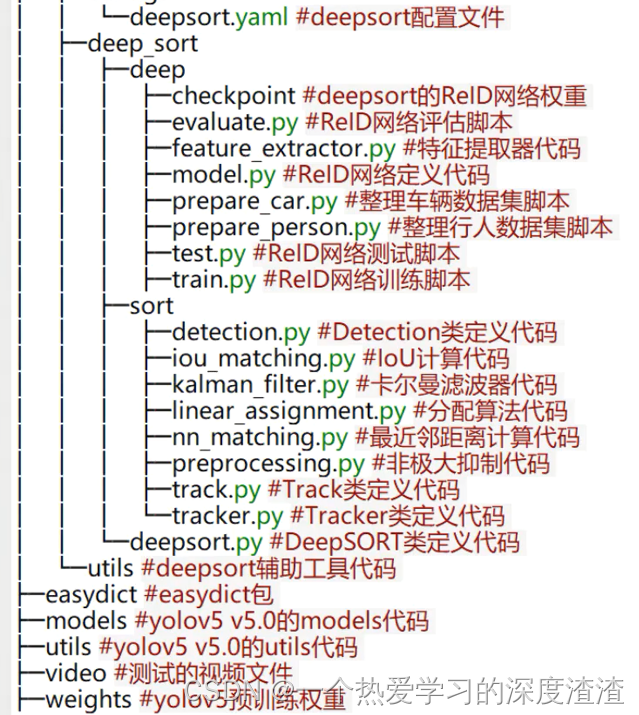
首先了解下整个项目的代码结构:
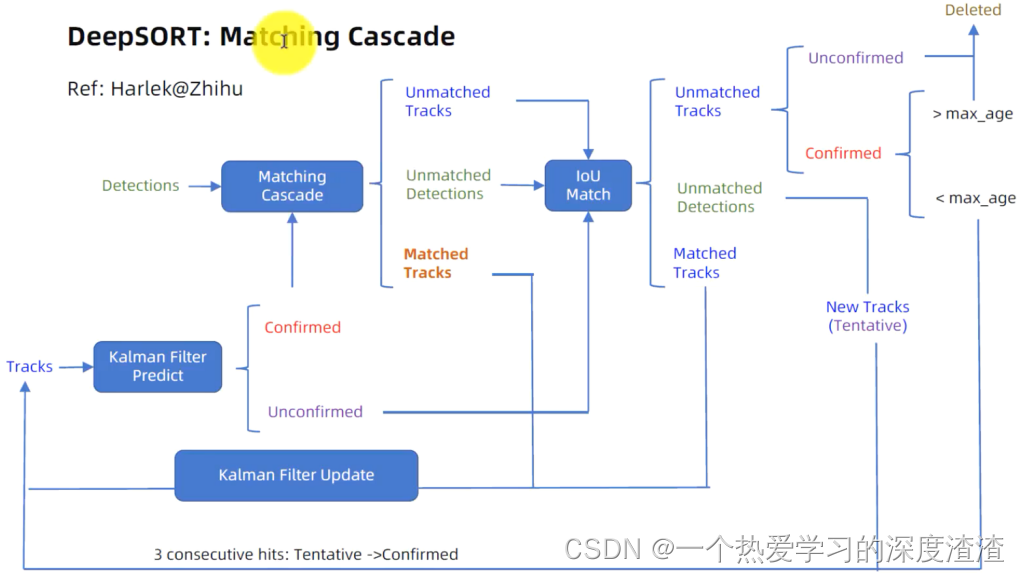
下面看一下整个实现流程图:
下面依次讲解一些重要工具类代码:
nn_matching.py
作用:对于每个目标,返回最近邻居的距离度量, 即与到目前为止已观察到的任何样本的最接近距离。
1、欧式距离计算
"""
a :NxM 矩阵,代表 N 个样本,每个样本 M 个数值
b :LxM 矩阵,代表 L 个样本,每个样本有 M 个数值
返回的是 NxL 的矩阵,比如 dist[i][j] 代表 a[i] 和 b[j] 之间的平方和距离
"""
def _pdist(a, b):
    a, b = np.asarray(a), np.asarray(b)
    if len(a) == 0 or len(b) == 0:
        return np.zeros((len(a), len(b)))
    a2, b2 = np.square(a).sum(axis=1), np.square(b).sum(axis=1)
    r2 = -2. * np.dot(a, b.T) + a2[:, None] + b2[None, :]
    r2 = np.clip(r2, 0., float(np.inf))			# 将矩阵小于0的值都变为0
    return r2
上述实际上是通过一个公式推到,详情可查看下面的博文介绍:
https://blog.csdn.net/frankzd/article/details/80251042
拓展:
求最近邻的欧氏距离
distances = _pdist(a, b)
return np.maximum(0.0, distances.min(axis=0))	# 实际上就是求第一维度上的最小值
2、余弦距离计算
"""
a :NxM 矩阵,代表 N 个样本,每个样本 M 个数值
b :LxM 矩阵,代表 L 个样本,每个样本有 M 个数值
返回的是 NxL 的矩阵,比如 c[i][j] 代表 a[i] 和 b[j] 之间的余弦距离
"""


# np.linalg.norm 求向量的范式,默认是 L2 范式
a = np.asarray(a) / np.linalg.norm(a, axis=1, keepdims=True)
b = np.asarray(b) / np.linalg.norm(b, axis=1, keepdims=True)
return 1. - np.dot(a, b.T) # 余弦距离 = 1 - 余弦相似度
参考博文:https://blog.csdn.net/u013749540/article/details/51813922
说明:求最近邻的方式和欧式距离的最近邻求法一致;
3、代价矩阵的计算
"""
计算features和targets之间的距离,返回一个成本矩阵(代价矩阵)
"""
cost_matrix = np.zeros((len(targets), len(features)))
for i, target in enumerate(targets):
	cost_matrix[i, :] = self._metric(self.samples[target], features)	# 默认采用余弦距离
return cost_matrix
个人理解:
nn_matching的主要作用我认为是DeepSORT后引进的,也就是引入了表观特征后,通过REID网络能够得到一个目标的特征信息,将两帧之间的目标得到的特征,进行余弦距离的最近邻求值,也就是上面讲解的方法,最终能得到一个代价矩阵;
linear_assignment.py
作用:通过成本矩阵以及匈牙利算法,也就是级联匹配的功能实现;
# 计算成本矩阵
cost_matrix = distance_metric(
	tracks, detections, track_indices, detection_indices)
cost_matrix[cost_matrix > max_distance] = max_distance + 1e-5

# 执行匈牙利算法,得到指派成功的索引对,行索引为tracks的索引,列索引为detections的索引
"""
官方函数说明:
https://docs.scipy.org/doc/scipy/reference/generated/scipy.optimize.linear_sum_assignment.html#scipy.optimi#ze.linear_sum_assignment
"""
row_indices, col_indices = linear_assignment(cost_matrix)

matches, unmatched_tracks, unmatched_detections = [], [], []
# 找出未匹配的detections
for col, detection_idx in enumerate(detection_indices):
	if col not in col_indices:
		unmatched_detections.append(detection_idx)
# 找出未匹配的tracks
for row, track_idx in enumerate(track_indices):
	if row not in row_indices:
		unmatched_tracks.append(track_idx)
# 遍历匹配的(track, detection)索引对
for row, col in zip(row_indices, col_indices):
	track_idx = track_indices[row]
	detection_idx = detection_indices[col]
# 如果相应的cost大于阈值max_distance,也视为未匹配成功
	if cost_matrix[row, col] > max_distance:
		unmatched_tracks.append(track_idx)
		unmatched_detections.append(detection_idx)
	else:
		matches.append((track_idx, detection_idx))
return matches, unmatched_tracks, unmatched_detections
四、主代码讲解
首先来看一下检测模块,所用到YOLOV5网络,并且其效果也影响着整个任务的效果;
objdetector.py
作用:用于实现目标检测,将视频帧中的目标检测出来;
# 检测的目标对象(如果不希望检测的目标可以直接去掉)
OBJ_LIST = ['person', 'car', 'bus', 'truck']
# YoloV5模型权重,这里也可以选择其他类型的模型
DETECTOR_PATH = 'weights/yolov5m.pt'

# 先定义一个基础类,实现初始化和函数原型
class baseDet(object):
    def __init__(self):
        self.img_size = 640		# 缩放的尺寸
        self.threshold = 0.3	# 阈值
        self.stride = 1

    def build_config(self):
        self.frameCounter = 0

    def feedCap(self, im, func_status):
        # 这个字典是最终返回的结果,也就是将模型的输出保存成字典的形式
        retDict = {
            'frame': None,
            'list_of_ids': None,
            'obj_bboxes': []
        }
        self.frameCounter += 1
        # 这里调用了objtracker,会调用ReID模型得到特征,然后进行匹配
        im, obj_bboxes = objtracker.update(self, im)
        retDict['frame'] = im
        retDict['obj_bboxes'] = obj_bboxes

        return retDict
    def init_model(self):
        raise EOFError("Undefined model type.")
    def preprocess(self):
        raise EOFError("Undefined model type.")
    def detect(self):
        raise EOFError("Undefined model type.")

# 对YOLOV5检测器的一个封装,使得使用起来更加简便
class Detector(baseDet):
    def __init__(self):
        super(Detector, self).__init__()
        self.init_model()
        self.build_config()

    # 加载模型
    def init_model(self):
        self.weights = DETECTOR_PATH
        self.device = '0' if torch.cuda.is_available() else 'cpu'
        self.device = select_device(self.device)
        model = attempt_load(self.weights, map_location=self.device)
        model.to(self.device).eval()
        model.half()
        self.m = model
        self.names = model.module.names if hasattr(
            model, 'module') else model.names

    # 对传进来的视频帧进行预处理
    def preprocess(self, img):
        img0 = img.copy()
        img = letterbox(img, new_shape=self.img_size)[0]
        img = img[:, :, ::-1].transpose(2, 0, 1)
        img = np.ascontiguousarray(img)
        img = torch.from_numpy(img).to(self.device)
        img = img.half()  # 半精度
        img /= 255.0  # 图像归一化
        if img.ndimension() == 3:
            img = img.unsqueeze(0)
        return img0, img		# img0是原始的图像,img是处理后的图像

    def detect(self, im):
        im0, img = self.preprocess(im)
        pred = self.m(img, augment=False)[0]		# 将图像传入检测器中,得到推理后的结果
        pred = pred.float()
        pred = non_max_suppression(pred, self.threshold, 0.4)	# 进行非极大值抑制
        pred_boxes = []
        for det in pred:
            if det is not None and len(det):
                det[:, :4] = scale_coords(
                    img.shape[2:], det[:, :4], im0.shape).round()
                for *x, conf, cls_id in det:
                    lbl = self.names[int(cls_id)]
                    if not lbl in OBJ_LIST:			# 这里就是判断类别,不在我们需要检测的类别中就跳过
                        continue
                    x1, y1 = int(x[0]), int(x[1])
                    x2, y2 = int(x[2]), int(x[3])
                    pred_boxes.append(
                        (x1, y1, x2, y2, lbl, conf))
        return im, pred_boxes							# 最后返回原始图像以及检测到的目标框
objtracker.py
作用:一个跟踪器的类,对检测后的目标进行跟踪;
cfg = get_config()
cfg.merge_from_file("deep_sort/configs/deep_sort.yaml")
# 首先需要实例化一个DeepSORT的类,其中封装了一些工具类的实现
deepsort = DeepSort(cfg.DEEPSORT.REID_CKPT,
                    max_dist=cfg.DEEPSORT.MAX_DIST, min_confidence=cfg.DEEPSORT.MIN_CONFIDENCE,
                    nms_max_overlap=cfg.DEEPSORT.NMS_MAX_OVERLAP, max_iou_distance=cfg.DEEPSORT.MAX_IOU_DISTANCE,
                    max_age=cfg.DEEPSORT.MAX_AGE, n_init=cfg.DEEPSORT.N_INIT, nn_budget=cfg.DEEPSORT.NN_BUDGET,
                    use_cuda=True)

# 下面重点看一下update这个函数,也就是更新图像中的检测框
def update(target_detector, image):
		# 这里也就是用之前的检测器得到检测框
		_, bboxes = target_detector.detect(image)
        bbox_xywh = []
        confs = []
        bboxes2draw = []
        if len(bboxes):
            # Adapt detections to deep sort input format(更新检测对象的状态)
            for x1, y1, x2, y2, _, conf in bboxes:
                obj = [
                    int((x1+x2)/2), int((y1+y2)/2),
                    x2-x1, y2-y1
                ]
                bbox_xywh.append(obj)
                confs.append(conf)
            xywhs = torch.Tensor(bbox_xywh)
            confss = torch.Tensor(confs)

            # Pass detections to deepsort(这里就可以得到最终的这一帧的目标框和目标ID)
            outputs = deepsort.update(xywhs, confss, image)
            for value in list(outputs):
                x1,y1,x2,y2,track_id = value
                bboxes2draw.append(
                    (x1, y1, x2, y2, '', track_id)
                )
        # 这里起到一个将检测框和ID信息绘制到图像上的作用
        image = plot_bboxes(image, bboxes2draw)
        return image, bboxes2draw
demo.py
作用:实现对传入的视频文件进行目标跟踪,并将最终结果保存为一个新的视频文件;实际上就是将之前封装好的类进行调用,得到我们想要的信息,最终进行可视化的呈现;
VIDEO_PATH = './video/test_person.mp4'		# 传入视频文件
RESULT_PATH = 'result.mp4'					# 输出视频文件

def main():

    func_status = {}
    func_status['headpose'] = None

    name = 'demo'

    det = Detector()
    cap = cv2.VideoCapture(VIDEO_PATH)
    fps = int(cap.get(5))
    print('fps:', fps)			# 得到帧率
    t = int(1000/fps)			# 每一帧的间隔时间

    size = None
    videoWriter = None

    while True:

        # try:
        _, im = cap.read()	# 读入一帧帧数据,也就是视频的全部帧
        if im is None:
            break

        result = det.feedCap(im, func_status)	# 这里的im表示所有输入视频帧
        result = result['frame']
        result = imutils.resize(result, height=500)
        # 下面代码也就是保存成视频的一个操作
        if videoWriter is None:
            fourcc = cv2.VideoWriter_fourcc(
                'm', 'p', '4', 'v')  # opencv3.0
            videoWriter = cv2.VideoWriter(
                RESULT_PATH, fourcc, fps, (result.shape[1], result.shape[0]))

        videoWriter.write(result)
        cv2.imshow(name, result)
        cv2.waitKey(t)

        if cv2.getWindowProperty(name, cv2.WND_PROP_AUTOSIZE) < 1:
            # 点x退出
            break

    cap.release()
    videoWriter.release()
    cv2.destroyAllWindows()
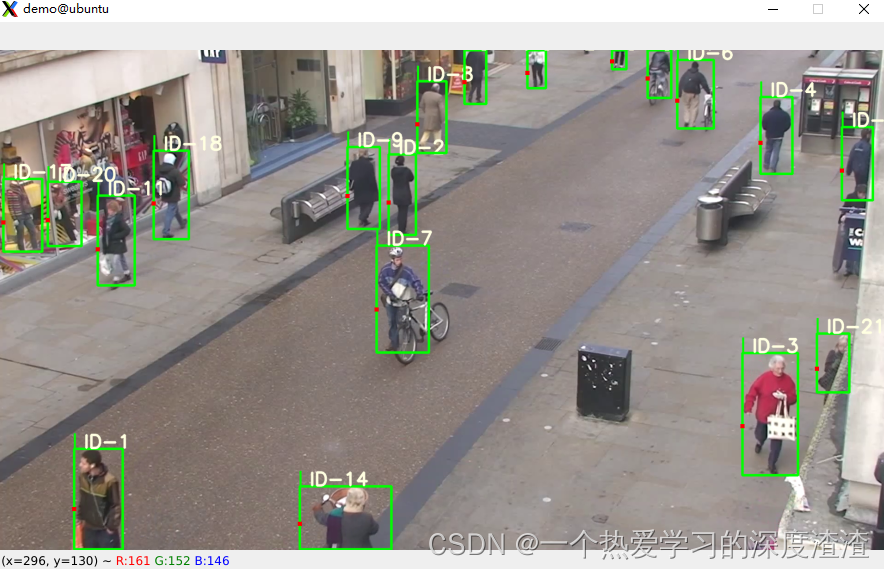
效果展示:
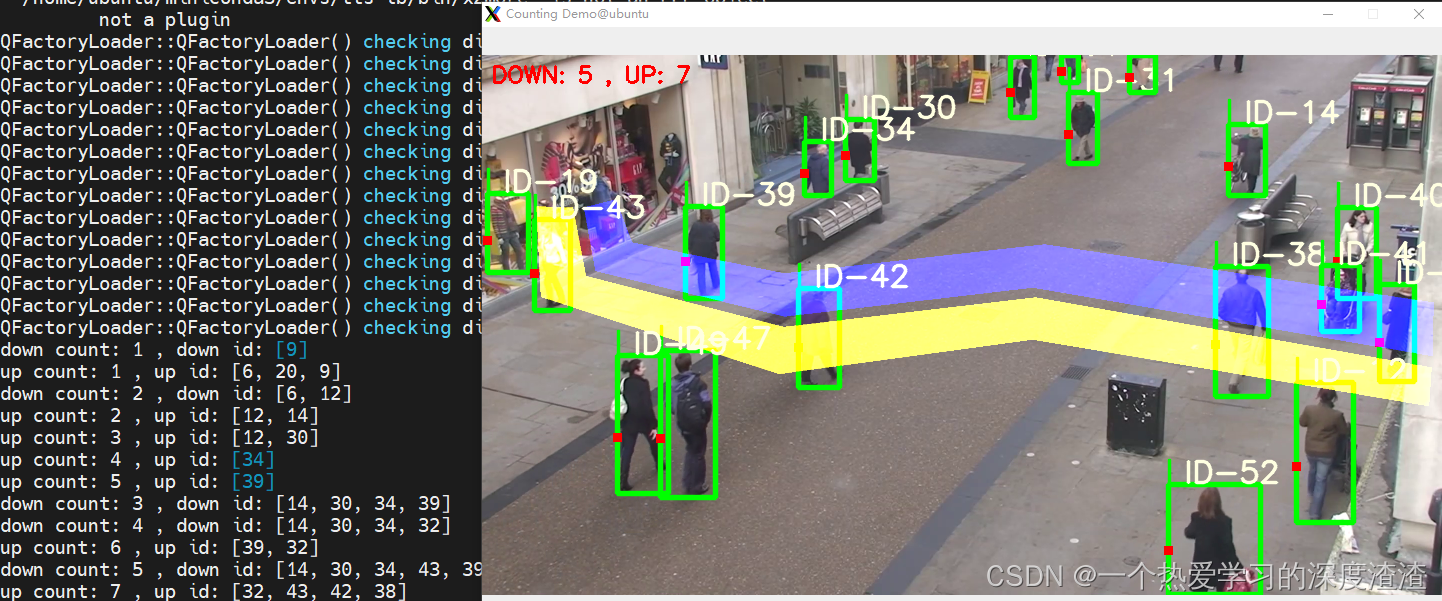
count_person.py
作用:实现计数的功能,可以对检测到的目标进行计数统计;
这部分的代码主要是实现自定义撞线,并且统计经过的目标数量和ID,代码就不在这进行讲解了;
行人计数效果展示:
当然,像车辆计数也是可以实现的,效果如下:

五、总结
关键知识点:
- 理解DeepSORT全流程;
- 对目标检测,目标重识别有初步认知;
- 多个模型的任务集成;
- 距离度量方式及代价矩阵的计算;
- 将代码封装成类的能力;
待深入知识点:
- 卡尔曼滤波器的作用和实现;
- 如何改进任务的运行效率;
- 将该任务进行部署,转换成用C++可调用的动态库;
- 轻量化其中的流程和模型,优化性能;
文章出处登录后可见!