大家好,最近 AI 绘画太火了,火到我无论是打开b乎还是b站,都会给我的首页推荐AI绘画相关的。当然我也是收藏和关注了一大波内容,后续会分享出来,各路大佬的新奇玩法。
网上有一大堆一键安装的教程,但是很多人提示存在一定的风险,而且还有一个问题就是在没有会员的情况下,下载所需的时间太久了。
今天分享的内容就是如何不浪费大量时间去下载,以及不使用科技的情况在本地安装。
思路
必须安装:
1)英伟达显卡驱动(推荐使用),(据说也支持 amd 的显卡,没试过)
2)python3.10.6,一定要添加到环境变量中(https://www.python.org/downloads/release/python-3106/)
1、主要项目:
https://github.com/AUTOMATIC1111/stable-diffusion-webui/
一个基于 Gradio 开发的可以在浏览器界面使用 Stable Diffusion
2、依赖项目
https://github.com/TencentARC/GFPGAN
https://github.com/openai/CLIP
https://github.com/CompVis/stable-diffusion
https://github.com/CompVis/taming-transformers
https://github.com/crowsonkb/k-diffusion
https://github.com/sczhou/CodeFormer
https://github.com/salesforce/BLIP
3、修改一键安装脚本,快速配置环境
4、下载权重文件
实现
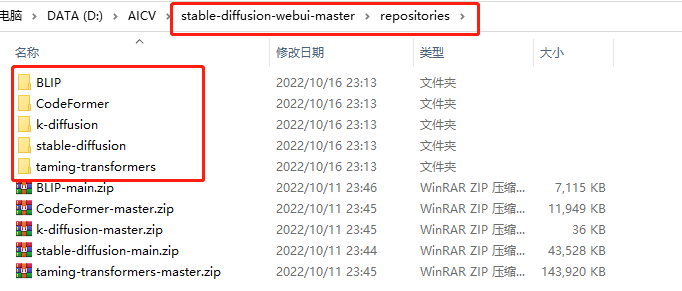
1、项目下载
由于 git 克隆项目很容易失败,因为可以借助 “码云” 来下载项目
https://github.com/TencentARC/GFPGAN
https://github.com/openai/CLIP
上面两个项目分别改名为 gfpgan 、 clip
https://github.com/CompVis/stable-diffusion
https://github.com/CompVis/taming-transformers
https://github.com/crowsonkb/k-diffusion
https://github.com/sczhou/CodeFormer
https://github.com/salesforce/BLIP
上面五个保存到新建的文件夹 repositories 中
2、修改 “launch.py” 文件
注释 包含 git_clone 的五行
    # git_clone("https://github.com/CompVis/stable-diffusion.git", repo_dir('stable-diffusion'), "Stable Diffusion", stable_diffusion_commit_hash)
    # git_clone("https://github.com/CompVis/taming-transformers.git", repo_dir('taming-transformers'), "Taming Transformers", taming_transformers_commit_hash)
    # git_clone("https://github.com/crowsonkb/k-diffusion.git", repo_dir('k-diffusion'), "K-diffusion", k_diffusion_commit_hash)
    # git_clone("https://github.com/sczhou/CodeFormer.git", repo_dir('CodeFormer'), "CodeFormer", codeformer_commit_hash)
    # git_clone("https://github.com/salesforce/BLIP.git", repo_dir('BLIP'), "BLIP", blip_commit_hash)
注释掉 安装 clip 和 gfgan 的部分
    #if not is_installed("gfpgan"):
    #    run_pip(f"install {gfpgan_package}", "gfpgan")


    #if not is_installed("clip"):
    #    run_pip(f"install {clip_package}", "clip")
修改 torch_command --> 使用国内源快速安装
 torch_command = os.environ.get('TORCH_COMMAND', "pip install torch==1.12.1+cu113 torchvision==0.13.1+cu113 -i http://mirrors.aliyun.com/pypi/simple/ --trusted-host mirrors.aliyun.com  --default-timeout=10000 -f https://download.pytorch.org/whl/torch_stable.html")
修改 run_pip --> 使用国内源快速安装
丰富def run_pip(args, desc=None):
    # TODO
return run(f'"{python}" -m pip {args} --prefer-binary -i https://pypi.tuna.tsinghua.edu.cn/simple', desc=f"Installing {desc}", errdesc=f"Couldn't install {desc}")3、下载权重文件,后台回复“AI绘画” 即可获取
1)GFPGANv1.4.pth 实现人脸修复功能


2)final-pruned.ckpt 是 nounovelai 的权重,可以生成动漫的效果


3)sd-v1-4.ckpt 是 stable diffusion 的权重,这个可以直接去
hugging face 上下载会快很多
(https://huggingface.co/CompVis/stable-diffusion)

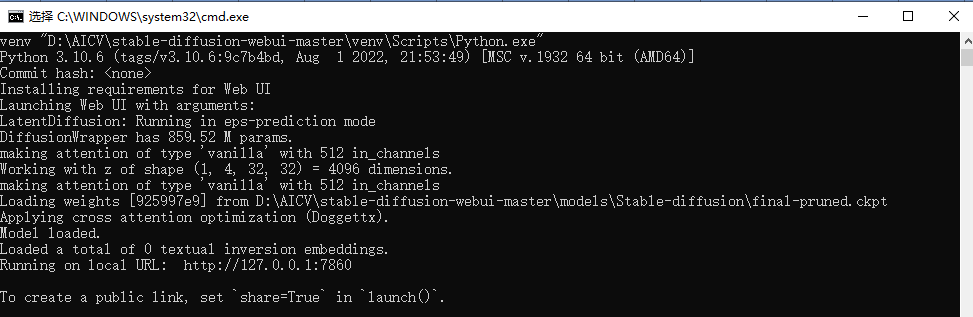
4、运行 “webui-user.bat” 脚本
会自动配置环境,等待即可
注意点:
如果不会改,可以直接使用我这里提供的 launch.py,替换原始的文件即可
效果
1、页面
2、使用


总结
按照本文的思路,必须通过 网盘下载的文件只有 final-pruned.ckpt 和 GFPGANv1.4.pth 其他的 项目通过 码云 快速下载,环境配置通过更换国内源也能快速下载。
最后,如果有用,欢迎帮忙转发一下哈,后续会分享更多 AI 绘画相关的内容

资料
关注公众号 AI算法与图像处理:并在公众号后台回复“AI绘画”,即可获取文中提取的资料
文章出处登录后可见!