前言
理论详解:YOLO-V3-SPP详细解析
build_targets
讲解的形式主要是流程图的形式,每一行代码一个个流程详细讲解
代码以pytorch框架为基础
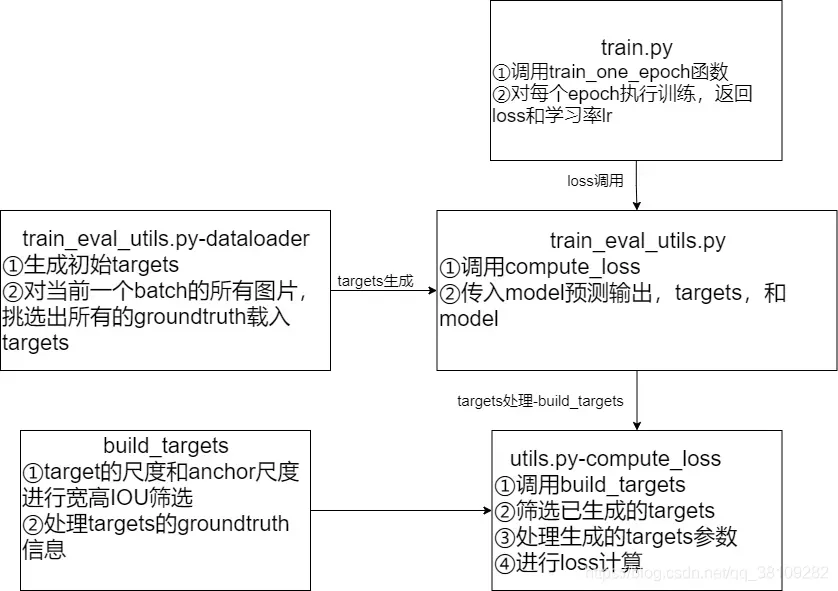
targets处理整体流程
这里主要介绍了targets的来龙去脉,targets指的是数据集中标注好的GroundTruth的目标信息,,build_target这个函数主要是处理当前批次的所有图片的targets,将当前批次的所有targets经过:
- 宽高IOU筛选
- 标注的yolo格式的box信息
转化为
,其中
和
分别表示当前box中心离所在grid_cell左上角坐标的偏移量
博文主要讲解targets的筛选过程,主要讲清楚build_targets这个函数在做什么
build_targets源码
def build_targets(p, targets, model):
    # 这里输入的p包含了三个YoloLayer的输出,相比model里YoloLayer的输出多了一个维度
    # YoloLayer的p的shape为:(batch_size,anchor_num,grid_cell,grid_cell,xywh+obj_confidence+classes_num)
    # targets: [num_obj, 6] , that number 6 means -> (img_index, obj_index, x, y, w, h)

    # Build targets for compute_loss(), input targets(image,class,x,y,w,h)
    # shape[0]返回第一维度的个数,即image的个数,num_targets

    # 获取当前批次的target数
    nt = targets.shape[0]
    tcls, tbox, indices, anch = [], [], [], []
    # gain是一个6维的tensor
    gain = torch.ones(6, device=targets.device)  # normalized to gridspace gain

    multi_gpu = type(model) in (nn.parallel.DataParallel, nn.parallel.DistributedDataParallel)
    for i, j in enumerate(model.yolo_layers):  # model定义的yolo层索引list=[89, 101, 113]
        # 获取该第i个yolo predictor对应的anchors缩放后的尺度anchor_vec
        # anchor是shape为(3,2)的tensor,包含三组anchor尺度,分配给当前预测器
        anchors = model.module.module_list[j].anchor_vec if multi_gpu else model.module_list[j].anchor_vec
        # 2索引开始,即第三个元素开始到最后一个元素,{_,_,[],[],[],[]}其中[]为填充到gain的值
        gain[2:] = torch.tensor(p[i].shape)[[3, 2, 3, 2]]  # xyxy gain
        na = anchors.shape[0]  # number of anchors
        # [3] -> [3, 1] -> [3, nt]
        at = torch.arange(na).view(na, 1).repeat(1, nt)  # anchor tensor, same as .repeat_interleave(nt)

        # Match targets to anchors
        # gain的tensor状态为(1.,1.,grid_x,grid_y,grid_x,grid_y)其中在训练模式中,由于采用了多尺度训练,
        # gain中的grid_x和grid_y不一定相等,根据输入图像的size有关
        # targets的状态(img_index, obj_index, x, y, w, h)
        a, t, offsets = [], targets * gain, 0
        # t在这里t=targets*gain,解释:targets是图片的target归一化后的尺度,现在图片的feature map输出为(grid_x,grid_y)的尺度,
        # t则是将归一化的target映射到预测器的feature map上的尺度
        if nt:  # 如果存在target的话
            # iou_t = 0.20
            # j: [3, nt]
            # 传入anchors尺度,t为shape为(228,6)的tensor,取(228,(4,5))这个tensor传入,即w,h尺度
            # j是布尔值,大于0.2返回true,否则返回false,表示每组anchor和target的wh尺度,wh_iou表示宽高iou
            j = wh_iou(anchors, t[:, 4:6]) > model.hyp['iou_t']
            # iou(3,n) = wh_iou(anchors(3,2), gwh(n,2))
            # t.repeat(na, 1, 1): [nt, 6] -> [3, nt, 6]
            # 获取iou大于阈值的anchor与target对应信息
            # 这里非常重点,当前groundtruth的box信息和该预测器的其中一个anchor尺度的wh_iou>iou_t才能被筛选上
            a, t = at[j], t.repeat(na, 1, 1)[j]  # filter

        # Define
        # long等于to(torch.int64), 数值向下取整
        b, c = t[:, :2].long().T  # image_index, class_index
        gxy = t[:, 2:4]  # grid xy
        gwh = t[:, 4:6]  # grid wh
        gij = (gxy - offsets).long()  # 匹配targets所在的grid cell左上角坐标
        gi, gj = gij.T  # grid xy indices

        # Append
        # a为target使用的anchor索引
        indices.append((b, a, gj, gi))  # image, anchor, grid indices(x, y)
        tbox.append(torch.cat((gxy - gij, gwh), 1)) # gt box相对grid的x,y偏移量以及w,h
        # anch为每个target使用的anchor尺度
        anch.append(anchors[a])  # anchors
        tcls.append(c)  # class
        if c.shape[0]:  # if any targets
            # 目标的标签数值不能大于给定的目标类别数
            assert c.max() < model.nc, 'Model accepts %g classes labeled from 0-%g, however you labelled a class %g. ' \
                                       'See https://github.com/ultralytics/yolov3/wiki/Train-Custom-Data' % (
                                           model.nc, model.nc - 1, c.max())
    # 返回值参数
    # 返回当前批次所有groundtruth中和anchor的wh_iou>iou_t这个超参的targets信息
    """
    tcls:筛选出来的gt的类索引,shape(YoloLayer_num,targets_num)
    tbox:筛选出来的gt的box信息,tx,ty,w,h。其中tx,ty是偏移量;w,h是宽高,shape(YoloLayer_num,targets_num,txtywh)
    indices:(YoloLayer_num,img_index+anchor_index+grid_y+grid_x)
    anch:每个target对应使用的anchor尺度,shape(YoloLayer_num,targets_num,wh)
    """
    return tcls, tbox, indices, anch
build_targets源码详解
建议将以上源码复制到编译器中,边看代码边看分析
基本参数解析
def build_targets(p, targets, model):
函数传入三个参数
- p为model的输出,在build_target中只有一个作用,获取p的shape,然后将targets映射的p的shape尺度
- targets为dataloader迭代器生成的一个batch的所有ground truth
- model为整个yolo的model,以获取当前model对应YoloLayer的信息和YoloLayer对应的anchor尺度
p的shape为
targets的shape为,其中数字6代表
    nt = targets.shape[0]
    tcls, tbox, indices, anch = [], [], [], []
nt获取targets第一个维度的数值
(groundtruth简写为gt)
- tcls为筛选后gt的类索引
- tbox为筛选后的gt的box信息,包含了
信息,其中
离gt所在的
的左上角坐标的偏移量,
表示gt的宽高信息
- indices包含了tcls以及tbox信息的图像索引、所用的anchor索引、以及gt所在的
- anch为每个gt对应使用的anchor尺度
以上4组参数也是该build_targets所返回的参数
    gain = torch.ones(6, device=targets.device)  # normalized to gridspace gain
    multi_gpu = type(model) in (nn.parallel.DataParallel, nn.parallel.DistributedDataParallel)
前面提到buildd_targets的输入参数p的作用,这里gain的作用就是将输入参数p的shape转化为tensor,后面会提到gain的操作,这里只是对gain进行初始化,初始化为一个6维都为数值1的tensor
multi_gpu这里的处理代码我并没有了解,本人由于只使用了一个gpu,就没有去了解这相关的代码,感兴趣的请自行查阅相关库函数及处理
    for i, j in enumerate(model.yolo_layers):
        anchors = model.module.module_list[j].anchor_vec if multi_gpu else model.module_list[j].anchor_vec
        gain[2:] = torch.tensor(p[i].shape)[[3, 2, 3, 2]]
        na = anchors.shape[0]
        at = torch.arange(na).view(na, 1).repeat(1, nt)
        a, t, offsets = [], targets * gain, 0
model.yolo_layers参数为model的成员变量,定义为yolo层索引list=[89, 101, 113]
anchor_vec为当前yolo_layer分配到的三组anchor缩放后的尺度,三个yolo_layer的缩放倍数分别为[32,16,8],这里的anchors表示当前yolo_layer的三组缩放后的anchor尺度。
上面提到的gain操作就是
gain[2:] = torch.tensor(p[i].shape)[[3, 2, 3, 2]]
p[i]表示第i个yolo_layer的输出,shape为
执行完上述代码之后,gain的值为,待会以这个gain去让targets从一个归一化的值恢复到yolo_layer的feature map尺度上,这个feature map的尺度就是p的
的尺度
na获取anchors第一个维度的值,即anchors的数量3
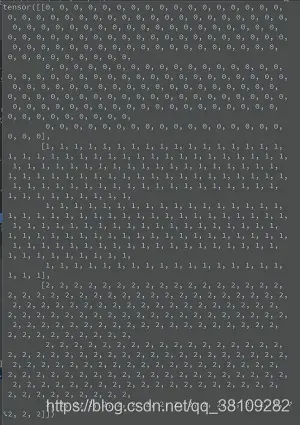
at生成一个shape为,其中
的值都为0,
的值都为1,
的值都为2.
更详细来看,我debug出来的结果如下,此时我当前batch的gt的数量,即nt为228,那么at的shape为:

gt恢复到feature map尺度
a, t, offsets = [], targets * gain, 0
a作target使用的anchor索引用
gain的状态为:
targets的shape为:
gain与targets的个维度的
tensor进行逐元素相乘,可将targets中所有gt的
恢复到当前yolo_layer的feature map尺度上
注:后面提到的nt均表示
offsets默认为0,在获取当前gt所在的左上角坐标时会用到,但该函数offsets的设置一直为0,并没有什么作用
wh_IOU(宽高IOU筛选gt)
思路:gt与当前yolo_layer分配到的三组anchor进行宽高IOU筛选
        if nt:  # 如果存在target的话
            # iou_t = 0.20
            # j: [3, nt]
            # 传入anchors尺度,t为shape为(228,6)的tensor,取(228,(4,5))这个tensor传入,即w,h尺度
            # j是布尔值,大于0.2返回true,否则返回false,表示每组anchor和target的wh尺度,wh_iou表示宽高iou
            j = wh_iou(anchors, t[:, 4:6]) > model.hyp['iou_t']
            # iou(3,n) = wh_iou(anchors(3,2), gwh(n,2))
            # t.repeat(na, 1, 1): [nt, 6] -> [3, nt, 6]
            # 获取iou大于阈值的anchor与target对应信息
            # 这里非常重点,当前groundtruth的box信息和该预测器的其中一个anchor尺度的wh_iou>iou_t才能被筛选上
            a, t = at[j], t.repeat(na, 1, 1)[j]  # filter
这里判断是否有gt,有的话对gt进行筛选,筛选方式是宽高IOU,宽高IOU的源码如下:
def wh_iou(wh1, wh2):
    # Returns the nxm IoU matrix. wh1 is nx2, wh2 is mx2
    wh1 = wh1[:, None]  # [N,1,2]
    wh2 = wh2[None]  # [1,M,2]
    inter = torch.min(wh1, wh2).prod(2)  # [N,M]
    return inter / (wh1.prod(2) + wh2.prod(2) - inter)  # iou = inter / (area1 + area2 - inter)
None的作用是增加一个维度,具体请见注释
这里的宽高IOU与坐标形式的IOU计算有很大不同,这里的IOU对比的是尺度间的IOU关系。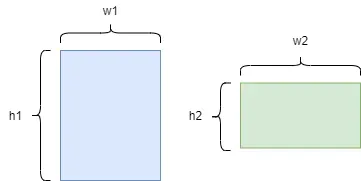
如上图所示,宽高IOU的公式可以描述为:
以此来描述两个box的尺度联系
j = wh_iou(anchors, t[:, 4:6]) > model.hyp['iou_t']
j表示对所有gt的box与三组anchor的wh_iou是否满足超参数iou_t=0.2的布尔关系
j是tensor为(3,nt)的参数,debug出来如下: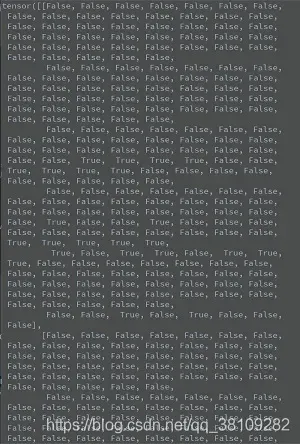
a, t = at[j], t.repeat(na, 1, 1)[j] # filter
a前面已经说过,表示筛选后的gt的anchor索引
at前面已经说明了,at的shape为,其中
的值都为0,
的值都为1,
的值都为2.
注意:这里的筛选规则是,gt的box和其中一个anchor的尺度满足大于iou_t就被筛选上。
at[j]的作用:将j的三个维度中满足True的anchor索引筛选出来,对应的a的索引表示gt的索引。
t = t.repeat(na, 1, 1)[j]作用:前面提过t的shape为,即
t.repeat(na,1,1)之后的shape为第1、2和3维度的值均相同
经过t.repeat(na, 1, 1)[j]之后,筛选得到gt与a的索引对应
最终t的shape为,即
注:此处的数值范围为:
这里筛选出来的gt对应的anchor并不是唯一的,一个gt至多对应三个anchor,这里只是初步经过wh_IOU筛选,传入compute_loss之后还会经过nms再次筛选
无关:
这里在debug的时候,由于我的模型采用了多尺度训练,每次输出到yololayer的grid_cell都会不太一样,但调用的都是同一个batch的图片,当前batch的gt的数量是228个,对不同的grid_cell,筛选出来的gt也不同,从这里看出,grid_cell的大小也会影响筛选的gt数量,这可能是由于多尺度训练过程中对图片resize之后导致gt的实际信息和对应的anchor的wh_iou会发生变化,当然这只是我的猜测,留个坑,有兴趣的朋友可以研究下。
对筛选后的gt进行数值调整
        # Define
        # long等于to(torch.int64), 数值向下取整
        b, c = t[:, :2].long().T  # image_index, class_index
        gxy = t[:, 2:4]  # grid xy
        gwh = t[:, 4:6]  # grid wh
        gij = (gxy - offsets).long()  # 匹配targets所在的grid cell左上角坐标
        gi, gj = gij.T  # grid xy indices
t[:, :2].long().T对的第二个维度开始筛选前两个值,即img_index和cls_index
b和c均为Tensor均包含了
个值,
记住,这里的t是已经恢复到yolo_layer的feature map尺度的tensor了
gxy = t[:, 2:4]:gxy获取x和y坐标,gwh同理
gij = (gxy – offsets).long() 这里offsets为0,等于没有使用到,这里long()函数将gxy向下取整,刚好就能得到当前gt的所在的grid的左上角坐标,具体解释如下图: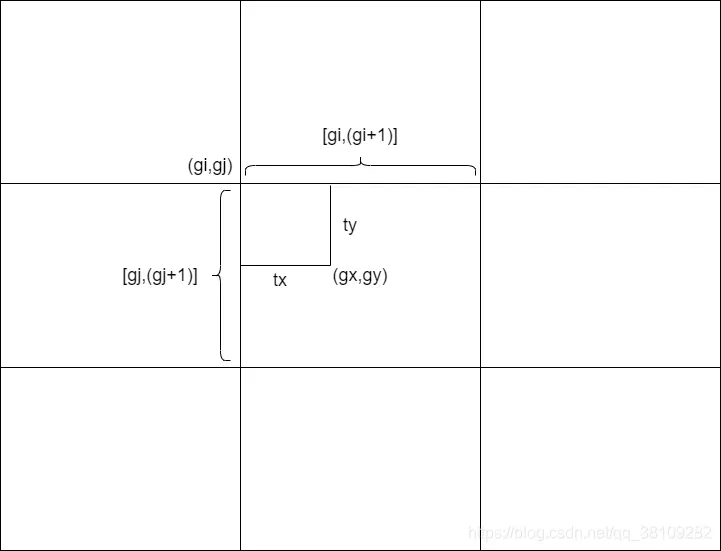
从上图可以看出,经过long()函数之后,
被消除,剩下的
即当前gt的grid坐标
返回参数
        # Append
        # a为target使用的anchor索引
        indices.append((b, a, gj, gi))  # image, anchor, grid indices(x, y)
        tbox.append(torch.cat((gxy - gij, gwh), 1))
        # gt box相对anchor的x,y偏移量以及w,h
        # anch为每个target使用的anchor尺度
        anch.append(anchors[a])  # anchors
        tcls.append(c)  # class
tcls:筛选出来的gt的类索引,shape(YoloLayer_num,targets_num)
tbox:筛选出来的gt的box信息,tx,ty,w,h。其中tx,ty是偏移量;w,h是宽高,
indices:(YoloLayer_num,img_index+anchor_index+grid_y+grid_x)
anch:每个target对应使用的anchor尺度,shape(YoloLayer_num,targets_num,wh)
总结
build_targets的代码比较繁琐,基本都是tensor的操作比较多,读起来不太容易,但搞清楚了这个函数,你就能知道获取的gt的状态,从而了解到loss是如何计算的,包括loss的正负样本的判别。
版权声明:本文为博主小哈蒙德原创文章,版权归属原作者,如果侵权,请联系我们删除!
原文链接:https://blog.csdn.net/qq_38109282/article/details/119411005