目录
一.什么是mybatis
mybatis的概念
MyBatis 是一款优秀的持久层框架,它支持定制化 SQL、存储过程以及高级映射。1、Mybatis是一个半ORM(对象关系映射)框架,底层封装了JDBC,是程序员在开发时只需要关注SQL语句本身,不需要花费精力去处理加载驱动、创建连接、创建statement等繁杂的过程。使得程序员可以花更多的精力放到业务开发中。另外,程序员直接编写原生态sql,严格控制sql执行性能,灵活度高。2、MyBatis 可以使用简单的 XML文件 或注解方式来配置和映射原生信息,将 POJO映射成数据库中的记录,避免了几乎所有的 JDBC 代码和手动设置参数以及获取结果集。3、通过xml 文件或注解的方式将要执行的各种 statement 配置起来,并通过java对象和 statement中sql的动态参数进行映射生成最终执行的sql语句,最后由mybatis框架执行sql并将结果映射为java对象并返回。(从执行sql到返回result的过程)。
mybatis的优势
1.mybatis基于sql进行编程,通过将sql语句写入xml文件中,不会对我们当前应用程序和数据库的设计产生任何影响;同时将sql写在xml文件中,解除了sql和程序代码的耦合,便于程序的统一管理,同时提供xml标签,允许实现动态sql,从而提高了sql的可重用性
2.与JDBC相比,代码量减少了50%以上,消除了大量的冗余代码,使我们更多的精力放到了sql的设计
3.提供映射标签,提供java对象和数据库字段的ORM字段映射。
4.很好的与各种数据库兼容(因为MyBatis使用JDBC来连接数据库,所以只要JDBC支持的数据库MyBatis都支持)
5.能够与Spring很好的集成;
二.mybatis相对于JDBC,框架帮我们做了哪些事情?
我们通过对比JDBC进行数据库操作的代码,我们对JDBC和MyBatis进行对比
 public static Blog selectById(Long id){
        //检查id的有效性
        if (LongUtil.isValid(id)){
            return null;
        }
        Connection connection=null;
        PreparedStatement statement=null;
        ResultSet resultSet=null;


        //数据有效,进行数据查询
        //建立连接
        try {
            connection = DBUtil.getConnection();
            //定义sql语句
            String sql="select id,title,content,createTime,userId from blog where id=?";
            //创建执行对象并填充参数
            statement = connection.prepareStatement(sql);
            //填充参数
            statement.setLong(1,id);
            //执行语句
            resultSet = statement.executeQuery();
            //处理运行结果
            if (resultSet.next()){
                //创建新对象返回
                Blog blog = new Blog();
                blog.setId(resultSet.getLong("id"));
                blog.setTitle(resultSet.getString("title"));
                blog.setContent(resultSet.getString("content"));
                blog.setCreateTime(resultSet.getTimestamp("createTime"));
                blog.setUserId(resultSet.getLong("userId"));
                return blog;

            }else {
                //如果结果为空
                return null;
            }


        } catch (SQLException e) {
            throw new RuntimeException(e);
        }finally {
            //断开连接
            DBUtil.close(resultSet, statement, connection);
        }
    }
我们可以从中总结以下七个步骤:①建立连接②定义sql语句③预执行④补充参数⑤执行sql语句⑥返回并处理结果⑦断开连接
而mybatis相对其而言就化简了很多,通过在配置文件中设置数据库连接的相关参数,不需要再手动调用api进行数据库的连接,也不需要手动调用api执行sql语句(内层api),处理结果直接通过对应的mapper接口对应的方法的返回值映射到java类中,更不需要进行手动断开与数据库的连接,总结下来:我们只需要进行mapper接口和对应的xml文件的映射操作和编写sql语句,大大提高了我们进行代码开发的效率,在很大程度上也减少了代码量。
除此之外,我们在mapper的接口和对应的xml文件只进行了命名空间和方法的映射的标识,而实际的映射工作是mybatis框架帮我们做的(mybatis框架对jdbc进行了封装,并通过其他配置自动完成某些工作)
三.对包含mybatis的程序进行实操
1.创建项目
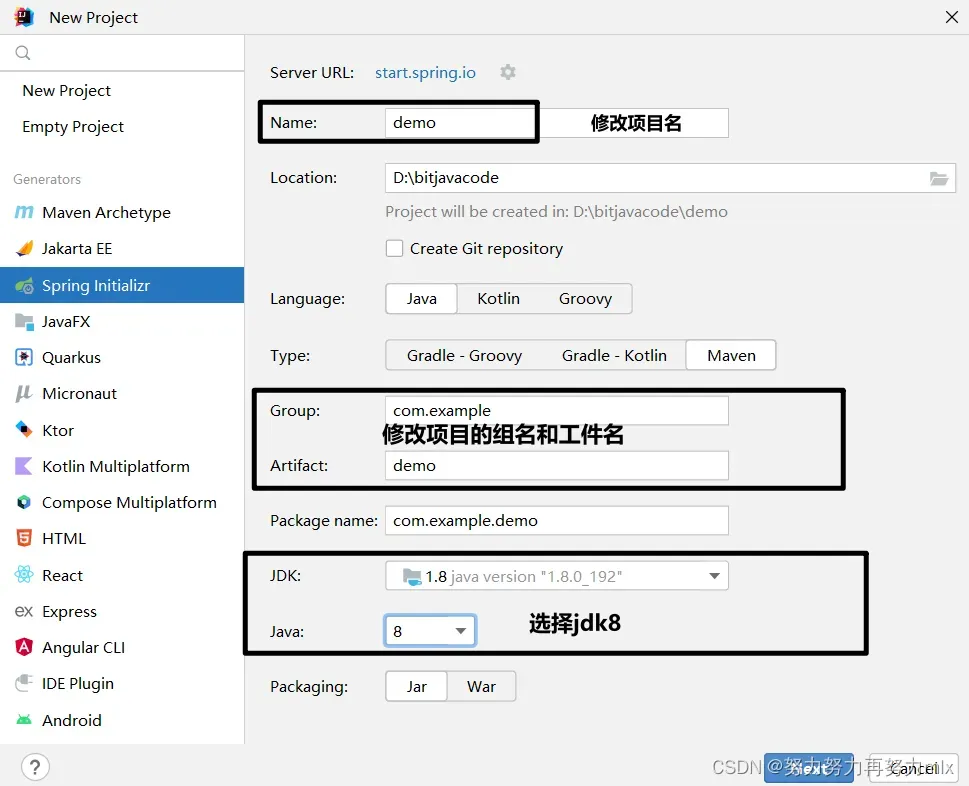
选择依赖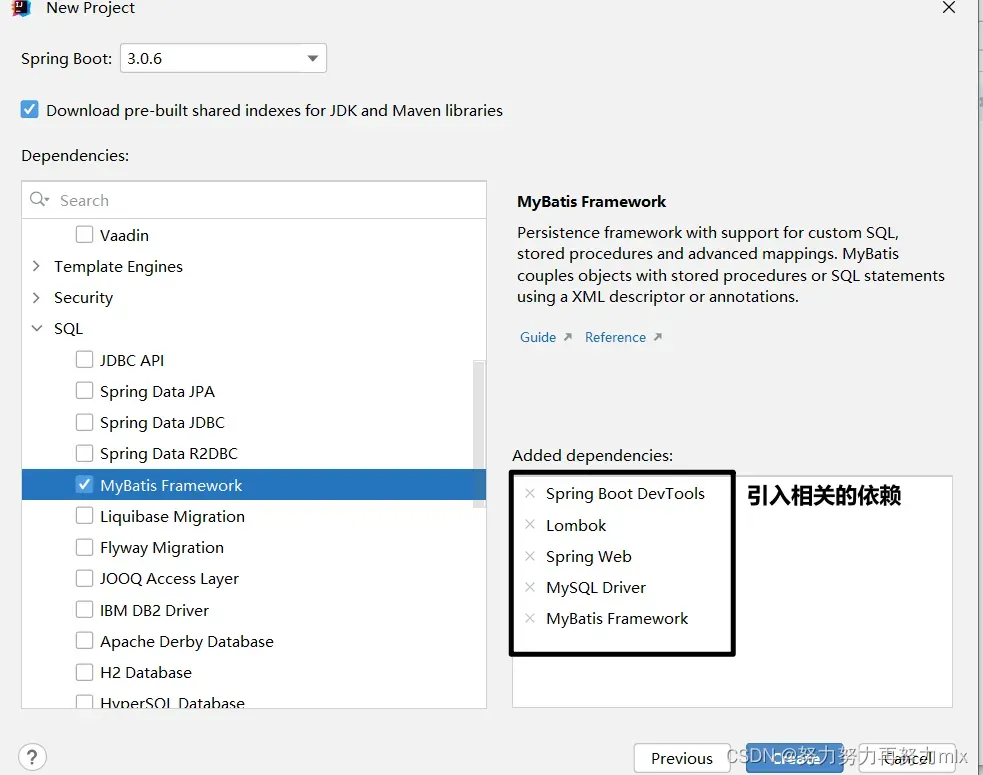
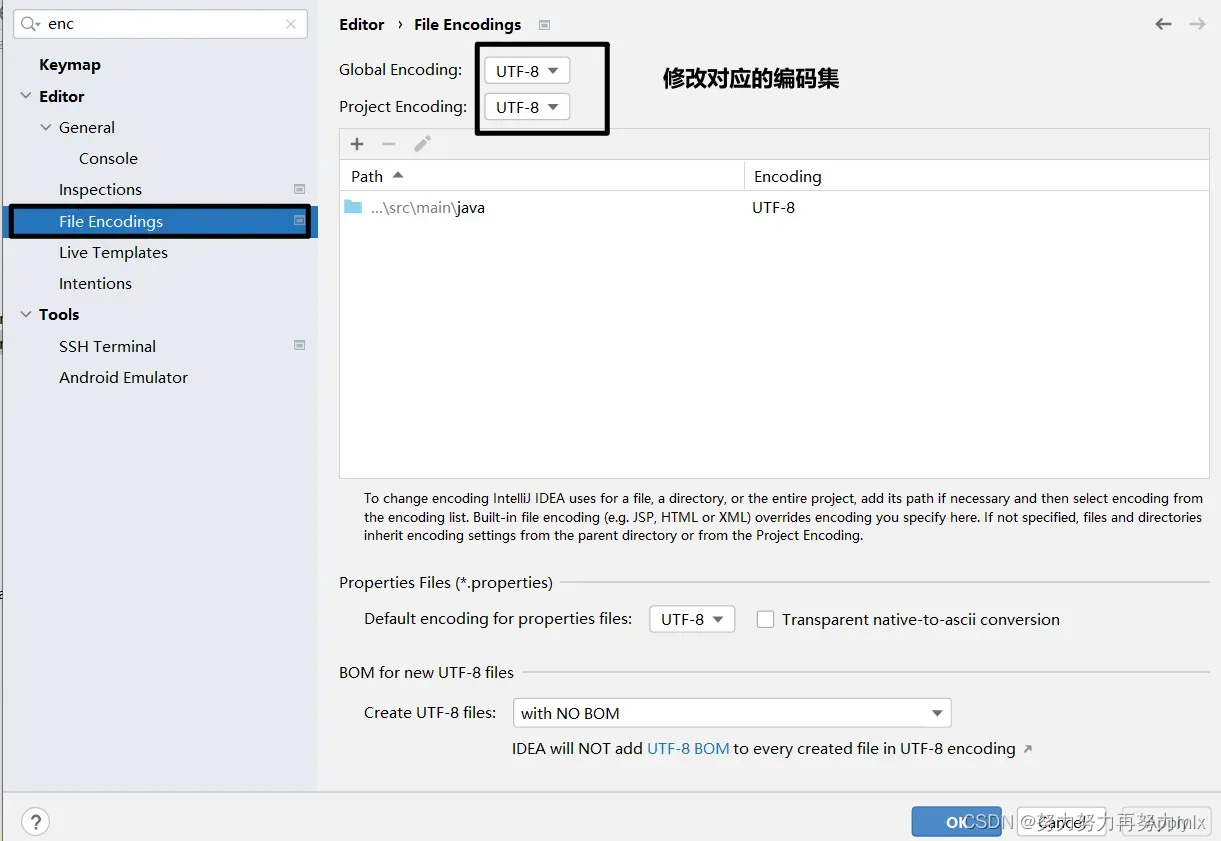
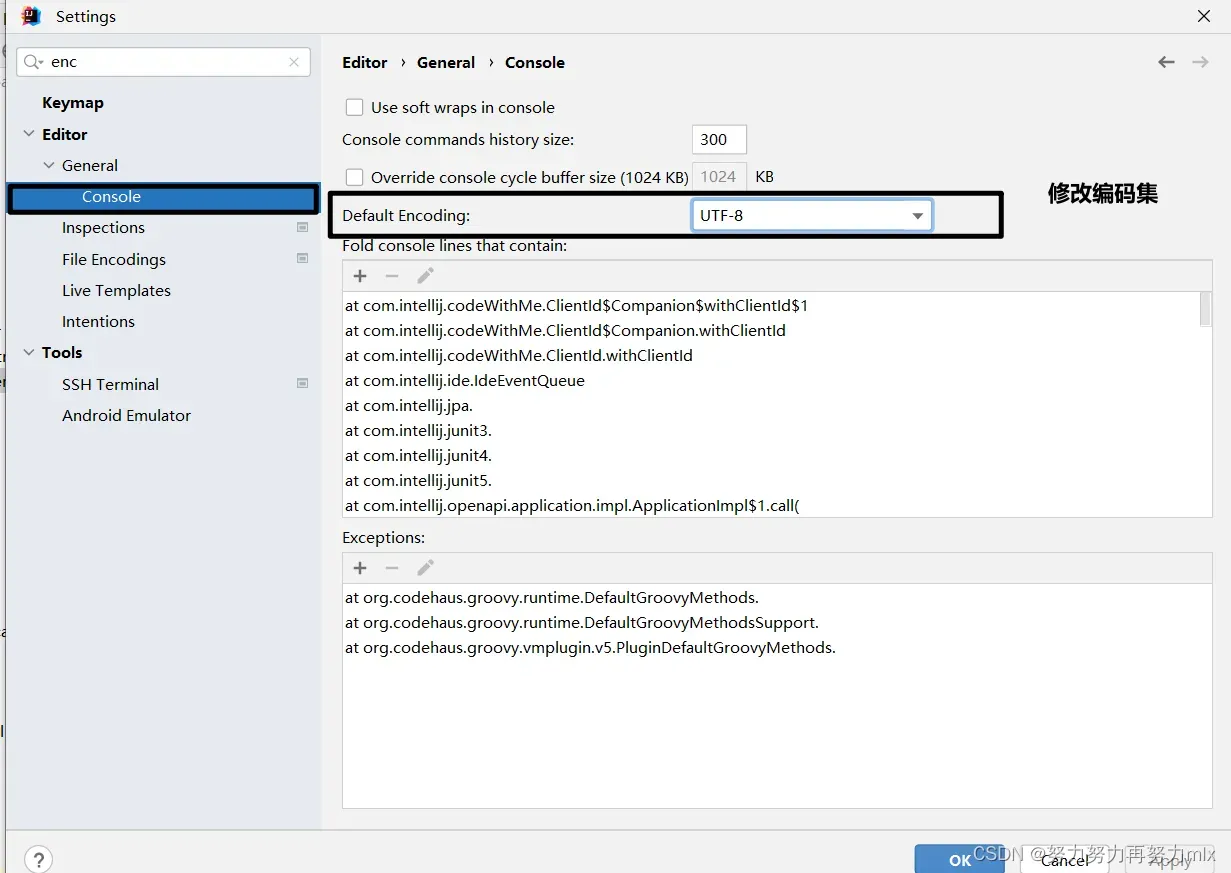
配置编码集
禁用JMX并配置热部署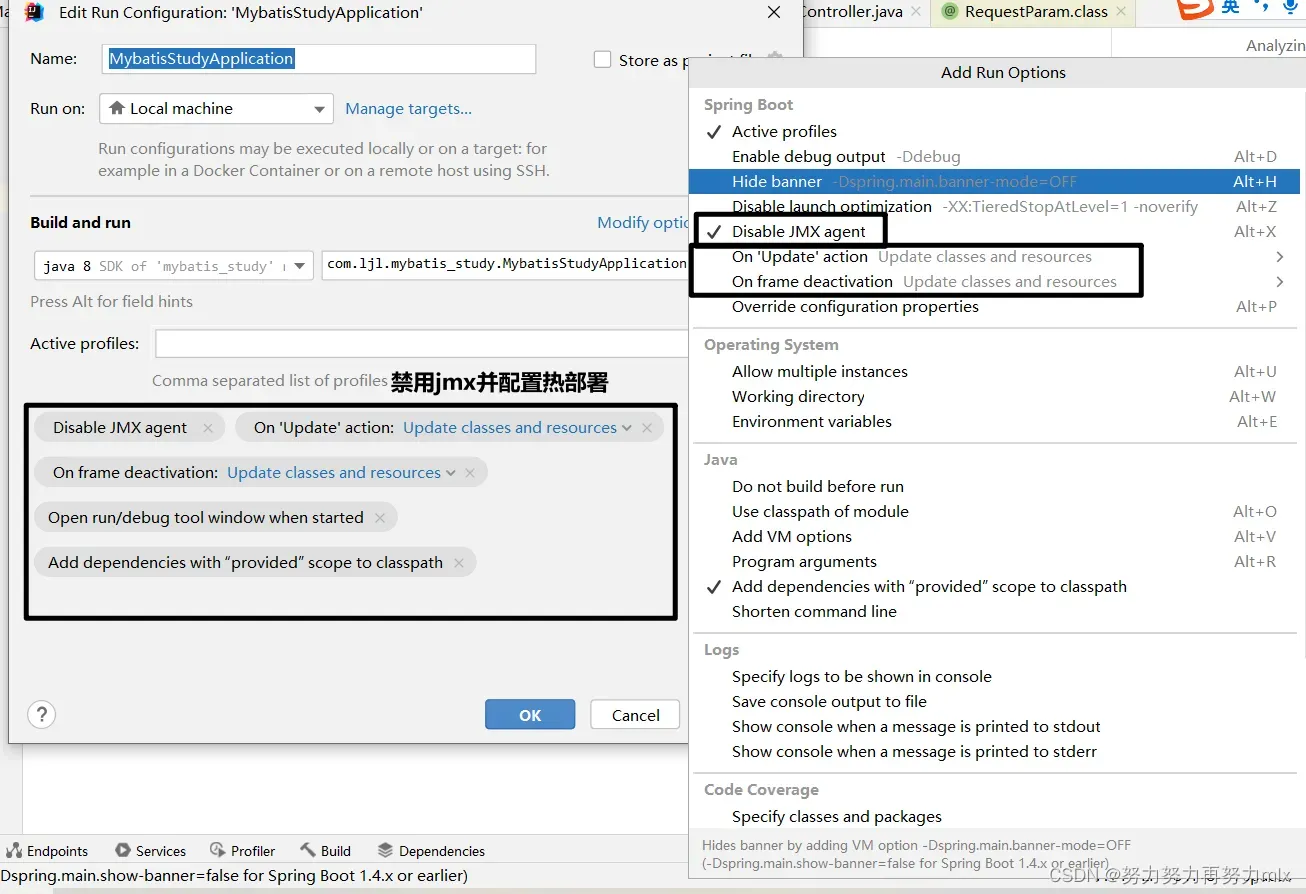
2.修改配置文件
如果我们在项目启动时没有配置对应的驱动源、url、用户名和密码,会报以下的错误: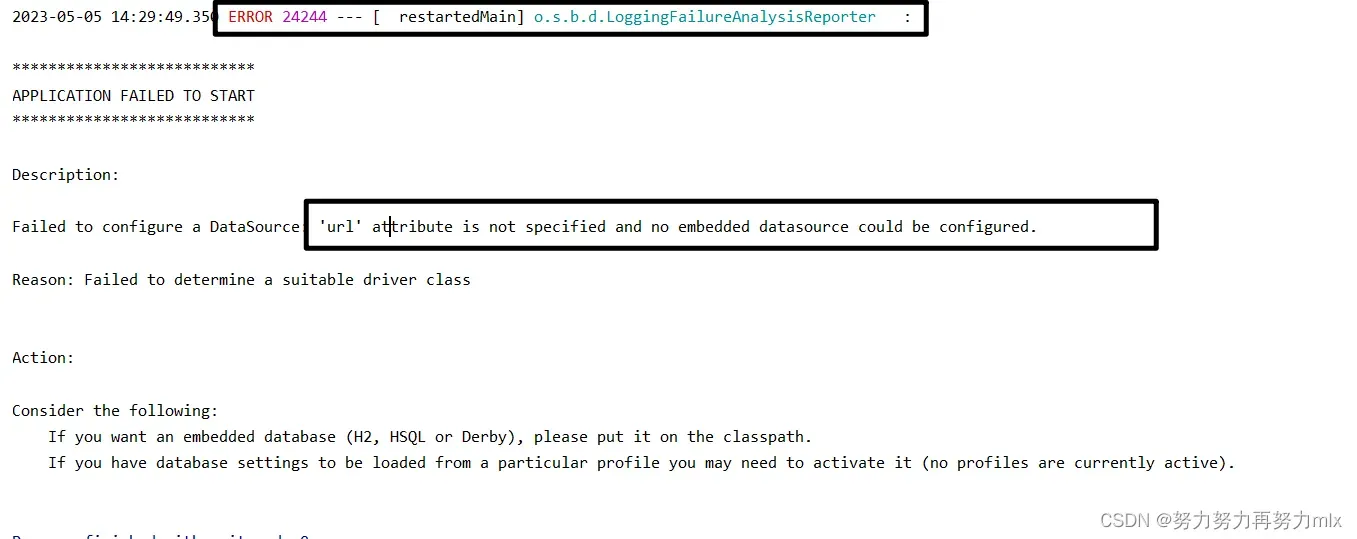
原因如下:springboot引入了mybatis框架依赖包,在项目启动时会默认加载一些资源,如果在配置文件中找不到这部分资源,则就会报错
# 设置mysql数据源驱动
spring.datasource.driver-class-name=com.mysql.cj.jdbc.Driver
# 设置url
spring.datasource.url=jdbc:mysql://localhost:3307/java23characterEncoding=utf8&useSSL=false
# 设置用户名
spring.datasource.username=root
# 设置密码
spring.datasource.password=abc123
# 定义mapper文件的配置
mybatis.mapper-locations=classpath:mapper/**Mapper.xml
3.准备数据库相关内容
建表语句如下:
-- 创建数据库
drop database if exists java23;
create database java23 DEFAULT CHARACTER SET utf8;

-- 使用数据数据
use java23;

-- 创建表[用户表]
drop table if exists  userinfo;
create table userinfo(
 id int primary key auto_increment,
 username varchar(100) not null,
 password varchar(32) not null,
 photo varchar(500) default '',
 createtime datetime default now(),
 updatetime datetime,
 `state` int default 1
);

-- 创建文章表
drop table if exists  articleinfo;
create table articleinfo(
                            id int primary key auto_increment,
                            title varchar(100) not null,
                            content text not null,
                            createtime datetime default now(),
                            updatetime datetime,
                            uid int not null,
                            rcount int not null default 1,
                            `state` int default 1
);

-- 创建视频表
drop table if exists videoinfo;
create table videoinfo(
                          vid int primary key,
                          `title` varchar(250),
                          `url` varchar(1000),
                          createtime datetime default now(),
                          updatetime datetime,
                          uid int
);

-- 添加一个用户信息
INSERT INTO `userinfo` (`id`, `username`, `password`, `photo`, `createtime`, `updatetime`, `state`) VALUES
    (1, 'admin', 'admin', '', '2021-12-06 17:10:48', '2021-12-06 17:10:48', 1);
INSERT INTO `userinfo` (`id`, `username`, `password`, `photo`, `createtime`, `updatetime`, `state`) VALUES
    (2, 'abc', '123', '', '2021-12-06 17:10:48', '2021-12-06 17:10:48', 1);

-- 文章添加测试数据
insert into articleinfo(title,content,uid,createtime) values('Java','Java正文',1,'2023-05-05 19:09');
insert into articleinfo(title,content,uid,createtime) values('C++','C++正文',1,'2023-05-04 19:09');
insert into articleinfo(title,content,uid,createtime) values('#C','#C正文',1,'2023-05-03 19:09');
insert into articleinfo(title,content,uid,createtime) values('Python','Python正文',2,'2023-05-03 19:09');
4.准备对应的xml文件和对应的mapper接口
设置mapper接口
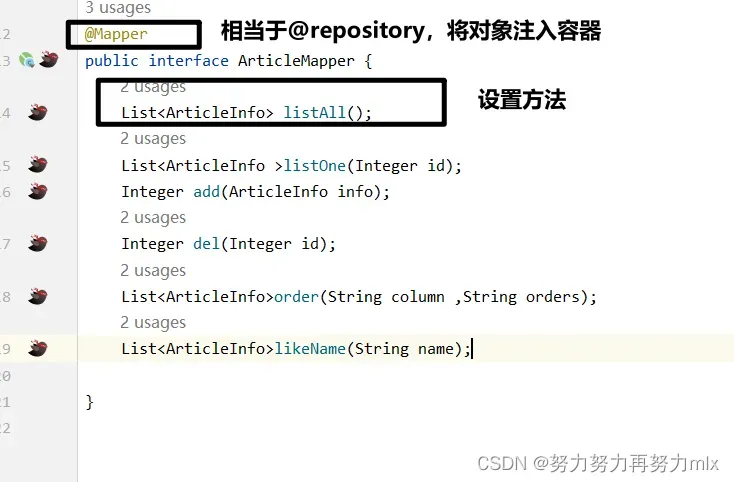
源码:
import com.ljl.mybatis_study.model.ArticleInfo;
import org.apache.ibatis.annotations.Mapper;

import java.util.List;

/**
 * @author tongchen
 * @create 2023-05-05 15:15
 */
@Mapper
public interface ArticleMapper {
    List<ArticleInfo> listAll();
    List<ArticleInfo >listOne(Integer id);
    Integer add(ArticleInfo info);
    Integer del(Integer id);
    List<ArticleInfo>order(String column ,String orders);
    List<ArticleInfo>likeName(String name);

}
设置对应的xml文件

源码如下:
<?xml version="1.0" encoding="UTF-8"?>
<!DOCTYPE mapper PUBLIC "-//mybatis.org//DTD Mapper 3.0//EN" "http://mybatis.org/dtd/mybatis-3-mapper.dtd">
<mapper namespace="com.ljl.mybatis_study.mapper.ArticleMapper">
    <select id="listAll" resultType="com.ljl.mybatis_study.model.ArticleInfo">
        select *from articleinfo
    </select>


</mapper>
5.定义对应的sql语句
在对应的标签中写入对应的sql语句
在此处就是在select标签内写入对应的sql语句
select *from articleinfo6.准备对应的java类
select语句返回的是具体的sql对象,在我们的程序中由数据库以字符串的形式传输过来之后,需要映射到具体的java类,而这个类,需要对应我们程序中的具体实体类
我们给出实体类的源码:
import lombok.Getter;
import lombok.Setter;
import lombok.ToString;

import java.util.Date;

/**
 * @author tongchen
 * @create 2023-05-05 15:24
 */
@Setter
@Getter
@ToString
public class ArticleInfo {
    private Integer id;
    private String title;
    private String content;
    private Date createtime;
    private Date updatetime;
    private Integer uid;
    private Integer rcount;
    private Integer state;
    private Userinfo userinfo;
}
四.占位符
在mybatis中存在两种类型的占位符:#{对应的变量名称}和${对应的变量名称}:两者的区别如下:#{}对应的到具体的sql语句中存在单引号,即为’变量名’,它的特征也侧面反映了它的应用场景:存放某个变量中具体的值。它的实现原理如下:通过jdbc的预处理,变量名对应的位置首先用?进行占位,之后调用preparedStatement.setxxx来进行替换
而${}对应的变量在sql语句中没有单引号,因此它的应用场景一般如下:例如order by 变量名 遍历顺序 ,它的实现原理是字符串的拼接:但是字符串拼接存在一个相对严重的安全隐患:sql注入,而预处理恰好可以解决此问题,预处理解决问题的方式如下:对”进行转义
我们以like语句进行举例说明:

五.多表查询
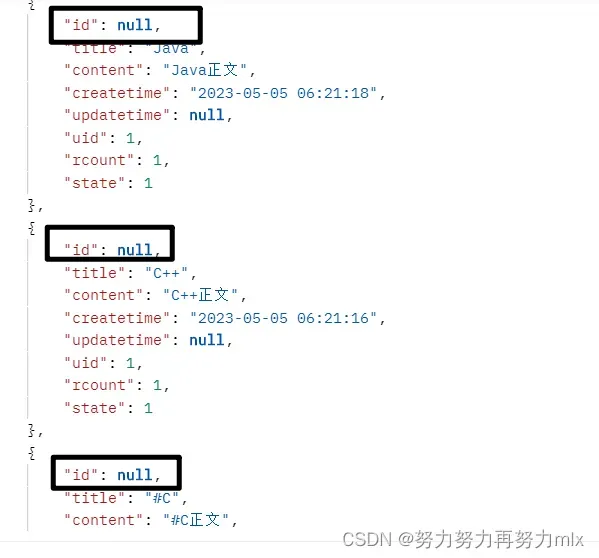
我们在前后端传输过程汇中从sql中的对象到java类中对象的映射过程中对应着java类中具体的对象类型,但是如果我们在进行多表查询时,查询到的数据通常是除了具体的java类之外还包括其他的额外字段,这时我们又该如何进行从sql对象到java对象的映射呢?
answer:使用resultMap(结果映射):resultMap是Mybatis最强大的元素,它可以将查询到的复杂数据(比如查询到几个表中数据)映射到一个结果集当中。使用resultType进行输出映射,只有查询出来的列名和pojo(实体bean)中的属性名一致,该列才可以映射成功。简单来说也就是你的数据库字段和JavaBean里的字段名称必须一致才能映射成功。所以当我们JavaBean中的字段名和数据库字段名称有不同的时候,或者是多表查询的时候,一般会使用resultMap
resultMap的作用和意义: resultMap 元素是 MyBatis 中最重要最强大的元素。它就是让你远离 90%的需要从结果 集中取出数据的 JDBC 代码的那个东西, 而且在一些情形下允许你做一些 JDBC 不支持的事 情。 事实上, 编写相似于对复杂语句联合映射这些等同的代码, 也许可以跨过上千行的代码。 ResultMap 的设计就是简单语句不需要明确的结果映射,而很多复杂语句确实需要描述它们 的关系。
resultMap一般存在的字段如下:
| id | 映射的主键信息 |
| property | 映射到javaBean的字段名称 |
| column | sql语句返回的查询结果对应的列名 |
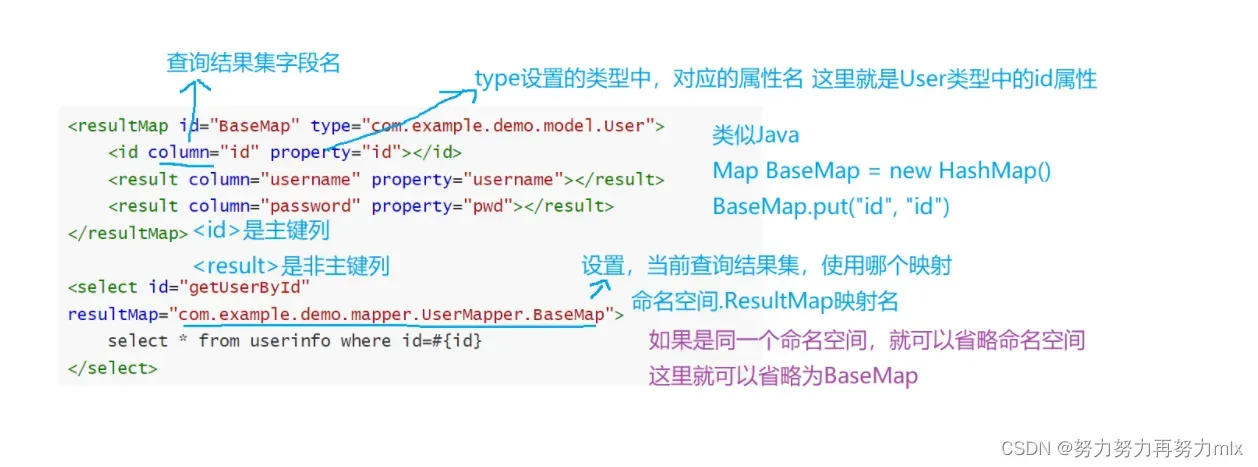
基本的结果映射如下:
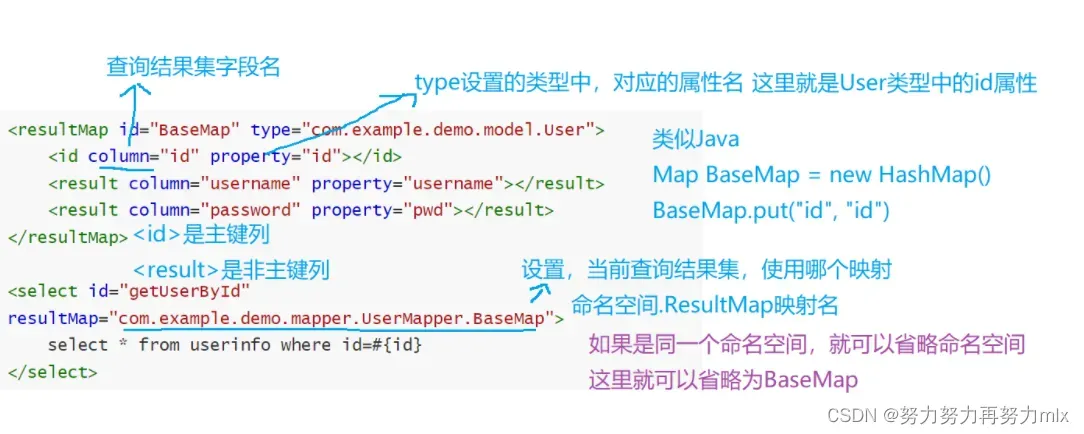
映射时需要注意的是:property 和 column所对应的数据变量名必须相对应,即java类中的属性名和property对应的变量名应该完全一致,column和对应的变量名和sql语句返回对象对应的字段名称也应该保持一致。
映射的类名不匹配:
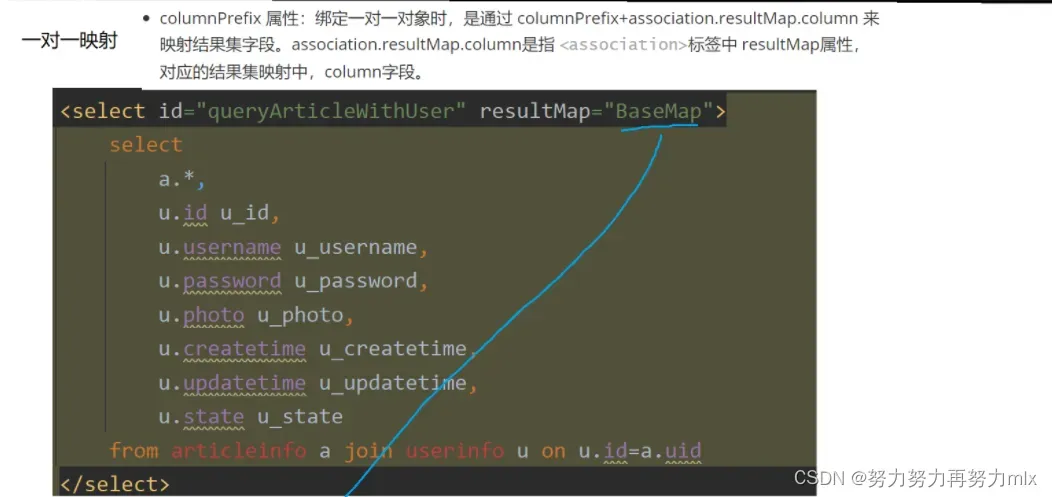
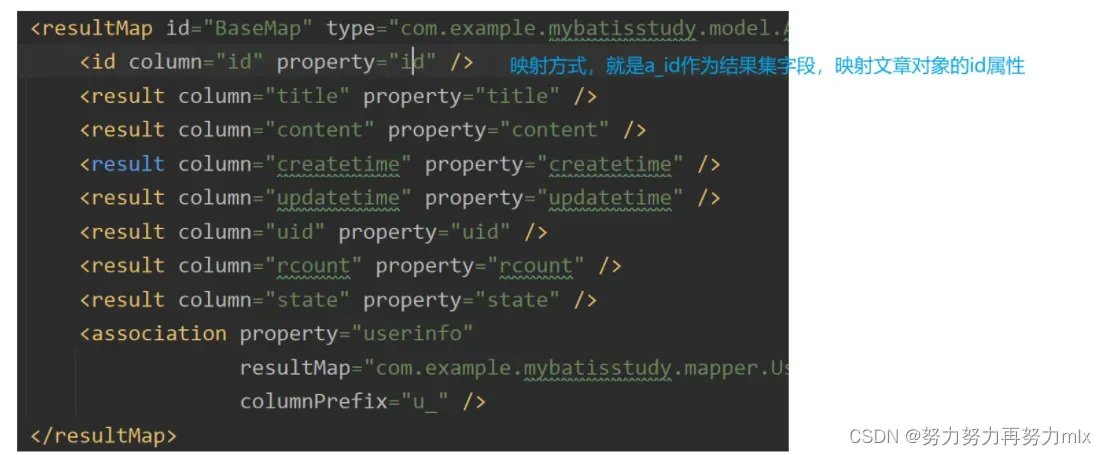
一对一的映射
这里进行的一对一映射和一对多映射才真正涉及到多表查询
这里引出了association联合:
联合元素用来处理“一对一”的关系。需要指定映射的Java实体类的属性,属性的javaType(通常MyBatis 自己会识别)。
type:resultMap中对应的java中的类
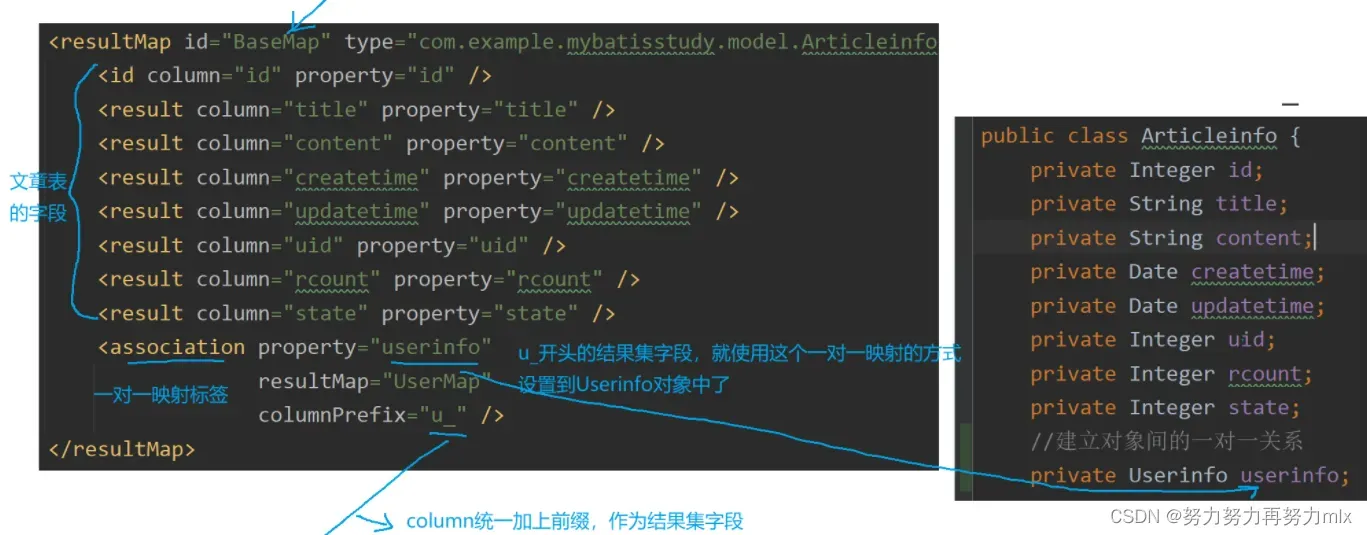
除了上所示例的对应的属性的对应关系之外,还需要一个association来进行额外关系的映射(除了某个具体的java类对应的字段之外的额外字段)
    <resultMap id="BaseMap" type="com.ljl.mybatis_study.model.ArticleInfo">
        <id column="id" property="id"/>
        <result column="title" property="title"/>
        <result column="content" property="content"/>
        <result column="createtime" property="createtime"/>
        <result column="updatetime" property="updatetime"/>
        <result column="uid" property="uid"/>
        <result column="rcount" property="rcount"/>
        <result column="state" property="state"/>
        <association property="userinfo" resultMap="UserMap" columnPrefix="u_"/>

    </resultMap>
除此之外,还需要对返回值类型对应的主类中添加对应的字段: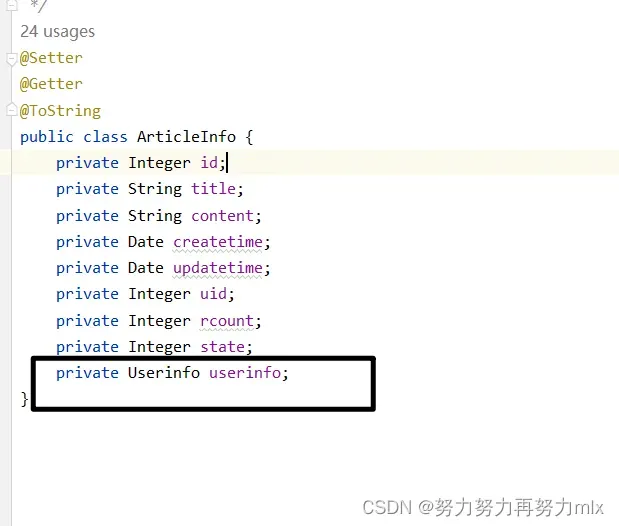
源码如下:
import lombok.Getter;
import lombok.Setter;
import lombok.ToString;
import java.util.Date;
/**
* @author tongchen
* @create 2023-05-05 15:24
*/
@Setter
@Getter
@ToString
public class ArticleInfo {
private Integer id;
private String title;
private String content;
private Date createtime;
private Date updatetime;
private Integer uid;
private Integer rcount;
private Integer state;
private Userinfo userinfo;
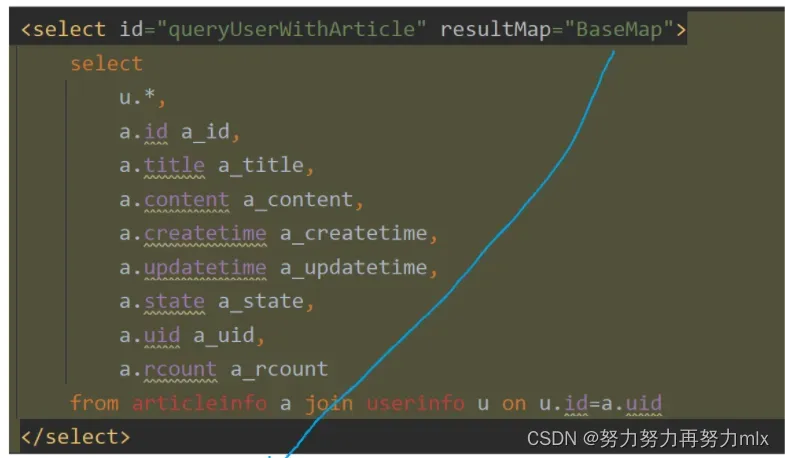
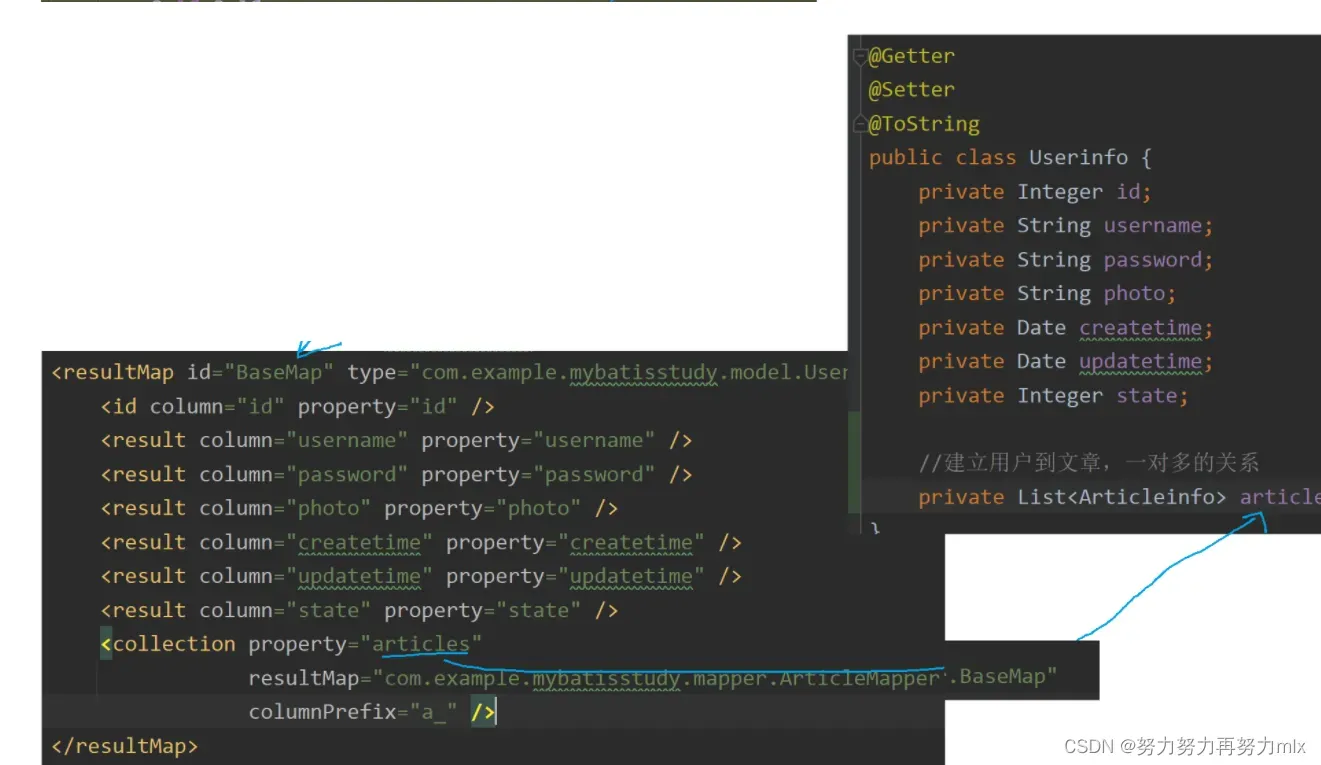
}一对多的映射
由于是一对多,所以这里就引出了collection聚集:
聚集元素用来处理“一对多”的关系。需要指定映射的Java实体类的属性,属性的javaType(一般为ArrayList);列表中对象的类型ofType(Java实体类)。
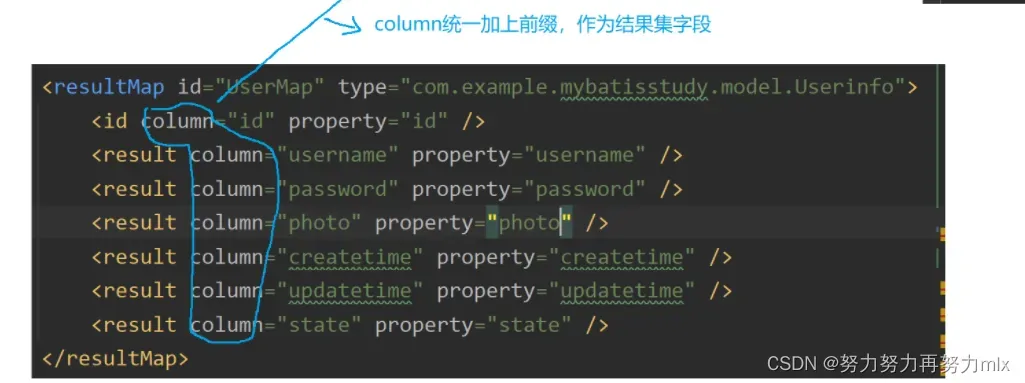
同样,type代表的是这个resultmap对应的java类
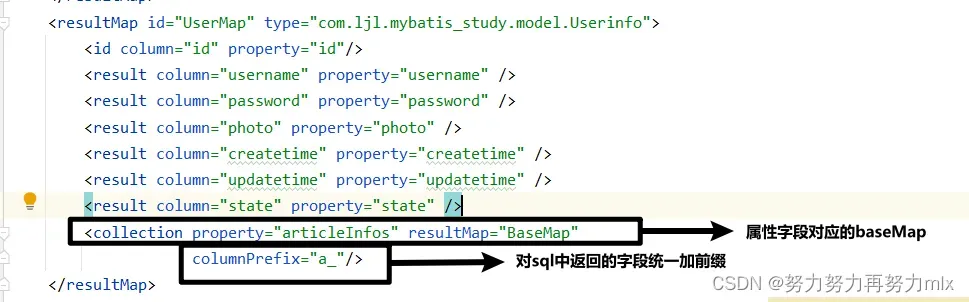
<resultMap id="UserMap" type="com.ljl.mybatis_study.model.Userinfo">
        <id column="id" property="id"/>
        <result column="username" property="username" />
        <result column="password" property="password" />
        <result column="photo" property="photo" />
        <result column="createtime" property="createtime" />
        <result column="updatetime" property="updatetime" />
        <result column="state" property="state" />
        <collection property="articleInfos" resultMap="BaseMap"
                    columnPrefix="a_"/>
    </resultMap>
我们引入具体的前后端交互的逻辑关系:
一对一映射:
一对多的映射
六.动态sql
<if>标签
语法规则:<if test=”条件语句”>
if标签通常结合trim标签结合使用,是动态sql的语句符合SQL的语法规则
实例:
 <insert id="dynamicInsert">
        insert into userinfo <trim prefix="(" suffix=")" suffixOverrides=",">
        <if test="id!=null">
            id,
        </if>
        <if test="username!=null">
            username,
        </if>
        <if test="password!=null">
            password,
        </if>
        <if test="photo!=null">
            photo,
        </if>
    </trim>
            values
                <trim prefix="(" suffix=")" suffixOverrides=",">
        <if test="id!=null">
            #{id},
        </if>
        <if test="username!=null">
            #{username},
        </if>
        <if test="password!=null">
            #{password},
        </if>
        <if test="photo!=null">
            #{photo},
        </if>
                </trim>
</insert><trim>标签
语法规则:
prefix:表示整个语句块,以prefix的值作为前缀 suffix:表示整个语句块,以suffix的值作为后缀 prefixOverrides:表示整个语句块要去除掉的前缀 suffixOverrides:表示整个语句块要去除掉的后缀作用:加入或删除某些sql语句的内容,使sql语句符合语法规则,提高效率
 <insert id="dynamicInsert">
        insert into userinfo <trim prefix="(" suffix=")" suffixOverrides=",">
        <if test="id!=null">
            id,
        </if>
        <if test="username!=null">
            username,
        </if>
        <if test="password!=null">
            password,
        </if>
        <if test="photo!=null">
            photo,
        </if>
    </trim>
            values
                <trim prefix="(" suffix=")" suffixOverrides=",">
        <if test="id!=null">
            #{id},
        </if>
        <if test="username!=null">
            #{username},
        </if>
        <if test="password!=null">
            #{password},
        </if>
        <if test="photo!=null">
            #{photo},
        </if>
                </trim>
</insert><where>标签
对动态sql语句进行条件限制,并可以去除where条件下第一个and符号
在作用上相当于: <trim prefix=”where” prefixOverrides=”and”>
具体使用:
 <select id="dynamicSelect" resultMap="UserMap">
        select *from userinfo
        <where>
            <if test="id!=null">
              and  id=#{id}
            </if>
            <if test="username!=null">
              and  username=#{username}
            </if>
        </where>
</select><set>标签
用于sql语句中的update语句,并且可以去除最后一个逗号
set标签也可以使用 <trim prefix=”set” suffixOverrides=”,”> 替换。
具体使用如下:
  <update id="dynamicUpdate">
        update userinfo
        <set >
            <if test="photo!=null">
                photo=#{photo},
            </if>
            <if test="username!=null">
                username=#{username},
            </if>
        </set>
            where id=#{id}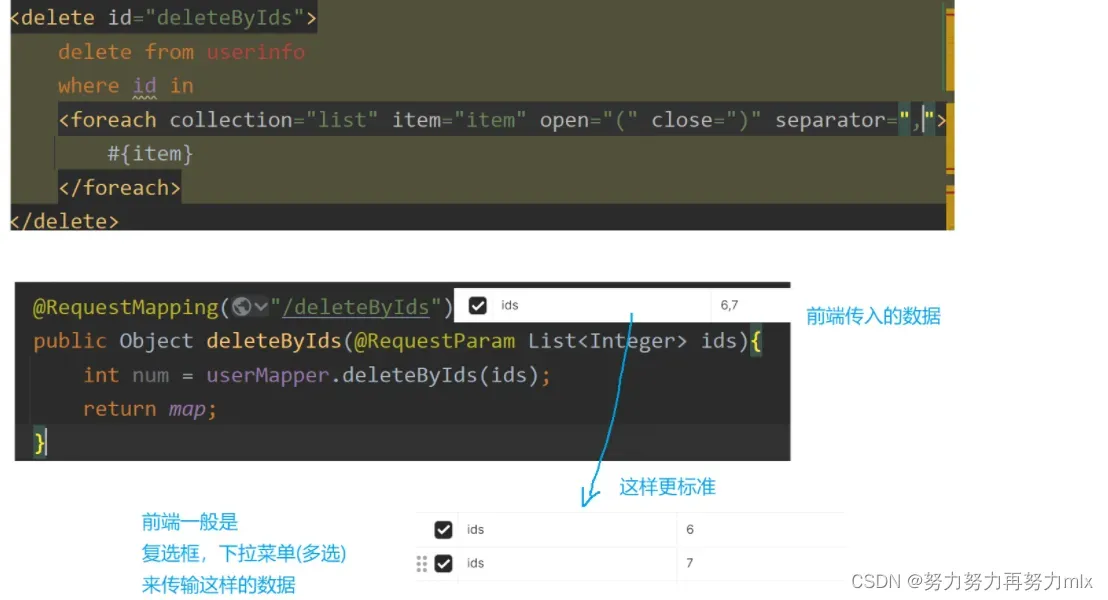
</update><foreach>标签
对集合进行遍历时使用该标签
- collection:绑定方法参数中的集合,如 List,Set,Map或数组对象
- item:遍历时的每一个对象
- open:语句块开头的字符串
- close:语句块结束的字符串
- separator:每次遍历之间间隔的字符串
对于使用foreach进行遍历的元素,一般将其划分为两种,集合中存在的基本数据类型或者是其包装类,另一种是自定义的数据类型,对于集合中储存基本数据类型,我们一般要在Controller层对应的方法参数中添加@RequestParam注解,如果不加传输的数据当做普通元素进行处理,会报错,报错信息如下:Request processing failed; nested exception is java.lang.IllegalStateException: No primary or single unique constructor found for interface java.util.List
at org.springframework.web.servlet.FrameworkServlet.processRequest(FrameworkServlet.java:1014) ~[spring-webmvc-5.3.27.jar:5.3.27]
at org.springframework.web.servlet.FrameworkServlet.doPost(FrameworkServlet.java:909) ~[spring-webmvc-5.3.27.jar:5.3.27]
即没有唯一的构造方法
而对于我们自定义的方法,我们一般使用的则是@RequestBody这个注解,此时前端传输的数据通常是json类型
我们对一个简单类型和复杂类型分别进行遍历:
简单类型:
复杂类型:
  <insert id="dynamicInsertMore">
    insert into userinfo (username ,password ,photo)
    values
    <foreach collection="list" item="userinfo"  separator=",">
        (#{userinfo.username},#{userinfo.password},#{userinfo.photo})
    </foreach>
文章出处登录后可见!