来源:投稿 作者:毛华庆
编辑:学姐
前言
本课程来自深度之眼《大模型——前沿论文带读训练营》公开课,部分截图来自课程视频。
文章标题:LLaMA: Open and Efficient Foundation Language Models
向量空间中词表示的有效估计
文章链接:https://arxiv.org/pdf/2302.13971.pdf
作者:Hugo Touvron等
单位:Meta AI
发表时间:2023 arxiv
ChatGPT相关工具:https://github.com/pengwei-iie/A_survey_and_tools_of_ChatGPT
不过貌似好多都很麻烦,要部署,直接能用的没看见。。。
导读
摘要
We introduce LLaMA, a collection of foundation language models ranging from 7B to 65B parameters. We train our models on trillions of tokens, and show that it is possible to train state-of-the-art models using publicly available datasets exclusively, without resorting to proprietary and inaccessible datasets. In particular, LLaMA-13B outperforms GPT-3 (175B) on most benchmarks, and LLaMA 65B is competitive with the best models, Chinchilla-70B and PaLM-540B. We release all our models to the research community.
预备知识
「预训练模型」
预训练模型就像是一个已经读过很多书的人,他从书中学到了很多知识和常识,比如语法、词汇、句子的意思等等。这些知识和常识可以帮助他更好地理解和表达自己的想法。 可以通过对预训练模型进行fine-tune使得模型可以用在某个特殊的领域。
「提示学习」
提示学习就像是一个老师,他会根据不同的问题,给预训练模型一些提示或者建议,让他能够更快更准确地回答问题。比如,如果问题是“猴子最讨厌什么线?“,老师可能会给预训练模型一个提示,说“比如猴子喜欢吃香蕉;答案是一个数学名词(考虑谐音),对角线,平行线”。这样,预训练模型就可以根据提示,从自己学过的知识中找到正确的答案。
其实在和ChatGPT互动的时候你也会发现,有时候提问ChatGPT是无法回答的,这个时候,你需要在问题中给出一些提示。例如:
-
请解释某某概念。(可能得到一段回答)
-
某某概念包含几个方面。(可得到分成几个方面的回答,更加详细)
错误提问:请给出海南七日游规划
正确提问:假如你是一个导游,你想要为坐飞机来海南旅游7日的两名游客制定一个旅游计划,需要包含某某、某某景点,请给出具体规划。
语言模型
可以看之前的博文:https://blog.csdn.net/oldmao_2001/article/details/104522821
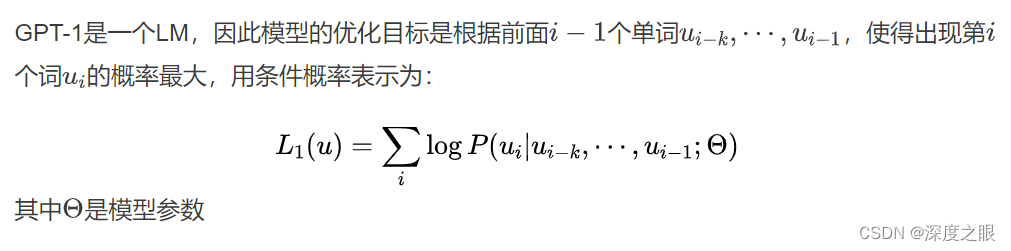
语言模型的任务是预测一个句子在语言中出现的概率。简单来说,语言模型就是用来计算一个句子的概率的模型。如:输出北京是中国的首都的概率大于东京是中国的首都。
「本文的LLaMA属于GPT类的LM」
ChatGPT性能暴涨的原因(涌现)
-
算力和数据
-
语言模型一直使用循环神经网络
-
Transformer潜力还未被发掘
GPT-1
模型包含12个解码器层。由于在这种设置中没有编码器,这些解码器层将不会有普通transformer解码器层所具有的编码器-解码器注意力子层。但是,它仍具有自注意力层。
说人话:
-
GPT-1只有Decoder,没有Encoder
-
没有Cross Attention(或者说Encoder-Decoder Attention),只有Self Attention
通过语料的训练,然模型读各种句子,模型就具备了预测下一个词的能力。这里GPT-1的语料包括7000本未出版的书籍(涵盖冒险类、神话类、爱情类)。
Transformer
具体内容可以看这里: https://blog.csdn.net/oldmao_2001/article/details/105064585
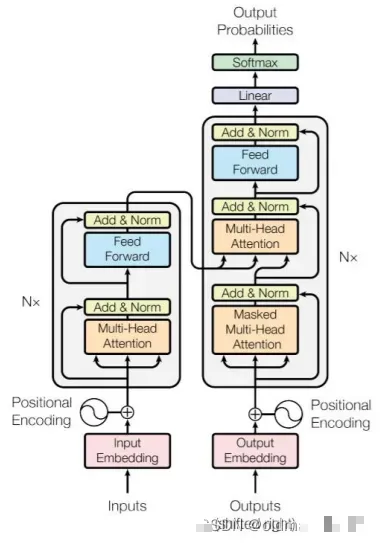
原图应该是来自经典的attention is all u need

左边是编码器,右边是解码器
- 编码器(6 layers)
-
多头自注意神经网络

-
全连接神经网络
-
残差连接以及层的Normalization
-
- 解码器(6 layers)
-
掩码多头自注意神经网络
-
多头注意力机制
-
全连接神经网络
-
残差连接以及层的Normalization
-
背景介绍
「什么是LLaMA:」
-
参数量有四档:7/13/33/65亿,最低那档据说24g显存的显卡可以跑,7亿的LLaMA用了1万亿token进行训练,最大模型则用了1.4万亿。
-
用了万亿个token进行训练(所有数据均来自公开数据集)
-
性能和175亿参数的GPT-3相当
-
由Meta AI于2023年2月发布,作为致力于开放科学和人工智能实践的一部分
「LLaMA与其他大型语言模型的关联:」
LLaMA与GPT、GPT-3、Chinchilla和PaLM等其他大型语言模型类似,因为它使用 Transformer architecture 来预测给定单词或token序列作为输入的下一个单词或token。
LLaMA与其他模型的不同之处在于,它使用了更多token进行训练,得到较小模型,这使它更高效,资源密集度更低。(可部署在CPU上做预测)
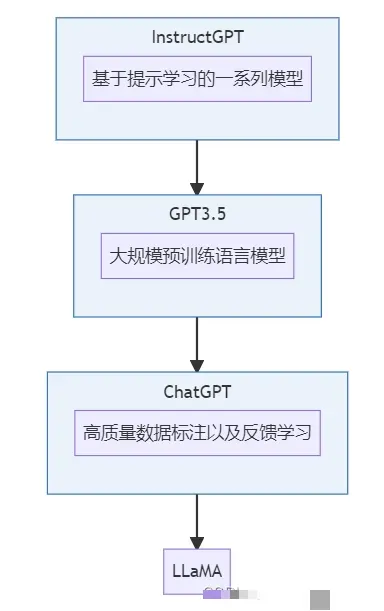
「LLaMA发展史」
「LLaMA的特点」
-
语种: LLaMA涵盖了20种使用者最多的语言,重点是那些使用拉丁字母和西里尔字母的语言。这些语言包括英语、西班牙语、法语、俄语、阿拉伯语、印地语、汉语等。
-
生成方式:和GPT一样
-
所需资源更小: LLaMA比其他模型更高效,资源密集度更低,因为它使用在更多tokens上训练的较小模型。这意味着它需要更少的计算能力和资源来训练和运行这些模型,也需要更少的内存和带宽来存储和传输它们。例如,LLaMA 13B在大多数基准测试中都优于GPT-3 175B),而只使用了约7%的参数。这个特点也为个人部署LLaMA提供了可能,让研究人员实现现更多的可访问性和个性化,并探索新的用例和应用程序。
-
开源。
模型精讲
| 模型 | 训练方法 |
|---|---|
| Bert系列 | 自编码(AutoEncoder) |
| GPT、LLaMA | 自回归(AutoRegression) |
| T5、BART | Seq2Seq |
自回归
数据集及处理
Common Crawl大规模的网络文本数据集(公开的)和其他开源数据集,具体如下图:
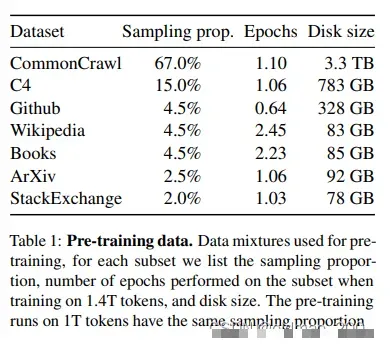
论文的第二节对每个数据集做的处理进行了描述。
Common Crawl
Common Crawl是一个公开的网络文本数据集,它包含了从2008年开始收集的数千亿个网页的原始数据(包括JS脚本)、元数据和文本提取。LLaMA只取了2017-2020的数据,并进行了一些预处理,来确保数据的质量要求:
-
使用 fastText 线性分类器执行语言识别去掉非英语页面
-
使用 n-gram 语言模型过滤低质量内容
This process deduplicates the data at the line level, performs language identification with a fastText linear classifier to remove non-English pages and filters low quality content with an n-gram language model. In addition, we trained a linear model to classify pages used as references in Wikipedia v.s. randomly sampled pages, and discarded pages not classified as references.
从原文看,作者还做了一个分类器,把没有在维基百科中引用的随机内容页面过滤掉,简单说就是一个页面上的内容如果没有一个单词出现在维基百科中,说明这个页面内容是无意义的,应该去掉。
C4
C4数据集是一个巨大的、清洗过的Common Crawl网络爬取语料库的版本。
文章对C4进行了一些不同的预处理,因为作者观察到使用不同的预处理可以提高性能。
C4 的预处理也包含去重和语言识别步骤:上一个数据集处理区别在于质量过滤,它主要依赖于启发式方法,例如对网页中标点符号的过滤、或者限制单词和句子的数量。
The preprocessing of C4 also contains deduplication and language identification steps: the main difference with CCNet is the quality filtering, which mostly relies on heuristics such as presence of punctuation marks or the number of words and sentences in a webpage.
Github
使用 Google BigQuery 上可用的公共 GitHub 数据集。 只保留在 Apache、BSD 和 MIT 许可证下分发的项目。 根据行长或字母数字字符的比例使用启发式方法过滤了低质量文件。
在文件级别对生成的数据集进行重复数据删除。
We use the public GitHub dataset available on Google BigQuery. We only kept projects that are distributed under the Apache, BSD and MIT licenses. Additionally, we filtered low quality files with heuristics based on the line length or proportion of alphanumeric characters, and removed boilerplate, such as headers, with regular expressions. Finally, we deduplicate the resulting dataset at the file level, with exact matches.
Wikipedia
添加了 2022 年 6 月至 8 月期间的维基百科数据,涵盖 20 种语言,这些语言使用的是拉丁文或西里尔文,作者删除了超链接、评论和其他格式化的模板:
We add Wikipedia dumps from the June-August 2022 period, covering 20 languages, which use either the Latin or Cyrillic scripts: bg, ca, cs, da, de, en, es, fr, hr, hu, it, nl, pl, pt, ro, ru, sl, sr, sv, uk. We process the data to remove hyperlinks, comments and other formatting boilerplate.
| 缩写 | 语言 |
|---|---|
| bg | 保加利亚语 |
| ca | 加泰罗尼亚语 |
| cs | 捷克语 |
| da | 丹麦语 |
| de | 德语 |
| en | 英语 |
| es | 西班牙语 |
| fr | 法语 |
| hr | 克罗地亚语 |
| hu | 匈牙利语 |
| it | 意大利语 |
| nl | 荷兰语 |
| pl | 波兰语 |
| pt | 葡萄牙语 |
| ro | 罗马尼亚语 |
| ru | 俄语 |
| sl | 斯洛文尼亚语 |
| sr | 塞尔维亚语 |
| sv | 瑞典语 |
| uk | 乌克兰语 |
Gutenberg and Books3
古腾堡计划(The Gutenberg Project)包含公共领域的书籍,以及ThePile的Books3部分,这是一个用于训练大型语言模型的公开数据集。作者在图书层面上进行重复数据删除,删除内容重叠度超过90%的图书
The Gutenberg Project, which contains books that are in the public domain, and the Books3 section of ThePile , a publicly available dataset for training large language models. We perform deduplication at the book level, removing books with more than 90% content overlap.
ArXiv
论文数据,删除了第一节之前的所有内容,书目,latex源文件中的注释,用户自定义的内联扩展和宏。
Following Lewkowycz et al. (2022), we removed everything before the first section, as well as the bibliography. We also removed the comments from the .tex files, and inline-expanded definitions and macros written by users to increase consistency across papers.
Stack Exchange
应该是类似Stack Overflow论坛的数据,stack系列涵盖多个论坛,Overflow是其中一个。作们保留了28个最大网站的数据,去掉了文本中的HTML标签,并按分数(从高到低)对答案进行了排序。
We include a dump of Stack Exchange, a website of high quality questions and answers that covers a diverse set of domains, ranging from computer science to chemistry. We kept the data from the 28 largest websites, removed the HTML tags from text and sorted the answers by score (from highest to lowest).
小结
整个数据涵盖的面很广:通用语料、书籍、论文、代码、论坛、不同语言。
作者对数据进行使用了字节对编码(BPE,byte-pair encoding)算法完成token化。作者将所有数字分割成单个数字,并回退到字节来分解未知的UTF-8字符。
Notably, we split all numbers into individual digits, and fallback to bytes to decompose unknown UTF-8 characters.
最终得到大约1.4T的token,对于训练数据,每个token只使用一次(Wikipedia和Books是用了两个epochs)。
关键Trick
Pre-normalization
为了提高训练稳定性,作者对每个Transformer子层的输入进行归一化,而不是对输出进行归一化。注意看Transformer中黄色方块(Add & Norm)部分,都是在输出部分的,现在把这个操作调整到前面对输入进行Norm操作。
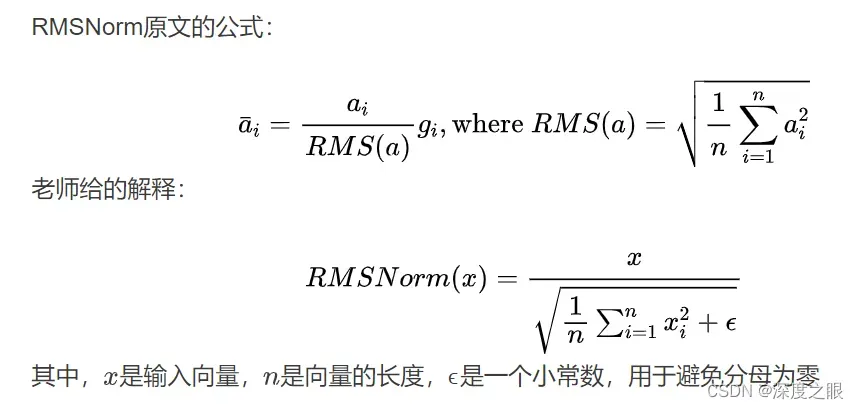
文章使用了「Zhang B, Sennrich R. Root mean square layer normalization」(https://www.zora.uzh.ch/id/eprint/177483/1/9403-root-mean-square-layer-normalization.pdf)的RMSNorm归一化方法
SwiGLU
作者用 Shazeer (2020)(https://arxiv.org/pdf/2002.05202.pdf)引入的 SwiGLU 激活函数代替 ReLU 非线性激活函数,提高性能。(原文超短)
-
SwiGLU 激活函数的收敛速度更快,效果更好。
-
SwiGLU 激活函数和 ReLU 都拥有线性的通道,可以使梯度很容易通过激活的units,更快收敛。
-
SwiGLU 激活函数相比 ReLU 更具有表达能力。
-
SwiGLU激活函数的收敛速度更快,这是因为它在计算过程中使用了门控机制,可以更好地控制信息的流动。公式如下:

Rotary Embeddings
作者使用rotary positional embeddings (RoPE)(https://arxiv.org/pdf/2104.09864.pdf)来替换原理的绝对位置向量(absolute positional embeddings)。
关于绝对位置向量和相对位置向量看下面例子。
「绝对位置向量」(Bert,原版的Transformer都用的这个):
| 1 | 2 | 3 | 4 |
|---|---|---|---|
| 今天 | 天气 | 还 | 不错 |
「相对位置向量」(XLNet用的这个):
| -2 | -1 | 0 | 1 |
|---|---|---|---|
| 今天 | 天气 | 还 | 不错 |
「关于RoPE先大概理解旋转对称性:」
旋转对称性是指物体在旋转后仍然具有相同的性质。例如,一个正方形在旋转90度后仍然是一个正方形,因此具有旋转对称性。对于NLP来说,旋转对称性指的是序列中的某些部分可以通过旋转变换得到其他部分。
例如,在机器翻译任务中,源语言句子和目标语言句子之间存在一定的对称性。这意味着我们可以通过将源语言句子旋转一定角度来得到目标语言句子。
上面讲的两种表示方式仅仅表达了词在句子中出现的顺序,没有嵌入对称信息。
RoPE可以更好地处理序列中的旋转对称性。在传统的位置编码方法中,位置信息只是简单地编码为一个向量,而没有考虑到序列中的旋转对称性。而旋转位置嵌入则将位置信息编码为一个旋转矩阵,从而更好地处理了序列中的旋转对称性。
不过看了一眼原文,这个方法的效果并没有提升很多,但是它可以不受句子长度的限制。
The experimental results also show that our proposed RoFormer can achieve better performance on long texts task.
实验分析和讨论
训练Trick
因果多头注意力算子:这个Trick实现借用了xformers库,它的思路是不存储注意力权重,不计算其中注意力得分。
This implementation, available in the xformers library, is inspired by Rabe and Staats (2021) and uses the backward from Dao et al. (2022). This is achieved by not storing the attention weights and not computing the key/query scores that are masked due to the causal nature of the language modeling task.
重新实现了反向传播的梯度计算:为了进一步提高训练效率,作者减少了在带有检查点的反向传播过程中重新计算的激活量。通过手动实现变换器层的反向功能来实现的,而不是依赖于 PyTorch的autograd。
To further improve training efficiency, we reduced the amount of activations that are recomputed during the backward pass with checkpointing. More precisely, we save the activations that are expensive to compute, such as the outputs of linear layers. This is achieved by manually implementing the backward function for the transformer layers, instead of relying on the PyTorch autograd. To fully benefit from this optimization, we need to reduce the memory usage of the model by using model and sequence parallelism, as described by Korthikanti et al. (2022).
原文还提到这里还用了多GPU并行工作提高速度。
Moreover, we also overlap the computation of activations and the communication between GPUs over the network (due to all_reduce operations) as much as possible.
当训练LLaMA-65B模型时,在80GB显存的2048 A100 GPU上处理速度为:380个token/sec/GPU。在包含1.4T token 的数据集上进行训练大约需要21天。
大模型就是烧钱烧算力,一些研究者提出要发展低碳式的模型训练。
模型的损失和tokens之间的关系
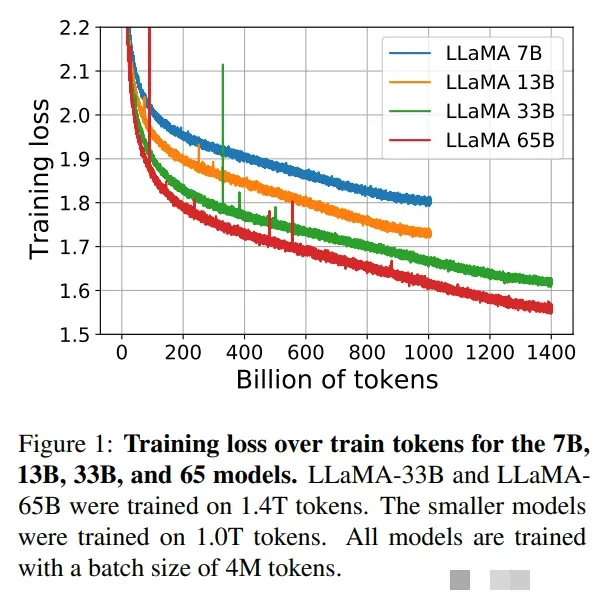
可以看到7B和13B如果丢更多的语料,loss应该会继续下降。
不同数据集比拼结果
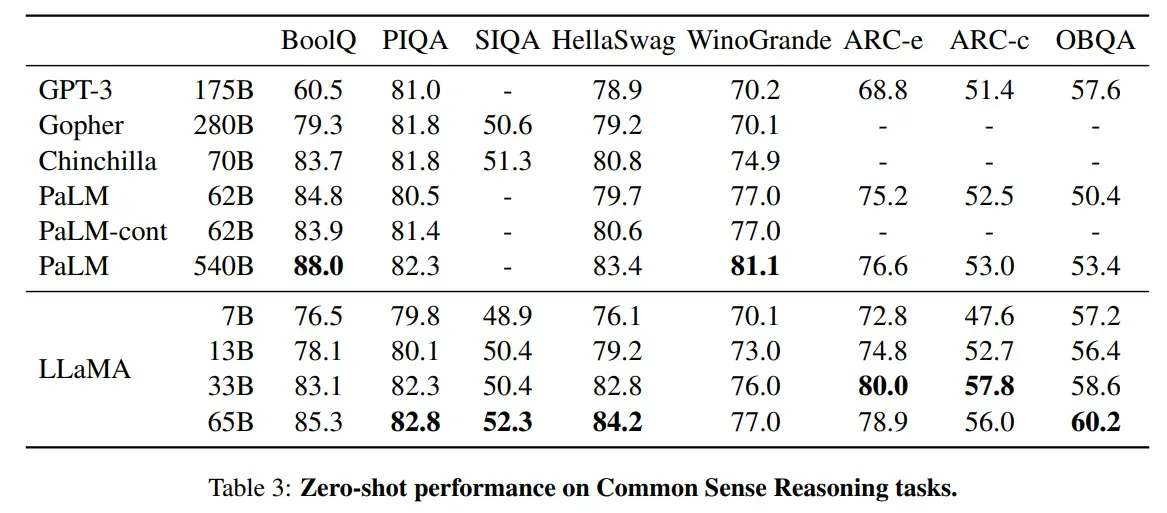
在20个数据集上对比了开源和闭源模型,主要是zero-shot和few-shot性能,也对比了instruct-tuning之后的效果。
这里可以重点查看13B和GPT-3 175B的结果实际上是非常相近的。
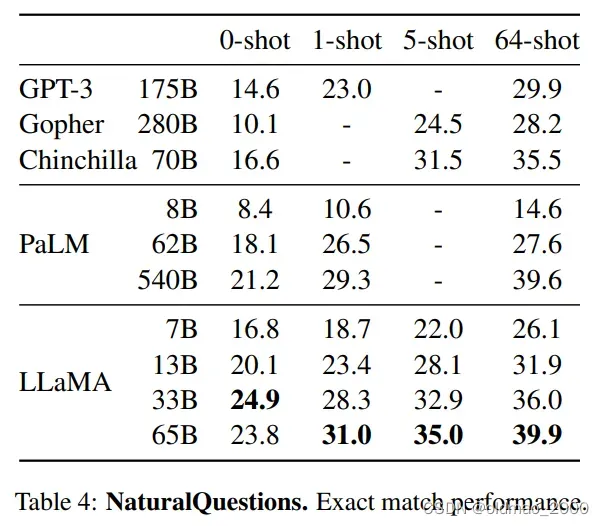
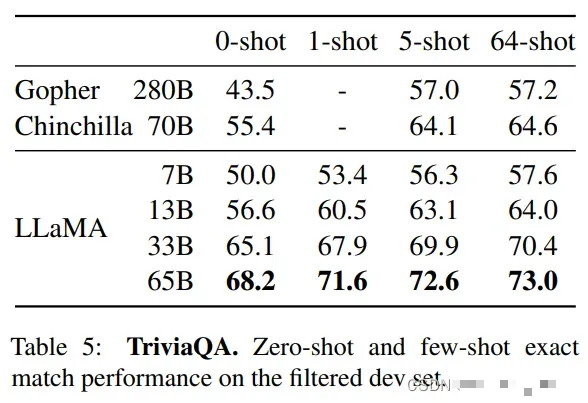
QA结果
In Table 4, we report performance on NaturalQuestions, and in Table 5, we report on TriviaQA. On both benchmarks, LLaMA-65B achieve state-of-the-arts performance in the zero-shot and few-shot settings.
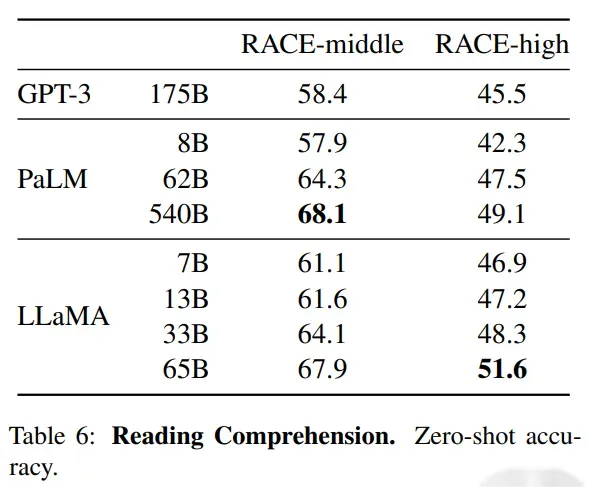
阅读理解
可以看到LLaMA对标到540B的PaLM。
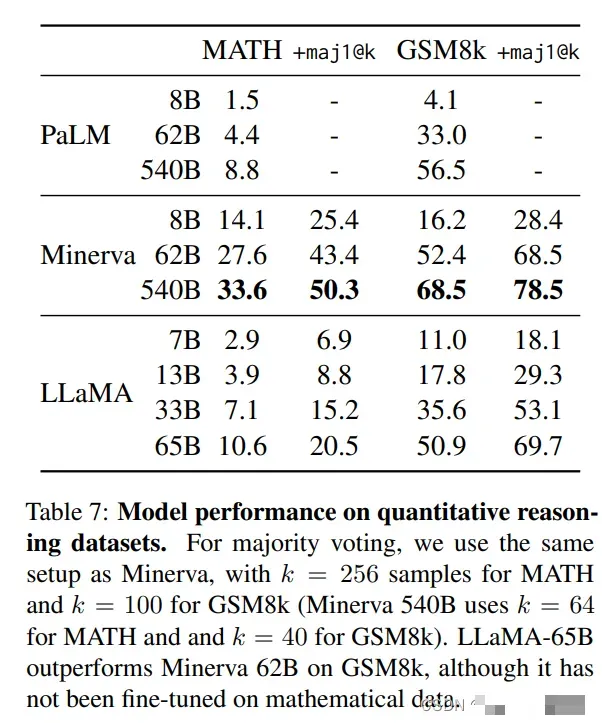
数学QA
模型对于数学问题也是根据语言模型来推理出来的,而非进行计算,如果有些题目比较少见,即使很简单,模型也会答错。
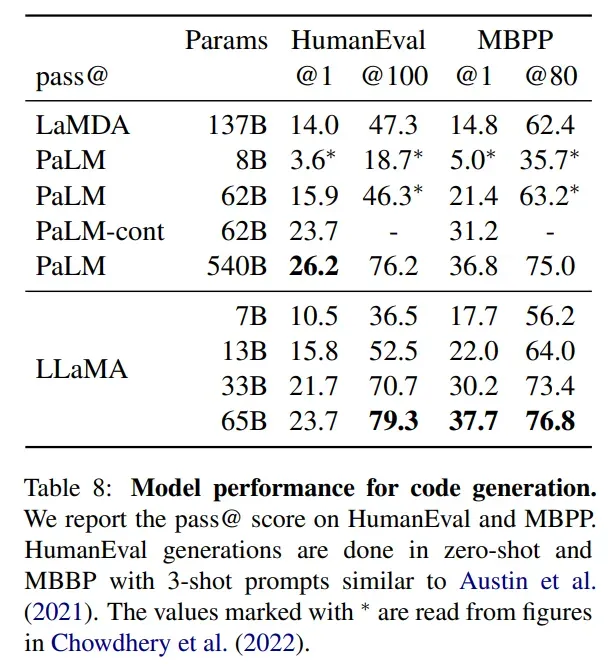
代码生成
代码生成这块LLaMA表现也还可以,而且吃的代码语料也不多,还有进步的空间。
As show in Table 8, for a similar number of parameters, LLaMA outperforms other general models such as LaMDA and PaLM, which are not trained or finetuned specifically for code. LLaMA with 13B parameters and more outperforms LaMDA 137B on both HumanEval and MBPP. LLaMA 65B also outperforms PaLM 62B, even when it is trained longer.
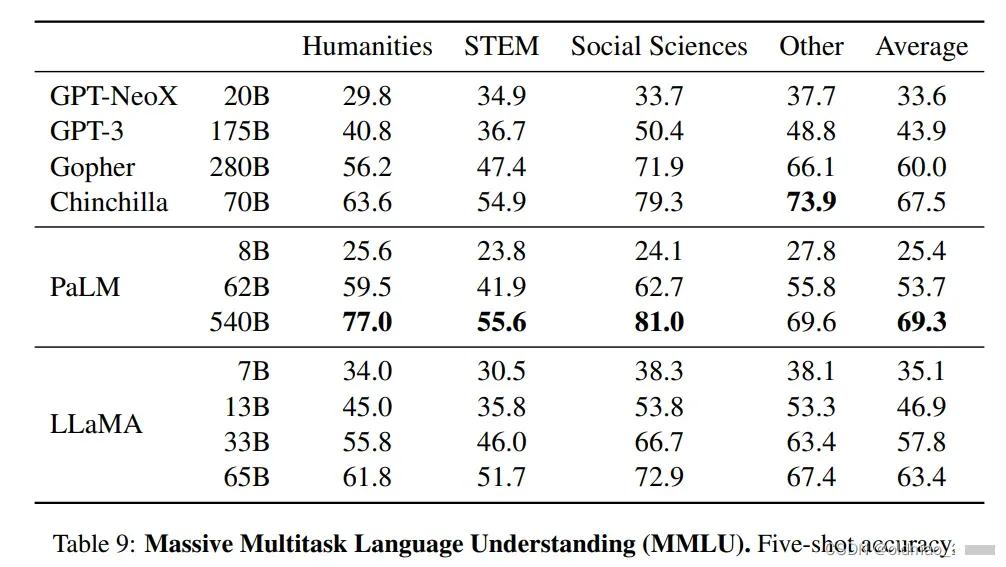
MMLU
大规模多任务语言理解(Massive Multitask LanguageUnderstanding),从结果上看,貌似没有拿到benchmark,原因估计是书籍和论文见的太少了,只有177GB,PaLM模型吃了2TB
部署
环境
Git:安装参考 https://openai.wiki/git-windows-install.html
MIniconda:无需安装完整版的Anaconda,精简版的conda就可以,安装参考 https://openai.wiki/anaconda-and-miniconda-windows-install.html
貌似以上两个东西在实例服务器中已包含,而且教程给的是Windows下的,LLaMA是要跑在Linux下,权当记录好了。
打开:https://github.com/pengwei-iie/llama_bugs,注意阅读里面的README,里面有老师踩过的坑(一个是模型参数文件的选择,另外一个是batch size的设置,对应example_small.py)。
安装GPU服务器:在恒源云上创建一个Linux实例,至少要求16G显存。
-
PyTorch:1.12.0
-
Cuda:11.3
-
Python:3.8
使用checkpoints和tokenizer之前按理要填写谷歌的一个表单,类似注册API,但是分词器已有破解,「该步骤可以省略」。
准备工作就绪后开干。
-
打开Linux服务器实例,在终端使用以下命令克隆项目
git clone https://github.com/pengwei-iie/llama_bugs.git
克隆的项目会放在llama_bugs目录下,可以使用cd和ls进入目录查看一下。
2.安装相关包
pip install -r requirements.txt
有四个:
| 包名 | |
|---|---|
| torch | 这个不用说 |
| fairscale、fire | 多线程相关的包 |
| sentencepiece | 分词相关的包 |
3.安装相关依赖包
pip install -e .
到这一步,代码就准备好了。
4.到 https://huggingface.co/nyanko7/LLaMA-7B/tree/main 下载模型。并把模型保存到代码文件夹下,例如可以使用以下命令新建一个名为model7b的文件夹:
mkdir model7b
这个文件将在下一步中作为参数用到。
模型大概14g,下载需要几个小时。
网上的模型文件有pth格式,有bin格式,这里不要下错。
Inference预测
读懂下面的命令
torchrun --nproc_per_node MP example.py --ckpt_dir $TARGET_FOLDER/model_size --tokenizer_path $TARGET_FOLDER/tokenizer.model
nproc_per_node 要小于等于当前服务器中GPU的数量 MP是不同LLaMA模型取值:
| 模型 | MP取值 |
|---|---|
| 7B | 1 |
| 13B | 2 |
| 33B | 4 |
| 65B | 8 |
example.py是原始batchsize对应的代码,这里要使用修改过的example_small.py
ckpt_dir 是指模型文件存放的文件夹名称 tokenizer_path 是指分词器所存放的文件夹位置 使用vi编译一个可执行脚本:
vi run.sh
把上面的命令粘贴过来,并修改为我们实际的参数:
torchrun --nproc_per_node 1 example_small.py --ckpt_dir ./model7b --tokenizer_path ./model7b/tokenizer.model
按esc进入vi的命令模式,然后使用x:保存并退出。 然后使用以下命令运行LLaMA。
bash run.sh
由于在example_small.py中设置了promt是: Once upon a time, there were three bears. They
因此模型就会根据提示进行后续的文本补全操作:

仔细看还是有不符合逻辑的地方,例如papa bear喜欢吃石头是什么鬼。。。
注意事项
-
最好是Linux
-
最好是GPU,CPU还没试过行不行(虽然网上有对应的CPU的版本)
主要代码解析
主要针对model.py进行分析
先看Transformer类,再看TransformerBlock类
Transformer类
class Transformer(nn.Module):
 #初始化
    def __init__(self, params: ModelArgs):
        super().__init__()
        self.params = params
        self.vocab_size = params.vocab_size#词表大小
        self.n_layers = params.n_layers#TransformerBlock的层数

        self.tok_embeddings = ParallelEmbedding(
            params.vocab_size, params.dim, init_method=lambda x: x
        )#word embedding

        self.layers = torch.nn.ModuleList()
        for layer_id in range(params.n_layers):#循环将TransformerBlock加入模型
            self.layers.append(TransformerBlock(layer_id, params))

  #使用RMSNorm而非普通的归一化
        self.norm = RMSNorm(params.dim, eps=params.norm_eps)
        #输出计算的是每个词在词表中的概率分布
        self.output = ColumnParallelLinear(
            params.dim, params.vocab_size, bias=False, init_method=lambda x: x
        )

  #用于计算rotate embedding信息
        self.freqs_cis = precompute_freqs_cis(
            self.params.dim // self.params.n_heads, self.params.max_seq_len * 2
        )

    @torch.inference_mode()
    %前向传播
    def forward(self, tokens: torch.Tensor, start_pos: int):
        _bsz, seqlen = tokens.shape#获取到输入的batch size和长度
        h = self.tok_embeddings(tokens)#得到输入的隐层表示
        #下面两行是嵌入rotate embedding信息的
        self.freqs_cis = self.freqs_cis.to(h.device)
        freqs_cis = self.freqs_cis[start_pos : start_pos + seqlen]

        mask = None
        if seqlen > 1:
            mask = torch.full((1, 1, seqlen, seqlen), float("-inf"), device=tokens.device)
            mask = torch.triu(mask, diagonal=start_pos + 1).type_as(h)

        for layer in self.layers:#让输入循环通过若干层Transformer
            h = layer(h, start_pos, freqs_cis, mask)
        h = self.norm(h)#归一化
        output = self.output(h[:, -1, :])  # only compute last logits得到概率分布
        return output.float()
这里可以结合上面Pre-normalization一节中的图的右边decoder一起来看。
TransformerBlock类
class TransformerBlock(nn.Module):
    def __init__(self, layer_id: int, args: ModelArgs):
        super().__init__()
        self.n_heads = args.n_heads#多头注意力的头的数量
        self.dim = args.dim
        self.head_dim = args.dim // args.n_heads
        self.attention = Attention(args)
        self.feed_forward = FeedForward(
            dim=args.dim, hidden_dim=4 * args.dim, multiple_of=args.multiple_of
        )
        self.layer_id = layer_id
        self.attention_norm = RMSNorm(args.dim, eps=args.norm_eps)
        self.ffn_norm = RMSNorm(args.dim, eps=args.norm_eps)

    def forward(self, x: torch.Tensor, start_pos: int, freqs_cis: torch.Tensor, mask: Optional[torch.Tensor]):
     # 先Pre-normalization,体现在输入的x先经过attention_norm
     # 然后做attention(多头)
     # 然后与原输入做add操作
        h = x + self.attention.forward(self.attention_norm(x), start_pos, freqs_cis, mask)
        # Post-normalization,体现在h先经过ffn_norm
        # 做前馈全连接
        # 做add残差操作
        out = h + self.feed_forward.forward(self.ffn_norm(h))
        return out
Attention类
初始化函数中有定义对应的QKV,在这里使用的是多头注意力,以期捕获句子中不同部分的关系。
        self.wq = ColumnParallelLinear(
            args.dim,
            args.n_heads * self.head_dim,
            bias=False,
            gather_output=False,
            init_method=lambda x: x,
        )
        self.wk = ColumnParallelLinear(
            args.dim,
            args.n_heads * self.head_dim,
            bias=False,
            gather_output=False,
            init_method=lambda x: x,
        )
        self.wv = ColumnParallelLinear(
            args.dim,
            args.n_heads * self.head_dim,
            bias=False,
            gather_output=False,
            init_method=lambda x: x,
        )
wo用来合并多头计算的结果,因此其维度是n_heads * self.head_dim
        self.wo = RowParallelLinear(
            args.n_heads * self.head_dim,
            args.dim,
            bias=False,
            input_is_parallel=True,
            init_method=lambda x: x,
        )
最后两个cache_k 和cache_v ,这两个变量在训练时不起作用,而是在inference过程中用来缓存前k个单词的k和v的值,以便预测出第k+1个词,这样可以避免重复的计算
        self.cache_k = torch.zeros(
            (args.max_batch_size, args.max_seq_len, self.n_local_heads, self.head_dim)
        ).cuda()
        self.cache_v = torch.zeros(
            (args.max_batch_size, args.max_seq_len, self.n_local_heads, self.head_dim)
        ).cuda()
在前向传播forword函数中 先对输入进行线性变换得到xq,xk,xv
        bsz, seqlen, _ = x.shape
        xq, xk, xv = self.wq(x), self.wk(x), self.wv(x)
然后对q和k嵌入rotate embedding信息[^1]:
xq, xk = apply_rotary_emb(xq, xk, freqs_cis=freqs_cis)
然后将k和v放入上面提到的用于预测的缓存中。用于训练的keys和values 也算一份
        self.cache_k = self.cache_k.to(xq)
        self.cache_v = self.cache_v.to(xq)

        self.cache_k[:bsz, start_pos : start_pos + seqlen] = xk
        self.cache_v[:bsz, start_pos : start_pos + seqlen] = xv

        keys = self.cache_k[:bsz, : start_pos + seqlen]
        values = self.cache_v[:bsz, : start_pos + seqlen]
算q和key的点乘,然后加上mask
        scores = torch.matmul(xq, keys.transpose(2, 3)) / math.sqrt(self.head_dim)
        if mask is not None:
            scores = scores + mask  # (bs, n_local_heads, slen, cache_len + slen)
然后用softmax算出概率分布
scores = F.softmax(scores.float(), dim=-1).type_as(xq)
RMSNorm
RMSNorm可以从代码与上面的公式做对应:
 def _norm(self, x):
        return x * torch.rsqrt(x.pow(2).mean(-1, keepdim=True) + self.eps)
FFNSwiGLU
模型的FFN对应的公式为:
代码如下:
 def forward(self, x):
        return self.w2(F.silu(self.w1(x)) * self.w3(x))
[^1]: 为什么只对q和k嵌入roteate embedding信息?.
关注下方《学姐带你玩AI》🚀🚀🚀
回复“大模型”获取大模型前沿必读论文
码字不易,欢迎大家点赞评论收藏!
文章出处登录后可见!