文章目录
- SD
- 前期预备
- 一些惊喜
- TorchHijackForUnet
- Txt2Img 搭配 Lora 使用
- 单独运行 txt2img.py
- 获取所有资源
- 代码地址
- 参数
- sd model
- 主程序
- 代码地址
- 参数(同上)
- 模型Inference
- LORA应用
- 重构并使用LORA模型
- 用Lora重构后的网络 做 sampler
- 后处理
- API
- 运行指南
- 根据自己的需要编写Api
- api.py
- models.py
- Samplers
- 误区
- Euler
- LMS
- DDIM
- DPM solver++
- Patch Diffusion
以下内容是最近的学习笔记,如果有不对的地方,还望同志们指出~共勉
SD
前期预备
深入Stable diffusion时,可以不按照官方指导来。官方指导对于AIGC爱好者比较的友好~.
可以选择Anaconda 按照之前AI传统,安装环境(需要从代码包里找到所有需要安装的库,有点麻烦,但是能用),也可以直接运行webui.sh安装虚拟的python环境(个人推荐VENV,非常省事,删掉VENV重新安装,科学上网后耗时只在半小时内)。
安装完环境后,可以设置IDE的python环境,然后debug ‘launch.py’, voila, 你可以开始各种探索了。
一些惊喜
TorchHijackForUnet
CondFunc(‘modules.models.diffusion.ddpm_edit.LatentDiffusion.decode_first_stage’, first_stage_sub, first_stage_cond)
用于dynamicly import modules.
Txt2Img 搭配 Lora 使用

单独运行 txt2img.py
可以自行改写以下(放在txt2img.py的最后):
if __name__ == "__main__":
    txt2img(id_task= 'task(lt4vr6pvvx26gfm)',
            prompt= 'pandas',
            negative_prompt= 'cats',
            prompt_styles=[],
            steps= 20,
            sampler_index= 0,
            restore_faces= False,
            tiling= False,
            n_iter= 1, #(对应GUI上的Batch count)
            batch_size= 1,
            cfg_scale= 7,
            seed= -1,
            subseed= -1,
            subseed_strength= 0,
            seed_resize_from_h= 0,
            seed_resize_from_w= 0,
            seed_enable_extras= False,
            height= 512,
            width= 512,
            enable_hr= False,
            denoising_strength= 0.7,
            hr_scale= 2,
            hr_upscaler= 'Latent',
            hr_second_pass_steps= 0,
            hr_resize_x= 0,
            hr_resize_y= 0,
            hr_sampler_index= 0,
            hr_prompt= '',
            hr_negative_prompt='',
            override_settings_texts=[],
    )
获取所有资源
代码地址
modules\txt2img.py
参数
是一个Object processing.StableDiffusionProcessingTxt2Img
参数地址: Line 871 和 Line 105
modules\processing.py
p = processing.StableDiffusionProcessingTxt2Img(
        sd_model=shared.sd_model,
        outpath_samples=opts.outdir_samples or opts.outdir_txt2img_samples,
        outpath_grids=opts.outdir_grids or opts.outdir_txt2img_grids,
        prompt=prompt,
        styles=prompt_styles,
        negative_prompt=negative_prompt,
        seed=seed,
        subseed=subseed,
        subseed_strength=subseed_strength,
        seed_resize_from_h=seed_resize_from_h,
        seed_resize_from_w=seed_resize_from_w,
        seed_enable_extras=seed_enable_extras,
        sampler_name=sd_samplers.samplers[sampler_index].name,
        batch_size=batch_size,
        n_iter=n_iter,
        steps=steps,
        cfg_scale=cfg_scale,
        width=width,
        height=height,
        restore_faces=restore_faces,
        tiling=tiling,
        enable_hr=enable_hr,
        denoising_strength=denoising_strength if enable_hr else None,
        hr_scale=hr_scale,
        hr_upscaler=hr_upscaler,
        hr_second_pass_steps=hr_second_pass_steps,
        hr_resize_x=hr_resize_x,
        hr_resize_y=hr_resize_y,
        hr_sampler_name=sd_samplers.samplers_for_img2img[hr_sampler_index - 1].name if hr_sampler_index != 0 else None,
        hr_prompt=hr_prompt,
        hr_negative_prompt=hr_negative_prompt,
        override_settings=override_settings,
    )
sd model
除了:
unet = p.sd_model.model.diffusion_model
text_encoder = p.sd_model.cond_stage_model
sd model还包含:
- first_stage_model
- configure_shareded_model
主程序
- process_images()
- process_images_inner()
代码地址
modules\processing.py
参数(同上)
是一个Object processing.StableDiffusionProcessingTxt2Img
参数地址: Line 871 和 Line 105
modules\processing.py
模型Inference
LORA应用
地址:Line 186
extensions\sd-webui-additional-networks\scripts\additional_networks.py
Line 236 – Line 251:
- 加载Lora模型到latest_networks 这个list中
- 通过
du_state_dict = load_file(model_path)导入LORA模型每层权重(类似于一个ZIP里包含每一个layer的权重文件,然后通过文件名的index对应到每一层的名字上(单独一个name list)) - network, info = lora_compvis.create_network_and_apply_compvis(du_state_dict, weight_tenc, weight_unet, text_encoder, unet) 将权重和LORA模型进行结合:
dimension: {96}, alpha: {48.0}, multiplier_unet: 1, multiplier_tenc: 1
create LoRA for Text Encoder: 72 modules.
create LoRA for U-Net: 192 modules.
original forward/weights is backed up.
enable LoRA for text encoder
enable LoRA for U-Net
shapes for 0 weights are converted.
重构并使用LORA模型
地址:
extensions\sd-webui-additional-networks\scripts\lora_compvis.py
靠 model里是否包含”MultiheadAttention”判断LORA的版本。有:V2,没有:V1
modules 里的dim 和 alpha 都是传入的一个list,可以潜在不唯一(如果满足网络结构)
comp_vis_loras_dim_alpha[comp_vis_lora_name] = (dim, alpha)
把SD与lora结合就需要根据几点去筛选出Unet和CLIP里有用的那几层, 条件:
- 选择:Linear or Conv2d相关的
- 不选
_resblocks_23_, 即StabilityAi Text Encoder最后一个block - 不选不在comp_vis_loras_dim_alpha这个dict的keys里的
- 不选
- 选择:MultiheadAttention相关的
- 在这个范围内的每一层,都会通过加入 [“q_proj”, “k_proj”, “v_proj”, “out_proj”] 这些suffix 来构建关于 Q,K, V, O 的重复项
- 不选
_resblocks_23_, 即StabilityAi Text Encoder最后一个block - 不选不在comp_vis_loras_dim_alpha这个dict的keys里的
以上条件都满足的会通过:
lora = LoRAModule(lora_name, child_module, multiplier, dim, alpha)
重构针对Lora使用的Unet 或者 CLIP的每一层/block,形成新的Unet & CLIP,也因此,我们的SD model 融入好了我们自己的LORA
用Lora重构后的网络 做 sampler
地址:
modules\processing.py
通过 def sample() 来运行:
- 组装sampler
- 设定latent scale mode
- create_random_tensors
- noise的shape =(4, 64, 64)
- noise 被 slerp(subseed_strength, noise, subnoise)做interpolation的平滑优化
samples = self.sampler.sample(self, x, conditioning, unconditional_conditioning, image_conditioning=self.txt2img_image_conditioning(x)
后处理
地址:
modules\processing.py
通过以下代码得到最终模型输出得结果:
with devices.without_autocast() if devices.unet_needs_upcast else devices.autocast():
                samples_ddim = p.sample(conditioning=p.c, unconditional_conditioning=p.uc, seeds=p.seeds, subseeds=p.subseeds, subseed_strength=p.subseed_strength, prompts=p.prompts)
从Line 741 开始进入后处理得阶段(根据用户需要进行处理),以下为一个例子:
改颜色范围以及调换shape(从(3, 512, 512)==> (512, 512, 3)).
x_sample = 255. * np.moveaxis(x_sample.cpu().numpy(), 0, 2)
API
运行指南
- 修改webui-user.bat
@echo off

set PYTHON=
set GIT=
set VENV_DIR=
set COMMANDLINE_ARGS=--api

call webui.bat
- 打开powershell, 运行stablediffusion
webui-user.bat
webui 会被locate 在: http://127.0.0.1:7860
- 假设你要运行txt2img 并且需要额外辅助
def run():
    import json
    import requests
    import io
    import base64
    import cv2
    from PIL import Image, PngImagePlugin

    img_path = r'C:\Users\Me\Desktop\tryout.jpg'
    img = cv2.imread(img_path)
    retval, bytes = cv2.imencode('.png', img)
    encoded_image = base64.b64encode(bytes).decode('utf-8')

    url = "http://127.0.0.1:7860"
    height, width = 800, 800
    payload = {
        "prompt": "puppy dog",
        "sampler_name":'DPM++ 2S a Karras',
        "steps": 100,
        "width": width,
        "height":height,
        "hr_scale":2,
        "hr_upscaler":'Latent',
        "alwayson_scripts": {
            "ControlNet": {
                "args": [
                    {
                    "enabled": True,
                    "input_image": encoded_image,
                    "module": "inpaint_only",
                    "model": "control_v11p_sd15_inpaint [ebff9138]",
                    "resize_mode":"Resize and Fill",
                    "control_mode": "ControlNet is more important",
                    },
                ]
            }
        }
    }


    response = requests.post(url=f'{url}/sdapi/v1/txt2img', json=payload)
    r = response.json()
    result = r['images'][0]
    image = Image.open(io.BytesIO(base64.b64decode(result.split(",", 1)[0])))
    image.save('output.png')


if __name__ == "__main__":
    run()
根据自己的需要编写Api
api.py
有2个东西需要复制用作你自己的api: 假设你有个api叫做:xxx
- 添加route
self.add_api_route("/sdapi/v1/xxx", self.xxxapi, methods=["POST"], response_model=models.xxxResponse)
- 写自己的api
def xxxapi(self, xxxreq: models.StableDiffusionXXXProcessingAPI):
	...
models.py
有1个东西需要复制用作你自己的api:
- input Object
假设这里你还是需要做txt2img, 那么保留,但是由于你有自己的API,那么名字是不能重复的,所有要用StableDiffusionProcessingXXX
StableDiffusionXXXProcessingAPI = PydanticModelGenerator(
    "StableDiffusionProcessingXXX",
    StableDiffusionProcessingTxt2Img,
    [
        {"key": "sampler_index", "type": str, "default": "Euler"},
        {"key": "script_name", "type": str, "default": None},
        {"key": "script_args", "type": list, "default": []},
        {"key": "send_images", "type": bool, "default": True},
        {"key": "save_images", "type": bool, "default": False},
        {"key": "alwayson_scripts", "type": dict, "default": {}},
    ]
).generate_model()
Samplers
误区
-
因为要和制造一个好的图联系在一起,这里的sampler 比较容易让我和Adam 等optimisation混在一起.
-
如果有接触 Monte Carlo, 这个也比较迷惑我。
- sampler是用来求一个解的方式。例如穷举,通过得到整个解的空间,找到最终解(如果solution space小),类似的还有 Monte Carlo, 当你solution space巨大,那么就根据已知的概率分布,随机方式采样(sampling),获得近似解。
-
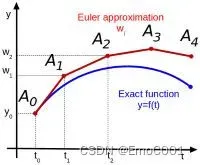
但是, Euler sampler实际上做的是估计一个函数本身,而不是估计一个函数的解
- Euler sampler可以当作是,已知一个Function A的Differential equation, 记为B, 通过对这Differential equation 求 N个解,估计出Function A。或者说已知 10个点,但是Euler Sampler可以得到一个完整的曲线,并且确保这个10个点也属于这个完整曲线的解
- 也就是说,我一定已经有了一个Differential Equation。 从一个初始值开始,通过微分方程逐步推进解,从而得到整个解的轨迹或曲线。
- DDPM这个内容里,Difussion是一个扩散的过程 这样的”扩散“ 更应当往动力学上 一个小球的滚动路径上想象。因为Diffusion的机制是依赖feedforward 和 backforward,这里运用到了概率上 bayesian的思想,DDPM的做法也使得扩散(diffusion)是随机的。说扩散随机,主要源自于在推导每步高斯分布的noise基础上,额外加了random noise。但实际上整个DDPM过程求解,只是用一个function更好的更高端的推测Difussion扩散的过程。
因为是随机的,这样的动力function更可以用一个SDE(随机的 Differential Equation, 不是Diffusion)来重新归纳。
https://learn.rundiffusion.com/sampling-methods/
https://github.com/crowsonkb/k-diffusion
Euler
Euler’s method is used to approximate solutions to ordinary differential equations
https://tutorial.math.lamar.edu/classes/de/eulersmethod.aspx
这属于老套路的解法,除此之外还有基于Exponential intergrators的。这个有在DPM-Solver ++ 介绍。
LMS
DDIM
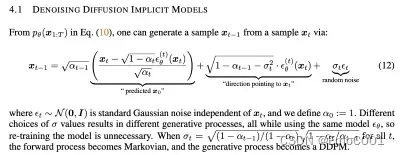
对DDPM做了优化,去掉了“ramdom noise”,让stochastic Diffusion变成 Deterministic, 它可以重新用 ODE(Ordinary Differential Equation)做归纳。
DPM solver++
Diffusion Probabilistic model
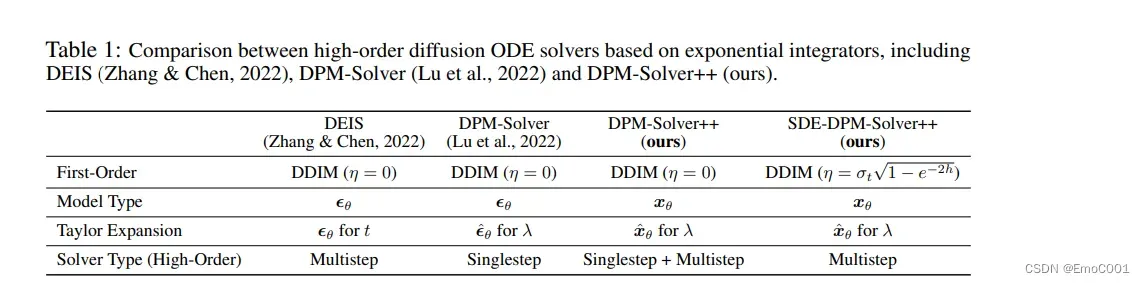
之前的DPM是针对noise去预测,这个版本的DPM++是针对image x 去
Patch Diffusion
https://github.com/ericl122333/PatchDiffusion-Pytorch
文章出处登录后可见!