一、首先是文件的读取和写入
Java为 Java 中的图像实现了一种称为BufferedImage的特定类型的对象。BufferedImage 可以从多种不同的图像类型(即 BMP、HEIC 等)中读取。并非所有这些都由 ImageIO 本身支持,但有一些插件可以扩展 ImageIO 和其他库,例如 Apache Imaging 和 JDeli。
在Java本身中,各种图像类型的所有复杂性都被隐藏了,我们只处理BufferedImage。Java 提供对图像像素和颜色信息的立即访问,并允许转换和图像处理。
执行读写操作所需的 类:
-
java.io.File:要读写图像文件,我们必须导入File类。此类通常表示文件和目录路径名。
-
java.io.IOException:为了处理错误,我们使用IOException类。
-
java.awt.image.BufferedImage:为了保存图像,我们创建BufferedImage对象;我们使用 BufferedImage 类。该对象用于在 RAM 中存储图像。
-
javax.imageio.ImageIO:为了执行图像读写操作,我们将导入ImageIO类。此类具有读取和写入图像的静态方法。
// Java program to demonstrate read and write of image

import java.awt.image.BufferedImage;
import java.io.File;
import java.io.IOException;
import javax.imageio.ImageIO;

public class MyImage {
    public static void main(String args[])
        throws IOException
    {
        // width of the image
        int width = 963;

        // height of the image
        int height = 640;

        // For storing image in RAM
        BufferedImage image = null;

        // READ IMAGE
        try {
            File input_file = new File(
                "C:/Users/hp/Desktop/Image Processing in Java/gfg-logo.png");

            // image file path create an object of
            // BufferedImage type and pass as parameter the
            // width,  height and image int
            // type. TYPE_INT_ARGB means that we are
            // representing the Alpha , Red, Green and Blue
            // component of the image pixel using 8 bit
            // integer value.

            image = new BufferedImage(
                width, height, BufferedImage.TYPE_INT_ARGB);

            // Reading input file
            image = ImageIO.read(input_file);

            System.out.println("Reading complete.");
        }
        catch (IOException e) {
            System.out.println("Error: " + e);
        }

        // WRITE IMAGE
        try {
            // Output file path
            File output_file = new File(
                "C:/Users/hp/Desktop/Image Processing in Java/gfg.png");

            // Writing to file taking type and path as
            ImageIO.write(image, "png", output_file);

            System.out.println("Writing complete.");
        }
        catch (IOException e) {
            System.out.println("Error: " + e);
        }
    } // main() ends here
} // class ends here
下面是获取和设置像素
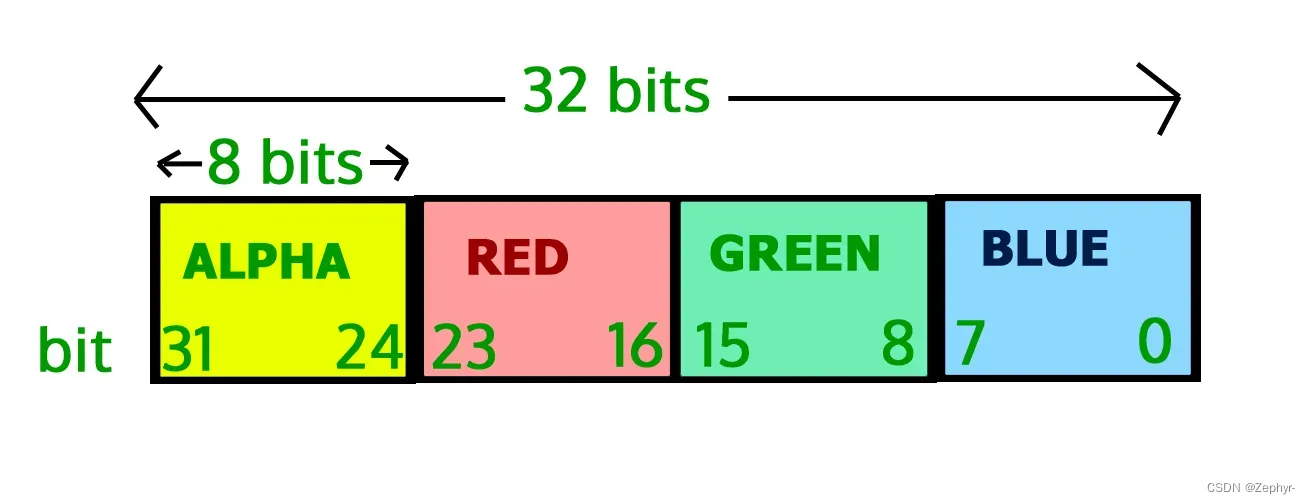
以下解释如何获取图像的像素值以及如何使用 Java 编程语言设置图像中的像素值。像素是图像的最小单位,由四个分量 Alpha(透明度度量)、红色、绿色、蓝色和简称 (ARGB) 组成。所有分量的值都在 0 到 255 之间(包含这两个值)。零表示该组件不存在,255 表示该组件完全存在。
注意: 由于 2^8 = 256 并且像素分量的值位于 0 到 255 之间,因此我们只需要 8 位来存储这些值。
因此,存储 ARGB 值所需的总位数为 8*4=32 位或 4 个字节。正如顺序所示,Alpha 获取最左边的 8 位。蓝色获取最右边的 8 位。
因此位位置:
对于蓝色分量为 7-0,
对于绿色分量为15-8,
对于红色分量为23-16,
对于 alpha 分量为 31-24,
索引的图形表示:
代码如下
// Java program to demonstrate get
// and set pixel values of an image

import java.awt.image.BufferedImage;
import java.io.File;
import java.io.IOException;
import javax.imageio.ImageIO;

public class GetSetPixels {
    public static void main(String args[])
        throws IOException
    {
        BufferedImage img = null;
        File f = null;

        // read image
        try {
            f = new File(
                "C:/Users/hp/Desktop/Image Processing in Java/gfg-logo.png");
            img = ImageIO.read(f);
        }
        catch (IOException e) {
            System.out.println(e);
        }

        // get image width and height
        int width = img.getWidth();
        int height = img.getHeight();

        // Since, Inp.jpg is a single pixel image so, we
        // will not be using the width and height variable
        // get pixel value (the arguments in the getRGB
        // method denotes the  coordinates of the image from
        // which the pixel values need to be extracted)
        int p = img.getRGB(0, 0);

        // We, have seen that the components of pixel occupy
        // 8 bits. To get the bits we have to first right
        // shift the 32 bits of the pixels by bit
        // position(such as 24 in case of alpha) and then
        // bitwise ADD it with 0xFF. 0xFF is the hexadecimal
        // representation of the decimal value 255.

        // get alpha
        int a = (p >> 24) & 0xff;

        // get red
        int r = (p >> 16) & 0xff;

        // get green
        int g = (p >> 8) & 0xff;

        // get blue
        int a = p & 0xff;

        // for simplicity we will set the ARGB
        // value to 255, 100, 150 and 200 respectively.

        a = 255;
        r = 100;
        g = 150;
        b = 200;

        // set the pixel value
        p = (a << 24) | (r << 16) | (g << 8) | b;
        img.setRGB(0, 0, p);

        // write image
        try {
            f = new File(
                "C:/Users/hp/Desktop/Image Processing in Java/GFG.png");
            ImageIO.write(img, "png", f);
        }
        catch (IOException e) {
            System.out.println(e);
        }
    }
}
文章出处登录后可见!