这里主要介绍如何从0到1搭建Stable Diffusion XL进行AI绘画。
Stable Diffusion XL是Stable Diffusion的优化版本,由Stability AI发布。比起Stable Diffusion,Stable Diffusion XL做了全方位的优化,Rocky相信,Stable Diffusion会是图像生成领域的“YOLO”,而Stable Diffusion XL那就是“YOLOv3”。
零基础使用ComfyUI搭建Stable Diffusion XL推理流程
ComfyUI是一个基于节点式的Stable Diffusion AI绘画工具。和Stable Diffusion WebUI相比,ComfyUI通过将Stable Diffusion模型生成推理的pipeline拆分成独立的节点,实现了更加精准的工作流定制和清晰的可复现性。
同时其完善的模型加载和图片生成机制,让其能够在2080Ti显卡上构建Stable Diffusion XL的工作流,并能生成1024×1024分辨率的图片,如此算力友好,可谓是初学者的福音。
目前ComfyUI已经能够兼容Stable Diffusion XL的Base模型和Refiner模型,下面两张图分别是Rocky使用ComfyUI来加载Stable Diffusion XL Base模型和Stable Diffusion XL Base + Refiner模型并生成图片的完整Pipeline: ComfyUI加载Stable Diffusion XL Base模型
 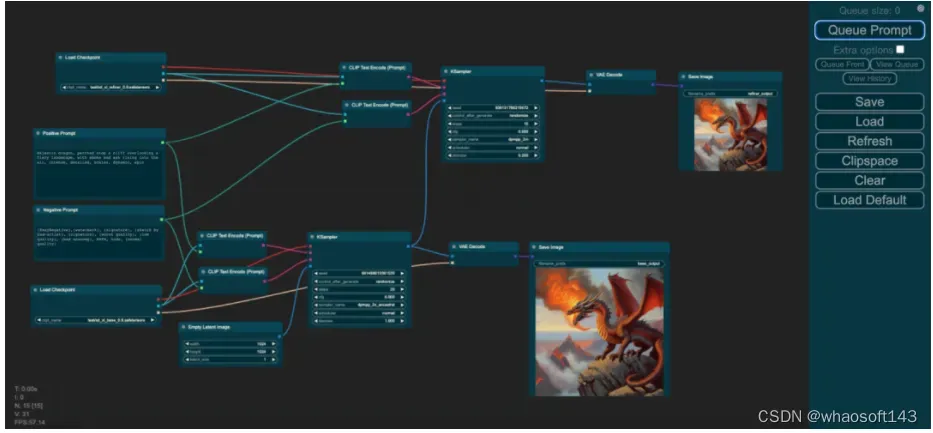 ComfyUI加载Stable Diffusion XL Base + Refiner模型
下面Rocky将带着大家一步一步使用ComfyUI搭建Stable Diffusion XL推理流程,从而实现上面两张图的生成过程。
首先,我们需要安装ComfyUI框架,这一步非常简单,在命令行输入如下代码即可:
git clone https://github.com/comfyanonymous/ComfyUI.git
安装好后,我们可以看到本地的ComfyUI文件夹。
ComfyUI框架安装到本地后,我们需要安装其依赖库,我们只需以下操作:
cd ComfyUI #进入下载好的ComfyUI文件夹中
pip install -r requirements.txt -i https://pypi.tuna.tsinghua.edu.cn/simple some-package
完成这些配置工作后,我们就可以配置模型了,我们将Stable Diffusion XL模型放到ComfyUI/models/checkpoints/路径下。这样以来,等我们开启可视化界面后,就可以选择Stable Diffusion XL模型进行AI绘画了。
接下来,我们就可以启动ComfyUI了!我们到ComfyUI/路径下,运行main.py即可:
python main.py --listen --port 8888
运行完成后,可以看到命令行中出现的log:
To see the GUI go to: http://0.0.0.0:8888
我们将http://0.0.0.0:8888输入到我们本地的网页中,即可打开如上图所示的ComfyUI可视化界面,愉快的使用Stable Diffusion XL模型生成我们想要的图片了。
接下来就是ComfyUI的节点式模块讲解了,首先是只加载Base模型的情况: Stable Diffusion XL Base模型使用的注释
Rocky已经进行了比较详细的注释,首先大家可以在红框中选择我们的模型(Stable Diffusion XL Base),接着填入Prompt和负向Prompt,并且配置生成推理过程的参数(迭代次数,CFG,Seed等),然后在绿色框中设置好生成图片的分辨率,然后在紫色框中点击Queue Prompt按钮,整个推理过程就开始了。等整个推理过程完成之后,生成的图片会在图中黄色箭头所指的地方进行展示,并且会同步将生成图片保存到本地的ComfyUI/output/路径下。
完成了Stable Diffusion Base模型的推理流程,我们再来看看Base+Refiner模型的推理流程如何搭建: Stable Diffusion XL Base+Refiner模型使用的注释
和Base模型的构建十分相似,首先大家可以在红框中选择我们的Refiner模型(Stable Diffusion XL Refiner),Refiner模型使用的Prompt和负向Prompt与Base模型一致,并且配置生成推理过程的参数(迭代次数,CFG,Seed等),绿色箭头表示将Base模型输出的Latent特征作为Refiner模型的输入,然后在蓝色框中点击Queue Prompt按钮,整个Refiner精修过程就开始了。等整个推理过程完成之后,生成的图片会在图中紫色箭头所指的地方进行展示,并且会同步将生成图片保存到本地的ComfyUI/output/路径下。
到此为止,Rocky已经详细讲解了如何使用ComfyUI来搭建Stable Diffusion XL模型进行AI绘画,大家可以按照Rocky的步骤进行尝试。
零基础使用SD.Next搭建Stable Diffusion XL推理流程
SD.Next原本是Stable Diffusion WebUI的一个分支,再经过不断的迭代优化后,最终成为了一个独立版本。
SD.Next与Stable Diffusion WebUI相比,包含了更多的高级功能,也兼容Stable Diffusion, Stable Diffusion XL, Kandinsky, DeepFloyd IF等模型结构,是一个功能十分强大的AI绘画框架。
那么我们马上开始SD.Next的搭建与使用吧。
首先,我们需要安装SD.Next框架,这一步非常简单,在命令行输入如下代码即可:
git clone https://github.com/vladmandic/automatic
安装好后,我们可以看到本地的automatic文件夹。
SD.Next框架安装到本地后,我们需要安装其依赖库,我们只需以下操作:
cd automatic #进入下载好的automatic文件夹中
pip install -r requirements.txt -i https://pypi.tuna.tsinghua.edu.cn/simple some-package
除了安装依赖库之外,还需要配置SD.Next所需的repositories插件,我们需要运行一下代码:
cd automatic #进入下载好的automatic文件夹中
python installer.py
在完成了依赖库和repositories插件的安装后,我们就可以配置模型了,我们将Stable Diffusion XL模型放到/automatic/models/Stable-diffusion/路径下。这样以来,等我们开启可视化界面后,就可以选择Stable Diffusion XL模型用于推理生成图片了。
完成上述的步骤后,我们可以启动SD.Next了!我们到/automatic/路径下,运行launch.py即可:
python launch.py --listen --port 8888
运行完成后,可以看到命令行中出现的log:
To see the GUI go to: http://0.0.0.0:8888
我们将http://0.0.0.0:8888输入到我们本地的网页中,即可打开如下图所示的SD.Next可视化界面,愉快的使用Stable Diffusion XL模型进行AI绘画了。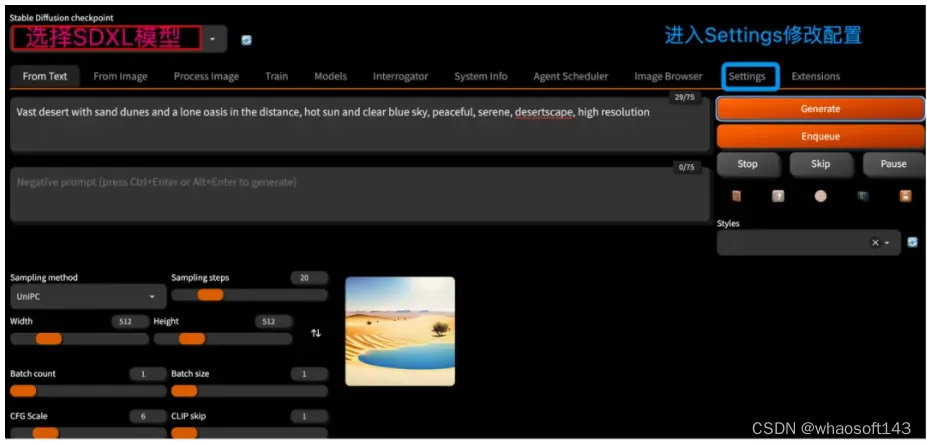 automatic可视化界面
进入SD.Next可视化界面后,我们可以在红色框中选择模型,然后需要修改Settings中的配置,来让SD.Next能够加载Stable Diffusion XL模型。
我们点击上图蓝色框中的Settings,进入Settings配置界面: automatic框架配置修改【1】
  automatic框架配置修改【2】
从上面图示中可以看到,我们需要做的修改是将Settings -> Stable Diffusion -> Stable Diffusion backend设置为diffusers,并在Stable Diffusion refiner栏中选择Refiner模型。
然后我们需要将Settings -> Diffusers Settings-> Select diffuser pipeline when loading from safetensors栏设置为Stable Diffusion XL。
完成了上述的配置修改后,我们就可以使用SD.Next加载Stable Diffusion XL进行AI绘画了!
零基础使用Stable Diffusion WebUI搭建Stable Diffusion XL推理流程
目前Stable Diffusion WebUI已经支持Stable Diffusion XL中的Base模型,但是对Refiner模型暂不支持。
Stable Diffusion WebUI是AI绘画领域最为流行的框架,其生态极其繁荣,非常多的上下游插件能够与Stable Diffusion WebUI一起完成诸如AI视频生成,AI证件照生成等工作流,可玩性非常强。
接下来,咱们就使用这个流行框架搭建Stable Diffusion XL推理流程吧。
首先,我们需要下载安装Stable Diffusion WebUI框架,我们只需要在命令行输入如下代码即可:
git clone https://github.com/AUTOMATIC1111/stable-diffusion-webui.git
安装好后,我们可以看到本地的stable-diffusion-webui文件夹。
下面我们需要安装其依赖库,我们进入Stable Diffusion WebUI文件夹,并进行以下操作:
cd stable-diffusion-webui #进入下载好的automatic文件夹中
pip install -r requirements.txt -i https://pypi.tuna.tsinghua.edu.cn/simple some-package
和SD.Next的配置流程类似,我们还需要配置Stable Diffusion WebUI的repositories插件,我们需要运行下面的代码:
sh webui.sh
#主要依赖包括:BLIP CodeFormer generative-models k-diffusion stable-diffusion-stability-ai taming-transformers
在完成了依赖库和repositories插件的安装后,我们就可以配置模型了,我们将Stable Diffusion XL模型放到/stable-diffusion-webui/models/Stable-diffusion/路径下。这样以来,等我们开启可视化界面后,就可以选择Stable Diffusion XL模型用于推理生成图片了。
完成上述的步骤后,我们可以启动Stable Diffusion WebUI了!我们到/stable-diffusion-webui/路径下,运行launch.py即可:
python launch.py --listen --port 8888
运行完成后,可以看到命令行中出现的log:
To see the GUI go to: http://0.0.0.0:8888
我们将http://0.0.0.0:8888输入到我们本地的网页中,即可打开如下图所示的Stable Diffusion WebUI可视化界面,愉快的使用Stable Diffusion XL模型进行AI绘画了。
 Stable Diffusion WebUI可视化界面
进入Stable Diffusion WebUI可视化界面后,我们可以在红色框中选择SDXL模型,然后在黄色框中输入我们的Prompt和负向提示词,同时在绿色框中设置我们想要生成的图像分辨率(推荐设置成1024×1024),然后我们就可以点击Generate按钮,进行AI绘画了。
等待片刻后,图像就生成好了,并展示在界面的右下角,同时也会保存到/stable-diffusion-webui/outputs/txt2img-images/路径下,大家可以到对应路径下查看。
零基础使用diffusers搭建Stable Diffusion XL推理流程
在diffusers中能够非常好的构建Stable Diffusion XL推理流程,由于diffusers目前没有现成的可视化界面,Rocky将在Jupyter Notebook中搭建完整的Stable Diffusion XL推理工作流,让大家能够快速的掌握。
首先,我们需要安装diffusers库,并确保diffusers的版本 >= 0.18.0,我们只需要在命令行中输入一下命令进行安装即可:
pip install diffusers --upgrade -i https://pypi.tuna.tsinghua.edu.cn/simple some-package
显示如下log表示安装成功:
Successfully installed diffusers-0.18.2 huggingface-hub-0.16.4
命令中加入:-i https://pypi.tuna.tsinghua.edu.cn/simple some-package 表示使用清华源下载依赖包,速度非常快!
接着,我们继续安装其他的依赖库:
pip install transformers==4.27.0 accelerate==0.12.0 safetensors==0.2.7 invisible\_watermark -i https://pypi.tuna.tsinghua.edu.cn/simple some-package
显示如下log表示安装成功:
Successfully installed transformers-4.27.0 accelerate==0.12.0 safetensors==0.2.7 invisible\_watermark-0.2.0
注意:想要在diffusers中以fp16的精度加载Stable Diffusion XL模型,必须满足transformers库的版本>=4.27.0
完成了上述依赖库的安装,我们就可以搭建Stable Diffusion XL模型的完整工作流了。
我们先单独使用Stable Diffusion XL中的Base模型来生成图像:
# 加载diffusers和torch依赖库
from diffusers import DiffusionPipeline
import torch


# 构建Stable Diffusion XL Base模型的Pipeline,加载Stable Diffusion XL Base模型
pipe = DiffusionPipeline.from\_pretrained\("/本地路径/stable-diffusion-xl-base-0.9",torch\_dtype=torch.float16, variant="fp16"\)
# "本地路径/stable-diffusion-xl-base-0.9"表示我们需要加载的Stable Diffusion XL Base模型,
# 大家可以关注Rocky的公众号WeThinkIn,后台回复:SDXL模型,即可获得资源链接
# "fp16"代表启动fp16精度。比起fp32,fp16可以使模型显存占用减半。

# 使用GPU进行Pipeline的推理
pipe.to\("cuda"\)

# 输入提示词
prompt = "Watercolor painting of a desert landscape, with sand dunes, mountains, and a blazing sun, soft and delicate brushstrokes, warm and vibrant colors"

# 输入负向提示词,表示我们不想要生成的特征
negative\_prompt = "\(EasyNegative\),\(watermark\), \(signature\), \(sketch by bad-artist\), \(signature\), \(worst quality\), \(low quality\), \(bad anatomy\), NSFW, nude, \(normal quality\)"

# 设置seed,可以固定构图
seed = torch.Generator\("cuda"\).manual\_seed\(42\)

# Pipeline进行推理
image = pipe\(prompt, negative\_prompt=negative\_prompt,generator=seed\).images\[0\]
\# Pipeline生成的images包含在一个list中:\[\<PIL.Image.Image image mode=RGB size=1024x1024>\]
#所以需要使用images\[0\]来获取list中的PIL图像

# 保存生成图像
image.save\("test.png"\)
完成上面的整个代码流程,我们可以生成一张水彩风格的沙漠风景画,如果大家按照Rocky的参数进行操作,应该能确保生成下面的图片: Base模型生成的图片
接着,我们将Base模型和Refiner模型级联来生成图像:
from diffusers import DiffusionPipeline
import torch

pipe = DiffusionPipeline.from\_pretrained\("/本地路径/stable-diffusion-xl-base-0.9", torch\_dtype=torch.float16, variant="fp16"\)

pipe.to\("cuda"\)

prompt = "Watercolor painting of a desert landscape, with sand dunes, mountains, and a blazing sun, soft and delicate brushstrokes, warm and vibrant colors"

negative\_prompt = "\(EasyNegative\),\(watermark\), \(signature\), \(sketch by bad-artist\), \(signature\), \(worst quality\), \(low quality\), \(bad anatomy\), NSFW, nude, \(normal quality\)"

seed = torch.Generator\("cuda"\).manual\_seed\(42\)

# 首先运行Base模型的Pipeline,输出格式为output\_type="latent"
image = pipe\(prompt=prompt, negative\_prompt=negative\_prompt, generator=seed, output\_type="latent"\).images

# 构建Stable Diffusion XL Refiner模型的Pipeline,加载Stable Diffusion XL Refiner模型
pipe = DiffusionPipeline.from\_pretrained\("/本地路径/stable-diffusion-xl-refiner-0.9", torch\_dtype=torch.float16, variant="fp16"\)
# "本地路径/stable-diffusion-xl-refiner-0.9"表示我们需要加载的Stable Diffusion XL Refiner模型,
# 大家可以关注Rocky的公众号WeThinkIn,后台回复:SDXL模型,即可获得资源链接

pipe.to\("cuda"\)

images = pipe\(prompt=prompt, negative\_prompt=negative\_prompt, generator=seed, image=image\).images

images\[0\].save\("test.png"\)
完成了上述的代码流程,我们再来看看这次Base模型和Refiner模型级联生成的图片: Base模型和Refiner模型级联生成的图片
为了更加直观的对比,我们将刚才生成的两张图片放在一起对比: 我们可以清楚的看到,使用了Refiner模型之后,图片的整体质量和细节有比较大的增强,构图色彩更加柔和。
当然,我们也可以单独使用Refiner模型对图片进行优化:
import torch
from diffusers import StableDiffusionXLImg2ImgPipeline
from diffusers.utils import load\_image

pipe = DiffusionPipeline.from\_pretrained\("/本地路径/stable-diffusion-xl-refiner-0.9", torch\_dtype=torch.float16, variant="fp16"\)

pipe = pipe.to\("cuda"\)

image\_path = "/本地路径/test.png"

init\_image = load\_image\(image\_path\).convert\("RGB"\)

prompt = "Watercolor painting of a desert landscape, with sand dunes, mountains, and a blazing sun, soft and delicate brushstrokes, warm and vibrant colors"

negative\_prompt = "\(EasyNegative\),\(watermark\), \(signature\), \(sketch by bad-artist\), \(signature\), \(worst quality\), \(low quality\), \(bad anatomy\), NSFW, nude, \(normal quality\)"

seed = torch.Generator\("cuda"\).manual\_seed\(42\)

image = pipe\(prompt, negative\_prompt=negative\_prompt, generator=seed, image=init\_image\).images\[0\]

image.save\("refiner.png"\)
Rocky这里是使用了未来机甲风格的图片进行测试对比,可以从下图看到,Refiner模型优化图像质量的效果还是非常明显的,图像毛刺明显消除,整体画面更加自然柔和,细节特征也有较好的补充和重建。 Stable Diffusion XL生成示例
示例一:未来主义的城市风格 whaosoft aiot http://143ai.com
Prompt:Stunning sunset over a futuristic city, with towering skyscrapers and flying vehicles, golden hour lighting and dramatic clouds, high detail, moody atmosphere
Negative Prompt:(EasyNegative),(watermark), (signature), (sketch by bad-artist), (signature), (worst quality), (low quality), (bad anatomy), NSFW, nude, (normal quality)
Stable Diffusion XL Base+Refiner生成结果: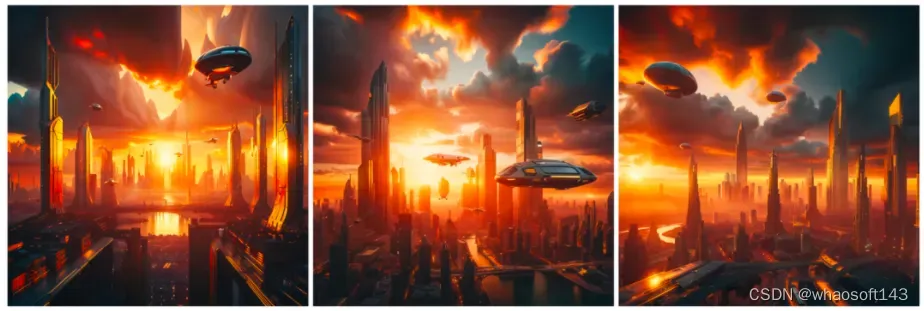 Stable Diffusion XL生成结果:未来主义的城市风格
示例二:天堂海滩风格 Prompt:Serene beach scene with crystal clear water and white sand, tropical palm trees swaying in the breeze, perfect paradise, seascape
Negative Prompt:(EasyNegative),(watermark), (signature), (sketch by bad-artist), (signature), (worst quality), (low quality), (bad anatomy), NSFW, nude, (normal quality)
Stable Diffusion XL Base+Refiner生成结果: Stable Diffusion XL生成结果:天堂海滩风格
示例三:未来机甲风格
Prompt:Giant robots fighting in a futuristic city, with buildings falling and explosions all around, intense, fast-paced, dramatic, stylized, futuristic
Negative Prompt:(EasyNegative),(watermark), (signature), (sketch by bad-artist), (signature), (worst quality), (low quality), (bad anatomy), NSFW, nude, (normal quality)
Stable Diffusion XL Base+Refiner生成结果: Stable Diffusion XL生成结果:未来机甲风格
示例四:马斯克风格
Prompt:Elon Musk standing in a workroom, in the style of industrial machinery aesthetics, deutscher werkbund, uniformly staged images, soviet, light indigo and dark bronze, new american color photography, detailed facial features
Negative Prompt:(EasyNegative),(watermark), (signature), (sketch by bad-artist), (signature), (worst quality), (low quality), (bad anatomy), NSFW, nude, (normal quality)
Stable Diffusion XL Base+Refiner生成结果: Stable Diffusion XL生成结果:马斯克风格
文章出处登录后可见!