上一篇文章《AI作画技术实践第一期》提到用腾讯云智能能力如何实现简易版的AI画画,发布后受到大量网友关注,也在思考还能不能做出更好的效果。最近发现AI绘画玩法在短视频平台也掀起了一波热潮,结合在网上看到有一些很优秀的AI画画模型,也想尝试在上一篇的基础上做出更好的体验效果。
接下来完整的分享下我的实践过程,感兴趣的朋友也可以尝试。
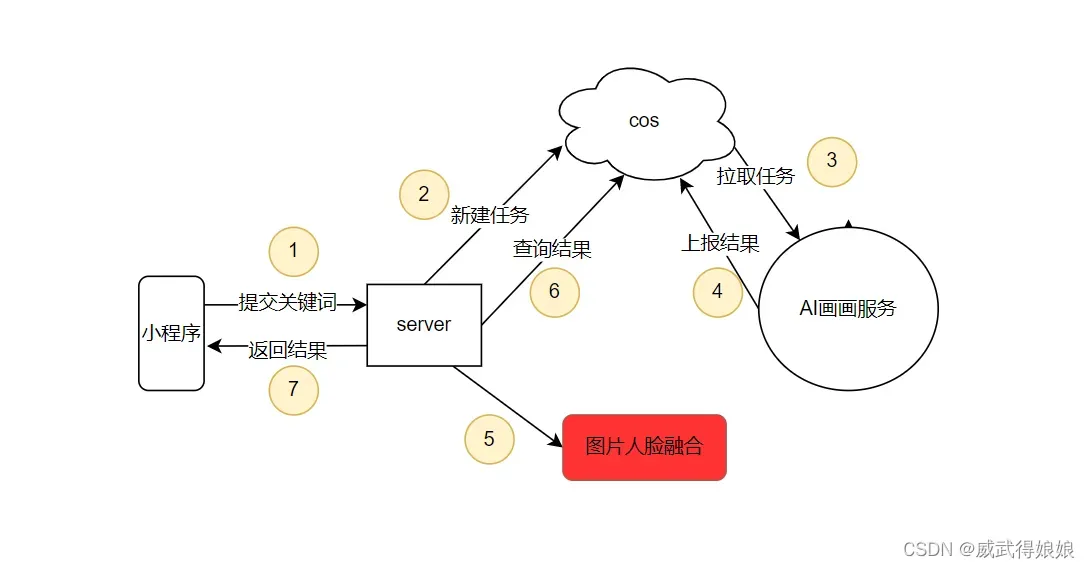
1.实现思路
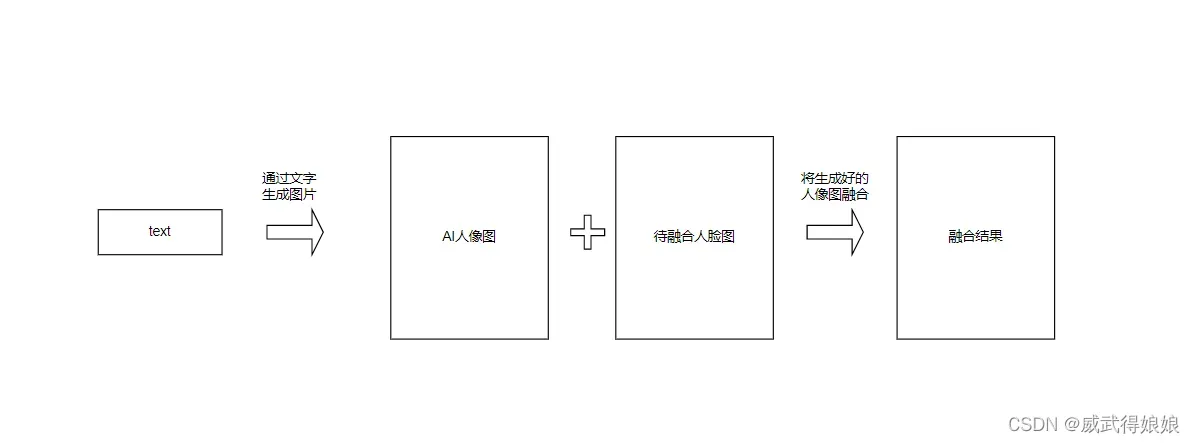
通过AI生成人像图,然后调用腾讯云智能能力进行人脸融合,最终生成一张效果比较好的人像图。
1.1 详细流程:

2.准备工作
2.1 Stable-Diffusion部署
Stable Diffusion 是一个开源的文本转图像模型,可以通过输入一段文字,生成一张符合语义的图片。 具体可以看github的介绍: GitHub – CompVis/stable-diffusion: A latent text-to-image diffusion model
按照文档安装,安装过程大同小异, 不再赘述。
通过脚本的方式生成图片:
from torch import autocast
from diffusers import StableDiffusionPipeline
import sys

# 指定模型
pipe = StableDiffusionPipeline.from_pretrained(
        # "CompVis/stable-diffusion-v1-4",
        "runwayml/stable-diffusion-v1-5",
        # "hakurei/waifu-diffusion",
        use_auth_token=True
).to("cuda")

prompt = "a photo of an astronaut riding a horse on mars"
prompt = sys.argv[1]
with autocast("cuda"):
    image = pipe(prompt, num_inference_steps=100).images[0]
    image.save(sys.argv[2] + ".png")
指定关键词,调用输出,看下生成效果:
python3 interface.py "*******" out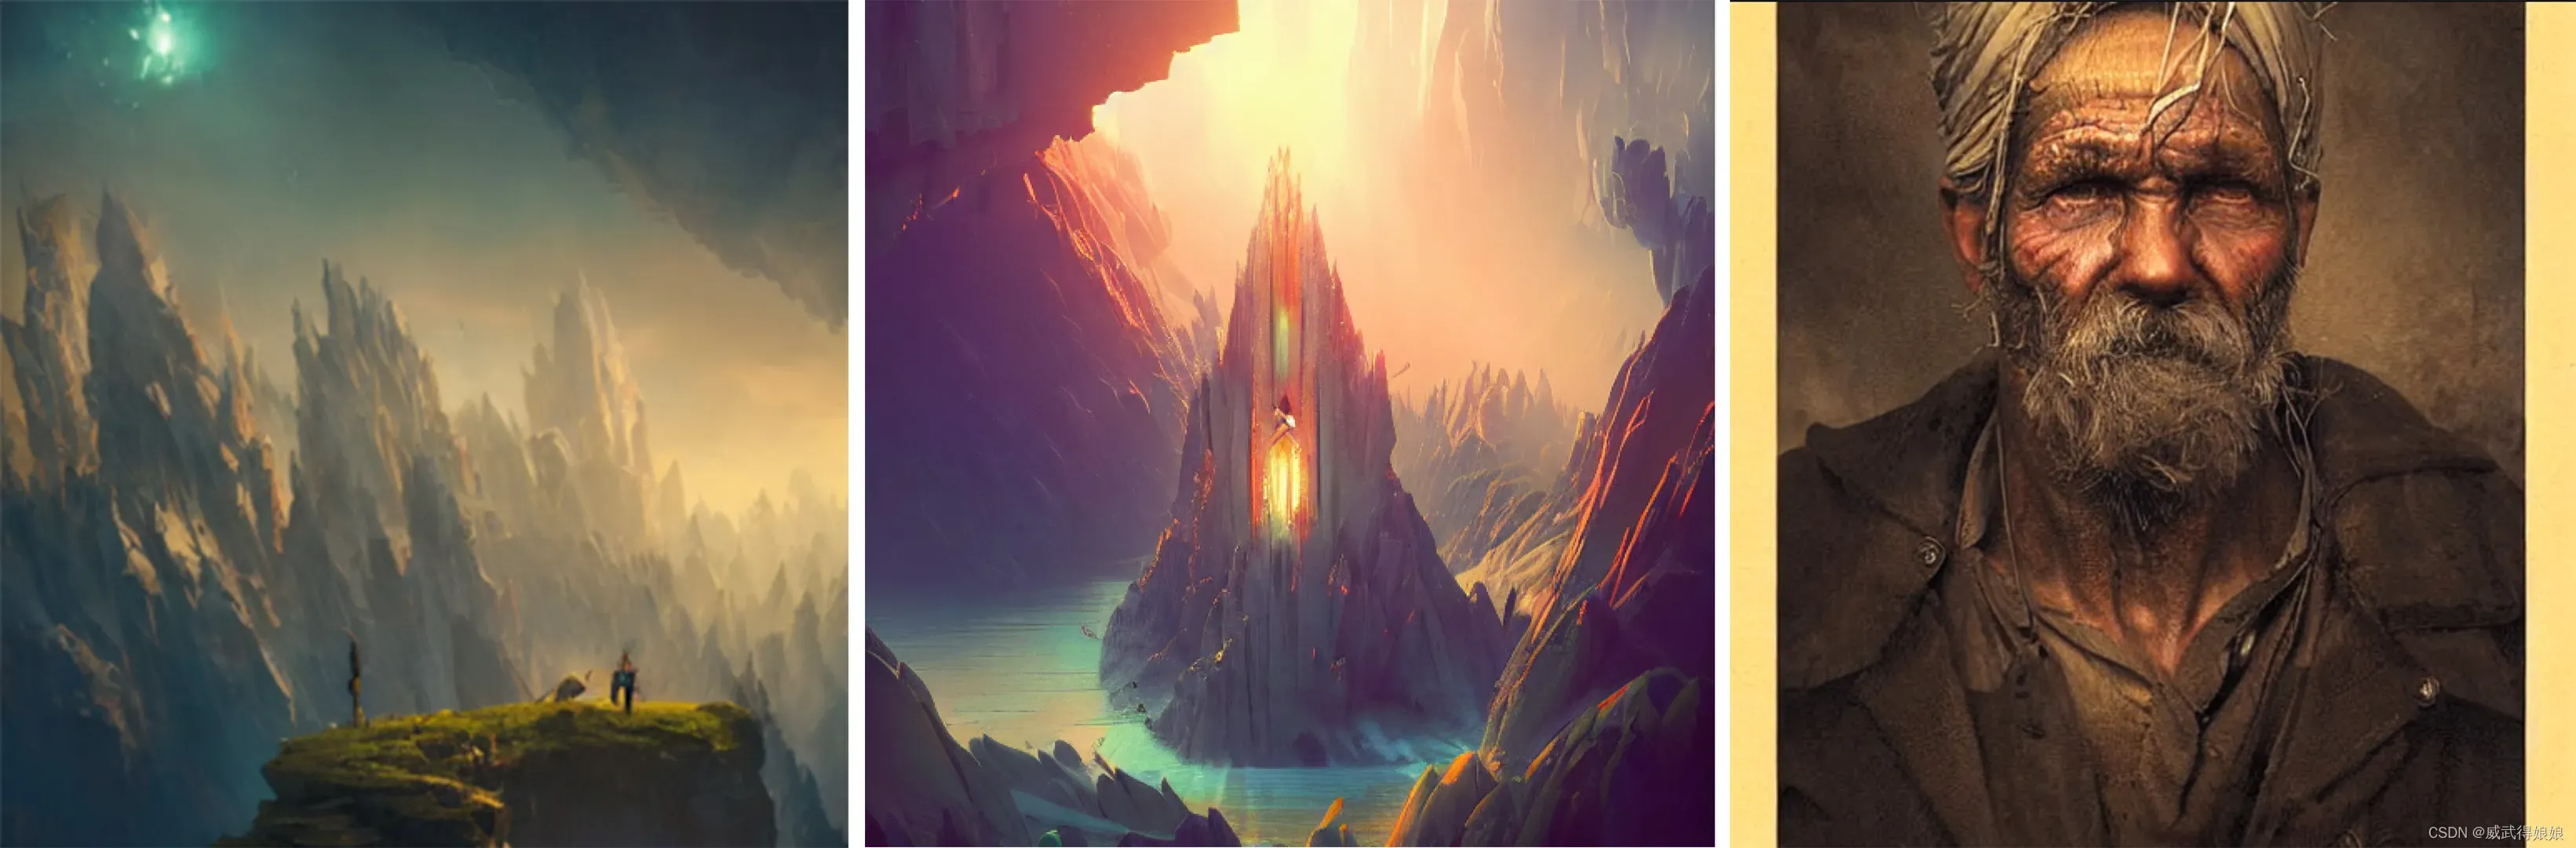
3.小程序demo实践
下面是我通过小程序端来实现AI作画的过程。
3.1 AI画画服务端:
模型部署好后只能本地执行, 我们简单实现下功能:
一、用户把任务提交到cos上,服务通过拉去cos的内容来执行AI画画任务。
二、通过执行shell命令,并将生成好的图片上传到cos。
COS文档: 对象存储简介_对象存储购买指南_对象存储操作指南-腾讯云
AI画画模型执行代码:
type Request struct {
	SessionId string `json:"session_id"`
	JobId     string `json:"job_id"`
	Prompt    string `json:"prompt"`
	ModelUrl  string `json:"model_url"`
	ImageUrl  string `json:"image_url"`
}

type JobInfo struct {
	JobId string `json:"job_id"`
	Request
}
func run(req *JobInfo) {
	begin := time.Now()

	Log("got a job, %+v", req)
	jobId := req.JobId
	cmd := exec.Command("sh", "start.sh", req.Prompt, jobId)

	err := cmd.Run()
	if err != nil {
		fmt.Println("Execute Command failed:" + err.Error())
		return
	}

	result, err := os.ReadFile(fmt.Sprintf("output/%s.png", jobId))
	if err != nil {
		panic(err)
	}
	url, err := cos.PutObject(context.Background(), fmt.Sprintf("aidraw/%s.png", jobId), result)
	if err != nil {
		panic(err)
	}
	resp := &Response{
		SessionId: req.SessionId,
		JobId:     jobId,
		JobStatus: "FINISNED",
		CostTime:  time.Since(begin).Milliseconds(),
		ResultUrl: url,
	}
	Log("job finished, %+v", resp)
	data, _ := json.Marshal(resp)
	pushResult(jobId, string(data))
}
通过cos来实现任务管理,涉及到任务拉取和结果上传, 以下是实现代码:
func pullJob() *JobInfo {
	res, _, err := cos.GetInstance().Bucket.Get(context.Background(), &cossdk.BucketGetOptions{
		Prefix:       JOB_QUEUE_PUSH,
		Delimiter:    "",
		EncodingType: "",
		Marker:       "",
		MaxKeys:      10000,
	})
	if err != nil {
		return nil
	}
	var jobId string
	for _, v := range res.Contents {
		if !objectExist(fmt.Sprintf("%s/%s", JOB_QUEUE_RESULT, getNameByPath(v.Key))) {
			jobId = v.Key
			break
		}
	}
	if len(jobId) == 0 {
		return nil
	}
	jobId = getNameByPath(jobId)
	Log("new job %s", jobId)
	resp, err := cos.GetInstance().Object.Get(context.Background(), fmt.Sprintf("%s/%s", JOB_QUEUE_PUSH, jobId), &cossdk.ObjectGetOptions{})
	if err != nil {
		panic(err)
	}
	defer resp.Body.Close()
	if resp.StatusCode != 200 {
		return nil
	}
	body, err := io.ReadAll(resp.Body)
	if err != nil {
		return nil
	}
	job := &JobInfo{
		JobId: jobId,
	}
	err = json.Unmarshal(body, &job)
	if err != nil {
		return nil
	}

	return job
}

func pullResult(jobId string) *Response {
	resp, err := cos.GetInstance().Object.Get(context.Background(), fmt.Sprintf("%s/%s", JOB_QUEUE_RESULT, jobId), &cossdk.ObjectGetOptions{})
	if err != nil {
		return nil
	}
	defer resp.Body.Close()
	if resp.StatusCode != 200 {
		return nil
	}
	body, err := io.ReadAll(resp.Body)
	if err != nil {
		return nil
	}
	rsp := &Response{}
	json.Unmarshal(body, &rsp)
	return rsp
}

func pushResult(jobId, result string) {
	_, err := cos.PutObject(context.Background(), fmt.Sprintf("%s/%s", JOB_QUEUE_RESULT, jobId), []byte(result))
	if err != nil {
		panic(err)
	}
}
3.2 小程序服务端:
小程序要通过中转服务来异步处理消息,梳理一下server的功能:
一、转发请求到AI画画。
二、查询AI画画的结果。(通过cos中转)
以下是部分代码:
协议相关:
type Request struct {
	SessionId string `json:"session_id"`
	JobId     string `json:"job_id"`
	Prompt    string `json:"prompt"`
	ModelUrl  string `json:"model_url"`
	ImageUrl  string `json:"image_url"`
}

type Response struct {
	SessionId string `json:"session_id"`
	JobId     string `json:"job_id"`
	JobStatus string `json:"job_status"`
	CostTime  int64  `json:"cost_time"`
	ResultUrl string `json:"result_url"`
	TotalCnt  int64  `json:"total_cnt"`
}
提交任务:
// submitJobHandler 提交任务
func submitJobHandler(writer http.ResponseWriter, request *http.Request) {
	body, err := io.ReadAll(request.Body)
	req := &Request{}
	err = json.Unmarshal(body, &req)
	if err != nil {
		panic(err)
	}
	Log("got a submit request, %+v", req)
	jobId := GenJobId()
	pushJob(jobId, string(body))
	resp := &Response{
		SessionId: req.SessionId,
		JobId:     jobId,
		TotalCnt:  sumJob(),
	}
	data, _ := json.Marshal(resp)
	writer.Write(data)
}

// describeJobHandler 查询任务
func describeJobHandler(writer http.ResponseWriter, request *http.Request) {
	body, err := io.ReadAll(request.Body)
	req := &Request{}
	err = json.Unmarshal(body, &req)
	if err != nil {
		panic(err)
	}
	Log("got a query request, %+v", req.JobId)
	var ret *Response
	ret = pullResult(req.JobId)
	if ret == nil {
		ret = &Response{
			SessionId: req.SessionId,
			JobId:     req.JobId,
			JobStatus: "RUNNING",
		}
	}
	data, _ := json.Marshal(ret)
	writer.Write(data)
}
3.3.小程序实现AI画画:
index.js
// index.js
// 获取应用实例
const app = getApp()

Page({
  data: {
    totalTask: 0,
    leftTime: 40,
    beginTime: 0,
    processTime: 0,
    taskStatus: "STOP",
    inputValue: "",
    tags: [],
    option: [],
    buttonStatus: false,
    index: 0,
    motto: 'Hello World',
    userInfo: {},
    hasUserInfo: false,
    canIUse: wx.canIUse('button.open-type.getUserInfo'),
    canIUseGetUserProfile: false,
    canIUseOpenData: wx.canIUse('open-data.type.userAvatarUrl') && wx.canIUse('open-data.type.userNickName') // 如需尝试获取用户信息可改为false
  },
  // 事件处理函数
  bindViewTap() {
    wx.navigateTo({
      url: '../logs/logs'
    })
  },
  onLoad() {
    if (wx.getUserProfile) {
      this.setData({
        canIUseGetUserProfile: true
      })
    }
    this.onTimeout();
  },

  getUserProfile(e) {
    // 推荐使用wx.getUserProfile获取用户信息,开发者每次通过该接口获取用户个人信息均需用户确认,开发者妥善保管用户快速填写的头像昵称,避免重复弹窗
    wx.getUserProfile({
      desc: '展示用户信息', // 声明获取用户个人信息后的用途,后续会展示在弹窗中,请谨慎填写
      success: (res) => {
        console.log(res)
        this.setData({
          userInfo: res.userInfo,
          hasUserInfo: true
        })
      }
    })
  },
  getUserInfo(e) {
    // 不推荐使用getUserInfo获取用户信息,预计自2021年4月13日起,getUserInfo将不再弹出弹窗,并直接返回匿名的用户个人信息
    console.log(e)
    this.setData({
      userInfo: e.detail.userInfo,
      hasUserInfo: true
    })
  },

  enentloop() {
    var that = this
    if (!that.data.Resp || !that.data.Resp.job_id) {
      console.log("not found jobid")
      return
    }
    return new Promise(function(yes, no) {
      wx.request({
      url: 'http://127.0.0.1:8000/frontend/query',
      data: {
        "session_id": "123",
        "job_id": that.data.Resp.job_id
      },
      method: "POST",
      header: {
        'Content-Type': "application/json"
      },
      success (res) {
        yes("hello");
        if (res.data == null) {
          wx.showToast({
            icon: "error",
            title: '请求查询失败',
          })
          return
        }
        console.log(Date.parse(new Date()), res.data)
        that.setData({
          Job: res.data,
        })
        console.log("job_status: ", res.data.job_status)
        if (res.data.job_status === "FINISNED") {
          console.log("draw image: ", res.data.result_url)
          that.drawInputImage(res.data.result_url);
          that.setData({
            Resp: {},
            taskStatus: "STOP"
          })
        } else {
          that.setData({
            taskStatus: "PROCESSING",
            processTime: (Date.parse(new Date()) - that.data.beginTime)/ 1000
          })
        }
      },
      fail(res) {
        wx.showToast({
          icon: "error",
          title: '请求查询失败',
        })
        console.log(res)
      }
    })
  })
  },

  onTimeout:  function() {
    // 开启定时器
    var that = this;
    let ticker = setTimeout(async function() {
      console.log("begin")
      await that.enentloop();
      console.log("end")
      that.onTimeout();
    }, 3 * 1000); // 毫秒数
    // clearTimeout(ticker);
    that.setData({
      ticker: ticker
    });
  },

  imageDraw() {
    var that = this
    var opt = {}
    if (that.data.option && that.data.option.length > 0) {
      opt = {
        "tags": that.data.option
      }
    }
    console.log("option:", opt)
    wx.request({
      url: 'http://127.0.0.1:8000/frontend/create',
      data: {
        "prompt": that.data.inputValue
      },
      method: "POST",
      header: {
        'Content-Type': "application/json"
      },
      success (res) {
        if (res.data == null) {
          wx.showToast({
            icon: "error",
            title: '请求失败',
          })
          return
        }
        console.log(res.data)
        // let raw = JSON.parse(res.data)
        that.setData({
          Resp: res.data,
        })
        that.setData({
          totalTask: res.data.total_cnt,
          beginTime: Date.parse(new Date())
        })
      },
      fail(res) {
        wx.showToast({
          icon: "error",
          title: '请求失败',
        })
      }
    })
  },

  drawInputImage: function(url) {
    var that = this;
    console.log("result_url: ", url)

    let resUrl = url; // that.data.Job.result_url;

    wx.downloadFile({
      url: resUrl,
      success: function(res) {
        var imagePath = res.tempFilePath
        wx.getImageInfo({
          src: imagePath,
          success: function(res) {
            wx.createSelectorQuery()
            .select('#input_canvas') // 在 WXML 中填入的 id
            .fields({ node: true, size: true })
            .exec((r) => {
              // Canvas 对象
              const canvas = r[0].node
              // 渲染上下文
              const ctx = canvas.getContext('2d')
              // Canvas 画布的实际绘制宽高
              const width = r[0].width
              const height = r[0].height
              // 初始化画布大小
              const dpr = wx.getWindowInfo().pixelRatio
              canvas.width = width * dpr
              canvas.height = height * dpr
              ctx.scale(dpr, dpr)
              ctx.clearRect(0, 0, width, height)

              let radio = height / res.height
              console.log("radio:", radio)
              const img = canvas.createImage()
              var x = width / 2 - (res.width * radio / 2)

              img.src = imagePath
              img.onload = function() {
                ctx.drawImage(img, x, 0, res.width * radio, res.height * radio)
              }
            })
          }
        })
      }
    })
  },

  handlerInput(e) {
    this.setData({
      inputValue: e.detail.value
    })
  },

  handlerSearch(e) {
    console.log("input: ", this.data.inputValue)

    if (this.data.inputValue.length == 0) {
      wx.showToast({
        icon: "error",
        title: '请输入你的创意 ',
      })
      return
    }
    this.imageDraw()
  },
  handlerInputPos(e) {
    console.log(e)
    this.setData({
      inputValue: e.detail.value
    })
  },
  handlerInputFusion(e) {
    console.log(e)
    this.setData({
      inputUrl: e.detail.value
    })
  },
  handlerInputImage(e) {
    console.log(e)
  },
  clickItem(e) {
    let $bean = e.currentTarget.dataset
    console.log(e)
    console.log("value: ", $bean.bean)
    this.setData({
      option: $bean.bean
    })
    this.imageDraw()
  }
})
index.wxml:
<view class="container" style="width: 750rpx; height: 1229rpx; display: flex; box-sizing: border-box">
  <div class="form-item" style="width: 673rpx; height: 70rpx; display: block; box-sizing: border-box">
    <input placeholder="写下你的创意" class="input" bindinput="handlerInput" />
    <input placeholder="待融合URL" class="input" bindinput="handlerInputFusion" />
    <button class="button" loading="{{buttonStatus}}" bindtap="handlerSearch" size="mini" style="width: 158rpx; height: 123rpx; display: block; box-sizing: border-box; left: 0rpx; top: -60rpx; position: relative"> 立即生成 </button>
  </div>
  <view class="text_box">
    <text class="text_line" style="position: relative; left: 18rpx; top: 0rpx">完成任务数:</text>
    <text class="text_line" style="position: relative; left: 8rpx; top: 0rpx">{{totalTask}},</text>
    <text class="text_line" style="position: relative; left: 38rpx; top: 0rpx">{{taskStatus}}</text>
    <text class="text_line" style="position: relative; left: 43rpx; top: 0rpx">{{processTime}}/{{leftTime}}s</text>
  </view>

  <view class="output_line" style="position: relative; left: 2rpx; top: 51rpx; width: 714rpx; height: 40rpx; display: flex; box-sizing: border-box">
    <text class="text_line" style="width: 199rpx; height: 0rpx; display: block; box-sizing: border-box; position: relative; left: 1rpx; top: -92rpx">作品图片</text>
    <view style="position: relative; left: -15rpx; top: 2rpx; width: 571rpx; height: 0rpx; display: block; box-sizing: border-box"></view>
  </view>
  <canvas type="2d" id="input_canvas" style="background: rgb(228, 228, 225); width: 673rpx; height: 715rpx; position: relative; left: 2rpx; top: -64rpx; display: block; box-sizing: border-box">
  </canvas>
  <view class="output_line" style="position: relative; left: 0rpx; top: 50rpx; width: 714rpx; height: 58rpx; display: flex; box-sizing: border-box">
  </view>
</view>
到这里就实现了一个AI画画小程序。接下来看下效果, 通过输入关键字可以得到作品图:

新的问题来了, 测试下来, 发现AI模型直接生成的图, 人脸部分不太理想, 如下图所示:

如何使得人像更加自然呢? 我调研了市面上现有的AI能力, 发现腾讯云AI的人脸融合可以实现换脸功能, 下面看下具体介绍。
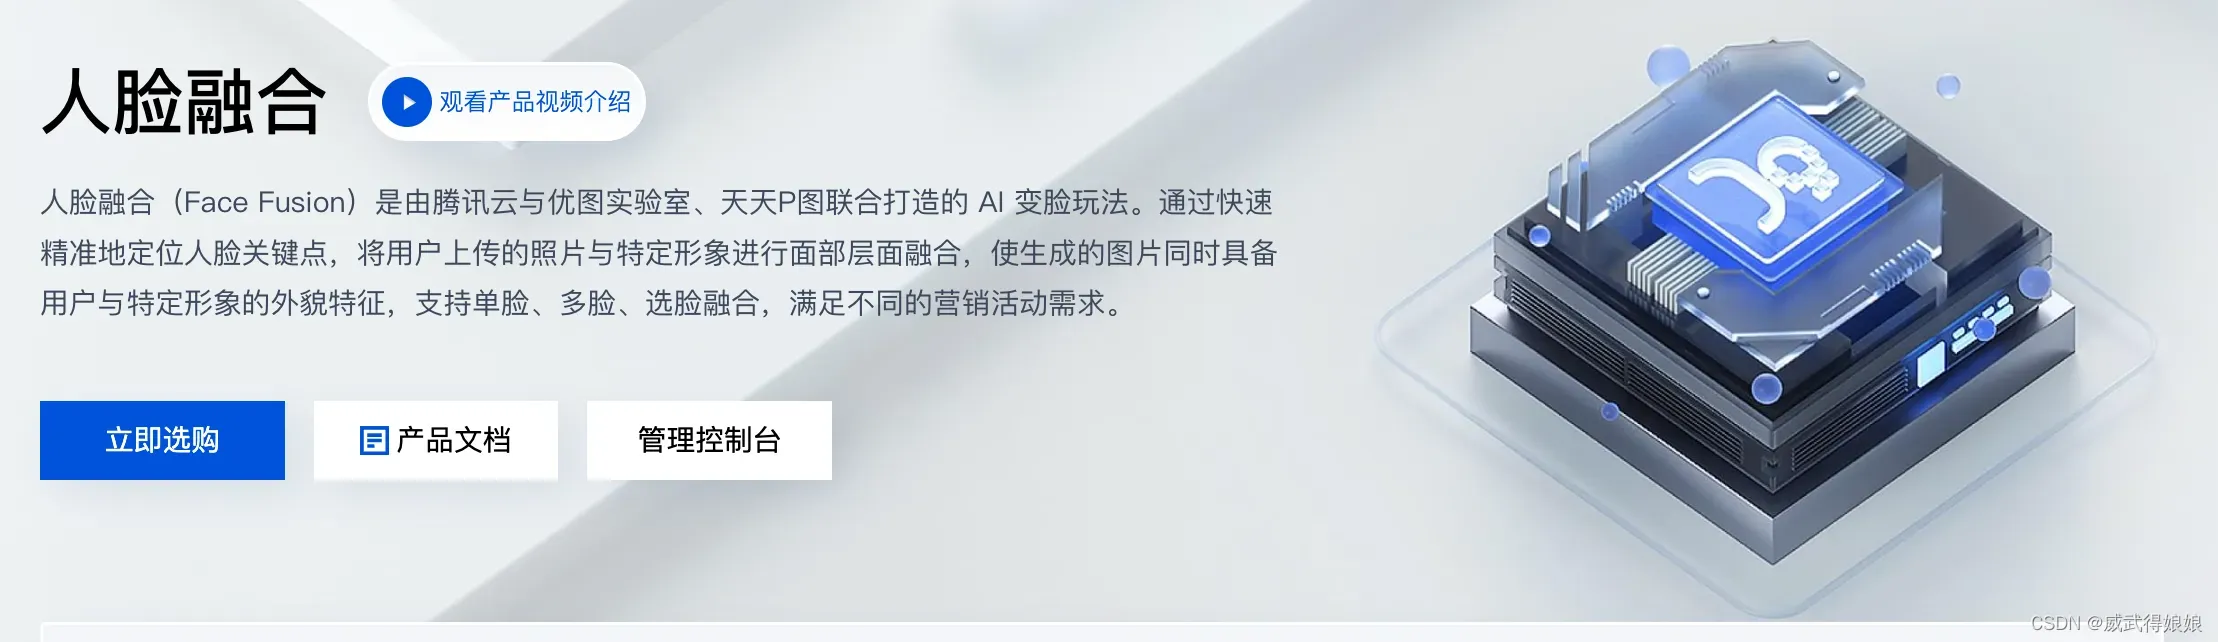
3.4. 人脸融合
3.4.1 人脸融合介绍
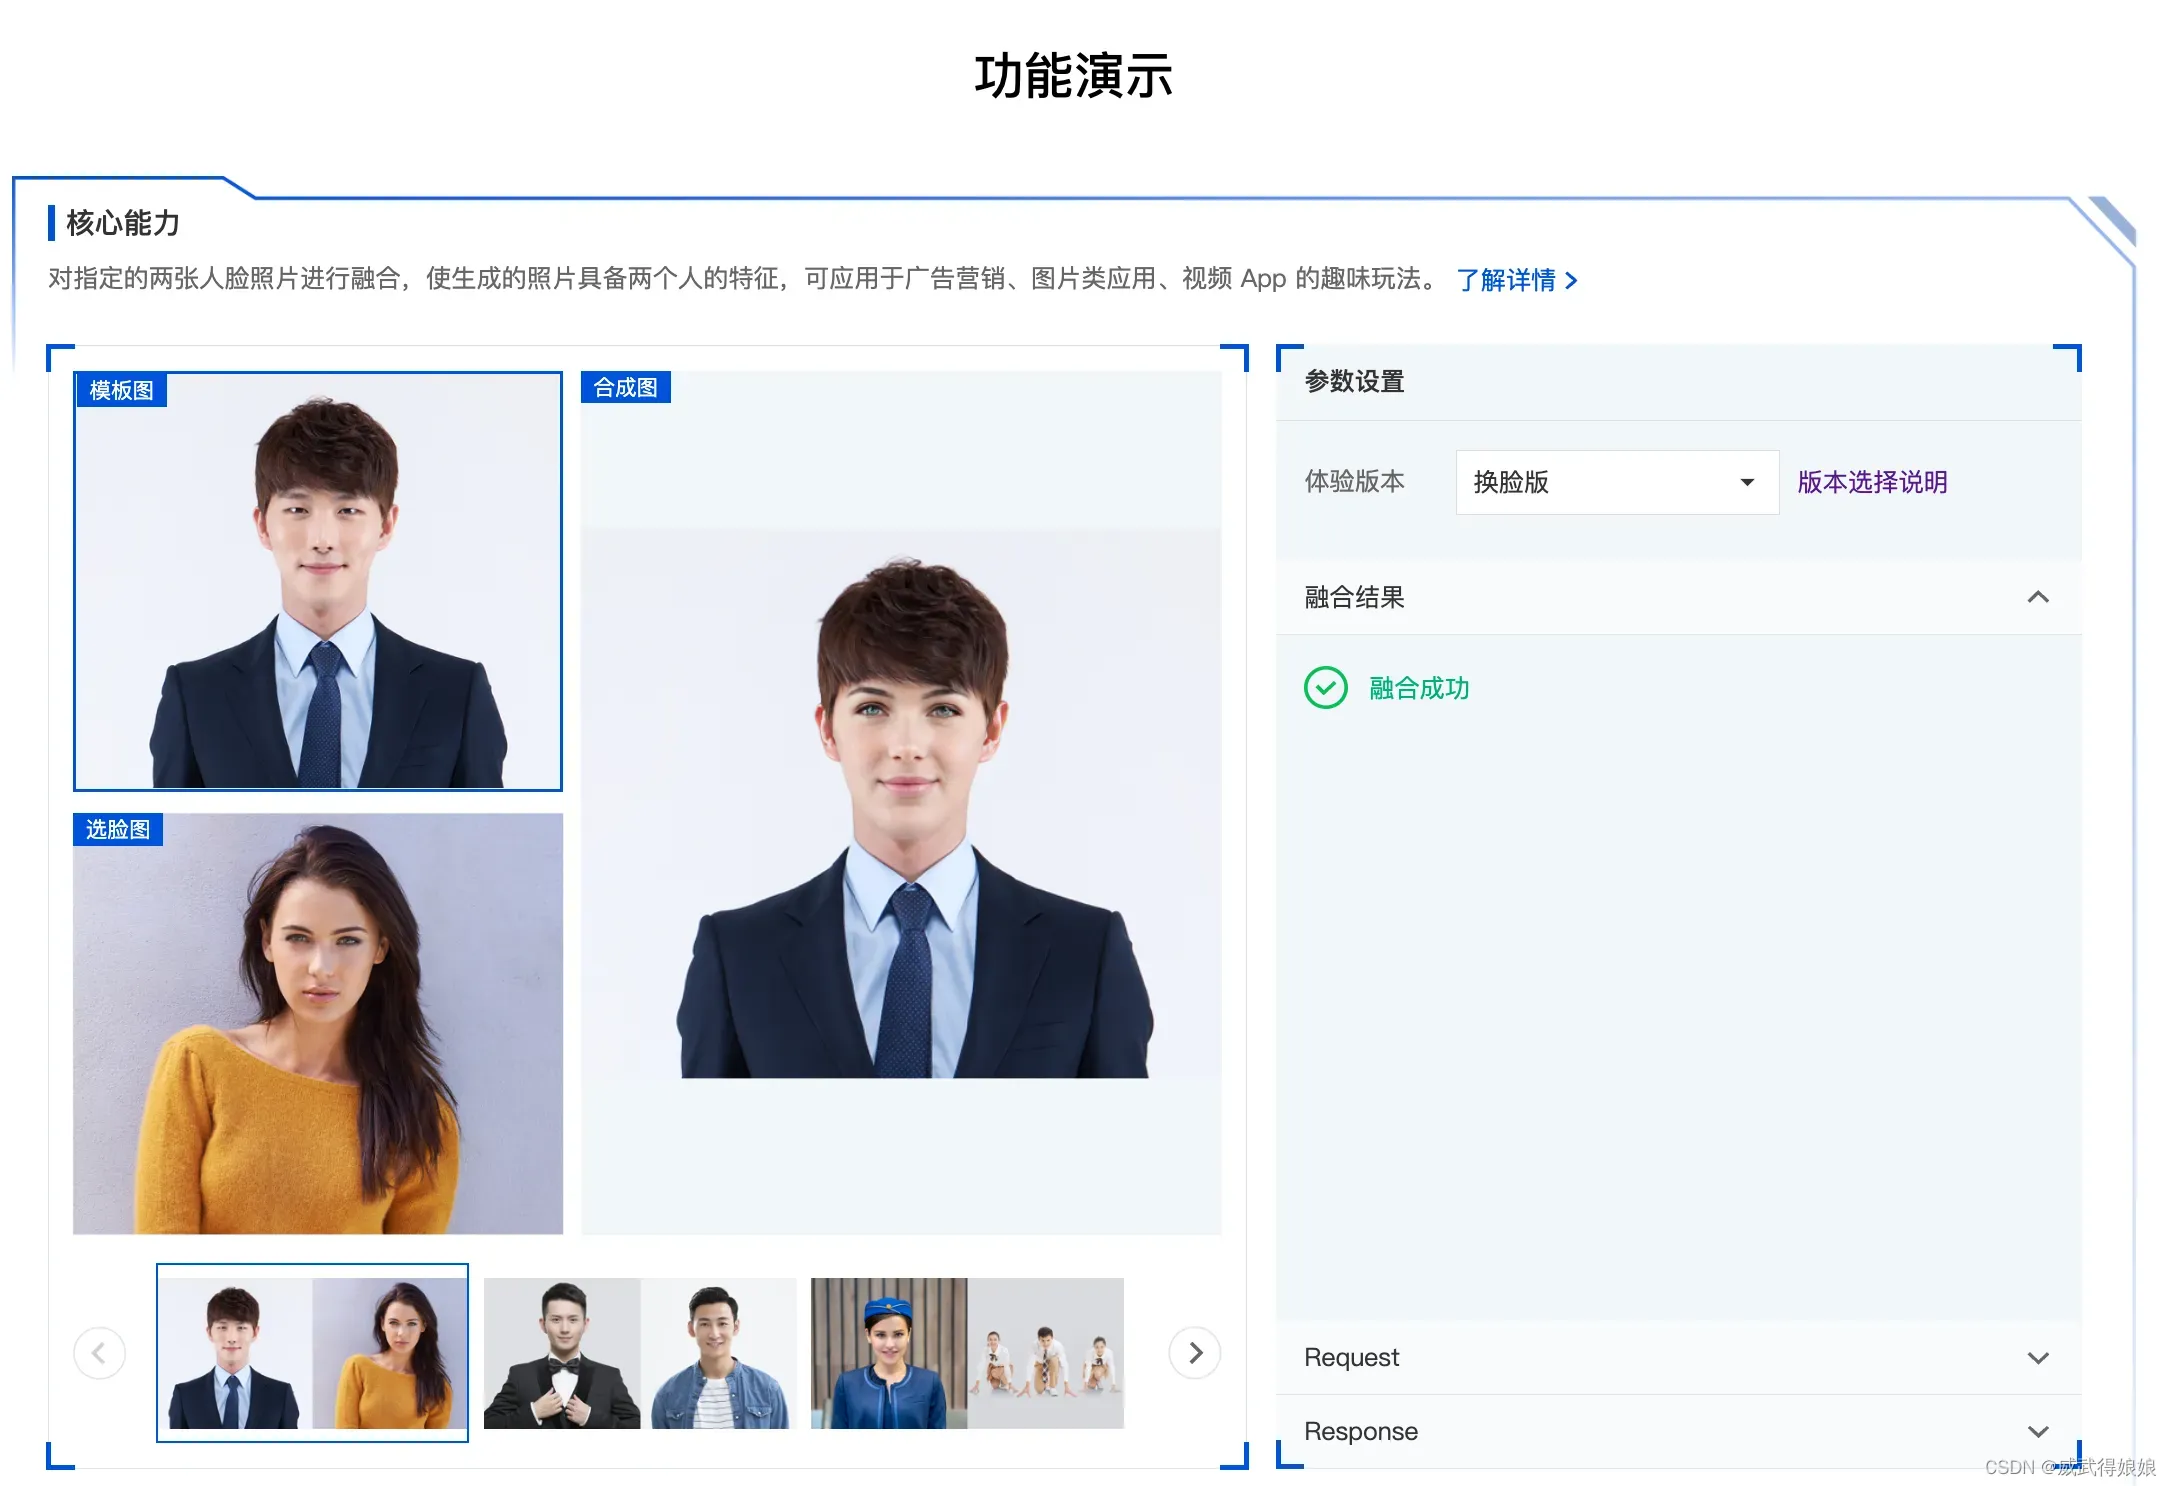
3.5.2 融合功能演示:
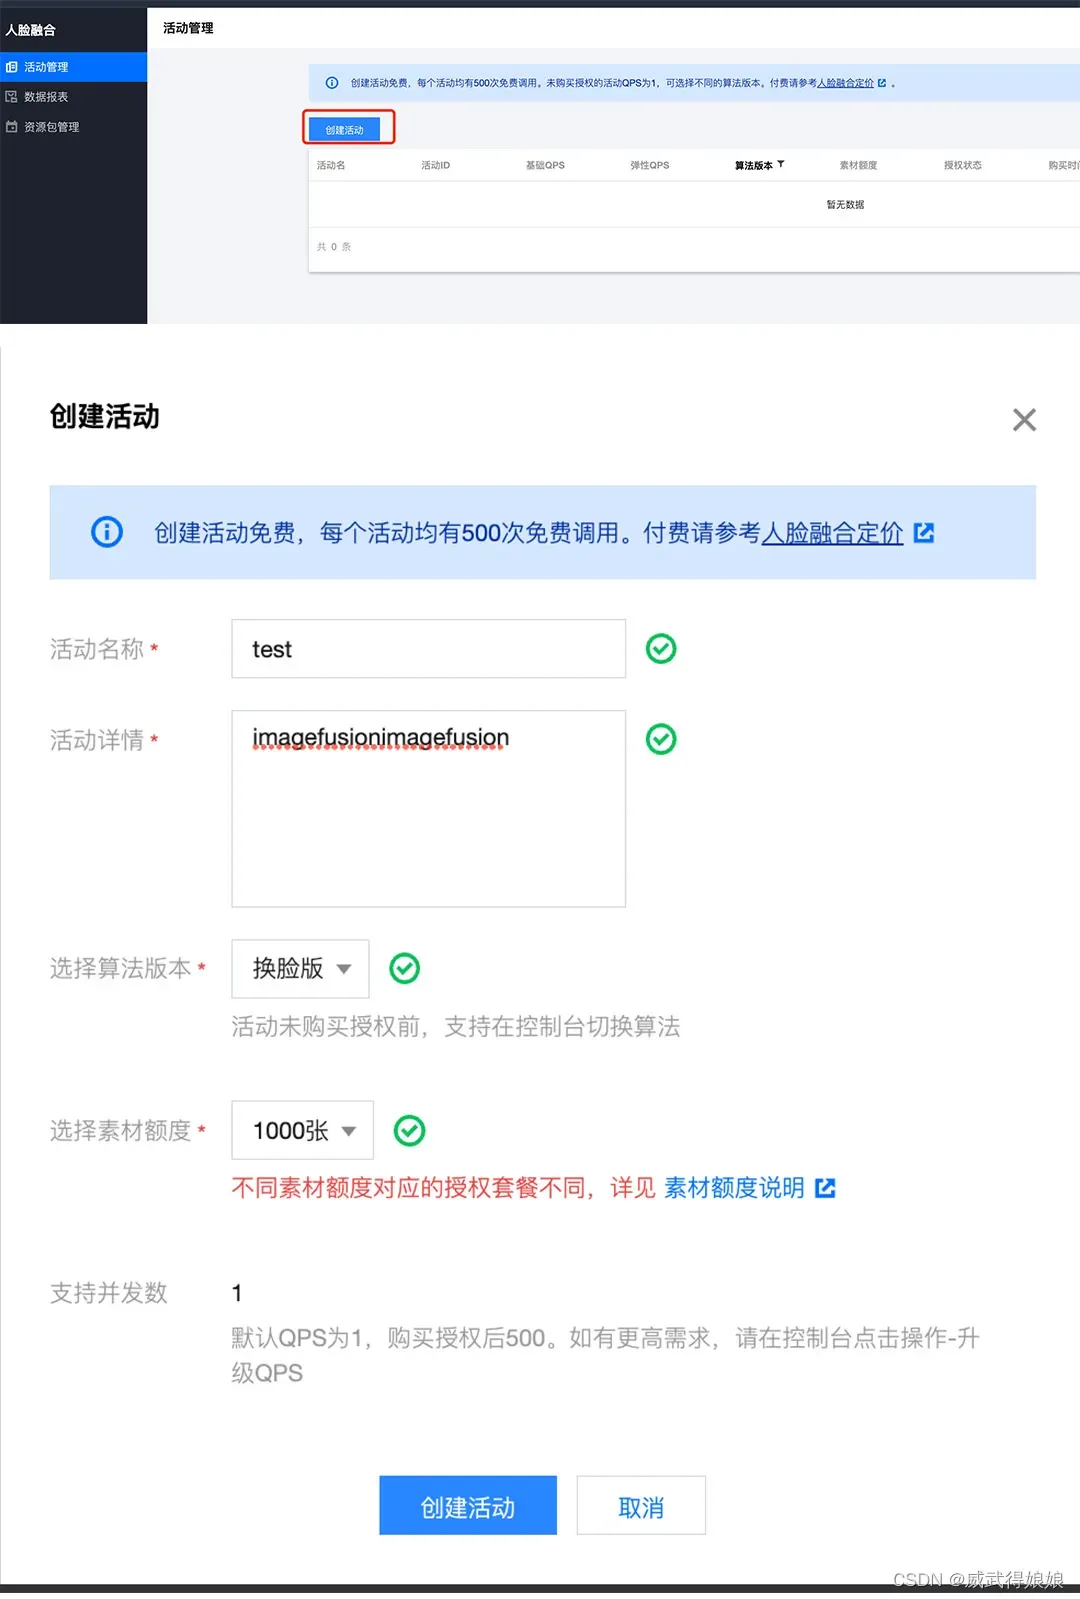
3.4.3 融合控制台:
用于创建活动和素材。
3.4.4 素材管理:

添加素材即可: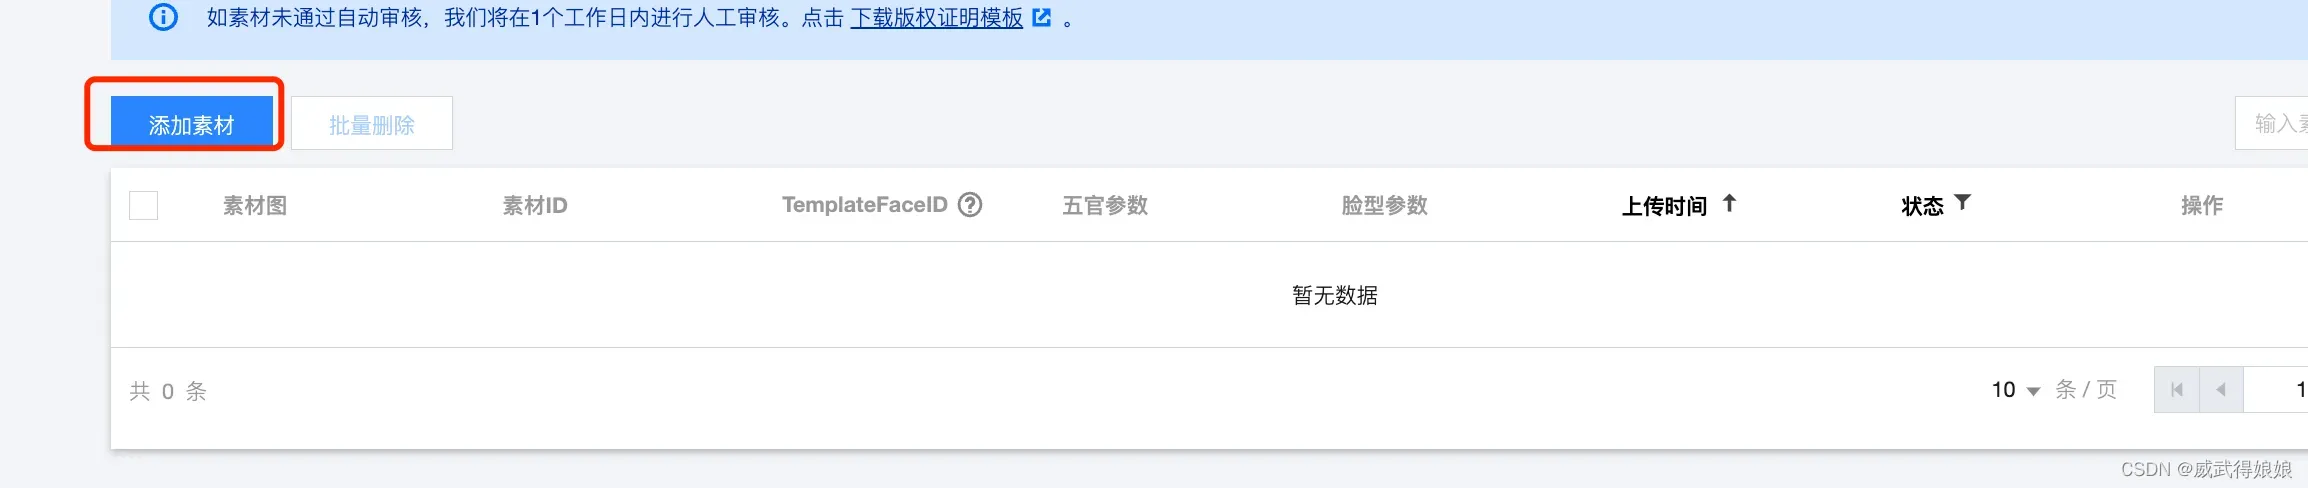
这里的素材指的就是我们通过AI生成的图, 下面看下效果。
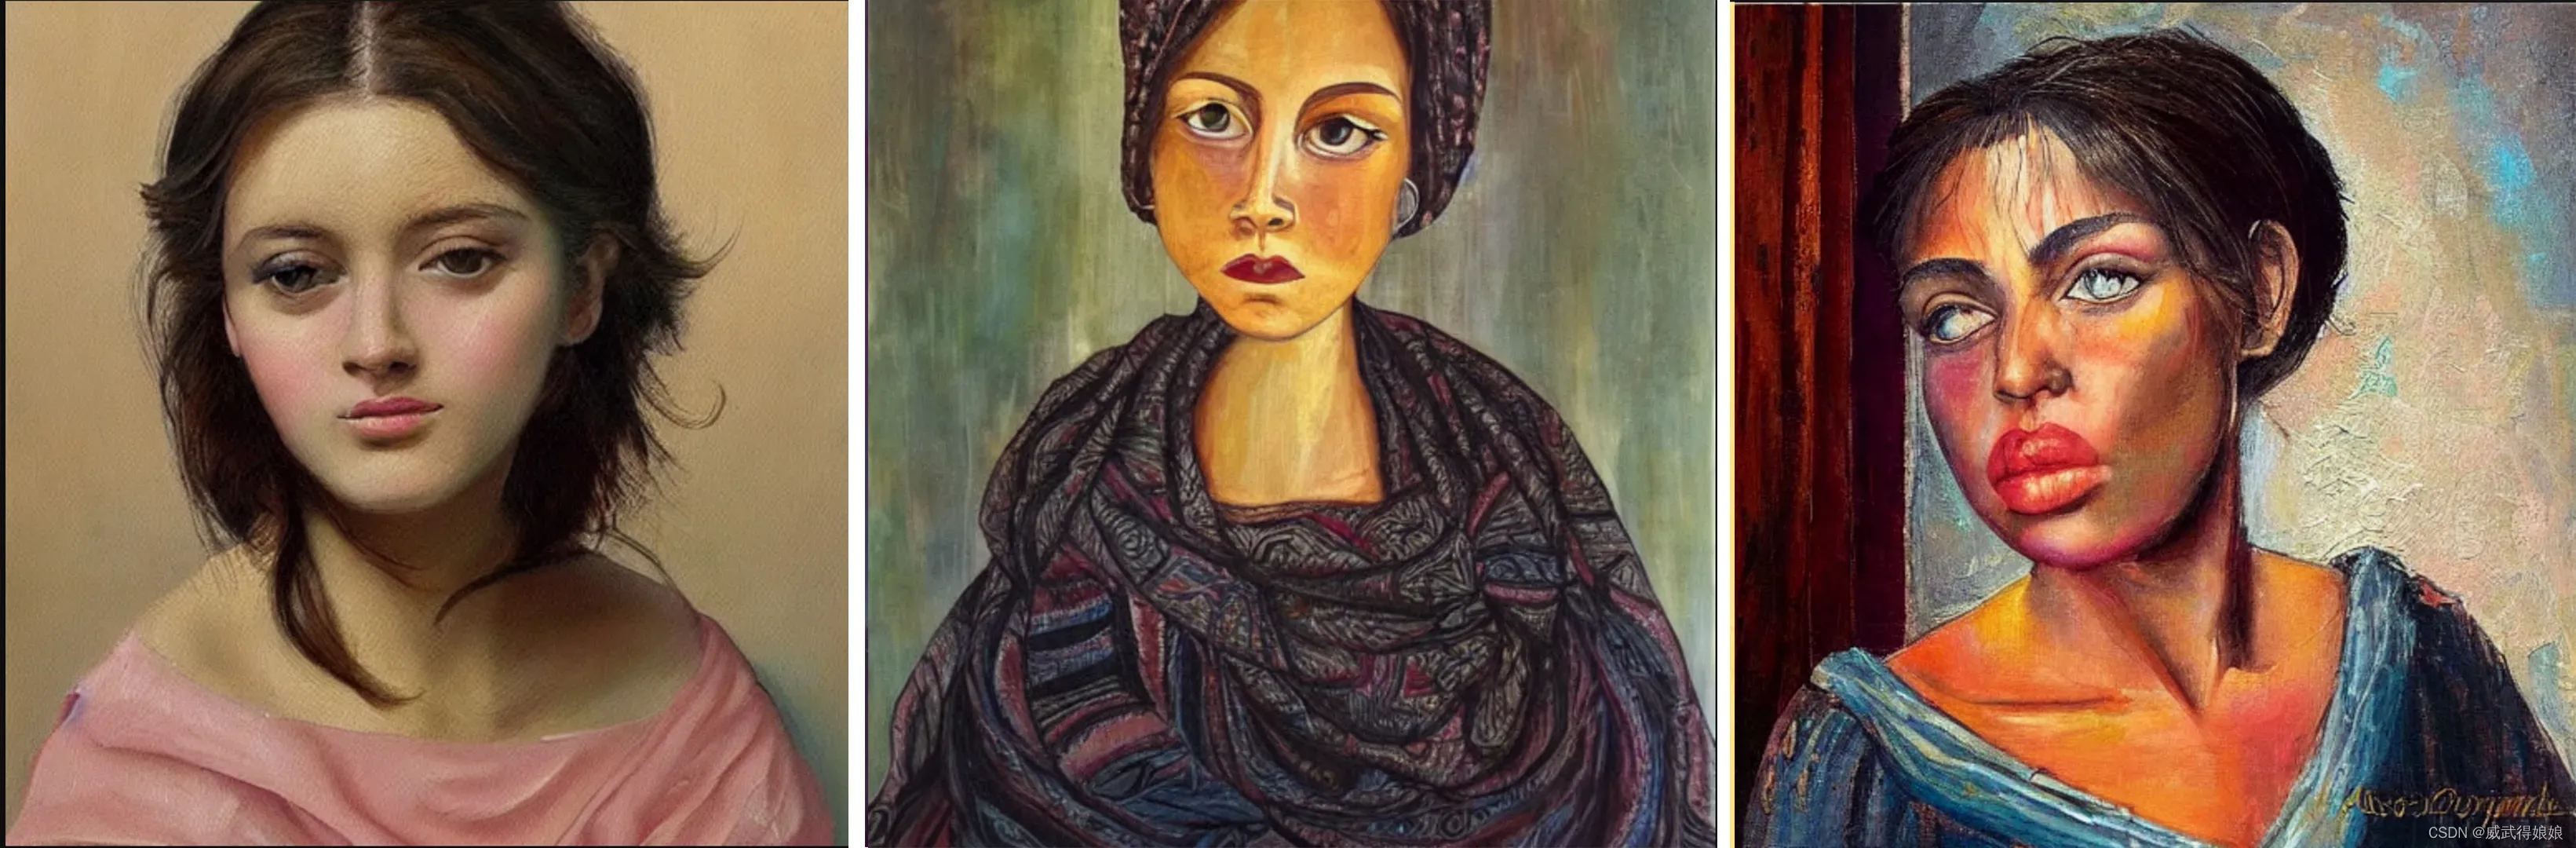
3.4.5 验证AI画画+融合效果
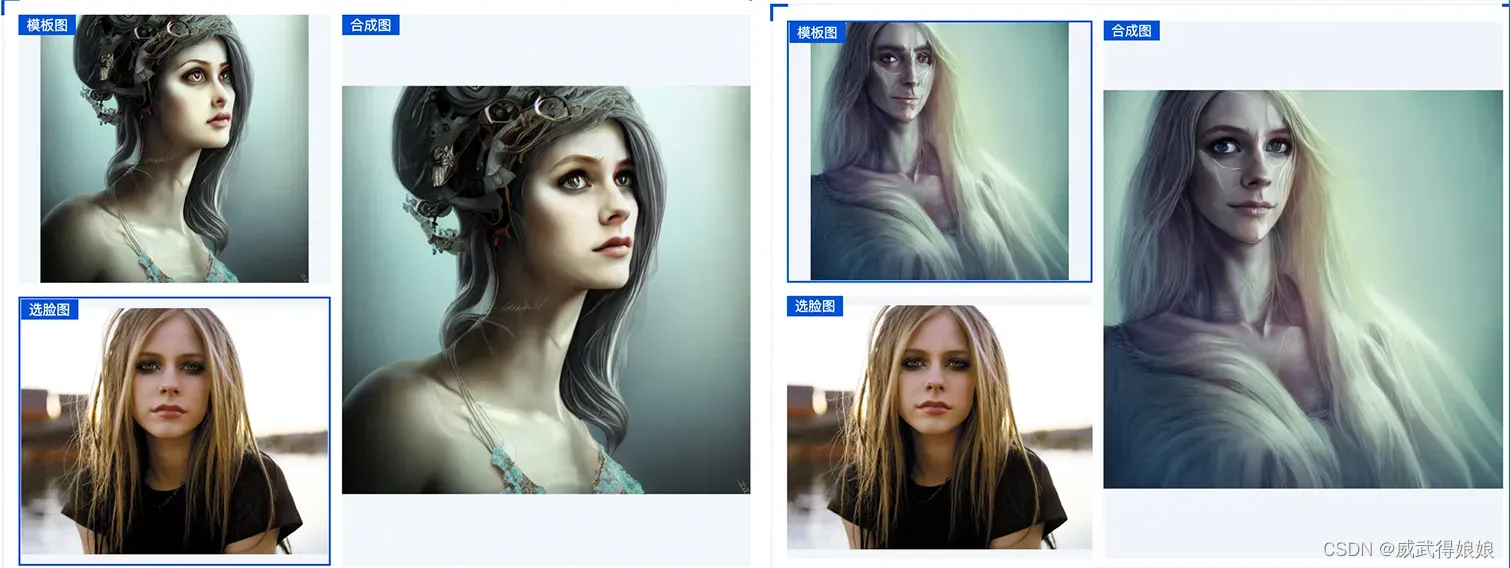
我们将上述有问题的图片上传到图片融合的DEMO页, 我们做一次图片人脸融合,发现效果相当惊艳:
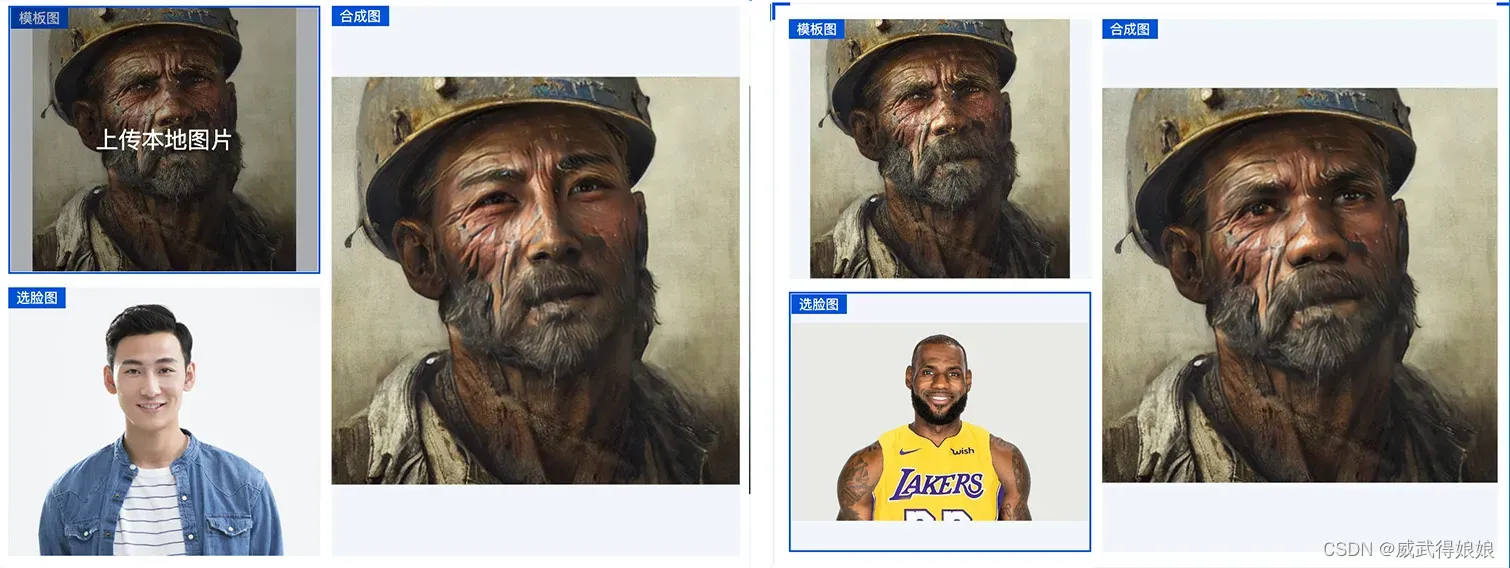
下面是正常换脸效果:
基于上述结果, 结合我们的使用场景, 我们可以在现有的AI画画基础上增加腾讯云图片融合的能力。
3.5 小程序增加融合效果:
我们在原来的流程基础上增加融合的步骤,下面是具体流程:
3.5.1 大概思路:
3.5.2 详细流程:
增加人脸融合的操作。
3.5.3 服务端增加人脸融合处理接口:
在小程序服务端增加融合的任务处理:
// facefusionHandler ...
func facefusionHandler(writer http.ResponseWriter, request *http.Request) {
	body, err := io.ReadAll(request.Body)
	req := &Request{}
	err = json.Unmarshal(body, &req)
	if err != nil {
		panic(err)
	}

	ret := &Response{
		SessionId: req.SessionId,
 		// 将AI画画的图上传至素材管理, 并和输入图做融合
		ResultUrl: rawCloud(req.ModelUrl, req.ImageUrl),
	}
	data, _ := json.Marshal(ret)
	writer.Write(data)
}
将AI画画的图上传到素材管理,一般需要在控制台执行, 我这里直接通过API来调用, 需要手写V3签名, 代码就不贴了, 感兴趣的可以在这里看下。
3.5.4 小程序端增加融合后置任务:
小程序端在拿到AI画画后的图, 根据需要走一遍融合操作。
facefusion(modelUrl, imageUrl) {
var that = this;
that.setData({
taskStatus: "融合中...",
processTime: (Date.parse(new Date()) - that.data.beginTime)/ 1000
})
wx.request({
url: 'http://127.0.0.1:8000/frontend/fusion',
data: {
"session_id": "123",
"model_url": modelUrl,
"image_url": imageUrl
},
method: "POST",
header: {
'Content-Type': "application/json"
},
success (res) {
if (res.data == null) {
wx.showToast({
icon: "error",
title: '请求融合失败',
})
return
}
if (res.data.result_url !== "") {
console.log("draw image: ", res.data.result_url)
that.drawInputImage(res.data.result_url);
that.setData({
Resp: {}
})
that.setData({
taskStatus: "STOP"
})
// clearTimeout(that.data.ticker);
} else {
that.setData({
taskStatus: "PROCESSING",
processTime: (Date.parse(new Date()) - that.data.beginTime)/ 1000
})
}
// a portrait of an old coal miner in 19th century, beautiful painting with highly detailed face by greg rutkowski and magali villanueve
},
fail(res) {
wx.showToast({
icon: "error",
title: '请求融合失败',
})
console.log(res)
}
})
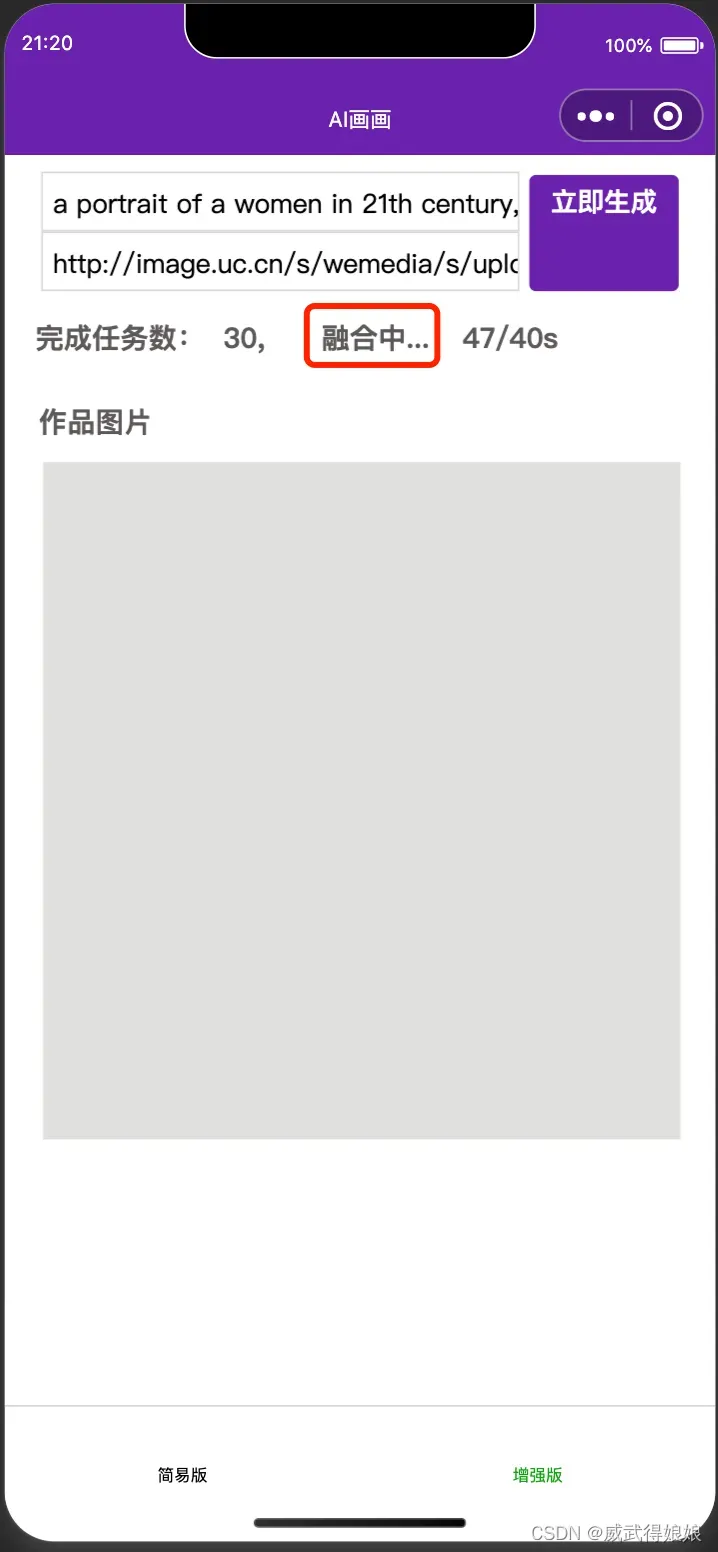
},编译启动, 任务状态这里会增加“融合中”的状态:
看下前后对比, 这是AI生成的图:
经过融合后的图:
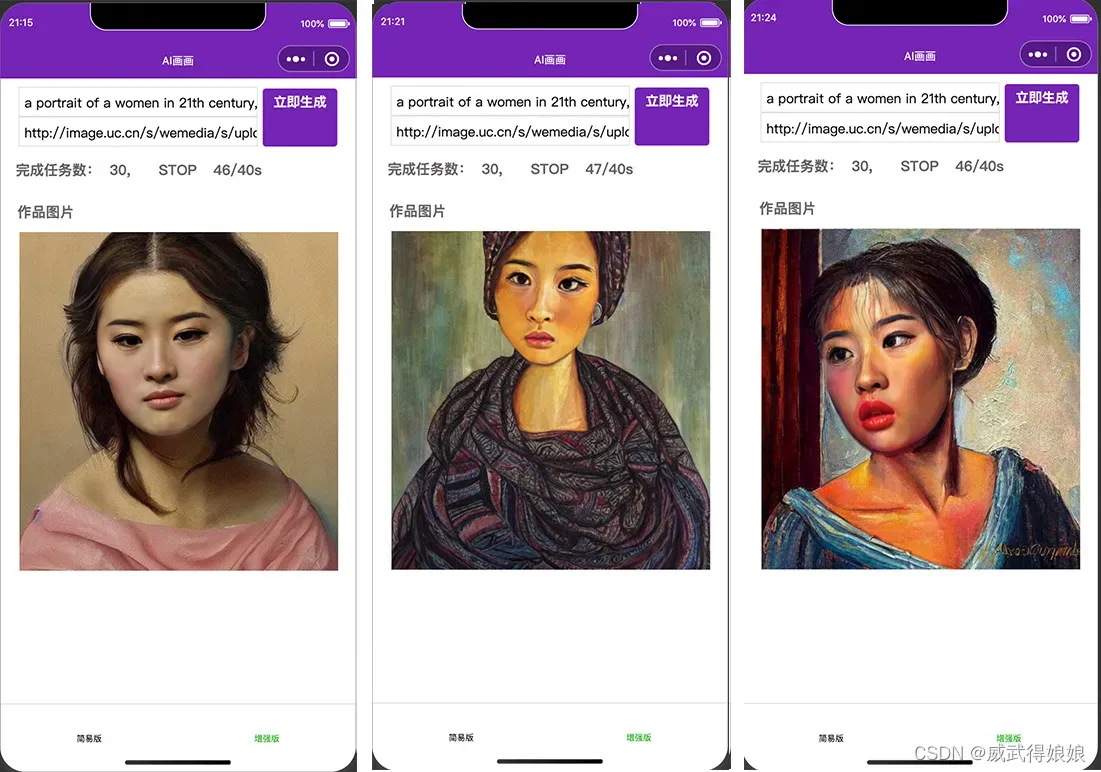
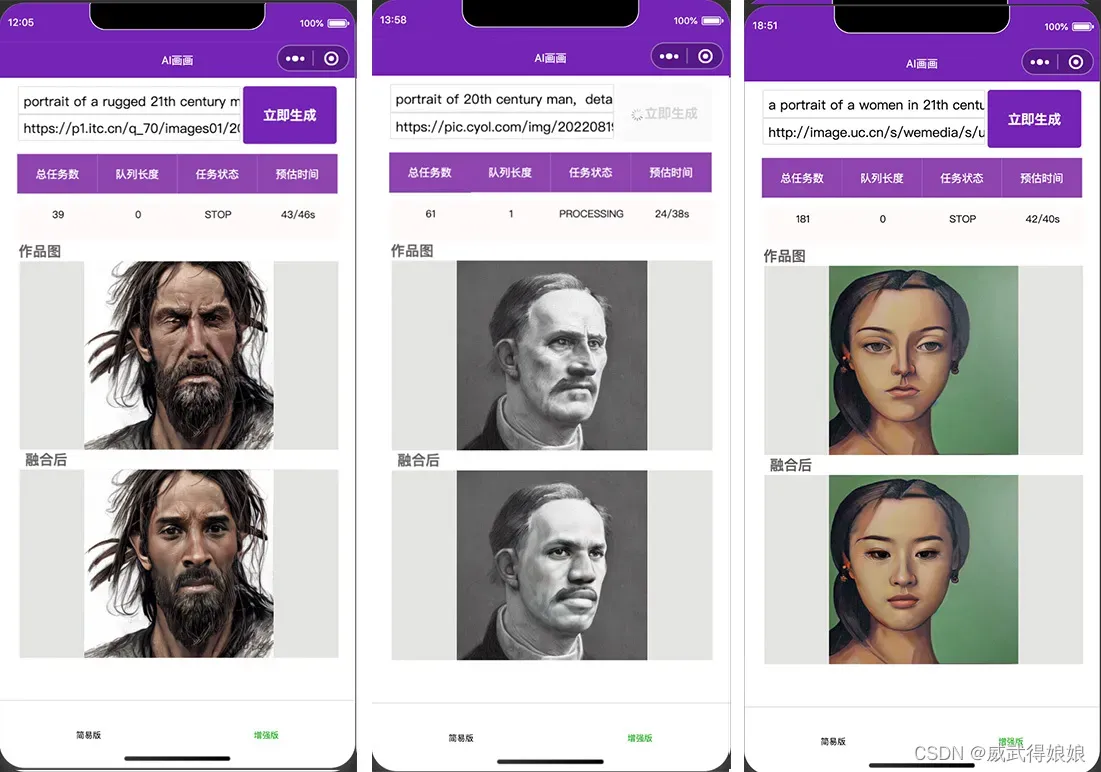
优化了下界面, 看看最终版::
总结
至此,就实现了一个AI画画+人像融合的demo, 二者搭配使用,可以生成更好的人脸效果, 也可以自己组织比较好的prompt来生成比较好的人像图。 在huggingface上有很多模型和关键词值得探索, 本期先介绍到这里了。
版权声明:本文为博主作者:威武得娘娘原创文章,版权归属原作者,如果侵权,请联系我们删除!
原文链接:https://blog.csdn.net/tencentAI/article/details/128316153