如何在Linux机器上使用ssh远程连接Windows Server服务器并使用rsync同步文件
- 一、源起
- 二、使用ssh远程连接Windows
-
- 1.先决条件
-
- (1)至少运行 Windows Server 2019 或 Windows 10(内部版本 1809)的设备。
- (2)PowerShell 5.1 或更高版本。
- (3)作为内置管理员组成员的帐户。
- 2.先决条件检查
- 3.安装适用于 Windows 的 OpenSSH
-
- (1)打开“设置”,选择“应用”,然后选择“可选功能”。
- (2)扫描列表,查看是否已安装 OpenSSH。 如果未安装,请在页面顶部选择“添加功能”,然后:
- (3)设置完成后,回到“应用”和“可选功能”,并确认 OpenSSH 已列出。
- (4)打开“服务”桌面应用。 (选择“开始”,在搜索框中键入 services.msc ,然后选择“服务”应用或按 ENTER。)
- (5)在详细信息窗格中,双击“OpenSSH SSH 服务器”。
- (6)在“常规”选项卡上的“启动类型”下拉菜单中,选择“自动”。
- (7)若要启动服务,请选择“启动”。
- 4.连接到 OpenSSH 服务器
- 三、OpenSSH for Windows 中基于密钥的身份验证
-
- 1.部署私钥
- 2.部署公钥
-
- (1)标准用户
- (2)管理用户
- 四、实际验证
- 五、配置rsync远程同步文件
-
- 1.windows下安装cwrsync客户端
- 2.配置系统环境变量
- 六、远程linux服务器配置ssh远程连接
- 七、rsync执行样例
-
- 1.linux向windows同步数据样例(默认是采取ssh模式)
- 2.windows向linux同步数据样例
- 2.windows向windows同步数据样例
一、源起
当前在研究goploy自动化开源部署工具,该工具部署在linux机器上,而要部署服务的目标服务器有一部分是windows server服务器,goploy自动化部署,使用rsync部署方式,底层依赖于ssh远程连接目标服务器,所以,要实现自动化部署,必须先实现ssh远程连接目标windows server服务器。下面将依次说明具体步骤。
二、使用ssh远程连接Windows
1.先决条件
在开始之前,计算机必须满足以下要求:
(1)至少运行 Windows Server 2019 或 Windows 10(内部版本 1809)的设备。
(2)PowerShell 5.1 或更高版本。
(3)作为内置管理员组成员的帐户。
2.先决条件检查
若要验证环境,请打开提升的 PowerShell 会话并执行以下操作:
键入 winver.exe ,然后按 Enter 查看 Windows 设备的版本详细信息。
运行 $PSVersionTable.PSVersion。 验证主要版本至少为 5,次要版本至少为 1。 详细了解如何在 Windows 上安装 PowerShell。
运行下面的命令(PowerShell)。 当你是内置管理员组的成员时,输出将显示 True。
(New-Object Security.Principal.WindowsPrincipal([Security.Principal.WindowsIdentity]::GetCurrent())).IsInRole([Security.Principal.WindowsBuiltInRole]::Administrator)
3.安装适用于 Windows 的 OpenSSH
可以使用 Windows Server 2019 和 Windows 10 设备上的 Windows 设置安装这两个 OpenSSH 组件。
若要安装 OpenSSH 组件:
(1)打开“设置”,选择“应用”,然后选择“可选功能”。
(2)扫描列表,查看是否已安装 OpenSSH。 如果未安装,请在页面顶部选择“添加功能”,然后:
找到“OpenSSH 客户端”,然后选择“安装”
找到“OpenSSH Server”,然后选择“安装”
(3)设置完成后,回到“应用”和“可选功能”,并确认 OpenSSH 已列出。
(4)打开“服务”桌面应用。 (选择“开始”,在搜索框中键入 services.msc ,然后选择“服务”应用或按 ENTER。)
(5)在详细信息窗格中,双击“OpenSSH SSH 服务器”。
(6)在“常规”选项卡上的“启动类型”下拉菜单中,选择“自动”。
(7)若要启动服务,请选择“启动”。
备注:
安装 OpenSSH 服务器将创建并启用一个名为 OpenSSH-Server-In-TCP 的防火墙规则。 这允许端口 22 上的入站 SSH 流量。 如果未启用此规则且未打开此端口,那么连接将被拒绝或重置。
4.连接到 OpenSSH 服务器
Shell或PowerShell中依照下面格式“ssh domain\username@servername”输入命令,样例如下:
ssh administrator@192.168.13.142
正常输入密码即可连接上,然后就可以在控制台输入命令运行了。
参考链接:
适用于 Windows 的 OpenSSH 入门
三、OpenSSH for Windows 中基于密钥的身份验证
下面是摘抄的ssh连接的全部内容,如果只是关注linux使用ssh连接windows服务器,则只需要关注“部署公钥”相关的部分。生成公私钥可参见下面命令:
ssh-keygen -t ed25519 -C "your_email@example.com"
1.部署私钥
PowerShell脚本说明:
# By default the ssh-agent service is disabled. Configure it to start automatically.
# Make sure you're running as an Administrator.
Get-Service ssh-agent | Set-Service -StartupType Automatic

# Start the service
Start-Service ssh-agent

# This should return a status of Running
Get-Service ssh-agent

# Now load your key files into ssh-agent
ssh-add $env:USERPROFILE\.ssh\id_ed25519
将密钥添加到客户端上的 ssh-agent 后,ssh-agent 会自动检索本地私钥并将其传递给 SSH 客户端。
2.部署公钥
要使用上面创建的用户密钥,必须将公钥 (.ssh\id_ed25519.pub) 的内容作为文本文件放在服务器上。 文件的名称和位置取决于用户帐户是本地管理员组的成员还是标准用户帐户。 以下部分涵盖标准和管理用户。特别提醒,下面的PowerShell脚本,都是需要在其他windows机器的PowerShell终端上执行,实现远程配置功能。
(1)标准用户
公钥 (.ssh\id_ed25519.pub) 的内容需放置在服务器上的一个名为 authorized_keys 的文本文件中,该文件位于 C:\Users\username.ssh\。 可以使用 OpenSSH scp 安全文件传输实用工具或使用 PowerShell 将密钥写入文件来复制公钥。
以下示例将公钥复制到服务器(其中“username”替换为你的用户名)。 最初,你需要使用服务器的用户帐户的密码。
PowerShell脚本说明:
# Get the public key file generated previously on your client
$authorizedKey = Get-Content -Path $env:USERPROFILE\.ssh\id_ed25519.pub

# Generate the PowerShell to be run remote that will copy the public key file generated previously on your client to the authorized_keys file on your server
$remotePowershell = "powershell New-Item -Force -ItemType Directory -Path $env:USERPROFILE\.ssh; Add-Content -Force -Path $env:USERPROFILE\.ssh\authorized_keys -Value '$authorizedKey'"

# Connect to your server and run the PowerShell using the $remotePowerShell variable
ssh username@domain1@contoso.com $remotePowershell
(2)管理用户
公钥 (.ssh\id_ed25519.pub) 的内容需放置在服务器上的一个名为 administrators_authorized_keys 的文本文件中,该文件位于 C:\ProgramData\ssh\。 可以使用 OpenSSH scp 安全文件传输实用工具或使用 PowerShell 将密钥写入文件来复制公钥。 此文件上的 ACL 需要配置为仅允许访问管理员和系统。
以下示例将公钥复制到服务器并配置 ACL(其中“username”替换为你的用户名)。 最初,你需要使用服务器的用户帐户的密码。
备注:此示例演示了创建 administrators_authorized_keys 文件的步骤。 这仅适用于管理员帐户,并且在用户配置文件位置内的必须是用户而不是每用户文件。
PowerShell脚本说明:
# Get the public key file generated previously on your client
$authorizedKey = Get-Content -Path $env:USERPROFILE\.ssh\id_ed25519.pub

# Generate the PowerShell to be run remote that will copy the public key file generated previously on your client to the authorized_keys file on your server
$remotePowershell = "powershell Add-Content -Force -Path $env:ProgramData\ssh\administrators_authorized_keys -Value '$authorizedKey';icacls.exe ""$env:ProgramData\ssh\administrators_authorized_keys"" /inheritance:r /grant ""Administrators:F"" /grant ""SYSTEM:F"""

# Connect to your server and run the PowerShell using the $remotePowerShell variable
ssh username@domain1@contoso.com $remotePowershell
PowerShell实际样例如下:
# Get the public key file generated previously on your client
$authorizedKey = Get-Content -Path C:\Users\tom\.ssh\id_ed25519.pub

# Generate the PowerShell to be run remote that will copy the public key file generated previously on your client to the authorized_keys file on your server
$remotePowershell = "powershell Add-Content -Force -Path $env:ProgramData\ssh\administrators_authorized_keys -Value '$authorizedKey';icacls.exe ""$env:ProgramData\ssh\administrators_authorized_keys"" /inheritance:r /grant ""Administrators:F"" /grant ""SYSTEM:F"""

# Connect to your server and run the PowerShell using the $remotePowerShell variable
ssh administrator@192.168.13.142 $remotePowershell
参考链接:
OpenSSH for Windows 中基于密钥的身份验证
四、实际验证
上述步骤完成后,在配置好私钥的Wndwos或Linux机器上都可以使用下面的命令ssh远程连接Windows服务器,且不需要输入密码:
ssh administrator@192.168.13.142
五、配置rsync远程同步文件
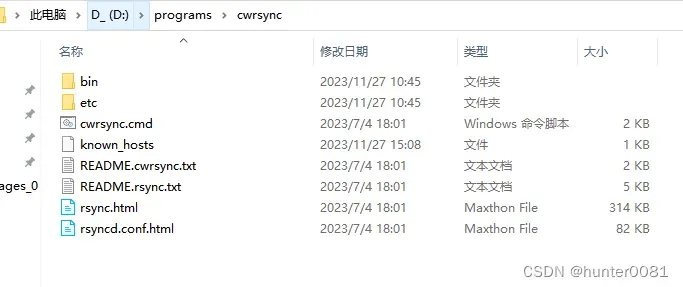
1.windows下安装cwrsync客户端
windows系统先下载cwrsync客户端(下载链接),我使用的是6.2.9版本,如果两边机器都是windows的话,则需要都安装cwrsync客户端,如解压之后统一放到“D:\programs\cwrsync”目录下,
2.配置系统环境变量
在系统环境变量中,添加CWRSYNC_HOME,值为“D:\programs\cwrsync”,并将“%CWRSYNC_HOME%\bin”添加进系统环境变量Path中,并且确保在“%SYSTEMROOT%\System32\OpenSSH\”的上面,样例如下:
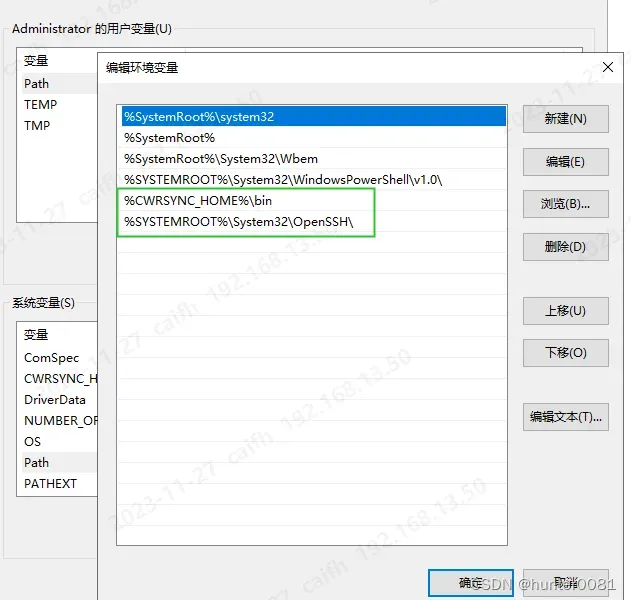
确保系统优先使用cwrsync自带的ssh.exe可执行文件。配置完毕后,远程的windows服务器,需要重启一下,rsync同步才会生效。
六、远程linux服务器配置ssh远程连接
重点是在远程linux机器对应帐号的.ssh文件夹下,将本机公钥写入authorized_keys文件中(文件属性是600),PowerShell脚本命令如下:
$publicKey = Get-Content -Path "C:\Users\tom\.ssh\id_ed25519.pub"
ssh root@192.168.13.145 "mkdir -p ~/.ssh && echo `"$publicKey`" >> ~/.ssh/authorized_keys && chmod 700 ~/.ssh && chmod 600 ~/.ssh/authorized_keys"
七、rsync执行样例
rsync使用方法可参考rsync 用法教程。
官方帮助文档。
1.linux向windows同步数据样例(默认是采取ssh模式)
如果目录不存在则先创建目录
directoryPath="D:/temp/rsync/receive"
remotePowershell="powershell if (!(Test-Path -Path $directoryPath -PathType Container)) { New-Item -ItemType Directory -Force -Path $directoryPath;Write-Host ""Directory created successfully."";} else { Write-Host ""Directory already exists."";}"
# Connect to your server and run the PowerShell using the $remotePowerShell variable
ssh administrator@192.168.13.180 $remotePowershell
从本地同步数据到远端
rsync -e ssh -avn /root/backup/goploy/ administrator@192.168.13.180:/cygdrive/D/temp/rsync/receive
rsync -avz /root/backup/goploy/ administrator@192.168.13.180:/cygdrive/D/temp/rsync/receive
rsync -e ssh -avz /root/backup/goploy/ administrator@192.168.13.180:/cygdrive/D/temp/rsync/receive
rsync -e ssh -avzn /root/backup/goploy/ administrator@192.168.13.180:/cygdrive/D/temp/rsync/receive
2.windows向linux同步数据样例
使用ssh输入密码方式远程连接目标linux机器并配置公钥PowerShell样例如下:
$publicKey = Get-Content -Path "C:\Users\tom\.ssh\id_ed25519.pub"
ssh root@192.168.13.190 "mkdir -p ~/.ssh && echo `"$publicKey`" >> ~/.ssh/authorized_keys && chmod 700 ~/.ssh && chmod 600 ~/.ssh/authorized_keys"
下面是将整个F:\temp\apk文件夹同步到远端/root/temp/what文件夹下:
ssh root@192.168.13.190 "[ ! -d /root/temp/what ] && mkdir -p /root/temp/what || echo 'already exists'"
rsync -r /cygdrive/F/temp/apk root@192.168.13.190:/root/temp/what
做整体同步:
rsync -avz /cygdrive/F/temp/apk/ --delete root@192.168.13.190:/root/temp/what
反过来,从远程服务器拷贝文件到本地(将/root/temp/what目录整体拷贝到本地):
rsync -avz root@192.168.13.190:/root/temp/what --delete /cygdrive/F/temp/apk_receive
2.windows向windows同步数据样例
先创建文件夹,再同步数据:
$directoryPath = "tom\storage"
$remotePowershell = "powershell if (!(Test-Path -Path $directoryPath -PathType Container)) { New-Item -ItemType Directory -Force -Path $directoryPath;Write-Host ""Directory created successfully."";} else { Write-Host ""Directory already exists."";}"
# Connect to your server and run the PowerShell using the $remotePowerShell variable
ssh administrator@192.168.13.180 $remotePowershell
同步数据样例:
rsync -avz -e ssh -vvv /local/path username@remotehost:/remote/path
rsync -avz -e ssh -vvv /cygdrive/F/temp/apk --delete administrator@192.168.13.180:/cygdrive/D/temp/apk
rsync -avz -e ssh -vvv /cygdrive/F/temp/apk administrator@192.168.13.180:/cygdrive/D/temp/apk
rsync -avz /cygdrive/F/temp/apk administrator@192.168.13.180:/cygdrive/D/temp/apk
版权声明:本文为博主作者:hunter0081原创文章,版权归属原作者,如果侵权,请联系我们删除!
原文链接:https://blog.csdn.net/cfh0081/article/details/134242062