记录了自己跑通Stable Diffusion的过程和踩过的坑,目前只是初步跑了一下,没有很深入的使用代码,希望能有一些参考价值。
在Windows系统运行,需要提前装好Conda
一、下载代码和模型
1、下载代码:
代码下载:代码地址
或者
git clone https://github.com/CompVis/stable-diffusion.git2、下载预训练模型:
a.下载sd-v1-4.ckpt模型
地址:模型地址
按照下列顺序点击下载模型
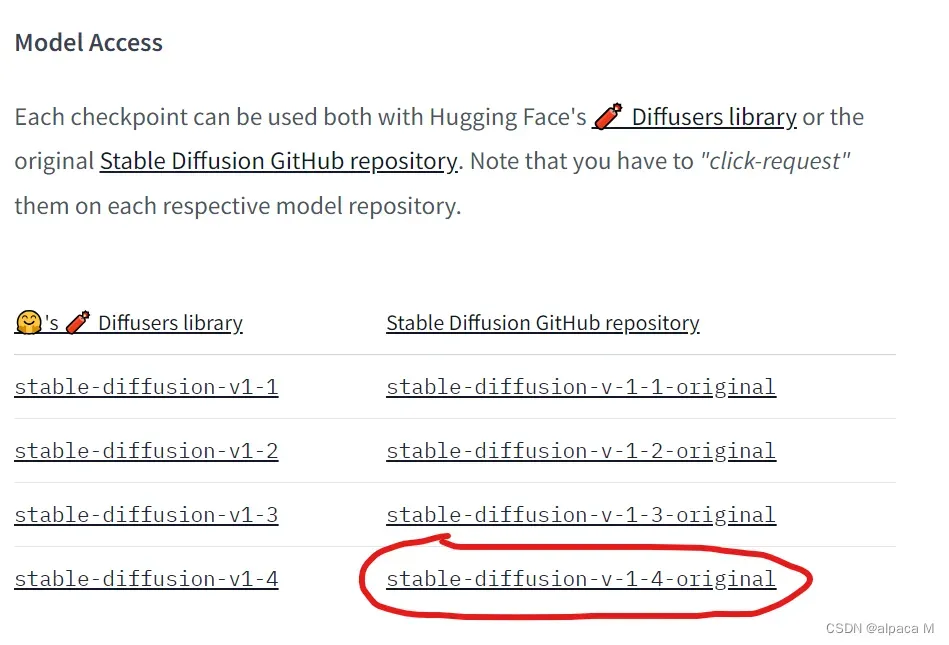

红圈模型有4G,下面的模型有7G,自行选择下载
- 在stable-diffusion-main\models\ldm路径下创建文件夹stable-diffusion-v1,将模型放在里面
- 将模型名称改为model.ckpt

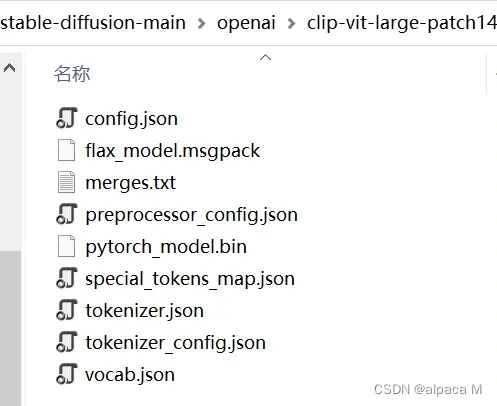
b.下载clip-vit-large-patch14模型
模型地址

下载红框内文件。
- 放置在路径stable-diffusion-main\openai\clip-vit-large-patch14下,自己创建路径。
c.下载safety_checker模型
模型地址

依旧下载红框内文件
- 文件存放在stable-diffusion-main\CompVis\stable-diffusion-safety-checker下,自行创建路径。
- 将这次下载的safety_checker_config文件命名为config.json
- 将上一块中下载的preprocessor_config.json文件粘贴过来

二、配置环境
使用conda配置环境,在Anaconda Prompt下指向stable-diffusion-main文件夹,运行:
conda env create -f environment.yaml报错:
Installing pip dependencies: - Ran pip subprocess with arguments:
['C:\Users\neals\.conda\envs\ldm\python.exe', '-m', 'pip', 'install', '-U', '-r', 'I:\tmp\sd\stable-diffusion-main\condaenv.wws0680u.requirements.txt', '--exists-action=b']
Pip subprocess output:
Obtaining taming-transformers from git+https://github.com/CompVis/taming-transformers.git@master#egg=taming-transformers (from -r I:\tmp\sd\stable-diffusion-main\condaenv.wws0680u.requirements.txt (line 17))
Cloning https://github.com/CompVis/taming-transformers.git (to revision master) to i:\tmp\sd\stable-diffusion-main\src\taming-transformers
Pip subprocess error:
ERROR: Command errored out with exit status 128: git clone -q https://github.com/CompVis/taming-transformers.git 'I:\tmp\sd\stable-diffusion-main\src\taming-transformers' Check the logs for full command output.
failed
CondaEnvException: Pip failed
将environment.yaml中的这两行删掉:
- -e git+https://github.com/CompVis/taming-transformers.git@master#egg=taming-transformers
- -e git+https://github.com/openai/CLIP.git@main#egg=clip
改用pip命令自己手动配置这两个包:
pip install taming-transformers
pip install clip
但是environment.yaml总是报错或者conda总是卡住,把文件里pip后的部分用一个requirements.txt存储,使用pip安装:(如果pytorch这些没装上就手动安装一下)
pip install -r requirements.txt下载太慢就给pip配上清华源,教程
三、运行代码
我运行的是文本生成图像任务,在终端中输入指令:
python scripts/txt2img.py --prompt "a photograph of an astronaut riding a horse" --plms 运气好的话直接就能生成图像,生成的图像存储在outputs\txt2img-samples\samples下。
报错 ModuleNotFoundError: No module named ‘ldm’:
这里报错的ldm是指stable-diffusion-main文件夹下的ldm文件夹。
解决方法:
将scripts文件夹下的所有内容复制到stable-diffusion-main文件夹下,指令改为:
python txt2img.py --prompt "a photograph of an astronaut riding a horse" --plms 报错 ImportError: cannot import name ‘VectorQuantizer2’ from ‘taming.modules.vqvae.quantize’
原因:taming库的版本问题
解决方法:
将stable-diffusion-main\ldm\models下的autoencoder.py中的:
from taming.modules.vqvae.quantize import VectorQuantizer2 as VectorQuantizer改为:
from taming.modules.vqvae.quantize import VectorQuantizer报错:RuntimeError: CUDA out of memory.
原因:显卡的内存不够
可能的解决方法:
在终端里使用指令:
python txt2img.py --prompt "a photograph of an astronaut riding a horse" --plms --n_samples 1设置n_samples=1运行,或者在txt2img.py文件中修改这个参数为1。
n_samples的注释是:how many samples to produce for each given prompt. A.k.a. batch size
如果更改后还是内存不够,可以去看看有没有什么其他的参数可以修改,试试能不能减少显卡用量。
报错couldn’t connect to ‘https://huggingface.co’
原因:没有搜索到本地下载好的模型,试图连接https://huggingface.co失败
检查模型是否下好了,位置和命名是否正确。
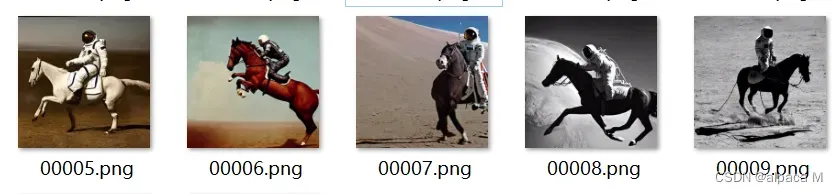
跑通后的生成的一些图像:
参考链接,感谢大佬们的指点:
AIGC:文生图模型Stable Diffusion-CSDN博客
latent diffusion model 复现问题记录-CSDN博客
Diffusion程序调试相关问题汇总-CSDN博客
版权声明:本文为博主作者:alpaca M原创文章,版权归属原作者,如果侵权,请联系我们删除!
原文链接:https://blog.csdn.net/m0_57530926/article/details/134899271