最近生产系统系统需要使用MySQL5.7版本的数据库,而Ubuntu20.04默认是8.0的版本,折腾了一段时间后,测试了3中方法,在实际应用环境中测试成功,因此发布出来给大家参考。建议使用方案三方式部署,乐意折腾的可以试试方案二和方案一!
方案一
采用更换镜像源的方式进行安装部署。
1.更换镜像源
sudo cp /etc/apt/sources.list /etc/apt/sources.list.old     #备份原来的文件
sudo vim /etc/apt/sources.list      #修改sources.list文件
配置文件内容如下所示:
#清华镜像源
deb https://mirrors.tuna.tsinghua.edu.cn/ubuntu/ xenial main restricted universe multiverse
deb-src https://mirrors.tuna.tsinghua.edu.cn/ubuntu/ xenial main restricted universe multiverse
deb https://mirrors.tuna.tsinghua.edu.cn/ubuntu/ xenial-updates main restricted universe multiverse
deb-src https://mirrors.tuna.tsinghua.edu.cn/ubuntu/ xenial-updates main restricted universe multiverse
deb https://mirrors.tuna.tsinghua.edu.cn/ubuntu/ xenial-backports main restricted universe multiverse
deb-src https://mirrors.tuna.tsinghua.edu.cn/ubuntu/ xenial-backports main restricted universe multiverse
deb https://mirrors.tuna.tsinghua.edu.cn/ubuntu/ xenial-security main restricted universe multiverse
2.更新
sudo apt update # 更新镜像源3.安装MySQL5.7(需要输入两次mysql的root用户的密码)
安装记录如下所示
root@zgk-Ubuntu-T01:~# sudo apt install -y mysql-server-5.7
正在读取软件包列表... 完成
正在分析软件包的依赖关系树
正在读取状态信息... 完成
有一些软件包无法被安装。如果您用的是 unstable 发行版,这也许是
因为系统无法达到您要求的状态造成的。该版本中可能会有一些您需要的软件
包尚未被创建或是它们已被从新到(Incoming)目录移出。
下列信息可能会对解决问题有所帮助:
下列软件包有未满足的依赖关系:
 mysql-server-5.7 : 依赖: mysql-client-5.7 (>= 5.7.33-0ubuntu0.16.04.1) 但是它将不会被安装
E: 无法修正错误,因为您要求某些软件包保持现状,就是它们破坏了软件包间的依赖关系。
root@zgk-Ubuntu-T01:~# sudo apt install -y mysql-client-5.7
正在读取软件包列表... 完成
正在分析软件包的依赖关系树
正在读取状态信息... 完成
有一些软件包无法被安装。如果您用的是 unstable 发行版,这也许是
因为系统无法达到您要求的状态造成的。该版本中可能会有一些您需要的软件
包尚未被创建或是它们已被从新到(Incoming)目录移出。
下列信息可能会对解决问题有所帮助:
下列软件包有未满足的依赖关系:
 mysql-client-5.7 : 依赖: mysql-client-core-5.7 但是它将不会被安装
E: 无法修正错误,因为您要求某些软件包保持现状,就是它们破坏了软件包间的依赖关系。
root@zgk-Ubuntu-T01:~# sudo apt install -y mysql-client-core-5.7
正在读取软件包列表... 完成
正在分析软件包的依赖关系树
正在读取状态信息... 完成
有一些软件包无法被安装。如果您用的是 unstable 发行版,这也许是
因为系统无法达到您要求的状态造成的。该版本中可能会有一些您需要的软件
包尚未被创建或是它们已被从新到(Incoming)目录移出。
下列信息可能会对解决问题有所帮助:
下列软件包有未满足的依赖关系:
 mysql-client-core-5.7 : 依赖: libtinfo5 (>= 6) 但是它将不会被安装
E: 无法修正错误,因为您要求某些软件包保持现状,就是它们破坏了软件包间的依赖关系。
root@zgk-Ubuntu-T01:~# sudo apt install libtinfo5
正在读取软件包列表... 完成
正在分析软件包的依赖关系树
正在读取状态信息... 完成
下列软件包将被【卸载】:
  ncurses-base ncurses-term
下列【新】软件包将被安装:
  libtinfo5
【警告】:下列基础软件包将被卸载。
请勿尝试,除非您确实知道您在做什么!
  ncurses-base
升级了 0 个软件包,新安装了 1 个软件包,要卸载 2 个软件包,有 1 个软件包未被升级。
需要下载 76.8 kB 的归档。
解压缩后将会空出 4,194 kB 的空间。
您的操作有潜在的危害性。
若要继续,请输入下面的短句“是,按我说的做!”
 ?] 是,按我说的做!
获取:1 https://mirrors.tuna.tsinghua.edu.cn/ubuntu xenial/main amd64 libtinfo5 amd64 6.0+20160213-1ubuntu1 [76.8 kB]
已下载 76.8 kB,耗时 1秒 (51.4 kB/s)

(正在读取数据库 ... 系统当前共安装有 187784 个文件和目录。)
正在卸载 ncurses-term (6.2-0ubuntu2) ...
dpkg: 警告: 由于开启了 --force 选项,以下问题被忽略:
dpkg: 警告: 这是一个至关重要的软件包;您不应当把它卸载。
正在卸载 ncurses-base (6.2-0ubuntu2) ...
正在选中未选择的软件包 libtinfo5:amd64。
(正在读取数据库 ... 系统当前共安装有 184914 个文件和目录。)
准备解压 .../libtinfo5_6.0+20160213-1ubuntu1_amd64.deb  ...
正在解压 libtinfo5:amd64 (6.0+20160213-1ubuntu1) ...
正在设置 libtinfo5:amd64 (6.0+20160213-1ubuntu1) ...
正在处理用于 libc-bin (2.31-0ubuntu9.2) 的触发器 ...

root@zgk-Ubuntu-T01:~# sudo apt install -y mysql-client-core-5.7
正在读取软件包列表... 完成
正在分析软件包的依赖关系树
正在读取状态信息... 完成
将会同时安装下列软件:
  libaio1 libssl1.0.0
下列【新】软件包将被安装:
  libaio1 libssl1.0.0 mysql-client-core-5.7
升级了 0 个软件包,新安装了 3 个软件包,要卸载 0 个软件包,有 1 个软件包未被升级。
需要下载 7,343 kB 的归档。
解压缩后会消耗 34.4 MB 的额外空间。
获取:1 https://mirrors.tuna.tsinghua.edu.cn/ubuntu xenial-updates/main amd64 libssl1.0.0 amd64 1.0.2g-1ubuntu4.20 [1,083 kB]
获取:2 https://mirrors.tuna.tsinghua.edu.cn/ubuntu xenial/main amd64 libaio1 amd64 0.3.110-2 [6,356 B]
获取:3 https://mirrors.tuna.tsinghua.edu.cn/ubuntu xenial-updates/main amd64 mysql-client-core-5.7 amd64 5.7.33-0ubuntu0.16.04.1 [6,254 kB]
已下载 7,343 kB,耗时 8秒 (932 kB/s)
正在预设定软件包 ...

正在选中未选择的软件包 libssl1.0.0:amd64。
(正在读取数据库 ... 系统当前共安装有 184922 个文件和目录。)
准备解压 .../libssl1.0.0_1.0.2g-1ubuntu4.20_amd64.deb  ...
正在解压 libssl1.0.0:amd64 (1.0.2g-1ubuntu4.20) ...
正在选中未选择的软件包 libaio1:amd64。
准备解压 .../libaio1_0.3.110-2_amd64.deb  ...
正在解压 libaio1:amd64 (0.3.110-2) ...
正在选中未选择的软件包 mysql-client-core-5.7。
准备解压 .../mysql-client-core-5.7_5.7.33-0ubuntu0.16.04.1_amd64.deb  ...
正在解压 mysql-client-core-5.7 (5.7.33-0ubuntu0.16.04.1) ...
正在设置 libssl1.0.0:amd64 (1.0.2g-1ubuntu4.20) ...
正在设置 libaio1:amd64 (0.3.110-2) ...
正在设置 mysql-client-core-5.7 (5.7.33-0ubuntu0.16.04.1) ...
正在处理用于 man-db (2.9.1-1) 的触发器 ...
正在处理用于 libc-bin (2.31-0ubuntu9.2) 的触发器 ...

root@zgk-Ubuntu-T01:~# sudo apt install -y mysql-client-core-5.7
正在读取软件包列表... 完成
正在分析软件包的依赖关系树
正在读取状态信息... 完成
mysql-client-core-5.7 已经是最新版 (5.7.33-0ubuntu0.16.04.1)。
升级了 0 个软件包,新安装了 0 个软件包,要卸载 0 个软件包,有 1 个软件包未被升级。
root@zgk-Ubuntu-T01:~# sudo apt install -y mysql-server-5.7
正在读取软件包列表... 完成
正在分析软件包的依赖关系树
正在读取状态信息... 完成
将会同时安装下列软件:
  initscripts insserv libcgi-pm-perl libhtml-template-perl mysql-client-5.7
  mysql-server-core-5.7 sysv-rc
建议安装:
  bootchart2 libipc-sharedcache-perl mailx tinyca bum
推荐安装:
  libcgi-fast-perl
下列【新】软件包将被安装:
  initscripts insserv libcgi-pm-perl libhtml-template-perl mysql-client-5.7
  mysql-server-5.7 mysql-server-core-5.7 sysv-rc
升级了 0 个软件包,新安装了 8 个软件包,要卸载 0 个软件包,有 1 个软件包未被升级。
需要下载 11.4 MB 的归档。
解压缩后会消耗 126 MB 的额外空间。
获取:1 https://mirrors.tuna.tsinghua.edu.cn/ubuntu xenial/main amd64 insserv amd64 1.14.0-5ubuntu3 [38.2 kB]
获取:2 https://mirrors.tuna.tsinghua.edu.cn/ubuntu xenial/main amd64 sysv-rc all 2.88dsf-59.3ubuntu2 [18.2 kB]
获取:3 https://mirrors.tuna.tsinghua.edu.cn/ubuntu xenial/main amd64 initscripts amd64 2.88dsf-59.3ubuntu2 [24.4 kB]
获取:4 https://mirrors.tuna.tsinghua.edu.cn/ubuntu xenial-updates/main amd64 mysql-client-5.7 amd64 5.7.33-0ubuntu0.16.04.1 [1,430 kB]
获取:5 https://mirrors.tuna.tsinghua.edu.cn/ubuntu xenial-updates/main amd64 mysql-server-core-5.7 amd64 5.7.33-0ubuntu0.16.04.1 [7,215 kB]
获取:6 https://mirrors.tuna.tsinghua.edu.cn/ubuntu xenial-updates/main amd64 mysql-server-5.7 amd64 5.7.33-0ubuntu0.16.04.1 [2,423 kB]
获取:7 https://mirrors.tuna.tsinghua.edu.cn/ubuntu xenial/main amd64 libcgi-pm-perl all 4.26-1 [185 kB]
获取:8 https://mirrors.tuna.tsinghua.edu.cn/ubuntu xenial/main amd64 libhtml-template-perl all 2.95-2 [60.4 kB]
已下载 11.4 MB,耗时 32秒 (351 kB/s)
正在预设定软件包 ...
软件包设置
   ┌──────────────────────────┤ 正在设定 mysql-server-5.7 ├──────────────────────────┐
   │ While not mandatory, it is highly recommended that you set a password for the   │
   │ MySQL administrative "root" user.                                               │
   │                                                                                 │
   │ If this field is left blank, the password will not be changed.                  │
   │                                                                                 │
   │ New password for the MySQL "root" user:                                         │
   │                                                                                 │
   │ *********______________________________________________________________________ │
   │                                                                                 │
   │                                     <确定>                                      │
   │                                                                                 │
   └─────────────────────────────────────────────────────────────────────────────────┘
软件包设置
                     ┌────────┤ 正在设定 mysql-server-5.7 ├────────┐
                     │                                             │
                     │                                             │
                     │ Repeat password for the MySQL "root" user:  │
                     │                                             │
                     │ *********__________________________________ │
                     │                                             │
                     │                   <确定>                    │
                     │                                             │
                     └─────────────────────────────────────────────┘
正在选中未选择的软件包 insserv。
(正在读取数据库 ... 系统当前共安装有 184958 个文件和目录。)
准备解压 .../0-insserv_1.14.0-5ubuntu3_amd64.deb  ...
正在解压 insserv (1.14.0-5ubuntu3) ...
正在选中未选择的软件包 sysv-rc。
准备解压 .../1-sysv-rc_2.88dsf-59.3ubuntu2_all.deb  ...
正在解压 sysv-rc (2.88dsf-59.3ubuntu2) ...
正在选中未选择的软件包 initscripts。
准备解压 .../2-initscripts_2.88dsf-59.3ubuntu2_amd64.deb  ...
正在解压 initscripts (2.88dsf-59.3ubuntu2) ...
被已安装的软件包 sysvinit-utils (2.96-2.1ubuntu1) 中的文件替换了...
正在选中未选择的软件包 mysql-client-5.7。
准备解压 .../3-mysql-client-5.7_5.7.33-0ubuntu0.16.04.1_amd64.deb  ...
正在解压 mysql-client-5.7 (5.7.33-0ubuntu0.16.04.1) ...
正在选中未选择的软件包 mysql-server-core-5.7。
准备解压 .../4-mysql-server-core-5.7_5.7.33-0ubuntu0.16.04.1_amd64.deb  ...
正在解压 mysql-server-core-5.7 (5.7.33-0ubuntu0.16.04.1) ...
正在选中未选择的软件包 mysql-server-5.7。
准备解压 .../5-mysql-server-5.7_5.7.33-0ubuntu0.16.04.1_amd64.deb  ...
正在解压 mysql-server-5.7 (5.7.33-0ubuntu0.16.04.1) ...
正在选中未选择的软件包 libcgi-pm-perl。
准备解压 .../6-libcgi-pm-perl_4.26-1_all.deb  ...
正在解压 libcgi-pm-perl (4.26-1) ...
正在选中未选择的软件包 libhtml-template-perl。
准备解压 .../7-libhtml-template-perl_2.95-2_all.deb  ...
正在解压 libhtml-template-perl (2.95-2) ...
正在设置 mysql-client-5.7 (5.7.33-0ubuntu0.16.04.1) ...
正在设置 libcgi-pm-perl (4.26-1) ...
正在设置 mysql-server-core-5.7 (5.7.33-0ubuntu0.16.04.1) ...
正在设置 libhtml-template-perl (2.95-2) ...
正在设置 insserv (1.14.0-5ubuntu3) ...
正在设置 sysv-rc (2.88dsf-59.3ubuntu2) ...
正在设置 initscripts (2.88dsf-59.3ubuntu2) ...
正在设置 mysql-server-5.7 (5.7.33-0ubuntu0.16.04.1) ...
update-alternatives: 使用 /etc/mysql/mysql.cnf 来在自动模式中提供 /etc/mysql/my.cnf (my.cnf)
Renaming removed key_buffer and myisam-recover options (if present)
Created symlink /etc/systemd/system/multi-user.target.wants/mysql.service → /lib/systemd/system/mysql.service.
正在处理用于 man-db (2.9.1-1) 的触发器 ...
正在处理用于 systemd (245.4-4ubuntu3.15) 的触发器 ...
4、安装完成,查看MySQL的版本
root@zgk-Ubuntu-T01:~# mysql -V    # 查看mysql版本
mysql  Ver 14.14 Distrib 5.7.33, for Linux (x86_64) using  EditLine wrapper
5、连接MySQL(使用root和刚才设置的root的密码)
后面重启系统后,发现键盘“Backspace”和方向键出现异常,切换到系统桌面终端任有此现象。
方案二
采用在线安装方式进行。
1、下载deb文件并配置
如果你选择下载mysql-apt-config_0.8.xx-1.all.deb文件,到这里下载,选择一个版本,然后下载到ubuntu中,然后就可以dpkg -i运行,进行配置mysql-server的源。
安装记录如下所示 :
root@zgk-Ubuntu-T01:~# wget https://repo.mysql.com//mysql-apt-config_0.8.12-1_all.deb
--2022-12-09 17:05:27--  https://repo.mysql.com//mysql-apt-config_0.8.12-1_all.deb
正在解析主机 repo.mysql.com (repo.mysql.com)... 96.16.68.238
正在连接 repo.mysql.com (repo.mysql.com)|96.16.68.238|:443... 已连接。
已发出 HTTP 请求,正在等待回应... 200 OK
长度: 36306 (35K) [application/x-debian-package]
正在保存至: “mysql-apt-config_0.8.12-1_all.deb”

mysql-apt-config_0.8.1 100%[=========================>]  35.46K   187KB/s    用时 0.2s

2022-12-09 17:05:28 (187 KB/s) - 已保存 “mysql-apt-config_0.8.12-1_all.deb” [36306/36306])

root@zgk-Ubuntu-T01:~# sudo dpkg -i mysql-apt-config_0.8.12-1_all.deb
正在选中未选择的软件包 mysql-apt-config。
(正在读取数据库 ... 系统当前共安装有 187436 个文件和目录。)
准备解压 mysql-apt-config_0.8.12-1_all.deb  ...
正在解压 mysql-apt-config (0.8.12-1) ...
正在设置 mysql-apt-config (0.8.12-1) ...
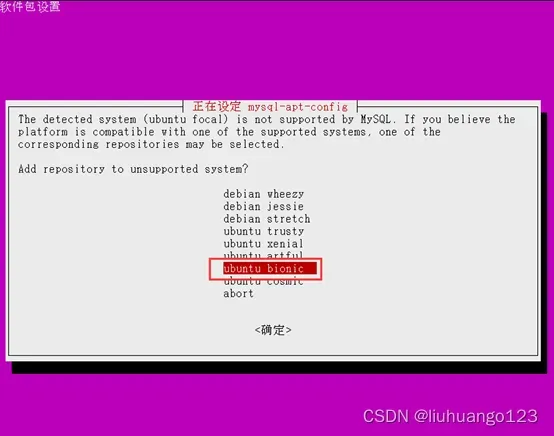
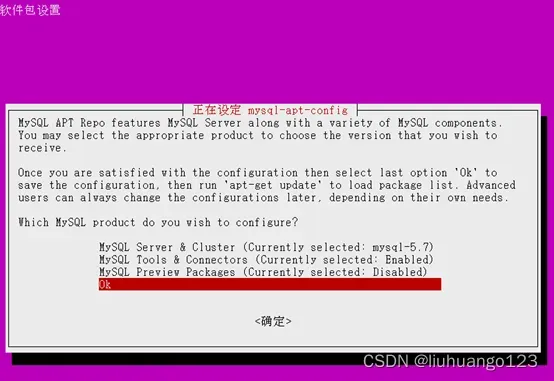
执行这一步最好在机器上运行,在终端工具上,有可能显示不了选项,我使用xshell可以正常。 这个弹出框里,我选择的是“ubuntu bionic”。
之后单击“确定”选项,进入下一个选项,此处默认为第一项,我们在第一项上,回车。
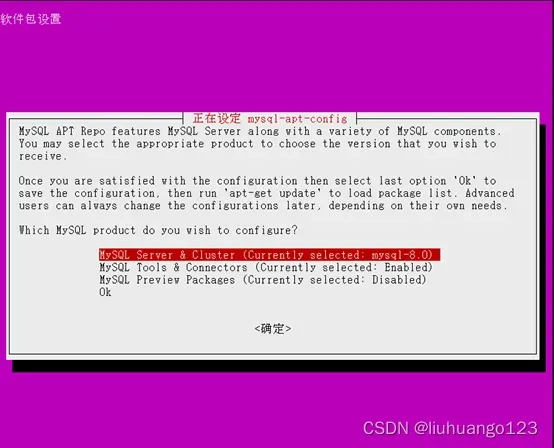
在出来的选项中,我们就可以选择mysql-5.7了,在“mysq-5.7”上回车。
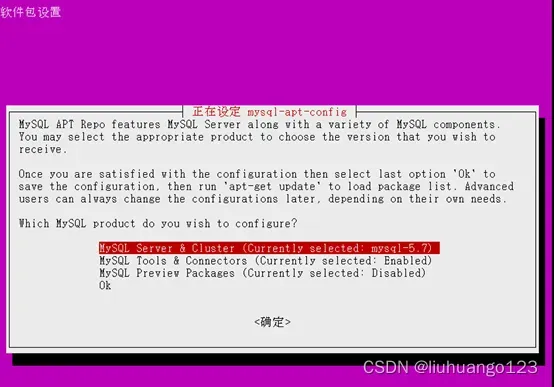
回车后,系统自动显示我们选择的5.7的选项,通过键盘,选择“ok”,然后回车确定。
配置结束后,运行update更新。
root@zgk-Ubuntu-T01:~# apt update
命中:1 http://mirrors.aliyun.com/ubuntu focal InRelease
获取:2 http://mirrors.aliyun.com/ubuntu focal-updates InRelease [114 kB]
获取:3 http://repo.mysql.com/apt/ubuntu bionic InRelease [20.0 kB]
错误:3 http://repo.mysql.com/apt/ubuntu bionic InRelease
  由于没有公钥,无法验证下列签名: NO_PUBKEY 467B942D3A79BD29
获取:4 http://mirrors.aliyun.com/ubuntu focal-backports InRelease [108 kB]
获取:5 http://mirrors.aliyun.com/ubuntu focal-security InRelease [114 kB]
获取:6 http://mirrors.aliyun.com/ubuntu focal-updates/main i386 Packages [761 kB]
获取:7 http://mirrors.aliyun.com/ubuntu focal-updates/main amd64 Packages [2,267 kB]
获取:8 http://mirrors.aliyun.com/ubuntu focal-updates/main amd64 DEP-11 Metadata [275 kB]
获取:9 http://mirrors.aliyun.com/ubuntu focal-updates/universe amd64 Packages [1,009 kB]
获取:10 http://mirrors.aliyun.com/ubuntu focal-updates/universe i386 Packages [705 kB]
获取:11 http://mirrors.aliyun.com/ubuntu focal-updates/universe amd64 DEP-11 Metadata [408 kB]
获取:12 http://mirrors.aliyun.com/ubuntu focal-updates/multiverse amd64 DEP-11 Metadata [940 B]
获取:13 http://mirrors.aliyun.com/ubuntu focal-backports/main amd64 DEP-11 Metadata [7,940 B]
获取:14 http://mirrors.aliyun.com/ubuntu focal-backports/universe amd64 DEP-11 Metadata [30.5 kB]
获取:15 http://mirrors.aliyun.com/ubuntu focal-security/main amd64 DEP-11 Metadata [40.7 kB]
获取:16 http://mirrors.aliyun.com/ubuntu focal-security/universe amd64 DEP-11 Metadata [93.9 kB]
获取:17 http://mirrors.aliyun.com/ubuntu focal-security/multiverse amd64 DEP-11 Metadata [940 B]
正在读取软件包列表... 完成
W: GPG 错误:http://repo.mysql.com/apt/ubuntu bionic InRelease: 由于没有公钥,无法验证下列签名: NO_PUBKEY 467B942D3A79BD29
E: 仓库 “http://repo.mysql.com/apt/ubuntu bionic InRelease” 没有数字签名。
N: 无法安全地用该源进行更新,所以默认禁用该源。
提示没有公钥,因此我们最好安装公钥。
root@zgk-Ubuntu-T01:~# sudo apt-key adv --keyserver keyserver.ubuntu.com --recv-keys 467B942D3A79BD29
Executing: /tmp/apt-key-gpghome.6S4Xo2qxW8/gpg.1.sh --keyserver keyserver.ubuntu.com --recv-keys 467B942D3A79BD29
gpg: 密钥 467B942D3A79BD29:公钥 “MySQL Release Engineering <mysql-build@oss.oracle.com>” 已导入
gpg: 处理的总数:1
gpg:               已导入:1
执行成功后,继续执行“apt update”,运行正常,接下来可以正常安装。
2、安装mysq-5.7
此时,在/etc/apt/source.list.d/目录下生成mysql.list,更新完成,我们通过apt-cache policy mysql-server可以查看到,系统中出现了mysql5.7的源。
root@zgk-Ubuntu-T01:~# apt-cache policy mysql-server
mysql-server:
  已安装:(无)
  候选: 8.0.31-0ubuntu0.20.04.2
  版本列表:
     8.0.31-0ubuntu0.20.04.2 500
        500 http://mirrors.aliyun.com/ubuntu focal-updates/main amd64 Packages
        500 http://mirrors.aliyun.com/ubuntu focal-updates/main i386 Packages
     8.0.31-0ubuntu0.20.04.1 500
        500 http://mirrors.aliyun.com/ubuntu focal-security/main amd64 Packages
        500 http://mirrors.aliyun.com/ubuntu focal-security/main i386 Packages
     8.0.19-0ubuntu5 500
        500 http://mirrors.aliyun.com/ubuntu focal/main amd64 Packages
        500 http://mirrors.aliyun.com/ubuntu focal/main i386 Packages
     5.7.40-1ubuntu18.04 500
        500 http://repo.mysql.com/apt/ubuntu bionic/mysql-5.7 amd64 Packages
2.1安装mysql-client
root@zgk-Ubuntu-T01:~# sudo apt install mysql-client=5.7.40-1ubuntu18.04
正在读取软件包列表... 完成
正在分析软件包的依赖关系树
正在读取状态信息... 完成
将会同时安装下列软件:
  libaio1 libtinfo5 mysql-community-client
下列【新】软件包将被安装:
  libaio1 libtinfo5 mysql-client mysql-community-client
升级了 0 个软件包,新安装了 4 个软件包,要卸载 0 个软件包,有 87 个软件包未被升级。
需要下载 15.4 MB 的归档。
解压缩后会消耗 98.9 MB 的额外空间。
您希望继续执行吗? [Y/n] y
获取:1 http://mirrors.aliyun.com/ubuntu focal/main amd64 libaio1 amd64 0.3.112-5 [7,184 B]
获取:2 http://mirrors.aliyun.com/ubuntu focal/universe amd64 libtinfo5 amd64 6.2-0ubuntu2 [83.0 kB]
获取:3 http://repo.mysql.com/apt/ubuntu bionic/mysql-5.7 amd64 mysql-community-client amd64 5.7.40-1ubuntu18.04 [15.2 MB]
获取:4 http://repo.mysql.com/apt/ubuntu bionic/mysql-5.7 amd64 mysql-client amd64 5.7.40-1ubuntu18.04 [69.6 kB]
已下载 15.4 MB,耗时 4秒 (3,539 kB/s)
正在选中未选择的软件包 libaio1:amd64。
(正在读取数据库 ... 系统当前共安装有 187441 个文件和目录。)
准备解压 .../libaio1_0.3.112-5_amd64.deb  ...
正在解压 libaio1:amd64 (0.3.112-5) ...
正在选中未选择的软件包 libtinfo5:amd64。
准备解压 .../libtinfo5_6.2-0ubuntu2_amd64.deb  ...
正在解压 libtinfo5:amd64 (6.2-0ubuntu2) ...
正在选中未选择的软件包 mysql-community-client。
准备解压 .../mysql-community-client_5.7.40-1ubuntu18.04_amd64.deb  ...
正在解压 mysql-community-client (5.7.40-1ubuntu18.04) ...
正在选中未选择的软件包 mysql-client。
准备解压 .../mysql-client_5.7.40-1ubuntu18.04_amd64.deb  ...
正在解压 mysql-client (5.7.40-1ubuntu18.04) ...
正在设置 libaio1:amd64 (0.3.112-5) ...
正在设置 libtinfo5:amd64 (6.2-0ubuntu2) ...
正在设置 mysql-community-client (5.7.40-1ubuntu18.04) ...
正在设置 mysql-client (5.7.40-1ubuntu18.04) ...
正在处理用于 man-db (2.9.1-1) 的触发器 ...
正在处理用于 libc-bin (2.31-0ubuntu9.7) 的触发器 ...
root@zgk-Ubuntu-T01:~# sudo apt install mysql-community=5.7.40-1ubuntu18.04
正在读取软件包列表... 完成
正在分析软件包的依赖关系树
正在读取状态信息... 完成
2.2安装mysql-community-server
root@zgk-Ubuntu-T01:~# sudo apt install mysql-community-server=5.7.40-1ubuntu18.04
正在读取软件包列表... 完成
正在分析软件包的依赖关系树
正在读取状态信息... 完成
将会同时安装下列软件:
libmecab2
下列【新】软件包将被安装:
libmecab2 mysql-community-server
升级了 0 个软件包,新安装了 2 个软件包,要卸载 0 个软件包,有 88 个软件包未被升级。
需要下载 40.1 MB 的归档。
解压缩后会消耗 229 MB 的额外空间。
您希望继续执行吗? [Y/n] y
获取:1 http://mirrors.aliyun.com/ubuntu focal/main amd64 libmecab2 amd64 0.996-10build1 [233 kB]
获取:2 http://repo.mysql.com/apt/ubuntu bionic/mysql-5.7 amd64 mysql-community-server amd64 5.7.40-1ubuntu18.04 [39.8 MB]
已下载 40.1 MB,耗时 5秒 (8,313 kB/s)
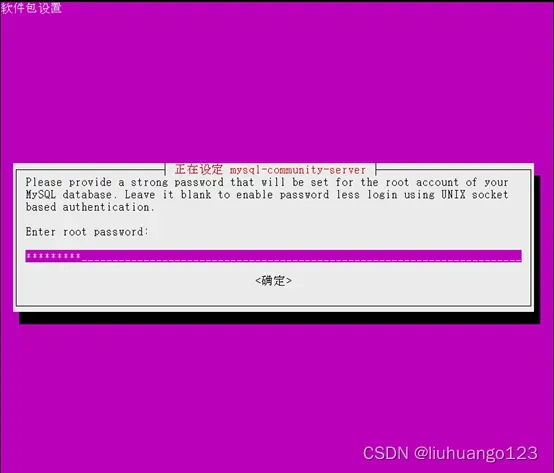
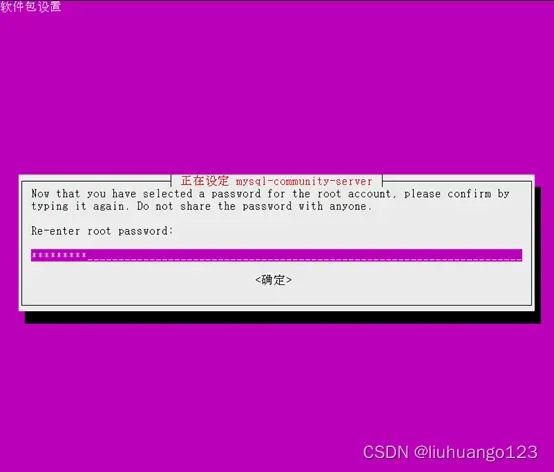
正在预设定软件包 ...
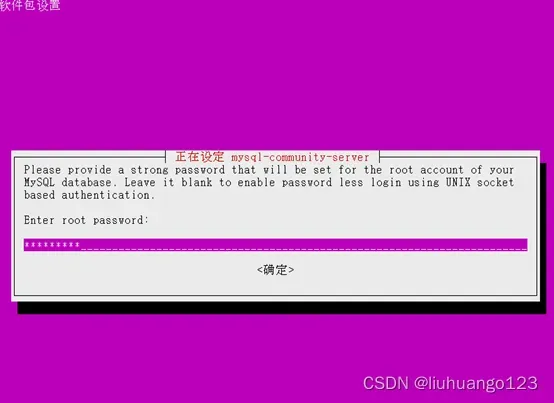
设置mysq的root密码,并进行二次密码确认

正在选中未选择的软件包 libmecab2:amd64。
(正在读取数据库 ... 系统当前共安装有 187517 个文件和目录。)
准备解压 .../libmecab2_0.996-10build1_amd64.deb  ...
正在解压 libmecab2:amd64 (0.996-10build1) ...
正在选中未选择的软件包 mysql-community-server。
准备解压 .../mysql-community-server_5.7.40-1ubuntu18.04_amd64.deb  ...
正在解压 mysql-community-server (5.7.40-1ubuntu18.04) ...
正在设置 libmecab2:amd64 (0.996-10build1) ...
正在设置 mysql-community-server (5.7.40-1ubuntu18.04) ...
update-alternatives: 使用 /etc/mysql/mysql.cnf 来在自动模式中提供 /etc/mysql/my.cnf (my.cnf)
Created symlink /etc/systemd/system/multi-user.target.wants/mysql.service → /lib/systemd/system/mysql.service.
正在处理用于 systemd (245.4-4ubuntu3.15) 的触发器 ...
正在处理用于 man-db (2.9.1-1) 的触发器 ...
正在处理用于 libc-bin (2.31-0ubuntu9.7) 的触发器 ...
2.3安装mysql-server
root@zgk-Ubuntu-T01:~# sudo apt install mysql-server=5.7.40-1ubuntu18.04
正在读取软件包列表... 完成
正在分析软件包的依赖关系树
正在读取状态信息... 完成
下列【新】软件包将被安装:
  mysql-server
升级了 0 个软件包,新安装了 1 个软件包,要卸载 0 个软件包,有 88 个软件包未被升级。
需要下载 69.6 kB 的归档。
解压缩后会消耗 79.9 kB 的额外空间。
获取:1 http://repo.mysql.com/apt/ubuntu bionic/mysql-5.7 amd64 mysql-server amd64 5.7.40-1ubuntu18.04 [69.6 kB]
已下载 69.6 kB,耗时 1秒 (98.2 kB/s)
正在选中未选择的软件包 mysql-server。
(正在读取数据库 ... 系统当前共安装有 187685 个文件和目录。)
准备解压 .../mysql-server_5.7.40-1ubuntu18.04_amd64.deb  ...
正在解压 mysql-server (5.7.40-1ubuntu18.04) ...
正在设置 mysql-server (5.7.40-1ubuntu18.04) ...
3、验证并测试
安装完成后,通过“dpkg -l | grep mysql”命令可以看到mysql的版本为5.7.40
root@zgk-Ubuntu-T01:~# dpkg -l | grep mysql
ii  libmysqlclient21:amd64                     8.0.31-0ubuntu0.20.04.1               amd64        MySQL database client library
ii  mysql-apt-config                           0.8.12-1                              all          Auto configuration for MySQL APT Repo.
ii  mysql-client                               5.7.40-1ubuntu18.04                   amd64        MySQL Client meta package depending on latest version
ii  mysql-common                               5.8+1.0.5ubuntu2                      all          MySQL database common files, e.g. /etc/mysql/my.cnf
ii  mysql-community-client                     5.7.40-1ubuntu18.04                   amd64        MySQL Client
ii  mysql-community-server                     5.7.40-1ubuntu18.04                   amd64        MySQL Server
ii  mysql-server                               5.7.40-1ubuntu18.04                   amd64        MySQL Server meta package depending on latest version
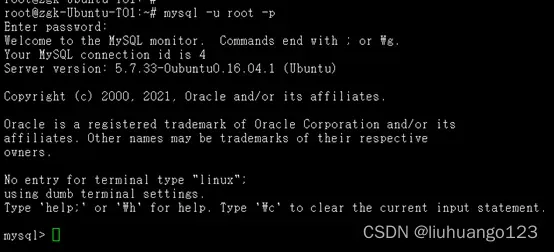
通过“mysql -u root -p”输入密码后,正常进入数据库
root@zgk-Ubuntu-T01:~# mysql -u root -p
Enter password:
Welcome to the MySQL monitor.  Commands end with ; or \g.
Your MySQL connection id is 3
Server version: 5.7.40 MySQL Community Server (GPL)

Copyright (c) 2000, 2022, Oracle and/or its affiliates.

Oracle is a registered trademark of Oracle Corporation and/or its
affiliates. Other names may be trademarks of their respective
owners.

Type 'help;' or '\h' for help. Type '\c' to clear the current input statement.

mysql> quit
系统重启后,一切正常!无方案一的重启后,键盘“Backspace”和方向键出现故障的现象。
方案三
采用源码包安装方式。
1、准备源码包与环境
提前通过如下方式下载包并解压,删除两个带test名称的deb文件。
wget https://dev.mysql.com/get/Downloads/MySQL-5.7/mysql-server_5.7.31-1ubuntu18.04_amd64.deb-bundle.tar
tar -xvf mysql-server_5.7.31-1ubuntu18.04_amd64.deb-bundle.tar
rm -f mysql-testsuite_5.7.31-1ubuntu18.04_amd64.deb
rm -f mysql-community-test_5.7.30-1ubuntu18.04_amd64.deb
依赖包可以去阿里巴巴开源镜像站-阿里云官网开发者社区_云计算社区提供全面,高效和稳定的系统镜像、应用软件下载、域名解析和时间同步服务
1.1安装步骤
1)本方案采用先装如下安装包
libmysqlclient20_5.7.31-1ubuntu18.04_amd64.deb
libmysqlclient-dev_5.7.31-1ubuntu18.04_amd64.deb
libmysqld-dev_5.7.31-1ubuntu18.04_amd64.deb
mysql-common_5.7.31-1ubuntu18.04_amd64.deb
2)再安装如下安装包(在安装“mysql-community-client_5.7.31-1ubuntu18.04_amd64.deb”包时提示依赖关系存在问题,参考“2、处理依赖关系”,并安装好几个依赖包,采用离线方式安装的话,可以去阿里镜像源上下载匹配的包,本方案中使用amd64,所以下载了“libaio1_0.3.112-5_amd64.deb”、“libmecab2_0.996-10build1_amd64.deb”、“libtinfo5_6.2-0ubuntu2_amd64.deb”三个依赖包)
mysql-community-source_5.7.31-1ubuntu18.04_amd64.deb
mysql-community-client_5.7.31-1ubuntu18.04_amd64.deb
mysql-client_5.7.31-1ubuntu18.04_amd64.deb
3)最后安装下述包
mysql-community-server_5.7.31-1ubuntu18.04_amd64.deb
mysql-server_5.7.31-1ubuntu18.04_amd64.deb
root@zgk-Ubuntu-T01:~# dpkg -i mysql-community-client_5.7.31-1ubuntu18.04_amd64.deb
(正在读取数据库 ... 系统当前共安装有 187799 个文件和目录。)
准备解压 mysql-community-client_5.7.31-1ubuntu18.04_amd64.deb  ...
正在解压 mysql-community-client (5.7.31-1ubuntu18.04) 并覆盖 (5.7.31-1ubuntu18.04) ...
dpkg: 依赖关系问题使得 mysql-community-client 的配置工作不能继续:
 mysql-community-client 依赖于 libaio1 (>= 0.3.93);然而:
  未安装软件包 libaio1。
 mysql-community-client 依赖于 libtinfo5 (>= 6);然而:
  未安装软件包 libtinfo5。

dpkg: 处理软件包 mysql-community-client (--install)时出错:
 依赖关系问题 - 仍未被配置
正在处理用于 man-db (2.9.1-1) 的触发器 ...
在处理时有错误发生:
 mysql-community-client
root@zgk-Ubuntu-T01:~# sudo apt install libaio1
正在读取软件包列表... 完成
正在分析软件包的依赖关系树
正在读取状态信息... 完成
您也许需要运行“apt --fix-broken install”来修正上面的错误。
下列软件包有未满足的依赖关系:
 mysql-community-client : 依赖: libtinfo5 (>= 6) 但是它将不会被安装
 mysql-community-server : 依赖: libmecab2 但是它将不会被安装
E: 有未能满足的依赖关系。请尝试不指明软件包的名字来运行“apt --fix-broken install”(也可以指定一个解决办法)。
root@zgk-Ubuntu-T01:~# sudo apt install libtinfo5
正在读取软件包列表... 完成
正在分析软件包的依赖关系树
正在读取状态信息... 完成
您也许需要运行“apt --fix-broken install”来修正上面的错误。
下列软件包有未满足的依赖关系:
 mysql-community-client : 依赖: libaio1 (>= 0.3.93) 但是它将不会被安装
 mysql-community-server : 依赖: libaio1 (>= 0.3.93) 但是它将不会被安装
                          依赖: libmecab2 但是它将不会被安装
E: 有未能满足的依赖关系。请尝试不指明软件包的名字来运行“apt --fix-broken install”(也可以指定一个解决办法)。
2、处理依赖关系
若出现单独安装某一个依赖包出现错误时,或安装的依赖包互相有依赖关系,则选择一次安装所有的依赖包,即可解决互相关联的依赖关系。
root@zgk-Ubuntu-T01:~# sudo apt install libaio1 libtinfo5 libmecab2
正在读取软件包列表... 完成
正在分析软件包的依赖关系树
正在读取状态信息... 完成
下列【新】软件包将被安装:
  libaio1 libmecab2 libtinfo5
升级了 0 个软件包,新安装了 3 个软件包,要卸载 0 个软件包,有 320 个软件包未被升级。
有 4 个软件包没有被完全安装或卸载。
需要下载 323 kB 的归档。
解压缩后会消耗 2,435 kB 的额外空间。
获取:1 http://mirrors.aliyun.com/ubuntu focal/main amd64 libaio1 amd64 0.3.112-5 [7,184 B]
获取:2 http://mirrors.aliyun.com/ubuntu focal/universe amd64 libtinfo5 amd64 6.2-0ubuntu2 [83.0 kB]
获取:3 http://mirrors.aliyun.com/ubuntu focal/main amd64 libmecab2 amd64 0.996-10build1 [233 kB]
已下载 323 kB,耗时 1秒 (543 kB/s)
正在选中未选择的软件包 libaio1:amd64。
(正在读取数据库 ... 系统当前共安装有 187799 个文件和目录。)
准备解压 .../libaio1_0.3.112-5_amd64.deb  ...
正在解压 libaio1:amd64 (0.3.112-5) ...
正在选中未选择的软件包 libtinfo5:amd64。
准备解压 .../libtinfo5_6.2-0ubuntu2_amd64.deb  ...
正在解压 libtinfo5:amd64 (6.2-0ubuntu2) ...
正在选中未选择的软件包 libmecab2:amd64。
准备解压 .../libmecab2_0.996-10build1_amd64.deb  ...
正在解压 libmecab2:amd64 (0.996-10build1) ...
正在设置 libmecab2:amd64 (0.996-10build1) ...
正在设置 libaio1:amd64 (0.3.112-5) ...
正在设置 libtinfo5:amd64 (6.2-0ubuntu2) ...
正在设置 mysql-community-client (5.7.31-1ubuntu18.04) ...
正在设置 mysql-client (5.7.31-1ubuntu18.04) ...
正在设置 mysql-community-server (5.7.31-1ubuntu18.04) ...
update-alternatives: 使用 /etc/mysql/mysql.cnf 来在自动模式中提供 /etc/mysql/my.cnf (my.cnf)
Created symlink /etc/systemd/system/multi-user.target.wants/mysql.service → /lib/systemd/system/mysql.service.
正在设置 mysql-server (5.7.31-1ubuntu18.04) ...
正在处理用于 libc-bin (2.31-0ubuntu9.2) 的触发器 ...
正在处理用于 systemd (245.4-4ubuntu3.15) 的触发器 ...
3、安装完成,查看数据库是否正常并修改允许root登录
mysql> use mysql;
Reading table information for completion of table and column names
You can turn off this feature to get a quicker startup with -A

Database changed
mysql> select user,host from user;
+---------------+-----------+
| user          | host      |
+---------------+-----------+
| mysql.session | localhost |
| mysql.sys     | localhost |
| root          | localhost |
+---------------+-----------+
3 rows in set (0.00 sec)

mysql> update user set host='%' where user='root';
Query OK, 1 row affected (0.00 sec)
Rows matched: 1  Changed: 1  Warnings: 0

mysql> select user,host from user;
+---------------+-----------+
| user          | host      |
+---------------+-----------+
| root          | %         |
| mysql.session | localhost |
| mysql.sys     | localhost |
+---------------+-----------+
3 rows in set (0.00 sec)

mysql> flush privileges;
Query OK, 0 rows affected (0.00 sec)

mysql> quit;
4、配置允许其他IP访问
root@zgk-Ubuntu-T01:/etc/mysql/mysql.conf.d# vim mysqld.cnf
# Copyright (c) 2014, 2016, Oracle and/or its affiliates. All rights reserved.
#
# This program is free software; you can redistribute it and/or modify
# it under the terms of the GNU General Public License, version 2.0,
# as published by the Free Software Foundation.
#
# This program is also distributed with certain software (including
# but not limited to OpenSSL) that is licensed under separate terms,
# as designated in a particular file or component or in included license
# documentation.  The authors of MySQL hereby grant you an additional
# permission to link the program and your derivative works with the
# separately licensed software that they have included with MySQL.
#
# This program is distributed in the hope that it will be useful,
# but WITHOUT ANY WARRANTY; without even the implied warranty of
# MERCHANTABILITY or FITNESS FOR A PARTICULAR PURPOSE.  See the
# GNU General Public License, version 2.0, for more details.
#
# You should have received a copy of the GNU General Public License
# along with this program; if not, write to the Free Software
# Foundation, Inc., 51 Franklin St, Fifth Floor, Boston, MA  02110-1301 USA

#
# The MySQL  Server configuration file.
#
# For explanations see
# http://dev.mysql.com/doc/mysql/en/server-system-variables.html

[mysqld]
pid-file        = /var/run/mysqld/mysqld.pid
socket          = /var/run/mysqld/mysqld.sock
datadir         = /var/lib/mysql
log-error       = /var/log/mysql/error.log
port = 3306
# By default we only accept connections from localhost
#bind-address   = 127.0.0.1
# Disabling symbolic-links is recommended to prevent assorted security risks
symbolic-links=0
~
"mysqld.cnf" 38L, 1621C 已写入
root@zgk-Ubuntu-T01:/etc/mysql/mysql.conf.d# /etc/init.d/mysql restart
至此,三种方案整理完毕!
版权声明:本文为博主作者:liuhuango123原创文章,版权归属原作者,如果侵权,请联系我们删除!
原文链接:https://blog.csdn.net/liuhuango123/article/details/128264867