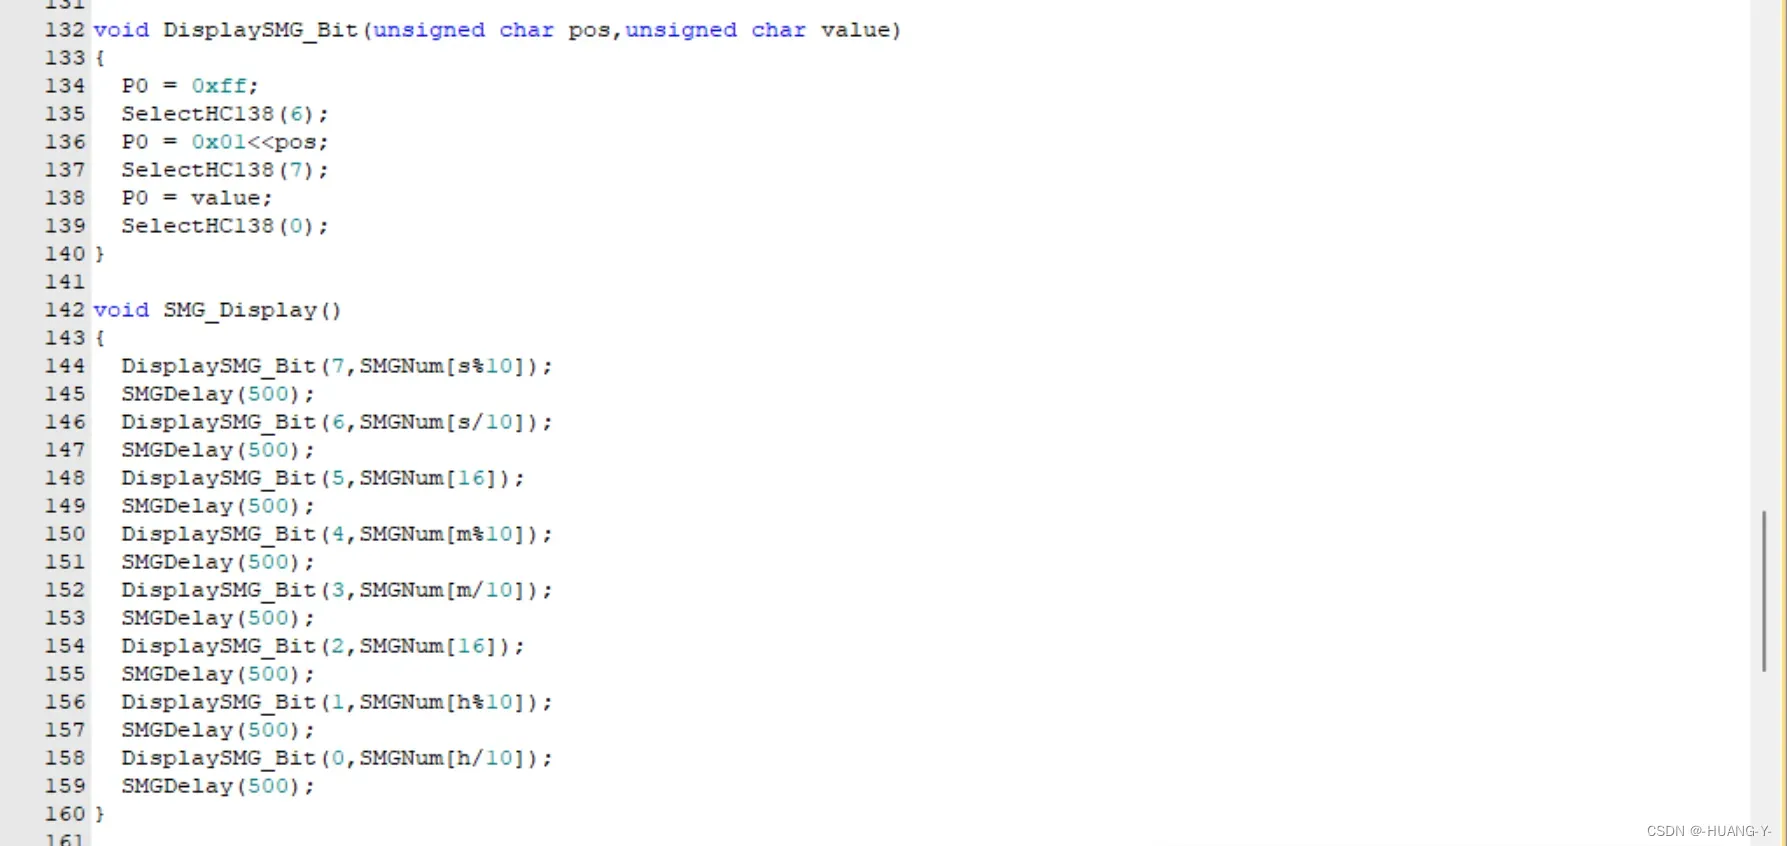
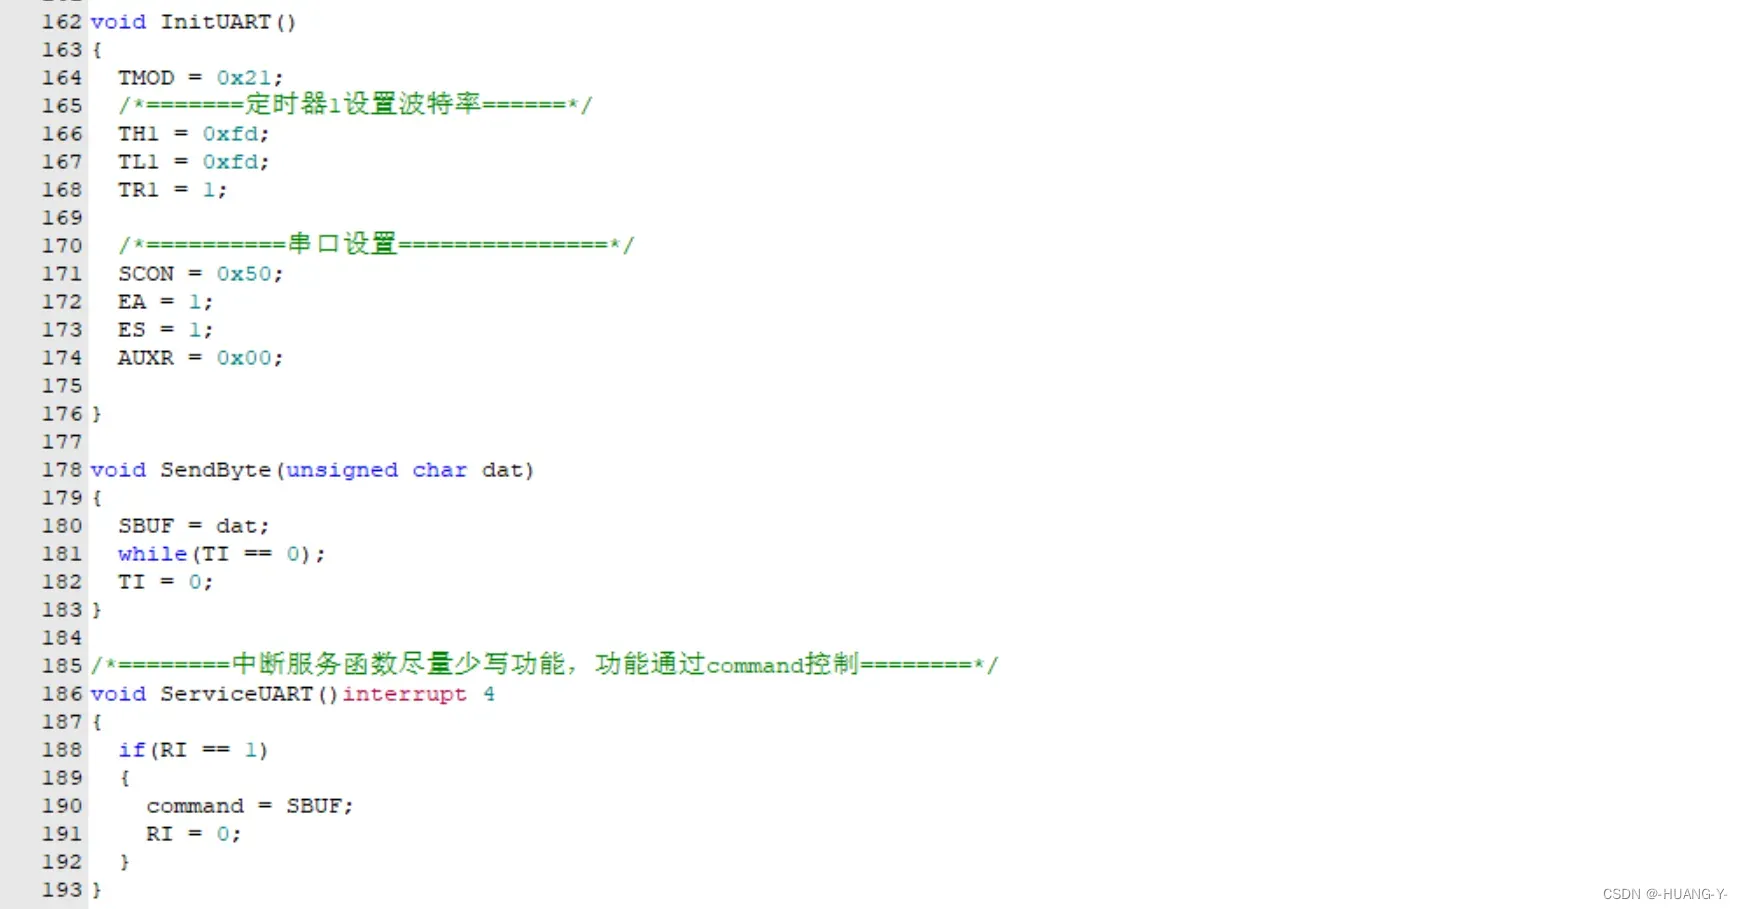
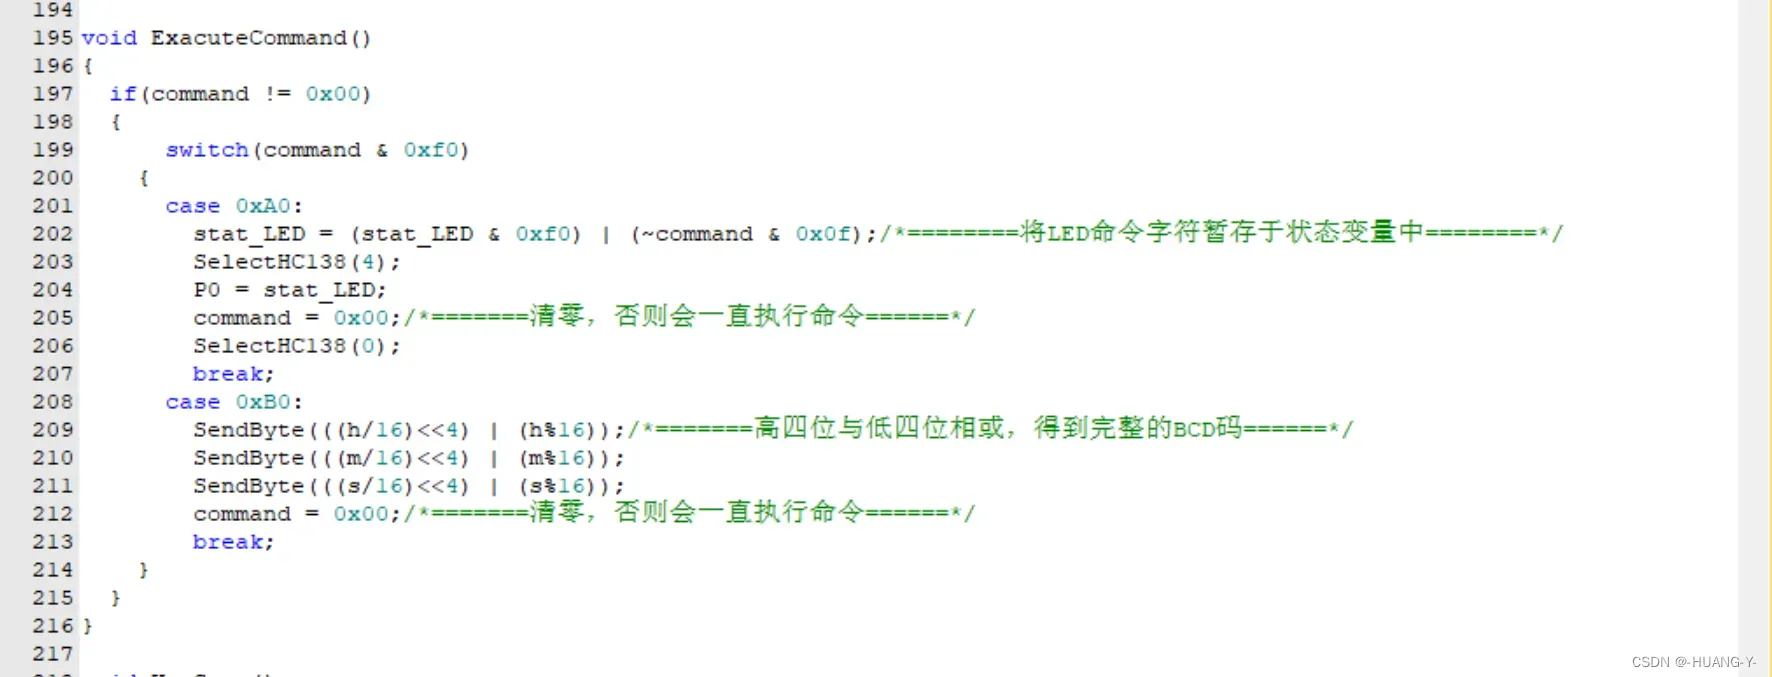
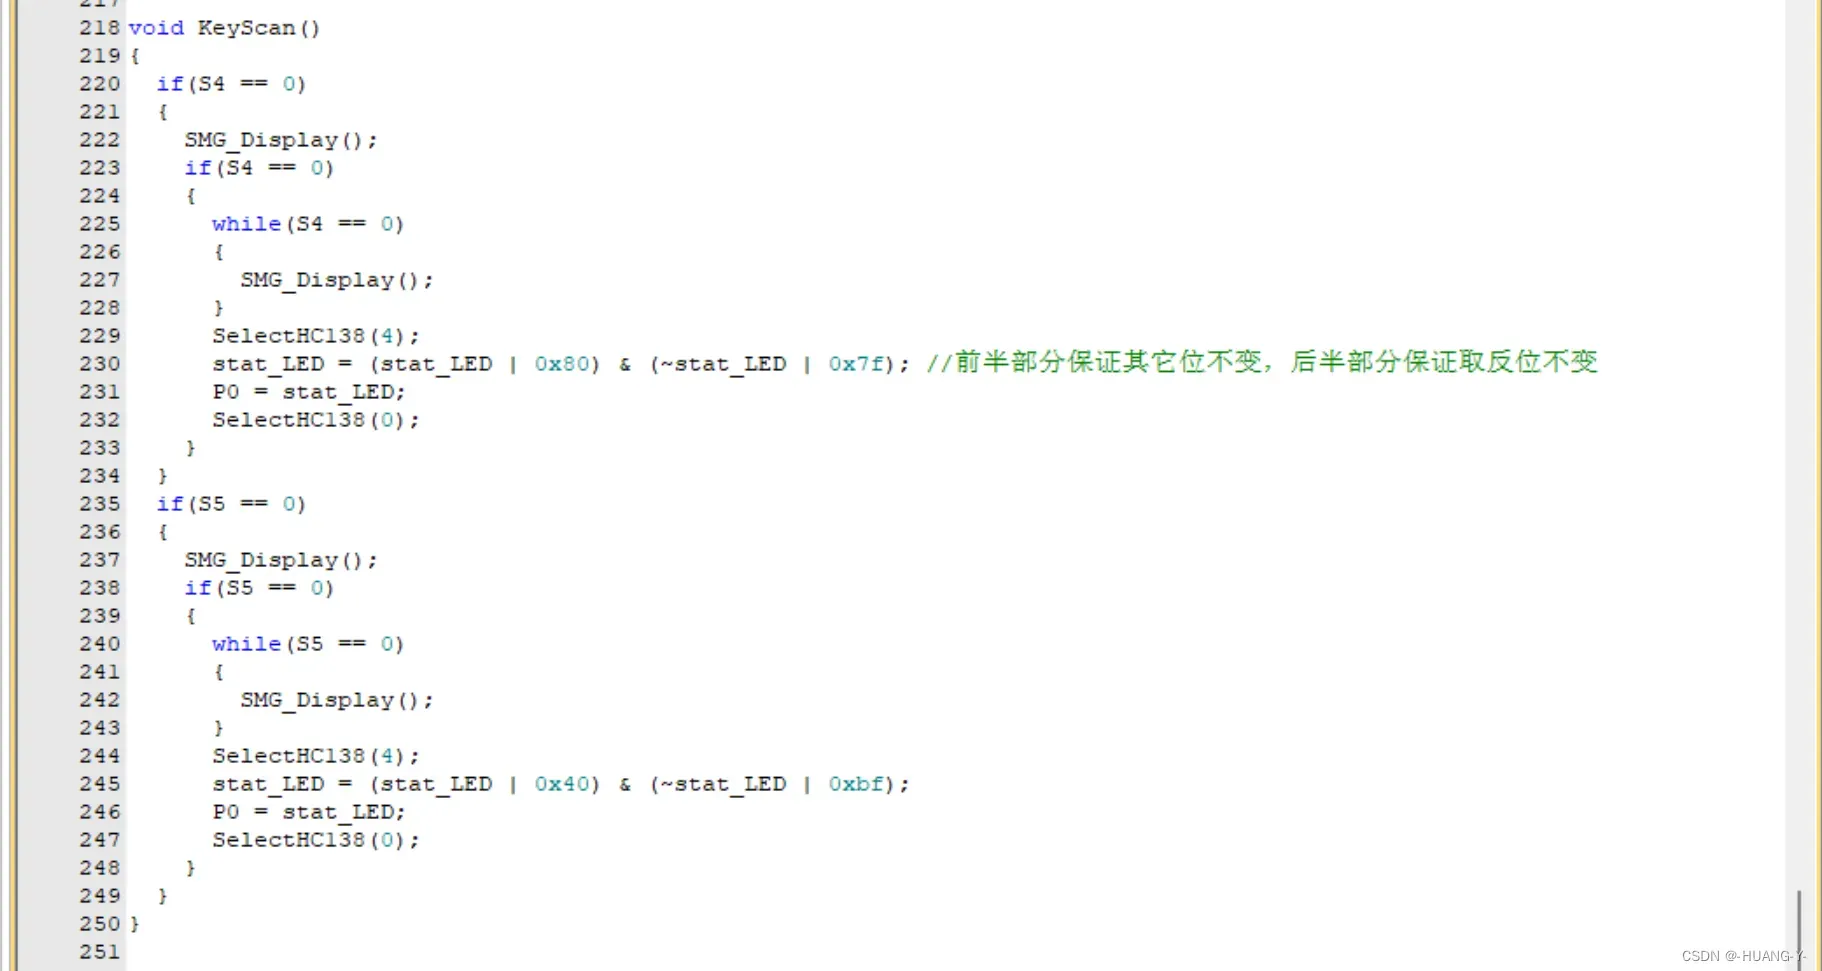
1、LED指示灯的控制
训练题目:

相关原理图:
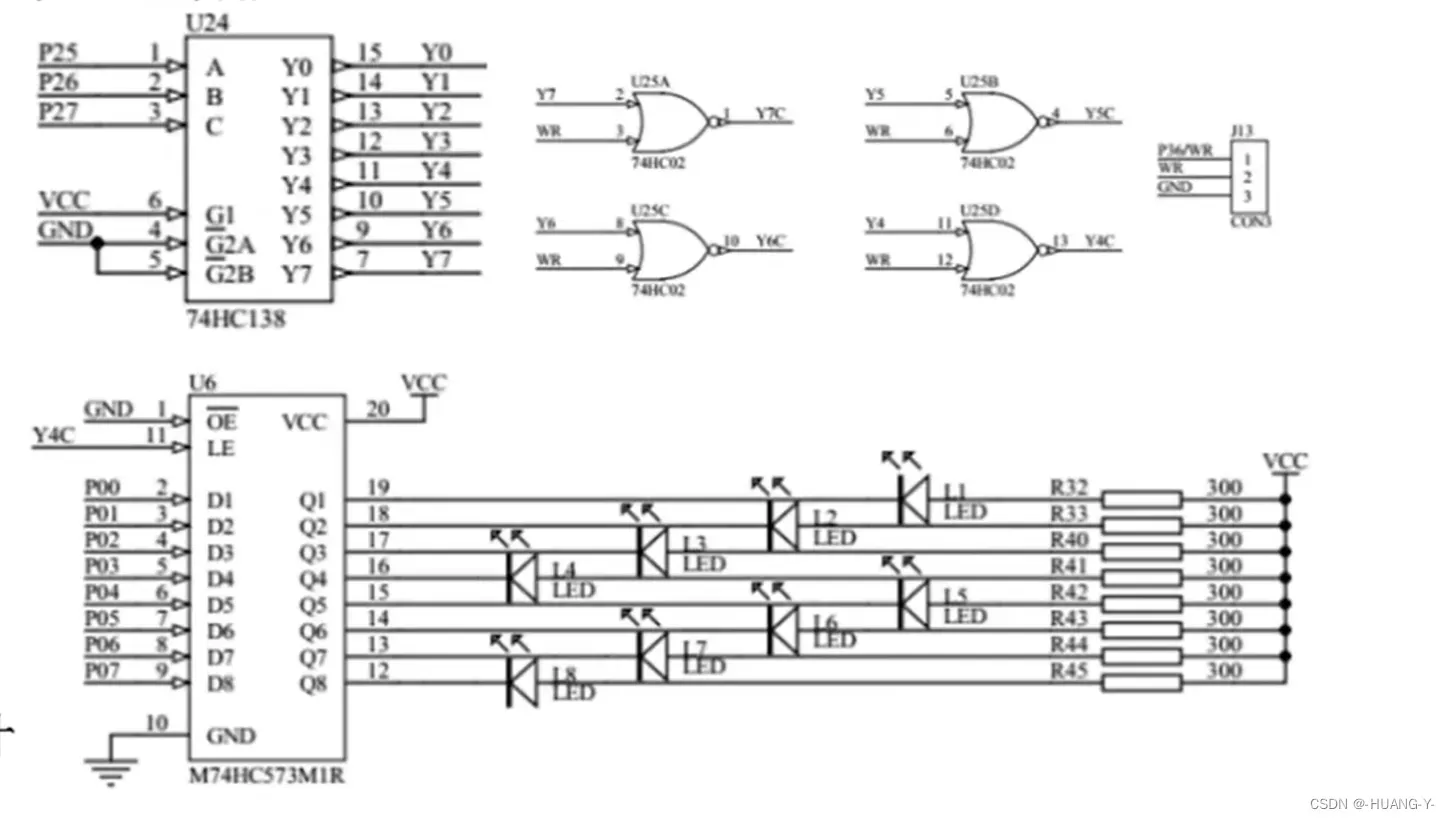
138译码器:
C,B,A所成二进制数转化为十进制后对应与Yn中n的值。
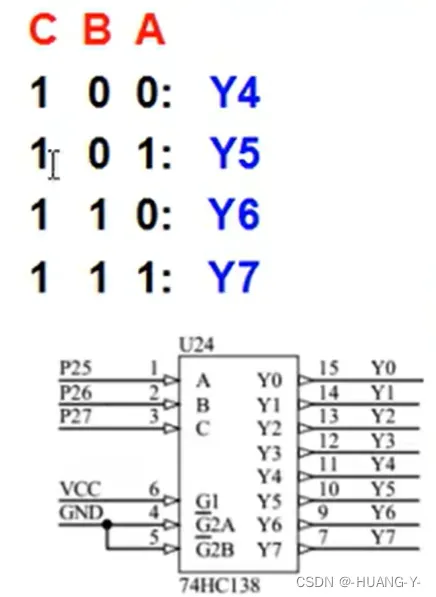
573锁存器:
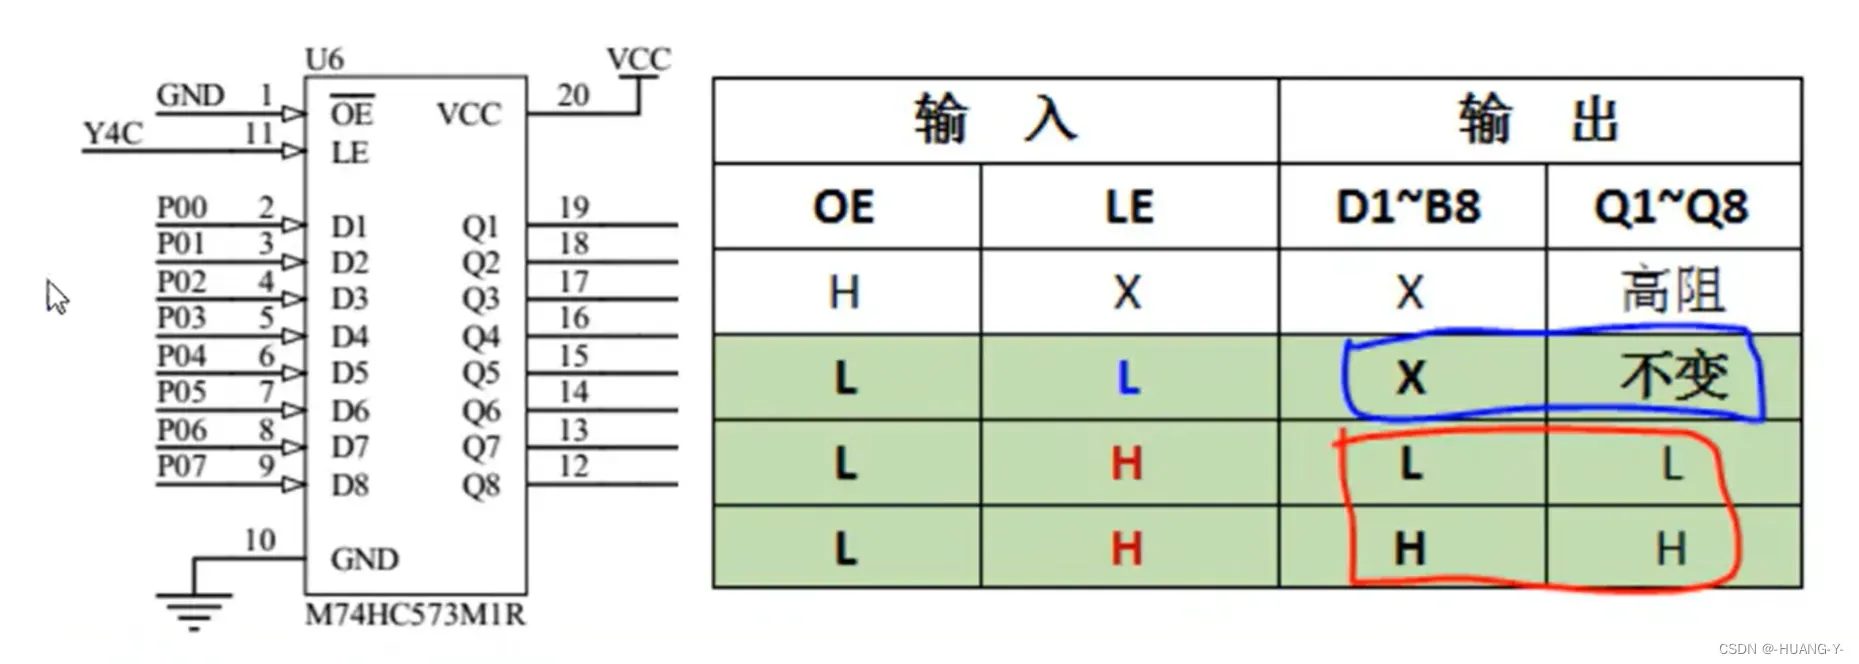
思路:

关键代码:
//LED逐个点亮,通过位运算实现
for(i = 1; i <= 8; i++)
	{
		P0 = 0xff << i; //逐个熄灭:P0 = ~(0xff << i);
		Delay(60000);
		Delay(60000);
	}
整体代码实现:
#include "reg52.h"

sbit HC138_A = P2^5;
sbit HC138_B = P2^6;
sbit HC138_C = P2^7;

void Delay(unsigned int t)
{
	while(t--);
	while(t--);
}

void LEDRunning()
{
	unsigned char i;
	HC138_C = 1;
	HC138_B = 0;
	HC138_A = 0;

	for(i = 0; i < 3; i++)
	{
		P0 = 0x00;
		Delay(60000);
		Delay(60000);
		P0 = 0xff;
		Delay(60000);
		Delay(60000);
	}

	for(i = 1; i <= 8; i++)
	{
		P0 = 0xff << i;
		Delay(60000);
		Delay(60000);
	}

	for(i = 1; i <= 8; i++)
	{
		P0 = ~(0xff << i);
		Delay(60000);
		Delay(60000);
	}

}

void main()
{
	while(1)
	{
		LEDRunning();
	}
}
2、蜂鸣器与继电器的控制
训练题目及原理图:
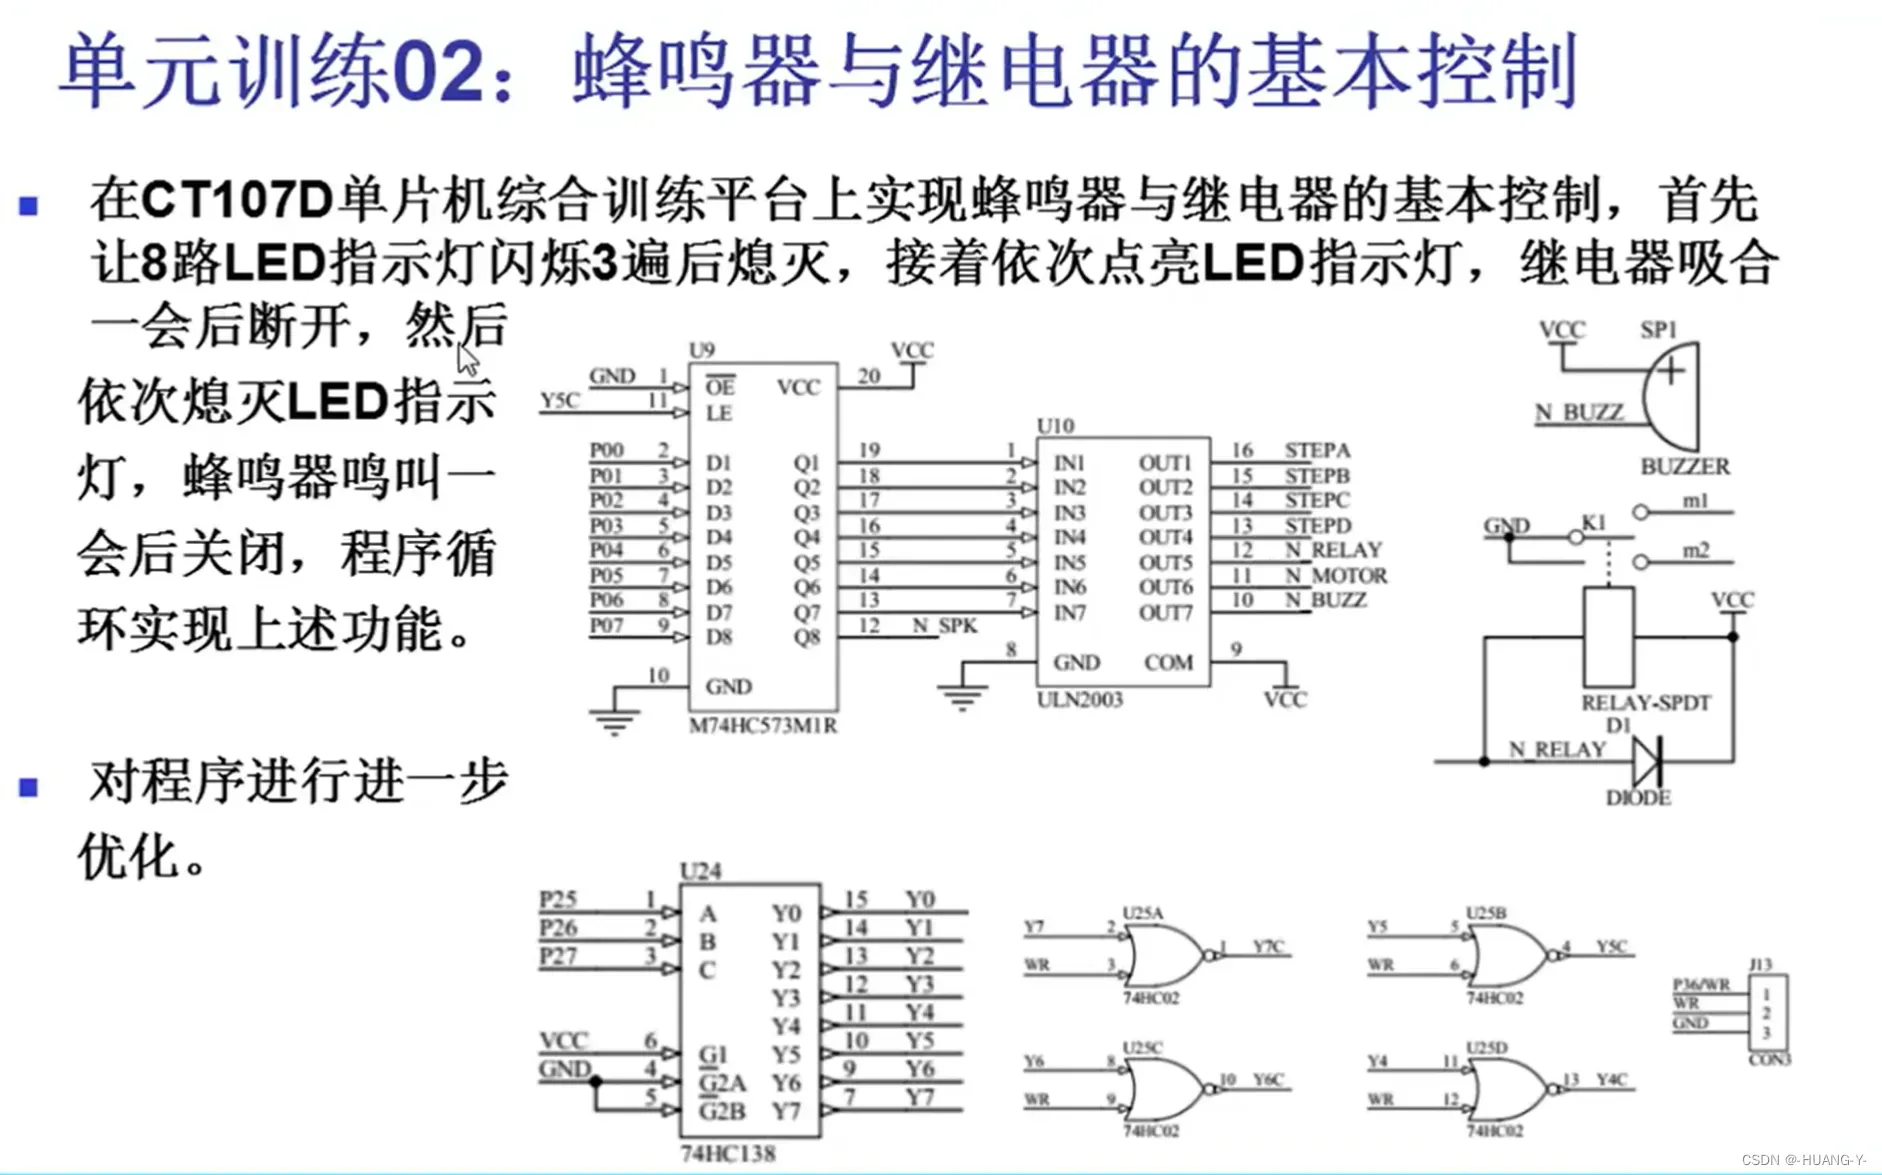
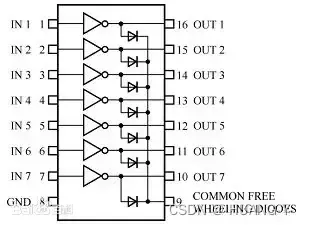
UNL2003:
关键:非门。
思路:
与LED类似,注意要通过非门,N_BUZZ和N_RELAY低电平时器件工作。
关键代码:
//138译码器初始化代码。
//LED、蜂鸣器和继电器、数码管使用时均需要
void InitHC138(unsigned char n)
{
	switch(n)
	{
		case 4:
			P2 = (P2 & 0X1f) | 0x80;
		break;  //LED
		case 5:
			P2 = (P2 & 0X1f) | 0xa0;
		break;  //蜂鸣器、继电器
		case 6:
			P2 = (P2 & 0X1f) | 0xc0;
		break;  //数码管位选
		case 7:
			P2 = (P2 & 0X1f) | 0xe0;
		break;  //数码管段选
	}
}
整体代码实现:
#include "reg52.h"

void Delay(unsigned int t)
{
	while(t--);
	while(t--);
}

void InitHC138(unsigned char n)
{
	switch(n)
	{
		case 4:
			P2 = (P2 & 0X1f) | 0x80;
		break;
		case 5:
			P2 = (P2 & 0X1f) | 0xa0;
		break;
		case 6:
			P2 = (P2 & 0X1f) | 0xc0;
		break;
		case 7:
			P2 = (P2 & 0X1f) | 0xe0;
		break;
	}
}

void OutPutP0(unsigned char channel, unsigned char dat)
{
	InitHC138(channel);
	P0 = dat;
}

void LEDRunning()
{
	unsigned char i;

	for(i = 0; i < 3; i++)
	{
		OutPutP0(4,0x00);
		Delay(60000);
		Delay(60000);
		OutPutP0(4,0xff);
		Delay(60000);
		Delay(60000);
	}

	for(i = 1; i <= 8; i++)
	{
		OutPutP0(4,(0xff << i));
		Delay(60000);
	}

	OutPutP0(5,0x10);
	Delay(60000);
	Delay(60000);
	OutPutP0(5,0x00);

	InitHC138(4);
	for(i = 1; i <= 8; i++)
	{
		OutPutP0(4,~(0xff << i));
		Delay(60000);
	}

	OutPutP0(5,0x40);
	Delay(60000);
	Delay(60000);
	OutPutP0(5,0x00);
}

void InitSystem()
{
	OutPutP0(5,0x00);
}

void main()
{
	InitSystem();
	while(1)
	{
		LEDRunning();
	}
}
3、共阳数码管的静态显示
训练题目:
相关原理图:
两块锁存器分别控制数码管的段选和位选。
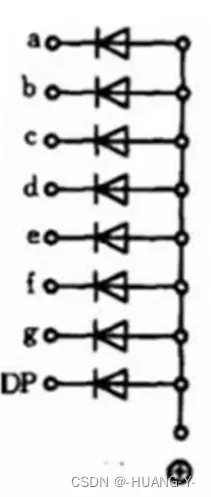
共阳P0低电平点亮,共阴高电平点亮。
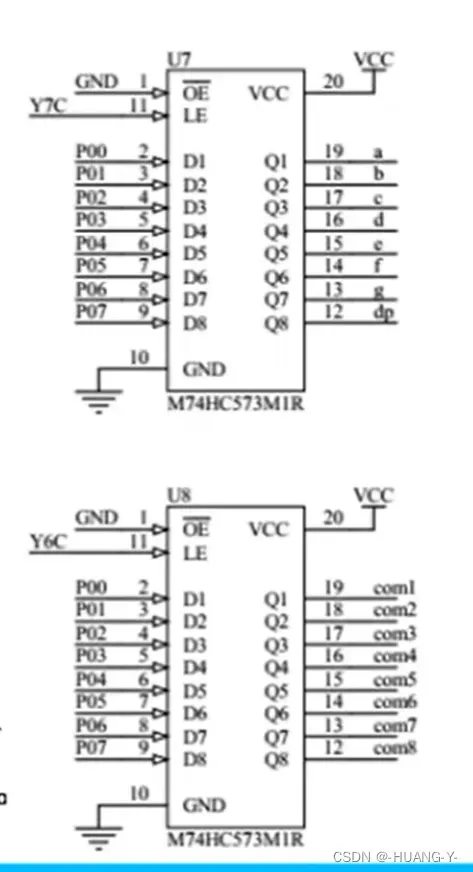
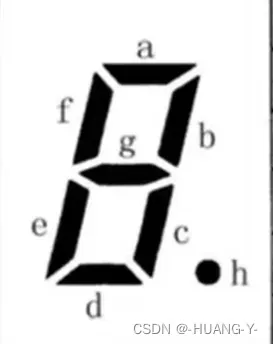
段选十六进制数:首先为八位二进制数,顺序由高到低为:hgfedcba。
再转为十六进制:四位一组,高到低,为:8/4/2/1。
位选:因为是共阳,所以选哪位哪位应为高电平。
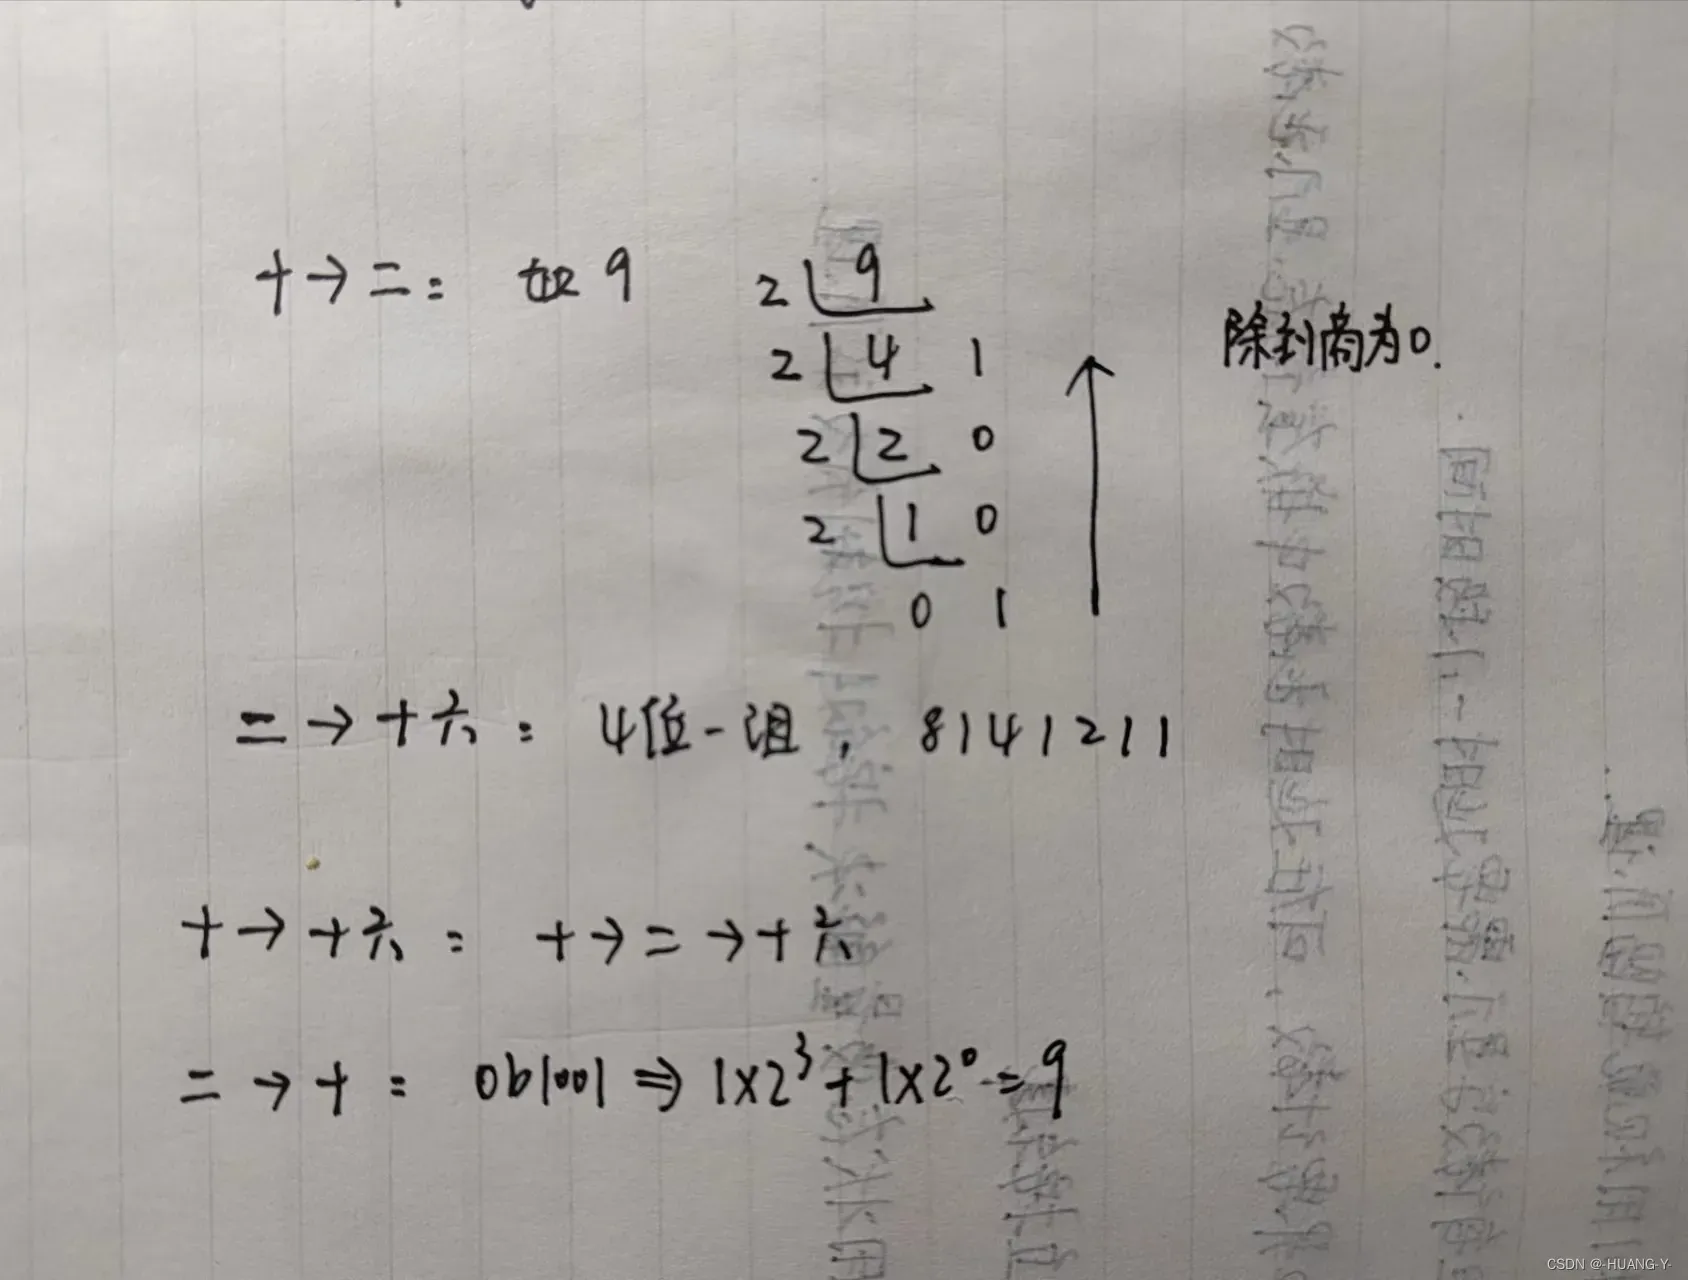
进制转换补充:
关键代码:
//单个数码管显示
void ShowSMG_Bit(unsigned char dat, unsigned pos)
{
	InitHC138(6);			//数码管的位置
	P0 = 0x01 << pos;
	InitHC138(7);			//数码管的内容
	P0 = dat;
}
整体代码实现:
#include "reg52.h"

unsigned char code SMG_duanma[18]=
		{0xc0,0xf9,0xa4,0xb0,0x99,0x92,0x82,0xf8,
     0x80,0x90,0x88,0x80,0xc6,0xc0,0x86,0x8e,
     0xbf,0x7f};


void Delay(unsigned int t)
{
	while(t--);
	while(t--);
}

void InitHC138(unsigned char n)
{
	switch(n)
	{
		case 4:
			P2 = (P2 & 0x1f) | 0x80;
		break;
		case 5:
			P2 = (P2 & 0x1f) | 0xa0;
		break;
		case 6:
			P2 = (P2 & 0x1f) | 0xc0;
		break;
		case 7:
			P2 = (P2 & 0x1f) | 0xe0;
		break;
	}
}

void ShowSMG_Bit(unsigned char dat, unsigned pos)
{
	InitHC138(6);			//数码管的位置
	P0 = 0x01 << pos;
	InitHC138(7);			//数码管的内容
	P0 = dat;
}

void SMG_Static()
{
	unsigned char i,j;
	for(i = 0; i < 8; i++)
	{
		for(j = 0; j < 10; j++)
		{
			ShowSMG_Bit(SMG_duanma[j],i);
			Delay(60000);
		}
	}
	for(j = 0; j < 16; j++)
	{
		InitHC138(6);			//数码管的位置
		P0 = 0xff;
		InitHC138(7);			//数码管的内容
		P0 = SMG_duanma[j];
		Delay(60000);
		Delay(60000);
	}
}

void main()
{
	while(1)
	{
		SMG_Static();
	}
}
4、共阳数码管的动态显示
训练题目:

原理:
视觉暂留效应,每位显示只延时很短时间。
关键代码:
//注意用全局变量来计数
void Display_Dynamic()
{
	DisplaySMG_Bit(SMG_duanma[2],0);
	DelaySMG(500);
	DisplaySMG_Bit(SMG_duanma[0],1);
	DelaySMG(500);
	DisplaySMG_Bit(SMG_duanma[1],2);
	DelaySMG(500);
	DisplaySMG_Bit(SMG_duanma[8],3);
	DelaySMG(500);

	DisplaySMG_Bit(SMG_duanma[16],4);
	DelaySMG(500);
	DisplaySMG_Bit(SMG_duanma[16],5);
	DelaySMG(500);

	DisplaySMG_Bit(SMG_duanma[yu/10],6);
	DelaySMG(500);
	DisplaySMG_Bit(SMG_duanma[yu%10],7);
	DelaySMG(500);
}

//因为单纯延时数码管会熄灭,所以里面嵌套了动态显示函数,以达到中断的效果
void Delay(unsigned char t)
{
		while(t--)
		{
			Display_Dynamic();
		}
}
整体代码实现:
#include "reg52.h"

unsigned char yu = 1;
unsigned char code SMG_duanma[18]=
		{0xc0,0xf9,0xa4,0xb0,0x99,0x92,0x82,0xf8,
     0x80,0x90,0x88,0x80,0xc6,0xc0,0x86,0x8e,
     0xbf,0x7f};

void SelectHC573(unsigned char channel)
{
	switch(channel)
	{
		case 4:
			P2 = (P2 & 0x1f) | 0x80;
		break;
		case 5:
			P2 = (P2 & 0x1f) | 0xa0;
		break;
		case 6:
			P2 = (P2 & 0x1f) | 0xc0;
		break;
		case 7:
			P2 = (P2 & 0x1f) | 0xe0;
		break;
	}
}

void DisplaySMG_Bit(unsigned char value, unsigned char pos)
{
	P0 = 0xff;
	SelectHC573(6);
	P0 = 0x01 << pos;
	SelectHC573(7);
	P0 = value;
}

void DelaySMG(unsigned int t)
{
	while(t--);
}

void Display_Dynamic()
{
	DisplaySMG_Bit(SMG_duanma[2],0);
	DelaySMG(500);
	DisplaySMG_Bit(SMG_duanma[0],1);
	DelaySMG(500);
	DisplaySMG_Bit(SMG_duanma[1],2);
	DelaySMG(500);
	DisplaySMG_Bit(SMG_duanma[8],3);
	DelaySMG(500);

	DisplaySMG_Bit(SMG_duanma[16],4);
	DelaySMG(500);
	DisplaySMG_Bit(SMG_duanma[16],5);
	DelaySMG(500);

	DisplaySMG_Bit(SMG_duanma[yu/10],6);
	DelaySMG(500);
	DisplaySMG_Bit(SMG_duanma[yu%10],7);
	DelaySMG(500);
}

void Delay(unsigned char t)
{
		while(t--)
		{
			Display_Dynamic();
		}
}

void main()
{
	while(1)
	{
		Display_Dynamic();
		yu++;
		if(yu > 12)
		{
			yu = 1;
		}
		Delay(200);
	}
}
5、独立按键:
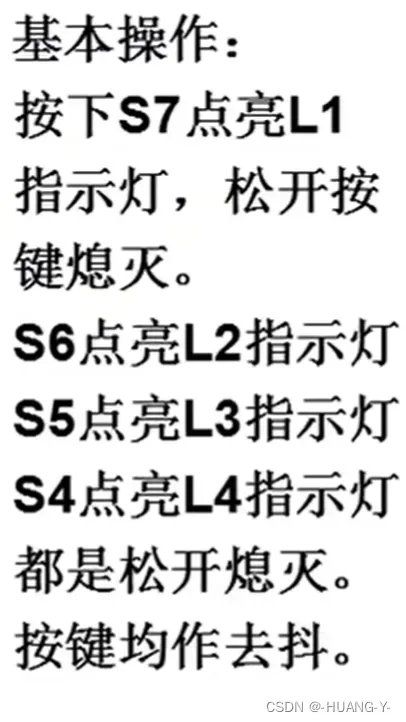
基本训练题目:
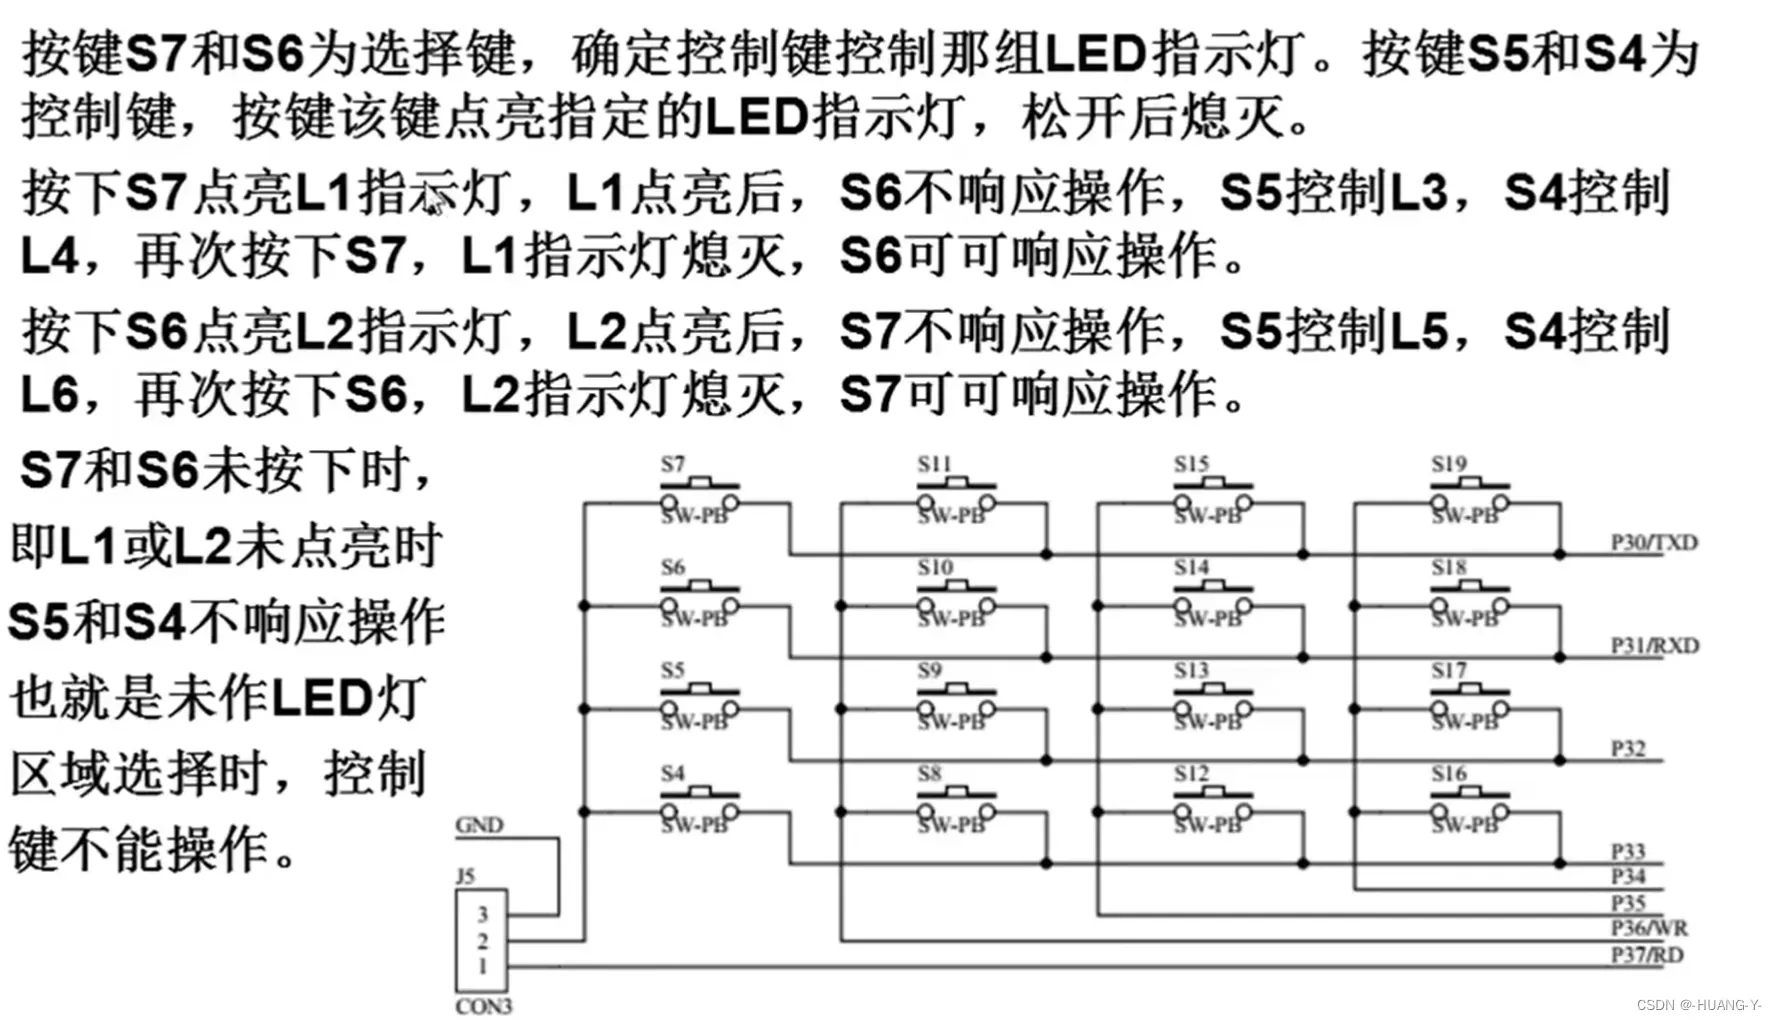
扩展训练题目:
原理:
跳帽接23端,若按键按下则可接收到低电平。
基本训练关键代码:
//按键扫描,以S7为例
void ScanKeys_Alone()
{
	if(S7 == 0)
	{
		DelayK(100);
		if(S7 == 0)//延时消抖
		{
			L1 = 0;
			while(S7 == 0);//按下常亮,松开熄灭,闪烁效果
			L1 = 1;
		}
	}
基本训练整体代码实现:
#include "reg52.h"

sbit S7 = P3^0;
sbit S6 = P3^1;
sbit S5 = P3^2;
sbit S4 = P3^3;

sbit L1 = P0^0;
sbit L2 = P0^1;
sbit L3 = P0^2;
sbit L4 = P0^3;
sbit L5 = P0^4;
sbit L6 = P0^5;

void SelectHC573(unsigned char channel)
{
	switch(channel)
	{
		case 4:
			P2 = (P2 & 0x1f) | 0x80;
		break;
		case 5:
			P2 = (P2 & 0x1f) | 0xa0;
		break;
		case 6:
			P2 = (P2 & 0x1f) | 0xc0;
		break;
		case 7:
			P2 = (P2 & 0x1f) | 0xe0;
		break;
	}
}

void DelayK(unsigned char t)
{
	while(t--);
}

void ScanKeys_Alone()
{
	if(S7 == 0)
	{
		DelayK(100);
		if(S7 == 0)
		{
			L1 = 0;
			while(S7 == 0);
			L1 = 1;
		}
	}
	if(S6 == 0)
	{
		DelayK(100);
		if(S6 == 0)
		{
			L2 = 0;
			while(S6 == 0);
			L2 = 1;
		}
	}
	if(S5 == 0)
	{
		DelayK(100);
		if(S5 == 0)
		{
			L3 = 0;
			while(S5 == 0);
			L3 = 1;
		}
	}
	if(S4 == 0)
	{
		DelayK(100);
		if(S4 == 0)
		{
			L4 = 0;
			while(S4 == 0);
			L4 = 1;
		}
	}
}

void main()
{
	SelectHC573(4);
	while(1)
	{
		ScanKeys_Alone();
	}
}
扩展训练整体代码实现:
#include "reg52.h"

sbit S7 = P3^0;
sbit S6 = P3^1;
sbit S5 = P3^2;
sbit S4 = P3^3;

sbit L1 = P0^0;
sbit L2 = P0^1;
sbit L3 = P0^2;
sbit L4 = P0^3;
sbit L5 = P0^4;
sbit L6 = P0^5;

void SelectHC573(unsigned char channel)
{
	switch(channel)
	{
		case 4:
			P2 = (P2 & 0x1f) | 0x80;
		break;
		case 5:
			P2 = (P2 & 0x1f) | 0xa0;
		break;
		case 6:
			P2 = (P2 & 0x1f) | 0xc0;
		break;
		case 7:
			P2 = (P2 & 0x1f) | 0xe0;
		break;
	}
}

void DelayK(unsigned char t)
{
	while(t--);
}

unsigned char stat_k = 0;//全局状态变量实现按键控制分支按键,且不互相干扰
void ScanKeys_Alone()
{
	if(S7 == 0)
	{
		DelayK(100);
		if(S7 == 0)
		{
			if(stat_k == 0)
			{
				L1 = 0;
				stat_k = 1;
			}
			else if(stat_k == 1)
			{
				L1 = 1;
				stat_k = 0;
			}
			while(S7 == 0);//避免一次按下读多次
		}
	}
	if(S6 == 0)
	{
		DelayK(100);
		if(S6 == 0)
		{
			if(stat_k == 0)
			{
				L2 = 0;
				stat_k = 2;
			}
			else if(stat_k == 2)
			{
				L2 = 1;
				stat_k = 0;
			}
			while(S6 == 0);
		}
	}
	if(S5 == 0)
	{
		DelayK(100);
		if(S5 == 0)
		{
			if(stat_k == 1)
			{
				L3 = 0;
				while(S5 == 0);
				L3 = 1;
			}
			else if(stat_k == 2)
			{
				L5 = 0;
				while(S5 == 0);
				L5 = 1;
			}
		}
	}
	if(S4 == 0)
	{
		DelayK(100);
		if(S4 == 0)
		{
			if(stat_k == 1)
			{
				L4 = 0;
				while(S4 == 0);
				L4 = 1;
			}
			else if(stat_k == 2)
			{
				L6 = 0;
				while(S4 == 0);
				L6 = 1;
			}
		}
	}
}

void main()
{
	SelectHC573(4);
	while(1)
	{
		ScanKeys_Alone();
	}
}
6、矩阵按键:
训练题目:

原理:
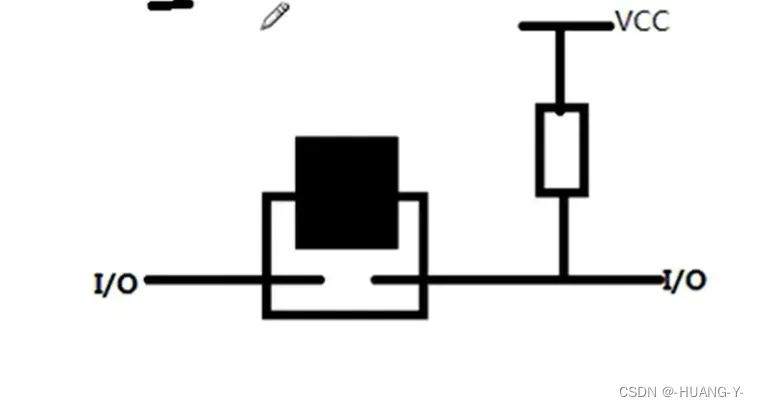
P36、P37改为P42、P44。跳帽接到12端。通过逐行输入低电平信号,从检查哪列收到低电平信号,确定按键按下位置。
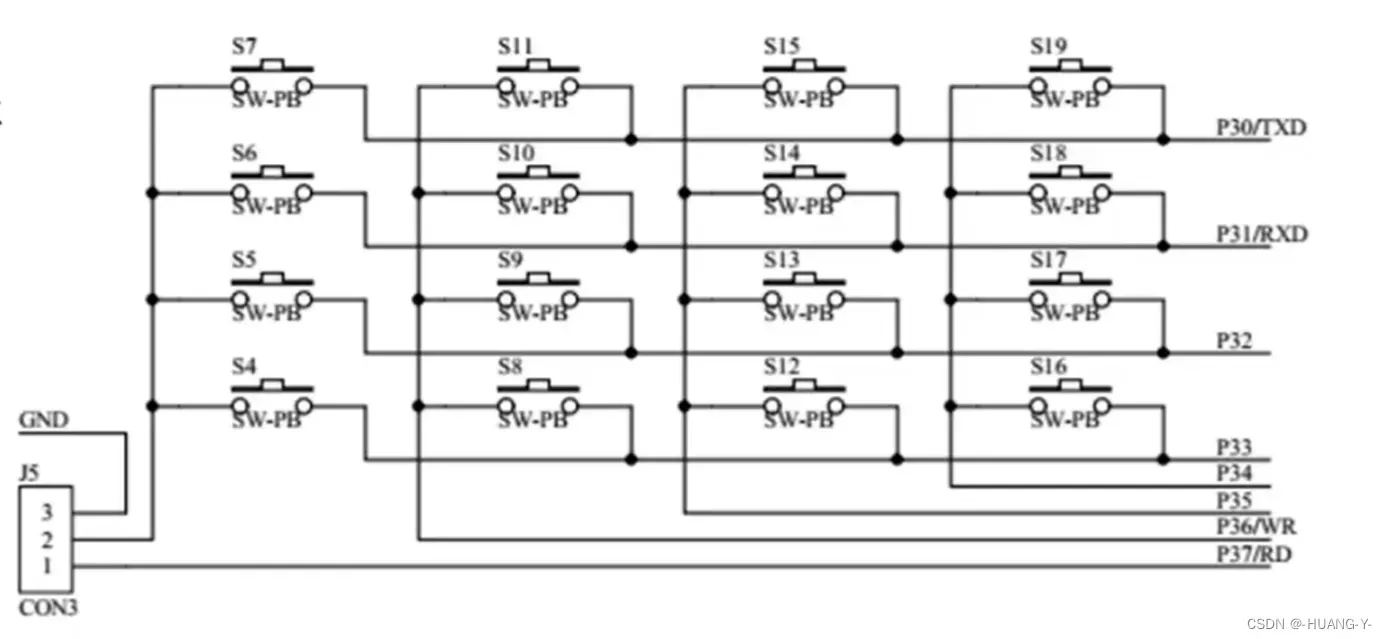
独立按键内部结构:
未按下时高电平,按下后低电平。
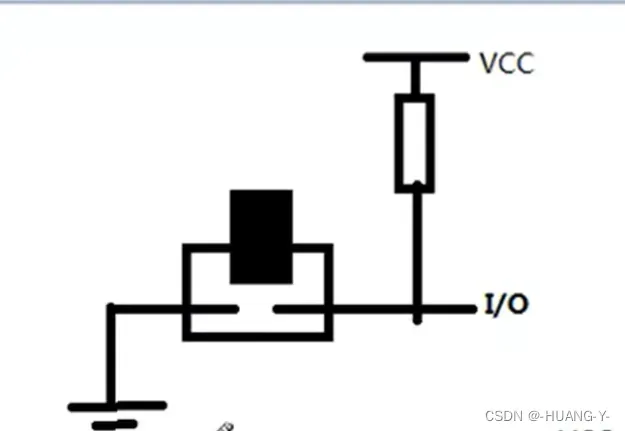
矩阵按键内部结构:
图中,左边为行IO口,右边为列IO口。当行IO口输出低电平时,按键按下,右边可检测到低电平。
整体代码实现:
#include "reg52.h"

sfr P4    = 0xC0;

sbit R1 = P3^0;
sbit R2 = P3^1;
sbit R3 = P3^2;
sbit R4 = P3^3;

sbit C4 = P3^4;
sbit C3 = P3^5;
sbit C2 = P4^2;
sbit C1 = P4^4;

unsigned char code SMG_duanma[18]=
		{0xc0,0xf9,0xa4,0xb0,0x99,0x92,0x82,0xf8,
     0x80,0x90,0x88,0x80,0xc6,0xc0,0x86,0x8e,
     0xbf,0x7f};

void SelectHC573(unsigned char channel)
{
	switch(channel)
	{
		case 4:
			P2 = (P2 & 0x1f) | 0x80;
		break;
		case 5:
			P2 = (P2 & 0x1f) | 0xa0;
		break;
		case 6:
			P2 = (P2 & 0x1f) | 0xc0;
		break;
		case 7:
			P2 = (P2 & 0x1f) | 0xe0;
		break;
	}
}

void DisplayKeyNum(unsigned char value)
{
	P0 = 0xff;
	SelectHC573(6);
	P0 = 0x01;
	SelectHC573(7);
	P0 = value;
}

unsigned char key_num;
void ScanKeysMulti()
{
	R1 = 0;
	R2 = R3 = R4 = 1;
	C1 = C2 = C3 = C4 =1;
	if(C1 == 0)
	{
		while(C1 == 0);//避免按下一次扫描多次
		key_num = 0;
		DisplayKeyNum(SMG_duanma[key_num]);
	}
	else if(C2 == 0)
	{
		while(C2 == 0);
		key_num = 1;
		DisplayKeyNum(SMG_duanma[key_num]);
	}
	else if(C3 == 0)
	{
		while(C3 == 0);
		key_num = 2;
		DisplayKeyNum(SMG_duanma[key_num]);
	}
	else if(C4 == 0)
	{
		while(C4 == 0);
		key_num = 3;
		DisplayKeyNum(SMG_duanma[key_num]);
	}

	R2 = 0;
	R1 = R3 = R4 = 1;
	C1 = C2 = C3 = C4 =1;
	if(C1 == 0)
	{
		while(C1 == 0);
		key_num = 4;
		DisplayKeyNum(SMG_duanma[key_num]);
	}
	else if(C2 == 0)
	{
		while(C2 == 0);
		key_num = 5;
		DisplayKeyNum(SMG_duanma[key_num]);
	}
	else if(C3 == 0)
	{
		while(C3 == 0);
		key_num = 6;
		DisplayKeyNum(SMG_duanma[key_num]);
	}
	else if(C4 == 0)
	{
		while(C4 == 0);
		key_num = 7;
		DisplayKeyNum(SMG_duanma[key_num]);
	}

	R3 = 0;
	R2 = R1 = R4 = 1;
	C1 = C2 = C3 = C4 =1;
	if(C1 == 0)
	{
		while(C1 == 0);
		key_num = 8;
		DisplayKeyNum(SMG_duanma[key_num]);
	}
	else if(C2 == 0)
	{
		while(C2 == 0);
		key_num = 9;
		DisplayKeyNum(SMG_duanma[key_num]);
	}
	else if(C3 == 0)
	{
		while(C3 == 0);
		key_num = 10;
		DisplayKeyNum(SMG_duanma[key_num]);
	}
	else if(C4 == 0)
	{
		while(C4 == 0);
		key_num = 11;
		DisplayKeyNum(SMG_duanma[key_num]);
	}

	R4 = 0;
	R2 = R3 = R1 = 1;
	C1 = C2 = C3 = C4 =1;
	if(C1 == 0)
	{
		while(C1 == 0);
		key_num = 12;
		DisplayKeyNum(SMG_duanma[key_num]);
	}
	else if(C2 == 0)
	{
		while(C2 == 0);
		key_num = 13;
		DisplayKeyNum(SMG_duanma[key_num]);
	}
	else if(C3 == 0)
	{
		while(C3 == 0);
		key_num = 14;
		DisplayKeyNum(SMG_duanma[key_num]);
	}
	else if(C4 == 0)
	{
		while(C4 == 0);
		key_num = 15;
		DisplayKeyNum(SMG_duanma[key_num]);
	}
}

void main()
{
	while(1)
	{
		ScanKeysMulti();
	}
}
7、外部中断的基本操作
训练题目:
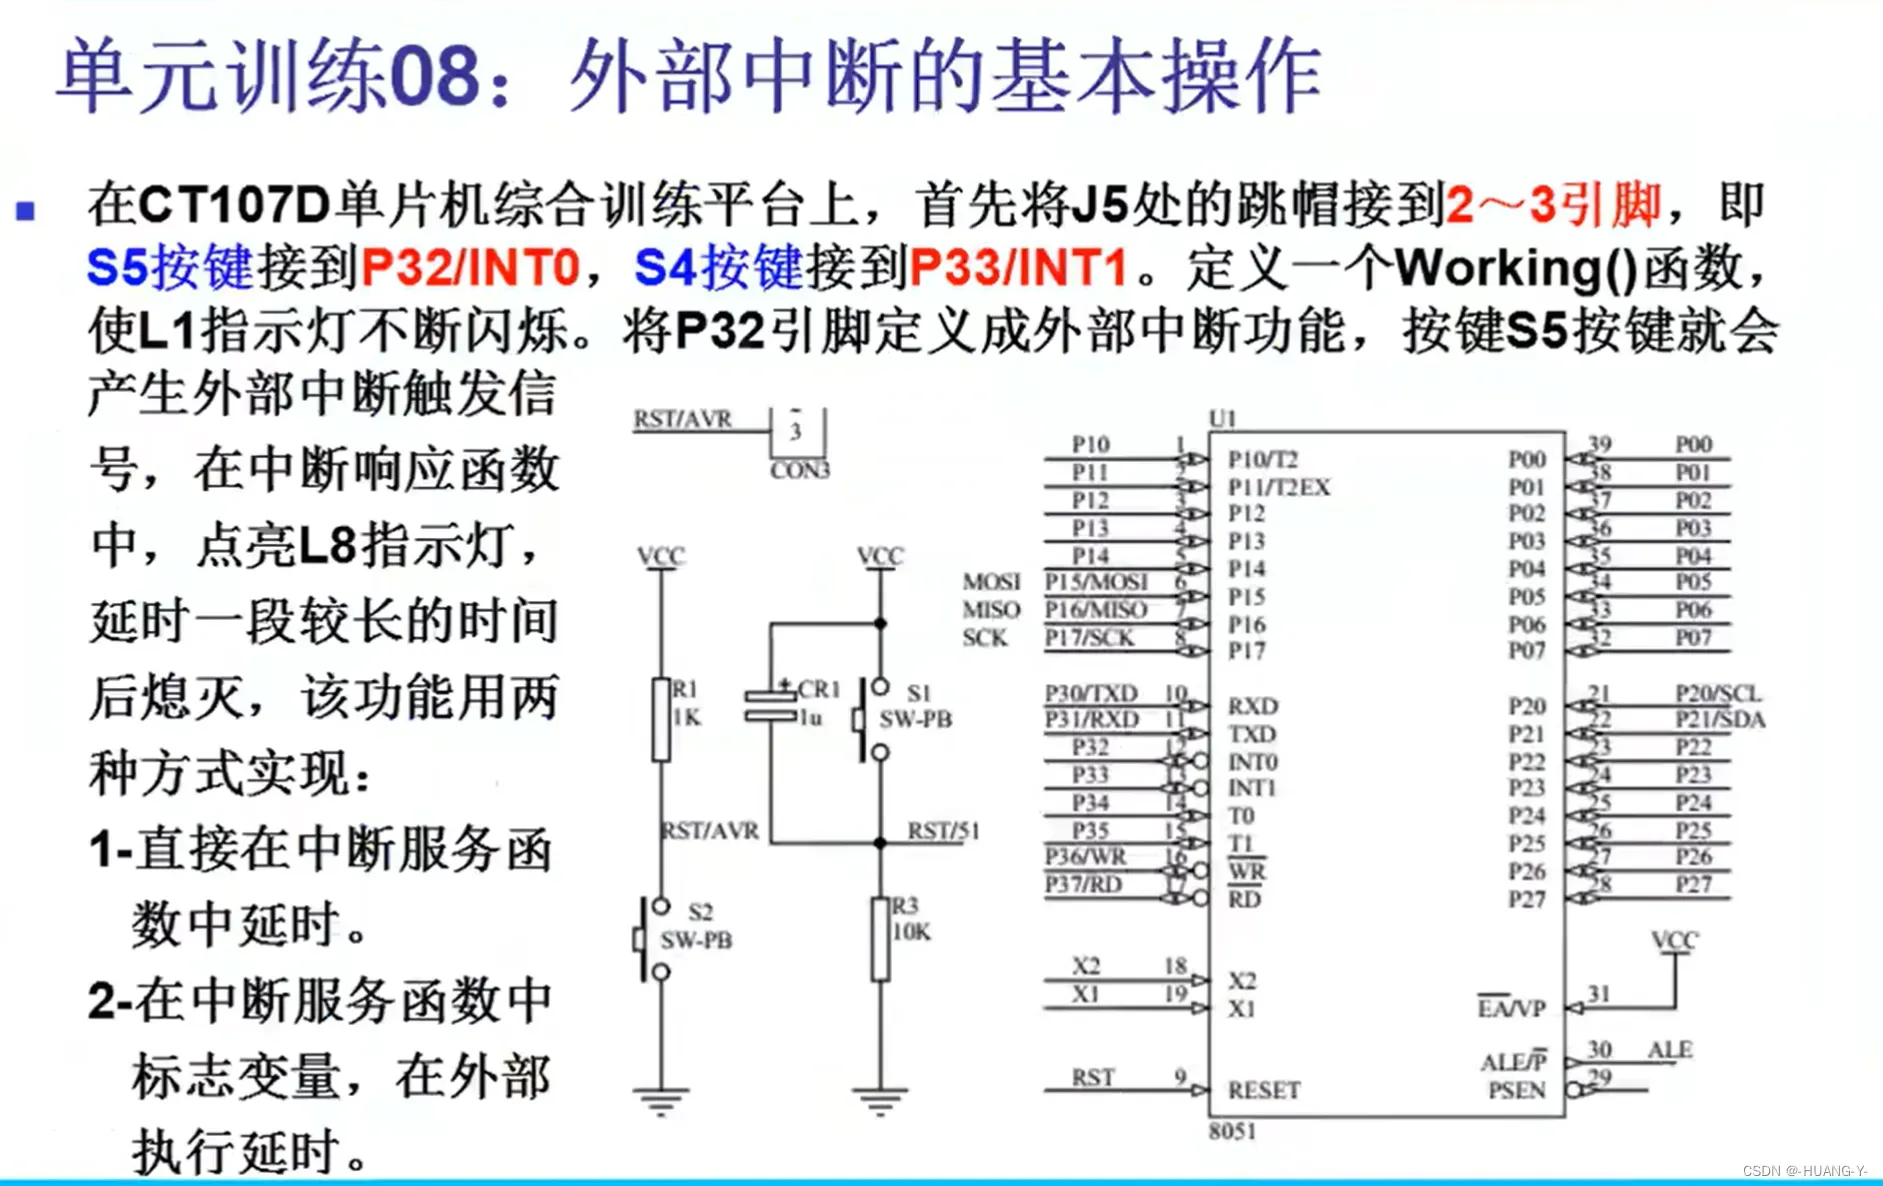
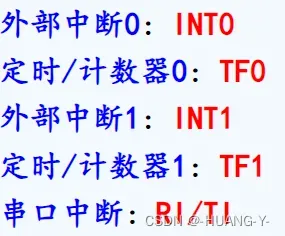
原理:
51有五个中断源,分为三类:外部中断、定时/计数器中断、串口中断。自然优先级如下图所示。
中断系统结构如下图。在这里我们只考虑外部中断。(以INT0为例)
EA:类似总开关。置1打开。
IT0:置1为下降沿触发,置0为低电平触发。
EX0:置1为外部中断0打开。
IE0:外部中断标志位
每个寄存器都可以位寻址,即只控制一位变化即可。
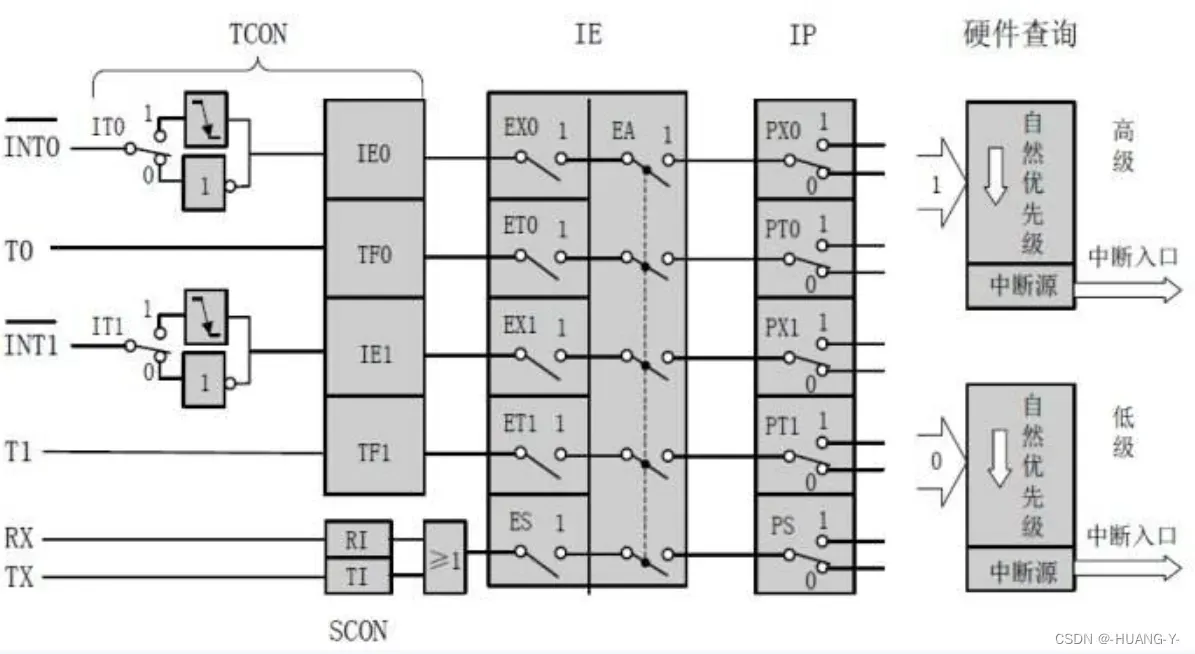

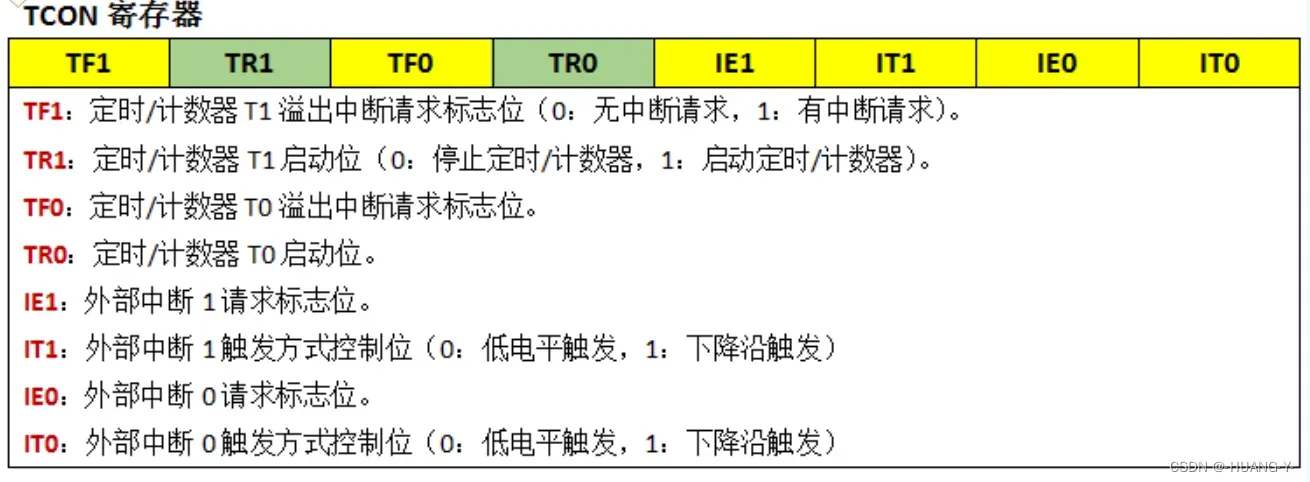
中断代码分为两部分:中断初始化函数,中断服务函数(注意中断序号)。
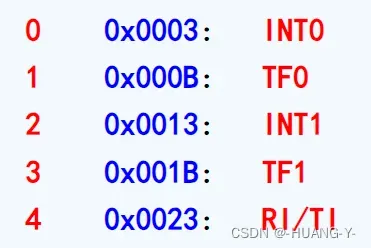
中断函数里尽量少写功能
整体代码实现:
#include "reg52.h"

sbit L1 = P0^0;
sbit L8 = P0^7;

void Delay(unsigned int t)
{
	while(t--);
	while(t--);
	while(t--);
}

void SelectHC573()
{
	P2 = (P2 & 0x1f) | 0x80;
}

void Working()
{
	SelectHC573();
	L1 = 0;
	Delay(60000);
	L1 = 1;
	Delay(60000);
}

//================================
void Init_INT0()//外部中断初始化
{
	IT0 = 1;
	EX0 = 1;
	EA = 1;
}

unsigned char stat_int = 0;
void ServiceINT0() interrupt 0
{
	stat_int = 1;//通过状态变量控制中断中的功能
}

void LEDINT()
{
	if(stat_int == 1)
	{
		L8 = 0;
		Delay(60000);
		Delay(60000);
		Delay(60000);
		Delay(60000);
		Delay(60000);
		Delay(60000);
		L8 = 1;
	}
	stat_int = 0;
}
//================================
void main()//这种方式中断只会在L1熄灭后进行
{
	Init_INT0();
	while(1)
	{
		Working();
		LEDINT();
	}
}
8、定时器中断
训练题目:

原理:
定时/计数器的最基本工作原理是进行计数。作为定时器时,计数信号的来源选择周期性的内部时钟脉冲;用作计数器时,计数信号的来源选择非周期性的外部输入信号。
51单片机有两个定时/计数器T0和T1,为16位加法计数器,由低8位TLx和高8位THx两个寄存器组成,最大计数值为65535个计数脉冲。
该加1计数器的计数脉冲来源有2个:
<1> 系统时钟振荡器输出的12分频。
<2> T0或T1引脚输入的外部脉冲信号。
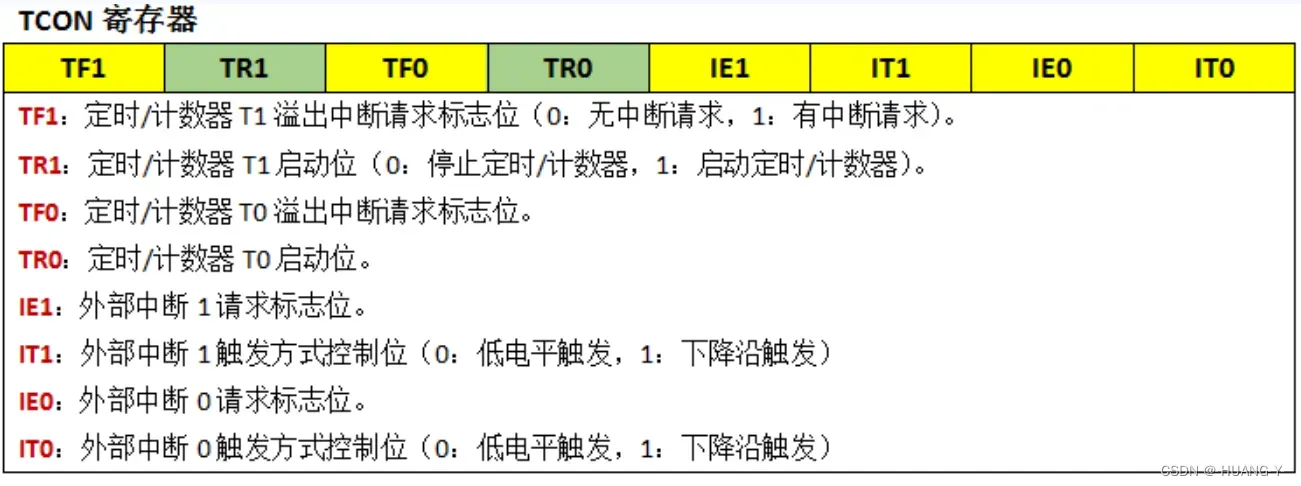
每接收到一个计数脉冲,计数器就会加1,当计数值累计至全为1时,再输入一个计数脉冲,计数器便会溢出回零,并且计数器的溢出是TCON寄存器的TF0或TF1位置1,同时向内核提出中断请求。
假设单片机的外部晶振为12MHz,那么,经过12分频后输入计数器的计数脉冲为1MHz,即每个脉冲的周期为1us。因此定时器T0的16位工作模式最大的定时时间为65535us,65.5ms。
1.计数初值寄存器THx和TLx的配置,确定初值的代码(以10ms为例):

2.TMOD寄存器的定时器功能配置,必须整个字节操作:

3.TCON中断标志寄存器(以定时器0为例):
ET0 = 1;
EA = 1;
TR0 = 1;//定时器特有,注意
整体代码实现:
#include "reg52.h"

sbit L1 = P0^0;
sbit L8 = P0^7;

void SelectHC573()
{
	P2 = (P2 & 0x1f) | 0x80;
}

//=================================
void InitTimer0()
{
	TMOD = 0x01;
	TH0 = (65535 - 50000) / 256;
	TL0 = (65535 - 50000) % 256;

	ET0 = 1;
	EA = 1;
	TR0 = 1;
}

unsigned char count = 0;
void ServiceTimer0() interrupt 1
{
	TH0 = (65535 - 50000) / 256;
	TL0 = (65535 - 50000) % 256;//每次溢出清零,所以中断函数内部要重新赋值

	count++;
	if(count % 10 == 0)//用倍数的性质,减少了一个全局变量
	{
		L1 = ~L1;
	}
	if(count == 100)
	{
		L8 = ~L8;
		count = 0;
	}
}
//================================
void main()
{
	SelectHC573();
	InitTimer0();
	while(1)
	{
	}
}
9、定时器扩展应用
训练内容:
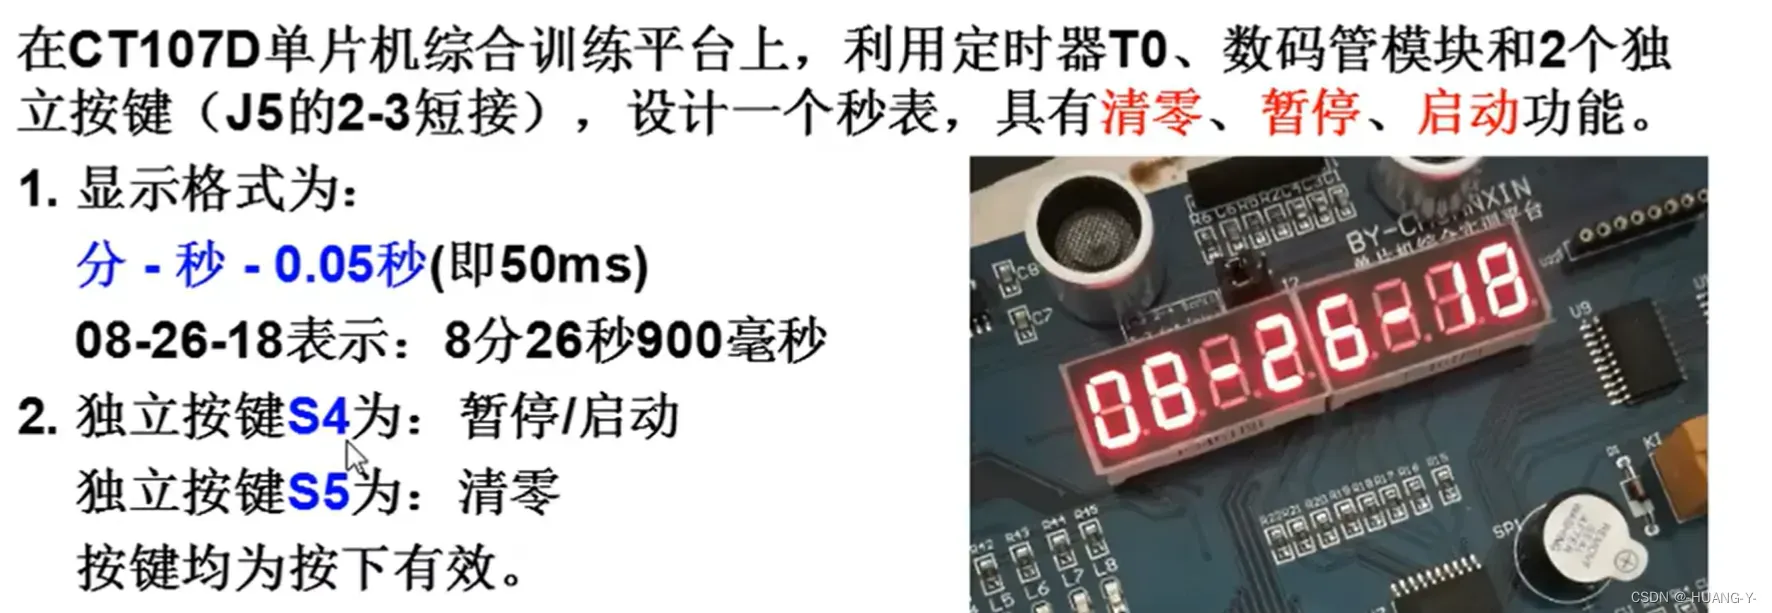
整体代码实现:
#include "reg52.h"

sbit S4 = P3^3;
sbit S5 = P3^2;

unsigned char t_m = 0;
unsigned char t_s = 0;
unsigned char t_005s = 0;

unsigned char code SMG_NoDot[18] =
    {0xc0,0xf9,0xa4,0xb0,0x99,0x92,0x82,0xf8,
     0x80,0x90,0x88,0x80,0xc6,0xc0,0x86,0x8e,
     0xbf,0x7f};

void SelectHC573(unsigned char channel)
{
	switch(channel)
	{
		case 4:
			P2 = (P2 & 0x1f) | 0x80;
		break;
		case 5:
			P2 = (P2 & 0x1f) | 0xa0;
		break;
		case 6:
			P2 = (P2 & 0x1f) | 0xc0;
		break;
		case 7:
			P2 = (P2 & 0x1f) | 0xe0;
		break;
	}
}

void DisplaySMG_Bit(unsigned char value, unsigned char pos)
{
	P0 = 0xff;
	SelectHC573(6);
	P0 = 0x01 << pos;
	SelectHC573(7);
	P0 = value;
}

void DelaySMG(unsigned int t)
{
	while(t--);
}

void DisplayTime()
{
	DisplaySMG_Bit(SMG_NoDot[t_005s%10],7);//从0开始数
	DelaySMG(500);
	DisplaySMG_Bit(SMG_NoDot[t_005s/10],6);
	DelaySMG(500);
	DisplaySMG_Bit(SMG_NoDot[16],5);
	DelaySMG(500);

	DisplaySMG_Bit(SMG_NoDot[t_s%10],4);
	DelaySMG(500);
	DisplaySMG_Bit(SMG_NoDot[t_s/10],3);
	DelaySMG(500);
	DisplaySMG_Bit(SMG_NoDot[16],2);
	DelaySMG(500);

	DisplaySMG_Bit(SMG_NoDot[t_m%10],1);
	DelaySMG(500);
	DisplaySMG_Bit(SMG_NoDot[t_m/10],0);
	DelaySMG(500);
}

void InitTimer0()
{
	TMOD = 0x01;
	TH0 = (65535 - 50000) / 256;
	TL0 = (65535 - 50000) % 256;
	ET0 = 1;
	EA = 1;
	TR0 = 1;
}

void ServiceTimer0() interrupt 1
{
	TH0 = (65535 - 50000) / 256;
	TL0 = (65535 - 50000) % 256;

	t_005s++;
	if(t_005s == 20)
	{
		t_s++;
		t_005s = 0;
		if(t_s == 60)
		{
			t_m++;
			t_s = 0;
		}
		if(t_m == 99)
		{
			t_m = 0;
		}
	}
}

void DelayK(unsigned char t)
{
	while(t--);
}
void ScanKeys()
{
	if(S4 == 0)
	{
		DelayK(100);
		if(S4 == 0)//消抖
		{
			TR0 = ~TR0;
			while(S4 == 0)//防止一个语句经历多次循环
			{
				DisplayTime();//注意要加显示语句,否则什么都不做会熄灭
			}
		}
	}

	if(S5 == 0)
	{
		DelayK(100);
		if(S5 == 0)
		{
			t_005s = 0;
			t_s = 0;
			t_m = 0;
			while(S5 == 0)
			{
				DisplayTime();
			}
		}
	}
}

void main()
{
	InitTimer0();
	while(1)
	{
		DisplayTime();
		ScanKeys();
	}
}
10、PWM
训练题目:
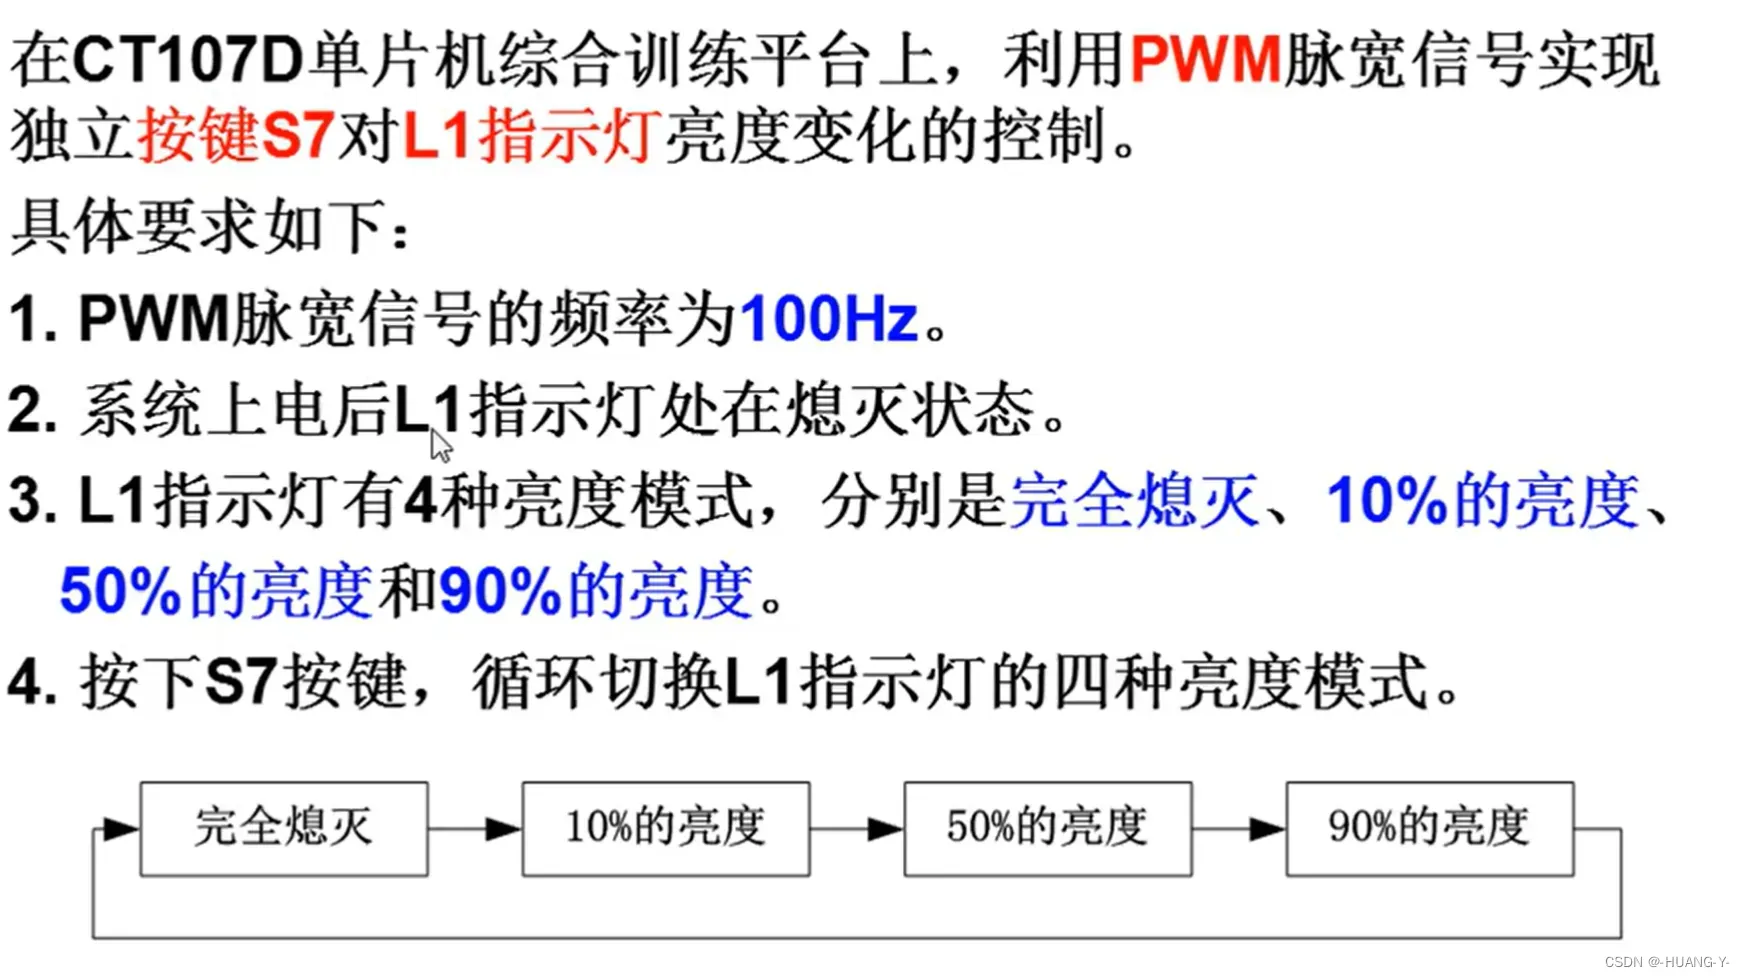
原理:
占空比:高电平在一个周期的比例。
PWM常用于电机、舵机、灯光亮暗等。注意时高电平还是低电平导通。
1ms = 1000 us
整体代码实现:
#include "reg52.h"

sbit L1 = P0^0;
sbit S7 = P3^0;

void SelectHC573()
{
	P2 = (P2 & 0x1f) | 0x80;
}

//============定时相关的函数================
unsigned char count = 0;
unsigned char pwm_duty = 0;
void InitTimer0()
{
	TMOD = 0x01;
	TH0 = (65535 - 100) / 256;
	TL0 = (65535 - 100) % 256;

	ET0 = 1;
	EA = 1;
}

void ServiceTimer0() interrupt 1
{
	TH0 = (65535 - 100) / 256;//10ms分为100份,来控制占空比
	TL0 = (65535 - 100) % 256;

	count++;
	if(count == pwm_duty)
	{
		L1 = 1;
	}
	else if(count == 100)
	{
		L1 = 0;
		count = 0;
	}
}

//============按键相关的函数================
void Delay(unsigned int t)
{
	while(t--);
}

unsigned char stat = 0;//用状态变量来控制不同分支
void ScanKeys()
{
	if(S7 == 0)
	{
		Delay(100);
		if(S7 == 0)
		{
			switch(stat)
			{
				case 0:
					L1 = 0;
				    TR0 = 1;//按键按下定时器才启动
					pwm_duty = 10;
				    stat = 1;
				    break;

				case 1:
					pwm_duty = 50;
					stat = 2;
				    break;

				case 2:
					pwm_duty = 90;
				    stat = 3;
				    break;

				case 3:
					L1 = 1;//灯熄灭
				    TR0 = 0;//定时器关闭
				    stat = 0;
				    break;
			}
			while(S7 == 0);//防止多次循环检测
		}
	}
}

void main()
{
	SelectHC573();
	L1 = 1;
	InitTimer0();
	while(1)
	{
		ScanKeys();
	}
}
11、串口通信基础
训练题目:
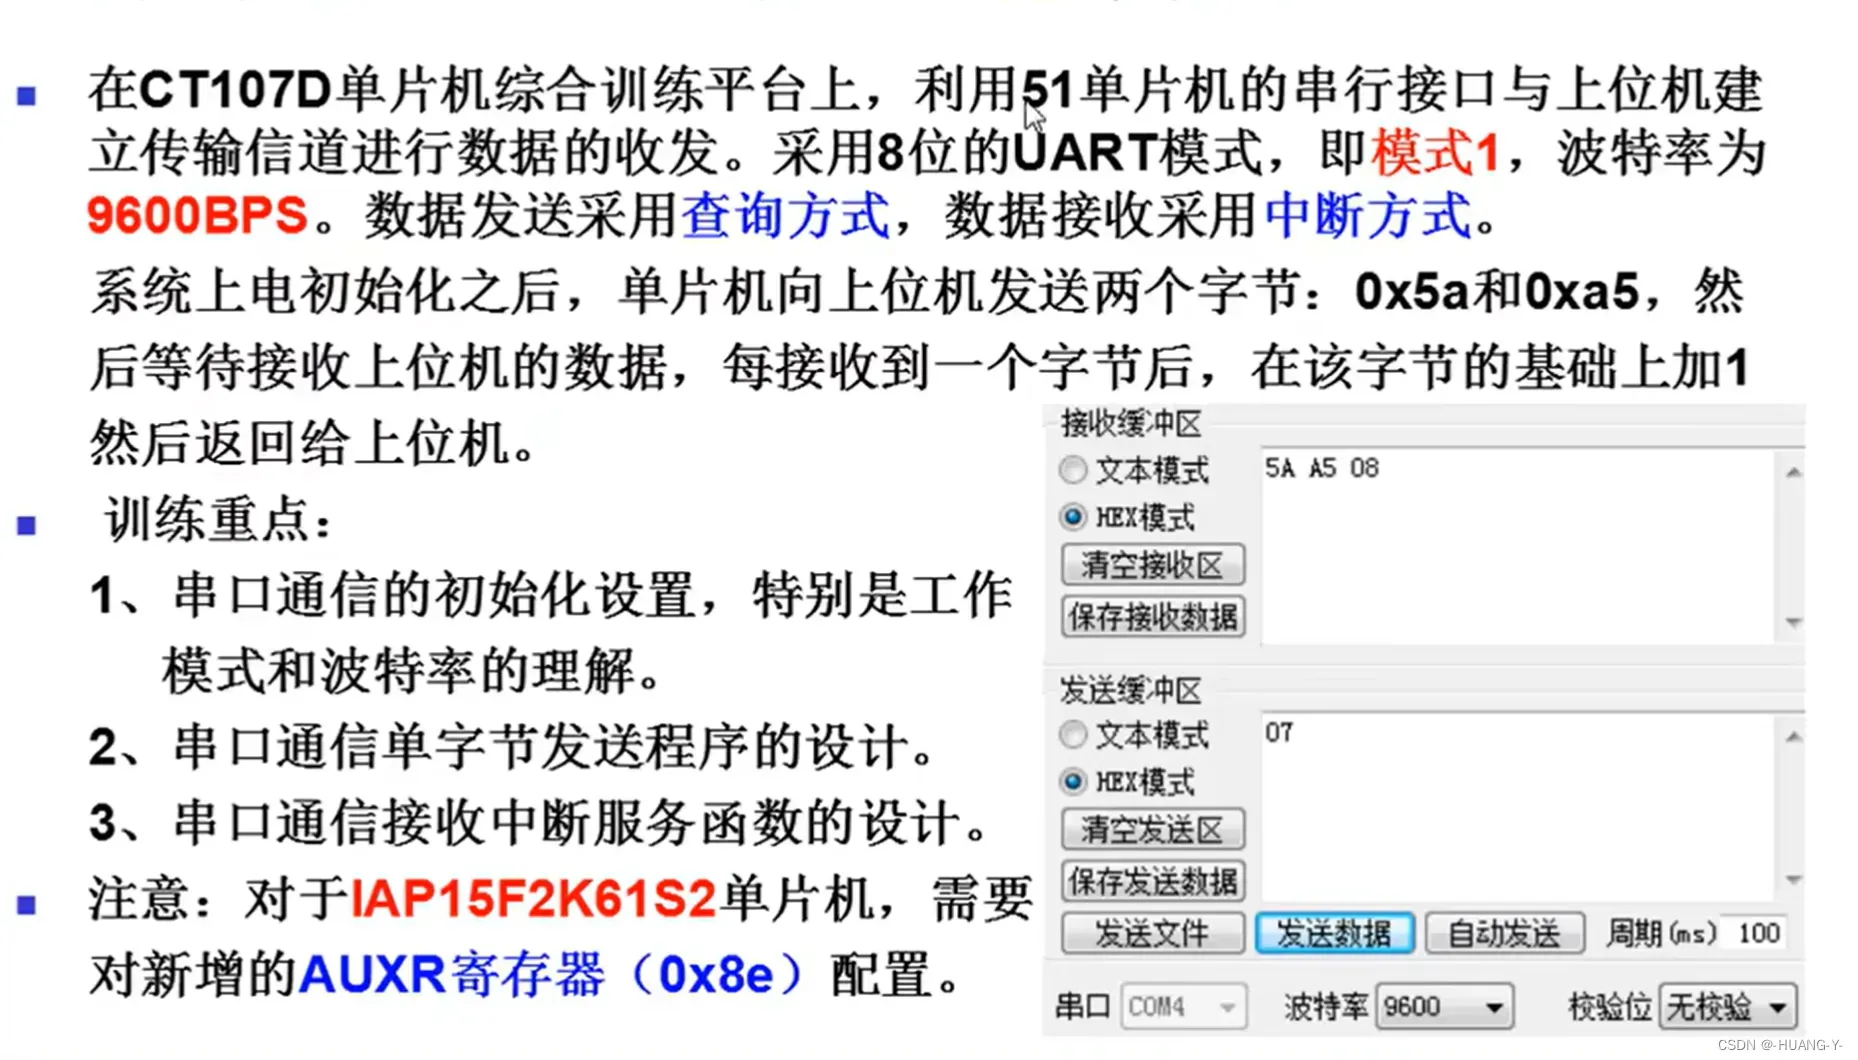
串口通信基本原理:
分类:

SPI,IIC,UART均属串行通信。串口通信常指UART。
串行通信分类:
单工(只能接收)、半双工(接收、发送,只有一个信道)、全双工(接收、发送、两个信道)。
串行通信方式:
同步(一个时钟,数据块传输)、异步(多个时钟,波特率一致,数据帧传输)。
波特率:串口每秒传输的位数。
代码实现的前提准备:
波特率取决于定时器1的溢出率,即每溢出一次,串口就发送一次数据。
而定时器1通常我们采用工作模式2(8位自动重装),当计数到最大值溢出时,TH1的值会自动重装到TL1。
SMOD:0时(默认值)波特率正常,1时波特率翻倍。

∴TH1 = 0xfd;TL1 = 0xfd;
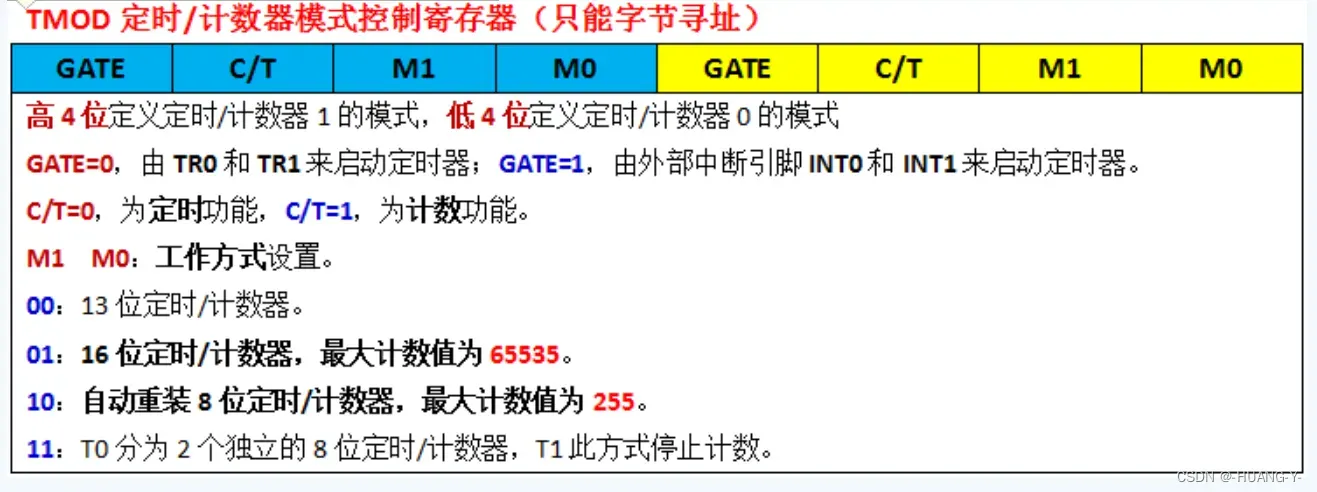
此处使用的是定时器1(自动重装),所以控制高四位,应为0010 0000,即TMOD = 0x20;
SCON寄存器:
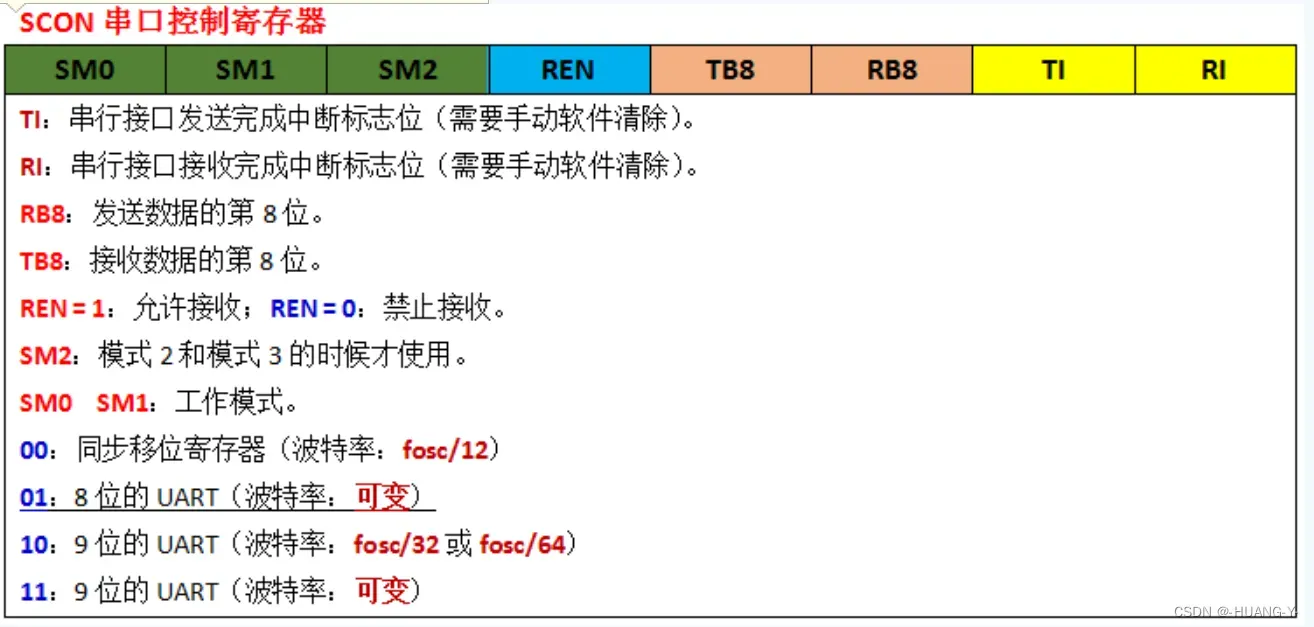
SM0,SM1:01(八位波特率UART,常用);TB8,RB8功能不常用,置零即可。
所以,SCON = 0x50;
sfr AUXR = 0x8e;
AUXR = 0x00;(蓝桥杯板子要用)
ES = 1;(串口开关)
EA = 1;(总开关)
串口初始化函数:
sfr AUXR = 0x8e;

void InitUart()
{
	TMOD = 0x20;
	TH1 = 0xfd;
	TL1 = 0xfd;
	TR1 = 1;

	SCON = 0x50;
	AUXR = 0x00;

	ES = 1;
	EA = 1;
}RI(接收完成中断标志),TI(发送完成中断标志)。都需手动清零。
SBUF寄存器:
SBUF = 数据/变量;(发送)
变量 = SBUF ;(接收)
中断函数用interrupt 4
整体代码实现:
#include "reg52.h"

sfr AUXR = 0x8e;

unsigned char urdat;

void SendByte(unsigned char dat);

void InitUart()
{
	TMOD = 0x20;
	TH1 = 0xfd;
	TL1 = 0xfd;
	TR1 = 1;

	SCON = 0x50;
	AUXR = 0x00;

	ES = 1;
	EA = 1;
}

void ServiceUart() interrupt 4
{
	if(RI == 1)
	{
		RI = 0;
		urdat = SBUF;
		SendByte(urdat + 1);
	}
}

void SendByte(unsigned char dat)
{
	SBUF = dat;
	while(TI == 0);
	TI = 0;
}

void main()
{
	InitUart();
	SendByte(0x5a);
	SendByte(0xa5);
	while(1);
}
12、串口通信进阶
训练题目:
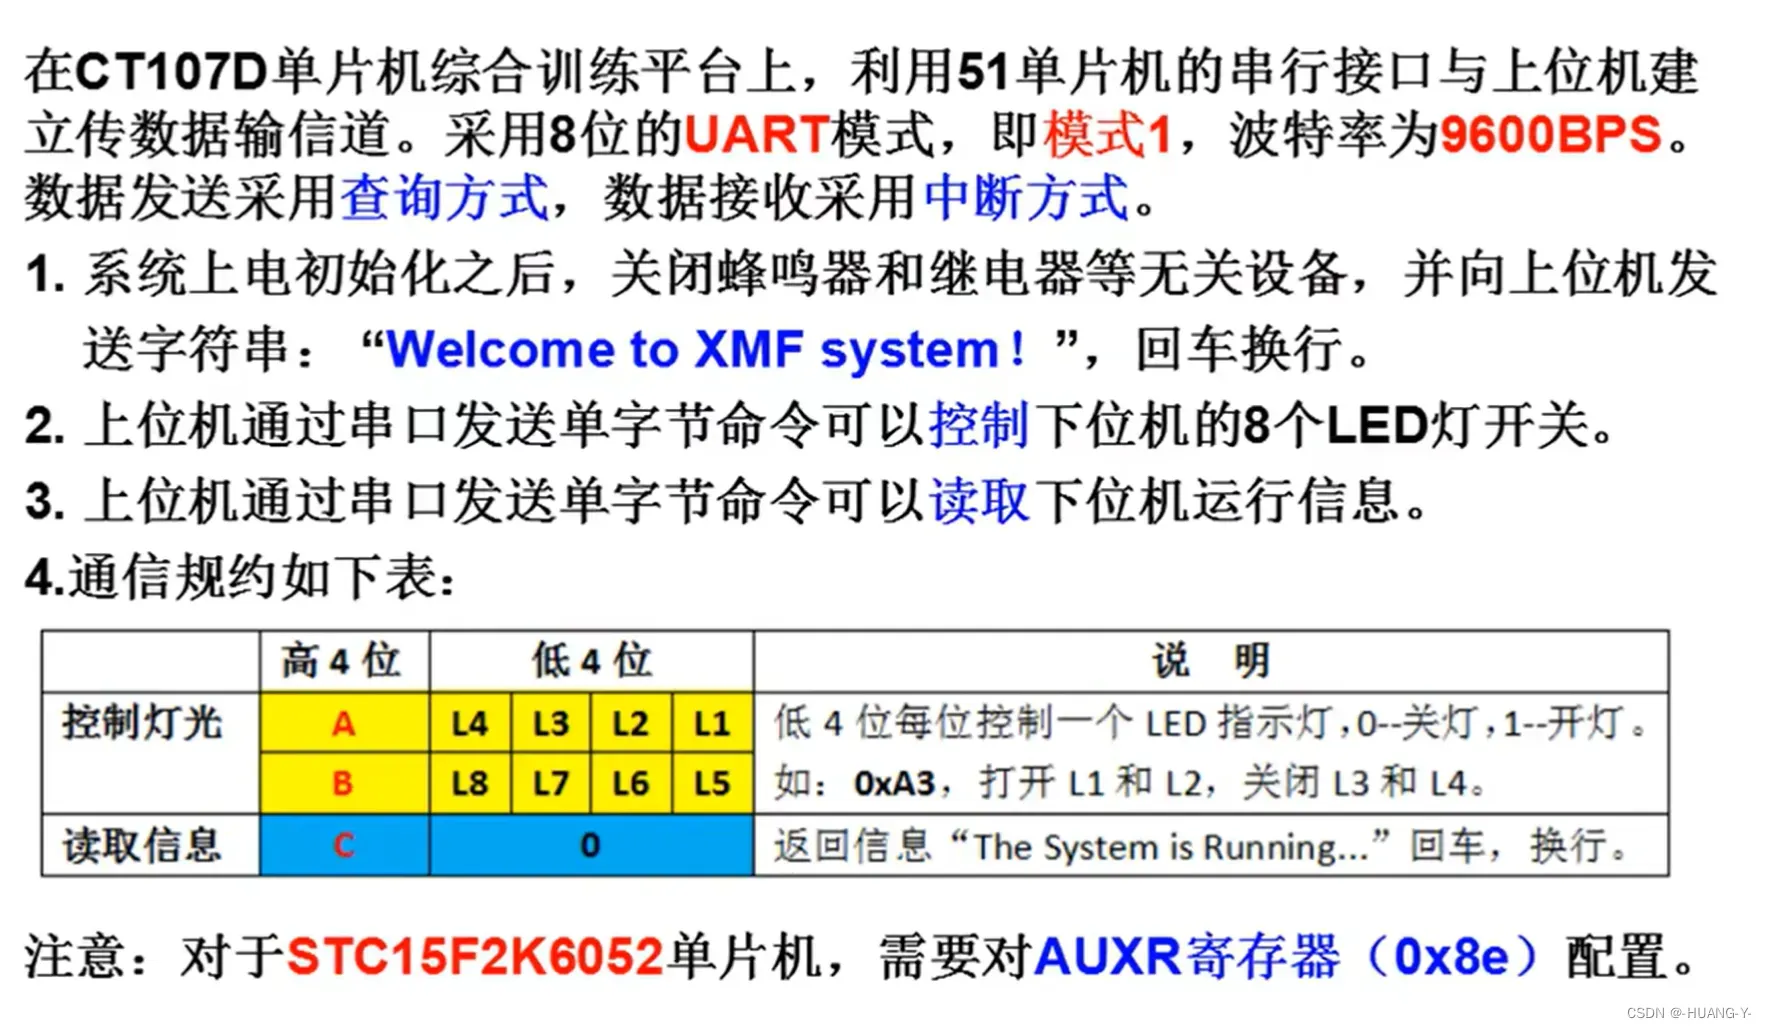
整体代码:
#include "reg52.h"

sfr AUXR = 0x8e;

void SelectHC573(unsigned char channel)
{
	switch(channel)
	{
		case 4:
			P2 = (P2 & 0x1f) | 0x80;
		break;
		case 5:
			P2 = (P2 & 0x1f) | 0xa0;
		break;
		case 6:
			P2 = (P2 & 0x1f) | 0xc0;
		break;
		case 7:
			P2 = (P2 & 0x1f) | 0xe0;
		break;
		case 0:
			P2 = (P2 & 0x1f) | 0x00;//保持锁存器的值不变
		break;
	}
}

void InitSystem()
{
	SelectHC573(5);
	P0 = 0x00;
	SelectHC573(4);
	P0 = 0xff;
}

//=======================================
void InitUart()
{
	TMOD = 0x20;
	TH1 = 0xfd;
	TL1 = 0xfd;
	TR1 = 1;

	SCON = 0x50;
	AUXR = 0x00;

	ES = 1;
	EA = 1;
}

unsigned char command = 0x00;
void ServiceUart() interrupt 4
{
	if(RI == 1)
	{
		command = SBUF;
		RI = 0;
	}
}

void SendByte(unsigned char dat)
{
	SBUF = dat;
	while(TI == 0);
	TI = 0;
}

void SendString(unsigned char *str)//字符串的发送
{
	while(*str != '\0')
	{
		SendByte(*str++);
	}
}
//=======================================
void Working()
{
	if(command != 0x00)
	{
		switch(command & 0xf0)
		{
			case 0xa0:
				P0 = (P0 | 0x0f) & (~command | 0xf0);//前者保证高四位不变,低四位熄灭;后者控制低四位
				command = 0x00;
			break;

			case 0xb0:
				P0 = (P0 | 0xf0) & ((~command << 4)| 0x0f);//类似
				command = 0x00;
			break;

			case 0xc0:
				SendString("The System is Running...\r\n");
				command = 0x00;
			break;
		}
	}
}

void main()
{
	InitSystem();
	InitUart();
	SendString("Welcome to XMF system!\r\n");
	while(1)
	{
		Working();
	}
}
13、存储器映射(可跳)
训练题目:
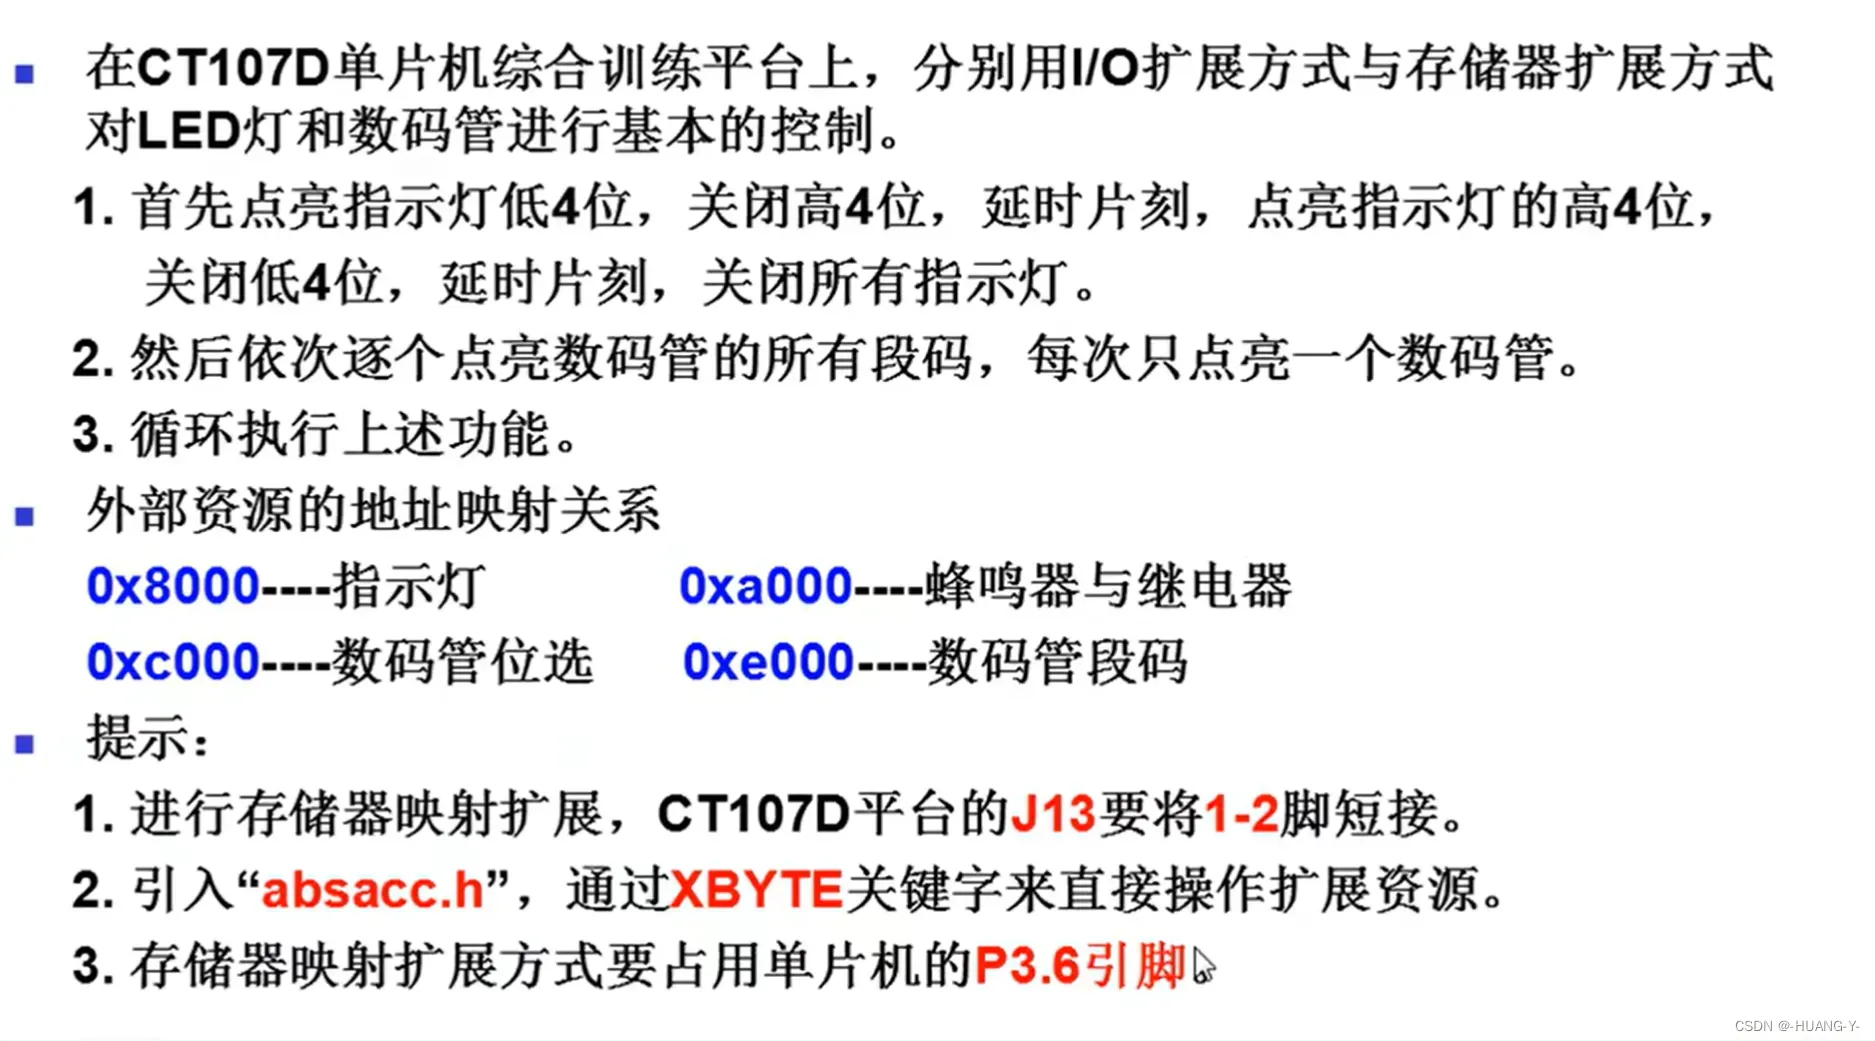
注:由于占用了P3.6,所以存储器映射与矩阵键盘不能复用。
整体代码实现:
#include "reg52.h"
#include "absacc.h"//

void Delay(unsigned int t)
{
	while(t--);
	while(t--);
}

void LEDRuning()
{
	XBYTE[0x8000] = 0xf0;//
	Delay(60000);
	Delay(60000);
	XBYTE[0x8000] = 0x0f; //
	Delay(60000);
	Delay(60000);
	XBYTE[0x8000] = 0xff;//
	Delay(60000);
	Delay(60000);
}

void SMGRunning()
{
	unsigned char i;
	for(i = 0; i < 8; i++)
	{
		XBYTE[0xc000] = 0x01 << i;//
		XBYTE[0xe000] = 0x00; //
		Delay(60000);
		Delay(60000);
	}
	XBYTE[0xe000] = 0xff;//
	Delay(60000);
	Delay(60000);
}

void main()
{
	while(1)
	{
		LEDRuning();
		SMGRunning();
	}
}
14、 综合设计
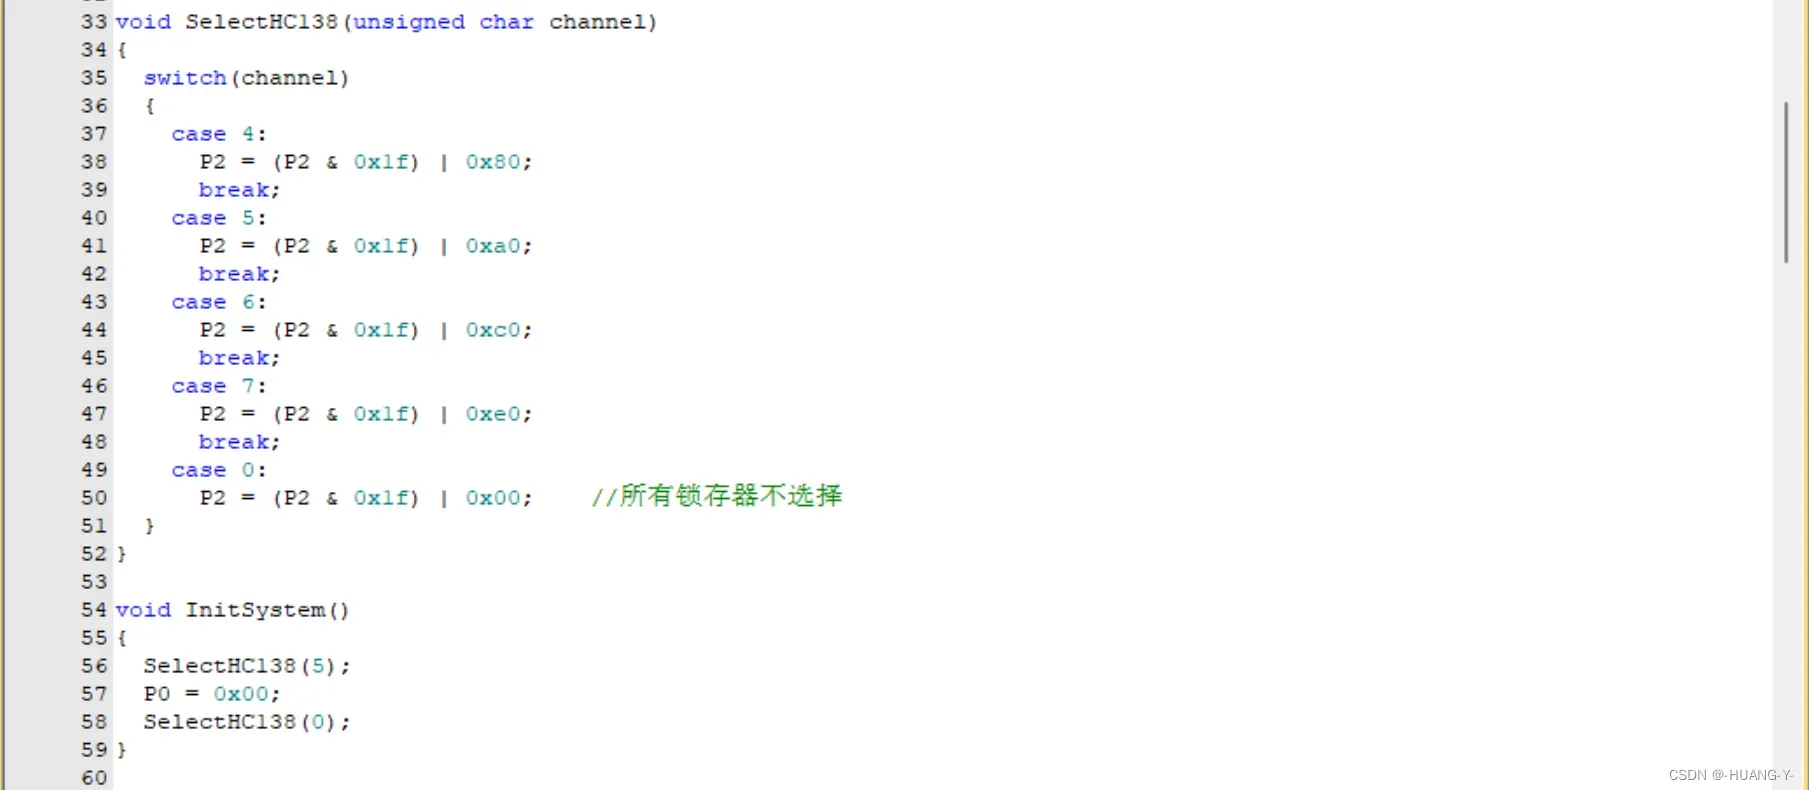
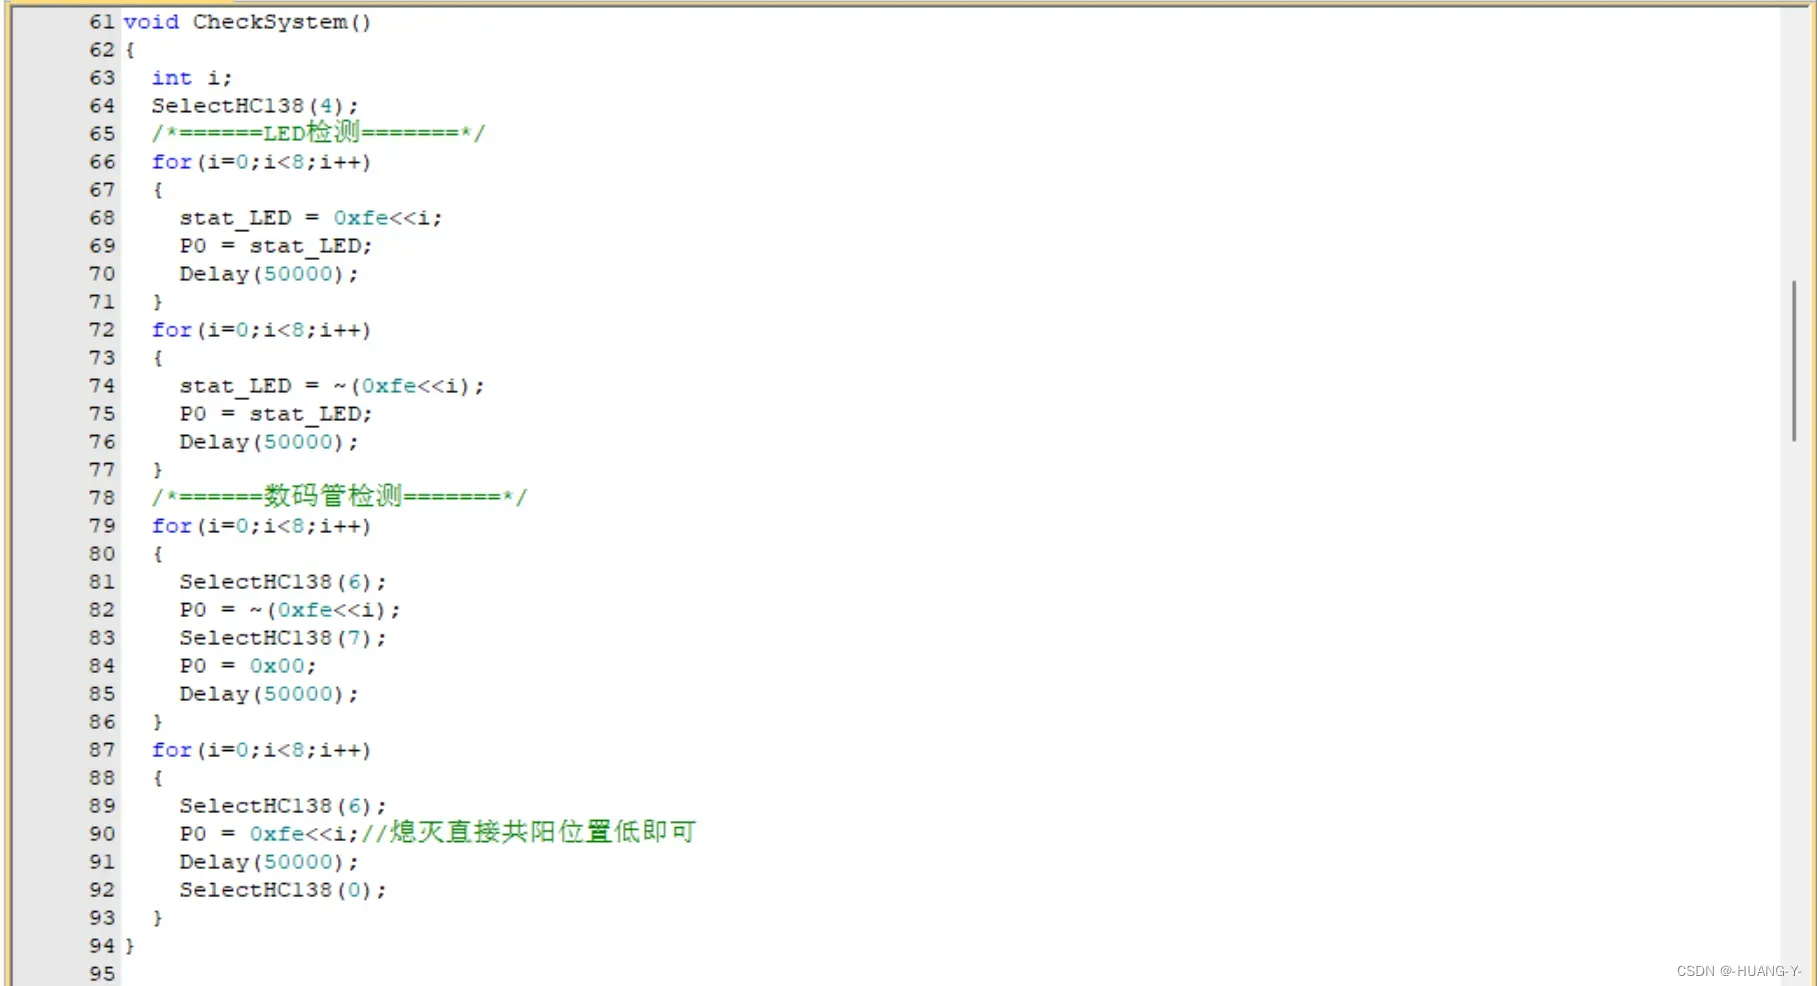
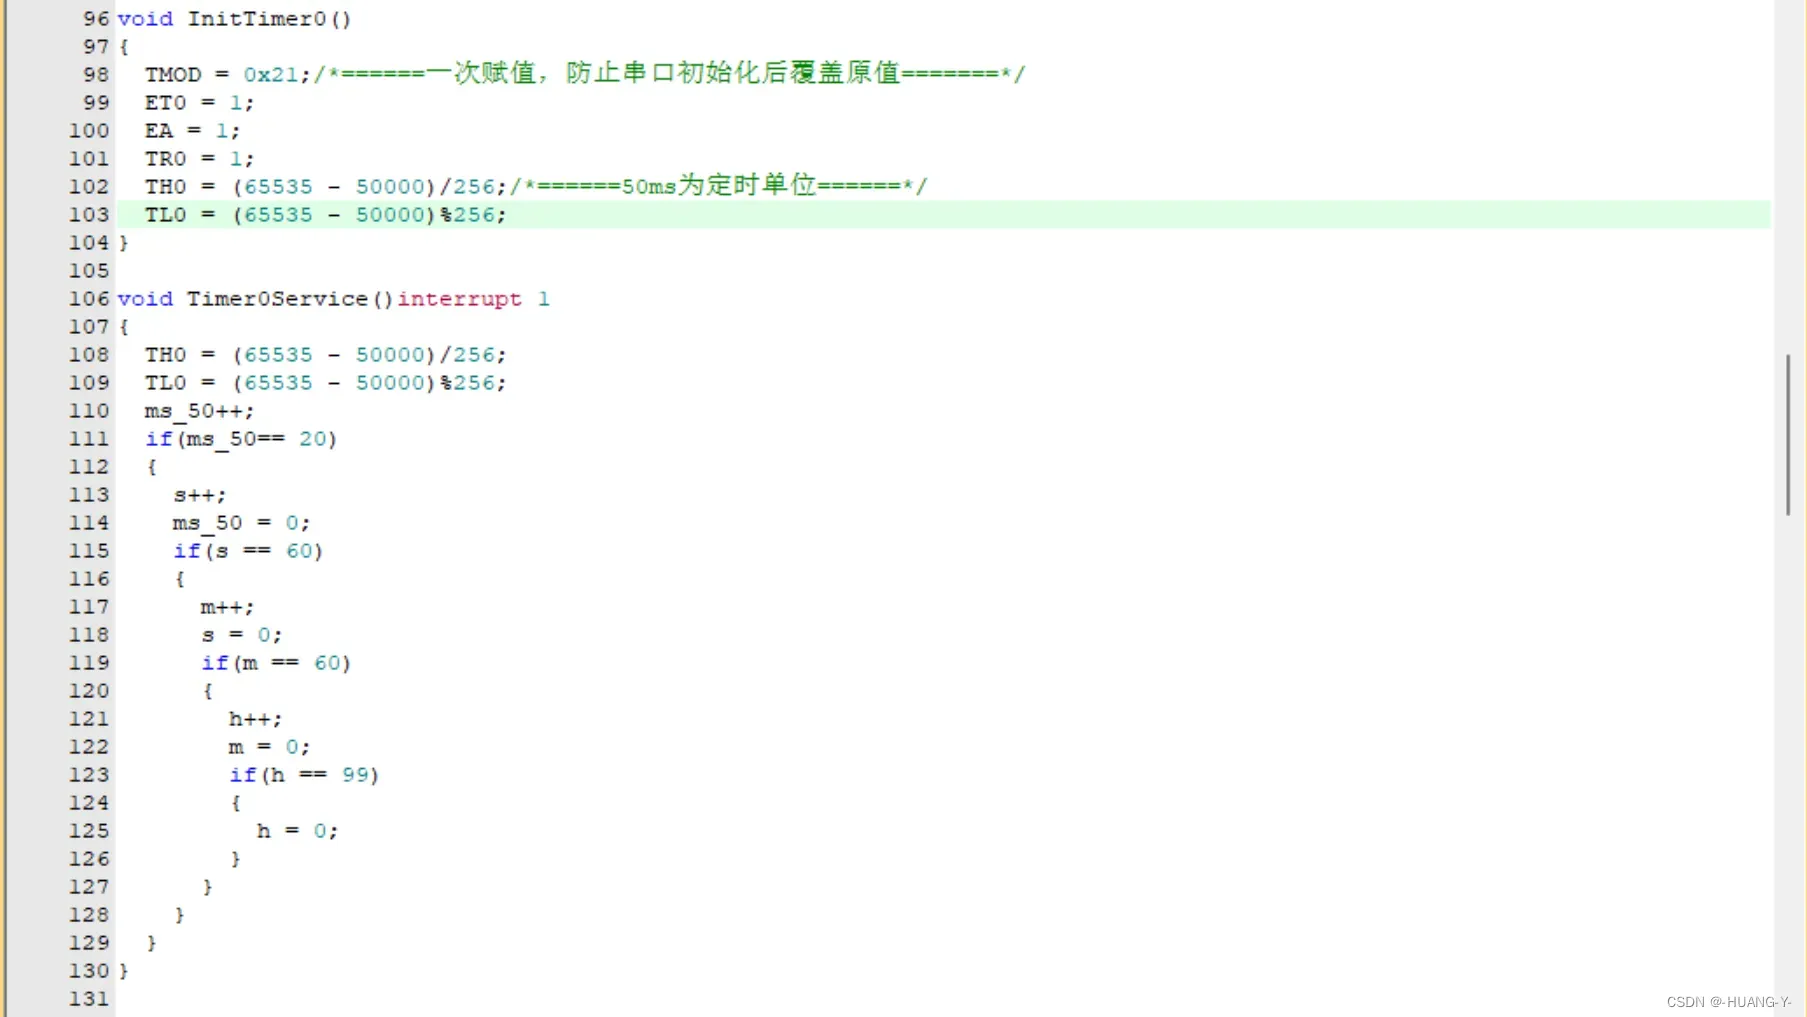
训练题目:
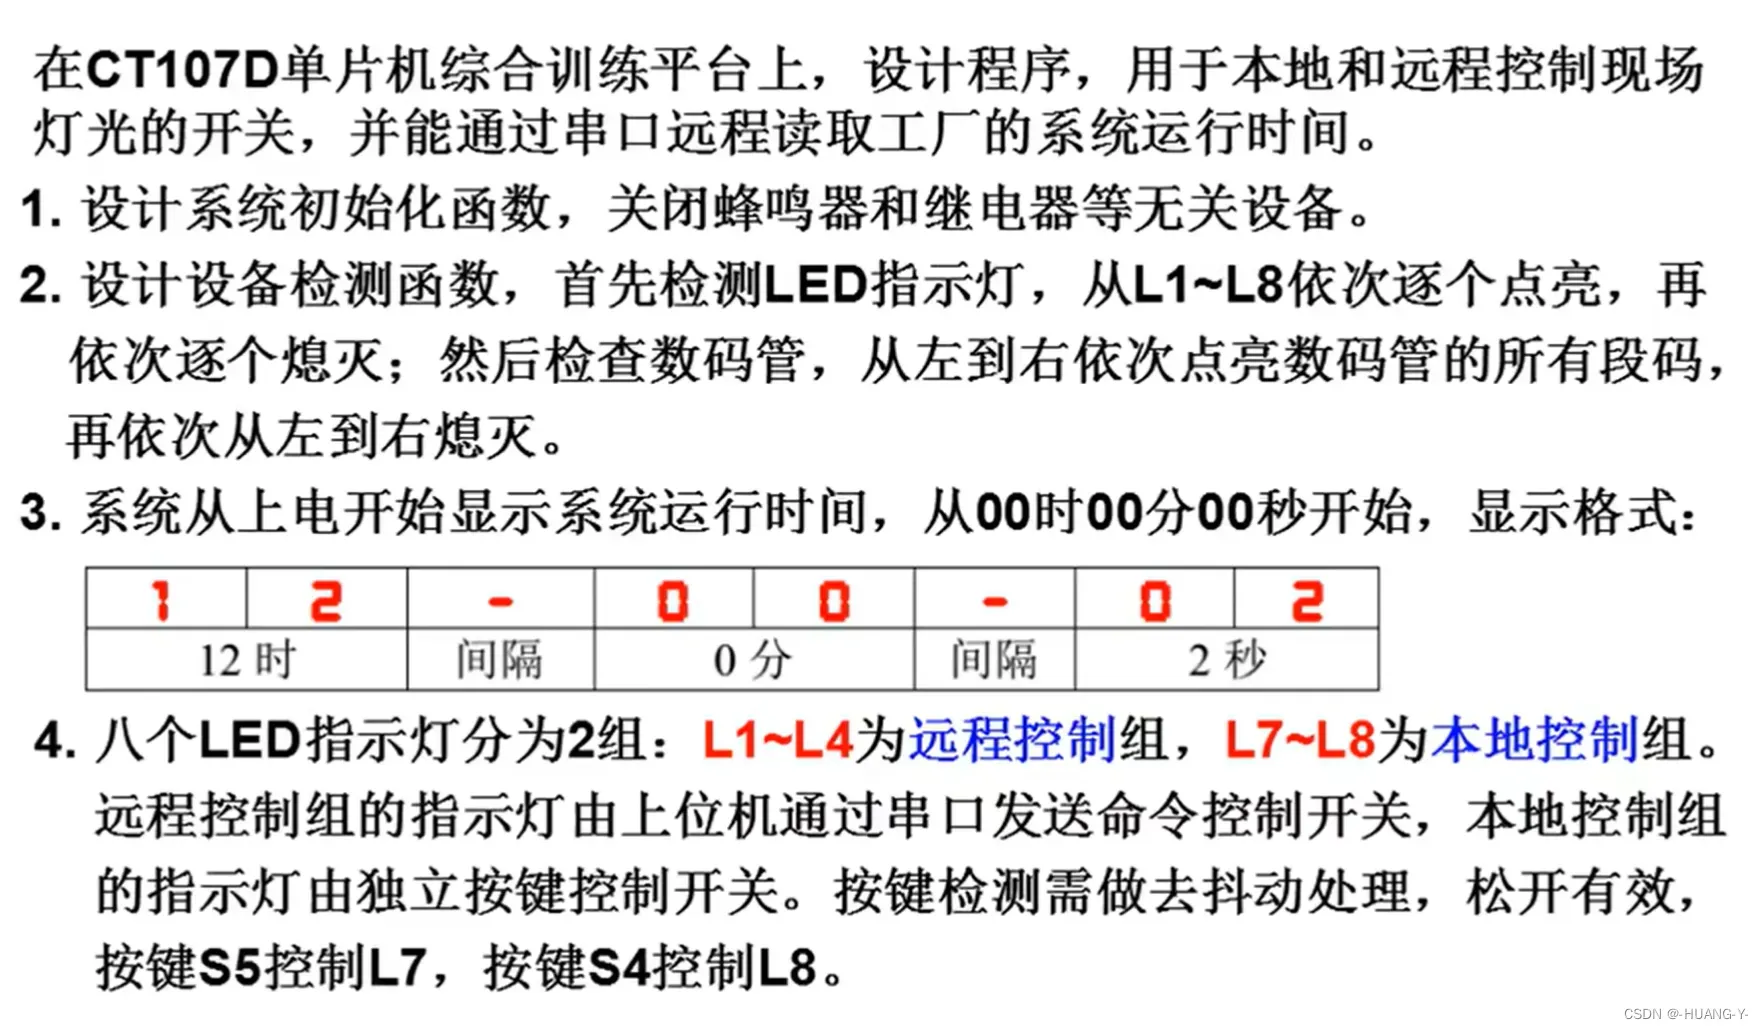
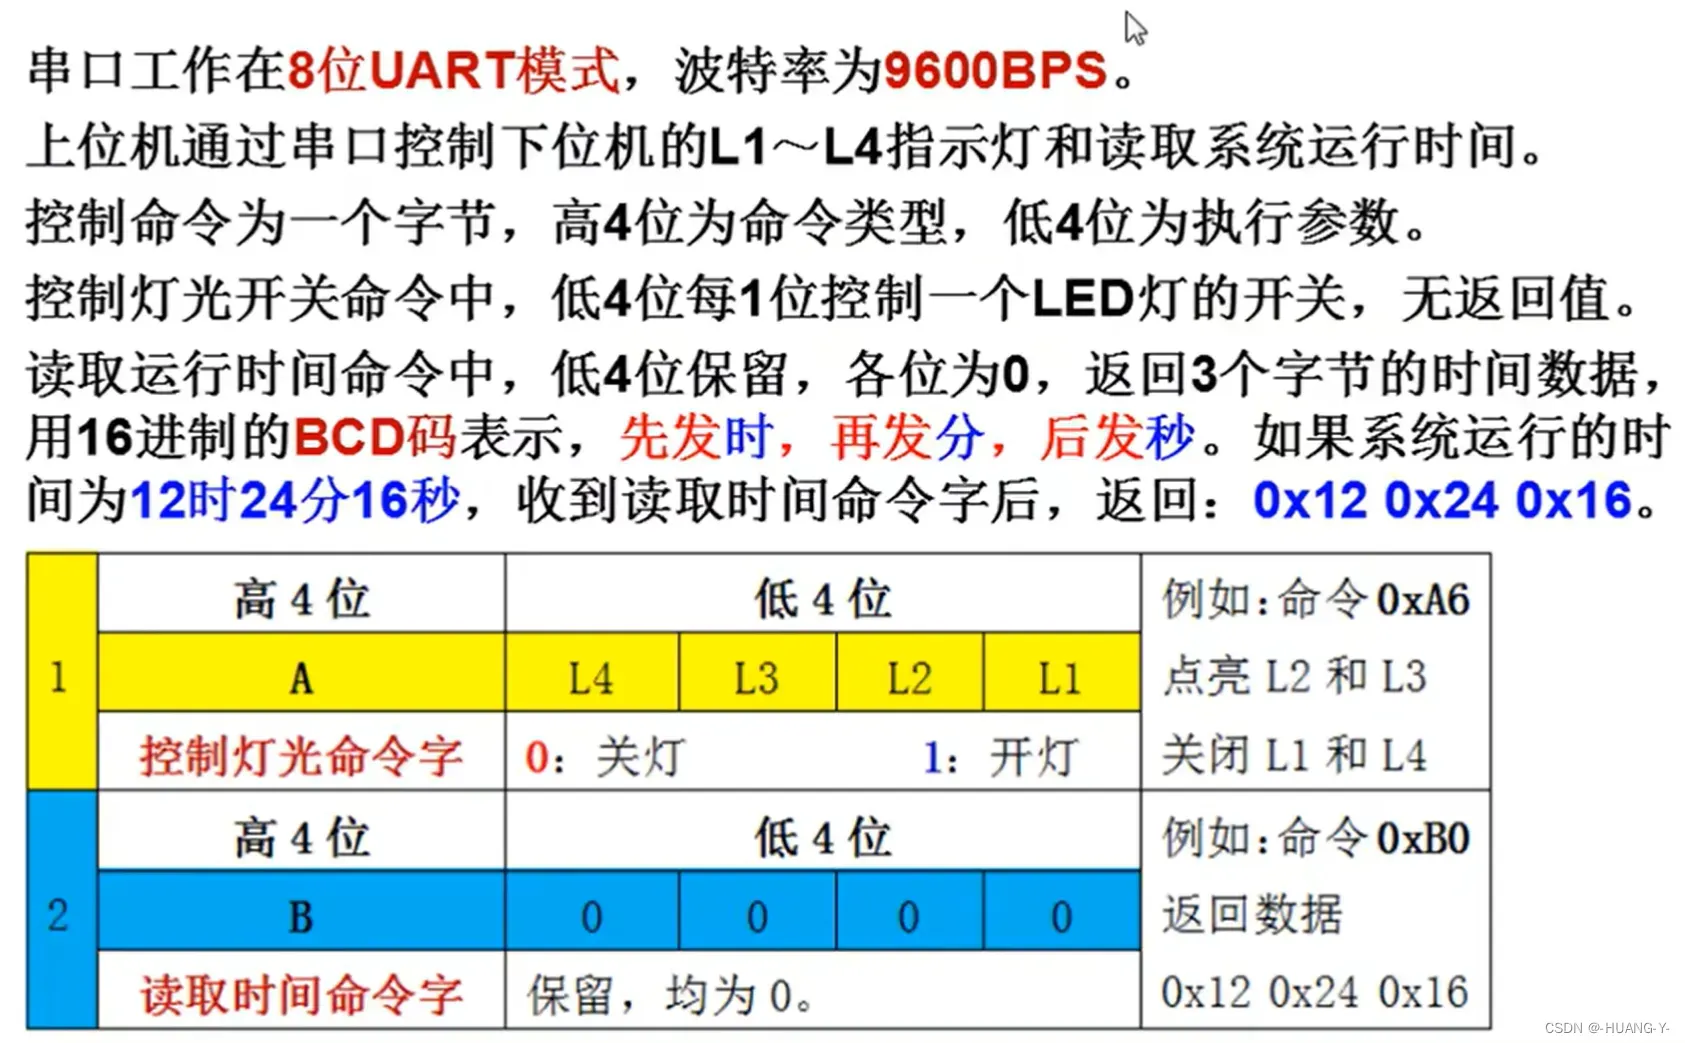
设计思路:
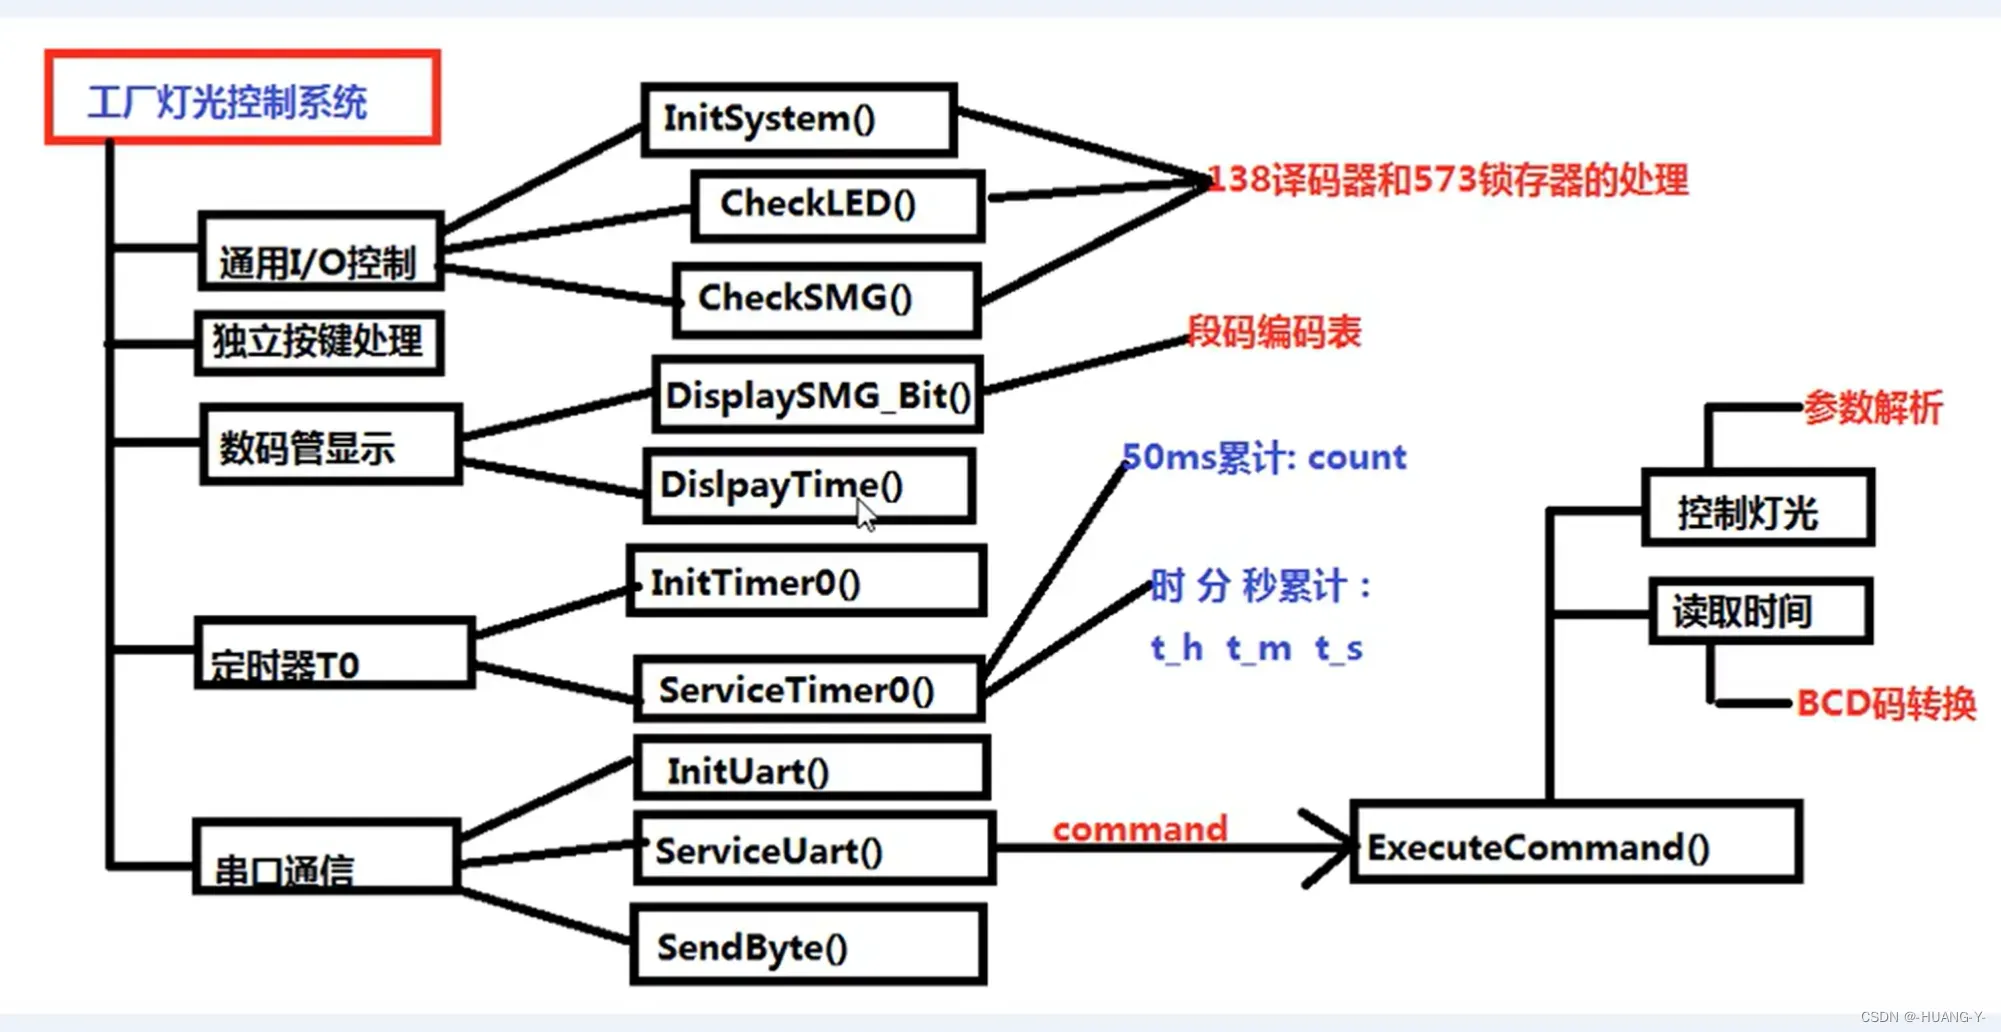
整体代码实现:
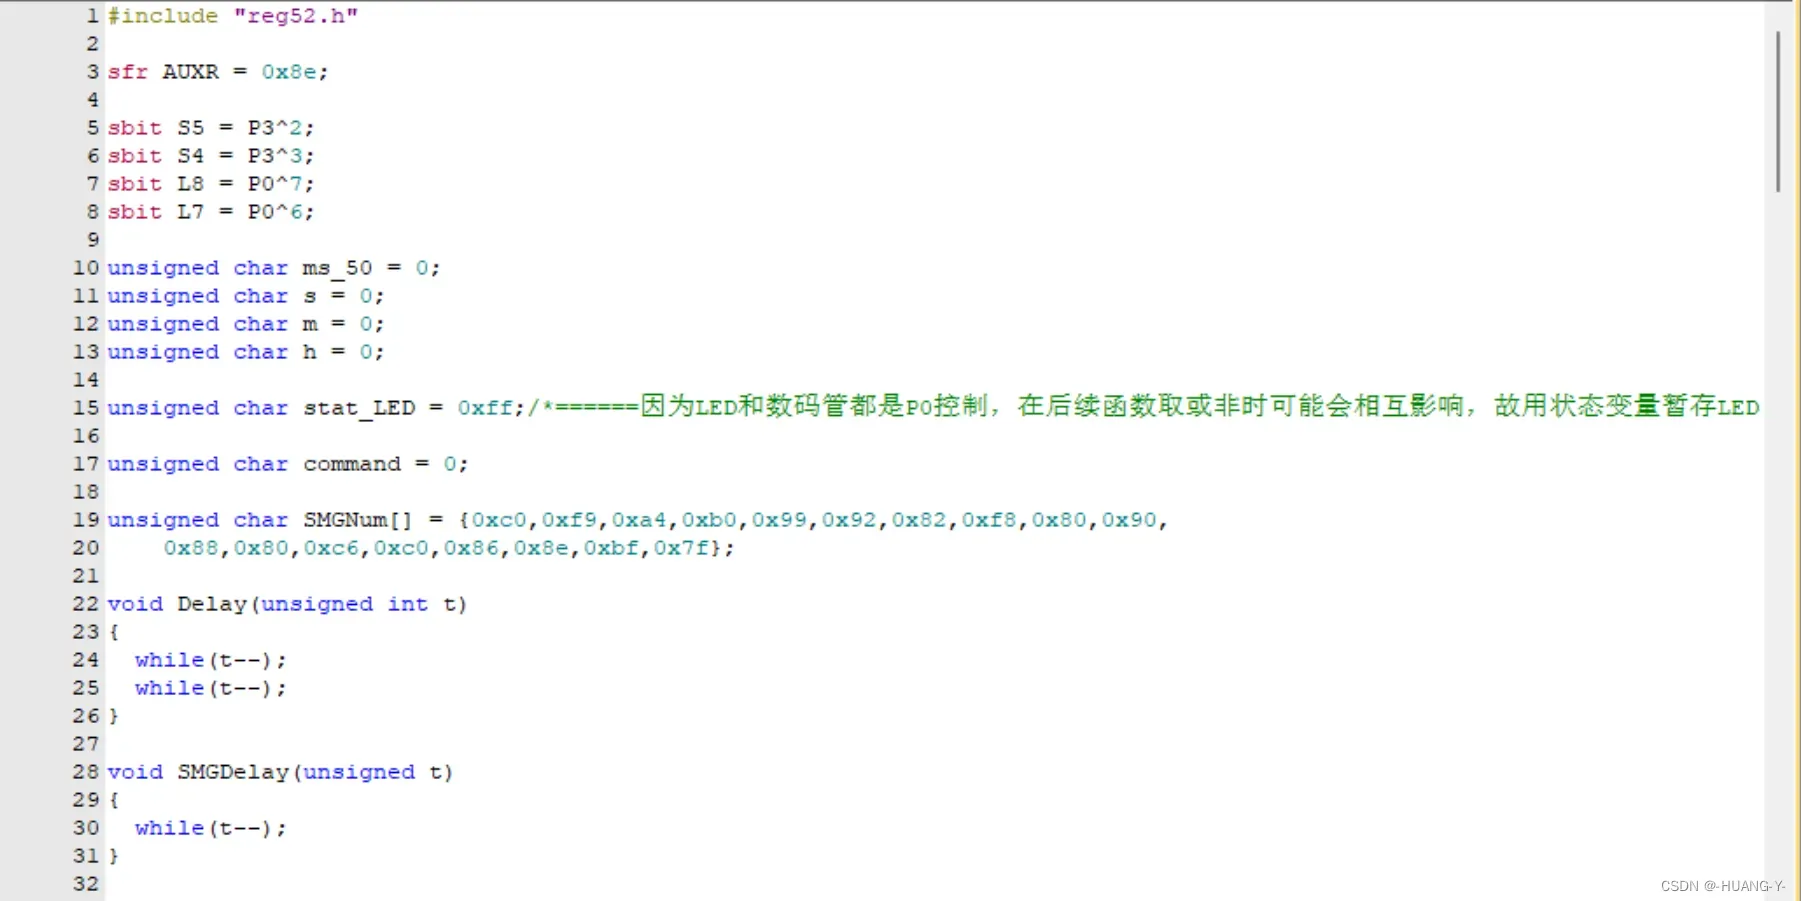
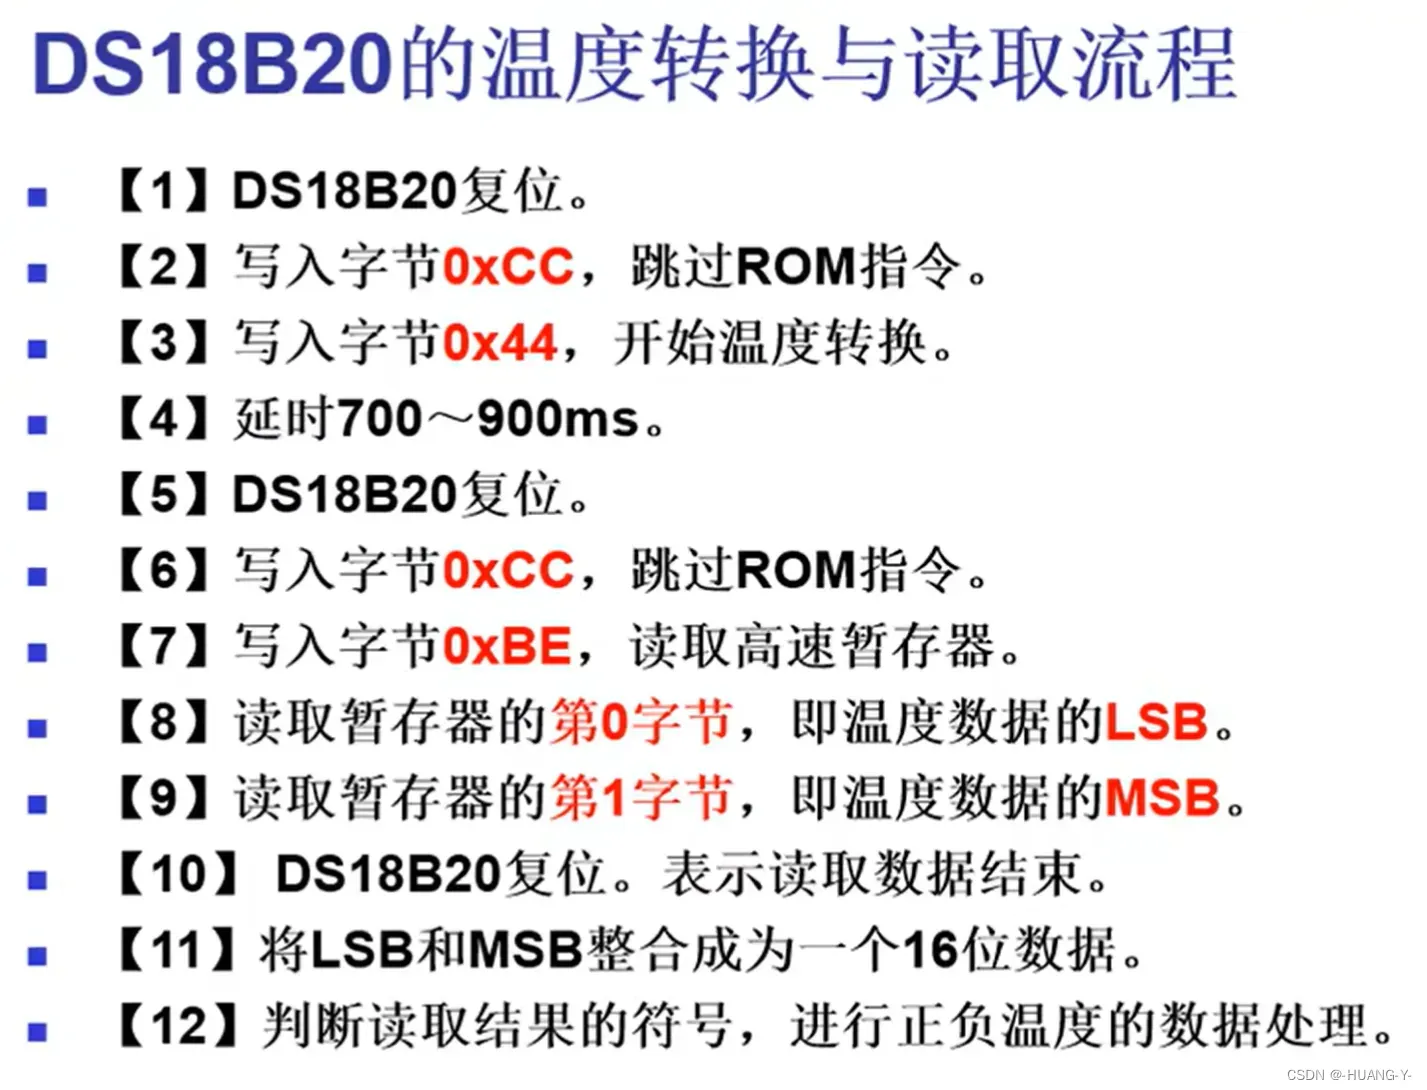
15、单总线温度传感器DS18B20
训练题目:
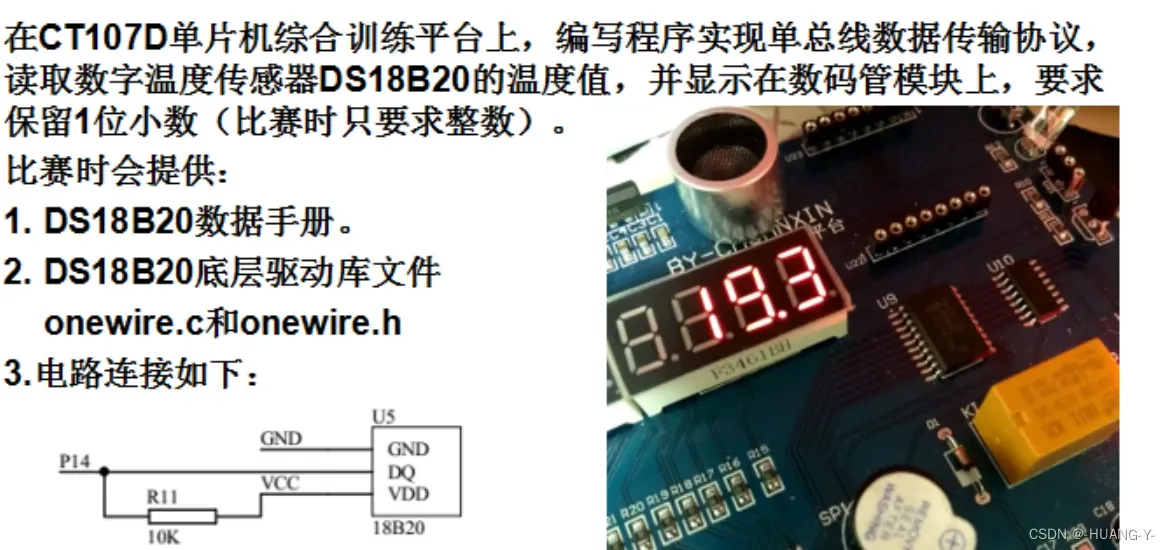
原理:
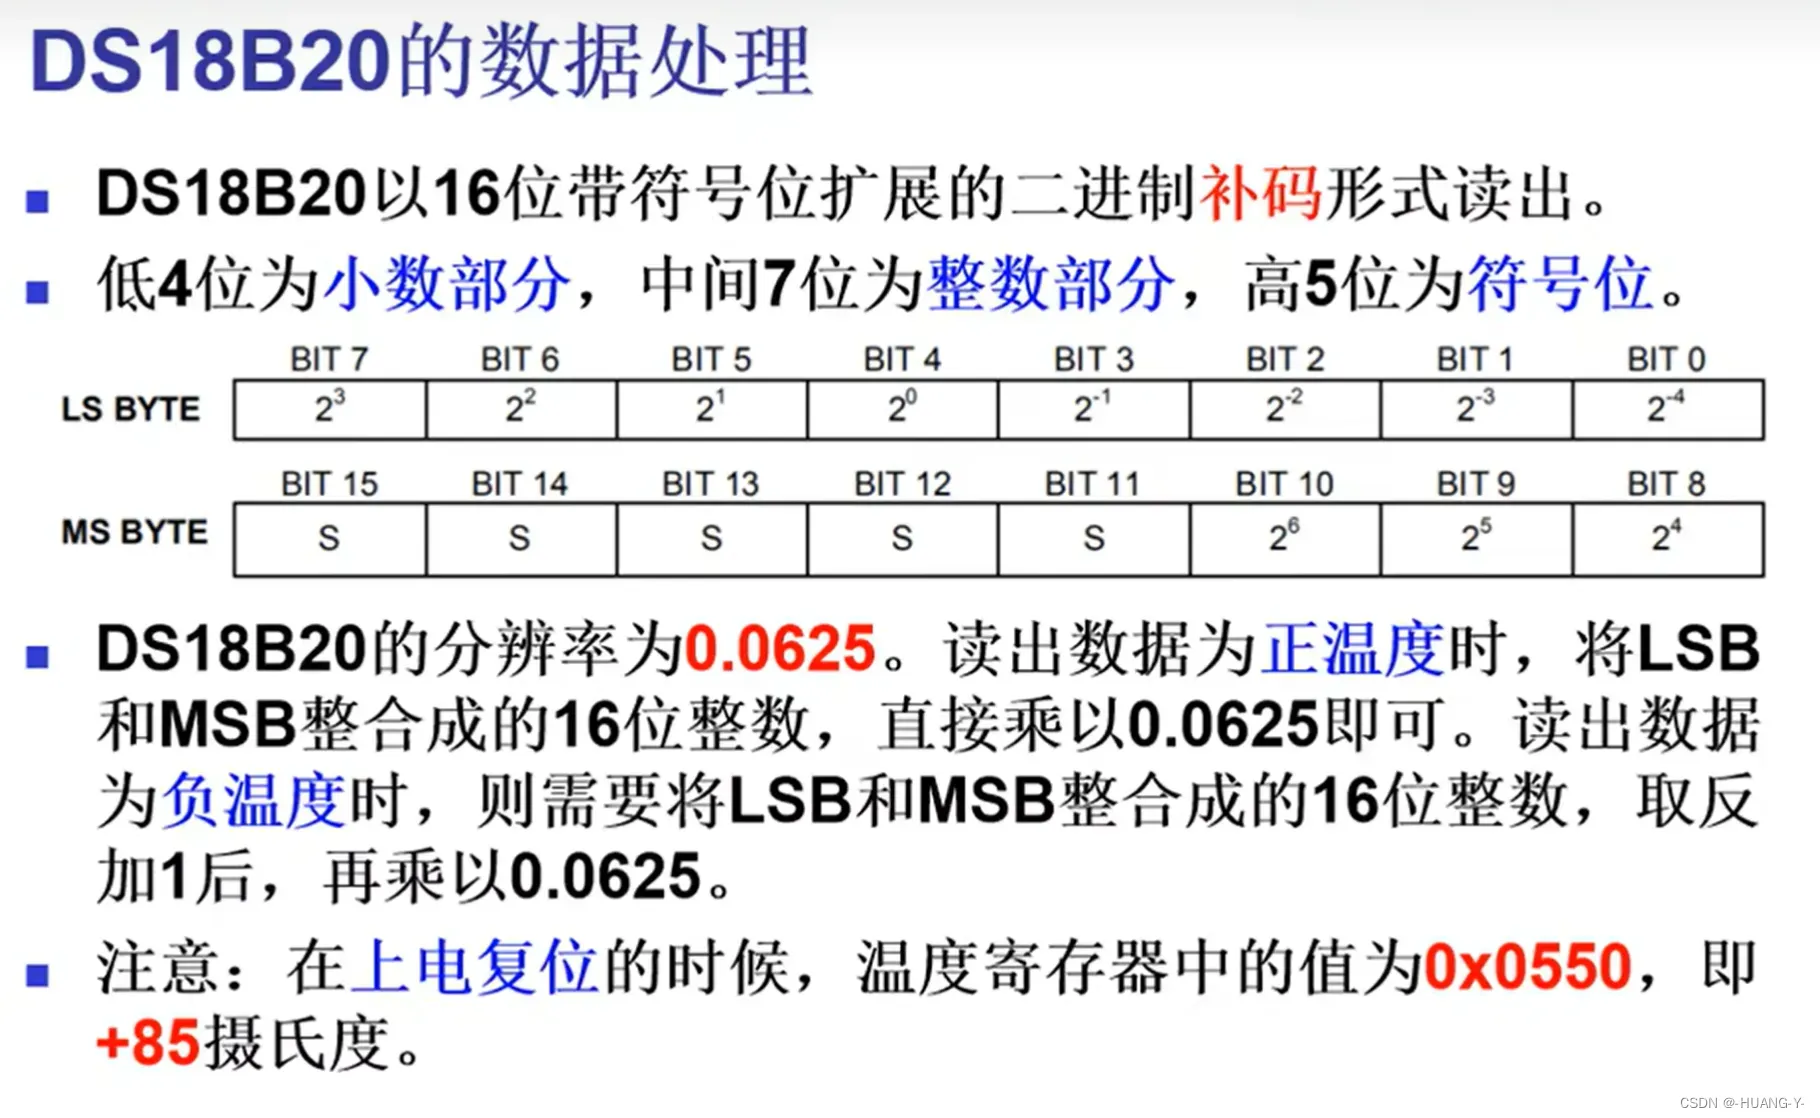
整体代码实现 :
带小数的温度显示:
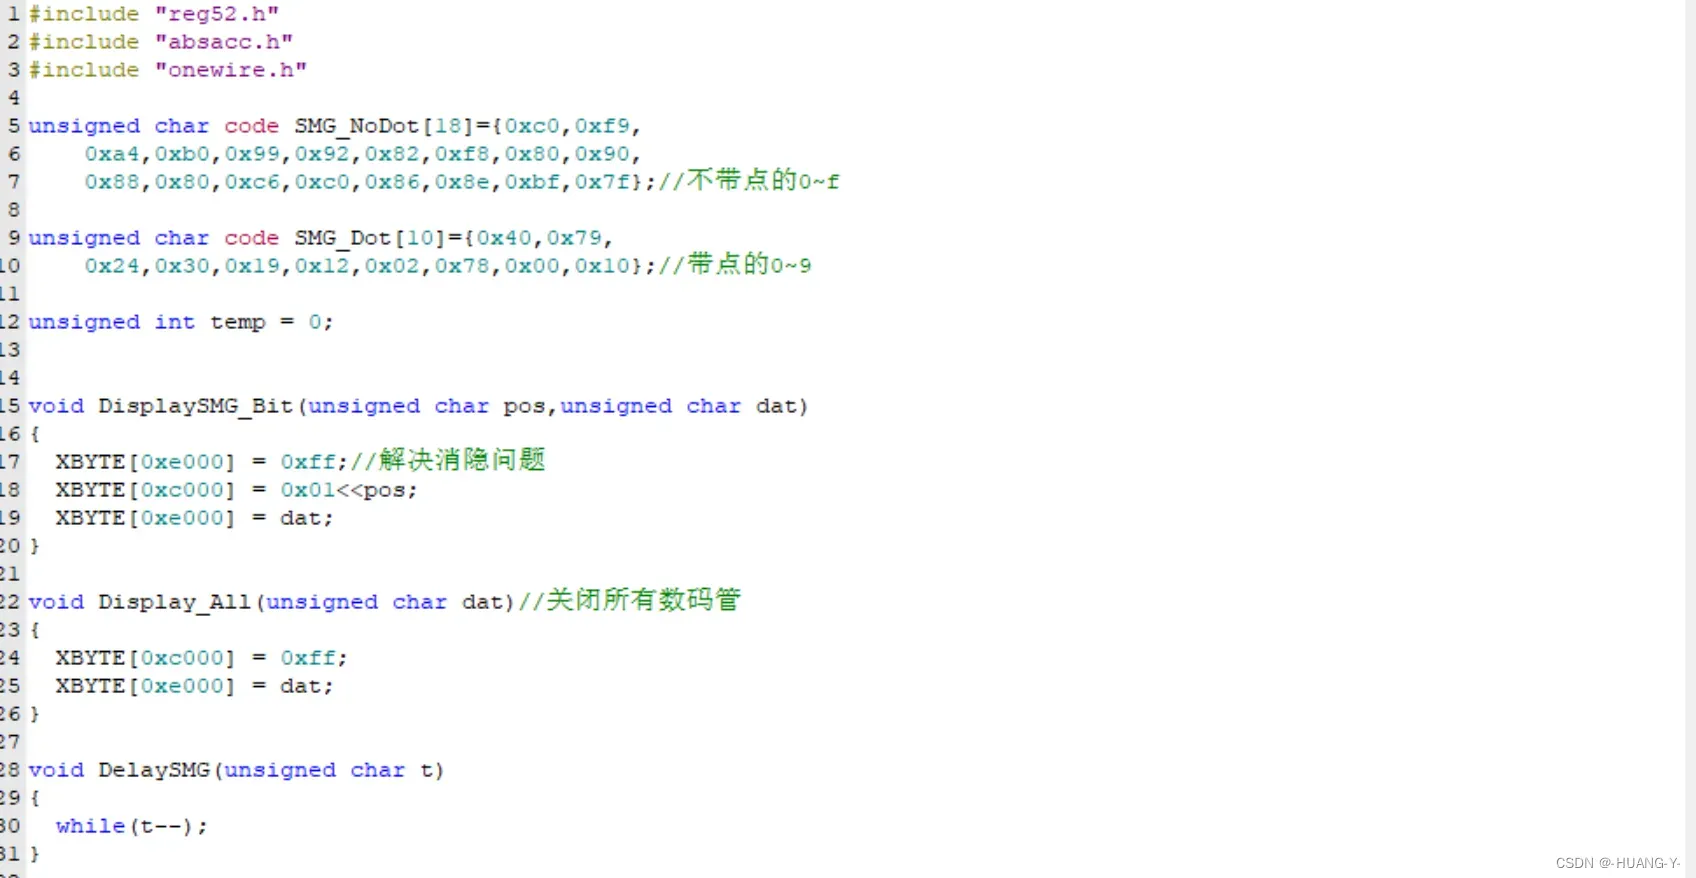
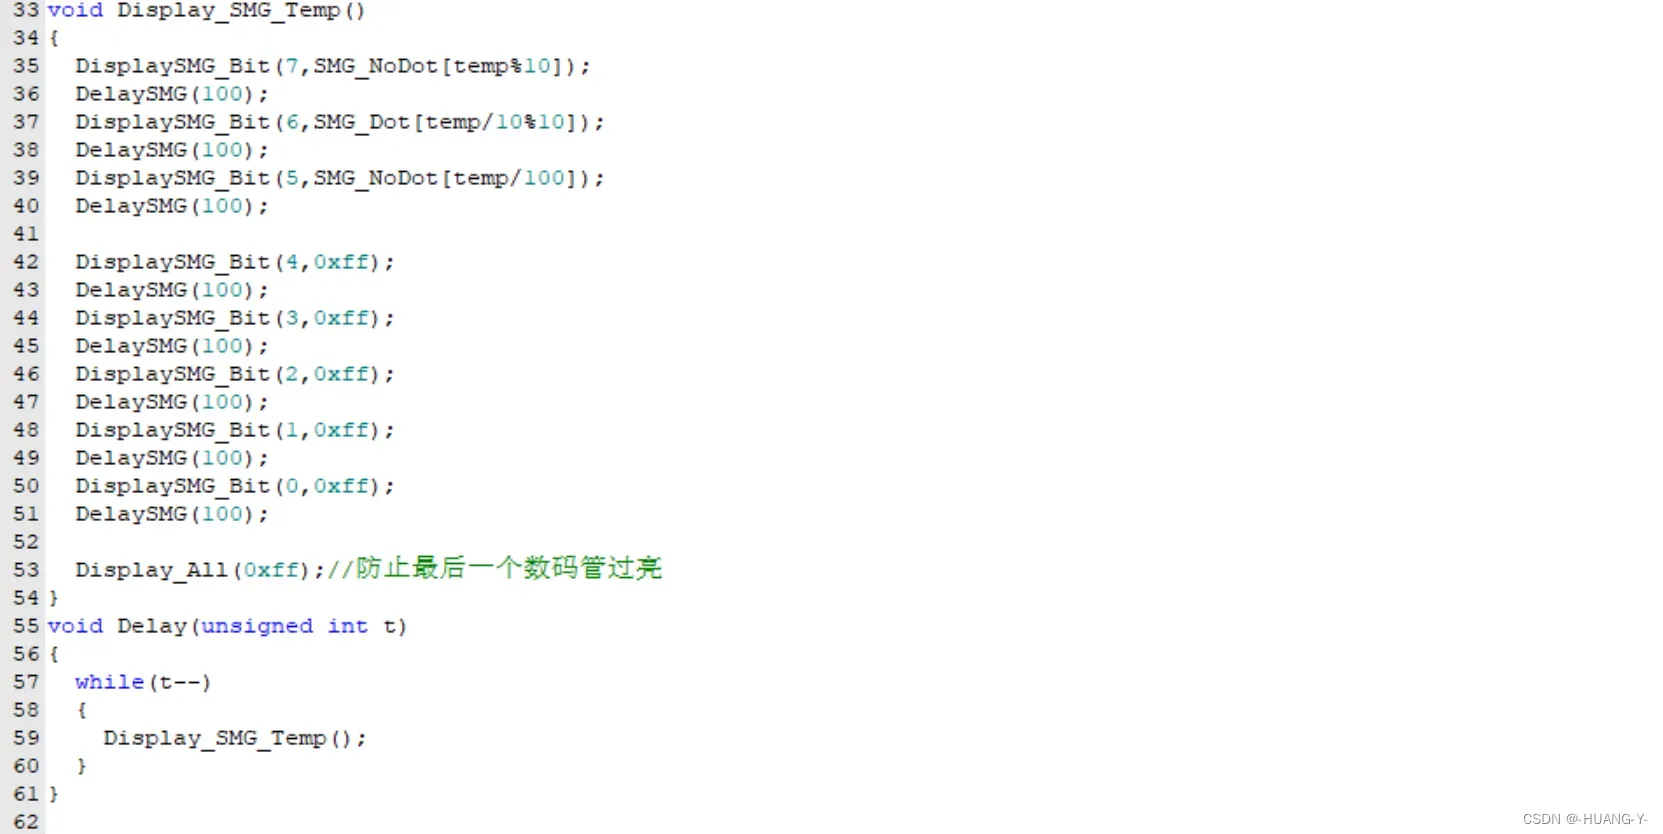
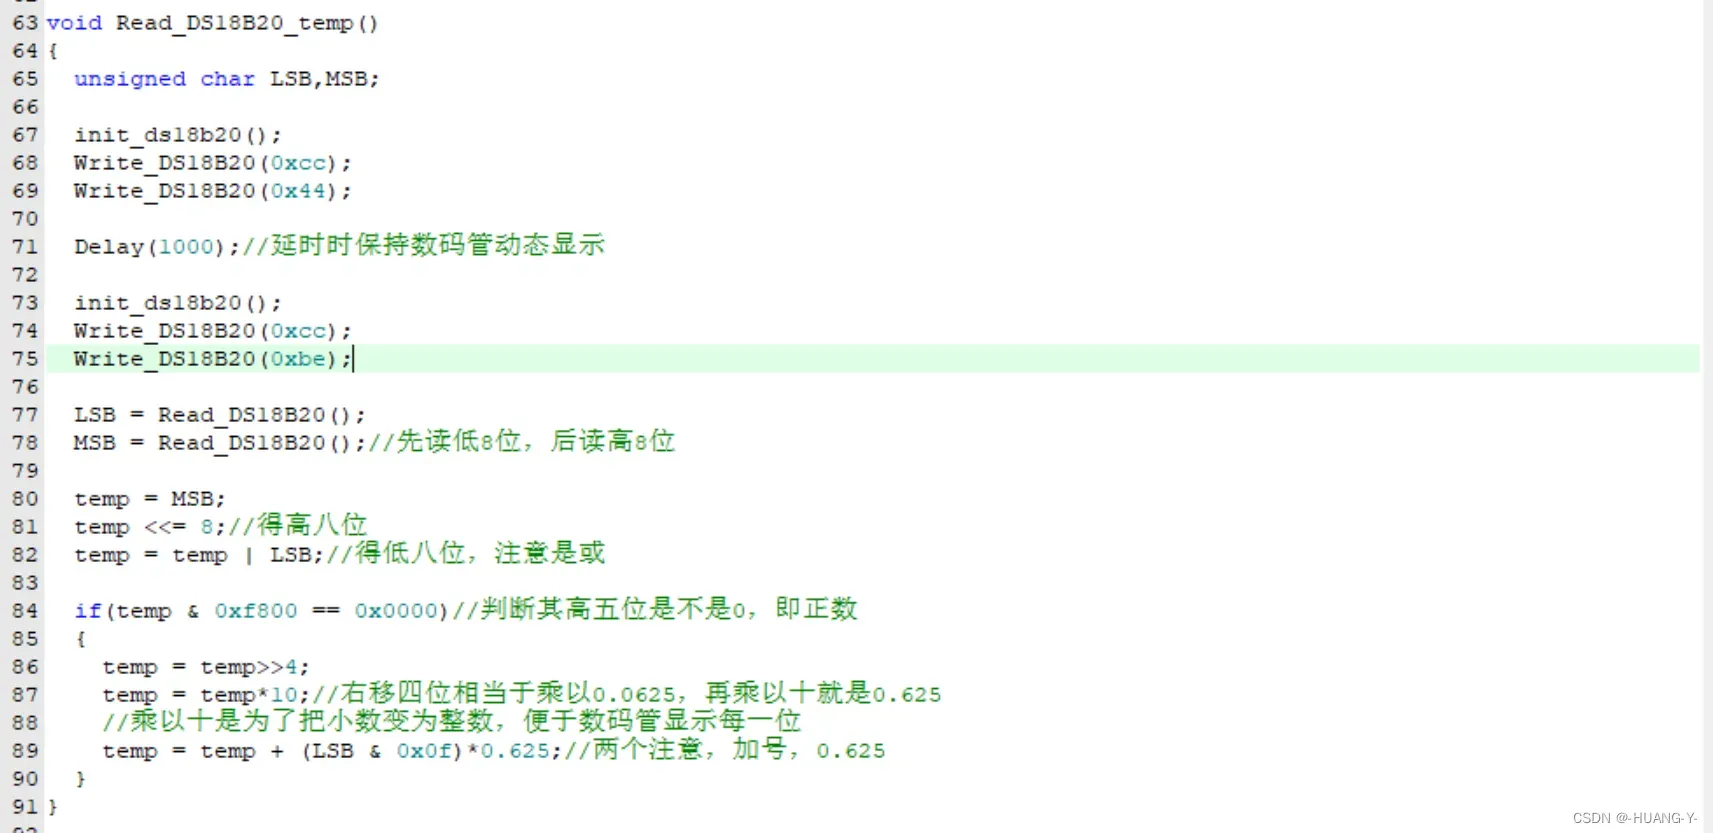

蓝桥杯一般只保留整数部分。
注意:
1、onewire.h中需要声明初始化、读、写函数。
2、onewire.c中所有延时函数都需要乘10(近似即可),因为驱动代码时钟周期是12T,而单片机是1T的。
3、因为是MM模式,所以记得引脚上的帽子移动。
4、拷贝onwire.c和onewire.h到工程文件中。
16、头文件与模块设计
原理:
头文件.h:
#indef 头文件名//即if not define
#define 头文件名
函数声明 常量(如数组code)
#endif头文件.c:正常写函数。
记得把头文件.c加入进来。
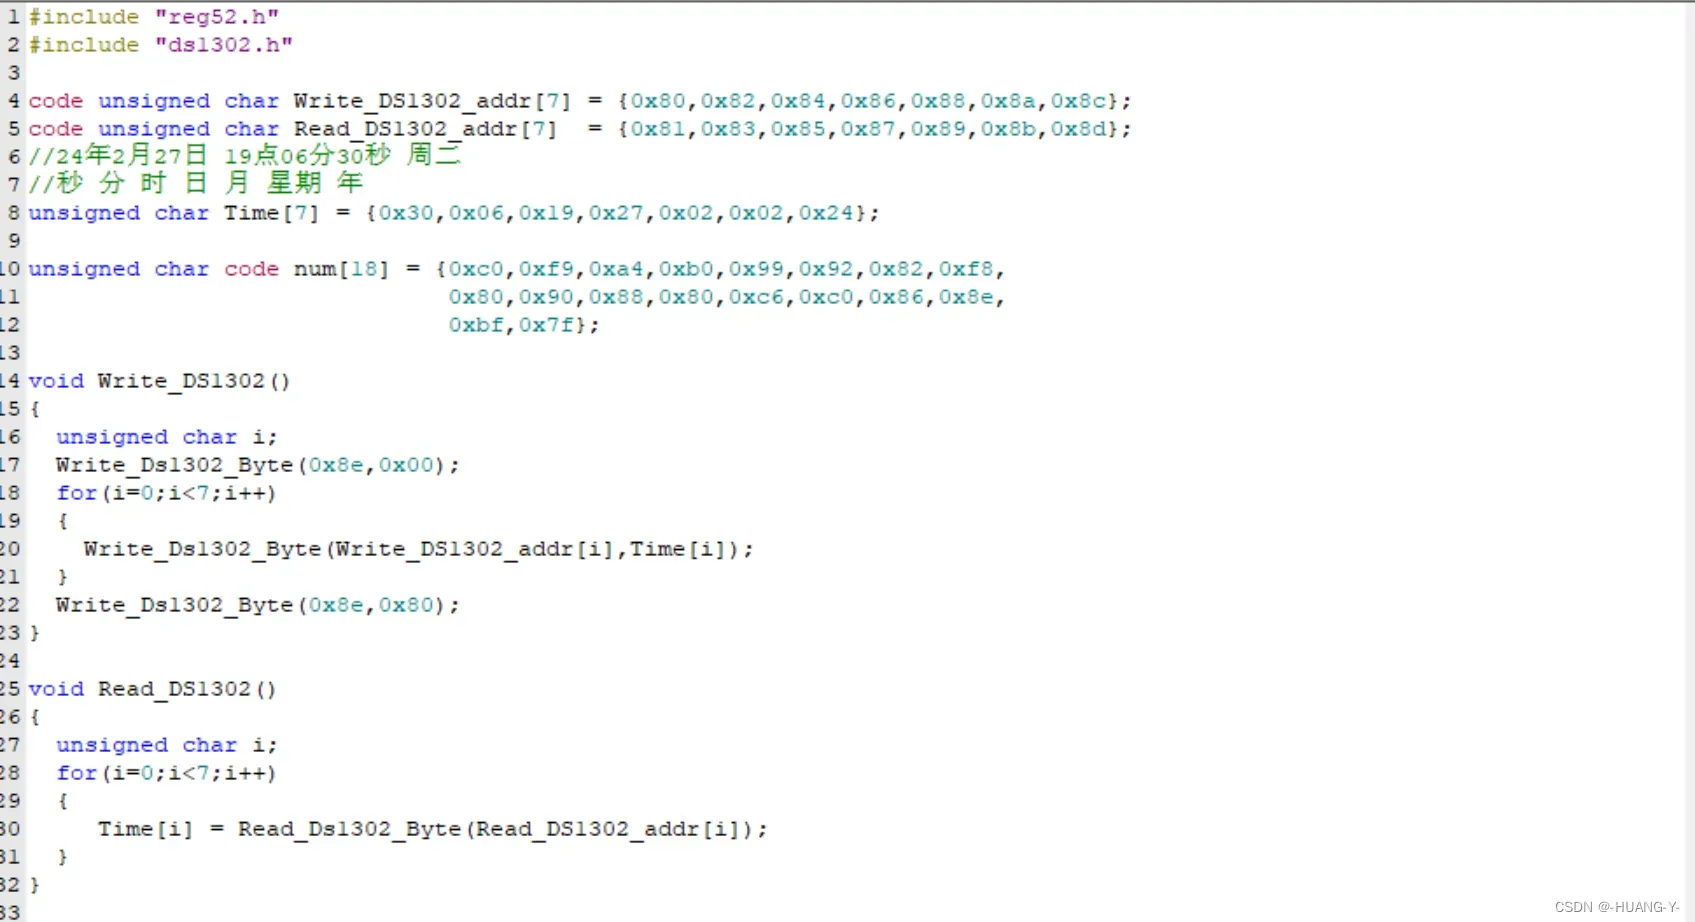
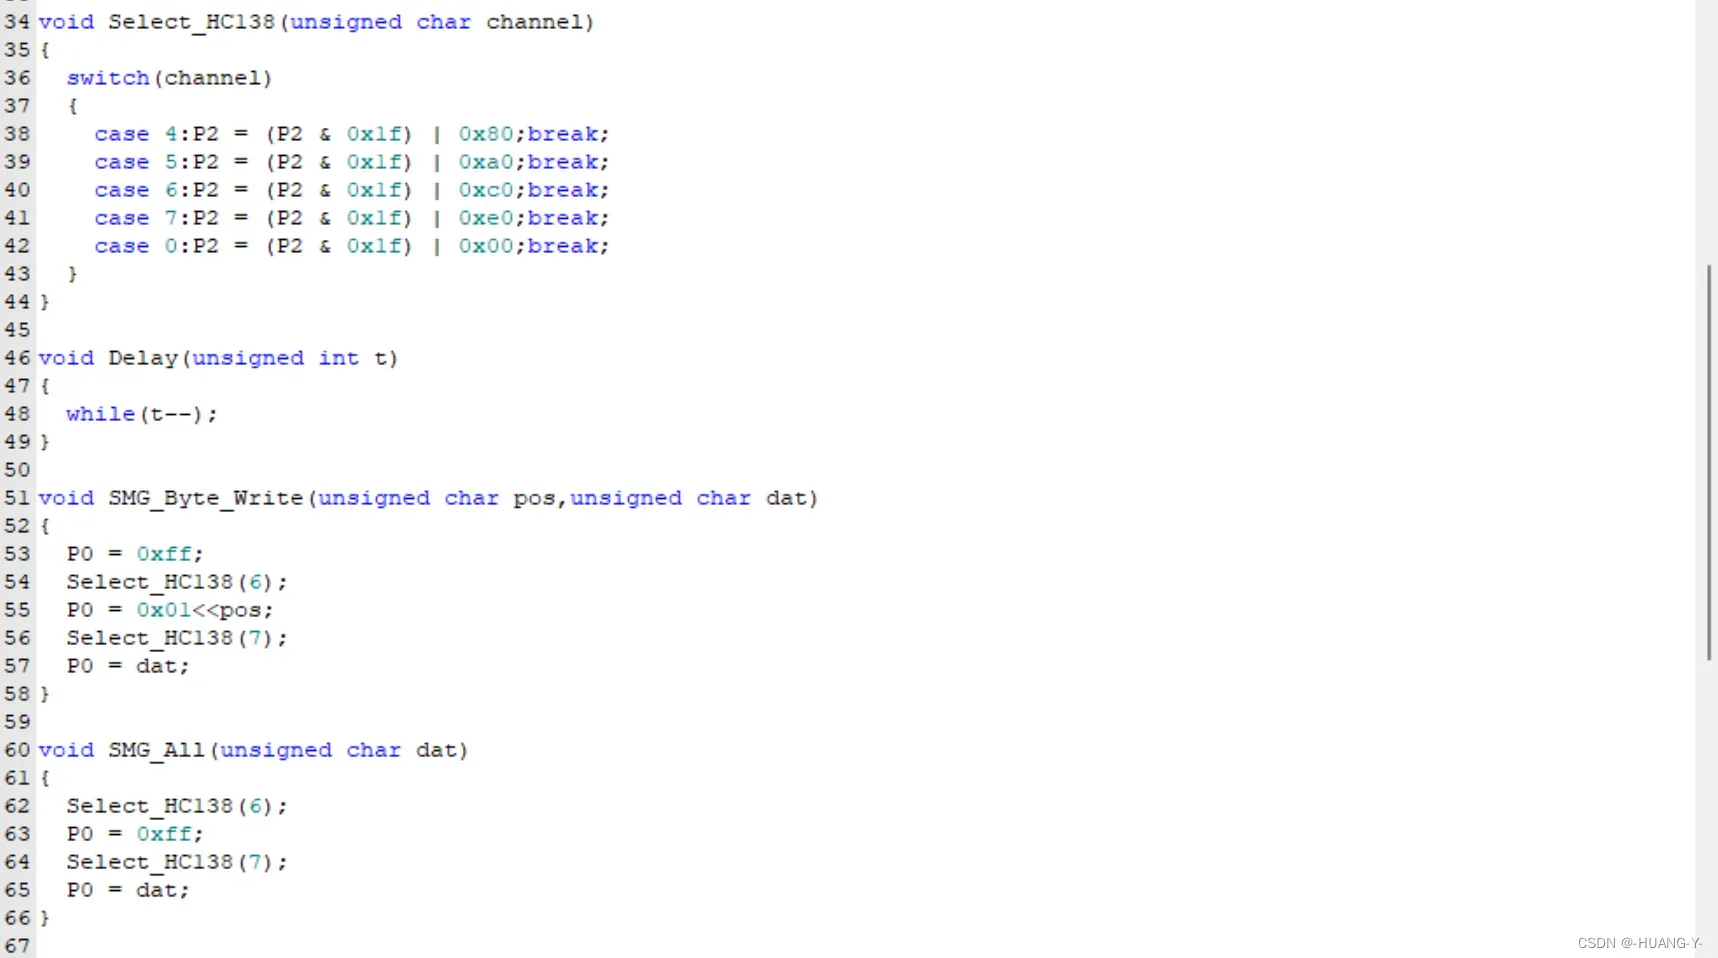
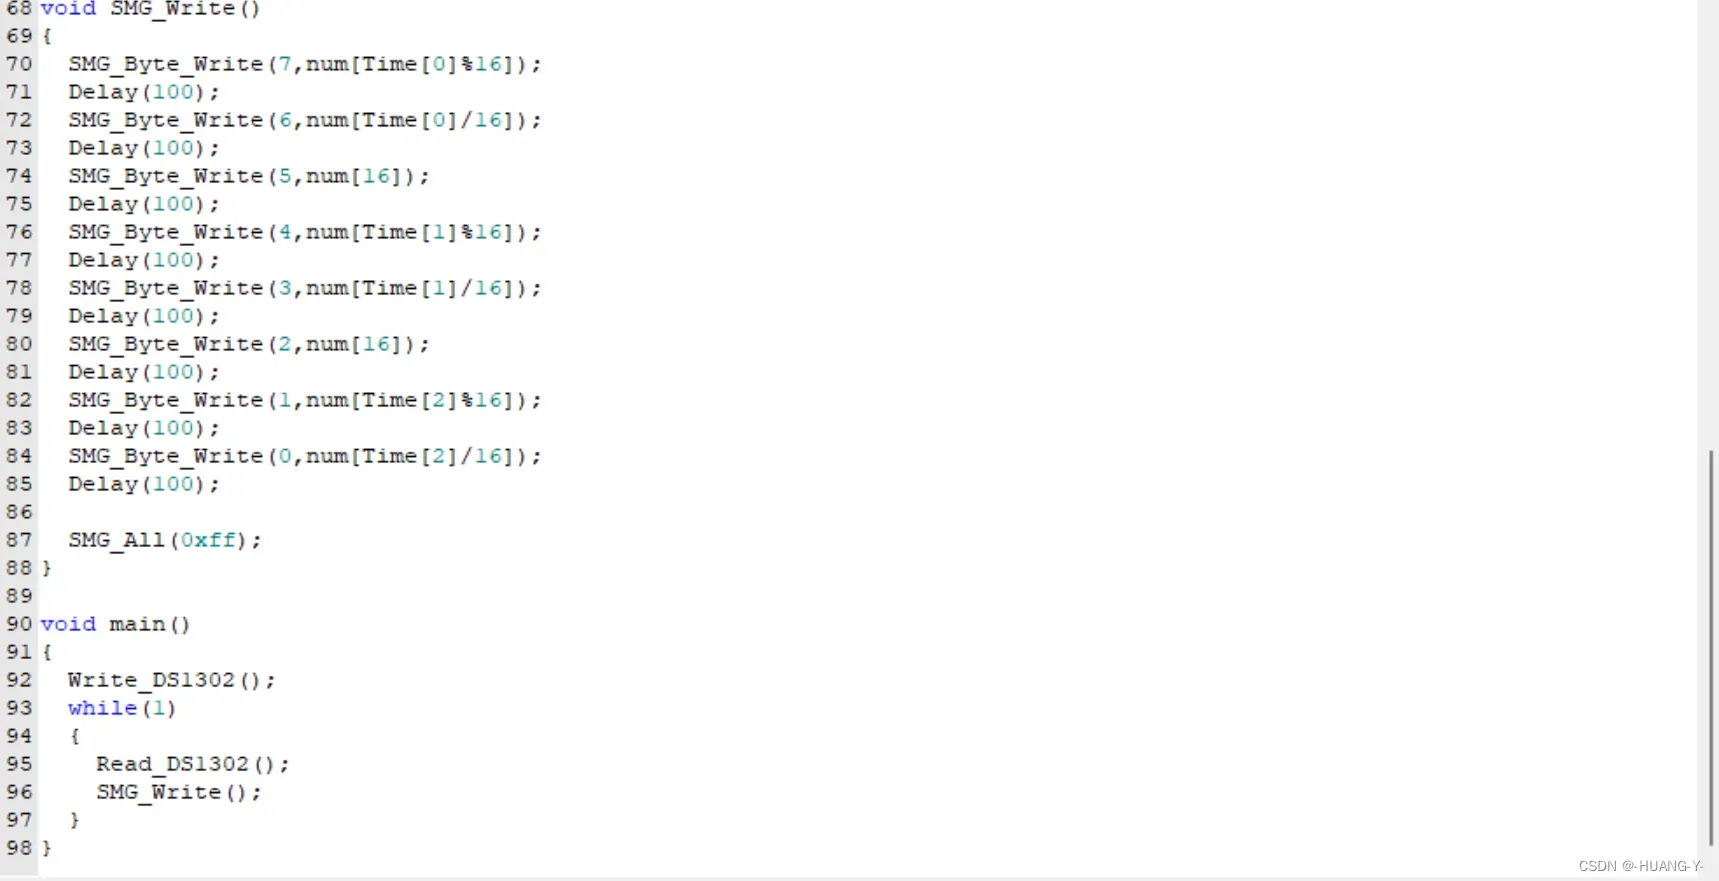
17、DS1302时钟
原理:
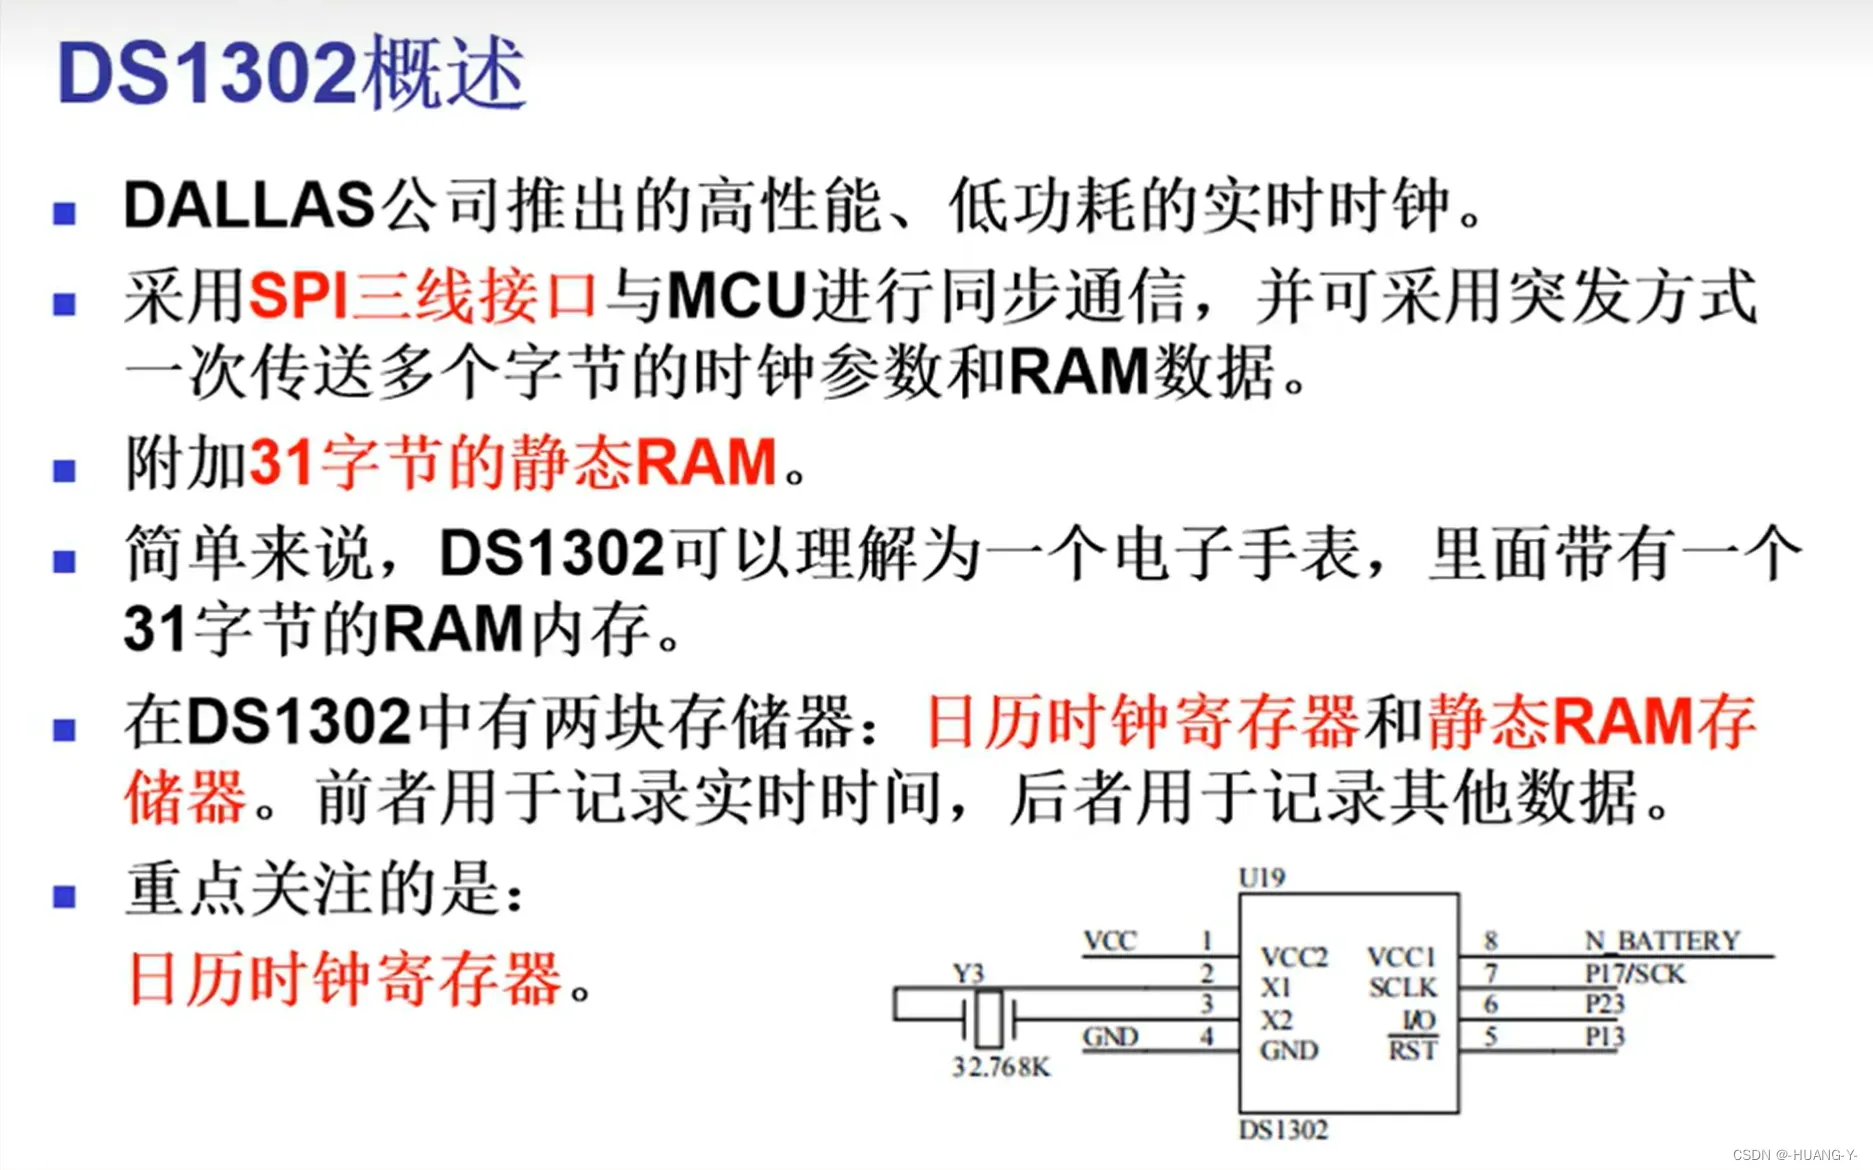
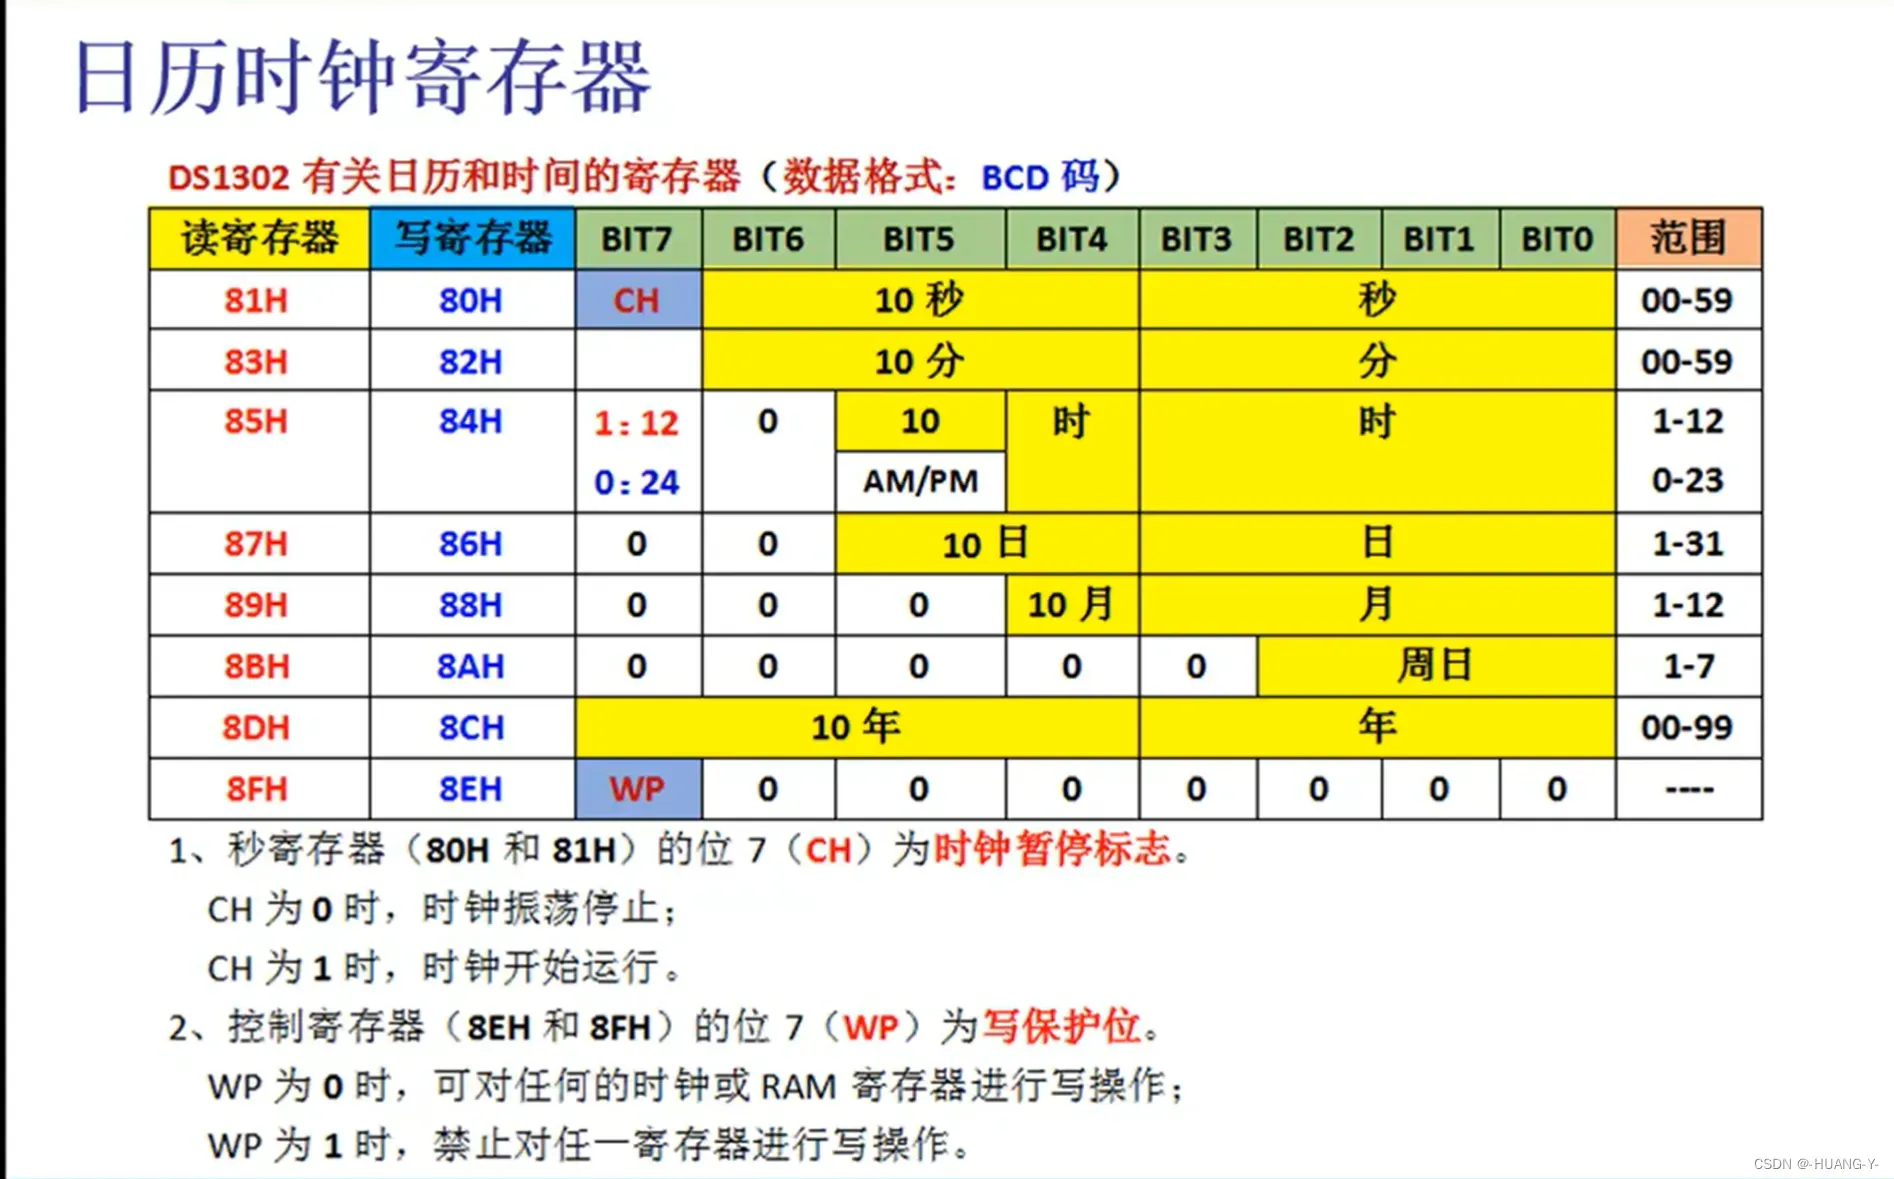
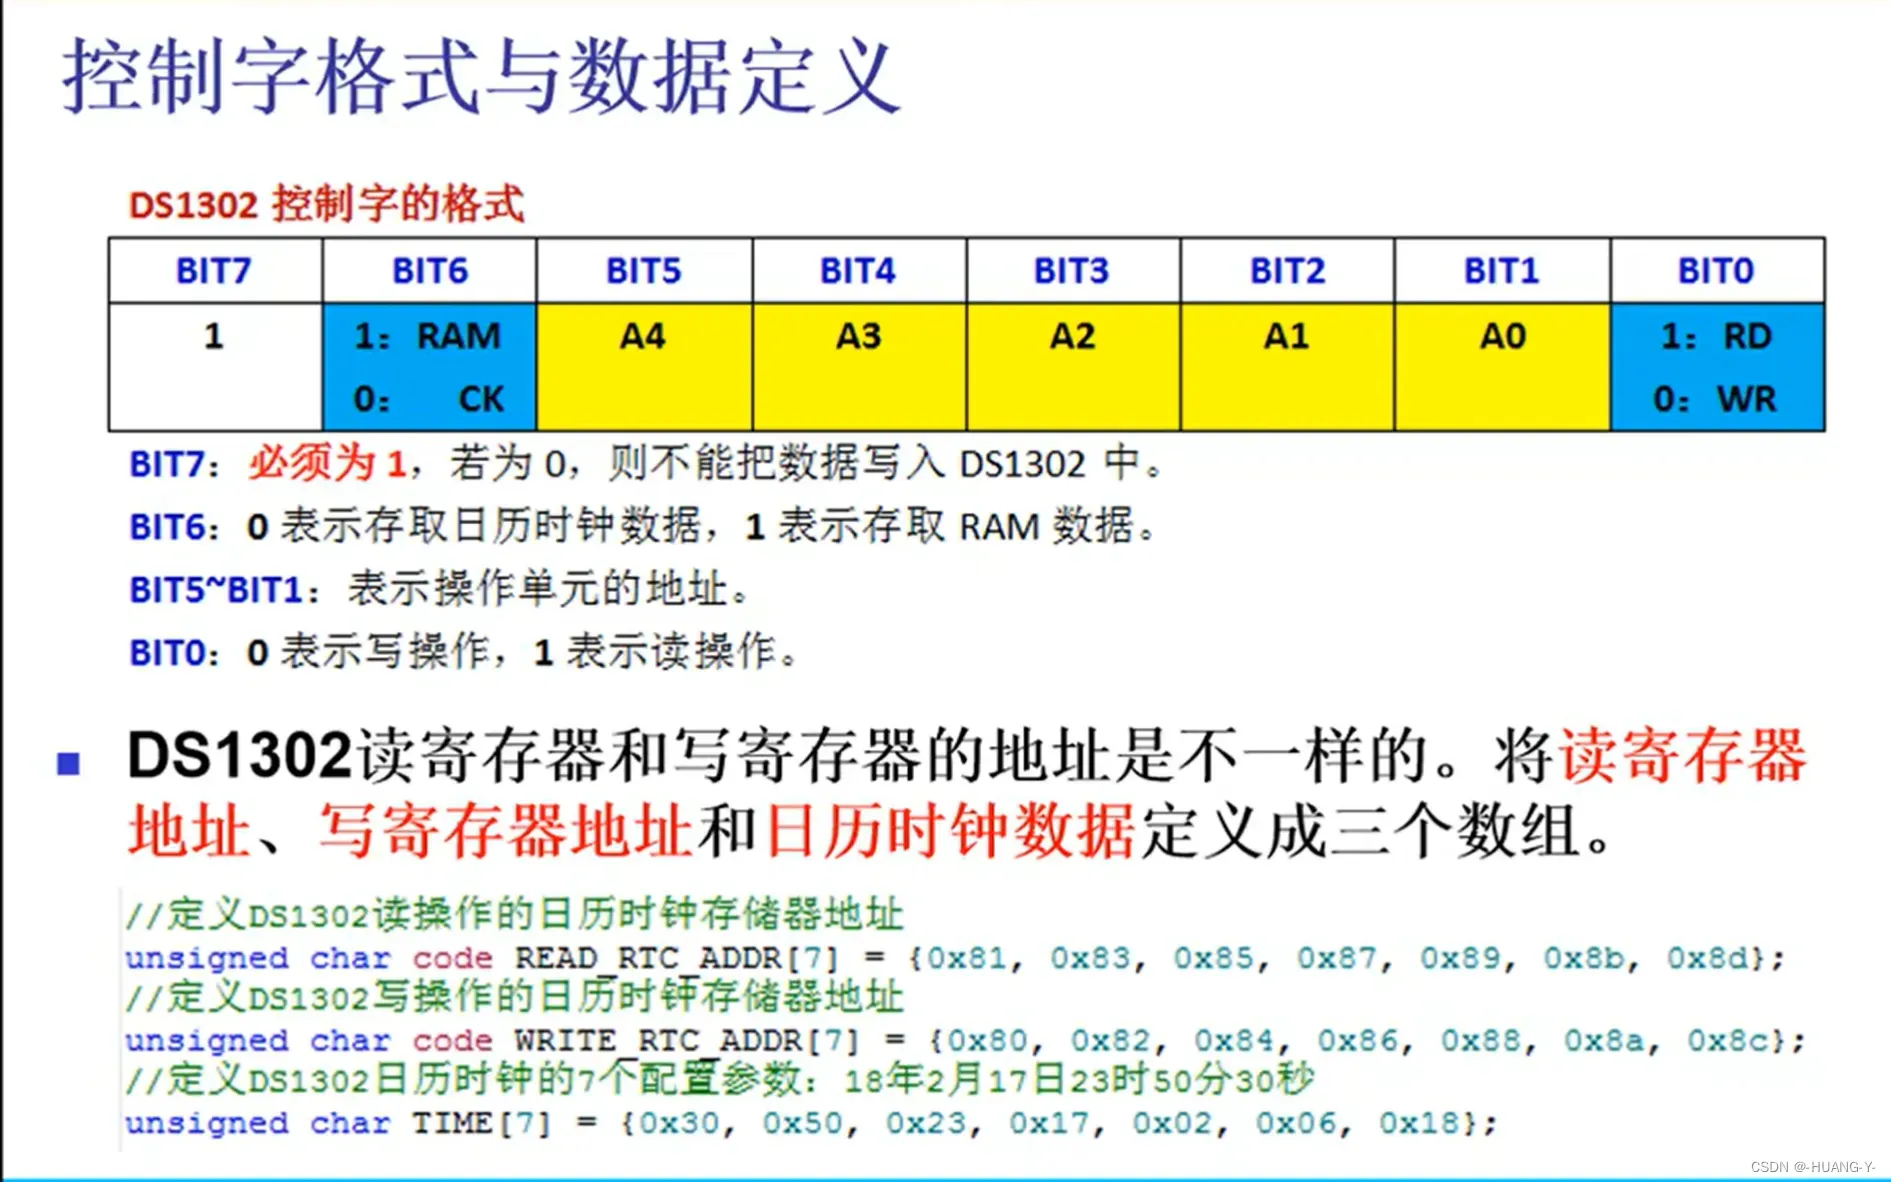
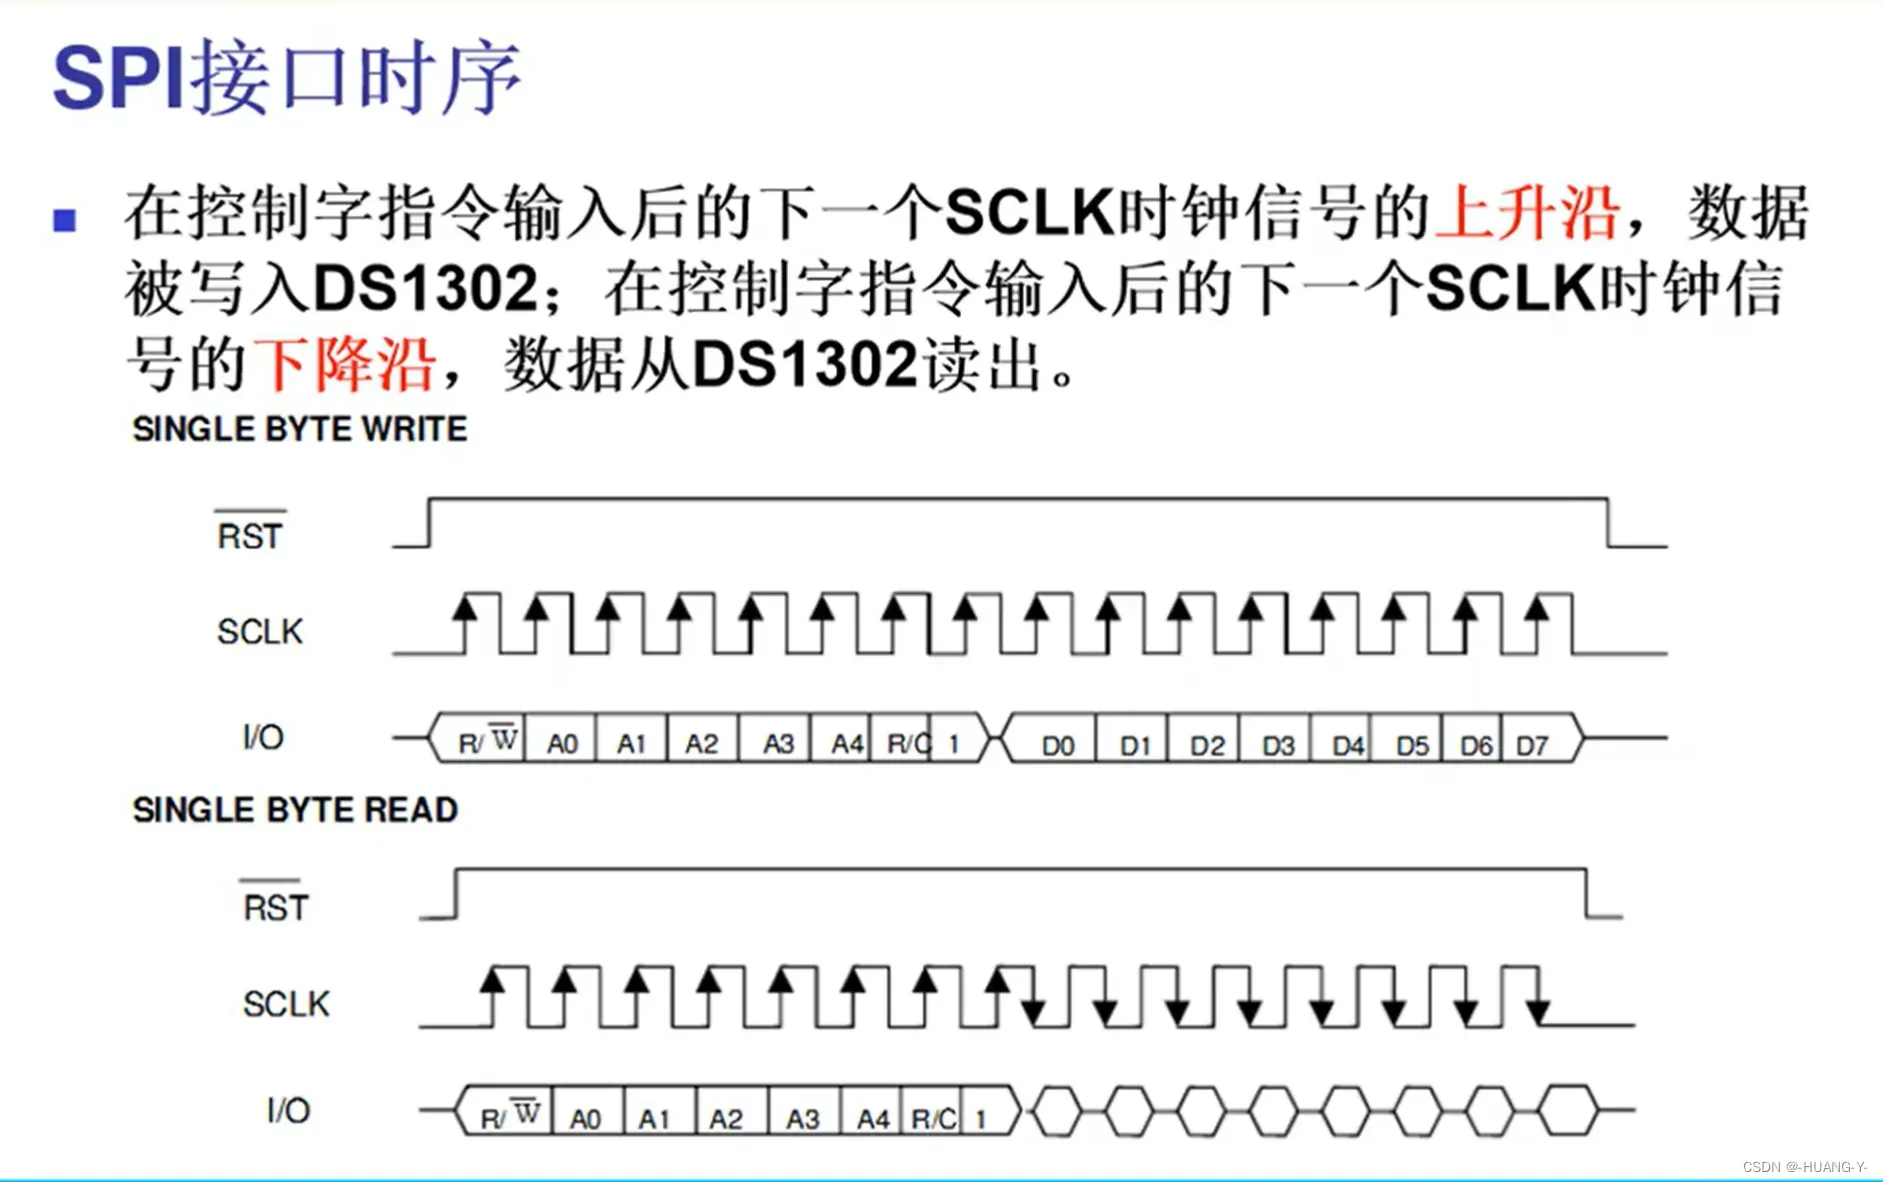
SPI和IIC时序有自己的时钟线,与单片机时钟无关,所以不用修改延时函数。
整体代码实现:

18、555定时器
训练题目:
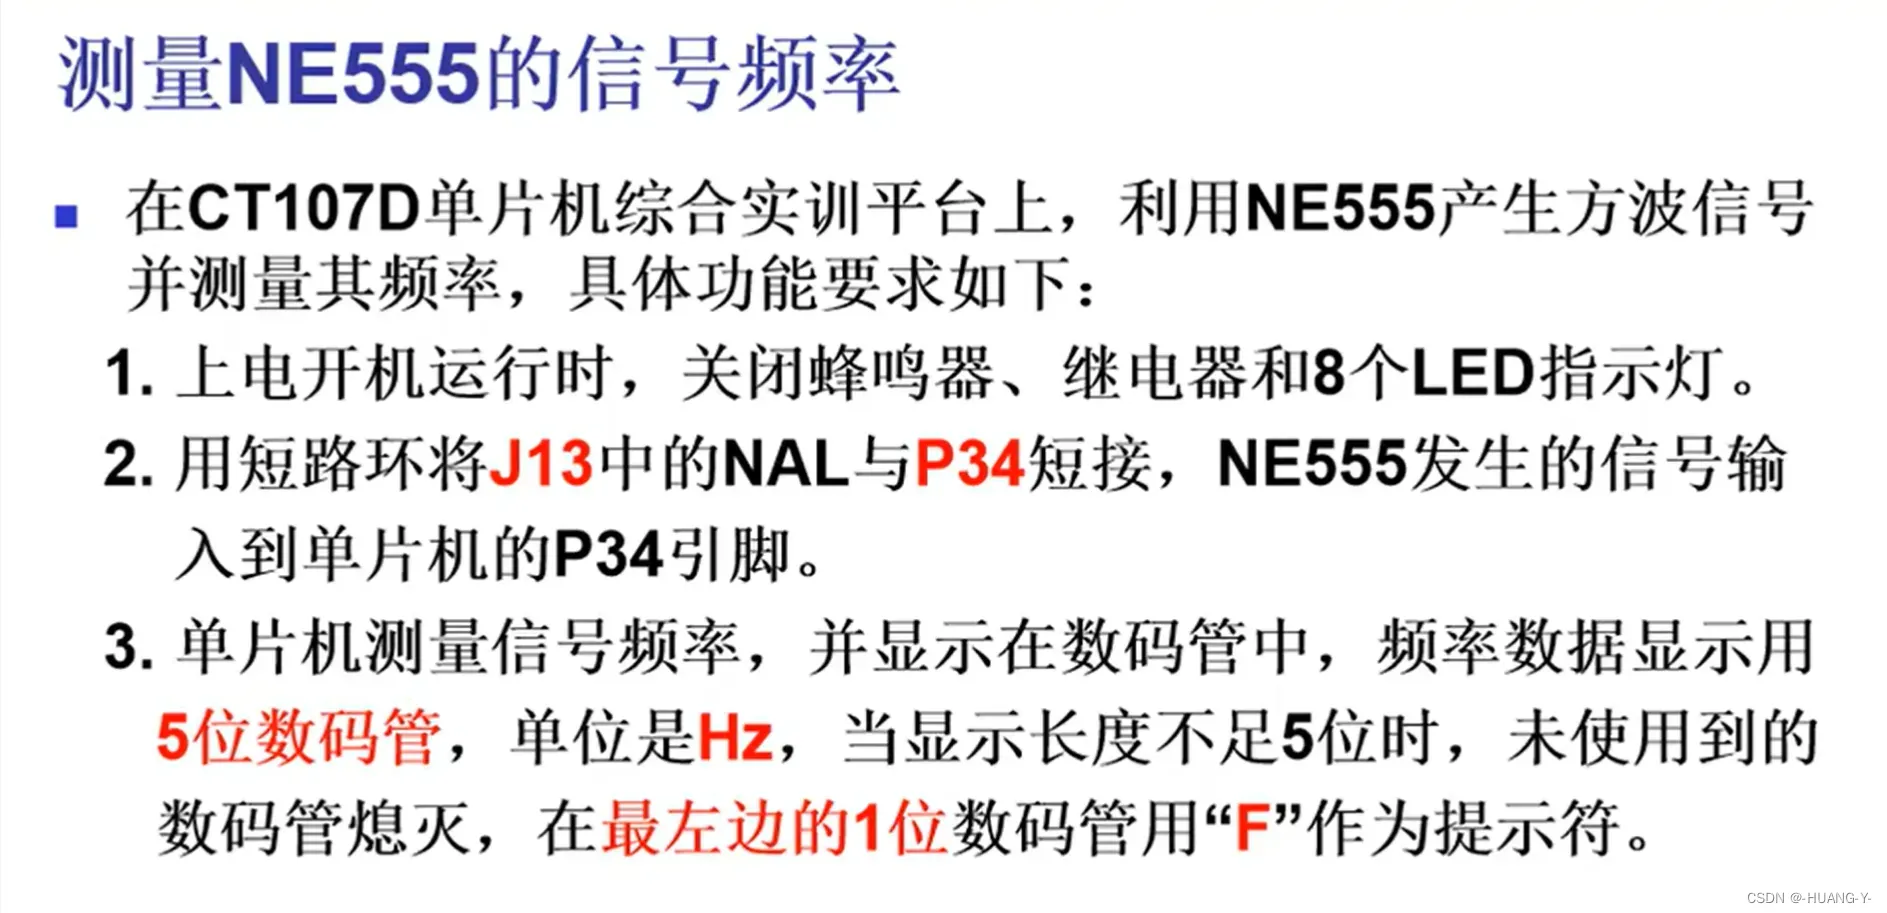
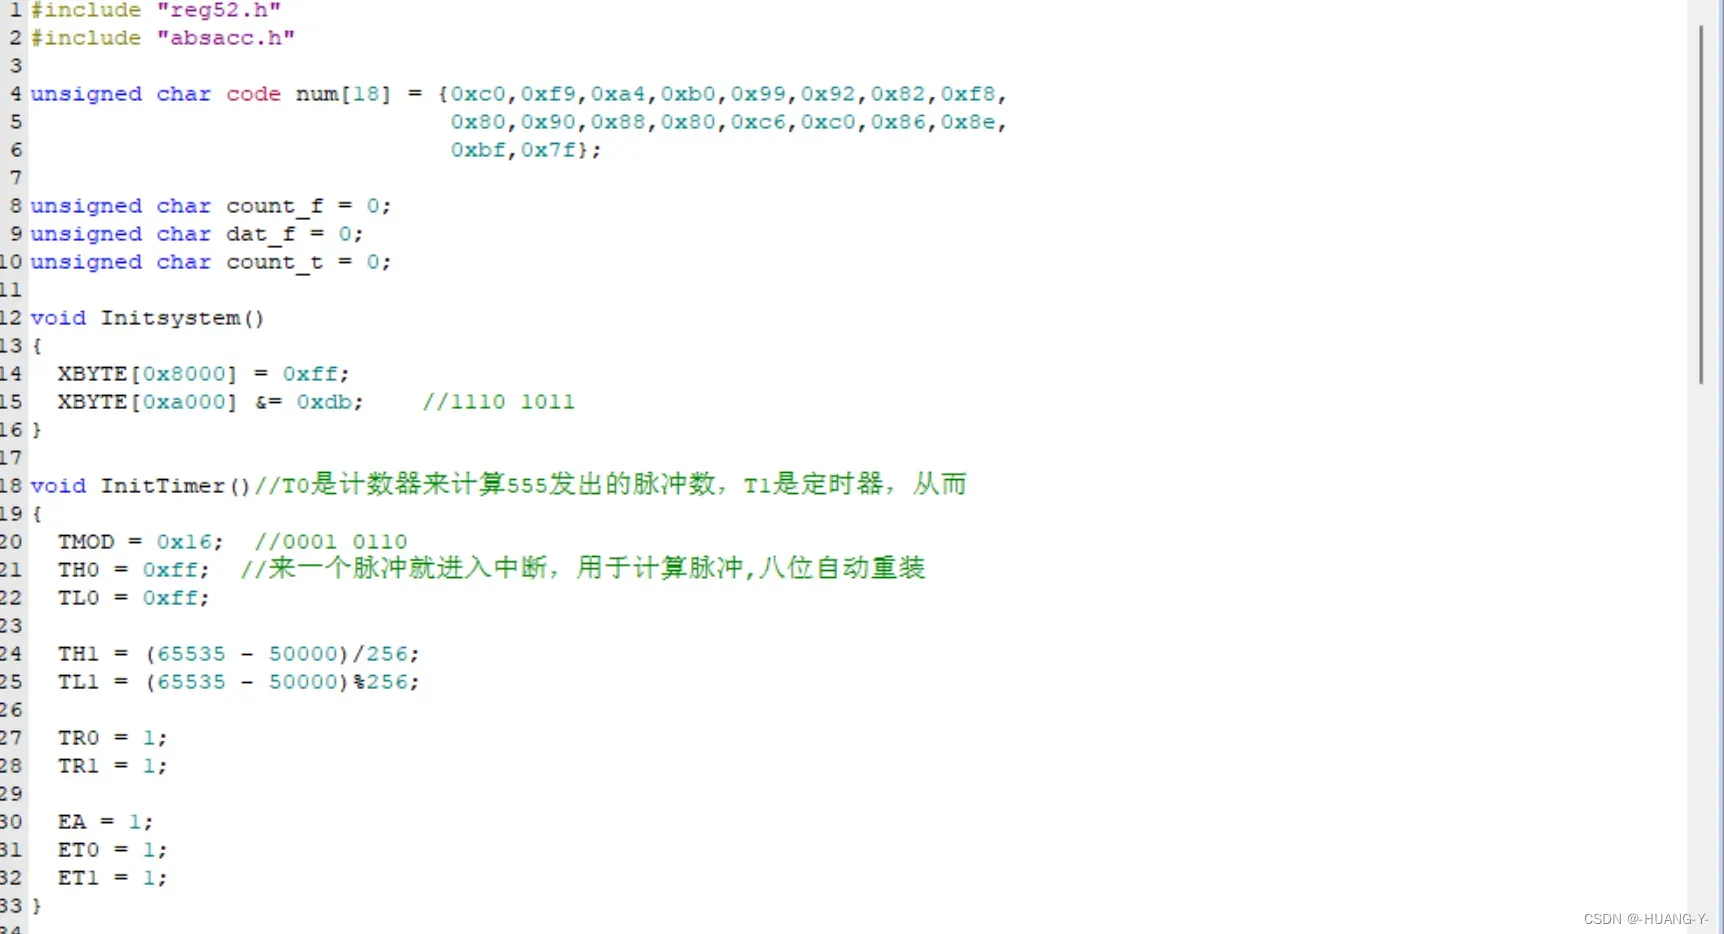
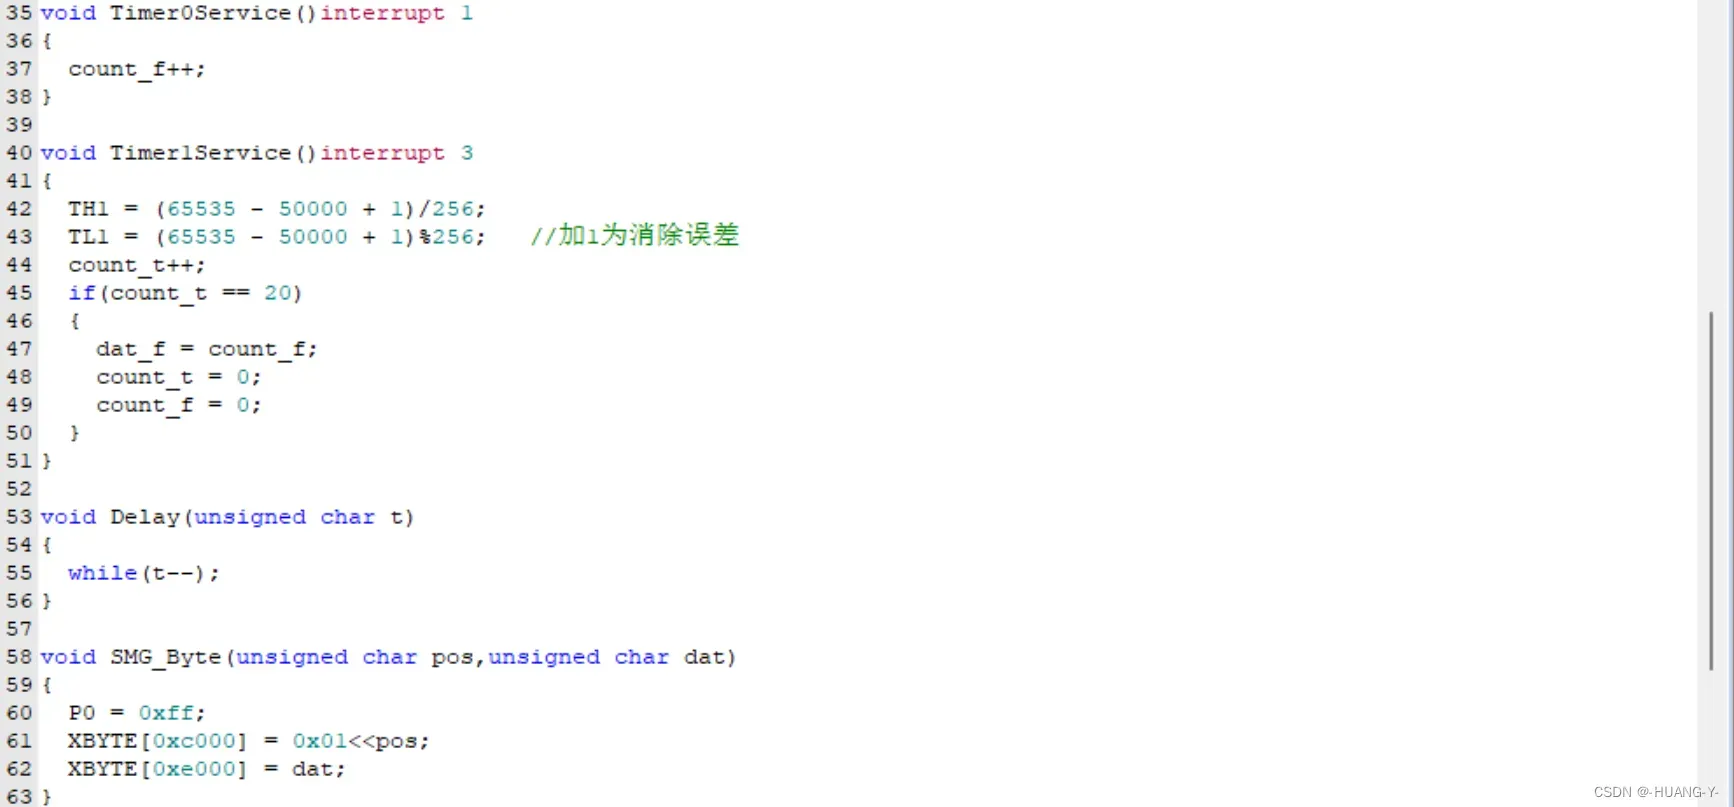
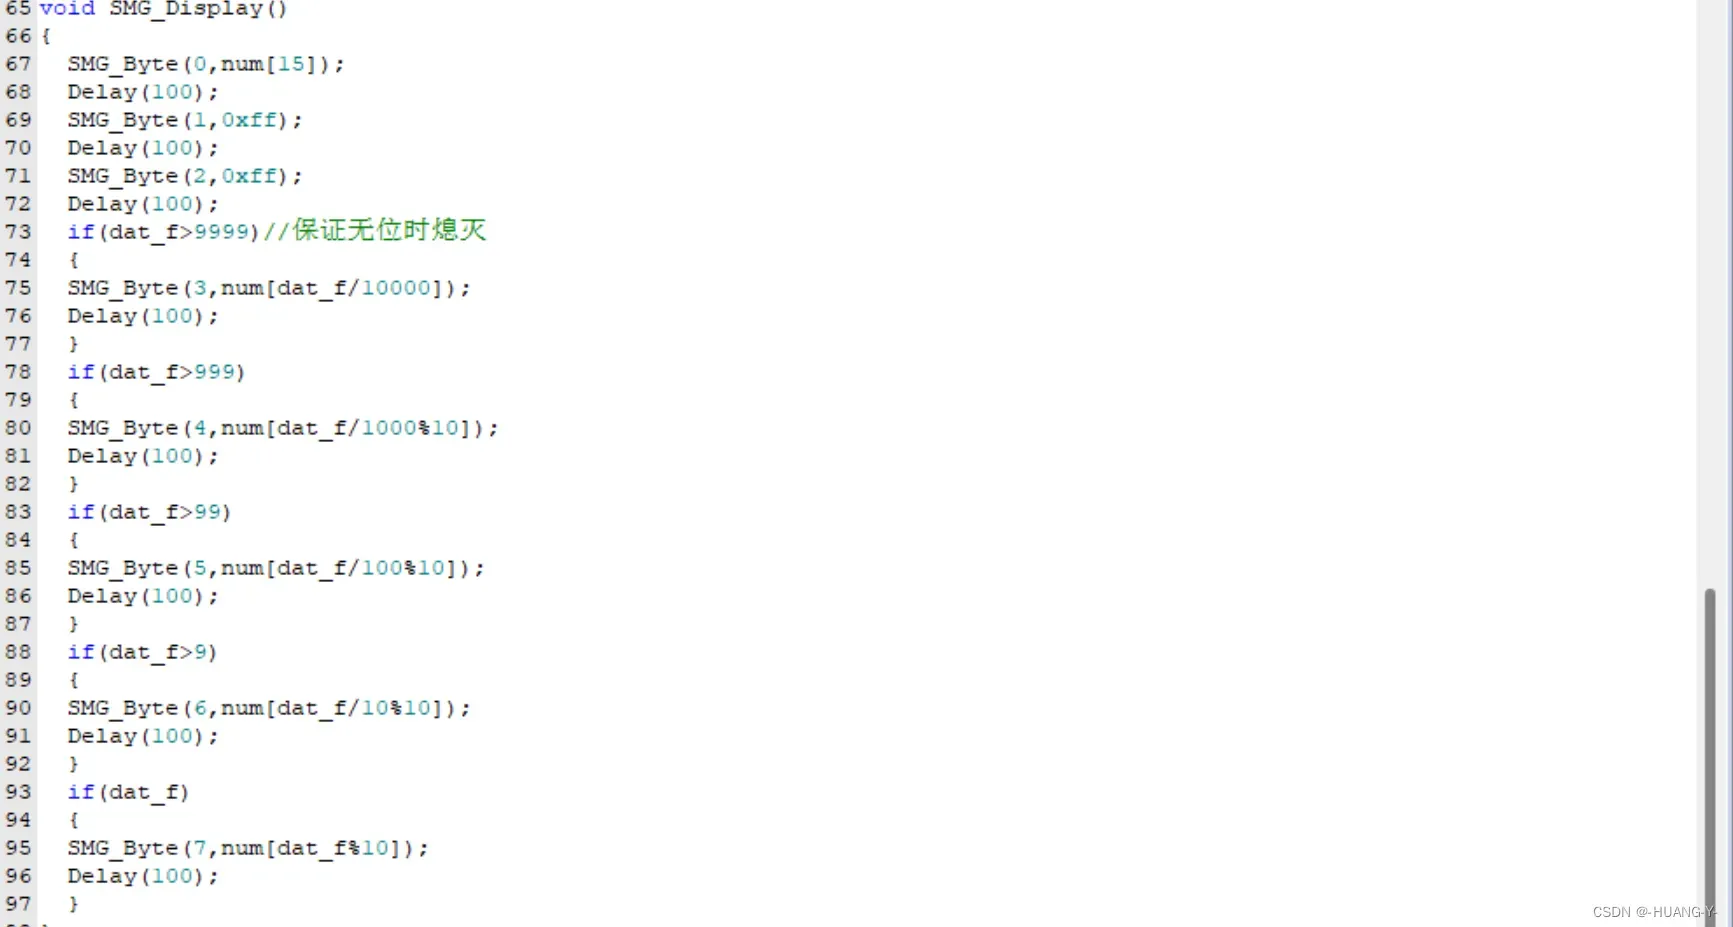
注意:555没有特殊的硬件操作,官方给的头文件中需注意引脚对应是否正确。
整体代码实现:

19、第零讲 倒计时系统
题目:

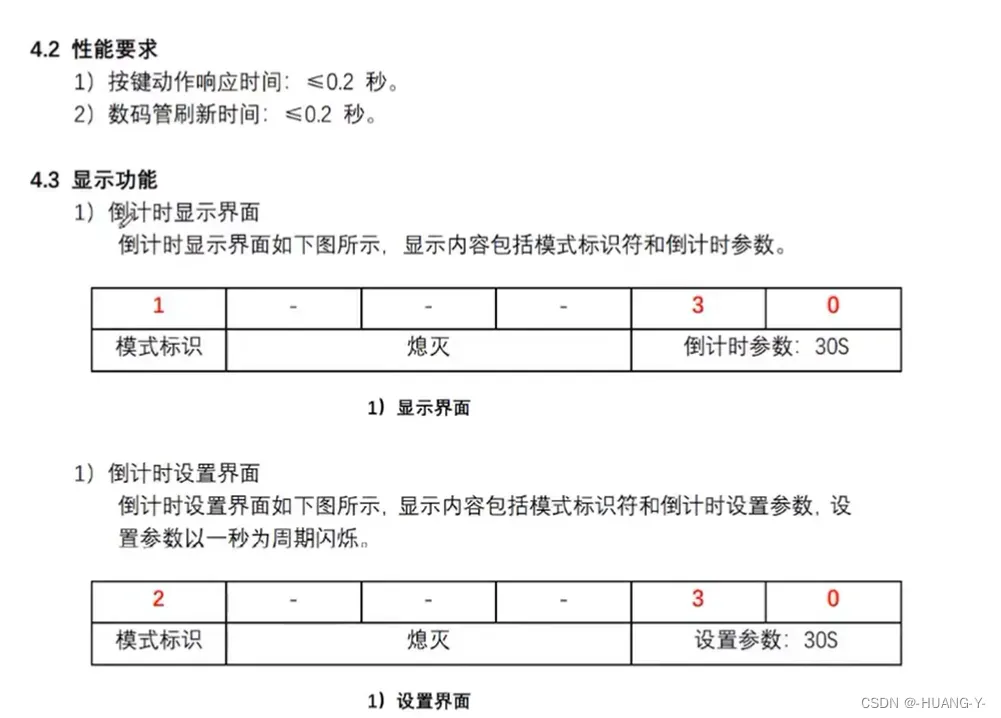
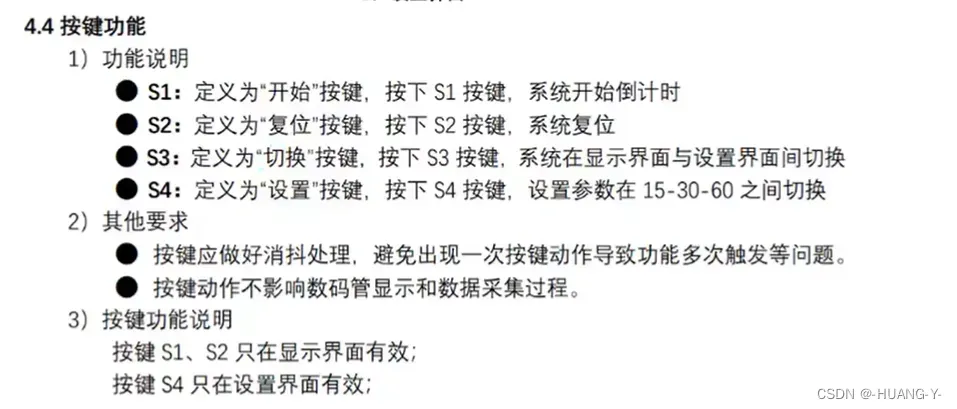
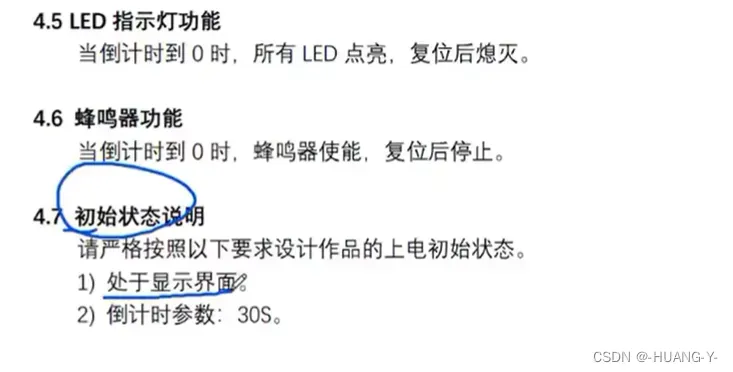
关键思路讲解:
1、因为有两个界面,分别是显示和设置界面,所以我们定义一个界面切换的全局变量。且此变量能确保SegBuf[6]数组里的值互不干扰。
unsigned char Seg_Mode = 0;//0为显示,1为设置2、此题中复位功能应最后写,因为复位后的值可能为15,30,60三种值,而这三种值与S4有关。
3、显示和设置都有时间的参与,为区分两个界面,一个用变量,一个用数组。最后通过按键按下界面切换的时候将两者关联。
4、注意倒计时减到零后溢出的情况。
整体代码实现:
#include "reg52.h"

unsigned char Seg_Dula[] = {0xc0,0xf9,0xa4,0xb0,0x99,0x92,0x82,0xf8,0x80,0x90,0xff};
unsigned char Seg_Wela[] = {0x01,0x02,0x04,0x08,0x10,0x20,0x40,0x80};

//ÊýÂë¹Ü»ù±¾º¯Êý
void Seg_Disp(unsigned char wela,dula)
{
	  P0=0xff;
		P2=P2&0x1f|0xe0;
		P2&=0x1f;

		P0=Seg_Wela[wela];
		P2=P2&0x1f|0xc0;
		P2&=0x1f;

		P0=Seg_Dula[dula];
	  P2=P2&0x1f|0xe0;
		P2&=0x1f;
}


unsigned char Key_Read(void)
{
  unsigned char Key_temp;
	unsigned char Key_Value;

	P3 |= 0x0f;
	Key_temp = P3&0x0f;

	switch(Key_temp)
	{
	  case 0x0e : Key_Value = 7; break;  //S7
		case 0x0d : Key_Value = 6; break;  //S6
		case 0x0b : Key_Value = 5; break;  //S5
		case 0x07 : Key_Value = 4; break;  //S4
		default: Key_Value = 0;
	}

	return Key_Value;
}


unsigned char Key_Val,Key_Down,Key_Old;
unsigned char Key_Slow_Down;
unsigned char Seg_Buf[8] = {10,10,10,10,10,10,10,10};
unsigned char Seg_Pos;
unsigned int Seg_Slow_Down;

bit openflag = 0;
bit Seg_Mode = 0;
unsigned int ms_1000 = 0;
unsigned char count = 30;
unsigned char Seg_count[] = {15,30,60};
unsigned char count_index = 1;
bit Shin_flag = 0;
unsigned int ms_500 = 0;

void Key_Proc()
{
	if(Key_Slow_Down) return;
	Key_Slow_Down = 1;

	Key_Val = Key_Read();
	Key_Down = Key_Val & (Key_Old ^ Key_Val);
	Key_Old = Key_Val;

	switch(Key_Down)
	{
		case 4:
			if(Seg_Mode == 0)
			{
			  openflag = 1;
				count = Seg_count[count_index];
			}
			break;
		case 5:
			if(Seg_Mode == 0)
			{
			  count = Seg_count[count_index];
			}
			break;
		case 6:
			Seg_Mode = ~Seg_Mode;
		  if(Seg_Mode == 0)
			{
		    count = Seg_count[count_index];
			}
			break;
		case 7:
			if(Seg_Mode == 1)
			{
			  if(++count_index == 3)
			  {
				  count_index = 0;
			  }
			}
			break;
	}
}

void Seg_Proc()
{
	if(Seg_Slow_Down) return;
	Seg_Slow_Down = 1;
	if(Seg_Mode==0)
	{
		Seg_Buf[0] = 1;
		Seg_Buf[6] = count/10;
		Seg_Buf[7] = count%10;
	}
	else if(Seg_Mode==1)
	{
		Seg_Buf[0] = 2;
		if(Shin_flag == 0)
		{
		  Seg_Buf[6] = Seg_count[count_index]/10;
		  Seg_Buf[7] = Seg_count[count_index]%10;
		}
		else
		{
			Seg_Buf[6] = 10;
		  Seg_Buf[7] = 10;
		}
	}
}

void Led_Proc()
{
	if(count == 0)
	{
		P0 = 0x00;
		P2 = (P2 & 0x1f) | 0x80;
	}
	else
	{
		P0 = 0xff;
		P2 = (P2 & 0x1f) | 0x80;
	}

}

void Timer0Init(void)
{
	TMOD = 0x01;
	TL0 = (65535 - 1000)%256;
	TH0 = (65535 - 1000)/256;
	TR0 = 1;
	ET0 = 1;
	EA = 1;
}


void Timer0Server() interrupt 1
{
 	TL0 = (65535 - 1000)%256;
	TH0 = (65535 - 1000)/256;
	if(++Key_Slow_Down == 10) Key_Slow_Down = 0;
	if(++Seg_Slow_Down == 500) Seg_Slow_Down = 0;
	if(++Seg_Pos == 8) Seg_Pos = 0;
	Seg_Disp(Seg_Pos,Seg_Buf[Seg_Pos]);
  if(openflag == 1)
	{
	if(++ms_1000 == 1000)
	{
	 ms_1000 = 0;
	  if(--count == 255)
	 {
			count = 0;
	 }
	}
 }
	if(++ms_500 == 500)
	{
		ms_500 = 0;
		Shin_flag = ~Shin_flag;
	}
}


void main()
{
	Timer0Init();
	while (1)
	{
		Key_Proc();
		Seg_Proc();
		Led_Proc();
	}
}
20、第零讲 时钟系统
题目:
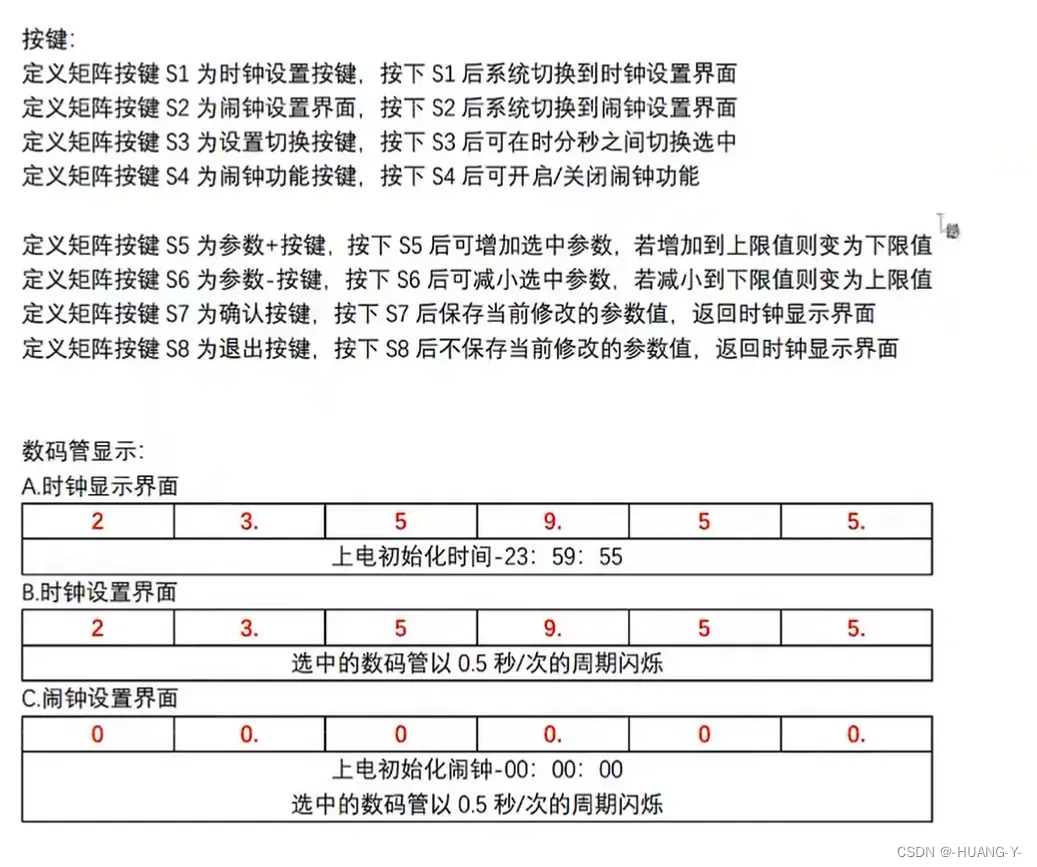
关键思路讲解:
1、显示界面和设置界面要用两个数组存储时间显示。
2、切换按键闪烁:
else if(Seg_Mode == 1)
	{
		Seg_Buf[0] = SegSet[0]/10;//先正常显示,保持未选中位常亮
		Seg_Buf[1] = SegSet[0]%10;
		Seg_Buf[3] = SegSet[1]/10;
		Seg_Buf[4] = SegSet[1]%10;
		Seg_Buf[6] = SegSet[2]/10;
		Seg_Buf[7] = SegSet[2]%10;

		switch(SegSetindex)//覆盖数据闪烁
		{
			case 0:
			  Seg_Buf[0] = ShinFlag?SegSet[0]/10:10;
			  Seg_Buf[1] = ShinFlag?SegSet[0]%10:10;
			break;
			case 1:
			  Seg_Buf[3] = ShinFlag?SegSet[1]/10:10;
			  Seg_Buf[4] = ShinFlag?SegSet[1]%10:10;
			break;
			case 2:
			  Seg_Buf[6] = ShinFlag?SegSet[2]/10:10;
			  Seg_Buf[7] = ShinFlag?SegSet[2]%10:10;
			break;

		}
	}
3、最大值溢出
if(Seg_Mode == 1)
			{
				++SegSet[SegSetindex];
				if(SegSet[SegSetindex] == (SegSetindex==0?24:60))
				{
					SegSet[SegSetindex] = 0;
				}
			}
4、最小值溢出 注意是255
if(Seg_Mode == 1)
			{
				--SegSet[SegSetindex];
				if(SegSet[SegSetindex] == 255)
				{
					SegSet[SegSetindex] = ((SegSetindex == 0)?23:59);
				}
			}
5、为保证闹钟开启时一直响,用标志变量控制。
6、四个LED闪烁,异或
if(ShowNum[0]<12)
{
	Led ^= 0xf0;
}
else
{
	Led ^= 0x0f;
}
整体代码实现:
#include "reg52.h"

sfr P4    = 0xC0;

sbit A0 = P3^4;
sbit A1 = P3^5;
sbit A2 = P4^2;
sbit A3 = P4^4;
sbit BUZZ = P0^6;
/*===================???======================*/

unsigned char Seg_Dula[] = {0xc0,0xf9,0xa4,0xb0,0x99,0x92,0x82,0xf8,0x80,0x90,0xff};//?? 0~9+??
unsigned char Seg_Wela[] = {0x01,0x02,0x04,0x08,0x10,0x20,0x40,0x80};//??

unsigned char Seg_Mode = 0;//0-ÏÔʾ 1-ʱÖÓÉèÖã¬2-ÄÖÖÓÉèÖÃ
unsigned char ShowNum[] = {23,59,55};
unsigned char PointShow[8] = {0,1,0,0,1,0,0,1};
unsigned char SegSet[3];
unsigned char SegSetindex = 0;
unsigned char AlarmSetindex = 0;
unsigned int ms_500 = 0;
bit ShinFlag = 0;
unsigned int ms_1000 = 0;
unsigned char AlarmSet[] = {0,0,0};
bit AlarmFlag = 0;
unsigned char Led;

void Seg_Disp(unsigned char wela,dula,point)//
{
  P0=0xff;//??
  P2=P2&0x1f|0xe0;
  P2&=0x1f;

  P0=Seg_Wela[wela];//??
  P2=P2&0x1f|0xc0;
  P2&=0x1f;
	if(point)
	{
    P0=Seg_Dula[dula] & 0x7f;
	}
	else
	{
	  P0=Seg_Dula[dula];
	}
  P2=P2&0x1f|0xe0;
  P2&=0x1f;
}

/*===================??======================*/

unsigned char Key4_Read(void) //????????
{
  unsigned char Key_temp;
	unsigned char Key_Value;

	P3 |= 0x0f;
	Key_temp = P3&0x0f;

	switch(Key_temp)
	{
	  case 0x0e : Key_Value = 7; break;  //S7
		case 0x0d : Key_Value = 6; break;  //S6
		case 0x0b : Key_Value = 5; break;  //S5
		case 0x07 : Key_Value = 4; break;  //S4
		default: Key_Value = 0;
	}

	return Key_Value;
}

unsigned char Key16_Read(void)
{
  unsigned int  Key_temp;
	unsigned char Key_Value;

	A3=0;
	A2=1;
	A1=1;
	A0=1;
	P3|=0X0F;
	Key_temp = P3;

	A3=1;
	A2=0;
	A1=1;
	A0=1;
	P3|=0X0F;
	Key_temp = (Key_temp<<4) | (P3&0X0F);

	A3=1;
	A2=1;
	A1=0;
	A0=1;
	P3|=0X0F;
	Key_temp = (Key_temp<<4) | (P3&0X0F);

	A3=1;
	A2=1;
	A1=1;
	A0=0;
	P3|=0X0F;
	Key_temp = (Key_temp<<4) | (P3&0X0F);

	switch(~Key_temp)
	{
		case 0X8000: Key_Value = 4; break;   //S4
		case 0X4000: Key_Value = 5; break;   //S5
		case 0X2000: Key_Value = 6; break;   //S6
		case 0X1000: Key_Value = 7; break;   //S7

		case 0X0800: Key_Value = 8; break;   //S8
		case 0X0400: Key_Value = 9; break;   //S9
		case 0X0200: Key_Value = 10; break;   //S10
		case 0X0100: Key_Value = 11; break;   //S11

		case 0X0080: Key_Value = 12; break;   //S12
		case 0X0040: Key_Value = 13; break;   //S13
		case 0X0020: Key_Value = 14; break;   //S14
		case 0X0010: Key_Value = 15; break;   //S15

		case 0X0008: Key_Value = 16; break;   //S16
		case 0X0004: Key_Value = 17; break;   //S17
		case 0X0002: Key_Value = 18; break;   //S18
		case 0X0001: Key_Value = 19; break;   //S19

		default: Key_Value = 0;
	}
	return Key_Value;
}


/*===================????======================*/

unsigned char Key_Val,Key_Down,Key_Old;//??????
unsigned char Key_Slow_Down;//????????
unsigned char Seg_Buf[8] = {10,10,10,10,10,10,10,10};//???????
unsigned char Seg_Pos;//?????????
unsigned int Seg_Slow_Down;//?????????

/*===================????======================*/

void Key_Proc()//??????
{
	if(Key_Slow_Down) return;
	Key_Slow_Down = 1;

	Key_Val = Key16_Read();
	Key_Down = Key_Val & (Key_Old ^ Key_Val);
	Key_Old = Key_Val;

	if(Key_Down != 0)
	{
		AlarmFlag = 0;
	}
	switch(Key_Down)
	{
		case 4://½øÈëʱÖÓÉèÖÃ
			SegSetindex = 0;
			Seg_Mode = 1;
		  SegSet[0] = ShowNum[0];
		  SegSet[1] = ShowNum[1];
		  SegSet[2] = ShowNum[2];
			break;
		case 5:
			Seg_Mode = 2;
		  AlarmSetindex = 0;//ÄÖÖÓÉèÖÃ
			break;
		case 6://Çл»ÉÁ˸
			if(Seg_Mode == 1)
			{
			  if(++SegSetindex == 3)
			  {
				  SegSetindex = 0;
			  }
		  }
			if(Seg_Mode == 2)
			{
			  if(++AlarmSetindex == 3)
			  {
				  AlarmSetindex = 0;
			  }
		  }
			break;
		case 7:

			break;
		case 8://°´¼ü¼Ó
			if(Seg_Mode == 1)
			{
				++SegSet[SegSetindex];
				if(SegSet[SegSetindex] == (SegSetindex==0?24:60))
				{
					SegSet[SegSetindex] = 0;
				}
			}
			if(Seg_Mode == 2)
			{
				++AlarmSet[AlarmSetindex];
				if(AlarmSet[AlarmSetindex] == (AlarmSetindex==0?24:60))
				{
					AlarmSet[AlarmSetindex] = 0;
				}
			}
			break;
		case 9://°´¼ü¼õ
		if(Seg_Mode == 1)
			{
				--SegSet[SegSetindex];
				if(SegSet[SegSetindex] == 255)
				{
					SegSet[SegSetindex] = ((SegSetindex == 0)?23:59);
				}
			}
			if(Seg_Mode == 2)
			{
				--AlarmSet[AlarmSetindex];
				if(AlarmSet[AlarmSetindex] == 255)
				{
					AlarmSet[AlarmSetindex] = ((AlarmSetindex == 0)?23:59);
				}
			}
			break;
		case 10:
			if(Seg_Mode == 1)
			{
				ShowNum[0] = SegSet[0];
		    ShowNum[1] = SegSet[1];
		    ShowNum[2] = SegSet[2];
				Seg_Mode = 0;
			}
			break;
		case 11:
			Seg_Mode = 0;
			break;
	}
}

void Seg_Proc()//???????
{
	if(Seg_Slow_Down) return;
	Seg_Slow_Down = 1;//???????

	if(Seg_Mode == 0)
	{
		Seg_Buf[0] = ShowNum[0]/10;
		Seg_Buf[1] = ShowNum[0]%10;
		Seg_Buf[3] = ShowNum[1]/10;
		Seg_Buf[4] = ShowNum[1]%10;
		Seg_Buf[6] = ShowNum[2]/10;
		Seg_Buf[7] = ShowNum[2]%10;
	}
	else if(Seg_Mode == 1)
	{
		Seg_Buf[0] = SegSet[0]/10;//ÏÈÕý³£ÏÔʾ
		Seg_Buf[1] = SegSet[0]%10;
		Seg_Buf[3] = SegSet[1]/10;
		Seg_Buf[4] = SegSet[1]%10;
		Seg_Buf[6] = SegSet[2]/10;
		Seg_Buf[7] = SegSet[2]%10;

		switch(SegSetindex)//Ñ¡ÖеÄÊýÂë¹ÜÉÁ˸
		{
			case 0:
				Seg_Buf[0] = ShinFlag?SegSet[0]/10:10;
			  Seg_Buf[1] = ShinFlag?SegSet[0]%10:10;
			break;
			case 1:
				Seg_Buf[3] = ShinFlag?SegSet[1]/10:10;
			  Seg_Buf[4] = ShinFlag?SegSet[1]%10:10;
			break;
			case 2:
				Seg_Buf[6] = ShinFlag?SegSet[2]/10:10;
			  Seg_Buf[7] = ShinFlag?SegSet[2]%10:10;
			break;

		}
	}
	else
	{
		Seg_Buf[0] = AlarmSet[0]/10;
		Seg_Buf[1] = AlarmSet[0]%10;
		Seg_Buf[3] = AlarmSet[1]/10;
		Seg_Buf[4] = AlarmSet[1]%10;
		Seg_Buf[6] = AlarmSet[2]/10;
		Seg_Buf[7] = AlarmSet[2]%10;

		switch(AlarmSetindex)//Ñ¡ÖеÄÊýÂë¹ÜÉÁ˸
		{
			case 0:
				Seg_Buf[0] = ShinFlag?AlarmSet[0]/10:10;
			  Seg_Buf[1] = ShinFlag?AlarmSet[0]%10:10;
			break;
			case 1:
				Seg_Buf[3] = ShinFlag?AlarmSet[1]/10:10;
			  Seg_Buf[4] = ShinFlag?AlarmSet[1]%10:10;
			break;
			case 2:
				Seg_Buf[6] = ShinFlag?AlarmSet[2]/10:10;
			  Seg_Buf[7] = ShinFlag?AlarmSet[2]%10:10;
	}
}
}

void Led_Proc()//LED
{
	if(Seg_Mode == 0)
	{
	if((AlarmSet[0] == ShowNum[0])&&(AlarmSet[1] == ShowNum[1])&&(AlarmSet[2] == ShowNum[2]))
	{
		AlarmFlag = 1;
	}
	if(AlarmFlag == 1)
	{
		P2 = (P2 &0x1f) | 0xa0;
		BUZZ = 1;
    P2 = P2 &0x1f;
		P2 = (P2 &0x1f) | 0x80;
	  P0 = Led;
		P2 = P2 &0x1f;
	}
	else if(AlarmFlag == 0)
	{
		P2 = (P2 &0x1f) | 0xa0;
		BUZZ = 0;
		P2 = P2 &0x1f;
		P2 = (P2 &0x1f) | 0x80;
	  P0 = 0xff;
		P2 = P2 &0x1f;
	}
}
}

/*===================???0????======================*/

void Timer0Init(void)		//1ms???????
{
	TMOD = 0x01;
	TL0 = (65535 - 1000)%256;
	TH0 = (65535 - 1000)/256;
	TR0 = 1;
	ET0 = 1;
	EA = 1;
}

void Timer0Server() interrupt 1//???0??????
{
 	TL0 = (65535 - 1000)%256;
	TH0 = (65535 - 1000)/256;
	if(++Key_Slow_Down == 10) Key_Slow_Down = 0;//10ms????
	if(++Seg_Slow_Down == 500) Seg_Slow_Down = 0;//500ms?????
	if(++Seg_Pos == 8) Seg_Pos = 0;
	Seg_Disp(Seg_Pos,Seg_Buf[Seg_Pos],PointShow[Seg_Pos]);
	if(Seg_Mode == 1)
	{
	  if(++ms_500 == 500)
	  {
		  ms_500 = 0;
		  ShinFlag = ~ShinFlag;
	  }
	}
	if(Seg_Mode == 2)
	{
	  if(++ms_500 == 500)
	  {
		  ms_500 = 0;
		  ShinFlag = ~ShinFlag;
	  if(ShowNum[0]<12)
	  {
			Led ^= 0xf0;
	  }
		else
		{
			Led ^= 0x0f;
		}
	  }
	}

	if(Seg_Mode == 0)
	{
	if(++ms_1000 == 1000)
	{
		ms_1000 = 0;
		++ShowNum[2];
		if(ShowNum[2] == 60)
		{
			ShowNum[2] = 0;
			++ShowNum[1];
			if(ShowNum[1] == 60)
			{
				ShowNum[1] = 0;
				++ShowNum[0];
				if(ShowNum[0] == 24)
				{
					ShowNum[0] = 0;
				}
			}
		}
	}
}
}

/*===================???======================*/
void main()
{
	Timer0Init();
	while (1)
	{
		Key_Proc();
		Seg_Proc();
		Led_Proc();
	}
}
21、第一讲 决赛试题和过渡模拟
决赛试题题目:
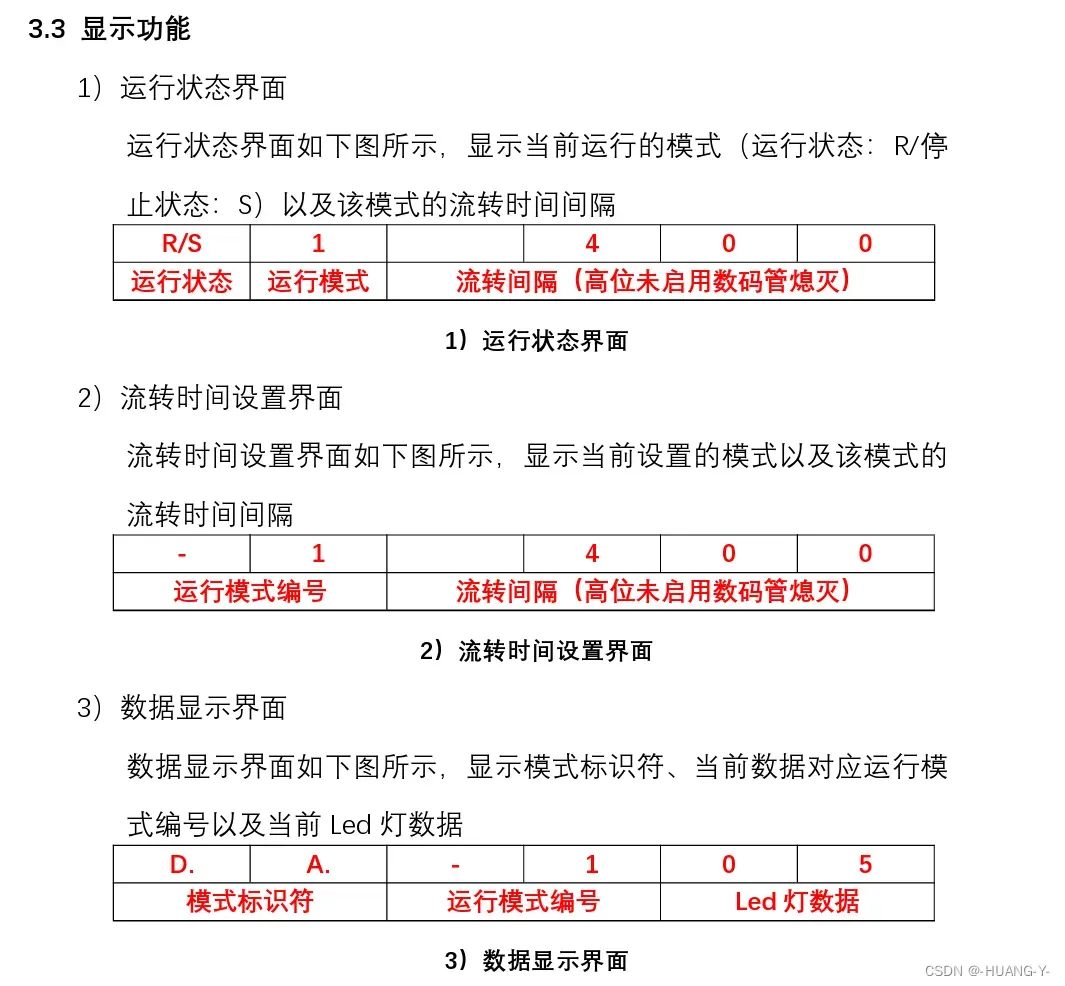
关键思路讲解:
1、控制LED的流转不要直接对P0口操作,应该P0 = LED,对变量LED进行过渡操作。
2、LED流转函数
 #include "intrins.h"

 Led = _crol_(Led,1);//L1-L8
 Led = _cror_(Led,1);//L8-L1
3、避免模式四到模式一的变换出错
版权声明:本文为博主作者:-堂吉诃德-原创文章,版权归属原作者,如果侵权,请联系我们删除!
原文链接:https://blog.csdn.net/m0_73527150/article/details/135886346

